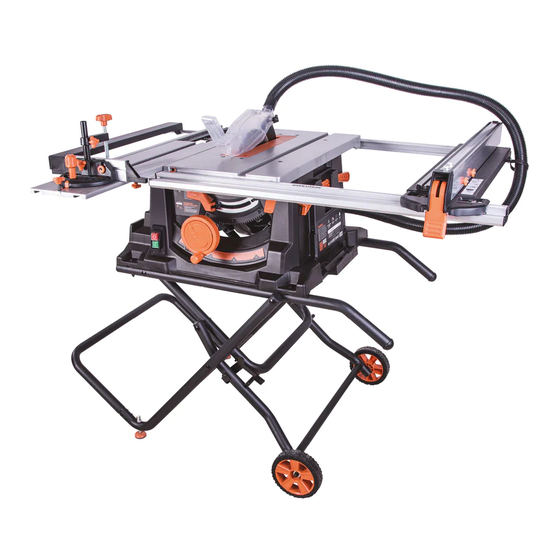
Evolution RAGE5-S Original Bedienungsanleitung
Tischkreissäge
Vorschau ausblenden
Andere Handbücher für RAGE5-S:
- Originalanweisungen (60 Seiten) ,
- Originalbetriebsanleitung (133 Seiten)

Verwandte Anleitungen für Evolution RAGE5-S


Inhaltszusammenfassung für Evolution RAGE5-S
- Seite 1 RAGE5-S Original Instructions Original-Bedienungsanleitung Instructions d’origine Originele Instructies 5015647 Written originally in UK English Date Published: 01/07/2016...
- Seite 2 Evolution Power Tools website. We operate several helplines throughout our worldwide organization, but technical help is also available from your supplier.
-
Seite 3: Machine Specifications
www.evolutionpowertools.com MACHINE SPECIFICATIONS MACHINE METRIC IMPERIAL Motor UK/EU: 220-240V ~ 50Hz S1 1500W S6 40% 1800W Motor UK: 110V ~ 50Hz 1600W Motor US/CAN: 120V ~ 60Hz Minimum Table Surface Area: 745mm x 640mm 29-1/4 x 25-3/16 “ Maximum Table Surface Area: 1200mm x 640mm 47-1/4 x 25-3/16”... - Seite 4 WARNING: Do not operate this machine if vibration in the workplace is given in: warning and/or instruction labels are missing BS EN ISO 5349-1:2001 and or damaged. Contact Evolution Power Tools BS EN ISO 5349-2:2002 for replacement labels. • Many factors can influence the actual Note: All or some of the symbols on the vibration level during operation e.g.
-
Seite 5: Prohibited Use Of This Power Tool
Symbol Description Volts WARNING: This product is a table saw and Amperes has been designed to be used with special Evolution blades. Only use accessories Hertz designed for use in this machine and/or Speed those recommended specifically by Alternating Current Evolution Power Tools Ltd. - Seite 6 www.evolutionpowertools.com SAFETY PRECAUTIONS of flammable liquids, gasses or dust. Power tools create sparks which may ignite ELECTRICAL SAFETY the dust or fumes. (1.14) c) Keep children and bystanders away while This machine is fitted with the correct moulded plug and mains lead for the designated market. operating power tool.
- Seite 7 www.evolutionpowertools.com hard hat or hearing protection used for risk of starting the power tool accidentally. appropriate conditions will reduce d) Store idle power tools out of the reach of personal injuries. children and do not allow persons unfamiliar c) Prevent unintentional starting. Ensure the with the power tool or these Instructions switch is in the off-position before connecting to operate the power tool.
- Seite 8 www.evolutionpowertools.com d) Make sure the saw blade is not cause irreversible brain and nervous system contacting the guard, riving knife or damage. The young and unborn children are the workpiece before the switch is particularly vulnerable. You are advised to turned on.
- Seite 9 www.evolutionpowertools.com the table top when ripping workpieces binding and kickback. d) When ripping, always apply the less than 2mm thick. A thin workpiece workpiece feeding force between the may wedge under the rip fence and create fence and the saw blade. Use a push a kickback.
- Seite 10 www.evolutionpowertools.com cut into blind areas of assembled level area where you can maintain workpieces. The protruding saw blade good footing and balance. It should may cut objects that can cause kickback. be installed in an area that provides g) Support large panels to minimise enough room to easily handle the the risk of saw blade pinching and size of your workpiece.
-
Seite 11: Getting Started Unpacking
In addition to the standard items supplied with risk of suffocation. this machine the following accessories are also available from the Evolution online shop at SERIAL NO. / BATCH CODE www.evolutionpowertools.com The manufacturing date code is the first part of... -
Seite 12: Machine Overview
www.evolutionpowertools.com MACHINE OVERVIEW A. ON/OFF SWITCH SERIAL NUMBER / RATING LABEL B. HOLD DOWN CLAMP K. RISE AND FALL / BEVEL ADJUSTMENT HAND WHEEL C. SLIDING MITRE FENCE / MATERIAL PUSHER BEVEL LOCKING LEVER D. BLADE (NOT VISIBLE) M. LATCHING PIN RIVING KNIFE (NOT VISIBLE) N. -
Seite 13: What's In The Box
www.evolutionpowertools.com WHAT’S IN THE BOX LATCHING PIN LOCKING LATCH 1. STAND COMPONENT A. M8 X 78MM BOLT 2. STAND COMPONENT B. M6 X 53MM BOLT 3. STAND COMPONENT C. M5 X 50MM BOLT 4. STAND COMPONENT D. M5 X 40MM BOLT 5. - Seite 14 www.evolutionpowertools.com ASSEMBLY To assemble this saw you will need: Cross head screwdriver, 8mm & 10mm spanner or socket wrench, 13mm Socket wrench, 5mm allen key and a rubber mallet. Note: This process can be considerably aided by studying the images of the assembled machine and the components found on the machine overview &...
- Seite 15 www.evolutionpowertools.com Fig. 1 Fig. 2 Fig. 3 Fig. 4 Fig. 5 Fig. 6 Fig. 8 Fig. 9 Fig. 7 Fig. 10 Fig. 11 Fig. 12...
- Seite 16 www.evolutionpowertools.com Some further minor assembly is required to commission this machine. WARNING: This machine is heavy. Enlist competent help when removing this machine from its packaging. DEPLOYING THE LEGS The legs are stored underneath the machines main body. • Release the retaining latch (Fig 13). •...
- Seite 17 www.evolutionpowertools.com THE BLADE GUARD The Blade Guard labelled 9 must be attached to the machines riving knife. Note: The machine should never be used without this guard in its service position. WARNING: The machine must be disconnected from the mains supply when installing the blade guard. To attach the Blade Guard Fig.
-
Seite 18: Checking/Adjusting The Rip Fence
www.evolutionpowertools.com CHECKING/ADJUSTING THE RIP FENCE When the Rip Fence has been attached to the machine, the Rip Fence should be checked to ensure that it lies parallel to the blade. • Raise the blade to its full height. • Rest a straight-edge or similar against the blade. •... -
Seite 19: Raising/Lowering The Blade
www.evolutionpowertools.com OPERATIONS THE CONTROLS ON/OFF SAFETY SWITCH WARNING: Before operating the ON/OFF switch make sure that the blade guard is correctly installed and operating properly. • Push the ‘ON’ button to start the machine. (Fig. 26) • Push the ‘OFF’ button to stop the machine. Fig. - Seite 20 www.evolutionpowertools.com THE RIP FENCE This machine is fitted with a two piece Rip Fence. We recommend that the Rip Fence is normally used in conjunction with its adjustable Face Plate. The Rip Fence should normally be positioned to the RH side of the blade.
- Seite 21 www.evolutionpowertools.com Note: The face plate of the mitre gauge should be adjusted so that it passes close to, but does not touch the blade guard as it slides past during a cut. Adjust by loosening the finger nuts and sliding the faceplate to the required position.
-
Seite 22: Sliding Carriage
www.evolutionpowertools.com SLIDING CARRIAGE This machine is fitted with a Sliding Carriage (Fig. 36) to the LH side of the blade. This facility can be particularly useful when cross-cutting small section material such as metal box- section or extrusions etc. Such material can be clamped to the Sliding Carriage by using the secured Mitre Gauge and its Hold Down Clamp. -
Seite 23: Mitre Crosscutting
www.evolutionpowertools.com CROSSCUTTING Set the Mitre Gauge to 0˚ and tighten the vertical locking screw. If employing the Sliding Carriage position the Mitre Gauge in the LH ‘T’ slot and lock it in place by screwing the locking screw into the locating hole. Note: The Mitre Gauge can be used on the RH side of the blade if required. -
Seite 24: Repetitive Cross Cutting
www.evolutionpowertools.com REPETITIVE CROSS CUTTING Repetitive Cross Cutting is the process of cutting a number of pieces to the same length without having to mark out each piece separately. Note: We recommend that repetitive cross-cutting is carried out with the Mitre Gauge positioned on the LH side of the machine, with the Rip Fence on the RH side of the machine (Fig. -
Seite 25: Bevel Ripping
Note: If the push stick becomes damaged it should be replaced. If the operator makes their own push stick, we recommend that it follows the same pattern as that supplied. (Replacement push sticks are available from Evolution Power Tools.) MAINTENANCE WARNING: Ensure that the machine is disconnected from the mains supply before any maintenance tasks or adjustments are attempted. -
Seite 26: Environmental Protection
Inspect the riving knife at regular intervals and replace it if it is worn or damaged. Note: Use only a genuine Evolution Riving Knife, as this is a dedicated component for this machine. Non genuine parts could Fig. 51 be dangerous. -
Seite 27: Ec Declaration Of Conformity
In accordance with EN ISO 17050-1:2004 The manufacturer of the product covered by this Declaration is: UK: Evolution Power Tools Ltd. Venture One, Longacre Close, Holbrook Industrial Estate, Sheffield, S20 3FR. FR: Evolution Power Tools SAS. 61 Avenue Lafontaine, 33560, Carbon-Blanc, Bordeaux, France. - Seite 28 über irgendeinen Aspekt der Verwendung dieses Geräts unsicher sind, enden Sie sich bitte an die entsprechende technische Hotline, deren Nummer Sie auf der Evolution Power Tools-Webseite finden. Wir betreiben mehrere Hotlines in unserer weltweiten Organisation, technische Hilfe steht auch von Ihrem Lieferanten zur Verfügung.
- Seite 29 www.evolutionpowertools.com MASCHINENDATEN MASCHINE METRISCH IMPERIAL Motor UK/EU: 220-240 V ~ 50 Hz S1 1500W 8.5 A S6 40% 1800W Motor UK: 110 V ~ 50 Hz 1600 W 15.8 A Motor US: 120 V ~ 60 Hz 1800 W 15 A Minimum Tischoberfläche: 745 mm x 640 mm 29-1/4 x 25-1/4 In.
-
Seite 30: (1.8) Labels Und Symbole
Hinweis: Betreiben Sie diese Maschine nicht mit fehlenden oder beschädigten Warnungs- • Die Messung und Beurteilung der und/oder Anweisungs-anweisungslabels. Exposition des Menschen auf die Wenden Sie sich an Evolution Power Tools handübertragenen Vibrationen am für Ersatzaufkleber. Arbeitsplatz ist dargestellt in: BS EN ISO 5349-1:2001 und... -
Seite 31: (1.11) Verbotener Gebrauch Dieses Elektrowerkzeugs
Amperes verwendet zu werden. Verwenden Sie nur Zubehör, welches für den Einsatz in dieser Hertz Maschine entwickelt wurde und/oder die speziell von Evolution Power Tools Ltd. Drehzahl empfohlenen sind. Wechselstrom Wenn die Säge mit dem entsprechenden Sägeblatt ausgerüstet ist, kann diese Maschine Folgendes sägen:... -
Seite 32: Sicherheitshinweise
www.evolutionpowertools.com SICHERHEITSHINWEISE a) Der Arbeitsbereich sollte sauber und gut beleuchtet sein. Ungeordnete oder dunkle Bereiche führen zu Unfällen. ELEKTRISCHE SICHERHEIT (1.14) b) Benutzen Sie Elektrowerkzeuge nicht in Diese Maschine wird mit dem für den einem explosionsgefährdeten Bereich, wie Bestimmungsmarkt passenden angespritzten in Gegenwart von brennbaren Flüssigkeiten, Stecker und Netzkabel ausgeliefert. -
Seite 33: (2.7) Gesundheitshinweis
www.evolutionpowertools.com sind oder unter dem Einfluss von Drogen, gefährlich und muss repariert werden. c) Ziehen Sie den Stecker aus der Steckdose Alkohol oder Medikamenten stehen. Ein Moment der Unachtsamkeit beim Gebrauch und/oder entfernen Sie den Akku, bevor Sie des Elektrowerkzeugs kann zu ernsthaften Geräteeinstellungen vornehmen, Zubehörteile Verletzungen führen. - Seite 34 www.evolutionpowertools.com geringen Mengen von Blei kann irreversible Die Vorrichtung, der Spaltkeil und die Gehirn- und Nervensystemschäden Rückschlagsicherung mindern das Verletzungsrisiko. verursachen. Kleine und ungeborene Kinder d) Stellen Sie sicher, dass das Sägeblatt sind besonders gefährdet. Es wird empfohlen, nicht die Schutzvorrichtung, den die Risiken, die mit den Materialien, mit Spaltkeil oder das Werkstück berührt, denen Sie arbeiten, verbunden sind, zu...
- Seite 35 www.evolutionpowertools.com k) Entfernen Sie keine Stücke von Parallelanschlag und der Gehrungsanzeige Schnittmaterial, während die Säge erhöht die Wahrscheinlichkeit von läuft. Das Material kann zwischen Sägeblattverklemmungen und des Ausschlagens. dem Anschlag oder innerhalb des d) Beim Längstrennen sollte die Sägeblattschutzes eingeschlossen sein, Werkstückzuführkraft stets sodass das Sägeblatt Ihre Finger in das zwischen Anschlag und Sägeblatt...
- Seite 36 www.evolutionpowertools.com er parallel zum Sägeblatt verläuft. Ein 4) Bedienung der Tischsäge Warnungen zum Ablauf falsch ausgerichteter Anschlag drückt das Werkstück gegen das Sägeblatt und führt a) Schalten Sie die Tischsäge aus und zu Ausschlagen. e) Verwenden Sie einen Druckkamm, ziehen Sie das Netzkabel ab, wenn Sie um das Werkstück am Tisch den Tischeinsatz entfernen, das Sägeblatt entlangzuführen, und einen Anschlag...
-
Seite 37: (4.2) Mitgelieferte Teile
2 Stellen sind das Herstellungsjahr. Beschreibung Teilnummer 09 = 2009, 10 = 2010, usw. (Beispiel der Losnummer: XXX-A10) Mehrzweck Blatt RAGEBLADE255MULTI Holz Blatt RAGEBLADE255WOOD Für Hinweise zur Identifizierung der Losnummer, wenden Sie sich an die Evolution Power Tools Hilfelinie oder gehen Sie zu: www.evolutionpowertools.com... -
Seite 38: Maschinenübersicht
www.evolutionpowertools.com MASCHINENÜBERSICHT A. EIN/AUS SCHALTER K. HEBEN UND SENKEN / SCHRÄGE EINSTELLHANDRAD B. SPANNHEBEL SCHRÄGE ARRETIERHEBEL C. WINKELANSCHLAG / SCHIEBESTOCK M. VERRIEGELUNGSSTIFT D. BLATT (NICHT SICHTBAR) N. SCHIEBESCHLITTEN ENTRIEGELUNGSSTIFT SPALTKEIL (NICHT SICHTBAR) O. RECHTE SEITENTISCHVERBREITERUNG BLATTSCHUTZ ENTRIEGELUNGSHEBEL G. PARALLELANSCHLAG LINKE SEITENTISCHVERBREITERUNG ENTRIEGELUNGSSTIFTE - 1 VORNE, 1 H. -
Seite 39: Verriegelungsstift
www.evolutionpowertools.com SCHACHTELINHALT VERRIEGELUNGSSTIFT SPERRRIEGEL 1. GESTELLTEIL 9. BLATTSCHUTZ A. M8 X 78MM BOLZEN I. GROSSE SCHEIBE 2. GESTELLTEIL 10. WINKELANSCHLAG B. M6 X 53MM BOLZEN J. ABSTANDSSTÜCK 3. GESTELLTEIL 11. GEGENSCHWINGUNG GERÄT C. M5 X 50MM BOLZEN K. M8 MUTTER 4. -
Seite 40: Montage
www.evolutionpowertools.com MONTAGE Zusätzlich zur Montage benötigte Werkzeuge: Kreuzschlitzschraubendreher, 8 mm und 10 mm Maulschlüssel oder Steckschlüssel, 13 mm Steckschlüssel, 5 mm Inbusschlüssel und ein Gummihammer. Hinweis: Sehen Sie sich die Abbildungen der montierten Maschine und der Bauteile an, die Sie in der Maschinenübersicht und im Schachtelinhalt finden, dies hilft bei der Montage. - Seite 41 www.evolutionpowertools.com Abb. 1 Abb. 2 Abb. 3 Abb. 4 Abb. 5 Abb. 6 Abb. 8 Abb. 9 Abb. 7 Abb. 10 Abb. 11 Abb. 12...
- Seite 42 www.evolutionpowertools.com WARNUNG: Diese Maschine wiegt schwer. Suchen Sie eine weitere kräftige Person, wenn Sie die Maschine aus der Verpackung entnehmen. SPREIZEN DER BEINE Die Beine befinden sich unter dem Hauptkörper der Maschine. • Lösen Sie die Sicherungsklinke (Abb. 13). • Spreizen Sie die Beine. •...
-
Seite 43: Der Parallelanschlag
www.evolutionpowertools.com DIE SCHUTZHAUBE Die Schutzhaube markiert als 9 muss an dem Spaltkeil der Maschine befestigt werden. Hinweis: Die Maschine soll niemals ohne diese Schutzhaube in ihrer Arbeitsstellung benutzt werden. WARNUNG: Während der Befestigung der Schutzhaube muss der Stecker aus der Netzsteckdose gezogen sein. Zur Befestigung der Schutzhaube Abb. -
Seite 44: Prüfen/Anpassen Des Parallelanschlags
www.evolutionpowertools.com PRÜFEN/ANPASSEN DES PARALLELANSCHLAGS Wenn der Parallelanschlag an der Maschine befestigt ist, muss der Parallelanschlag auf seine Parallelität zum Sägeblatt geprüft werden. • Heben Sie das Blatt auf seine ganze Höhe. • Legen Sie ein Lineal oder ähnliches gegen das Sägeblatt. •... -
Seite 45: Betrieb
www.evolutionpowertools.com BETRIEB DIE STEUERUNG EIN/AUS SICHERHEITSSCHALTER WARNUNG: Bevor Sie den EIN/AUS-Schalter benutzen, vergewissern Sie sich, dass die Schutzhaube richtig eingebaut ist und normal arbeitet. • Drücken Sie die Taste ‚ON‘ zum Starten der Maschine. • Drücken Sie die Taste ‚OFF‘ zum Stoppen der Maschine •... - Seite 46 www.evolutionpowertools.com PARALLELANSCHLAG Diese Maschine ist mit einem zweiteiligen Parallelanschlag versehen. Wir empfehlen, den Parallelanschlag in der Regel in Verbindung mit seiner verstellbaren Frontplatte zu verwenden. Der Parallelanschlag sollte normalerweise auf die RH-Seite der Klinge positioniert werden. Er ist durch den Verriegelungshebel an der Stelle festgestellt.
-
Seite 47: Tischverbreiterungen
www.evolutionpowertools.com Hinweis: Die Frontplatte des Winkelanschlags sollte so angepasst werden, dass sie bei einem Schnitt nahe, ohne die Schutzhaube zu berühren, an der Schutzhaube vorbeigeht. Zum Einstellen lösen Sie die Flügelmuttern und schieben Sie die Frontplatte in die erforderliche Stellung. Danach ziehen Sie die Flügelmuttern fest an. -
Seite 48: Benutzung Des Schiebeschlittens
www.evolutionpowertools.com SCHIEBESCHLITTEN Diese Machine ist auf der linken Seite des Sägeblatts mit einem Schiebeschlitten ausgerüstet (Abb. 36). Dieses Merkmal ist besonders nützlich wenn Sie Kleinteile wie einen Metallabschnitt oder Extrusionsteile, usw. schneiden. Diese Teile können auf dem Schiebeschlitten unter Benutzung des festgestellten Winkelanschlags und seines Spannhebels eingespannt werden. -
Seite 49: Gehrungquerschnitt
www.evolutionpowertools.com QUERSCHNITTE Stellen Sie den Winkelanschlag auf 0˚ und ziehen Sie die senkrechte Feststellschraube an. Falls Sie den Schiebeschlitten benutzen stellen Sie den Winkelanschlag in den linken ‘T’ Schlitz und verriegeln Sie ihn durch Einschrauben der Feststellschraube in die Aufnahmebohrung. Hinweis: Der Winkelanschlag kann auf der rechten Seite des Sägeblatts, falls nötig, benutzt werden. - Seite 50 www.evolutionpowertools.com WIEDERHOLTE QUERSCHNITTE Wiederholte Querschnitte sind der Vorgang eine Anzahl von Teilen auf dieselbe Länge zu schneiden, ohne das Einzelteil jedes Mal zu markieren. Hinweis: Wir empfehlen, dass die sich wiederholenden Querschnitte mit dem Winkelanschlag auf der linken Maschinenseite ausgeführt werden, mit dem Parallelanschlag auf der rechten Maschinenseite.
-
Seite 51: Wartung
Gebrauch ist, bewahren Sie ihn dort auf. Hinweis: Falls der Schiebestock beschädigt wird, sollte er ersetzt werden. Falls der Betreiber seinen eigenen Stock machen will, empfehlen wir dieselbe Form zu machen. (Evolution Power Tools hat Ersatzstöcke verfügbar.) WARTUNG WARNUNG: Stellen Sie sicher, dass der Stecker der Maschine aus der Netzsteckdose gezogen ist, bevor Sie irgendwelche Wartung oder Anpassung vornehmen werden. -
Seite 52: Werkzeugaufbewahrung
Verklemmen des Teils während es durch die Säge geht. Prüfen Sie den Spaltkeil regelmäßig und ersetzen Sie ihn wenn er abgenutzt oder beschädigt ist. Hinweis: Benutzen Sie nur einen echten Evolution Spaltkeil, Abb. 51 denn dies ist ein abgestimmtes Bauteil für diese Maschine. Nicht Originalteile können gefährlich sein. - Seite 53 Gemäß EN ISO 17050-1:2004 Der Hersteller des Produkts in dieser Erklärung ist: UK: Evolution Power Tools Ltd. Venture One, Longacre Close, Holbrook Industrial Estate, Sheffield, S20 3FR. FR: Evolution Power Tools SAS. 61 Avenue Lafontaine, 33560, Carbon-Blanc, Bordeaux, France. Der Hersteller erklärt, dass die Maschine, die in dieser Erklärung beschrieben ist, alle einschlägigen Bestimmungen der Richtlinien und anderer zutreffender unten aufgeführter Richtlinien erfüllt.
- Seite 54 à un aspect quelconque du fonctionnement de cet outil, veuillez contacter le standard d’assistance qui convient, dont vous trouverez le numéro sur le site Web Evolution Power Tools. Notre organisation mondiale met à la disposition de ses clients plusieurs standards d’assistance.
-
Seite 55: Spécifications Techniques
www.evolutionpowertools.com SPÉCIFICATIONS TECHNIQUES OUTIL MÉTRIQUE IMPÉRIAL Moteur UK/UE : 220-240V ~ 50Hz S1 1500W S6 40% 1800W Moteur UK : 110V ~ 50Hz 1600 W Moteur US/CAN : 120V ~ 60Hz 15 A Surface minimale de la table 745 x 640 mm 29-1/4 x 25-3/16"... - Seite 56 étiquettes d’avertissement humaine aux vibrations transmises par et/d’instructions ont été retirées ou les mains sur les lieux de travail, sont endommagées. Contactez Evolution couvertes par les normes: Power Tools pour obtenir des étiquettes de BS EN ISO 5349-1:2001 et rechange.
-
Seite 57: Usage Prévu De Cet Outil Électrique
Description AVERTISSEMENT : ce produit est une scie Volts sur table conçue pour être utilisée avec des Ampères lames spéciales Evolution. N’utilisez que des accessoires compatibles avec cet outil et/ou Hertz les accessoires préconisés spécifiquement par Evolution Power Tools Ltd. - Seite 58 www.evolutionpowertools.com USAGE À L’EXTÉRIEUR pendant l’utilisation d’un outil électrique. (1.15) AVERTISSEMENT : pour votre protection Toute distraction pourrait vous faire perdre le en cas d’utilisation de cet outil à l’extérieur, contrôle de votN’utilisez pas cet outil dans un ne l’exposez pas à la pluie et ne l’utilisez pas local clos.
-
Seite 59: Conseils De Santé
www.evolutionpowertools.com glissantes, casque, protection des oreilles, d’alimentation et/ou les accumulateurs de etc.) permet de réduire le risque de blessures l’outil électrique avant de procéder à des corporelles. réglages, de changer des accessoires ou de le c) Empêchez les démarrages accidentels. ranger. - Seite 60 www.evolutionpowertools.com opération (telle que les coupes de vivement de vous en charger. Le contact de feuillures, le rainurage ou la refente) la main à la bouche des poussières déposées nécessitant le retrait du carter, du sur les surfaces des matériaux peut entraîner couteau fendeur et/ou du dispositif l’ingestion de plomb.
- Seite 61 www.evolutionpowertools.com l) Utilisez un guide auxiliaire en contact refend et le calibre d’onglet augmente le avec le dessus de la table lors du risque de blocage et de recul de la lame sciage en long des pièces d’une de la scie. d) Lors d’un sciage en long, appliquez épaisseur inférieure à...
- Seite 62 www.evolutionpowertools.com c) Installez la scie sur table dans un provoquer un effet de recul. g) Utilisez un support pour les grands endroit bien éclairé et à niveau où panneaux afin de réduire les risques vous pourrez adopter une position de blocage et de recul de la lame de la stable et garder un bon équilibre.
-
Seite 63: Pièces Fournies
Les numéros Fixations assorties 1 Sachet de série Evolution commencent par la forme abrégée de l’outil, suivie d’une lettre. A = janvier, B = février et ainsi de suite. Les deux (4.3) AUTRES ACCESSOIRES chiffres suivants correspondent à... -
Seite 64: Interrupteur Marche-Arrêt
www.evolutionpowertools.com VUE D’ENSEMBLE DE L’OUTIL A. INTERRUPTEUR MARCHE-ARRÊT K. MOLETTE DE LEVAGE ET D’ABAISSEMENT/ DE RÉGLAGE DE L’INCLINAISON B. SERRE-FLAN LEVIER DE BLOCAGE DE L’INCLINAISON BUTÉE D’ONGLET COULISSANTE/ POUSSOIR M. GOUPILLE DE BLOCAGE D. LAME (NON VISIBLE) N. CHARIOT COULISSANT PIN DÉVERROUILLAGE COUTEAU DIVISEUR (NON VISIBLE) O. -
Seite 65: Contenu De L'emballage
www.evolutionpowertools.com CONTENU DE L’EMBALLAGE PIN ACCROCHAGE VERROUILLAGE LOQUET 1. PIÈCES DE CHEVALET A. BOULONS M8 X 78 MM 2. PIÈCE DE CHEVALET B. BOULONS M6 X 53 MM 3. PIÈCE DE CHEVALET C. BOULONS M5 X 50 MM 4. PIÈCE DE CHEVALET D. - Seite 66 www.evolutionpowertools.com ASSEMBLAGE Pour procéder à l’assemblage de cette scie, vous devrez vous munir des outils suivants : tournevis cruciforme, clés plates ou clés à douille de 8 et 10 mm, clé à douille de 13 mm, clé Allen de 5 mm. Remarque : cl’étude des photos de l’outil assemblé...
- Seite 67 www.evolutionpowertools.com Fig. 1 Fig. 2 Fig. 3 Fig. 4 Fig. 5 Fig. 6 Fig. 8 Fig. 9 Fig. 7 Fig. 10 Fig. 11 Fig. 12...
-
Seite 68: Couteau Diviseur
www.evolutionpowertools.com La mise en service de cet outil nécessite plusieurs autres opérations d’assemblage simples. AVERTISSEMENT : cet outil est lourd. Faites-vous aider par une personne compétente pour le sortir de son emballage. POUR DÉPLOYER LES PIEDS Les pieds du chevalet se rangent sous le corps principal de l’outil. •... -
Seite 69: Butée Parallèle
www.evolutionpowertools.com boulons de fixation. • Vérifiez que la lame de la scie tourne librement et que les dents passent à 3 - 5 mm du couteau diviseur. • Réinstallez la plaque d’accès de la table. CARTER DE LAME Le carter de lame 9 de la nomenclature doit être installé sur le couteau diviseur de l’outil. - Seite 70 www.evolutionpowertools.com • Poussez la poignée vers le bas, pour verrouiller la butée parallèle (Fig. 20). CONTRÔLE/RÉGLAGE DE LA BUTÉE PARALLÈLE Après avoir installé la butée parallèle sur l’outil, vérifiez que la butée est bien parallèle à la lame. • Levez à fond la lame. •...
- Seite 71 www.evolutionpowertools.com • Saisissez la poignée de transport (Fig. 25). • Soulevez doucement et lentement les poignées, en veillant à ne pas déséquilibrer ou déstabiliser l’outil. • Déplacez l’outil à l’endroit voulu, à l’aide des roulettes. FONCTIONNEMENT COMMANDES INTERRUPTEUR DE SÉCURITÉ MARCHE/ARRÊT AVERTISSEMENT : avant d’appuyer sur le bouton Marche/ Fig.
- Seite 72 www.evolutionpowertools.com • Réglez l’angle souhaité à l’aide de la molette. Une jauge angulaire située derrière la molette facilite ce réglage. • Actionnez (fermez) le levier de verrouillage de l’inclinaison après avoir réglé l’angle d’inclinaison qui vous convient. • Laissez la molette revenir à la position «normale ». BUTÉE PARALLÈLE Cet outil est muni d’une butée parallèle en deux éléments.
- Seite 73 www.evolutionpowertools.com horaire pour bloquer la butée d’onglet à l’angle voulu. La butée d’onglet peut être bloquée sur le chariot de guidage, en serrant la vis de blocage de coulisse de butée d’onglet (Fig. 32). Remarque : la plaque de contact de la butée d’onglet, doit être réglée de manière à...
-
Seite 74: Chariot De Guidage
www.evolutionpowertools.com CHARIOT DE GUIDAGE Cet outil est muni d’un chariot de guidage (Fig. 36), situé du côté gauche de la lame. Ce chariot peut s’avérer particulièrement utile pour la découpe transversale de petites sections de matériaux, comme les sections carrées de métal ou extrusions, etc. Ces matériaux peuvent être calés sur le chariot de guidage à... - Seite 75 www.evolutionpowertools.com DÉCOUPE TRANSVERSALE Réglez la butée d’onglet sur 0°, vissez la vis de blocage verticale. Si vous utilisez le chariot de guidage, placez la butée d’onglet dans la fente en « T » gauche. Calez-la en vissant la vis de blocage dans le trou de centrage.
- Seite 76 www.evolutionpowertools.com DÉCOUPE TRANSVERSALE EN SÉRIE La découpe transversale en série désigne la procédure de découpe de plusieurs pièces de même longueur, sans être obligé de marquer chaque pièce individuellement. Remarque : nous vous recommandons de procéder aux découpes transversales en série en plaçant la butée d’onglet du côté...
-
Seite 77: Changer La Lame
(des tiges poussoir de rechange sont Fig. 47 disponibles auprès de la société Evolution Power Tools). MAINTENANCE AVERTISSEMENT : veillez à ce que l’outil soit débranché... -
Seite 78: Protection Environnementale
Contrôlez régulièrement le couteau diviseur et remplacez-le en cas d’usure ou de détérioration. Remarque : n’utilisez que les couteaux diviseurs d’origine Evolution, pièces spécialement conçues pour cet outil. Les pièces d’autres fabricants risquent d’être dangereuses. En cas de doute à ce sujet, contactez notre standard d’assistance. -
Seite 79: Déclaration De Conformité Ce
Conformément à la norme EN ISO 17050-1:2004 Le fabricant du produit couvert par cette Déclaration est : UK: Evolution Power Tools Ltd. Venture One, Longacre Close, Holbrook Industrial Estate, Sheffield, S20 3FR. FR: Evolution Power Tools SAS. 61 Avenue Lafontaine, 33560, Carbon-Blanc, Bordeaux, France. - Seite 80 Wij danken u hartelijk eventuele gevolgschade. dat u voor een product van Evolution Power Tools hebt gekozen. Geen verantwoordelijke, medewerker of vertegenwoordiger van Evolution Power EVOLUTION’S BEPERKTE GARANTIE...
- Seite 81 www.evolutionpowertools.com MACHINESPECIFICATIES MACHINE METRISCH IMPERIAAL Motor UK/EU: 220-240 V ~ 50 Hz S1 1500W 8,5 A S6 40% 1800W Motor UK: 110 V, 50 Hz 1600 W 15,8 A Motor US: 120 V, 60 Hz 1800 W 15 A Minimale tafeloppervlakte: 745 mm x 640 mm 29-1/4 x 25-1/4 In.
- Seite 82 Neem contact op veroorzaken. Langdurige of regelmatige met Evolution Power Tools voor vervangende gebruikers van deze machine moeten labels. de toestand van hun handen en vingers goed in de gaten houden. Indien een...
-
Seite 83: Het Bedoelde Gebruik Van Dit Elektrische Gereedschap
DIT ELEKTRISCHE GEREEDSCHAP Symbool Omschrijving WAARSCHUWING: Dit product is een tafelzaag Volt en is ontworpen om gebruikt te worden met speciale zaagbladen van Evolution. Gebruik Ampères alleen accessoires ontworpen voor deze machine en/of specifiek aanbevolen door Evolution Hertz Power Tools Ltd. - Seite 84 www.evolutionpowertools.com vochtige locaties wordt gebruikt. Plaats het bij geaarde elektrische gereedschappen. gereedschap niet op vochtige oppervlakken. Ongewijzigde stekkers en overeenkomende Gebruik een schone droge werkbank, indien stopcontacten verminderen het risico op een beschikbaar. Gebruik voor extra bescherming elektrische schok. b) Vermijd lichamelijk contact met geaarde een aardlekschakelaar die de stroomtoevoer zal onderbreken als de lekstroom groter is dan oppervlakken zoals pijpen, radiatoren, fornuizen...
- Seite 85 www.evolutionpowertools.com e) Reik niet te ver uit. Zorg dat u te allen tijde overeenstemming met deze instructies, rekening in evenwicht blijft. Dat zorgt voor een betere houdende met de werkomstandigheden en het controle over het elektrische gereedschap in werk dat moet worden uitgevoerd. Het elektrische onverwachte situaties.
- Seite 86 www.evolutionpowertools.com gemonteerd zijn. Een bewaker die loszit, het zaagblad boven de tafel plaatsen kan tot beschadigd is of niet correct werkt, moet gevolg hebben dat het werkstuk en uw hand in gerepareerd of vervangen worden. het zaagblad worden getrokken. b) Gebruik altijd een bewaker voor het c) Gebruik de verstekgeleider nooit om het zaagblad, een spouwmes en een werkstuk toe te voeren bij het langszagen...
- Seite 87 www.evolutionpowertools.com l) Gebruik een hulpgeleider die contact een werkstuk dat gedraaid, geknoopt, maakt met de bovenkant van de tafel kromgetrokken is of geen rechte rand bij het langszagen van werkstukken die heeft om het met een verstekgeleiding dunner zijn dan 2 mm. Een dun werkstuk kan of langs de geleider te leiden.
- Seite 88 Serienummers h) Gebruik nooit beschadigde of onjuiste van Evolution beginnen met de afkorting van de montagemiddelen voor het zaagbladen, machine gevolgd door een letter. A = januari, B = zoals flenzen, zaagbladringen, bouten februari en zo verder.
-
Seite 89: Overzicht Apparaat
www.evolutionpowertools.com OVERZICHT APPARAAT A. AAN/UIT-SCHAKELAAR SERIENUMMER / RATINGLABEL B. KLEMBEUGEL K. OMHOOG EN OMLAAG / HANDWIEL INSTELLING AFKANT C. GELEIDENDE VERSTEKAANSLAG / MATERIAALDUWER AFKANT SNELSPANNER D. ZAAGBLAD (NIET ZICHTBAAR) M. VERGRENDELINGSPEN SPOUWMES (NIET ZICHTBAAR) N. ONTGRENDELINGSPEN SCHUIFRAIL ZAAGBESCHERMKAP O. ONTGRENDELINGSHENDEL TAFELVERLENGING RECHTERKANT G. -
Seite 90: Wat Zit Er In De Doos
www.evolutionpowertools.com WAT ZIT ER IN DE DOOS VERGRENDELINGSPEN SLUITGRENDEL 1. COMPONENT ONDERSTEL A. M8 X 78 MM BOUT 2. COMPONENT ONDERSTEL B. M8 X 53 MM BOUT 3. COMPONENT ONDERSTEL C. M5 X 50 MM BOUT 4. COMPONENT ONDERSTEL D. M5 X 40 MM BOUT 5. - Seite 91 www.evolutionpowertools.com MONTAGE Om deze zaag te monteren heeft u nodig: Kruiskopschroevendraaier, 8 mm & 10 mm, schroefsleutel of dopsleutel, 13 mm dopsleutel, 5 mm inbussleutel en rubberen hamer. Opmerking: Dit proces kan aanzienlijk versneld worden door de afbeeldingen van de gemonteerde machine en de componenten in het machineoverzicht te bestuderen en de ‘Wat zit er in de doos?’-pagina’s aandachtig te lezen.
- Seite 92 www.evolutionpowertools.com Afb. 1 Afb. 2 Afb. 3 Afb. 4 Afb. 5 Afb. 6 Afb. 8 Afb. 9 Afb. 7 Afb. 10 Afb. 11 Afb. 12...
- Seite 93 www.evolutionpowertools.com Om dit gereedschap gebruiksklaar te maken is een kleine montage vereist. WAARSCHUWING: Deze machine is zwaar. Doe een beroep op vakkundige hulp wanneer u deze machine uit de verpakking haalt. DE POTEN UITKLAPPEN De poten bevinden zich onder het hoofdgedeelte van de machine. •...
- Seite 94 www.evolutionpowertools.com DE ZAAGBESCHERMKAP De zaagbeschermkap aangeduid met 9 moet bevestigd worden aan het spouwmes van de machine. Opmerking: De machine mag niet gebruikt worden zonder dat de beschermkap in werkingspositie staat. WAARSCHUWING: De machine moet van de stroomtoevoer worden losgekoppeld als u de zaagbeschermkap monteert. Om de zaagbeschermkap te monteren Afb.
- Seite 95 www.evolutionpowertools.com plaats vast te zetten. (Afb. 20). • Haak de achterkant van de parallelaanslag geleider over de achterste parallelaanslagrail. • Plaats de voorkant van de parallelaanslag over de voorkant van de parallelaanslagrail, terwijl de hendel in de hoogste positie staat. •...
- Seite 96 www.evolutionpowertools.com UW TAFELZAAG VERVOEREN WAARSCHUWING: Zorg ervoor dat deze handeling alleen wordt uitgevoerd als het apparaat van de stroomvoorziening is losgekoppeld. • Zorg ervoor dat de machine van de stroomtoevoer is losgekoppeld en dat het aansluitsnoer zorgvuldig op de machine opgeborgen is. •...
- Seite 97 www.evolutionpowertools.com bewegen. Wanneer het handwiel ingedrukt wordt tegen de bias veer, valt het in het gebogen gekartelde rek dat zich in het hoofdgedeelte van de machine bevindt. Hierdoor kan het handwiel worden gebruikt om het verstek van het blad aan te passen.
- Seite 98 www.evolutionpowertools.com parallelaanslag vastgemaakt is aan de korte zijde. Gebruik de oranje schaal als u de parallelaanslag zonder de frontplaat zou gebruiken. Opmerking: Lees de schalen via het kijkvenster links wanneer u de parallelaanslag aan de linkerkant van het zaagblad gebruikt. Lees de schalen via het kijkvenster rechts wanneer u de parallelaanslag aan de rechterkant van het zaagblad gebruikt.
- Seite 99 www.evolutionpowertools.com • Anderzijds kan het handig zijn de parallelaanslag tijdelijk van de machine los te maken. • Trek de vergrendelingshendel van de tafelverlenging omhoog, onderaan de rechterkant van de tafel. (Afb. 34). • Plaats de tafelverlenging om het werkstuk de benodigde steun te geven.
-
Seite 100: Elementaire Verrichtingen Tafelcirkelzaag
www.evolutionpowertools.com Ontgrendel de pen onder schuifrail door de knop (Afb. 37 A) uit te trekken en de pen 90° te draaien (Afb. 37 B), zodat ze in ontgrendelde positie blijft. (Afb. 37 C). Met verstekgeleider als beveiligingssysteem, duwt u de schuifrail zachtjes achteruit om te zagen. - Seite 101 www.evolutionpowertools.com TRANSVERSAAL AFSCHUINEN Afschuinen is hetzelfde als doorzagen maar dan met het blad gekanteld onder een bepaalde hoek. Kantel het blad in de gewenste hoek, zoals hierboven beschreven en zorg ervoor dat het wordt vastgezet. Zet de verstekgeleider op 0° en stel de frontplaat zo in dat deze het zaagblad als het draait, en de zaagbeschermkap, niet raakt noch daarmee in botsing komt.
- Seite 102 www.evolutionpowertools.com zaagblad passeert. Het laat toe het te zagen materiaal zijdelings weg van het zaagblad te verplaatsen, zonder dat er een groot risico ontstaat op vastlopen of terugslag. Plaats en houd het te zagen materiaal tegen de frontplaat van de verstekgeleider. Plaats vervolgens het materiaal ook zachtjes tegen de parallelaanslag.
- Seite 103 Opmerking: Als de duwstok beschadigd is moet deze vervangen worden. Als de gebruiker zelf een duwstok maakt raden we aan dat de stok hetzelfde patroon volgt als de originele. (Vervangende duwstokken kunnen bij Evolution Power Tools worden verkregen.) ONDERHOUD WAARSCHUWING: Zorg ervoor dat de machine is losgekoppeld van de stroomtoevoer voordat u onderhoudswerkzaamheden/aanpassingen uitvoert.
-
Seite 104: Bescherming Van Het Milieu
Controleer het spouwmes regelmatig en vervang het als het versleten of beschadigd is. Afb. 51 Opmerking: Gebruik alleen een origineel Evolution spouwmes, omdat dit een wezenlijk onderdeel voor deze machine is. Niet-originele onderdelen kunnen gevaarlijk zijn. Raadpleeg de hulplijn in geval van twijfel. -
Seite 105: Eg-Verklaring Van Conformiteit
In overeenstemming met EN ISO 17050-1:2004 De fabrikant van het product dat onder deze verklaring valt is: UK: Evolution Power Tools Ltd. Venture One, Longacre Close, Holbrook Industrial Estate, Sheffield, S20 3FR. FR: Evolution Power Tools SAS. 61 Avenue Lafontaine, 33560, Carbon-Blanc, Bordeaux, France. - Seite 106 www.evolutionpowertools.com Notes...
- Seite 107 www.evolutionpowertools.com Notes...
- Seite 108 Total Tools (Importing) Pty Ltd Evolution Power Tools SAS 20 Thackray Road 61 Avenue Lafontaine Port Melbourne 33560, Carbon-Blanc Vic 3207 Bordeaux T: 03 9261 1900 T: +33 (0)5 57 30 61 89 Evolution Power Tools Ltd Evolution Power Tools LLC...