Kapitel
Inhaltsverzeichnis

Verwandte Anleitungen für hanseatic 65C90C7-E11B000


Inhaltszusammenfassung für hanseatic 65C90C7-E11B000
- Seite 1 65C90C7-E11B000 + MC-HF605AG2 Gebrauchsanleitung Einbau-Herdset mit Glaskeramik- Anleitung/Version: 1901-03187_DE_20200731 Bestell-Nr.: 29965169 Kochfeld und Zeitschaltuhr Nachdruck, auch aus zugs wei se, nicht ge stat tet!
-
Seite 2: Inhaltsverzeichnis
Seite DE-2 Inhaltsverzeichnis Die Zeitschaltuhr des Backofens . . . DE-26 Lieferung ..... . . DE-3 Uhrzeit einstellen ....DE-26 Lieferumfang . -
Seite 3: Lieferung
Seite DE-3 Lieferung Lieferung Lieferumfang (1) 1× Glaskeramik-Kochfeld (2) 1× Backofen (3) 1× Gitterrost (4) 1× Backblech (5) 1× Fettpfanne (6) 4× Klammer zur Befestigung des Glaskeramik-Kochfelds an einer Arbeitsplatte (7) 4× Schraube zur Klammerbefestigung (8) 2× Schraube zur Backofenbefestigung (9) 1×... -
Seite 4: Sicherheit
Seite DE-4 Sicherheit Sicherheit Der Backofen eignet sich nicht zum Beheizen Bevor Sie das Gerät benut- eines Raumes. Die Leuchte im Backofen ist zen, le sen Sie bit te zu erst nur zur Beleuchtung des Garraums vorgese- die Si cher heits hin wei se und hen und nicht als Raumbeleuchtung. -
Seite 5: Sicherheitshinweise
Seite DE-5 Sicherheit Sicherheitshinweise Achten Sie beim Anschließen darauf, dass die richtige Spannung anliegt. In diesem Kapitel fi nden Sie allgemeine Nähere Informationen hierzu fi nden Sicherheitshinweise, die Sie zu Ihrem Sie auf dem Typenschild. eigenen Schutz und zum Schutz Dritter Der Anschluss an das Stromnetz darf ■... -
Seite 6: Risiken Für Kinder
Seite DE-6 Sicherheit Netzkabel / Netzstecker Zunächst den Backofen ausschal- ■ – Netzkabel so verlegen, dass es nicht ten, dann die Sicherungen heraus- – zur Stolperfalle wird. drehen bzw. ausschalten. Netzkabel nicht knicken oder klem- Lampe erst auswechseln, wenn der –... -
Seite 7: Risiken Im Umgang Mit Dem Gerät
Seite DE-7 Sicherheit tierenden Gefahren verstanden ha- Topf- und Pfannengriffe nicht nach – ben. vorne über die Arbeitsplatte he- Kinder dürfen nicht mit dem Gerät rausragen lassen, damit Kinder das ■ spielen und keinen Zugriff auf das Kochgeschirr nicht erreichen und Gerät haben, wenn sie unbeaufsich- herunterziehen können. - Seite 8 Seite DE-8 Sicherheit Backofen Niemals Gegenstände auf der ■ – Wasser nie direkt in den heißen Kochfläche lagern. – Backofen gießen. Durch den ent- Der Kochvorgang ist zu überwa- – stehenden Wasserdampf besteht chen. Ein kurzer Kochvorgang ist Verbrühungsgefahr und die Emaille ständig zu überwachen.
- Seite 9 Seite DE-9 Sicherheit Temperaturempfindliche, brenn- können, da sich sonst schädliche Mi- – bare oder feuergefährliche Ge- kroorganismen bilden können. genstände nicht im Backofen auf- bewahren! Bei unbeabsichtigtem Acrylamid steht im Verdacht, krebser- Einschalten können sie sich verfor- zeugend zu sein. Acrylamid entsteht bei men oder entzünden.
- Seite 10 Seite DE-10 Sicherheit Auch wenn kleine Ge gen stän de – HINWEIS punktförmig auf das Koch feld tref- Beschädigungsgefahr durch unsachge- fen, kann die Glaskeramik beschä- mäße Installation des Geräts. digt werden. Also z. B. keine Ge- Nicht ausreichender Luftumlauf kann würzstreuer aus dem Ober schrank zu Beschädigung durch Überhitzung auf das Kochfeld fallen lassen.
- Seite 11 Seite DE-11 Sicherheit Soll das Gerät mit einer Transportkar- ■ re gefahren werden, muss es so an- gehoben werden, wie auf der Verpa- ckung gezeigt ist. Den Herd/Backofen nicht am Türgriff ■ anheben! Dieser ist nicht dafür ge- dacht, das hohe Gewicht des Geräts zu tragen.
-
Seite 12: Das Kochfeld
Seite DE-12 Das Kochfeld Das Kochfeld Voraussetzungen VORSICHT – Sie haben das Kapitel „Sicherheit“ am An- Verletzungsgefahr! fang dieser Anleitung gelesen. Metallische Gegenstände – – Das Gerät ist angeschlossen, wie im Kapi- Messer, Gabeln, Löffel und Deckel tel „Einbau und Installation“ ab Seite DE-28 beschrieben. -
Seite 13: Versenkbare Regler
Seite DE-13 Das Kochfeld Nicht verwenden sollten Sie: – eingedrückte oder ausgebeulte Töpfe. – Töpfe mit rauem Boden. – Töpfe mit gewölbtem Boden. – beschichtetes Kochgeschirr, das innen zer- kratzt ist. Versenkbare Regler Zum Schutz vor heißen Dämpfen während Verwenden Sie am besten Elektrogeschirr des Betriebs und Verschmutzungen lassen –... -
Seite 14: Die Kontrollleuchten
Seite DE-14 Das Kochfeld Restwärmeanzeigen Das Kochfeld besitzt 4 Kochzonen. Jeder Kochzone ist auf der Bedienblende ein Reg- ler zugeordnet. Kochzone Ø in cm Regler hinten 16,5 links vorne 20,0 vorne 16,5 rechts hinten 20,0 • Drehen Sie den entsprechenden Regler je nach Bedarf auf die gewünschte Heiz- stufe. -
Seite 15: Tipps Zum Garen Und Energiesparen
Seite DE-15 Das Kochfeld (beachten Sie auch das Kapitel „Das richti- Tipps zum Garen und ge Kochgeschirr“). Energiesparen – Schalten Sie die Kochstufe rechtzeitig zu- rück und kochen Sie mit einer möglichst niedrigen Einstellung weiter. Regler- Anwendung Beispiele – Kochen Sie, wann immer es möglich ist, stellung mit Schnellkochtöpfen. -
Seite 16: Leichte, Nicht Fest Eingebrannte Verschmutzungen
Seite DE-16 Das Kochfeld Leichte, nicht fest eingebrannte Verunreinigungen mit zucker- Verschmutzungen oder stärkehaltigen Speisere sten, Kunststoff oder Alufolie entfernen • Wischen Sie leichte Verschmutzungen nach dem Abkühlen mit einem feuchten Lappen ohne Reinigungsmittel ab. Trock- HINWEIS nen Sie die Flächen anschließend mit ei- Zucker- oder stärkehaltige Speisereste nem wei chen Tuch ab, um Kalk flec ken zu sowie Reste von Kunststoffen oder Alu-... -
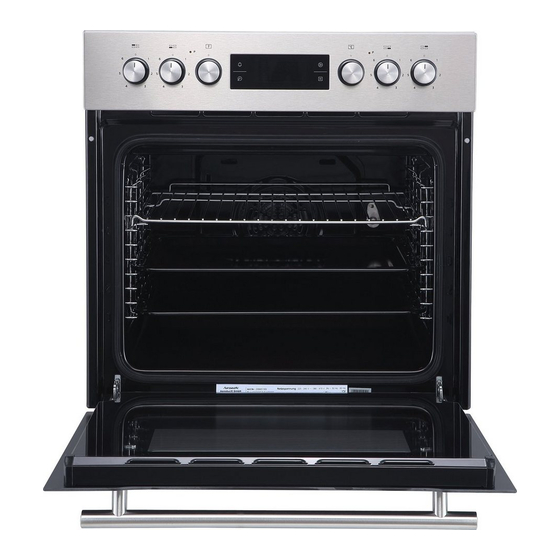
Seite 17: Der Backofen
Seite DE-17 Der Backofen Der Backofen Voraussetzungen Richtiger Umgang mit dem Ofen – Sie haben das Kapitel „Sicherheit“ am An- fang dieser Anleitung gelesen. VORSICHT! – Das Gerät ist angeschlossen, wie im Kapi- tel „Einbau und Installation“ ab Seite DE-28 Brandgefahr! beschrieben. -
Seite 18: Gitterrost, Backblech Und Fettpfanne
Seite DE-18 Der Backofen Gitterrost, Backblech und Signaltöne Fettpfanne Wenn Sie einen der Sensoren , , antippen, hören Sie einen Signalton. Der Gitterrost besitzt eine Erhöhung am hin- teren Ende. Er muss mit der Erhöhung zuerst eingeschoben werden, so kann verhindert werden, dass Gargut an die Backofenwand gerät. -
Seite 19: Wählen
Seite DE-19 Der Backofen Funktionen / Beheizungsarten wählen Standard- Symbol Bedeutung Einstellung Garraum-Beleuchtung: Nur der Garraum ist beleuchtet. Heizung und Gebläse bleiben – ausgeschaltet. Auftauen: Hier wird der Garraum lediglich von unbeheizter Luft durch- – strömt. Unterhitze: Die Hitze wird nur unten erzeugt. Das Gebläse ist ausgeschal- 60 °C tet. -
Seite 20: Garvorgang Beginnen
Seite DE-20 Der Backofen Garvorgang beginnen Nach Ablauf der eingestellten Gardauer hören Sie fünf Signaltöne und der Backofen schaltet Die folgende Beschreibung gilt für alle Funkti- selbsttätig aus. onen/Beheizungsarten mit Ausnahme von . Hierzu siehe weiter unten. Garvorgang unterbrechen/ beenden 88:88 Um den Garvorgang –... -
Seite 21: Besonderheiten Bei Der Funktion „Auftauen
Seite DE-21 Der Backofen Besonderheiten bei der 4. Um die angezeigte Gardauer zu bestäti- gen, tippen Sie auf den Sensor Funktion „Auftauen“ Um mehr Platz im Garraum zu erhal- WARNUNG ten, dürfen Sie zum Auftauen das Gesundheitsgefahr! Gefäß mit dem Gefriergut direkt auf den Das Auftauen von Fleisch, Gefl... -
Seite 22: Tipps Zum Energiesparen
Seite DE-22 Der Backofen Tipps zum Energiesparen Backofen reinigen – Heizen Sie den Backofen nur dann vor, wenn es im Rezept oder in den mitgeliefer- VORSICHT! ten Gartabellen angegeben ist. Verbrennungsgefahr! – Verwenden Sie möglichst dunkle Backfor- Den Backofen vollständig abkühlen ■... -
Seite 23: Garraum Reinigen
Seite DE-23 Der Backofen Garraum reinigen Backblechträger reinigen – Schalten Sie zum Reinigen nur die Gar- HINWEIS raumbeleuchtung ein. – Reinigen Sie den Garraum und die Back- Beschädigungsgefahr! blechträger mög lichst nach je dem Ge- Die Backblechträger können durch un- brauch mit war mem Spülwasser. -
Seite 24: Backofentür Reinigen
Seite DE-24 Der Backofen Backofentür reinigen HINWEIS Bruch- und Verletzungsgefahr! Die Back ofentür enthält schwere Glas- scheiben, die bei unsachgemäßer Be- handlung zerbrechen können. Die Back ofentür nicht fallen lassen. ■ Sicherstellen, dass Sie mit der Back- ■ ofentür nirgends anstoßen. Den Backofen nicht benutzen, wenn ■... -
Seite 25: Leuchtmittel Der Backofen- Beleuchtung Auswechseln
Seite DE-25 Der Backofen Leuchtmittel der Backofen- beleuchtung aus wech seln max. WARNUNG 40 W Stromschlaggefahr! Durch unsachgemäßen Umgang beim Wechsel des Back ofen-Leuchtmittels droht Stromschlag, der zu schweren Verletzungen oder sogar zum Tode füh- ren kann. Vor dem Austausch des Back ofen- ■... -
Seite 26: Die Zeitschaltuhr Des Backofens
Seite DE-26 Die Zeitschaltuhr des Backofens Die Zeitschaltuhr des Backofens Uhrzeit einstellen Startzeit einstellen Bei Erstinbetriebnahme oder nach Stromaus- Wenn der Garvorgang nicht sofort, sondern fall leuchtet im Display 0: 0 0. Die Uhrzeit muss zu einer bestimmten Uhrzeit beginnen soll, eingestellt werden. -
Seite 27: Countdown-Timer/Kurzzeitwecker . De
Seite DE-27 Die Zeitschaltuhr des Backofens Countdown-Timer/ Kurzzeitwecker Ihr Backofen kann Sie daran erinnern, den Garvorgang zu starten, oder Ihnen mitteilen, wenn Ihre Eier fertig gekocht sind. Hierzu ge- ben Sie einen Zeitraum von 0: 0 1 bis 9: 5 9 Stun- den ein. -
Seite 28: Einbau Und Installation
Seite DE-28 Einbau und Installation Einbau und Installation Transportieren • Der Backofen hat eingebaut nur etwa 1 cm Ab stand zur Wand. Die Herdan- HINWEIS schlussdose muss deshalb eine Un ter- putz do se sein oder außer halb des Ein bau- Beschädigungsgefahr! rau mes lie gen. -
Seite 29: Kochfeld Vorbereiten Und Einsetzen
Seite DE-29 Einbau und Installation Kochfeld vorbereiten und 1. Sägen Sie mit einer Stichsäge den Aus- schnitt für das Kochfeld mit folgenden Ma- einsetzen ßen in die Arbeitsplatte. HINWEIS 560 bis 564 Bruchgefahr! Kochfeld nicht auf den Glas ke ra mik- ■... -
Seite 30: Netzanschluss - Hinweise Für Den Installateur
Seite DE-30 Einbau und Installation mäß Überspannungskategorie III in Dicke Arbeitsplatte der Hausinstallation mit mindestens 3 mm Kontaktabstand vorgeschal- tet sein; hierzu zählen Sicherungen, LS-Schalter und Schütze. Anschlussbedingungen – Die zulässigen Bemessungsspannungen und die Bemessungsaufnahme des Geräts finden sich in Kapitel „Technische Daten“ auf Seite DE-41. -
Seite 31: Einbau Des Backofens
Seite DE-31 Einbau und Installation (EC 335-2-6). Sie dürfen Geräte dieses Kleinster Querschnitt der Leiter Typs nur auf einer Seite neben höheren Bemessungsstrom Nennquerschnitt Küchenmöbeln, Ge rä ten oder Wän den des Geräts in A in mm ein bauen. > 3 und ≤ 6 0,75 –... -
Seite 32: Backofen Einsetzen
Seite DE-32 Einbau und Installation – Die Einbaunische muss folgende Mindest- größe besitzen: ❶ 600 mm ➋ 606 mm ❸ 560 mm ➍ 575 mm ❺ 600 mm ❻ max. 50 mm ➐ max. 50 mm Backofen einsetzen 2. Stecken Sie die Stecker des Kochfelds in HINWEIS die Buchsen auf der Herdoberseite. -
Seite 33: Vor Dem Ersten Gebrauch
Seite DE-33 Einbau und Installation Vor dem ersten Gebrauch 1. Entfernen Sie alle Transportsicherungen (Pappstreifen etc.) und alle Klebestreifen aus dem Backofen. 2. Drehen Sie alle Regler des Herdes auf Null-Stellung. 3. Schalten Sie die Sicherungen für den Herdstromkreis ein. 4. -
Seite 34: Fehlersuchtabelle
Seite DE-34 Fehlersuchtabelle Fehlersuchtabelle Bei allen elektrischen Geräten können Störungen auf tre ten. Da bei muss es sich nicht um ei nen Defekt am Gerät handeln. Prüfen Sie des halb bitte an hand der Ta bel le, ob Sie die Störung be sei- ti gen können. -
Seite 35: Unser Service
Seite DE-35 Unser Service Unser Service Damit wir Ihnen schnell helfen können, nennen Sie uns bitte: Gerätebezeichnung Bestellnummer Hanseatic Herdset 65C90C7-E11B000 + MC-HF605AG2 29965169 Beratung, Bestellung und Reparaturen und Ersatzteile Reklamation Kunden in Deutschland – Wenden Sie sich bitte an unseren Technik-... -
Seite 36: Umweltschutz
Seite DE-36 Umweltschutz Umweltschutz Elektro-Altgeräte Verpackungstipps umweltgerecht entsorgen Sollten es Ihre räumlichen Ver- hältnisse zulassen, empfehlen wir Elektrogeräte enthalten Schadstoffe Ihnen, die Verpackung zumindest und wertvolle Ressourcen. während der Garantiezeit aufzubewahren. Jeder Verbraucher ist deshalb ge- Sollte das Gerät zur Reparatur eingeschickt setzlich verpflichtet, Elektro-Altge- werden müssen, ist es nur in der Originalver- räte an einer zugelassenen Sammel- oder... -
Seite 37: Tabelle Prüfgerichte
Seite DE-37 Tabelle Prüfgerichte Tabelle Prüfgerichte Diese Gerichte wurden gemäß den Normen DIN 44547 und EN 60350 zubereitet. Anzahl Einschub- Temperatur Gardauer Speise Beheizungsart Bleche höhe in °C in Min. Ober-/Unterhitze 180–200 10–20 Spritzgebäck Umluft mit 170–180 10–20 Ober- und Unterhitze Ober- /Unterhitze 170–180 25–35... -
Seite 38: Produktdatenblatt Gemäß Vo (Eu) Nr. 65/2014
Seite DE-38 Produktdatenblatt gemäß VO (EU) Nr. 65/2014 Produktdatenblatt gemäß VO (EU) Nr. 65/2014 Warenzeichen hanseatic Modellkennung 65C90C7-E11B000 + MC-HF605AG2 Energieeffizienzindex 94,0 Energieeffizienzklasse auf einer Skala A+++ (höchste Effizienz) bis D (geringste Effizienz) Energieverbrauch konventionellen Modus 0,99 kWh/Zyklus Energieverbrauch Umluft-Modus 0,79 kWh/Zyklus Anzahl der Garräume... -
Seite 39: Produktinformation Gemäß Vo (Eu) Nr. 66/2014
Seite DE-39 Produktinformation gemäß VO (EU) Nr. 66/2014 Produktinformation gemäß VO (EU) Nr. 66/2014 Modellkennung 65C90C7-E11B000 + MC-HF605AG2 Art des Backofens einbaufähig Masse des Gerätes 31,9 kg Anzahl der Garräume Wärmequelle elektrisch Volumen 70 l Energieverbrauch im konventionellen Modus 0,99 kWh/Zyklus... - Seite 40 Seite DE-40 Produktinformation gemäß VO (EU) Nr. 66/2014 Modellkennung 65C90C7-E11B000 + MC-HF605AG2 Art der Kochmulde elektrische Kochmulde Anzahl der Kochzonen Heiztechnik Strahlungskochzonen Maße Kochzone vorne links Ø 20,0 cm Kochzone hinten links Ø 16,5 cm Kochzone hinten rechts Ø 20,0 cm Kochzone vorne rechts Ø...
-
Seite 41: Technische Daten
Technische Daten Technische Daten Bestellnummer 29965169 Gerätebezeichnung Einbau-Herdset mit Glaskeramik-Kochfeld Modell 65C90C7-E11B000 + MC-HF605AG2 Bemessungsspannung 220-240 V ~ / 380 - 415 V 3N ~ Frequenz 50 H / 60 Hz Bemessungsaufnahme Backofen 3000 W Gerätemaße Backofen (H x B x T) 595 mm x 595 mm x 575 mm Nischenmaße Backofen (H x B x T) - Seite 42 Seite DE-42 Technische Daten...
- Seite 43 65C90C7-E11B000 + MC-HF605AG2 User manual Cooker set with glass ceramic hob Manual/version: 1901-03187_EN_20200731 Article no.: 29965169 and timer Reproduction, even of excerpts, is not permitted!
- Seite 44 Page EN-2 Table of contents Table of contents Oven timer ..... EN-25 Delivery ......EN-3 Setting the time .
-
Seite 45: Delivery
Page EN-3 Delivery Delivery Package contents (1) 1× Glass ceramic hob (2) 1× Oven (3) 1× Oven rack (4) 1× Baking tray (5) 1× Dripping pan (6) 4× Bracket for attaching the glass ce- ramic hob to a worktop (7) 4× Screw for attaching bracket (8) 2×... -
Seite 46: Intended Use
Page EN-4 Safety Safety Explanation of terms Please read through the safe- ty instructions and user man- The following symbols can be found in ual carefully before using the this user manual. appliance. This is the only way you can use all the functions reliably and safely. - Seite 47 Page EN-5 Safety Do not operate or continue to oper- If the mains plug is no longer acces- ■ ■ ate the appliance if sible after installation, an all-poles it shows visible signs of damage, disconnecting device complying with – for example, the connection cable overvoltage category III must be is defective;...
- Seite 48 Page EN-6 Safety Risks for certain groups of people Turn off and unplug the appliance ■ before cleaning, maintenance or re- Danger to children and persons with location and whenever it is not in use reduced physical, sensory or mental Oven lighting: ■...
- Seite 49 Page EN-7 Safety If a power failure occurs, the resid- – CAUTION ual heat indicators will go out and may not indicate the presence of Risks when handling the residual heat. appliance Always switch off the cooking – Risk of burns! zones/areas yourself if you wish to During its use, the device and its ex- stop a cooking process.
- Seite 50 Page EN-8 Safety Fire hazard! Oven ■ Do not cover the appliance with blan- Only ever operate the oven with the ■ – kets, cloths or similar, as these objects oven door closed. may become hot and catch fi re. Do not cover cakes or roasts be- –...
- Seite 51 Page EN-9 Safety Timer Risk of tipping and injury! ■ Before starting the timer, please If the oven door is loaded with a heavy – make sure you inform all members weight, the appliance can tilt forwards. of the household so that they do There is a risk of injury from falling ob- not put anything in the oven.
- Seite 52 Page EN-10 Safety Oven ■ NOTICE Do not place baking trays or alu- – Risk of damage from improper installa- minium foil directly on the bottom tion of the appliance. of the cooking compartment. It Insuffi cient air circulation may lead to may cause heat to build up inside damage caused by overheating.
-
Seite 53: The Hob
Page EN-11 The hob The hob Requirements NOTICE – You have read the chapter “Safety” at the Risk of damage! beginning of this manual. Improper handling of the appliance – The appliance is connected, as described may result in damage. in the chapter „Fitting and installation“... -
Seite 54: Retractable Dials
Page EN-12 The hob Retractable dials The best thing to use is cookware for electric hobs The function selectors can be pushed in to – with a completely even base, or if neces- protect them from hot steam and contamina- sary with very little curvature towards the tion during operation. -
Seite 55: The Indicator Lights
Page EN-13 The hob Residual heat indicators Cooking zone Ø in cm Dial rear 16.5 left front 20.0 front 16.5 right rear 20.0 • Turn the dial to the desired level of heat as needed. See „Tips for saving energy and for cooking“... -
Seite 56: Tips For Saving Energy And For Cooking
Page EN-14 The hob – Only use as much water as you really need Tips for saving energy and for to cook the food. A lot of energy is required cooking to warm up water. Dial Application Examples position Cleaning the hob Simmering/keeping Soaking rice warm... - Seite 57 Page EN-15 The hob Hard, baked-on dirt Removing sugar or starchy food particles, synthetic materials, or aluminium foil NOTICE Immediately remove sugar or starchy food particles and residues of plastics or aluminium foil. Otherwise, these may cause permanent and irreparable dam- age to the hob.
-
Seite 58: The Oven
Page EN-16 The oven The oven Requirements Proper handling of the oven – You have read the chapter “Safety” at the CAUTION! beginning of this manual. Fire hazard! – The appliance is connected, as described Only ever operate the oven with the in the chapter „Fitting and installation“... -
Seite 59: Oven Rack, Baking Tray And Dripping Pan
Page EN-17 The oven Oven rack, baking tray and Signal tones dripping pan If you tap the , , sensors, you will hear a beep. The oven rack is slightly lifted at the back. It must be inserted with the ridge first so that food does not touch the back wall of the oven. -
Seite 60: Selecting Functions/Heating Modes En
Page EN-18 The oven Selecting functions/heating modes Symbol Meaning Default setting Cooking compartment light: Only the cooking compartment is lit. Heating and fans remain – switched off. Defrosting: This merely circulates unheated air within the cooking compart- – ment. Bottom heat: Heat is only generated below. -
Seite 61: Start The Cooking Process
Page EN-19 The oven Start the cooking process Interrupting/ending the cooking process The following description applies to all func- tions/heating modes except for To interrupt the cooking process See below. – tap the sensor once. The remaining cooking time and the cur- rent temperature will flash in the display. -
Seite 62: Special Features Of The "Defrosting" Function
Page EN-20 The oven Special features of the In order to make more room in the cooking compartment when defrosting “defrosting” function food, you can remove the oven rack guides and place the food container directly on the WARNING bottom of the oven. Health hazard! Defrosting meat, poultry or fi... -
Seite 63: Tips For Saving Energy
Page EN-21 The oven Tips for saving energy The child lock can be • switched on by simultaneously tapping – Preheat the oven only if it is called for in the sensors for 3 seconds. recipe or stipulated in the cooking tables A lock symbol appears at the bottom provided. -
Seite 64: Cleaning The Housing Surface
Page EN-22 The oven Cleaning the housing surface Cleaning oven rack – After cooling, thoroughly clean the surfac- NOTICE es with warm rinsing water or all-purpose cleaner. Risk of damage! – For stainless steel surfaces, you can also The oven rack can be damaged by im- use special care products made just for proper cleaning. -
Seite 65: Cleaning The Oven Door
Page EN-23 The oven Cleaning the oven door NOTICE Risk of breakage and injury! The oven door is equipped with heavy glass panels that can break if handled improperly. Do not drop the oven door. ■ Make sure you do not hit the oven ■... -
Seite 66: Replacing Oven Lightbulbs
Page EN-24 The oven Replacing oven lightbulbs WARNING max. Risk of electric shock! 40 W Improper replacing of the oven light bulb may cause electric shock which can lead to serious injury or even death. Before replacing the oven bulb, be ■... -
Seite 67: Oven Timer
Page EN-25 Oven timer Oven timer Setting the time Setting the start time When starting up the appliance for the first If you don’t want the cooking process to be time or after a power failure, the display will started immediately, but at a certain time, you show 0: 0 0. -
Seite 68: Countdown Timer
Page EN-26 Oven timer Countdown timer Your oven can remind you to start cooking, or tell you when your eggs are cooked. To do this, enter a period of 0: 0 1 to 9: 5 9 hours. After the time has elapsed, you will hear 10 signal tones. -
Seite 69: Fitting And Installation
Page EN-27 Fitting and installation Fitting and installation Transport flush-mounted box or must be located outside the installation space. NOTICE • The hob and oven are connected by the permanently installed wiring harness; Risk of damage! they must therefore be installed in direct If a trolley is used to move the cook- ■... - Seite 70 Page EN-28 Fitting and installation Preparing and inserting the hob 560 to 564 NOTICE Risk of breakage! Do not place the hob on the glass ce- ■ ramic edge! 1. Take the hob out of the packaging. 2. Remove all protective films and adhesive tapes.
-
Seite 71: Connection To The Power Supply - Notes For The Installer
Page EN-29 Fitting and installation egory III must be connected within Thick worktop the house installation with at least 3 mm contact clearance; this includes fuses, miniature circuit breakers and protective devices. Connection conditions – The rated voltages allowed as well as the rating of the device can be found in Chapter „Technical specifications“... -
Seite 72: Installing The Oven
Page EN-30 Fitting and installation – Your built-in furniture may need to be mod- Smallest conductor cross-section ified. If you do not have the manual skills Rated current of Nominal cross sec- to do this, you should hire a professional. the device in A tion in mm –... -
Seite 73: Inserting The Oven
Page EN-31 Fitting and installation Inserting the oven 4. Keep the oven centred and push it fully into the built-in cabinet. The mains connection must not be NOTICE kinked, pinched or otherwise damaged. Risk of damage! Only lift the oven using the carrying ■... - Seite 74 Page EN-32 Fitting and installation It is normal for a slight odour to develop. If necessary, open the kitchen window. 2. After switching off the oven, open the oven door and allow the oven to cool completely. 3. Remove the dripping pan, baking tray and oven rack and clean and rinse off all piec- es as well as the cooking compartment.
-
Seite 75: Troubleshooting Table
Page EN-33 Troubleshooting table Troubleshooting table Malfunctions can occur in all electrical appliances. This does not necessarily mean there is a defect in the appliance. For this reason, please check the tables to see if you can correct the malfunction. WARNING Risk of electric shock in case of improper repair! Never try to repair a defective or suspected defective appliance yourself. -
Seite 76: Our Service
Our service Our service In order for us to help you quickly, please tell us: Name of appliance Order number Hanseatic cooker set 65C90C7-E11B000 + MC-HF605AG2 29965169 Advice, order and complaint Repairs and spare parts Please contact your mail order company’s... -
Seite 77: Environmental Protection
Page EN-35 Environmental protection Environmental protection Disposing of old Packaging tips electrical devices in an If you have sufficient space, we rec- ommend keeping the packaging, at environmentally-friendly least during the warranty period. If manner the appliance needs to be sent out for repairs, only the original packaging will provide suffi- Electrical appliances contain harm- cient protection. -
Seite 78: Test Report" Table
Page EN-36 “Test report” table “Test report” table These dishes were prepared in accordance with DIN 44547 and EN 60350 standards. Cooking Number Rack Tempera- Dish Heating method time in of trays height ture in °C min. Top/bottom heat 180–200 10–20 Shortbread biscuits Convection with top and... -
Seite 79: Product Fiche Concerning Regulation (Eu) No 65/2014
Product fiche concerning Regulation (EU) No 65/2014 Product fiche concerning Regulation (EU) No 65/2014 Trade mark hanseatic Model identifier 65C90C7-E11B000 + MC-HF605AG2 Energy efficiency index 94,0 energy efficiency class class on a scale from A+++ (most efficient) to D (least efficient) -
Seite 80: Product Information Concerning Regulation (Eu) No 66/2014
Page EN-38 Product information concerning Regulation (EU) No 66/2014 Product information concerning Regulation (EU) No 66/2014 Model identification 65C90C7-E11B000 + MC-HF605AG2 Type of oven built-in Mass of the appliance 31,9 kg Number of cavities Heat source electricity Volume 70 l... - Seite 81 Page EN-39 Product information concerning Regulation (EU) No 66/2014 Model identification 65C90C7-E11B000 + MC-HF605AG2 Type of hob electric hob Number of cooking zones Heating technology Radiant cooking zones Dimension Cooking zone front left Ø 20,0 cm Cooking zone back left Ø...
-
Seite 82: Technical Specifications
Technical specifications Item number 29965169 Name of appliance Built in oven with glass ceramic hob Modell 65C90C7-E11B000 + MC-HF605AG2 Rated voltage 220-240 V ~ / 380 - 415 V 3N ~ Frequency 50 H / 60 Hz Rated power input oven...