HomeMatic HM-SCI-3-FM Installation Und Betriebsanleitung
Schlisserkontaktschnittstelle
Vorschau ausblenden
Andere Handbücher für HM-SCI-3-FM:
- Bedienungs und installationsanleitung handbuch (36 Seiten)
Kapitel
Inhaltsverzeichnis

Verwandte Anleitungen für HomeMatic HM-SCI-3-FM


Inhaltszusammenfassung für HomeMatic HM-SCI-3-FM
- Seite 1 Installations- und Bedienungsanleitung (S. 3) Installation and operating manual (p. 21) Funk-Schließerkontaktschnittstelle 3 Eingänge, Unterputzmontage: Radio shutter contact interface 3-channel, flush-mount: HM-SCI-3-FM...
-
Seite 2: Inhaltsverzeichnis
Funktion ......5 Alle Rechte vorbehalten. Ohne schriftliche Zustimmung Allgemeine Systeminformation zu HomeMatic. . 6 des Herausgebers darf dieses Handbuch auch nicht Allgemeine Hinweise zum Funkbetrieb . -
Seite 3: Hinweise Zu Dieser Anleitung
Hinweise zu dieser Anleitung Funktion Lesen Sie diese Anleitung sorgfältig, bevor Sie Ihre Die Schließerkontaktschnittstelle ist eine Schaltzu- HomeMatic-Komponenten in Betrieb nehmen. standserkennung für handelsübliche Schalter, Magnet- Bewahren Sie die Anleitung zum späteren Nachschla- kontakte (Reed-Kontakte) oder Endschalter. Die Än-... -
Seite 4: Allgemeine Systeminformation Zu Homematic
Allgemeine Systeminformation Allgemeine Hinweise zum zu HomeMatic Funkbetrieb Dieses Gerät ist Teil des HomeMatic-Haussteuersy- Die Funk-Übertragung wird auf einem nicht exklusiven stems und arbeitet mit dem bidirektionalen BidCoS Übertragungsweg realisiert, weshalb Störungen nicht ® Funkprotokoll. ausgeschlossen werden können. Alle Geräte werden mit einer Standardkonfiguration Weitere Störeinflüsse können durch Schaltvorgänge,... -
Seite 5: Installation
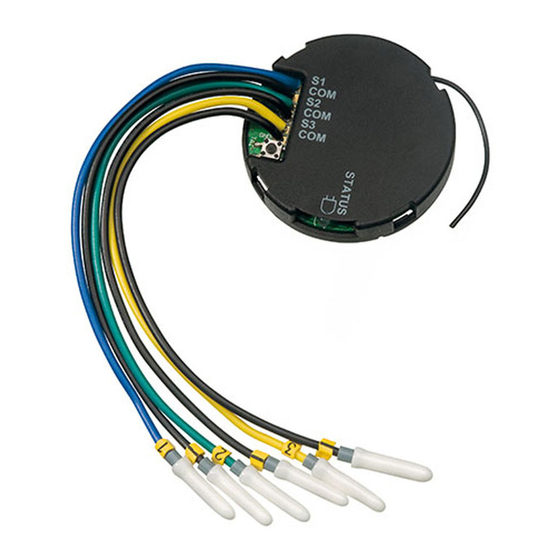
Installation Inbetriebnahme 7.1 Batterie einlegen und wechseln Die Schließerkontaktschnittstelle besitzt flexible Verbin- dungsleitungen (0, 75 mm ) mit Aderendhülsen. Entfer- nen Sie vor dem Anschluss die Gummikappen, die auf Entfernen Sie den Gehäusedeckel indem Sie vorsichtig die Aderendhülsen aufgesteckt sind. die Rastnasen am Gehäusedeckel nach innen drücken Damit sind diese direkt an die verwendeten Kontakte (Pfeile). -
Seite 6: Anlernen
7.2 Anlernen Legen Sie die mitgelieferte Lithium-Batterie (CR 2032) polrichtig entsprechend den Polaritätsmarkierungen in den Batteriehalter (E) ein (Pluspol nach oben). Bitte lesen Sie diesen Abschnitt erst vollständig, bevor sie mit dem Anlernen beginnen! Zum Anlernen müssen beide zu verknüpfenden Geräte in den Anlernmodus gebracht werden. Die Anlerntaste (A) befindet sich neben den Abgängen der Anschlussleitungen (B). Setzen Sie den Gehäusedeckel wieder auf. Achten Sie darauf, dass der Gehäusedeckel vollständig wieder einrastet. -
Seite 7: Konfigurationsmodus (Auch Mit Zentrale/Konfigurationsadapter)
Weitergehende Konfigurationsmöglichkeiten ergeben 20 Sekunden aktiv. Innerhalb dieser Zeit muss die an- sich im Zusammenspiel mit einer Zentrale oder einem dere anzulernende HomeMatic Komponente ebenfalls Konfigurationsadapter. Um die Konfiguration über eine in den Anlernmodus versetzt werden. Lesen Sie dazu dieser Komponenten einzuleiten, muss die Schließer- die entsprechende Bedienungsanleitung des Geräts. -
Seite 8: Einfache Bedienfunktionen
Schalter/Kontakt offen - Aktor EIN Schalter/Kontakt geschlossen - Aktor AUS. Rückmeldungen der Geräte-LED im Konfigurationsmo- Auch Wechselschaltungen können mit der Schließer- dus: kontaktschnittstelle realisiert werden. Gerät ist im Über eine HomeMatic Zentrale oder einen Grünes Blinken Konfigurationsmodus HomeMatic Konfigurationsadapter lässt sich die Konfiguration der Schließerkontaktschnittstelle ändern. Gerät ist im Anlernmodus Oranges Blinken (für Kanal S1, S2 oder S3) -
Seite 9: Fehlerbehebung
Beginnt die LED nach 5 Sekunden Drücken der Anlern- taste nicht zu blinken, sondern leuchtet dauerhaft auf, kann das Gerät nicht zurückgesetzt werden. In diesem Fall wurde über eine HomeMatic Zentrale ein eigener Verschlüsselungscode hinterlegt. Um das Gerät zu- rückzusetzen, müssen Sie die Konfigurationssoftware... -
Seite 10: Technische Daten
11 Technische Daten Entsorgungshinweis: Gerät nicht im Hausmüll entsorgen! Elektro- Funkfrequenz: 868,3 MHz nische Geräte sind entsprechend der Richtlinie Typ. Freifeldreichweite: 100 m über Elektro- und Elektronik-Altgeräte über die Stromversorgung: 1x Lithium-Knopfzelle CR örtlichen Sammelstellen für Elektronik-Altgeräte zu ent- 2032 sorgen. - Seite 11 General information about the 1. Issue English 01/2011 HomeMatic system ..... 24 Documentation © 2010 eQ-3 AG, Germany General information about radio operation..25 All rights reserved.
-
Seite 12: Information About This Manual
If you hand over the device to other persons for use, ed, but is also stored and transmitted to taught-in please hand over the operating manual as well. HomeMatic components in the form of a radio command. If a switch/contact is open, a switch-on sig- Symbols used: nal is sent, and if a switch/contact is closed, a switch-off signal is transmitted. -
Seite 13: General Information About The Homematic System
General information about General information about the HomeMatic system radio operation This device is part of the HomeMatic home control sys- Radio transmission is performed on a non-exclusive tem and works with the bidirectional BidCoS wireless transmission path, which means that there is a possibil- ®... -
Seite 14: Installation
Installation Start-up 7.1 Inserting and replacing the battery The shutter contact interface features flexible connect- ing cables (0.75 mm ) with ferrules. Remove the rubber caps from the ferrules prior to connection. Remove the housing cover by carefully pressing the These must then be connected to the appropriate con- clips on the housing cover inwards (in the direction indi- tacts directly, as per the diagram below: cated by the arrows). -
Seite 15: Teaching-In
7.2 Teaching-in Insert the lithium battery (CR2032) supplied into the battery holder (E), observing the correct polarity (posi- tive pole at the top). Please read this entire section before starting the teach-in procedure. To execute the teach-in procedure, both of the devices to be connected must be in teach-in mode. The teach-in button (A) is located next to the outgoing sections of the connecting cables (B). -
Seite 16: Configuration Mode
Using a central control unit or configuration tool opens Once the channel has been selected, teach-in mode up additional configuration options. To initiate configura- will remain active for 20 seconds. The other HomeMatic tion using one of these components, the shutter contact components to be taught-in must also be switched to interface must be manually switched to configuration teach-in mode during this time. -
Seite 17: Simple Operator Functions
HomeMatic central control unit Flashing green configuration mode HomeMatic configuration tool can be used to change the configuration of the shutter contact Device is in teach-in mode Flashing orange (for channel S1, S2 or S3) interface. See also Section 7.3 for more information on Green LED lighting this. -
Seite 18: Remedy
In this type CR 2032 case, a specific encryption key has been stored using a Battery life: Up to three years HomeMatic central control unit. To reset the device, you ( at 6 operations/day) will have to use the configuration software for resetting Degree of protection: IP 20 the central control unit. - Seite 19 Instructions for disposal: Do not dispose of the device with regular do- mestic waste. Electronic devices must be disposed of in accordance with the Waste Electrical and Electronic Equipment Directive via local disposal points for electronic waste. The CE sign is a free trade sign addressed exclusively to the authorities and does not war- rant any properties.