Inhaltsverzeichnis
Werbung
Verfügbare Sprachen
Verfügbare Sprachen
Art.-Nr.: 11439
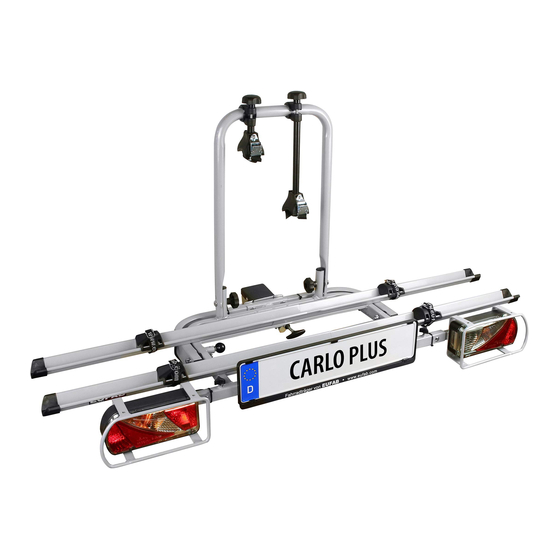
CARLO PLUS Anhängerkupplungsträger
für bis zu 2 Fahrräder
Bedienungsanleitung .......................... 3
Article number 11439
CARLO PLUS rack for trailer tow bar,
folding, for 2 bicycles
Operating instructions ......................... 7
Réf. 11439
CARLO PLUS pour attelage de remorque
pour jusqu'à 2 vélos
Manuel de l'opérateur ......................... 11
Cod. art. 11439
CARLO PLUS supporto per ganci di traino
per un massimo di 2 biciclette
Istruzioni per l'uso ............................... 15
© EAL GmbH, 11439, 06.2021
1
Werbung
Kapitel
Inhaltsverzeichnis

Verwandte Anleitungen für Eufab CARLO PLUS 11439


Inhaltszusammenfassung für Eufab CARLO PLUS 11439
- Seite 1 © EAL GmbH, 11439, 06.2021 Art.-Nr.: 11439 Réf. 11439 CARLO PLUS Anhängerkupplungsträger CARLO PLUS pour attelage de remorque für bis zu 2 Fahrräder pour jusqu‘à 2 vélos Bedienungsanleitung ......3 Manuel de l‘opérateur ......11 Article number 11439 Cod. art. 11439 CARLO PLUS rack for trailer tow bar, CARLO PLUS supporto per ganci di traino folding, for 2 bicycles...
-
Seite 3: Inhaltsverzeichnis
10 x Mutter M8 4 x Federring 8 mm CARLO PLUS Anhängerkupplungsträger für 6 x Scheibe 6 mm 1 x Montageschlüssel bis zu 2 Fahrräder 10 x Scheibe 8 mm Kabelbinder INHALT 3. SPEZIFIKATIONEN BESTIMMUNGSGEMÄSSER GEBRAUCH _______________ 3 Eigengewicht: ca.17 kg LIEFERUMFANG _____________________________ 3 Maximale Nutzlast: 36 kg (bei zul. -
Seite 4: Bedienungsanleitung
• Überprüfen Sie vor jedem Fahrtantritt den korrekten und festen Sitz 5. BEDIENUNGSANLEITUNG der beiden Gurte um das Vorderrad und den Gurt um das Hinterrad der 5.1 MONTAGE DES FAHRRADTRÄGERS Fahrräder. Der Fahrradträger muss noch zusammengebaut werden. Nehmen Sie • Spannen Sie die Gurte ggf. nach. alle Bauteile aus der Verpackung und legen diese übersichtlich hin. -
Seite 5: Montage Des Leuchtenträgers
Der U-Bügel wird am unteren Ende ca. 5 cm breiter als die Aufnahmen ausgeliefert, d. h. die Rohre sind in losem Zustand nicht parallel. Bei der Montage müssen die Rohrenden stark zusammengedrückt werden. Der Zweck der Vorspannung ist, der U-Bügel kann „klapperfrei“ 4 x Endkappe 4 x Radstopper für ein platzsparendes Verstauen umgelegt werden. -
Seite 6: Montage Des Fahrradträgers Auf Die
5.2 MONTAGE DES FAHRRADTRÄGERS AUF DIE Der Abklappmechanismus wir durch einen Sicherungsbolzen auf der ANHÄNGERKUPPLUNG linken Innenseite des Trägerrahmens und einen Bedienhebel in der Mitte des Rahmens arretiert. Zuerst ziehen Sie den Sicherungsbolzen auf der lin- Achten Sie auf eine unbeschädigte, saubere und ken Seite bis zum Anschlag heraus und verdrehen ihn ein wenig, damit er fettfreie Anhängerkupplung. -
Seite 7: Coupling Requirements
10 x Washer 6 mm 1 x Installation wrench CARLO PLUS rack for trailer tow bar, folding, 4 x Spring washer 8 mm Cable tie for 2 bicycles 3. SPECIFICATIONS CONTENTS Dead weight: approx. 17 kg PROPER USE OF THE PRODUCT ____________________ 7 Payload: 36 kg (at 50 kg supporting load) SCOPE OF DELIVERY __________________________ 7... -
Seite 8: Operating Instructions
• If necessary tighten the straps again. 5. OPERATING INSTRUCTIONS • Before embarking on any journey, check to make sure the straps used are 5.1 MOUNTING THE BICYCLE RACK undamaged and not worn. The bicycle rack must fi rst be assembled. Take all of the components out of •... -
Seite 9: Mounting The Lamp Mounts
The U-bracket is delivered approx. 5 cm wider at the lower end than the mounts, i.e. the pipes are not parallel when loose. During assembly, the ends of the tubes must be pressed together. The purpose of the pre-tensioning is, the U-bracket can be folded down „rattle-free“... -
Seite 10: Mounting The Bicycle Carrier To The Trailer Tow Bar
5.4 FOLDING OUT THE BICYCLE RACK 5.2 MOUNTING THE BICYCLE CARRIER TO THE TRAILER TOW BAR If you wish to operate the folding mechanism, always hold the Ensure that the trailer tow bar is undamaged, clean and U-bracket with one hand to ensure that the rack is not able to free of grease. -
Seite 11: Conditions De Raccord
4 x Vis M16 x 130 4 x Écrou M8 CARLO PLUS pour attelage de remorque pour 4 x Vis M8 x 50 10 x Écrou M6 jusqu‘à 2 vélos 4 x Vis à tête bombée M6 x 20 6 x Rondelle 8 mm 2 x Vis à... -
Seite 12: Montage De L'étrier En U
Dommages matériels ou aux personnes en cas de perte des vélos 5. MODE D‘EMPLOI • La conduite sans les sangles de sécurité peut entraîner des accidents. 5.1 MONTAGE DU PORTE-VÉLOS • Avant chaque déplacement, contrôlez la fi xation correcte de la sangle Le porte-vélos doit encore être assemblé. -
Seite 13: Pose Des Câbles Électriques
Le support en U est livré environ 5 cm plus large à l‘extrémité inférieure que les supports, c‘est-à-dire que les tubes ne sont pas parallèles lorsqu‘ils sont desserrés. Lors du montage, les extrémités des tubes doivent être fortement comprimées. L‘objectif de la pré-tension est de pouvoir rabattre le support en U „sans bruit“... -
Seite 14: Montage Du Porte-Vélos Sur L'attelage De Remorque
5.2 MONTAGE DU PORTE-VÉLOS SUR L‘ATTELAGE DE REMORQUE Le mécanisme d‘escamotage peut être bloqué sur le côté intérieur gauche du cadre support par un boulon de sécurité et par un levier de commande Veillez à ce que l‘attelage de remorque soit intact, au centre du cadre. - Seite 15 2 x Dado zigrinato M8 4 x Rosetta elastica 8 mm CARLO PLUS supporto per ganci di traino per 4 x Dado M8 1 x Chiave di montaggio un massimo di 2 biciclette 10 x Dado M6 Fascetta stringicavo 6 x Disco 8 mm INDICE 10 x Disco 6 mm USO PREVISTO ______________________________ 15...
- Seite 16 • Prima di iniziare il viaggio, controllare sempre che la ruota anteriore sia 5. ISTRUZIONI PER L‘USO fi ssata correttamente e saldamente con le due cinghie e quella posteriore 5.1 MONTAGGIO DEL PORTABICICLETTE con l’appo sita cinghia. Il portabiciclette deve essere ancora assemblato. Prelevare tutti i •...
-
Seite 17: Montaggio Dei Binari
5.1.3 MONTAGGIO DEI BINARI La staff a a U viene consegnata circa 5 cm più larga all‘estremità inferiore rispetto ai supporti, vale a dire che i tubi non sono par- alleli quando sono allentati. Durante il montaggio, le estremità dei tubi devono essere fortemente compresse. Lo scopo del pretensionamento è... -
Seite 18: Posa Dei Cavi Elettrici
5.1.5 MONTAGGIO DEI BRACCI DI FISSAGGIO lunga. Far passare la cinghia di sicurezza attraverso il telaio della bicicletta attorno alla staffa a U e tendere la cinghia. Il portabiciclette non si deve utilizzare senza questa cinghia di sicurezza. Braccio di fissaggio corto Braccio di fissaggio lungo Svitare la vite zigrinata del braccio di fissaggio ed estrarla completamen- Cinghia di sicurezza... -
Seite 19: Avvertenze Sulla Tutela Ambientale
7. AVVERTENZE SULLA TUTELA AMBIENTALE Grazie al sistema di illuminazione, il portabiciclette è un‘apparecchiatura elettrica. Le apparecchiature elettriche non vanno smaltite nei rifi uti domestici. I rifi uti di apparecch- iature elettriche ed elettroniche (RAEE) devono essere raccolti separatamente e riciclati nel rispetto dell‘ambiente. Per informazioni sulle possibilità... - Seite 20 EAL GmbH info@eal-vertrieb.com Otto-Hausmann-Ring 107 +49 (0)202 42 92 83 0 42115 Wuppertal, Deutschland +49 (0) 202 42 92 83 – 160 www.eal-vertrieb.com...