Inhaltsverzeichnis
Werbung
Verfügbare Sprachen
Verfügbare Sprachen
Quicklinks
Einziehbare Markise
mit verstellbarem Gelenk
und LED
1W�3���+���+adj.��� �HOU����
BW13000LED
D
Montageanleitung
D
NL
Montageanleitung
Handeleiding voor de montage
NL
Handeleiding voor de montage
F
Notice de montage
F
Notice de montage
WARNUNG! BITTE LESEN SIE DIESE ANLEITUNG GUT DURCH, BEVOR SIE DAS PRODUKT AN-
BRINGEN UND VERWENDEN.
WARNUNG! AUS SICHERHEITSGRÜNDEN MÜSSEN DIE ANWEISUNGEN UNBEDINGT BEFOLGT
WERDEN. BITTE BEWAHREN SIE DIE ANLEITUNG ZUM SPÄTEREN NACHSCHLAGEN AUF.
INHALT
► Technische Angaben/Vorsichtsmaßnahmen und
Sicherheitshinweise für die Montage und Bedienung
► Teile und erforderliche Werkzeuge
► Montage
► Bedienung
► Pflege
► Abbildung mit Bezeichnungen
Product name
IT
IT
GB
GB
- 1 -
Istruzioni di montaggio
Istruzioni di montaggio
Instruction manual
Assembly instructions
Assembly instructions
2
3
4-5
6
7
8
GB
D
Werbung
Inhaltsverzeichnis

Verwandte Anleitungen für KONIFERA BW13000LED


Inhaltszusammenfassung für KONIFERA BW13000LED
- Seite 1 Einziehbare Markise Product name mit verstellbarem Gelenk und LED 1W�3���+���+adj.��� �HOU���� BW13000LED Istruzioni di montaggio Montageanleitung Istruzioni di montaggio Assembly instructions Instruction manual Montageanleitung Handeleiding voor de montage Assembly instructions Handeleiding voor de montage Notice de montage Notice de montage WARNUNG! BITTE LESEN SIE DIESE ANLEITUNG GUT DURCH, BEVOR SIE DAS PRODUKT AN- BRINGEN UND VERWENDEN.
-
Seite 2: Vorsichtsmaßnahmen Und Sicherheitshinweise Für Die Montage Und Nutzung
Vorsichtsmaßnahmen und Sicherheitshinweise für die Montage und Nutzung Achtung! Vergewissern Sie sich, dass alle Befestigungsschrauben und Sicherheitsvorrichtungen ordnungs- gemäß eingebaut und festgezogen sind, bevor Sie die Markise öffnen. Schließen Sie die Markise bei Regen und Wind und wenn sie nicht verwendet wird. Nichtbeachtung der Sicherheitshinweise kann zu Beschädigungen am Material und an der Konstruktion der Markise führen. -
Seite 3: Teile Und Erforderliche Werkzeuge
TEILE UND ERFORDERLICHE WERKZEUGE Markise (1 Stück) LED-LAMPE: 3,7 V �DE LIGHT:3.7V Kurbel (1 Stück) Die Batterie ist nicht im Lieferumfang ent- ������y ���'� ������� . halten und muss separat gekauft werden. ��� ��y ���� ���� Anleitung Schalter Gelenkringe Klemmen (1 Stück) (1 Stück) (2 Stück) - Seite 4 MONTAGEVORGANG Vor der Montage Packen Sie den Artikel vorsichtig aus und lösen Sie die Verschnürungen. Die Montage sollte von zwei Personen gemeinsam durchgeführt werden. Entnehmen Sie das Befestigungsmaterial und bewahren Sie es so auf, dass nichts verloren geht. Achten Sie auf sich möglicherweise plötzlich ausklappende Teile, vor allem auf die Markisenarme. Lesen Sie sich die Montageanweisungen sorgfältig durch, bevor Sie mit der Montage beginnen.
-
Seite 5: Installation Der Wandhalterungen
INSTALLATION DER WANDHALTERUNGEN Mutter Dehnschraube Unterlegscheibe Schraube (Hinweis: Die Mutter und die Unterleg- Boden scheibe können während des Trans- ports von der Schraube getrennt wer- den. Bevor Sie die Dehnschrauben in die Wand hämmern, müssen alle Teile wieder zusammengesetzt werden.) Führen Sie die Dehnschrauben durch die Wandhalterungen und stecken Sie sie dann in die zuvor gebohrten Löcher. -
Seite 6: Die Markise An Den Wandhalterungen Anbringen
DIE MARKISE AN DEN WANDHALTERUNGEN ANBRINGEN Entfernen Sie die Schrauben an der Vorderseite der Wandhalterungen. Bringen Sie die Markise an den Wandhalterungen an, indem Sie den eckigen Drehstab in die Halterungen schieben. Ver- schrauben Sie die Wandhalterungen wieder mit den Schrauben und Muttern, um die Markise zu be- festigen. - Seite 7 FEHLER Stoff Stoff Warning: When the front bar touches the roller as shown, do not try to move them closer to each other, as this may cause damage to the product. Falsche Bedienung Ordnungsgemäße Bedienung Warnung: Der Stoff sollte während des Gebrauchs nicht durchhängen. Sonst kann sich Wasser auf der Markise sammeln.
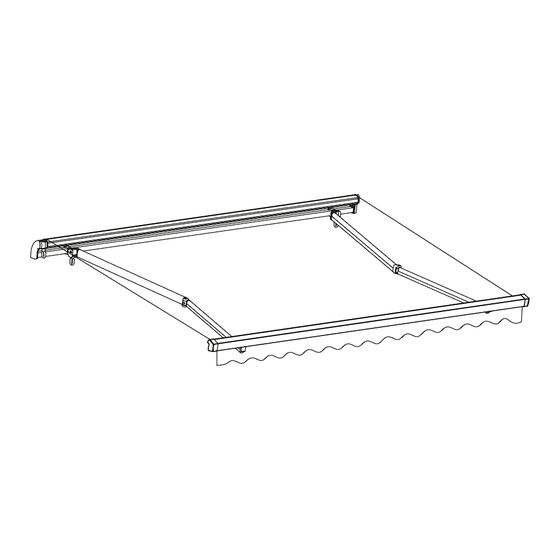
- Seite 8 ABBILDUNG MIT BEZEICHNUNGEN Endkappe Gelenk Rollkasten Drehstab Stoff Getriebekasten Schwenkarm Fallstange Kurbel Hinweis: 1. Wenn Teile defekt sind, die mit dem Symbol ♦ markiert sind, darf das Produkt erst dann wieder verwendet werden, wenn diese Teile ausgetauscht wurden. - 8 -...
- Seite 9 LED Nr. • No. • n° Typ • Type • Tipo BW13000LED Produktberatung: 01806/ 63 06 30 Festnetz 20 Cent/Anruf, Mobilfunk max. 60 Cent/Anruf Quelle D Fachberatung: 01806/111 100 Festnetz 20 Cent/Anruf, Mobilfunk max. 60 Cent/Anruf call center telefoonnummer 0900-1901 15 ct/min Call Universal: 0043/662/4485 59 Fachberatung Heimwerken (zum Festnetztarif –...
- Seite 10 Retractable Awning Product name +Adj.Arm Shoulder and LED 1W�3���+���+adj.��� �HOU���� BW13000LED Istruzioni di montaggio Montageanleitung Istruzioni di montaggio Assembly instructions Instruction manual Montageanleitung Handeleiding voor de montage Assembly instructions Handeleiding voor de montage Notice de montage Notice de montage WARNING! PLEASE READ THIS INSTRUCTION MANUAL BEFORE USING AND INSTALLING THE PRODUCT.
-
Seite 11: Symbol Explanation
Precautions and safety warnings for installation and operation Attention! Before opening the awning, make sure that all fixing bolts and security devices are properly installed and tightened. Always close the awning on rainy and windy days or when the awning is not in use. Failure to observe the instructions may lead to material and structural damage to the awning. - Seite 12 PARTS AND REQUIRED TOOLS Awning (quantity: 1) LED LIGHT: 3.7V �DE LIGHT:3.7V Crank (quantity: 1) Battery not included, must be purchased ������y ���'� ������� . separately. ��� ��y ���� ���� Instructions Switch box Wrist ring Shaft (quantity: 1) (quantity: 1) (quantity: 2) (quantity: 2) Attention!
-
Seite 13: Installation Procedure
INSTALLATION PROCEDURE Prior to installation Carefully unpack and release the fasteners. Two persons are needed to handle the product. Remove the hardware and keep it in a safe place, so nothing is lost. Be careful of any parts that may unfold suddenly, especially the folding arms. Read the assembly instructions carefully before installation. - Seite 14 INSTALLING THE WALL BRACKETS Expansion bolt Washer Bolt (Note: the nut and washer may be Ground separated from the bolt in transport, please put them back in place before hammering the expansion bolt into the wall.) Stick the expansion bolts through the wall brackets, then plug the expansion bolts into the holes drilled before.
- Seite 15 MOUNTING THE AWNING ON THE WALL BRACKETS Remove the bolts at the front of the wall brackets. Mount the awning to the wall brackets by inser- ting the square torsion bar into the wall brackets. Lock the awning in place by replacing the bolts and nuts on the wall brackets.
- Seite 16 FAULTS Warning: When the front bar touches the roller as shown, do not try to move them closer to each other, as this may cause damage to the product. Incorrect operation Correct operation Warning: The fabric should not sag while in use. Water may otherwise accumulate on the fabric. Please use correctly as shown in the illustration.
- Seite 17 ILLUSTRATION WITH PART NAMES End cap Arm shoulder Roller Torsion bar Fabric Gear-box Arm stand Front bar Crank Note: 1. If any parts marked with a ♦ are damaged, the product must not be used until they have been replaced. - 17 -...
- Seite 18 LED Nr. • No. • n° Typ • Type • Tipo BW13000LED Produktberatung: 01806/ 63 06 30 Festnetz 20 Cent/Anruf, Mobilfunk max. 60 Cent/Anruf Quelle D Fachberatung: 01806/111 100 Festnetz 20 Cent/Anruf, Mobilfunk max. 60 Cent/Anruf call center telefoonnummer 0900-1901 15 ct/min Call Universal: 0043/662/4485 59 Fachberatung Heimwerken (zum Festnetztarif –...