Werbung
T0365
INSTRUCTION MANUEL • GEBRUIKSAANWIJZING • INSTRUCTIONS DE MONTAGE • ANLEITUNG
11,5 - 13 kg.
WARNING ! This R/C kit and the model
you will build is not a toy.
LET OP ! Deze bouwdoos van een
radiobestuurd vliegtuig is geen
speelgoed.
93,0 dm
2
ATTENTION ! Ce kit d'avion R/C n'est
pas un jouet.
ACHTUNG ! Dieser Bausatz von
ferngesteurte model
ist kein Spielzeug.
version: 25/09/2002 • T0365
Extra 330 - 1
Werbung
Inhaltsverzeichnis

Verwandte Anleitungen für protech EXTRA 330 S


Inhaltszusammenfassung für protech EXTRA 330 S
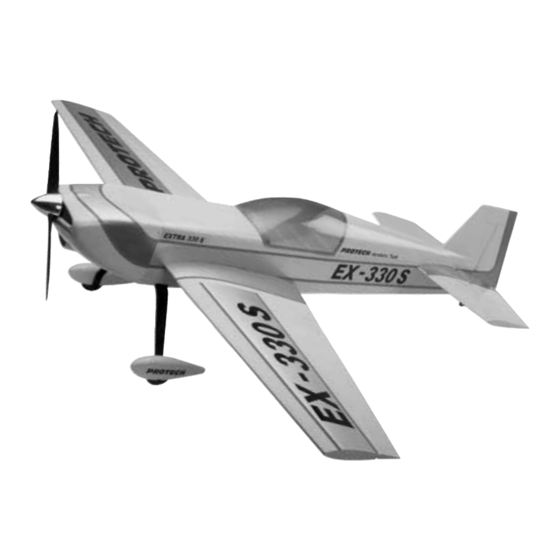
- Seite 1 T0365 INSTRUCTION MANUEL • GEBRUIKSAANWIJZING • INSTRUCTIONS DE MONTAGE • ANLEITUNG 11,5 - 13 kg. WARNING ! This R/C kit and the model you will build is not a toy. LET OP ! Deze bouwdoos van een radiobestuurd vliegtuig is geen speelgoed.
- Seite 2 Specifications / Specificaties / Spécifications / Technische daten Wing span: 2490 mm Spanwijdte: 2490 mm Envergure: 2490 mm Spannweite: 2490 mm Length: 2150 mm Lengte: 2150 mm Longueur: 2150 mm Länge: 2150 mm Wing area: 93,0 dm Vleugelopp.: 93,0 dm Surface alaire: 93,0 dm Tragflügelinhalt: 93,0 dm...
-
Seite 3: Important Safety Notes
Important Safety Notes. Be sure to read right through the instructions covering assembly and operation of your model before you attempt to operate it for the first time. You alone are responsible for the safe operation of your radio-controlled model. Young people should only be permitted to build and fly these models under the instruction and supervision of an adult who is aware of the hazards involved in this activity. -
Seite 4: Conseils De Sécurité Importants
Conseils de sécurité importants Avant de tenter la première mise en service, la totalité des instructions de montage et d’utilisation devront être attentivement lues. Vous êtes seul responsable de la sécurité d’utilisation de votre modèle volant R/C. Il est conseillé aux adolescents de se faire assister pour la construction et pour les premiers vols par un adulte déjà familiarisé... - Seite 5 Tools & items / Gereedschap & benodigdheden / Outils et équipements / Werkzeuge und erforderliches To assamble this airplane some tools are needed. Voor het samenstellen van het vliegtuig zijn er enkele gereedschappen nodig. Zum bauen dieses Flugzeug werden einige Werkzeuge gebraucht . Certains outils sont requis pour assembler cet avion.
- Seite 6 Assembling the ailerons / Monteren van de rolroeren / Assemblage des ailerons / Montieren von die Querrudern Fig. 1 Fig. 2 Fig. 3 Fig. 4 Make 4 slots in each wing part Maak 4 slots in elk vleugeldeel en Effectuez 4 fentes dans les 2 and in each aileron.
- Seite 7 Installing the aileron servos / Installeren van de servos voor de rolroeren / Installation des servos d’ailerons / Montierung von die Querruderservos Fig. 5 Fig. 6 Fig. 7 Fig. 8 Fig. 10 Fig. 9 Drw. 1 Cut out the covering in the Snij folie Installez les guignols sur les ai-...
- Seite 8 Installing the rudder & servo / Monteren van het richtingsroer en servo / Installation de la dérive et le servo / Montierung von das Seitenruder und servo Fig. 11 Fig. 12 Fig. 13 Fig. 14 Make 3 slots in the fuselage and Maak 3 slots in de romp en op Effectuez 3 fentes,à...
- Seite 9 Fixing the wing / Bevestigen van de vleugels / Montage des panneaux d’aile / Montierung von die Flügelflächen Fig. 15 Fig. 16 Fig. 17 Fig. 18 Fig. 19 Fig. 20 Fig. 21 Fig. 22 Fig. 23 Drw. 2 Cut out the covering at the slots Snij de folie weg aan de slots voor Découpez l’entoilage sur le fu- of the wing, wing pin and...
- Seite 10 Installing the tailgear / Bevestig het achterste landingsgestel / Fixation de la roulette de queue / Montieren von Hecksporn Fig. 24 Install the heavy duty Bevestig het staartwiel Installez la roulette de queue landinggear and wheel as achteraan de romp door gebruik comme indiqué...
- Seite 11 Installing main landing gear / Monteren van het landingsgestel / Installation du train d’attérissage / Montieren von Hauptfahrwerk Fig. 25 Fig. 26 Fig. 27 Fig. 28 Fig. 29 Glue the support (F64) in the Verlijm de versteviging (F64) in de Collez le renfort (F64) dans le wheel pants, see Fig.
- Seite 12 Fixing the stabilizer / Bevestigen van het hoogteroer / Fixation du stabilisateur / Befestigung von Höhenruder 12 mm Fig. 30 Fig. 31 Fig. 32 Fig. 35 Fig. 33 Fig. 34 Fig. 36 Cut out the covering at the slots Snij de folie weg uit de slots voor Découpez les trous de passage of the stabilizer pin and stabilizer de hoogteroer pen en de...
- Seite 13 Installing the steering servos / Installeren van de stuurservo’s / Installation des servos de stabilisateur / Montierung von Seitenruder Servo Fig. 37 Drw. 4 Cut out the covering at the slots Snij de folie weg uit de slots in het Découpez l’entoilage of the stabilizer and put the...
- Seite 14 Installing the engine / Monteren van de motor / Installation du moteur / Montieren von Motor 148 mm 6,1 mm 55 mm fig. 38 fig. 39 fig. 40 Install the motor with soft mounts. Monteer de motor met ‘soft Installez le moteur avec les silent- The motor back should have mounts’.
- Seite 15 Connecting the throttle servo / Bevestigen van de gasservo / Réglage de la commande de gas / Montieren von Gasservo Fig. 44 Carburator: Carburator: Gas: Remove the servo horn from the Neem de servoarm van de servo. Enlevez le palonnier du servo de throttle servo.
- Seite 16 Assembling the fuel tank / Monteren van de brandstoftank / Assemblage du réservoir / Zusammenbau von Kraftstoftank M3X20 Fig. 45 Drw. 5 Assemble the fuel tank as shown. Monteer de brandstoftank zoals Assemblez le réservoir comme afgebeeld. illustré. Warning: the silicon tube with the metal clunk needs to be about 10 Let op: de slang met de clunk Attention: le tube silicone avec le...
- Seite 17 Installing the receiver and battery pack / Monteren van de ontvanger en batterijpack / Installation de la batterie de réception et du récepteur / Montieren von Empfängerbatterie und Empfänger Fig. 46 Place the receiver batterypack Plaats de onntvangerbatterij en Placez la batterie de réception et and receiver just above the ontvanger in de ruimte boven het le récepteur dans l’espace desus...
- Seite 18 Fixing the cockpit / Bevestigen van de cockpit / Fixation de la verrière / Befestigung von Kabinehaube fig. 54 fig. 55 Cut out the cockpit and tape it Knip de cockpit uit en kleef deze Tracez et découpez la partie en on the fuselage.
- Seite 19 Adjustments / Afregelingen / Réglages The correct adjustment of your aircraft is very important. Check carefully that all control surfaces move in the correct direction. If they do not move in the correct direction, you can reverse the servo direction on your transmitter. It is very important that you check the position of the CG.
- Seite 20 PROTECH® is a registered trademark P.O.-Box 60 • B-2250 Olen Tel.: +32 (0)14 25 92 80 Fax: +32 (0)14 25 92 89 info@protech.be http://www.protech.be Limited warranty / Beperkte garantie / Limitation de garantie • Your kit is warranted against defects •...