Inhaltsverzeichnis
Werbung
Verfügbare Sprachen
Verfügbare Sprachen
Werbung
Kapitel
Inhaltsverzeichnis
Fehlerbehebung

Verwandte Anleitungen für SPORTSTECH FX300


Inhaltszusammenfassung für SPORTSTECH FX300
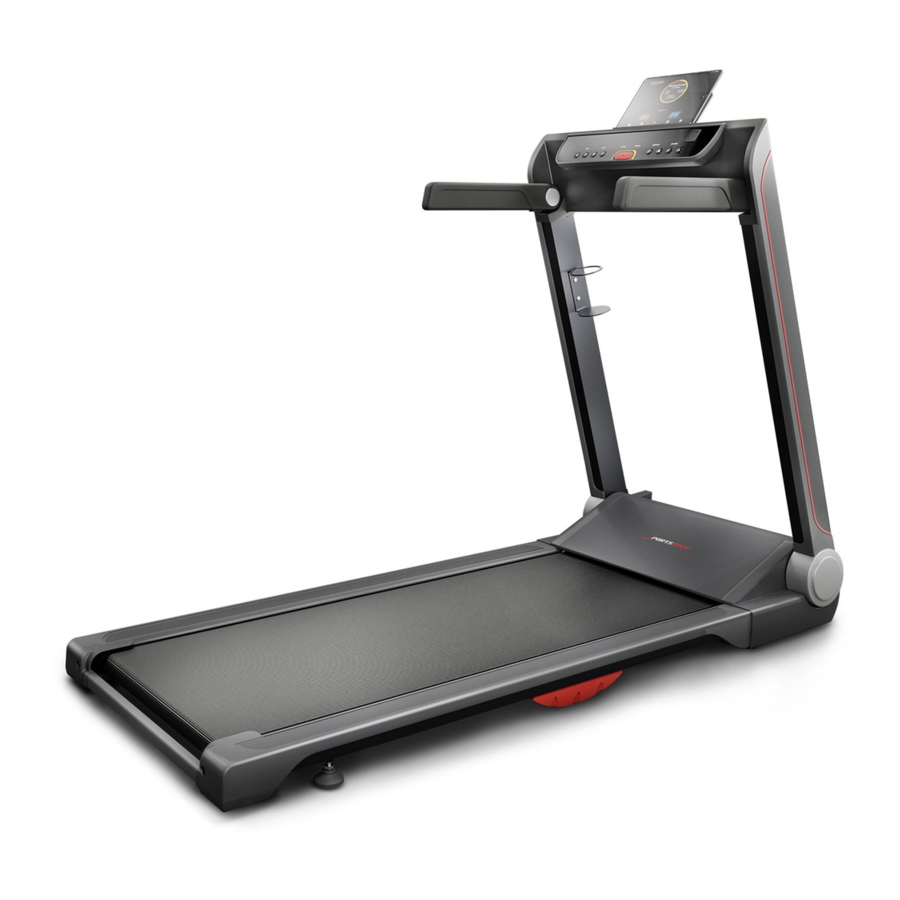
- Seite 1 FX300...
- Seite 2 BENUTZERHANDBUCH DEUTSCH Sehr geehrter Kunde, Vielen Dank für den Kauf dieses Produkts. Informationen zum Einrichten und Bedienen des Geräts sowie Informationen zum Kundensupport finden Sie unter folgenden Link: BEWAHREN SIE DAS BENUTZERHANDBUCH AN EINEM SICHEREN ORT AUF, UM IM BEDARFSFALL JEDERZEIT DARAUF ZURÜCKGREIFEN ZU KÖNNEN.
-
Seite 3: Inhaltsverzeichnis
INHALTSVERZEICHNIS INHALT 1. Sicherheitsanleitung ..............4 2. Besondere Sicherheitshinweise .............5 3. Beschreibung der Montage ............5 4. Montage Hardware ...............6 5. Explosionszeichnung ..............7 6. Teileliste ..................9 7. Montageanleitung ................11 8. Wartung und Pflege ..............13 9. Klappanleitung ................15 10. Aufbewahrung ................17 11. Wie man das Laufband umstellt ..........18 12. -
Seite 4: Sicherheitsanleitung
1. SICHERHEITSANLEITUNG Viele Sicherheitsprobleme wurden bei der Konstruktion und Herstellung des Produktes berücksichtigt, dennoch sollten Sie es für alle Fälle stets gemäß der untenstehenden Anleitung benutzen. Wir sind nicht verantwortlich für die Folgen einer davon etwa abweichenden Benutzung. Um Ihre Sicherheit zu gewährleisten und Unfälle zu vermeiden, lesen Sie bitte sorgfältig die Bedienungsanleitung, bevor Sie damit beginnen, das Gerät zu benutzen. -
Seite 5: Besondere Sicherheitshinweise
2. BESONDERE SICHERHEITSHINWEISE Stromversorgung • Stellen Sie das Fitness-Laufband in der Nähe einer Steckdose auf, wo der Stecker diese erreichen kann. • Schließen Sie die Netzleitung direkt an der Steckdose an und sichern Sie die Leitung. • Zur Vermeidung von Folgeschäden bitte nur an einer genormten Steckdose anschließen. Wenn der Stecker und die Steckdose nicht zueinander passen, holen Sie bitte den Rat eines Elektrikers ein, anstatt etwas am Stecker zu verändern. -
Seite 6: Montage Hardware
4. MONTAGE HARDWARE Beschreibung Daten Mg. Nr. Daten Beschreibung Laufband Stromkabel Schraubenschlüssel und S=13,14,15 Schmiermittel Schraubendreher Inbusschlüssel Sicherheitsschlüssel... -
Seite 7: Explosionszeichnung
5. EXPLOSIONSZEICHNUNG... -
Seite 9: Teileliste
6. TEILELISTE Beschreibung Beschreibung Grundgestell Kunststoffmutter Führungsstange Verbindungsrahmen Linker Griff Führungsstange Verbindungsrahmen Rechter Griff Hauptrahmen Linke Griff-Frontabdeckung Klapprahmen Rechte Griff-Frontabdeckung Linkes Standrohr Griff-Seitenverkleidung Rechtes Standrohr Obere Motorabdeckung Computer-Halterung Motor linke Seitenabdeckung Linke Griffhalterung Motor rechte Seitenabdeckung Rechte Griffhalterung Motor untere Abdeckung Horizontales Rohr hinten Linker Seitenträger Drehbare Platte... - Seite 10 USB obere Stromleitung Schraube M6*10 USB untere Stromleitung Schraube M5*16 USB-Modul Schraube M5*12 Gleichstrommotor Schraube M5*8 Laufdeck Schraube M6*10 Stromkabel Schraube M4*10 Quadratischer Schalter Schraube ST4.2*20 Steckdose Schraube ST4.2*12 Magnetring Schraube ST4.2*15 Magnetkern Schraube ST4.2*12 Überlastschutz Schraube ST2.9*8 AC Einzelleitung (Blau) Unterlegscheibe 10 AC Einzelleitung (Braun) Unterlegscheibe 8...
-
Seite 11: Montageanleitung
7. MONTAGEANLEITUNG Schritt 1 Öffnen Sie die Verpackung und ent- nehmen Sie den Inhalt. Stellen Sie das Laufband (A) auf eine ebene Fläche. Stellen Sie sicher, dass Ihr Arbeitsbe- reich sauber ist und Sie genügend Platz haben. Schritt 2 Drehbare Platte mit der rechten Hand (Nr. - Seite 12 Schritt 3 Ziehen Sie den linken und rechten Griff nach unten (Nr. C10 und C11) in die feste Position. Schritt 4 Stellen Sie sich hinter das Laufband. Ziehen Sie die Kunststoffmutter her- aus und halten Sie sie (Nr. C09) mit der linken Hand fest und drehen Sie den Halter (Nr.
-
Seite 13: Wartung Und Pflege
8. WARTUNG UND PFLEGE Allgemeine Wartung und Pflege helfen, die Lebensdauer und Leistung Ihres Laufbandes zu erhalten. Halten Sie das Gerät sauber, indem Sie die Komponenten regelmäßig abstauben. Reinigen Sie beide Seiten des Laufban- des, damit sich kein Staub unter dem Band ansammelt. Halten Sie Ihre Laufschuhe sauber, damit die Lauffläche und das Band nicht verschmutzen. -
Seite 14: Empfehlung
WICHTIGER HINWEIS: Sie müssen Ihr Laufband vor dem ersten Gebrauch schmieren. SCHMIERMITTEL FÜR DAS LAUFBAND: Die Schmierung von Lauffläche und Laufband ist unerlässlich, da die Reibung zwischen beiden die Lebens- dauer und Funktion des Laufbandes beeinflusst. Deshalb wird empfohlen, Lauffläche und Band regelmäßig zu kontrollieren. -
Seite 15: Klappanleitung
9. KLAPPANLEITUNG Schritt 1 Hinweis: Trennen Sie das Laufband immer vom Strom, bevor Sie es zusammenklappen. Ziehen Sie die Kunststoffmutter heraus und halten Sie sie (Nr. C09) mit der linken Hand fest und senken Sie den Halter (Nr. C08) mit der rechten Hand. - Seite 16 Schritt 4 Legen Sie Ihre Hand auf Position E und heben Sie das Laufband an. Schritt 5 Legen Sie Ihre Hand auf Position E und drehen Sie mit dem Fuß die klappbare feste Platte (Nr. A13) in eine horizontale Position. Schritt 6 Legen Sie Ihre Hand auf Position E und drücken Sie mit dem Fuß...
-
Seite 17: Aufbewahrung
10. AUFBEWAHRUNG Dieses Laufband wurde entwickelt, um Platz zu sparen. Sie können sich aussuchen, ob Sie das Laufband vertikal oder horizontal lagern möchten. A. Vertikale Aufbewahrung Stellen Sie das Gerät nach dem Klappen in der Nähe der Wand auf, damit es nicht umfällt. Für Kinder unzugänglich aufbewahren. -
Seite 18: Wie Man Das Laufband Umstellt
11. WIE MAN DAS LAUFBAND UMSTELLT Legen Sie Ihre Hände auf Position E. Legen Sie den Klapprahmen (A05) in den Boden des Laufbandes und drehen Sie die klappbare feste Platte (A13) mit dem Fuß in eine vertikale Position, um den Klapprahmen (A05) zu fixieren. -
Seite 19: Wichtige Elektrische Informationen
12. WICHTIGE ELEKTRISCHE INFORMATIONEN WARNUNG: Dieses Laufband benötigt die richtige Stromquelle, um korrekt zu funktionieren. Zu Ihrer Sicherheit und der Sicherheit anderer überprüfen Sie bitte, ob die Stromquelle korrekt ist, bevor Sie das Gerät anschließen. Jede Stromquelle, die über oder unter diesem Wert liegt, kann zu erheblichen Schäden am Gerät und/oder am Benutzer führen. -
Seite 20: Übungsanleitung
SICHERHEITSHINWEIS: 1. Wir empfehlen, zu Beginn eine langsame Geschwindigkeit beizubehalten und die Handläufe festzuhalten, bis Sie sich mit dem Laufband vertraut gemacht haben. 2. Stecken Sie das Magnetende des Sicherheitsschlüssels (Nr. D07) in die Computerkonsole und befestigen Sie das gegenüberliegende Ende (mit dem Sicherheitsclip) an Ihrer Kleidung, bevor Sie mit dem Training beginnen. -
Seite 21: Funktionen Der Konsole
16. FUNKTIONEN DER KONSOLE SCHNELLSTART: Stecken Sie das Magnetende des Sicherheitsschlüssels in die Computerkonsole. Schalten Sie den Netzschalter ein. Drücken Sie die START-Taste und das System zeigt automatisch einen Countdown von 3 Sekunden an. Sobald der Countdown bei Null angelangt ist, startet das Laufband mit der anfänglichen Standardgeschwindigkeit von 1 km/h. - Seite 22 3. KALORIEN/STRECKE: Zeigt die Menge der verbrannten Kalorien von 0 bis 999 KCAL an. Wenn der Zählerstand 999 erreicht, wird er zurückgesetzt und beginnt wieder bei 0. Im Countdown-Modus wird von der gewünschten Einstellung auf 0 heruntergezählt. Sobald 0 erreicht wurde, stoppt das Gerät langsam und zeigt „Ende“...
- Seite 23 ERINNERUNG ZUM SCHMIEREN Ihr Laufband muss alle 300 km geschmiert werden. Das System gibt alle 10 Sekunden einen Signalton und zeigt ein „ÖL“-Symbol auf Ihrem Display an, um Sie an das Schmieren zu erinnern. Bitte lesen Sie den Abschnitt SCHMIEREN DES LAUFBANDS, um die richtigen Schritte zur Schmierung Ihres Gerätes zu erfahren.
-
Seite 24: Herzfrequenzregelung
17. HERZFREQUENZREGELUNG HRC PARAMETER BPM (Schläge pro Minute) BPM (Schläge pro Minute) BPM (Schläge pro Minute) Alter Alter Alter STANDART STANDART STANDART Drücken Sie die Taste „P“ im Standby-Modus kontinuierlich. Die Herzfrequenzregelung finden Sie unter HP1 bis HP2. Die Höchstgeschwindigkeit für HP1 beträgt 10,0 km/h und die Höchstgeschwindigkeit für HP2 12,0 km/h. Drücken Sie dann direkt die START-Taste und das System empfiehlt ein Alter von 30 Jahren und ein Herzfrequenz-Ziel von 114. -
Seite 25: Fehlerbehebung
18. FEHLERBEHEBUNG PROBLEM MÖGLICHE URSACHE LÖSUNGSVORSCHLAG Nicht eingesteckt. Kabel einstecken. Laufband startet nicht Sicherheitsschlüssel nicht Sicherheitsschlüssel einstecken. eingesteckt. Die Laufbandspannung ist auf Ziehen Sie die Einstellschrauben auf der linken Laufband nicht zentriert der linken oder rechten Seite der und rechten Seite der hinteren Rolle an. Trittfläche nicht korrekt. -
Seite 26: Wichtige Informationen
19. WICHTIGE INFORMATIONEN Warnung Bitte konsultieren Sie Ihren Arzt und erhalten Sie eine vollständige körperliche Untersuchung, bevor Sie das Ge- rät zu benutzen beginnen. Bitte keine häufigen und heftigen Übungen ohne Erlaubnis des Arztes. Bitte beenden Sie die Benutzung und wenden Sie sich an Ihren Arzt wenn Sie sich beim Training unwohl fühlen. Das Produkt soll ordnungsgemäß... -
Seite 27: Anwendungssoftware (App)
ANWENDUNGSSOFTWARE (APP) Sie können die App's über die hier abgebildeten QR-Codes herunterladen oder in Ihrem Store suchen. Voraussetzung für mobiles Gerät: Android 5.0 oder höher mit Bluetooth 4.0, iOS 8.0 oder höher. Android Kinomap Hinweise zur Nutzung der App: Als Android-Nutzer stellen Sie bitte sicher, dass unter dem Punkt "Einstellungen -> Gerätesicherheit" ein Haken unter "Unbekannte Quellen"... - Seite 28 Europäische Entsorgungsrichtlinie 2002/96/EG Entsorgen Sie Ihr Trainingsgerät in keinem Fall über den normalen Hausmüll. Entsorgen Sie das Gerät ausschließlich über einen kommunalen oder zugelassenen Entsorgungsbetrieb.Beachten Sie hierbei die aktuell geltenden Vorschriften.Erkundigen Sie sich im Zweifelsfall bei Ihrer Stadt- bzw. Gemeindeverwal- tung nach einer sach- und umweltgerechten Entsorgungsmöglichkeit.
- Seite 29 USER MANUAL ENGLISH Dear customer Thank you for purchasing this product. It will improve your health. For information on how to set up or operate the device, as well as information on customer support, please refer to the following link: KEEP THE USER MANUAL IN A SAFE PLACE TO BE ABLE TO ACCESS IT AT ANY TIME IF NEEDED.
- Seite 30 TABLE OF CONTENTS INHALT 1. Safety instructions ................31 2. Special Safety Instruction ..............32 3. Description of Assembly ...............32 4. Configuration List .................33 5. Explosion Diagram ...............34 6. Parts List ..................36 7. Steps of Assembly ................38 8. Maintenance and Care ..............40 9.
-
Seite 31: Safety Instructions
1. SAFETY INSTRUCTIONS Many safety problems are considered in design and manufacturing of the product, but please still operate ac- cording to the instruction below just in case. We are not responsible for any consequences caused by abnormal operation. In order to ensure your safety and prevent accidents, please carefully read the operating instructions before use. -
Seite 32: Special Safety Instruction
2. SPECIAL SAFETY INSTRUCTION Power source • Place the treadmill where the plug can reach the socket. • Directly insert the power line into socket and keep it firm. • Please use qualified socket to avoid consequential danger. If the plug and socket are incom- patible, ask the electrician to deal with it instead of moving the plug. -
Seite 33: Configuration List
4. CONFIGURATION LIST Description Specification Qty No. Description Specification Qty Treadmill Power Wire Spanner W/ Screw Driver S=13,14,15 Lubricant Oil Allen Wrench Safety Key... -
Seite 34: Explosion Diagram
5. EXPLOSION DIAGRAM... -
Seite 36: Parts List
6. PARTS LIST Description Description Base Frame Plastic Nut Guide Rod Connecting Frame 1 Left Handle Bar Guide Rod Connecting Frame 2 Right Handle Bar Main Frame Left Handle Bar Front Cover Folding Frame Right Handle Bar Front Cover Left Upright Tube Handle Bar Side Cover Right Upright Tube Motor Top Cover... - Seite 37 USB Power Upper Wire Bolt M6*10 USB Power Lower Wire Bolt M5*16 USB Module Bolt M5*12 DC Motor Bolt M5*8 Running Deck Bolt M6*10 Power Wire Bolt M4*10 Square Switch Screw ST4.2*20 Power Socket Screw ST4.2*12 Magnetic Ring Screw ST4.2*15 Magnetic Core Screw ST4.2*12 Overload Protector...
-
Seite 38: Steps Of Assembly
7. STEPS OF ASSEMBLY Step 1 Open the box and remove contents. Place the treadmill (A) on level ground. Ensure that your work area is clean and you have adequate space. Step 2 Pull out the Rotating Plate (No. A12) with your right hand. - Seite 39 Step 3 Pull down the left and right handle bars (No. C10 and C11) to the fixed position. Step 4 Stand behind the treadmill. Pull out and hold the plastic nut (No. C09) with your left hand and turn up the holder (No. C08) with your right hand.
-
Seite 40: Maintenance And Care
8. MAINTENANCE AND CARE General maintenance and care will help to maintain the life and performance of your treadmill. Keep the unit clean by dusting the components on a regular basis. Clean both sides of the running belt to prevent dust from accumulating underneath the belt. - Seite 41 IMPORTANT NOTE: before the first use. You will need to lubricate your treadmill RUNNING BELTS & TREADMILL LUBRICANT: Lubricating the running board and running belt is essential as the friction between the two affects the life span and function of the treadmill. That is why it is recommended that the running board and belt will be inspected regularly.
-
Seite 42: Folding Instruction
9. FOLDING INSTRUCTION Step 1 NOTE: Always unplug the treadmill from the electrical outlet before folding. Pull out and hold the plastic nut (No. C09) with your left hand and pull down the holder (No. C08) with your right hand. Once the holder reaches a suitable angle, let go of the plastic nut (No. - Seite 43 Step 4 Place your hand at position E and lift up the treadmill. Step 5 Place your hand at position E and use your foot to turn the folding fixed board (No. A13) to a horizontal position. Step 6 Place your hand at position E and use your foot to firmly push against position J on the treadmill.
-
Seite 44: Storage
10. STORAGE This treadmill is designed for saving space. You can choose to store treadmill vertically or horizontally. A. Vertical Storage After folding, place the machine near the wall to avoid falling down. Keep out of reach of children. B. Horizontal Storage After folding, you can store the machine under a table or any other available space. -
Seite 45: How To Move The Treadmill
11. HOW TO MOVE THE TREADMILL Place your hands at Position E. Put the folding frame (A05) inside the bottom of the treadmill and turn the folding fixed board (A13) to a vertical position with your foot to fix the folding frame (A05). For transportation just hold the treadmill at position E and tilt it until the wheels can move smoothly. -
Seite 46: Important Electrical Information
12. IMPORTANT ELECTRICAL INFORMATION WARNING: GROUNDING METHODS: This product must be grounded. Grounding provides the least resistance for electrical current and will reduce the risk of electrical hazards. The plug must be plugged into an appropriate outlet that is properly installed and grounded in accordance with all local codes and ordinances. -
Seite 47: Exercise Instructions
SAFETY NOTE: 1. We recommend that you maintain a slow speed at the beginning of a session and hold the handrails until you have become familiar with the treadmill. 2. Insert the magnet end of the Safety Key (No. D07) into the computer console and attach the opposite end (containing the safety clip on it) to your clothing before starting your workout. -
Seite 48: Function Of The Console
16. FUNCTION OF THE CONSOLE QUICK START: 1. Insert the magnet end of the safety key into the computer console. Turn on the power switch. 2. Press the START button, and the system will automatically display a 3 second countdown. Once the countdown reaches zero, the running belt will start at the initial default speed of 1.0 KM/H. - Seite 49 3. CALORIES/DISTANCE: Displays the amount of calories burned from 0 to 999 KCAL. When the count reaches 999, it will reset and start again from 0. When in countdown mode, it will count down from the desired setting to 0. Once it reaches 0 the machine will stop smoothly and display “End”, then automatically reset to the initial setting after 5 seconds.
- Seite 50 LUBRICATION REMINDER Your treadmill needs lubrication maintenance every 300 KM. The system will release a beeping sound every 10 seconds and display an “OIL” icon on your display to remind you when it’s time. Please read the LUBRICATING THE TREADMILL to learn the proper steps to lubricating your machine.
-
Seite 51: Heart Rate Control
17. HEART RATE CONTROL HRC PARAMETER DEFAULT DEFAULT DEFAULT 1. Press “P” button continuously under the stand-by mode. You can find heart rate control from HP1 to HP2. The maximum speed for HP1 is 10.0 km/h and the maximum speed for HP2 is 12.0 km/h. Then push START key directly and the system will recommend the age of 30 years and heart rate target of 114. -
Seite 52: Troubleshooting
18. TROUBLESHOOTING PROBLEM POSSIBLE CAUSE SUGGESTED ACTION Not plugged in Plug cord into outlet Treadmill will not start Safety Key not inserted Insert Safety Key Running belt tension not correct Tighten the adjustment bolts on the left and Running belt not centered on the left or right sides of the right side of the rear roller. -
Seite 53: Important Matter
19. IMPORTANT MATTER Warning Please consult your doctor and receive complete physical examination before using the product. Don’t carry out frequent and violent exercise without permission of doctor. Please stop using the product and consult your doctor if you feel unwell in use. The product shall be used correctly. Please read service manual in detail before exercise. -
Seite 54: Application Software (App)
APPLICATION SOFTWARE (APP) You can download the app using the QR codes shown here or search in your store. Minimum compatibility specifications for mobile device; android 5.0 or higher with Bluetooth 4.0, iOS 8.0 or higher. Android Kinomap Notes on using the App: As an android user, please make sure that under "Settings ->... - Seite 55 European Disposal Directive 2002/96/EG Never dispose your training device in your regular household waste. Dispose the device only at a local or approved disposal. Take care of the currently applicable regulations. If you have doubts contact your local authorities for information about a correct and environment friendly disposal option.
- Seite 56 MANUAL ESPAÑOL Estimado cliente, Gracias por comprar este producto. Le ayudará a mejorar su salud. Para obtener información sobre cómo configurar o utilizar el dispositivo, así como información sobre asistencia al cliente, consulte el siguiente enlace: MANTENGA EL MANUAL DE USUARIO EN UN LUGAR SEGURO PARA PODER ACCEDER A ÉL CUANDO SEA NECESARIO.
- Seite 57 CONTENIDO INHALT 1. Instrucciones de seguridad ............62 2. Instrucciones especiales de seguridad ...........63 3. Descripción del ensamblaje ............63 4. Lista de accesorios ..............65 5. Vista en despiece .................66 6. Lista de piezas ................68 7. Instrucciones de montaje ..............70 8. Mantenimiento y cuidado ..............72 9.
-
Seite 58: Instrucciones De Seguridad
1. INSTRUCCIONES DE SEGURIDAD Muchos problemas de seguridad se tienen en cuenta en el diseño y fabricación del producto, pero se recomienda hacer uso del producto de acuerdo a las siguientes instrucciones. No somos responsables Por las consecuencias como resultado de un uso inadecuado del producto. Con el fin de garantizar su seguridad y evitar accidentes, por favor lea cuidadosamente las instrucciones de uso antes de usar el producto. -
Seite 59: Instrucciones Especiales De Seguridad
2. INSTRUCCIONES ESPECIALES DE SEGURIDAD Fuente de energía • Ubique la caminadora donde el conector pueda alcanzar el tomacorriente. • Introduzca el cable de energía directamente en el tomacorriente y manténgalo firme. • Por favor use un tomacorriente adecuado para evitar riesgos potenciales. Si el conector y el tomacorriente son incompatibles, pídale a un electricista que lo arregle en vez de mover el conector. -
Seite 60: Lista De Accesorios
4. LISTA DE ACCESORIOS Descripción Datos Cantidad No. Descripción Datos Cantidad Cinta de correr Cable de alimentación Llave y destornillador S=13,14,15 Lubricante Llave Allen Clave de seguridad... -
Seite 61: Vista En Despiece
5. VISTA EN DESPIECE... -
Seite 63: Descripción Del Ensamblaje
6. LISTA DE PIEZAS Descripción Cantidad Descripción Cantidad Bastidor principal Tuerca de plástico Bastidor de conexión de barra de Mango izquierdo guía 1 Bastidor de conexión de barra de Mango derecho guía 2 Bastidor principal Tapa frontal del mango izquierdo Bastidor plegable Tapa frontal del mango derecho Tubo vertical izquierdo... - Seite 64 Cable de alimentación USB superior Perno M6*10 Cable de alimentación USB inferior Perno M5*16 Puerto USB Perno M5*12 Motor de corriente continua Perno M5*8 Superficie de la máquina Perno M6*10 Cable de alimentación Perno M4*10 Interruptor cuadrado Tornillo ST4.2*20 Enchufe Tornillo ST4.2*12 Anillo magnético Tornillo ST4.2*15...
-
Seite 65: Instrucciones De Montaje
7. INSTRUCCIONES DE MONTAJE Paso 1 Abra el caja y saque todo lo que contiene. Coloque la cinta de cor- rer (A) sobre una superficie plana. Asegúrese de que el espacio dedi- cado al montaje esté limpio y sea lo suficientemente espacioso. - Seite 66 Paso 3 Tire en mango izquierdo y derecho hacia abajo (No.C10 y C11) hasta que estén fijos. Paso 4 Póngase de pie detrás de la cinta de correr. Tire la tuerca de plástico y sosténgala (No.C09) con la mano izquierda mientras que, con la mano derecha gire el soporte (No.C08).
-
Seite 67: Mantenimiento Y Cuidado
8. MANTENIMIENTO Y CUIDADO El mantenimiento y la atención generales ayudarán a prolongar la vida y mejorar rendimiento de su cinta de correr. Mantenga el dispositivo limpio, desempolvando regularmente los componentes. Limpie ambos lados de la cinta de correr para evitar la acumulación de polvo debajo del cinturón. Mantenga limpias sus zapatillas de correr para no ensuciar la cinta de andar. - Seite 68 NOTA IMPORTANTE: La cinta de correr se debe lubricar antes del primer uso. LUBRICANTE PARA LA CINTA DE CORRER: La lubricación de la superficie de rodadura y la cinta de correr es esencial ya que la fricción entre estas dos par- tes afecta la vida útil y el funcionamiento de la cinta de correr.
-
Seite 69: Instrucciones De Plegue
9. INSTRUCCIONES DE PLEGUE Paso 1 NOTA: esenchufe siempre la cinta de correr antes de plegarla. Tire de la tuerca de plástico y sosténgala (No. C09) con su mano izquierda y baje el soporte (No.C08) con su mano derecha. Cuando el soporte alcance el angúlo deseado, suelte la tuerca de plástico (No.C09). - Seite 70 Paso 4 Coloque su mano en la posición E y levante la cinta de correr. Paso 5 Coloque su mano según la posición E y use su pie para girar la placa fija con bisagras (No.A13) a una posición horizontal. Paso 6 Coloque su mano según la posición E y presione firmemente contra la posición J en la máquina...
-
Seite 71: Almacenamiento
10. ALMACENAMIENTO Esta cinta está diseñada para ahorrar espacio. Puede elegir almacenar la cinta de correr vertical u horizontalmente. A. Almacenamiento vertical Esta cinta está diseñada para ahorrar espacio. Puede elegir almacenar la cinta de correr vertical u horizontalmente. Almacenamiento horizontal Después de plegar, puede guardar la cinta debajo de una mesa u otro espacio libre. -
Seite 72: Cómo Desplazar La Cinta De Correr
11. CÓMO DESPLAZAR LA CINTA DE CORRER Posicionar los brazos según la posición E. Coloque el marco plegable (A05) en la parte inferior de la cinta de correr y use el pie para girar la placa fija plegable (A13) a una posición vertical para fijar el marco plegable (A05). -
Seite 73: Funciones
12. INFORMACIÓN IMPORTANTE SOBRE LA SEGURIDAD ELÉCTRICA ADVERTENCIA: Esta cinta necesita una fuente de alimentación adecuada para funcionar correctamente. Para su seguridad y la de los demás, compruebe que la fuente de alimentación sea correcta antes de conectar el dispositivo. Cualquier fuente de alimentación que esté... -
Seite 74: Instrucciones De Entrenamiento
SEGURIDAD: 1. Recomendamos disminuir la velocidad al principio y sujetarse a los pasamanos hasta que se haya familiarizado con la cinta de correr. 2. nserte el extremo magnético de la llave de seguridad (No.D07) en la consola del ordenador y enganche el extremo opuesto (con el clip de seguridad) a su ropa antes de empezar a entrenar. -
Seite 75: Función De La Consola
16. FUNCIÓN DE LA CONSOLA INICIO RÁPIDO: 1. Inserte el extremo magnético de la llave de seguridad en la consola del ordenador. Encienda el interruptor. 2. Presionando el botón START y el sistema mostrará automáticamente una cuenta regresiva de 3 segundos. Una vez que la cuenta regresiva llegue a cero, la cinta empezará a funcionar a la velocidad estándar inicial de 1 km/h. - Seite 76 3. CALORIES/DISTANCE: Muestra la cantidad de calorías quemadas de 0 a 999 KCAL. Una vez que el contador llegue a 999, se reiniciará y volverá a comenzar desde 0. En el modo de cuenta regresiva, la configuración deseada contará atrás hasta 0. Cuando llegue a 0, la unidad se detendrá lentamente y mostrará...
- Seite 77 NOTIFICACIÓN DE LUBRICACIÓN La cinta de correr se debe lubricar cada 300 km. El sistema emite un pitido cada 10 segundos y muestra un símbolo de „OIL“ en la pantalla para recordarle que necesita lubricación. Lea la LUBRICACIÓN DE LA CINTA DE CORRER para entender correctamente los pasos a seguir para lubricar su dispositivo.
-
Seite 78: Control De La Frecuencia Cardíaca
17.CONTROL DE LA FRECUENCIA CARDÍACA PARÁMETRO HRC Edad Edad Edad DEFAULT DEFAULT DEFAULT 1. Presione“ „P“ „continuamente en modo de espera. El control de la frecuencia cardíaca se puede encontrar en HP1 a HP2. La velocidad máxima para HP1 es de 10.0 km/h y la velocidad máxima para HP2 es de 12.0 km/h. A continuación, presione el botón START directamente y el sistema recomendará... -
Seite 79: Solución De Problemas
18. SOLUCIÓN DE PROBLEMAS PROBLEMA POSIBLE CAUSA SOLUCIÓN PROPUESTA No enchufado Enchufe el cable. La cinta no parte La clave de seguridad no está Inserta la clave de seguridad. conectada. La tensión de la cinta no es correcta en el lado izquierdo Apriete los tornillos de ajuste en el lado Cinta de correr no centrada o derecho de la banda de... -
Seite 80: Recomendaciones
19. RECOMENDACIONES Advertencia Por favor consulte a su médico y reciba un examen médico completo antes de usar el producto. No realice ejercicio fuerte y constante sin autorización de su médico. Por favor deje de usar el producto y consulte a su médico si no se siente bien al usarlo. El producto debe usare correctamente. Por favor lea el manual de instrucciones en detalle antes del ejercicio. -
Seite 81: Software De La Aplicacion
SOFTWARE (APLICACIÓN) Puede descargar las aplicaciones usando los códigos QR mostrados aquí o buscarlos en la tienda. Requisitos para dispositivos móviles: Android 5.0 o superior con Bluetooth 4.0, iOS 8.0 o superior. Android Kinomap Consejos para el uso de las aplicaciones: Como usuario de Android, por favor, asegúrese de marcar la opción "Fuentes desconocidas"... - Seite 82 Directiva Europea de Residuos 2002/96/EG Nunca elimine su dispositivo de entrenamiento en su basura doméstica ordinaria. Elimine el dispositivo únicamente en un sitio de eliminación aprobado. Tenga en cuenta las normativas aplicables actualmen- te. Si tiene dudas contacte a las autoridades locales para conseguir información sobre una opción de eliminación adecuada y ecológica.
- Seite 83 MANUEL FRANÇAIS Cher client, Merci d’avoir acheté notre produit. Cela va vous permettre d’avoir une santé plus saine. Pour plus d‘informations sur la configuration et l‘utilisation de l‘appareil, ainsi que sur le support client, veuillez consulter le lien suivant: GARDEZ LE MANUEL D'UTILISATEUR DANS UN ENDROIT SÛR POUR Y AVOIR ACCÈS À TOUT MOMENT SI NÉCESSAIRE.
- Seite 84 TABLE DES MATIÈRES INHALT 1. Instructions de sécurité ............... 85 2. Instructions spéciales de sécurité ..........86 3. Description de l‘assemblage ............86 4. Liste des configurations ............... 87 5. Diagramme à vue explosée ............88 6. Liste de diagrammes à vue explosée ..........90 7.
-
Seite 85: Instructions De Sécurité
1. INSTRUCTIONS DE SÉCURITÉ De nombreux problèmes de sécurité sont pris en compte dans la conception et la fabrication du produit, mais veuillez toujours opérer selon les instructions ci-dessous juste au cas où. Nous ne sommes pas responsables des conséquences dues à un fonctionnement anormal. Afin d‘assurer votre sécurité... -
Seite 86: Instructions Spéciales De Sécurité
2. INSTRUCTIONS SPÉCIALES DE SÉCURITÉ Source de courant • Placez le tapis roulant où la fiche peut atteindre la prise. • Branchez le câble d’alimentation sur prise et maintenez-le fermement. • Veuillez utiliser une prise de courant qualifiée pour éviter tout danger. Si la fiche et la prise sont incompatibles, demandez à... -
Seite 87: Liste Des Configurations
4. LISTE DES CONFIGURATIONS N° Description Spécification Quantité N° Description Spécification Quantité Tapis de course Câble électrique Huile de Clé et tournevis S=13,14,15 lubrification Clé Allen Clé de sécurité... -
Seite 88: Diagramme À Vue Explosée
5. DIAGRAMME À VUE EXPLOSÉE... -
Seite 90: Liste De Diagrammes À Vue Explosée
6. LISTE DE DIAGRAMMES À VUE EXPLOSÉE N° Description Quantité Description Quantité Cadre de base Ecrou en plastique Cadre de connexion de la tige de Poignée gauche guidage 1 Cadre de connexion de la tige de Poignée droite guidage 2 Couvercle avant de pognée Cadre principal gauche... - Seite 91 Ligne d'alimentation supérieure USB Vis M6*10 Ligne d'alimentation inférieure USB Vis M5*16 Module USB Vis M5*12 Moteur à courant continu Vis M5*8 Pont de course Vis M6*10 Câble électrique Vis M4*10 Commutateur carré Vis ST4.2*20 Prise de courant Vis ST4.2*12 Anneau magnétique Vis ST4.2*15 Noyau magnétique...
-
Seite 92: Instructions De Montage
7. INSTRUCTIONS DE MONTAGE Étape 1 Ouvrez l‘emballage et retirez le con- tenu. Placez le tapis de course (A) sur une surface plane. Assurez-vous que votre espace de travail est pro- pre et que vous avez suffisamment d‘espace. Étape 2 Tirez la plaque rotative avec votre main droite (N°A12) tout en posant votre main gauche sur la poignée... - Seite 93 Étape 3 Tirez les poignées gauche et droite (N°C10 et C11) vers la position fixe. Étape 4 Tenez-vous derrière le tapis de course. Retirez et maintenez l‘écrou en plastique (N°C09) avec votre main gauche et faites pivoter le sup- port (N°C08) avec votre main droi- te.
-
Seite 94: Maintenance Et Entretien
8. MAINTENANCE ET ENTRETIEN L‘entretien général aide à maintenir l‘état et les performances de votre tapis de course. Gardez l‘appa- reil propre en époussetant régulièrement les composants. Nettoyez les deux côtés du tapis de course pour éviter que la poussière ne s’accumule sous la bande roulement. Gardez vos chaussures de cour- se propres pour empêcher la bande de roulement de se salir. - Seite 95 NOTE IMPORTANTE: Vous devez lubrifier votre tapis de course avant la première utilisation. LUBRIFICATION DU TAPIS DE COURSE: La lubrification de la bande de roulement et du tapis roulant est essentielle car la friction entre celles-ci affecte la durée de vie et le fonctionnement du tapis de course. Par conséquent, il est recommandé de vérifier régulièrement la bande de roulement et le tapis roulant.
-
Seite 96: Instructions De Pliage
9. INSTRUCTIONS DE PLIAGE Étape 1 REMARQUE: débranchez toujours le tapis de course du secteur avant de le plier. Retirez l‘écrou en plastique et maintenez-le (N° C09) avec votre main gauche puis abaissez le support (N° C08) avec votre main droite. Lorsque le support atteint un angle approprié, relâchez l’écrou en plastique (N°... - Seite 97 Étape 4 Placez votre main en position E et soulevez le tapis de course. Étape 5 Placez votre main en position E et utilisez votre pied pour faire pivoter la plaque pliante fixe (N° A13) en position horizontale. Étape 6 Placez votre main en position E et pousser fermement avec votre pied contre la position J du tapis de course.
-
Seite 98: Rangement
10. RANGEMENT Ce tapis de course est conçu pour économiser de l‘espace. Vous pouvez choisir de ranger le tapis verticalement ou horizontalement. A. Rangement vertical Après le pliage, placez l‘appareil près du mur afin qu‘il ne tombe pas. Tenir hors de portée des enfants. B. -
Seite 99: Comment Déplacer Le Tapis De Course
11. COMMENT DÉPLACER LE TAPIS DE COURSE Mettez vos mains sur la position E. Placez le cadre pliant (A05) dans le bas du tapis de course et utilisez le pied pour faire pivoter la plaque pliante fixe (A13) en position verticale pour fixer le cadre de pliage (A05). -
Seite 100: Informations Électriques Importantes
12. INFORMATIONS ÉLECTRIQUES IMPORTANTES AVERTISSEMENT: Ce tapis de course a besoin de la bonne source d‘alimentation pour fonctionner correctement. Pour votre sécurité et celle des autres, veuillez vérifier si la source d‘alimentation est correcte avant de brancher l‘appareil. Toute source d‘alimentation supérieure ou inférieure à cette valeur peut causer des dommages importants à... -
Seite 101: Instructions D'exercice
14. INSTRUCTIONS D‘EXERCICE PREMIÈRES ÉTAPES: Avant de commencer tout programme d’exercices, vous devriez consulter votre médecin pour identifier tout problème de santé physique ou autre susceptible de présenter un risque pour la santé lors de l’utilisation de l’appareil, voire de nuire à son utilisation. Faites attention aux signaux de votre corps. -
Seite 102: Fonction De La Console
16. FONCTION DE LA CONSOLE PRISE EN MAIN RAPIDE: 1. Insérez l‘extrémité magnétique de la clé de sécurité dans la console de l‘ordinateur. Allumez l‘interrupteur d‘alimentation. 2. Appuyez sur le bouton START et le système affichera automatiquement un compte à rebours de 3 secondes. - Seite 103 3. CALORIES/DISTANCE: Affiche la quantité de calories brûlées de 0 à 999 KCAL. Lorsque le compte atteint 999, il se réinitialisera et recommencera à partir de 0. En mode compte à rebours, le réglage souhaité sera décompté à 0. Lorsque 0 est atteint, l‘appareil s‘arrête lentement et affiche „End“, après quoi il revient automatiquement au réglage par défaut après 5 secondes.
- Seite 104 RAPPEL DE LUBRIFICATION Votre tapis de course doit être lubrifié tous les 300 km. Le système émet un bip toutes les 10 secondes et affiche un symbole „OIL“ sur votre écran pour vous rappeler de le lubrifier. Veuillez lire la partie „LUBRIFICATION DU TAPIS DE COURSE“ pour connaître les étapes à suivre pour lubrifier votre appareil.
-
Seite 105: Contrôle De La Fréquence Cardiaque
17. CONTRÔLE DE LA FRÉQUENCE CARDIAQUE PARAMETERE HRC (paramètre de contrôle de la fréquence cardiaque) ÂGE ÂGE ÂGE DEFAULT DEFAULT DEFAULT Appuyez continuellement sur „P“ en mode veille. Le contrôle de la fréquence cardiaque est disponible sur HP1 et HP2. La vitesse maxi- male pour HP1 est de 10,0 km/h et de 12,0 km/h pour HP2. -
Seite 106: Dépannage
18. DÉPANNAGE PROBLEME CAUSE POSSIBLE SOLUTION PROPOSEE Pas branché Branchez le câble. Le tapis de course ne démarre Clé de sécurité non branchée Insérez la clé de sécurité. La tension de la bande de Serrez les boulons de réglage gauche et Bande de roulement non centrée roulement n‘est pas correcte du droit du rouleau arrière. -
Seite 107: Fait Important
19. FAIT IMPORTANT Attention Veuillez consulter votre médecin pour recevoir un examen physique complet avant d‘utiliser le produit. N’effectuez pas des exercices fréquents et violents sans la permission du médecin. Veuillez cesser d‘utiliser le produit et consulter votre médecin si vous tombez malade au cours de son utilisation. Le produit doit être utilisé... -
Seite 108: Logiciel D'application (Application)
LOGICIEL D’APPLICATION (APP) Pour télécharger l’application, scannez son code QR ou recherchez-la dans votre App Store. Conditions requises : l’appareil mobile doit correspondre à un Android 5.0 ou davantage avec Blue- tooth 4.0 ou un iOS 8.0 ou davantage. Android Kinomap Informations sur l’utilisation de l’application : Les utilisateurs d’Android doivent veiller à... - Seite 109 Directive européenne n° 2002/96/EG relative aux déchets Ne jeter en aucun cas l‘appareil avec les ordures ménagères. Ne disposez de l‘appareil que dans les décharges publiques (Gestion des déchets communaux de la ville). Pour leur élimination respectez les réglementations en vigueur locales. Renseignez-vous à la mairie ou à la commune de votre ville sur les possibilités offertes pour éliminer votre appareil correctement et en respectant l‘environnement.
- Seite 110 MANUALE D’USO ITALIANO Caro cliente, Grazie per aver acquistato questo prodotto. Migliorerà la vostra salute Per informazioni su come impostare o utilizzare il dispositivo, nonché informazioni su assistenza clienti, si prega di fare riferimento al seguente link: TENERE IL MANUALE DELL'UTENTE IN UN LUOGO SICURO PER POTERVI ACCEDERE IN QUALSIASI MOMENTO, OVE NECESSARIO.
- Seite 111 INDICE INHALT 1. Istruzioni di sicurezza ............... 112 2. Istruzioni di sicurezza speciale ........... 113 3. Descrizione dell‘assemblaggio ........... 113 4. Lista di configurazione ............... 114 5. Diagramma ad esplosione ............115 6. Lista del diagramma ad esplosione ..........117 7.
-
Seite 112: Istruzioni Di Sicurezza
1. ISTRUZIONI DI SICUREZZA Molti problemi relativi alla sicurezza vengono considerati nella progettazione e nella produzione del prodotto, ma vi preghiamo di attenervi alle istruzioni di cui sotto in caso di necessità. L’azienda non è responsabile per eventuali conseguenze causate da un funzionamento anormale. Al fine di garantire la sicurezza e prevenire gli incidenti, si prega di leggere attentamente le istruzioni per l‘uso prima di azionare il macchinario. -
Seite 113: Istruzioni Di Sicurezza Speciale
2. ISTRUZIONI DI SICUREZZA SPECIALE Alimentazione • Posizionare il tapis roulant in posto in cui la spina può raggiungere la presa di corrente. • Inserire direttamente la linea di alimentazione nella presa di corrente e tenerla salda. • Utilizzare una presa qualificata per evitare il pericolo consequenziale. Se la spina e la presa sono incompatibili, chiedere all‘elettricista di occuparsene, invece di rimuovere la spina. -
Seite 114: Lista Di Configurazione
4. LISTA DI CONFIGURAZIONE Descrizione Dati Nr. Descrizione Dati Quantità Quantità Tapis roulant Cavo elettrico Chiave inglese e S=13,14,15 Olio lubrificante cacciavite Brugola Chiave di accesso di sicurezza... -
Seite 115: Diagramma Ad Esplosione
5. DIAGRAMMA AD ESPLOSIONE... -
Seite 117: Lista Del Diagramma Ad Esplosione
6. LISTA DEL DIAGRAMMA AD ESPLOSIONE Descrizione Descrizione Telaio di base Dado di plastica Barra guida per collegamento telaio 1 Manubrio sinistro Barra guida per collegamento telaio 2 Manubrio destro Guaina anteriore per manubrio Struttura principale sinistro Guaina anteriore per manubrio Struttura ribaltabile destro Tubo verticale sinistro... - Seite 118 Cavo elettrico USB superiore Vite M6*10 Cavo elettrico USB inferiore Vite M5*16 Modulo USB Vite M5*12 Motore a CC Vite M5*8 Piano di corsa Vite M6*10 Cavo elettrico Vite M4*10 Centralina quadrata Vite ST4.2*20 Presa elettrica Vite ST4.2*12 Anello magnetico Vite ST4.2*15 Nucleo magnetico Vite ST4.2*12...
-
Seite 119: Istruzioni Di Montaggio
7. ISTRUZIONI DI MONTAGGIO Passo 1 Rimuovere l‘imballaggio ed estrar- re il contenuto. Posizionate il tapis roulant (A) su una superficie piana. Assicuratevi che la vostra zona di la- voro sia pulita e assicuratevi di avere spazio sufficiente. Passo 2 Estrarre la piastra girevole con la mano destra (Nr. - Seite 120 Passo 3 Tirate il manubrio dx e sx verso il basso (Nr. C10 und C11) per col- locarli nella posizione fissa. Passo 4 Posizionatevi sotto il tapis roulant. Estraete il dado di plastica, con la mano sinistra (Nr. C09) tenete fermo il pezzo e con la mano destra (Nr.
-
Seite 121: Manutenzione E Pulizia
8. MANUTENZIONE E PULIZIA Manutenzione e pulizia in generale allungano la durata di vita del macchinario, migliorandone la presta- zione. Mantenete pulito il tapis roulant spolverando regolarmente tutti i suoi componenti. Pulite entram- bi i lati del macchinario in modo tale che la polvere non si depositi sotto il nastro scorrevole. Pulite regolarmente le vostre scarpe da corsa per non sporcare la superficie di corsa. - Seite 122 INFORMAZIONE IMPORTANTE: Prima del primo utilizzo si prega di lubrificare il macchinario. LUBRIFICANTE PER IL TAPIS ROULANT: E‘ indispensabile lubrificare correttamente la superficie di corsa e il tapis roulant perchè l‘attrito presen- te tra le due influenza la durata di vita e la funzionalità del macchinario. Per questo motivo è necessario controllare regolarmente la superficie di corsa e il nastro.
-
Seite 123: Sistema Di Piegamento
9. SISTEMA DI PIEGAMENTO Passo 1 INDICAZIONI: Staccate la corrente dal tapis roulant prima di ripiegarlo. Estraete il dado di plastica, con la mano sinistra (Nr. C09) tenete fermo il pezzo e con la mano destra (Nr. C08) rotate il supporto. Potrete rilasciare il dado di plastica solo non appena il supporto è... - Seite 124 Passo 4 Mettete la vostra mano come mostrato in figura E e sollevate il tapis roulant. Passo 5 Mettete la vostra mano come mostrato in figura E e mettete la piastra fissa ribaltabile (Nr. A13) in posizione orizzontale aiutandovi col piede. Passo 6 Mettete la vostra mano come mostrato in figura E e premete col piede sul tapis roulant contro la...
-
Seite 125: Custodia
10. CUSTODIA Questo tapis roulant è stato progettato per far risparmiare spazio. Il macchinario può essere riposto in posizione verticale oppure orizzontale. A. In verticale Dopo averlo chiuso posizionate il tapis roulant vicino al muro in modo che non cada. Tenere lontano dalla portata dei bambini. -
Seite 126: Il Trasporto Corretto
11. IL TRASPORTO CORRETTO Mettete le mani come in figura E. Per fissare il telaio ribaltabile (A05) mettetelo a terra dalla parte della base di appoggio e girate la piastra fissa ribaltabile (A13) fino a raggiungere la posizione verticale. Aiutatevi col piede. Per trasportare il tapis roulant mettetevi in posizione E e piegatelo finchè... -
Seite 127: Informazioni Importanti Sulle Componenti Elettriche
INFORMAZIONI IMPORTANTI SULLE COMPONENTI ELETTRICHE ATTENZIONE: Questo tapis roulant deve essere allacciato ad una fonte di corrente elettrica per poter essere utilizzato. Per la vostra sicurezza e di chi vi sta intorno è necessario verificare che la fonte di elettricità sia corretta prima di collegare l‘apparecchio. -
Seite 128: Esercizi
14. ESERCIZI PRIMI PASSI: Prima di iniziare un programma di allenamento è opportuno consultare il medico per accertarsi di godere di buona salute e di non incorrere in alcun tipo di rischio utilizzando il tapis roulant. Un utilizzo non consapevole o eccessivo dell‘apparecchio può... -
Seite 129: Funzioni Della Console
16. FUNZIONI DELLA CONSOLE INIZIO VELOCE: 1. Inserite l‘estremità magnetica della chiave di accesso di sicurezza nella console del computer. Azionate poi l‘interruttore di rete. 2. Premere il tasto START in modo che il sistema attivi automaticamente un countdown di 3 secondi. - Seite 130 3. CALORIE/DISTANZA: Mostra la quantità di calorie bruciate da 0 a 999 KCAL. Se si raggiunge 999 si ricomincia nuovamente da 0. In modalità countdown si conta dal valore impostato fino a 0. Una volta raggiunto lo 0 il tapis roulant si ferma lentamente e mostra la scritta „Ende“ (fine). Dopo 5 secondi ritorna automaticamente all‘impostazione iniziale.
- Seite 131 RICORDATEVI DI LUBRIFICARLO Il vostro tapis roulant deve essere lubrificato ogni 300 km. Ogni 10 secondi il sistema emette un segnale e mostra un simbolo dell‘olio sul dispolay per ricordarvi di lubrificare il tapis roulant. Si prega di leggere attentamente il capitolo LUBRIFICAZIONE DEL TAPIS ROULANT per avere maggiori informazioni in merito.
-
Seite 132: Regolazione Frequenza Cardiaca
17. REGOLAZIONE FREQUENZA CARDIACA PARAMETRO HRC (Parametro di regolazione frequenza cardiaca) ETA‘ ETA‘ ETA‘ DEFAULT DEFAULT DEFAULT 1. Premere il tasto „P“ in modalità standby. La frequenza cardiaca è regolabile da HP1 a HP2. La velocità massima per HP1 è di 10,0 km/h mentre per HP2 è di 12,0 km/h. Premere direttamente il tasto START e il sistema mostrerà direttamente un’eltà... -
Seite 133: Risoluzione Errore
18. RISOLUZIONE ERRORE PROBLEMA POSSIBILE CAUSA PROPOSTA DI SOLUZIONE Errore di inserimento. Inserire cavo. Il tapis roulant non sia avvia La chiave di accesso di Inserire chiave di accesso di sicurezza. sicurezza non è stata inserita. Il tapis roulant non è stato correttamente teso vedi Inserire la vite di regolazione su lato sx e dx Il tapis roulant non è... -
Seite 134: Questioni Importanti
19. QUESTIONI IMPORTANTI Attenzione Si prega di consultare il proprio medico e sottoporsi ad un esame fisico completo prima di utilizzare il prodotto. Non allenarsi in maniera frequente e violenta senza il permesso del medico. Si prega di interrompere l’utilizzo del prodotto e consultare il proprio medico in caso di malessere durante uso. Il prodotto deve essere utilizzato in modo corretto. -
Seite 135: Software Di Utilizzo (App)
SOFTWARE DI UTILIZZO (APP) Puoi scaricare l'app utilizzando i codici QR mostrati qui o cercando direttamente nel negozio. Pre- requisito per il dispositivo mobile: Android 5.0 o versioni successive con Bluetooth 4.0, iOS 8.0 o versioni successive. Android Kinomap Note sull'uso dell'app: Come utente Android, assicurati che in "Impostazioni ->... -
Seite 136: Ec-Declaration Of Conformity / Eu-Konformitätserklärung
Declare under our sole responsibility that the following product: Erklären in alleiniger Verantwortung, dass das weiter unten genannte Produkt Type of product / Geräteart: Treadmill / Laufband Name / Handelsbezeichnung: FX300 Trade mark / Handelsmarke: Sportstech Model /Modell: FX300 Meets the essential requirements of the following EC directives: Die grundlegenden Anforderungen der aufgeführten EG Richtlinien erfüllt:... - Seite 137 Direttive Europee 2002/96/EG per lo smaltimento Non gettare mai il tuo attrezzo sportivo nell’immondizia normale. Smaltisci l’attrezzo solo tramite un siste- ma locale o approvato. Tieni in conto le regole applicabili correntemente. Se hai dubbi contatta le autorità locali per informazioni circa le opzioni per uno smaltimento corretto ed ecosostenibile. Batterie / Batterie ricaricabili In accordo con il regolamento per le batterie, sei obbligato legalmente a ritornare tutte le batterie usate ed esaurite.
- Seite 138 Verkauf durch / Distributed by / Distribuido por / Distribué / Distribuito da InnovaMaxx GmbH Potsdamer Platz 11 10785 Berlin +49 30 220 663 569 service@innovamaxx.de http://www.sportstech.de...