
Verwandte Anleitungen für Roto ZEL STG ZSU HS 10 II


Inhaltszusammenfassung für Roto ZEL STG ZSU HS 10 II
- Seite 1 Zeitschaltuhr im Handsender Timer in the hand-held transmitter Horloge de la télécommande Zegar sterujący w pilocie...
-
Seite 2: Inhaltsverzeichnis
Inhaltsverzeichnis Allgemeines..................... 3 Gewährleistung.................. 4 Sicherheitshinweise ................. 4 Bestimmungsgemäße Verwendung ............ 5 Anzeigen- und Tastenerklärung.............. 6 Funktionserklärung .................. 7 Einlernen des Funks ................ 14 Inbetriebnahme .................. 16 Werkseinstellung.................. 17 Programmierung.................. 18 Montage Wandhalterung ................. 26 Batteriewechsel .................. 27 Reinigung.................... 27 Technische Daten ................... 28 Was tun wenn...?.................. 28 Allgemeine Konformitätserklärung ............ 29 2 - de... -
Seite 3: Allgemeines
Allgemeines Mit diesem Sender können Sie bis zu 10 Empfänger über zugewiesene Kanäle einzeln oder alle zusammen steuern. Neben den 10 Einzel- Sendekanälen besitzt dieser Sender noch 3 Zentral- Sendekanäle welche die Sendekanäle 1-5, 6-10 und 1-10 ansprechen. Der vom Werk mit aktuellem Datum und Uhrzeit (MEZ) ausgelieferte Sender steuert die Antriebe morgens zur programmierten Schaltzeit und abends zur Astrozeit (Sonnenuntergang). -
Seite 4: Gewährleistung
Gewährleistung Bauliche Veränderungen und unsachgemäße Installationen entgegen dieser Anleitung und unseren sonstigen Hinweisen können zu ernsthaften Verletzun- gen von Körper und Gesundheit der Benutzer, z. B. Quetschungen, führen, sodass bauliche Veränderungen nur nach Absprache mit uns und unserer Zu- stimmung erfolgen dürfen und unsere Hinweise, insbesondere in der vorlie- genden Montage- und Betriebsanleitung, unbedingt zu beachten sind. -
Seite 5: Bestimmungsgemäße Verwendung
Bestimmungsgemäße Verwendung Der Sender in der vorliegenden Anleitung darf ausschließlich im Innenbereich für die Ansteuerung von Centronic kompatiblen Funk-Antrieben und Funk- Steuerungen verwendet werden. • Bitte beachten Sie, dass Funkanlagen nicht in Bereichen mit erhöhtem Störungsrisiko betrieben werden dürfen (z. B. Krankenhäuser, Flughä- fen). -
Seite 6: Anzeigen- Und Tastenerklärung
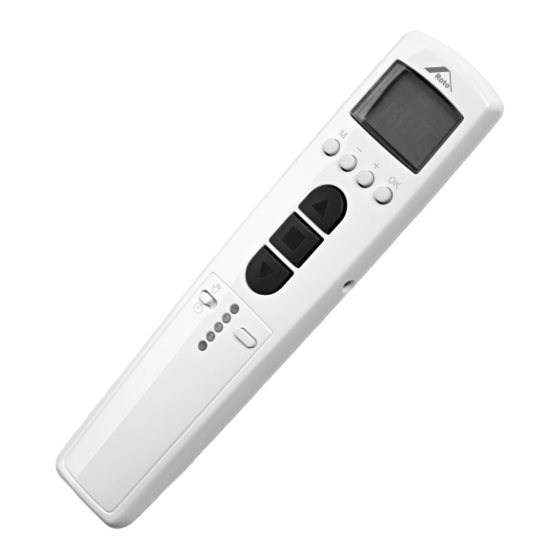
Anzeigen- und Tastenerklärung Display Hand- / Automatik- Schie- beschalter Menü-Tastenblock Einlerntaste EINFAHR-Taste Batteriefach STOPP-Taste Beschriftungsfeld AUSFAHR-Taste RESET-Taste (hinter dem Be- schriftungsfeld) Kanalwahltaste Typenschild Kanalkontrollleuchten 6 - de... -
Seite 7: Funktionserklärung
Displaysymbolik 7 8 9 Auffahrt Uhr/Datum Abfahrt Programm Wochentage (Mo.-So.) Einstellung Ziffernanzeige Funktion Textzeile Astro-Abend Funktionserklärung Rollladen-Auswahl Bei der Rollladen-Funktion fährt der Rollladen nach Betätigung einer Fahrtaste in Selbsthaltung. Jalousie-Auswahl Bei der Jalousie-Funktion fährt die Jalousie im Tippbetrieb, um eine genaue Positionierung der Lamellen zu ermöglichen. - Seite 8 Kanal Der Kanal eines Handsenders kann in einen oder mehrere Empfänger einge- lernt werden. Die Ansteuerung eines Empfängers ist ein Individualbefehl, die mehrerer Empfänger ein Gruppenbefehl. Zentralbefehl Wählt man alle Kanäle des Senders an, kann man alle zugeordneten Empfän- ger/-gruppen gleichzeitig ansteuern. Kanalwahltaste Die Kanalauswahl kann nur im Betriebsmodus erfolgen.
- Seite 9 OK-Taste Durch Drücken der OK-Taste im Menü, werden die aktuell angezeigten Werte gespeichert. +/- Tasten Folgende Bedienungen sind über + und - möglich: • Menü ->Wert verändern • Auto-Betrieb ->Informationen abfragen: ∙ + Taste ->Nächste automatische Beschattungszeit ∙ - Taste ->Nächste automatische Beschattungszeit ∙...
- Seite 10 ASTRO ABEND Steuert die Auffahrt nach der eingestellten Schaltzeit. Abfahrt nach Astrofunktion. Winterzeit Sommerzeit Winterzeit 05:00 Uhr Sonnenaufgang 07:00 Uhr 09:00 Uhr Jan. Feb. Mar. Apr. Mai. Jun. Jul. Aug. Sep. Okt. Nov. Dez. 15:00 Uhr 18:30 Uhr 22:00 Uhr Sonnenuntergang Winterzeit Sommerzeit...
- Seite 11 SCHALTZEIT Automatische Auf- und Abfahrzeiten für Rollladen und Jalousie in allen einge- lernten Empfängern. Bei der Displayanzeige --:-- (zwischen der Uhrzeit 23:59 und 00:00) wird die Schaltzeit nicht ausgeführt. Menü Einstellungen EINSTELLUNG Im Menü EINSTELLUNG haben Sie folgende Möglichkeiten: • URLAUB •...
- Seite 12 ZWISCHENPOSITION Die Zwischenposition ist eine frei wählbare Position des Rollladens/Jalousie, zwischen der oberen und unteren Endlage. Diese Position kann nach der Pro- grammierung aus der oberen Position angefahren werden. Dazu drücken Sie die AB-Taste zweimal kurz nacheinander. LUEFTUNG/WENDUNG Die Lüftungs-/Wendeposition ist eine frei wählbare Position des Rollladens/ Jalousie, zwischen der unteren und oberen Endlage.
-
Seite 13: Menü Funktion
SO/WI SO/WI bezeichnet die automatische Sommer-/Winterzeitumschaltung. Werk- seinstellung ist ON; das Gerät passt sich automatisch an. Menü Funktion Dieser Modus ist nur für ausgebildetes Fachpersonal bestimmt. Im Menü FUNKTION haben Sie die Möglichkeit, folgende Funktionen einzu- stellen: • ROLLLADEN/JALOUSIE (Auswahl des Behanges) •... -
Seite 14: Einlernen Des Funks
Einlernen des Funks Einlernen des Funks (Variante 1) Die Beschreibung gilt für die folgenden Produkte: • Rollladen ZRO EF • Markise ZMA EF • Funkempfänger FE 24 V • Funkempfänger FE 230 V • Funksteckdose FSD 1) Mastersender einlernen a) Empfänger in Lernbereitschaft bringen Bedienen Sie die Einlerntaste am Sender mit einem geeigne- ten zylindrischen Werkzeug (z. -
Seite 15: Einlernen Des Funks (Variante 2)
Einlernen des Funks (Variante 2) Die Beschreibung gilt für die folgenden Produkte: • WDT R4, R6 • WDT Solar R4, R6 • WDC i8 • Rollladen Solar ZRO SF (ab 01.05.2014) • Markise Solar ZMA SF (ab 01.05.2014) Das Wohndachfenster muss sich in Putzstellung befinden, sodass Sie die Einlerntasten des Empfängers erreichen kön- nen. -
Seite 16: Programmierung Des Empfängers Löschen
b. Mastersender einlernen Drücken Sie die Einlerntaste des Mastersenders innerhalb der Lernbereit- schaft, bis der Empfänger das erfolgreiche Einlernen quittiert (Signalton, Ru- cken, LED, etc.). Programmierung des Empfängers löschen Drücken und halten Sie die Tasten M1 und M3 an der Steuerung bis die LED dauerhaft leuchtet. -
Seite 17: Werkseinstellung
Werkseinstellung Durch Drücken der RESET-Taste (mit einem Kugelschreiber oder Ähnlichem) wird die Steuerung in die Werkseinstellung zurückgesetzt. Ausnahme: Menü Funktion, Sprachauswahl und Stadtaus- wahl. Der Sender bleibt im Empfänger eingelernt. UHR/DAT: aktuelle MEZ und aktuelles Datum PROGRAMM: Schaltzeiten Montag-Freitag (1-5) ASTRO ABEND ->... -
Seite 18: Programmierung
Programmierung Wählen Sie zuerst im Betriebsmodus den gewünschten Kanal mit der Kanalwahltaste aus. Menüübersicht AUTO UHR/DAT PROGRAMM EINSTELLUNG FUNKTION UHR/DAT AUTO Drücken Sie die MENUE-Taste UHR/DAT erscheint. Um weitere Menüs auszuwählen, drücken Sie die +/- Tasten. Drücken Sie die MENUE-Taste, um in den Betriebsmodus zu gelangen. UHR/DAT (Uhrzeit und Datum einstellen) AUTO UHR/DAT... - Seite 19 Verfahren Sie mit der Einstellung JAHR, MONAT und TAG wie oben be- schrieben. UHR/DAT erscheint. Drücken Sie die MENUE-Taste, um in den Betriebsmodus zu gelangen. PROGRAMM ASTRO ABEND (Auffahrt -> Schaltzeit, Abfahrt -> Sonnenuntergang) AUTO PROGRAMM ASTRO ABEND SCHALTZEIT PROGRAMM SPERRZEIT SCHALTZEIT SPERRZEIT...
- Seite 20 PROGRAMM INDIVIDUELL (Auf-/Abfahrt -> Schaltzeiten) AUTO PROGRAMM INDIVIDUELL SCHALTZEIT PROGRAMM SCHALTZEIT SCHALTZEIT SCHALTZEIT Wählen Sie zuerst im Betriebsmodus den gewünschten Kanal mit der Kanalwahltaste aus. Drücken Sie die MENUE-Taste. Um das Menü PROGRAMM auszuwählen, drücken Sie die + Taste bis PROGRAMM erscheint.
- Seite 21 EINSTELLUNG URLAUB (Urlaub OFF/ON) AUTO EINSTELLUNG URLAUB Die Einstellungen gelten für alle Kanäle. Drücken Sie die MENUE-Taste. Um das Menü EINSTELLUNG auszuwählen, drücken Sie die + Taste bis EINSTELLUNG erscheint. Bestätigen Sie mit OK. URLAUB ON/OFF erscheint. Mit der +/- Taste können sie die Urlaubsfunktion auf ON oder OFF stel- len.
- Seite 22 EINSTELLUNG ZWISCHENPOSITION, LUEFTUNG/WENDUNG, Prog ENDLAGE (Zeit/ Lageprogrammierung) Wählen Sie zuerst im Betriebsmodus den gewünschten Kanal mit der Kanalwahltaste aus. ZWISCHENPOSITION LUEFTUNG PROG ENDLAGE Sie haben die Funktion URLAUB bestätigt. ZWISCHENPOSITION er- scheint. Mit der +/- Taste können Sie die Fahrzeit zur ZWISCHENPOSITION ein- stellen.
- Seite 23 EINSTELLUNG DEUTSCH/ASTROVERSCHIEBUNG (Sprachauswahl, Astroverschie- bung) DEUTSCH ASTRO VERSCHIEBUNG Die Einstellungen gelten für alle Kanäle. Sie haben die Funktion PROG ENDLAGE bestätigt. DEUTSCH erscheint. Mit der +/- Taste können Sie die gewünschte Sprache einstellen. Bestätigen Sie Ihre Sprachauswahl mit OK. ASTROVERSCHIEBUNG erscheint.
- Seite 24 EINSTELLUNG (Städteauswahl, EXPERTEN MODUS (LAENGE, BREITE, ZEITZONE) KASSEL LAENGE BREITE ZEITZONE Die Einstellungen gelten für alle Kanäle. Sie haben die Funktion ASTROVERSCHIEBUNG bestätigt. Stadtaus- wahl (KASSEL) erscheint. Mit der +/- Taste können Sie die nächstgelegene Stadt einstellen. Betätigen Sie mit OK. Diese Dialogfenster werden nur angezeigt, wenn im Funkti- onsmenü...
- Seite 25 EINSTELLUNG SO/WI (Automatische Sommer-/Winterzeitumstellung) SO/WI EINSTELLUNG Die Einstellungen gelten für alle Kanäle. Sie haben die Funktion ZEITZONE bestätigt. SO/WI erscheint. Mit der +/- Taste können Sie SO/WI ein- oder ausschalten. Bestätigen Sie Ihre Auswahl mit OK. Drücken Sie die MENUE-Taste, um in den Betriebsmodus zu gelangen. 25 - de...
-
Seite 26: Montage Wandhalterung
FUNKTION ROLLLADEN/JALOUSIE, ERSTINBETRIEBNAHME (Auswahl des Be- hanges, Datum der Erstinbetriebnahme) AUTO FUNKTION ROLLLADEN EXPERTEN MODUS ERSTINBETRIEBNAHME FUNKTION Drücken Sie die MENUE-Taste. Um das Menü FUNKTION auszuwählen, drücken Sie die + Taste bis FUNKTION erscheint. Bestätigen Sie mit OK. ROLLLADEN/JALOUSIE erscheint. Mit der +/- Taste können Sie zwischen Rollladen/Jalousie auswählen. -
Seite 27: Batteriewechsel
Batteriewechsel Den entsprechenden Batterietyp entnehmen Sie bitte aus dem Kapitel „Technische Daten“. Wechseln Sie die Batterien in- nerhalb einer Minute und drücken Sie dabei keine Tasten. 1. Öffnen Sie die Abdeckung des Batteriefachs. 2. Entnehmen Sie die Batterien. 3. Legen Sie die neuen Batterien lagerichtig ein. -
Seite 28: Technische Daten
Technische Daten Nennspannung 3 V DC Batterietyp LR03 (AAA) Schutzart IP 20 Zulässige Umgebungstemperatur -10 bis +55 °C Funkfrequenz 868,3 MHz Die maximale Funkreichweite beträgt am und im Gebäude bis zu 25 m und im freien Feld bis zu 350 m. Was tun wenn...? Störung Ursache... -
Seite 29: Allgemeine Konformitätserklärung
Störung Ursache Abhilfe Astroprogramm schal- Datum stimmt nicht. Richtiges Datum ein- tet nicht genau. stellen. Falsche Stadt oder Richtige Stadt oder ex- falschen Breiten-/ Län- akten Breiten-/Längen- gengrad eingestellt. grad einstellen. Urlaubsfunktion einge- Urlaubsfunktion aus- schaltet. schalten. Astroverschiebung ist Astroverschiebung an- eingestellt. - Seite 30 Table of contents General information ................ 31 Warranty .................... 32 Safety instructions .................. 32 Intended use .................. 33 Explanation of displays and buttons ............ 34 Explanation of functions ................ 35 Programming the remote control.............. 41 Commissioning.................. 43 Factory setting.................. 44 Programming .................. 45 Installing the wall bracket................. 54 Changing batteries.................. 55 Cleaning.................... 55 Technical data .................. 56 What to do if...?.................. 56 General Declaration of Conformity............ 57...
-
Seite 31: General Information
General information With this transmitter you are able to control up to 10 receivers via assigned channels individually or all at the same time. In addition to the 10 individual transmission channels, this transmitter also has 3 central transmission channels which operate transmission channels 1-5, 6-10 and 1-10. -
Seite 32: Warranty
Warranty Structural modifications and incorrect installation which are not in accordance with these and our other instructions can result in serious injuries, e.g., crush- ing of limbs. Therefore, structural modifications may only be carried out with our prior approval and strictly in accordance with our instructions, particularly the information contained in these Assembly and Operating Instructions. -
Seite 33: Intended Use
Intended use The transmitter described in these instructions must only be used indoors for the operation of Centronic-compatible radio drives and radio control units. • Please note that radio-controlled systems may not be used in areas with a high risk of interference (e.g. hospitals, airports). •... -
Seite 34: Explanation Of Displays And Buttons
Explanation of displays and buttons Display Manual/Automatic slide switch Menu keypad Programming button RETRACT button Battery compartment STOP button Labelling field EXTEND button RESET button (behind the la- belling field) Channel selection button Type plate Channel indicator lamps 34 - en... -
Seite 35: Explanation Of Functions
Display symbols 7 8 9 Upward travel Time/date Downward travel Program Days of week (Mon – Sun) Setting Digital display Function Text field Astro evening Explanation of functions Roller shutter selection With the roller shutter function, the roller shutter runs in maintained operation mode after a travel button is pressed. -
Seite 36: Central Command
Channel The channel of a hand-held transmitter can be programmed into one or more receivers. One receiver is operated through an individual command, several receivers through a group command. Central command If all the channels of the transmitter are selected, it is possible to operate all of the assigned receivers/groups simultaneously. - Seite 37 OK button The displayed values are saved by pressing the OK button in the menu. +/- buttons The following operations are possible via + and -: • Menu ->Modify value • Automatic mode ->Retrieve information: ∙ + button ->Next automatic shade time ∙...
- Seite 38 ASTRO EVENING Controls opening according to the set switching time. Closing according to the Astro function. Winter time Summer time Winter time 05:00 Sunrise 07:00 09:00 Jan. Feb. Mar. Apr. Jun. Jul. Aug. Sep. Oct. Nov. Dec. 15:00 18:30 22:00 Sunset Winter time Summer time...
- Seite 39 SWITCHING TIME Automatic opening and closing times for roller shutter and venetian blind in all programmed receivers. When --:-- is shown on the display (between 23:59 and 00:00), the switching time is not executed. Settings menu SETTING In the SETTING menu, you have the following options: •...
- Seite 40 VENTILATION/TILT The ventilation/tilt position is any roller shutter/venetian blind position of your choosing, situated between the upper and lower end position. This function al- lows you to open the roller shutter from the lower end position until the ventila- tion slots are opened. With the venetian blind, the laths tilt. To do so, press the UP button briefly twice in succession.
-
Seite 41: Programming The Remote Control
• EXPERT MODE • INITIAL OPERATION (display only) EXPERT MODE If city selection (EXPERT MODE OFF) is too imprecise for you, you can set the exact location using degrees of latitude and longitude (EXPERT MODE ON). Programming the remote control Programming the remote control (variant 1) This description applies to the following products: •... -
Seite 42: Programming Additional Transmitters
2) Programming additional transmitters Press the programming button of the master transmitter until the re- ceiver confirms. Then press the programming button of the new transmitter until the re- ceiver confirms. Now press the programming button of the new transmitter again. The receiver confirms successful programming. -
Seite 43: Commissioning
Programming the master transmitter a. Preparing the receiver for programming Hold down the desired programming button on the control unit until the LED lights up: ▻ M1 for programming the skylight window (green) ▻ M2 for programming the interior accessories (orange) ▻... -
Seite 44: Factory Setting
Factory setting By pressing the RESET button (with a ballpoint pen or sim- ilar), the control unit is reset to its factory settings. Exception: Function, Language selection and City selection menus. Transmitter remains programmed in receiver. TIME/DATE: Current CET and current date PROGRAM: Switching times Monday–Friday (1–5) ASTRO EVENING ->... -
Seite 45: Programming
Programming First select the desired channel in Operating mode, using the channel selection button. Menu overview AUTO TIME/DATE PROGRAM SETTING AUTO FUNCTION TIME/DATE Press the MENU button, TIME/DATE appears. To select additional menus, press the +/- buttons. Press the MENU button to switch to Operating mode. 45 - en... - Seite 46 TIME/DATE (setting the time and date) AUTO TIME/DATE TIME YEAR AUTO MONTH TIME/DATE Press the MENU button, TIME/DATE appears. Press OK to go to the Time menu item. Now set the current time using the +/- buttons. Once the time is set, confirm with OK. To set the YEAR, MONTH and DAY, proceed as described above.
- Seite 47 PROGRAM ASTRO EVENING (upward travel -> switching time, downward travel -> sunset) AUTO PROGRAM ASTRO EVENING SWITCHING TIME BLOCKING TIME SWITCHING TIME BLOCKING TIME PROGRAM First select the desired channel in Operating mode, using the channel selection button. Press the MENU button. To select the PROGRAM menu, press the + button until PROGRAM ap- pears.
- Seite 48 PROGRAM INDIVIDUAL (upward/downward travel -> switching times) AUTO PROGRAM INDIVIDUAL SWITCHING TIME PROGRAM SWITCHING TIME SWITCHING TIME SWITCHING TIME First select the desired channel in Operating mode, using the channel selection button. Press the MENU button. To select the PROGRAM menu, press the + button until PROGRAM ap- pears.
- Seite 49 SETTING HOLIDAY (Holiday OFF/ON) AUTO SETTING HOLIDAY The settings apply to all channels. Press the MENU button. To select the SETTING menu, press the + button until SETTING appears. Confirm with OK. HOLIDAY ON/OFF appears. You can switch the holiday function to ON or OFF using the +/- buttons. Confirm your selection with OK.
- Seite 50 SETTING INTERMEDIATE POSITION, VENTILATION/TILT, Prog END POS (time/ position programming) First select the desired channel in Operating mode, using the channel selection button. INTERMEDIATE POSITION VENTILATION PROG END POSITION You have confirmed the HOLIDAY function. INTERMEDIATE POSITION appears. You can set the INTERMEDIATE POSITION running time using the +/- button.
- Seite 51 SETTING ENGLISH/ASTRO SHIFT (Language selection, Astro shift) ENGLISH ASTRO SHIFT (GB/US) The settings apply to all channels. You have confirmed the function PROG END POSITION. ENGLISH ap- pears. You can set the desired language using the +/- button. Confirm your language selection with OK. ASTRO SHIFT appears.
- Seite 52 SETTING (City selection, EXPERT MODE (LONGITUDE, LATITUDE, TIME ZONE) LONDON LONGITUDE LATITUDE TIME ZONE The settings apply to all channels. You have confirmed the function ASTRO SHIFT . City selection (LON- DON) appears. You can set the nearest city using the +/- button. Confirm with OK.
- Seite 53 SETTING SUMMER/WINTER (Automatic summer/winter time adjustment) SUMMER/WINTER SETTING The settings apply to all channels. You have confirmed the TIME ZONE function. SUMMER/WINTER ap- pears. You can turn SUMMER/WINTER on or off using the +/- buttons. Confirm your selection with OK. Press the MENU button to switch to Operating mode.
-
Seite 54: Installing The Wall Bracket
FUNCTION ROLLER SHUTTER/VENETIAN BLIND, INITIAL OPERATION (Selection of the shading solution, date of initial operation) AUTO FUNCTION ROLLER SHUTTER EXPERT MODE INITIAL OPERATION FUNCTION Press the MENU button. To select the FUNCTION menu, press the + button until FUNCTION ap- pears. -
Seite 55: Changing Batteries
Changing batteries You will find the appropriate battery type in the "Technical data" chapter. Change the batteries within a minute and do not press any but- tons in the process. 1. Open the cover of the battery compartment. 2. Take out the batteries. 3. -
Seite 56: Technical Data
Technical data Rated voltage 3 V DC Battery type LR03 (AAA) Degree of protection IP 20 Permissible ambient temperature -10°C to +55°C Radio frequency 868.3 MHz The maximum transmitter range on and in the building is up to 25 m, and up to 350 m in the open. -
Seite 57: General Declaration Of Conformity
Problem Cause Remedy Astro program is not Date is incorrect. Set correct date. switching accurately. Incorrect city or incor- Set correct city or exact rect degree of latitude/ degree of latitude/lon- longitude set. gitude. Holiday function Switch off holiday func- switched on. - Seite 58 Sommaire Généralités..................... 59 Garantie .................... 60 Consignes de sécurité................ 60 Utilisation conforme ................ 61 Description des affichages et des touches .......... 62 Description du fonctionnement .............. 63 Programmation radio ................ 70 Mise en service.................. 72 Réglage usine.................. 73 Programmation.................. 74 Montage du support mural............... 83 Remplacement des piles ................. 84 Nettoyage .................... 84 Caractéristiques techniques .............. 85 Que faire si...
-
Seite 59: Généralités
Généralités Cet émetteur permet de commander individuellement ou simultanément jus- qu’à 10 récepteurs via les canaux affectés. Outre les 10 canaux émetteurs individuels, cet émetteur dispose également de 3 canaux émetteurs centraux agissant sur les canaux 1 à 5, 6 à 10 et 1 à 10. L’émetteur, dont la date et l’heure actuelles (HEC) sont réglées à... -
Seite 60: Garantie
Garantie Toute modification du moteur et toute installation inappropriée allant à l’en- contre de cette notice et de nos autres consignes peuvent causer des bles- sures corporelles graves ou représenter un risque pour la santé des utilisa- teurs, par ex. des contusions. C’est pourquoi, toute modification de la construction ne peut être effectuée qu’après nous en avoir informés et après obtention de notre accord. -
Seite 61: Utilisation Conforme
• Lorsque l’installation est pilotée par un ou plusieurs émetteurs, la zone de déploiement de l’installation doit être visible pendant le fonctionnement. • L’appareil contient des petites pièces susceptibles d’être avalées. Utilisation conforme L’émetteur décrit dans la présente notice est conçu uniquement pour une ins- tallation en intérieur et pour le pilotage de moteurs et de récepteurs compa- tibles avec Centronic. -
Seite 62: Description Des Affichages Et Des Touches
Description des affichages et des touches Écran Curseur manuel/automatique Bloc de touches du menu Touche de programmation Touche MONTÉE Compartiment à piles Touche ARRÊT Champ d’identification Touche DESCENTE Touche RESET (derrière le champ d’identification) Touche de sélection du canal Plaque signalétique Témoins de contrôle du canal 62 - fr... -
Seite 63: Description Du Fonctionnement
Symboles d’affichage 7 8 9 Montée Heure/date Descente Programme Jours de la semaine (lu.-di.) Réglage Affichage des chiffres Fonction Ligne de texte Astro soir Description du fonctionnement Sélection du volet roulant Lors du fonctionnement comme volet roulant, le volet roulant se déplace en autoentretien lors de l’actionnement d’une touche de déplacement. -
Seite 64: Ordre Centralisé
Canal Le canal d’une télécommande peut être programmé dans un ou plusieurs ré- cepteurs. La commande d’un récepteur est un ordre individuel, la commande de plusieurs récepteurs est un ordre groupé. Ordre centralisé En choisissant tous les canaux de l’émetteur, vous pouvez commander simul- tanément tous les récepteurs/groupes affectés. - Seite 65 Touche OK Appuyez sur la touche OK dans le menu pour enregistrer les valeurs actuelle- ment affichées. Touches +/- Les touches + et - permettent d’exécuter les commandes suivantes : • Menu -> Modifier la valeur • Fonctionnement automatique -> Consulter les informations : ∙...
- Seite 66 ASTRO SOIR Commande la montée selon l’horaire de commutation réglé. Descente selon la fonction astro. Heure d’hiver Heure d’été Heure d’hiver 05h00 Lever du soleil 07h00 09h00 Jan. Fév. Mars Avr. Juin Juil. Août Sep. Oct. Nov. Déc. 15h00 18h30 22h00 Coucher du soleil Heure d’hiver...
- Seite 67 Jan. Fév. Mars Avr. . Juin Juil. Août Sep. Oct. Nov. Déc. . 15h00 Heure de blocage 18h30 Coucher du soleil 22h00 Heure d’hiver Heure d’été Heure d’hiver HORAIRE DE COMMUTATION Heures de montée et de descente automatiques du volet roulant et du store vénitien dans tous les récepteurs programmés.
- Seite 68 VACANCES La fonction vacances simule une maison habitée lorsque vous êtes en va- cances. Lorsque la fonction est activée (ON), le volet roulant/store vénitien se déplace en différé aux heures programmées (+ 30 minutes maxi.). POSITION FINALE La fin de course désigne la position dans laquelle le volet roulant/store véni- tien se trouve lorsqu’il est en position supérieure ou inférieure.
-
Seite 69: Menu Fonction
Sélection de la ville (PARIS avec le réglage de langue FRANCE) La sélection de la ville est importante pour la fonction astro. Sélectionnez ici la ville la plus proche de votre localité. LONGITUDE/LATITUDE/FUSEAU HORAIRE (uniquement lorsque le MODE EXPERT est en position ON) Vous pouvez calculer vos coordonnées par ex. -
Seite 70: Programmation Radio
Programmation radio Programmation radio (variante 1) La description est valable pour les produits suivants : • Volet roulant ZRO EF • Store banne ZMA EF • Récepteur radio FE 24 V • Récepteur radio FE 230 V • Prise radio FSD 1) Programmation de l’émetteur maître a) Mise en mode de programmation du récepteur Actionnez les touches de programmation de l’émetteur à... - Seite 71 Programmation radio (variante 2) La description est valable pour les produits suivants : • WDT R4, R6 • WDT Solar R4, R6 • WDC i8 • Volet roulant solaire ZRO SF (à partir du 01/05/2014) • Store banne solaire ZMA SF (à partir du 01/05/2014) La lucarne doit se trouver en position de nettoyage de ma- nière à...
-
Seite 72: Programmation D'émetteurs Supplémentaires
► Le récepteur se trouve maintenant en mode de programmation pendant trois minutes. b. Programmation de l’émetteur maître Appuyez sur la touche de programmation de l’émetteur maître en mode de programmation, jusqu’à acquittement par le récepteur de la réussite de la programmation (signal acoustique, à-coups, LED, etc.). -
Seite 73: Réglage Usine
Réglage usine En actionnant la touche RESET (avec un stylo ou un objet si- milaire), les réglages usine de la commande sont réinitiali- sés. Exception : menu Fonction, sélection de la langue et sélec- tion de la ville. L’émetteur reste programmé dans le récepteur. HEURE/DATE : HEC actuelle et date actuelle PROGRAMME :... -
Seite 74: Programmation
Programmation Sélectionnez d’abord le canal souhaité en mode de fonction- nement à l’aide de la touche de sélection du canal. Aperçu du menu AUTO HEURE/DATE PROGRAMME REGLAGE AUTO FONCTION HEURE/DATE Appuyez sur la touche MENU ; HEURE/DATE apparaît. Pour sélectionner des menus supplémentaires, appuyez sur les touches +/-. - Seite 75 HEURE/DATE (régler l’heure et la date) AUTO HEURE/DATE HEURE ANNEE AUTO MOIS JOUR HEURE/DATE Appuyez sur la touche MENU ; HEURE/DATE apparaît. En appuyant sur la touche OK, vous accédez à l’option de menu Heure. Réglez maintenant l’heure actuelle à l’aide des touches +/-. Lorsque l’heure est réglée, confirmez en appuyant sur la touche OK.
- Seite 76 PROGRAMME ASTRO SOIR (montée -> horaire de commutation, descente -> coucher du soleil) AUTO PROGRAMME ASTRO SOIR HEURE DE DECLENCHEMENT HEURE DE BLOCAGE HEURE DE DECLENCHEMENT HEURE DE BLOCAGE PROGRAMME Sélectionnez d’abord le canal souhaité en mode de fonction- nement à l’aide de la touche de sélection du canal. Appuyez sur la touche MENU.
- Seite 77 PROGRAMME INDIVIDUEL (montée/descente -> horaires de commutation) AUTO PROGRAMME HEURE DE DECLENCHEMENT INDIVIDUEL PROGRAMME HEURE DE DECLENCHEMENT HEURE DE DECLENCHEMENT HEURE DE DECLENCHEMENT Sélectionnez d’abord le canal souhaité en mode de fonction- nement à l’aide de la touche de sélection du canal. Appuyez sur la touche MENU.
- Seite 78 RÉGLAGE VACANCES (vacances OFF/ON) AUTO REGLAGE VACANCES Les réglages sont valables pour tous les canaux. Appuyez sur la touche MENU. Pour sélectionner le menu RÉGLAGE, appuyez sur la touche + jusqu’à ce que RÉGLAGE apparaisse. Confirmez en appuyant sur OK. VACANCES ON / OFF apparaît. Les touches +/- vous permettent de régler la fonction vacances sur ON ou OFF.
- Seite 79 RÉGLAGE POS. INTERM, AÉRATION/INVERSION, PROG POS. FINALE (program- mation de l’heure/de la position) Sélectionnez d’abord le canal souhaité en mode de fonction- nement à l’aide de la touche de sélection du canal. POS. INTERM AERATION PROG POS. FINALE Vous avez confirmé la fonction VACANCES. POS. INTERM apparaît. Les touches +/- vous permettent de régler l’horaire de déplacement vers la POS.
- Seite 80 RÉGLAGE FRANCE/DÉCALAGE ASTRO (sélection de la langue, décalage astro) FRANCE DECALAGE ASTRO Les réglages sont valables pour tous les canaux. Vous avez confirmé la fonction PROG POS. FINALE. FRANCE apparaît. Les touches +/- vous permettent de régler la langue souhaitée. Confirmez votre sélection de la langue avec OK.
- Seite 81 RÉGLAGE (Sélection de la ville, MODE EXPERT (LONGITUDE, LATITUDE, FUSEAU HORAIRE)) PARIS LONGITUDE LATITUDE FUSEAU HORAIRE Les réglages sont valables pour tous les canaux. Vous avez confirmé la fonction DÉCALAGE ASTRO . Sélection de la ville (PARIS) apparaît. Les touches +/- vous permettent de régler la ville la plus proche. Confirmez en appuyant sur OK.
- Seite 82 RÉGLAGE ÉTÉ/HIVER (passage automatique à l’heure d’été et d’hiver) ETE/HIVER REGLAGE Les réglages sont valables pour tous les canaux. Vous avez confirmé la fonction FUSEAU HORAIRE. ÉTÉ/HIVER apparaît. Les touches +/- vous permettent d’activer ou de désactiver ÉTÉ/HIVER. Confirmez votre sélection avec OK. Appuyez sur la touche MENU pour accéder au mode de fonctionnement.
-
Seite 83: Montage Du Support Mural
FONCTION VOLET ROULANT/STORE VÉNITIEN, 1-IÈRE MISE EN SERVICE (Sélec- tion du tablier/de la toile, date de la première mise en service) AUTO FONCTION VOLET ROULANT MODE EXPERT 1-IERE MISE EN SERVICE FONCTION Appuyez sur la touche MENU. Pour sélectionner le menu FONCTION, appuyez sur la touche + jusqu’à ce que FONCTION apparaisse. -
Seite 84: Remplacement Des Piles
Remplacement des piles Le type de pile correspondant est indiqué dans le chapitre « Caractéristiques techniques ». Remplacez les batteries dans un laps de temps d’une minute en veillant à n’appuyer sur aucune touche. 1. Ouvrez le cache du compartiment des piles. 2. -
Seite 85: Caractéristiques Techniques
Caractéristiques techniques Tension nominale 3 V CC Type de piles LR03 (AAA) Type de protection IP 20 Température ambiante admissible -10 à +55 °C Fréquence radio 868,3 MHz La portée radio maximale peut aller jusqu’à 25 m en intérieur et jusqu’à 350 m en extérieur. -
Seite 86: Déclaration De Conformité Générale
Dérangement Cause Comment y remédier Le programme astro ne La date est incorrecte. Réglez la date correcte. commute pas avec pré- La ville ou les degrés de Réglez la ville ou les de- cision. longitude et latitude ré- grés de longitude et la- glés sont incorrects. - Seite 87 87 - fr...
- Seite 88 Spis treści Informacje ogólne ................... 89 Gwarancja .................... 90 Wskazówki bezpieczeństwa .............. 90 Zastosowanie zgodne z przeznaczeniem........... 91 Objaśnienie wskaźników i przycisków............ 92 Działanie .................... 93 Programowanie sygnału radiowego............ 100 Uruchomienie .................. 102 Ustawienie fabryczne ................ 102 Programowanie .................. 103 Montaż uchwytu naściennego .............. 112 Wymiana baterii .................. 113 Czyszczenie .................. 113 Dane techniczne ................... 114 Co robić, gdy...? ................... 114 Ogólna deklaracja zgodności .............. 115 88 - pl...
-
Seite 89: Informacje Ogólne
Informacje ogólne Pilot umożliwia indywidualne lub łączne sterowanie maksymalnie 10 odbiorni- kami poprzez przypisane kanały radiowe. Oprócz 10 indywidualnych kanałów nadawczych, ten pilot posiada również 3 centralne kanały nadawcze zarządzające kanałami 1-5, 6-10 oraz 1-10. Pilot, dostarczany z ustawioną fabrycznie aktualną datą i godziną (CET), steru- je napędami rano o zaprogramowanym czasie przełączania oraz wieczorem o czasie astronomicznym (zachód słońca). -
Seite 90: Gwarancja
Gwarancja Zmiany konstrukcyjne oraz niewłaściwy montaż niezgodny z niniejszą instruk- cją i innymi naszymi wskazówkami mogą prowadzić do poważnych obrażeń ciała i uszczerbku na zdrowiu użytkownika, jak np. zmiażdżeń, dlatego też zmiany konstrukcyjne mogą być przeprowadzane jedynie po uzgodnieniu z na- mi i za naszą... -
Seite 91: Zastosowanie Zgodne Z Przeznaczeniem
Zastosowanie zgodne z przeznaczeniem Pilot opisany w niniejszej instrukcji jest przeznaczony do eksploatacji wyłącznie w pomieszczeniach i może być stosowane wyłącznie do sterowania napędami sterowanymi radiowo oraz sterownikami radiowymi kompatybilnymi z produk- tami Centronic. • Należy pamiętać, że urządzenia radiowe nie mogą być eksploatowane w obszarach o podwyższonym ryzyku zakłóceń... -
Seite 92: Objaśnienie Wskaźników I Przycisków
Objaśnienie wskaźników i przycisków Wyświetlacz Przełącznik Ręczny/Auto Blok przycisków menu Przycisk programowania Przycisk WSUŃ Komora na baterie Przycisk STOP Pole opisu Przycisk WYSUŃ Przycisk RESET (za polem opi- Przycisk wyboru kanału Tabliczka znamionowa Lampki kontrolne kanałów 92 - pl... -
Seite 93: Działanie
Symbole na wyświetlaczu 7 8 9 Przesuw góra Czas/Data Przesuw dół Program Dni tygodnia (Pon.-So.) Ustawienie Wyświetlacz cyfrowy Funkcja Wyświetlacz tekstowy Astro wieczór Działanie Wybór rolety Po wyborze funkcji Roleta, po wciśnięciu przycisku przesuwu roleta porusza się w trybie samopodtrzymania. Wybór żaluzji Po wyborze funkcji Żaluzja, żaluzja porusza się... - Seite 94 Kanał Kanał pilota może zostać zaprogramowany w jednym lub większej ilości od- biorników. Sterowanie odbiornikiem odbywa się poprzez polecenie indywidu- alne, natomiast sterowanie kilkoma odbiornikami poprzez polecenie grupowe. Polecenie centralne W przypadku wyboru wszystkich kanałów w pilocie, możliwe jest jednoczesne sterowanie wszystkimi przyporządkowanymi odbiornikami/grupami odbiorni- ków.
- Seite 95 Tryb pracy Na wyświetlaczu wskazywana jest godzina oraz aktualny tryb pracy, np. URLOP. Przycisk OK Wciśnięcie przycisku OK w menu powoduje zapamiętanie aktualnie wyświetla- nych wartości. Przyciski +/- Przyciski + oraz - umożliwiają następujące czynności: • Menu ->Zmiana wartości • Tryb Auto -> Podgląd informacji: ∙...
- Seite 96 ASTRO WIECZÓR Steruje przesuwem w górę zgodnie z ustawionym czasem przełączania. Przesuw w dół odbywa się zgodnie z funkcją Astro. Czas zimowy Czas letni Czas zimowy g. 05:00 Wschód słońca g. 07:00 g. 09:00 Paź g. 15:00 g. 18:30 g. 22:00 Zachód słońca Czas zimowy Czas letni...
- Seite 97 Paź g. 15:00 Czas blokady g. 18:30 Zachód słońca g. 22:00 Czas zimowy Czas letni Czas zimowy CZAS PRZEŁĄCZANIA Czasy automatycznego przesuwu w górę i w dół dla rolet i żaluzji we wszyst- kich zaprogramowanych odbiornikach. Gdy wyświetlacz wskazuje --:-- (między godziną 23:59 a 00:00) czas przełą- czania nie może być...
- Seite 98 URLOP Funkcja „Urlop” symuluje obecność mieszkańców w domu podczas ich pobytu na urlopie. Gdy funkcja jest aktywna (ON), roleta / żaluzja przesuwa się o zaprogramowa- nych porach z pewnym przesunięciem czasowym (maks.+ 30 min.). POŁOŻENIE KRAŃCOWE Położenie krańcowe to punkt, w którym znajduje się roleta / żaluzja przesunię- ta maksymalnie w górę...
- Seite 99 Wybór miasta (WARSZAWA przy ustawieniu języka na POLSKI) Wybór miasta jest istotny dla funkcji Astro. Należy w tym miejscu wskazać naj- bliżej położone miasto. DŁUGOŚĆ/SZEROKOŚĆ/STREFA CZASOWA (wyłącznie przy ustawieniu TRYB EKSPERT ON) Współrzędne można odczytać np. z atlasu. LATO/ZIMA LATO/ZIMA oznacza automatyczną zmianę czasu letniego na czas zimowy. Ustawienie fabryczne ON;...
-
Seite 100: Programowanie Sygnału Radiowego
Programowanie sygnału radiowego Programowanie sygnału radiowego (wariant 1) Opis obowiązuje dla następujących produktów: • Roleta ZRO EF • Markiza ZMA EF • Odbiornik radiowy FE 24 V • Odbiornik radiowy FE 230 V • Gniazdko radiowe FSD 1) Programowanie głównego pilota a) Przełączenie odbiornika w tryb programowania Przycisk programowania na pilocie należy obsługiwać... - Seite 101 • WDC i8 • Rolet solarna ZRO SF (od 01.05.2014) • Markiza solarna ZMA SF (od 01.05.2014) Okno dachowe musi znajdować się w pozycji mycia tak, aby umożliwić dostęp do przycisków programowania odbiornika. Należy przestrzegać właściwej instrukcji obsługi. Przyciski programowania znajdują się na sterowniku zamontowanym na górnej ościeżnicy.
-
Seite 102: Uruchomienie
Kasowanie zaprogramowanych ustawień odbiornika Wcisnąć i przytrzymać przyciski M1 i M3 na sterowniku aż wskaźnik LED za- cznie świecić światłem ciągłym. Spowoduje to skasowanie wszystkich zapro- gramowanych pilotów. ► Teraz odbiornik można zaprogramować na nowo. Programowanie kolejnych pilotów Wcisnąć przycisk programowania głównego pilota do czasu potwierdze- nia czynności przez odbiornik. -
Seite 103: Programowanie
USTAWIANIE: URLOP OFF POŁOŻENIE KRAŃCOWE LATO/ZIMA ON Astro przesunięcie + 15 min. FUNKCJA: ROLETA Programowanie W pierwszej kolejności należy wybrać w trybie pracy odpo- wiedni kanał za pomocą przycisku wyboru kanału. Przegląd menu AUTO CZAS/DATA PROGRAM USTAWIANIE AUTO FUNKCJA CZAS/DATA Wcisnąć przycisk MENU, pojawia się pozycja CZAS/DATA. Aby wybrać... - Seite 104 CZAS/DATA (Ustawienie daty i godziny) AUTO CZAS/DATA GODZINA AUTO MIESIAC DZIEN CZAS/DATA Wcisnąć przycisk MENU, pojawia się pozycja CZAS/DATA. Po wciśnięciu przycisku OK następuje przejście do ustawień godziny. Za pomocą przycisków +/- ustawić aktualną godzinę. Po wprowadzeniu godziny potwierdzić ustawienie przyciskiem OK. Zgodnie z powyższym opisem należy również...
- Seite 105 PROGRAM ASTRO WIECZÓR (Przesuw w górę-> Czas przełączania, Przesuw w dół- > Zachód słońca) AUTO PROGRAM ASTRO WIECZOR CZAS PRZELACZANIA BLOKADA CZAS PRZELACZANIA BLOKADA PROGRAM W pierwszej kolejności należy wybrać w trybie pracy odpo- wiedni kanał za pomocą przycisku wyboru kanału. Wcisnąć...
- Seite 106 PROGRAM INDYWIDUALNIE (Przesuw góra/dół -> Czasy przełączania) AUTO PROGRAM INDYWIDUALNIE CZAS PRZELACZANIA PROGRAM CZAS PRZELACZANIA CZAS PRZELACZANIA CZAS PRZELACZANIA W pierwszej kolejności należy wybrać w trybie pracy odpo- wiedni kanał za pomocą przycisku wyboru kanału. Wcisnąć przycisk MENU. Aby wybrać menu PROGRAM, wcisnąć przycisk + do czasu pojawienia się...
- Seite 107 USTAWIANIE URLOP (Urlop OFF/ON) AUTO USTAWIANIE URLOP Ustawienia dotyczą wszystkich kanałów. Wcisnąć przycisk MENU. Aby wybrać menu USTAWIANIE, wcisnąć przycisk + do czasu pojawienia się pozycji USTAWIANIE. Potwierdzić przyciskiem OK. Pojawia się URLOP ON/OFF. Za pomocą przycisku +/- można ustawić funkcję URLOP na ON lub OFF. Potwierdzić...
- Seite 108 USTAWIANIE POZYCJA POŚREDNIA, WENTYLACJA/OBRÓT, Prog POŁOŻENIE KRAŃ- COWE (programowanie czasu/położenia) W pierwszej kolejności należy wybrać w trybie pracy odpo- wiedni kanał za pomocą przycisku wyboru kanału. POZYCJA POSREDNIA WENTYLACJA PROG POLOZENIE KRANCOWE Funkcja URLOP została potwierdzona. Pojawia się POZYCJA POŚRED- NIA.
- Seite 109 USTAWIANIE POLSKI/ASTRO PRZESUNIĘCIE (Wybór języka, Astro przesunięcie) POLSKI ASTRO PRZESUNIECIE Ustawienia dotyczą wszystkich kanałów. Funkcja PROG POŁOŻENIE KRAŃCOWE została potwierdzona. Pojawia się POLSKI. Za pomocą przycisku +/- można ustawić odpowiedni język. Potwierdzić wybór języka przyciskiem OK. Pojawia się ASTRO PRZESUNIĘCIE Za pomocą...
- Seite 110 USTAWIANIE (Wybór miasta, TRYB EKSPERT (DŁUGOŚĆ, SZEROKOŚĆ, STREFA CZA- SOWA) WARSZAWA DLUGOSC SZEROKOSC STREFA CZASOWA Ustawienia dotyczą wszystkich kanałów. Funkcja ASTRO PRZESUNIĘCIE została potwierdzona. Pojawia się wy- bór miasta (WARSZAWA). Za pomocą przycisku +/- można wybrać najbliżej położone miasto. Potwierdzić przyciskiem OK. Te okna dialogowe wyświetlane są...
- Seite 111 USTAWIANIE LATO/ZIMA (automatyczna zmiana czasu letniego na czas zimowy) LATO/ZIMA USTAWIANIE Ustawienia dotyczą wszystkich kanałów. Funkcja STREFA CZASOWA została potwierdzona. Pojawia się LATO/ZI- Za pomocą przycisku +/- można włączyć lub wyłączyć opcję LATO/ZIMA. Potwierdzić wybór przyciskiem OK. Wcisnąć przycisk MENU, aby przejść do trybu pracy. 111 - pl...
-
Seite 112: Montaż Uchwytu Naściennego
FUNKCJA ROLETA/ŻALUZJA, URUCHOMIENIE (Wybór pancerza/poszycia, data pierwszego uruchomienia) AUTO FUNKCJA ROLETA TRYB EXPERT URUCHOMIENIE FUNKCJA Wcisnąć przycisk MENU. Aby wybrać menu FUNKCJA, wcisnąć przycisk + do czasu pojawienia się pozycji FUNKCJA. Potwierdzić przyciskiem OK. Pojawia się ROLETA/ŻALUZJA. Za pomocą przycisku +/- można dokonać wyboru opcji Roleta/Żaluzja. Potwierdzić... -
Seite 113: Wymiana Baterii
Wymiana baterii Informacje o odpowiednim typie baterii znajdują się w roz- dziale „Dane techniczne“. Baterie należy wymienić w przeciągu minuty, nie wciskając przy tym żadnych przycisków. 1. Otworzyć pokrywkę komory na ba- terie. 2. Wyjąć baterie. 3. Prawidłowo włożyć nowe baterie. 4. -
Seite 114: Dane Techniczne
Dane techniczne Napięcie sieciowe 3 V DC Typ baterii LR03 (AAA) Stopień ochrony IP 20 Dopuszczalna temperatura otoczenia -10 do +55 °C Częstotliwość sygnału radiowego 868,3 MHz Maksymalny zasięg sygnału radiowego wynosi 25 m przy i wewnątrz budynku oraz 350 m na otwartej przestrzeni. Co robić, gdy...? Usterka Przyczyna... -
Seite 115: Ogólna Deklaracja Zgodności
Usterka Przyczyna Środki zaradcze Program Astro nie załą- Nieprawidłowa data. Ustawić prawidłową da- cza się prawidłowo. tę. Ustawiono nieprawidło- Ustawić prawidłowe we miasto lub nieprawi- miasto lub dokładne dłowe współrzędne współrzędne geogra- geograficzne. ficzne. Włączona funkcja Wyłączyć funkcję „Urlop”. „Urlop”. Ustawione „Astro prze- Dopasować... - Seite 116 4034 630 255 0c 23.09.2015 310388...