Etherma eTouch hybrid Betriebs- Und Montageanleitung
Quelle: etherma.com/de

Verwandte Anleitungen für Etherma eTouch hybrid


Inhaltszusammenfassung für Etherma eTouch hybrid
- Seite 1 EthErma Etouch hybrid thermostat dE betriebs- und montageanleitung dE www.etherma.com...
- Seite 2 Form im Ganzen oder in teilen ist nicht gestattet. diese anleitung wurde nach bestem Wissen erstellt. dennoch übernimmt EthErma keine haftung auf Vollständigkeit und richtigkeit der informationen. die beschriebenen Leistungsmerkmale sind nur dann verbindlich, wenn sie bei Vertragsschluss ausdrücklich vereinbart wurden.
-
Seite 3: Inhaltsverzeichnis
INHALTSVERZEICHNIS 1 VORWORT ..............5 1.1 ÜbEr diESES ProduKt ..........5 1.2 bEStimmuNGSGEmÄSSE VErWENduNG ....5 1.3 rEchtLichE hiNWEiSE ..........6 1.3.1 cE Konformität ............6 1.3.2 hersteller ..............6 1.3.3 haftung ..............6 1.3.4 Gewähleistung ............8 2 SICHERHEITSRELEVANTE INFORMATIONEN ..... 9 2.1 aLLGEmEiNE hiNWEiSE.......... - Seite 4 6 INBETRIEBNAHME ..........15 7 BEDIENUNG ............. 16 7.1 haNdtuchtrocKNEr ..........16 7.2 FuSSbodENhEiZuNG ..........17 7.3 EiN- & auSSchaLtEN hiNtErGruNdLicht ..19 7.4 datumSaNZEiGE ............19 8 EINSTELLUNGSMENÜ ..........20 8.1 ZEitPLaN ..............21 8.2 LErNmoduS ............. 22 8.3 miNdESttEmPEratur ..........23 8.4 EiNStELLuNG VoN datum uNd uhrZEit .....
-
Seite 5: Vorwort
1 VORWORT EthErma bedankt sich für ihr Vertrauen und gratuliert zum Kauf des etouch hybrid. Wir stehen für ständige inno- vation, höchste Produktqualität und modernes design und bieten Ihnen ein zertifiziertes und überzeugendes Produkt mit modernem und anspruchsvollem design. 1.1 Über dieses Produkt ihr etouch hybrid ist ein Einbauthermostat mit 2 relaisaus- gängen und touchfunktion und kombiniert zwei Funktionen... -
Seite 6: Rechtliche Hinweise
1.3 Rechtliche Hinweise 1.3.1 CE Konformität diese anlage wurde konform nach den betroffenen richt- linien und Normen entwickelt und produziert. 1.3.2 Hersteller EthErma Elektrowärme Gmbh Landesstraße 16 a-5302 henndorf 1.3.3 Haftung die in dieser betriebsanleitung angegebenen informationen, daten und hinweise waren zum Zeitpunkt... - Seite 7 abbildungen sind Symbolfotos und müssen nicht der realität entsprechen. aus den angaben, abbildungen und beschreibungen in dieser anleitung können keine ansprüche auf Änderung bereits gelieferter Systeme und Komponenten geltend gemacht werden. technische Änderungen behalten wir uns vor. Änderungen, irrtümer und druckfehler begründen keinen anspruch auf Schadensersatz.
-
Seite 8: Gewähleistung
1.3.4 Gewähleistung Es gelten die Verkaufs- und Lieferbedingungen von EthErma. bitte beachten Sie unsere allgemeinen Geschäftsbedingungen. Gewährleistungsansprüche sind sofort nach Feststellen des mangels oder Fehlers beim hersteller zur Prüfung anzu- melden. die Gewährleistung erlischt in allen Fällen, in denen auch... -
Seite 9: Sicherheitsrelevante Informationen
2 SICHERHEITSRELEVANTE INFOR- MATIONEN 2.1 ALLGEMEINE HINWEISE • das heizsystem ist eine Starkstromanlage und muss daher von einem autorisierten Elektriker gemäß den geltenden nationalen Vorschriften installiert werden. • der thermostat sollte nicht direkter Sonneneinstrah- lung und Zugluft ausgesetzt sein, da ansonsten die thermostatfunktionen beeinträchtigt werden können. -
Seite 10: Sicherheitshinweise
• Kinder ab 8 Jahren sowie Personen mit verringerten physischen, sensorischen oder mentalen Fähigkeiten oder mangel an Erfahrung und Wissen dürfen das Gerät benutzen, wenn sie beaufsichtigt oder bezüglich des sicheren Gebrauchs des Gerätes unterwiesen wurden und die daraus resultierenden Gefahren verstehen. 2.2 Sicherheitshinweise im Folgenden werden die in der betriebs- und montagean- leitung verwendeten Symbole aufgeführt und definiert. -
Seite 11: Allgemeine Hinweise
VORSICHT diese Kennzeichnung warnt vor einer drohenden Verletzungsgefahr, erheblichen Sach oder umwelt- schäden. › Nichtbeachtung kann zu Verletzungen bzw. Sach- oder umweltschäden führen. 2.3 Allgemeine Hinweise HINWEIS hilfreiche information zur installation und be- dienung › Nichtbeachtung kann zu beeinträchtigungen in der Funktion führen. -
Seite 12: Produktbeschreibung
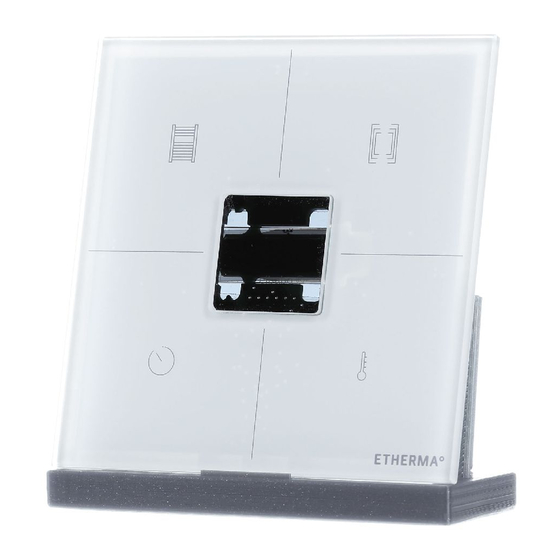
3 PRODUKTBESCHREIBUNG 3.1 Lieferumfang Folgende Komponenten sind enthalten: touchpanel, Sockel 23.1° abb. 1: touchpanel abb. 2: touchpanel abb. 3: Sockel Frontansicht Seitenansicht Ein/aus-taste handtuchtrockner; „Zurück“ im menü Ein/aus-taste Fußbodenheizung; „Nach oben“ im menü ... -
Seite 13: Technische Daten
4 TECHNISCHE DATEN Nennspannung 230 V Schaltstrom: 16 a temp.bereich: 18 bis 27 ºc montage: auf uP-Schalterdose Gangreserve: 3 min Farbe: weiß maße: 90 x 90 mm Schutzart: iP 21 Prüfzeichen: cE konform Typenschild: die Stromversorgung muss durch eine Fehler- stromschutzeinrichtung mit höchsens 30 ma und mit einem Leis-... -
Seite 14: Montage
5 MONTAGE Anschlussschema: Wochen timer: Wochen timer: programm: programm: 230 V 230 V 230 V 230 V L2 L L1 N B L2 L L1 N B L2 L L1 N B L2 L L1 N B ... -
Seite 15: Gefahr Durch Stromschlag
GEFAHR DURCH STROMSCHLAG › als trennvorrichtung ist ein Schaltgerät mit einer mind. 3 mm großen Kontaktöffnungsweite nötig. Z. b. Schalter, Sicherung, Fi-Schutz- schalter. die trennschaltung muss allpolig sein. Schutzschicht auftragen. (anforderungen EN 60335-1; 7.12.2) (1) den anschluss gemäß der anweisung auf der thermos- tatrückseite vornehmen (siehe abb. -
Seite 16: Bedienung
7 BEDIENUNG Wenn der thermostat ausgeschaltet 16:29 21.2° ist, zeigt das display die uhrzeit (sofern eingestellt) und die tatsächliche raum- temperatur an. Wenn ein Zeitplan aktiviert ist (automati- 16:29 AUTO 21.2° scher modus), zeigt das display auch das Wort auto an. 7.1 Handtuchtrockner der handtuchtrockner wird über die tasten links auf dem touchpanel bedient. -
Seite 17: Fussbodenheizung
um die betriebszeit zu ändern, tippen Sie auf die ti- mer-taste : der timer wechselt zum nächsten Wert. 16:29 21.2° mögliche Werte sind 1, 2 oder 3 Stunden. Nachdem die Zeit abgelaufen ist, wird der handtuch- trockner automatisch abgeschaltet. Sie können ihn jedoch ausschalten, bevor die Zeit um ist, indem Sie erneut auf die Ein/aus-taste ... - Seite 18 der bediener kann den thermostat trotzdem manuell ein- oder ausschalten, wenn der automatische modus aus- gewählt ist: Wenn ein Wochenprogramm für die Ein- und ausschaltzeit vorliegt, wird diese beim nächsten Schalt- punkt wieder übernommen. um den thermostat manuell auszuschalten, tippen Sie auf die Ein/aus-taste : das display zeigt das Symbol für die 16:29...
-
Seite 19: Ein- & Ausschalten Hintergrundlicht
um den thermostat auszuschalten, tippen Sie noch einmal auf die Ein/aus-taste . Wenn bei der Einheit ein ZEitPLaN aKtiViErt ist, läuft der automatische betrieb nach dem eingestellten Zeitplan. die Fußbodenheizung wird entsprechend ein- und ausge- schaltet. Sie können die Einheit unabhängig vom laufenden Programm ein- oder ausschalten. -
Seite 20: Einstellungsmenü
8 EINSTELLUNGSMENÜ Die Einheit erlaubt zahlreiche Konfigurationen entspre- chend Ihren Bedürfnissen. Die Konfigurationen werden im modus mENÜ vorgenommen. Sie haben nur Zugriff auf das mENÜ, wenn die Einheit vollständig auSGESchaLtEt ist (handtuchtrockner und heizung sind aus). Sie erhalten Zugriff auf das mENÜ indem Sie mindestens 5 Sekunden lang auf die taste ... -
Seite 21: Zeitplan
erlaubt die Einstellung des heizpro- PROGRAMM HEIZUNG gramms erlaubt die auswahl der Sprache SPRACHE ENGLISH im menümodus übernehmen die tasten folgende Funktio- nen: taste ZurÜcK taste Nach obEN taste Nach uNtEN taste EiNGabE 8.1 Zeitplan Sie können für die Einheit einen temperaturzeitplan fest- legen, nach dem sie automatisch betrieben wird. -
Seite 22: Lernmodus
das display zeigt den aktuellen modus an. PROGRAMM PROGRAMM Nehmen Sie jetzt mit den tasten (Nach PROGRAMM obEN) oder (Nach uNtEN) Änderun- gen vor. bestätigen Sie diese durch tippen auf die taste (EiNGabE): das display wechselt zum nächsten WAEHLEN LERNEN menüpunkt. -
Seite 23: Mindesttemperatur
das display zeigt den aktuellen modus an. LERNEN Nehmen Sie jetzt mit den tasten (Nach LERNEN obEN) oder (Nach uNtEN) Änderun- gen vor. bestätigen Sie diese durch tippen auf die taste (EiNGabE): das display wechselt zum nächsten WAEHLEN MINIMUM menüpunkt. -
Seite 24: Einstellung Von Datum Und Uhrzeit
tippen Sie auf die taste (EiNGabE): WAEHLEN MINIMUM das display zeigt die aktuelle mindest- MINIMUM TEMP. 5° temperatur an. Nehmen Sie jetzt mit den tasten (Nach MINIMUM TEMP. 15° obEN) oder (Nach uNtEN) Änderun- gen vor. bestätigen Sie diese durch tippen auf die taste ... - Seite 25 Zum Einstellen von datum und uhrzeit gehen Sie wie folgt vor: tippen Sie auf die taste (EiNGabE): EINSTELLEN DAT/ZEIT das display zeigt das aktuelle datum an; JAHR 18/01/01 hier können Sie das Jahr einstellen. Nehmen Sie jetzt mit den tasten (Nach JAHR 19/01/01 obEN) oder ...
- Seite 26 hier können Sie den tag einstellen. 19/04/01 Nehmen Sie jetzt mit den tasten (Nach 19/04/13 obEN) oder (Nach uNtEN) Änderun- gen vor. bestätigen Sie diese durch tippen auf die taste (EiNGabE): hier können Sie die Stunden einstellen. STUNDEN Nehmen Sie jetzt mit den tasten ...
- Seite 27 Nehmen Sie jetzt mit den tasten (Nach MINUTEN 16:25 obEN) oder (Nach uNtEN) Änderun- gen vor. bestätigen Sie diese durch tippen auf die taste (EiNGabE) hier können Sie die Zeitzone einstellen. ZONE --- Nehmen Sie jetzt mit den tasten (Nach ZONE obEN) oder ...
-
Seite 28: Winterprogramm
› Wenn die Zeitzone als gestrichelte Linie (---) angezeigt wird, wird die Sommerzeit nicht auto- matisch berücksichtigt. › Wenn die Zeitzone nicht als gestrichelte Linie angezeigt wird, wird die uhrzeit je nach Zeit- zone automatisch auf die Winterzeit (letzter Sonntag im oktober) bzw. die Sommerzeit (letzter Sonntag im märz) umgestellt. - Seite 29 das display zeigt den Wochentag „mon- WOCHENTAG MONTAG tag“ an. Sie können bei bedarf einen anderen tag wählen, indem Sie auf die taste (Nach obEN) oder (Nach uNtEN) tippen. bestätigen Sie diese durch tippen auf die 1 START 00-00H20 taste ...
- Seite 30 Sie können jetzt die temperatur für den TEMP. 06-09H20 ersten heizzeitraum festlegen. Nehmen Sie mit den tasten (Nach obEN) oder (Nach uNtEN) Änderun- gen vor. bestätigen Sie diese durch tippen auf die TEMP. TEMP. 06-09H22 taste (EiNGabE): Sie können jetzt die Startzeit für den zwei- TEMP.
- Seite 31 Sie haben die Wahl, ob Sie die Einstellung KOPIE für den Vortag kopieren oder Einstellun- gen für diesen tag separat bearbeiten. um die Einstellungen für diesen tag zu bearbeiten tippen Sie auf die taste (Nach uNtEN): das display zeigt jetzt bEarb. an. tippen BEARB.
- Seite 32 Sie haben die Wahl, ob Sie die Einstellung KOPIEREN für den Vortag kopieren oder Einstellun- gen für diesen tag separat bearbeiten. Wenn Sie die Einstellungen kopieren möchten, tippen Sie auf die taste (EiN- GabE): die Einstellungen werden kopiert und Sie WOCHENTAG MITTW.
-
Seite 33: Sprachauswahl
› Es ist nicht erforderlich, dass Sie alle betriebs- zeiten für einen bestimmten tag festlegen. damit das Programm gespeichert wird, müssen jedoch alle 3 heizzeiträume komplett bestätigt werden. Wenn Start- und Endzeiten gleich sind, läuft das Programm nicht. Wenn Sie Einstellungen für den letzten SPRACHE DEUTSCH Wochentag des Programms abgeschlos-... - Seite 34 das display zeigt die aktuelle Sprache WAEHLEN SPRACHE DEUTSCH ENGLISH an. Sie können eine andere Sprache wählen, indem Sie auf die taste (Nach obEN) oder (Nach uNtEN) tippen. die zur auswahl stehenden Sprachen sind Englisch, Französisch, deutsch, Nieder- ländisch und italienisch.
-
Seite 35: Energieverbrauch
9 ENERGIEVERBRAUCH in Verbindung mit einem Ökodesign-konformen thermos- tat entsprechen die Produktdaten den Eu-Verordnungen zur richtlinie für umweltgerechte Gestaltung energiever- brauchsrelevanter Produkte (ErP). 10 ENTSORGUNG Elektrische und elektronische altgeräte enthalten vielfach noch wertvolle materialien. Sie können aber auch schäd- liche Stoffe enthalten, die für ihre Funktion und Sicherheit notwendig waren. - Seite 36 ETHERMA T: +43 (0) 6212 76 77 Elektrowärme GmbH F: +43 (0) 6214 76 66 Landesstraße 16 office@etherma.com A-5302 Henndorf www.etherma.com...
- Seite 37 EthErma Etouch hybrid thermostat EN operating and assembly instructions EN www.etherma.com...
- Seite 38 Nevertheless, EthErma does not assume any liability for the completeness and correctness of the information. the performance characteristics described shall only be binding if they were...
- Seite 39 INHALTSVERZEICHNIS 1 FOREWORD .............. 41 1.1 about thiS Product ..........41 1.2 iNtENdEd uSE oF thE Product ......41 1.3 LEGaL iNFormatioN ..........42 1.3.1 cE conformity ............42 1.3.2 manufacturer ............42 1.3.3 Liability ..............42 1.3.4 Warranty ..............44 2 SAFETY-RELEVANT INFORMATION ......
- Seite 40 6 COMMISSIONING ............51 7 OPERATION ............. 52 7.1 toWEL dryEr ............52 7.2 uNdErFLoor hEatiNG ........... 53 7.3 SWitchiNG thE bacKLiGht oN & oFF ....55 7.4 datE diSPLay ............55 8 SETTINGS MENU ............. 56 8.1 SchEduLE ..............57 8.2 LEarN modE ............
-
Seite 41: Foreword
1 FOREWORD EthErma would like to thank you for your trust and warmly compliment you on your purchase of the etouch hybrid. We stand for constant innovation, highest product quality and modern design and offer you a certified and reliable product with a modern, sophisticated design. -
Seite 42: Legal Information
1.3 Legal information 1.3.1 CE Conformity this system was developed and produced in conformity with the relevant directives and standards. 1.3.2 Manufacturer EthErma Elektrowärme Gmbh Landesstraße 16 a-5302 henndorf 1.3.3 Liability the information, data and notes given in these operating instructions were up to date at the time of going to press. - Seite 43 descriptions in this manual cannot serve as a basis for any claims for changes to systems and components already supplied. We reserve the right to make technical changes. changes, errors and misprints do not justify a claim for damages. the information in these operating instructions describes the properties of the product without guaranteeing them.
-
Seite 44: Warranty
1.3.4 Warranty the sales and delivery conditions of EthErma apply. Please observe our general terms and conditions. Warranty claims must be submitted to the manufacturer for inspection immediately after discovery of the defect or fault. the warranty expires in all cases in which no liability claims... -
Seite 45: Safety-Relevant Information
2 SAFETY-RELEVANT INFORMATION 2.1 GENERAL INFORMATION • the heating system is a high power electrical system and therefore has to be installed by an authorized electrician in accordance with the applicable national regulations. • the thermostat should not be exposed to direct sunlight or drafts, as this can affect its correct operation. -
Seite 46: Safety Information
• children 8 years of age and older as well as persons with reduced physical, sensory or mental capabilities or lack of experience and knowledge may use the device if they have been supervised or instructed in the safe use of the device and understand the resulting dangers. -
Seite 47: General Information
CAUTION this symbol warns of an impending danger of injury, considerable damage to property or damage to the environment. › If ignored, the hazard can result in injury and/or damage to property or to the environment. 2.3 General information NOTE helpful information for installation and operation ›... -
Seite 48: Product Description
3 PRODUCT DESCRIPTION 3.1 Scope of delivery the following elements are included: touch panel, base 23.1° Fig. 1: touch pa- Fig. 2: touch panel, Fig. 3: base nel, front view view from side ... -
Seite 49: Technical Data
4 TECHNICAL DATA Nominal voltage 230 V Switching current: 16 a temp. range: 18 to 27º c assembly: on uP switch socket power reserve: 3 mins. color: white dimensions: 90 x 90 mm Protection type: iP 21 Certification mark: cE conformity the power supply Type plate: must be protected by a... -
Seite 50: Assembly
5 ASSEMBLY Connection diagram: Week timer: Week timer: program: program: 230 V 230 V 230 V 230 V L2 L L1 N B L2 L L1 N B L2 L L1 N B L2 L L1 N B ... -
Seite 51: Electric Shock Hazard
ELECTRIC SHOCK HAZARD › a switching device with a contact opening width of at least 3 mm is required as a disconnecting device. e.g. switch, fuse, earth leakage circuit breaker. the isolating circuit must be all-pole. apply protective coating. (requirements EN 60335-1;... -
Seite 52: Operation
7 OPERATION When the thermostat is off, the display 16:29 21.2° shows the time (if adjusted) and the actual ambient temperature. if a schedule is activated (automatic mode) 16:29 auto 21.2° the display also shows the word auto. 7.1 Towel dryer the towel dryer is operated with the left-hand keys of the touch panel. -
Seite 53: Underfloor Heating
to change the operation time press the timer key : the timer changes to the next value. 16:29 21.2° Possible values are 1 hour, 2 hours or 3 hours. the dryer will switch off automatically after that time elap- ses. however, you can turn it off before the time elapses by pressing the on/off key ... - Seite 54 gram for the switch-on and switch-off time, it is resumed at the next switching point. to switch off the thermostat manually, press the on/off key : the display shows the symbol for the 16:29 22° 21.2° underfloor heating on the right and the target temperature selected at top right.
-
Seite 55: Switching The Backlight On & Off
if the SchEduLE function is actiVatEd, it operates auto- matically according to the schedule defined. The underfloor heating is switched on and off accordingly. you can switch the unit on or off independently of the schedule. 7.3 Switching the backlight on & off the backlight can remain on or off constantly. -
Seite 56: Settings Menu
8 SETTINGS MENU The unit allows numerous configurations to suit your needs. The configurations are made in the MENU mode. The MENU can be accessed only if the unit is switched completely oFF (towel and heating are off). you can access the mENu by pressing and holding the (timEr) ... -
Seite 57: Schedule
allows the setting of the heating program ProGram timE hEatEr to select the language LaNGuaGE ENGLiSh in the menu mode, the keys have the following functions: key bacK key key doWN key ENtEr 8.1 SCHEDULE You may define a temperature schedule for the unit to ope- rate automatically. -
Seite 58: Learn Mode
the display shows the current mode. SchEduLE Now make the desired changes with the SchEduLE keys (uP) or (DOWN). Confirm the changes made by pressing the key (ENtEr): The display jumps to the next MENU item. SELEct LEarN 8.2 Learn mode the thermostat learns the time necessary to reach the tar-... -
Seite 59: Minimum Temperature
the display shows the current mode. LEarN Now make the desired changes with the LEarN keys (uP) or (doWN). Confirm the changes made by pressing the key (ENtEr): The display jumps to the next MENU item. tEmPEraturE miNimum 8.3 Minimum temperature the thermostat measures the room temperature continu-... -
Seite 60: Setting Date And Time
8.4 Setting date and time Press the key (ENtEr): tEmPEraturE miNimum the display shows the current minimum miNimum tEmP. 5° temperature. Now make the desired changes with the miNimum tEmP. 15° keys (uP) or (doWN). Confirm the changes made by pressing the key ... - Seite 61 a clock is required for the thermostat in order to be able to run a schedule. if the units are connected to a bus, the time settings on one unit are adopted for all the units in the house. the time remains the same on all the units in the house.
- Seite 62 Now make the desired changes with the moNth 19/04/01 keys (uP) or (doWN). Confirm the changes made by pressing the key (ENtEr): Here you can adjust the day. 19/04/01 Now make the desired changes with the 19/04/13 keys ...
- Seite 63 Now make the desired changes with the miNutES 16:25 keys (uP) or (doWN). Confirm the changes made by pressing the key (ENtEr) Here you can adjust the time zone. ZoNE --- Now make the desired changes with the ZoNE +1 keys ...
-
Seite 64: Winter Program
› if the time zone is not shown as a dashed line, the time is automatically adjusted to Winter time (last Sunday in october) and Summer time (last Sunday in march) according to the respec- tive time zone. › you can select the correct time zone by raising or lowering the value. - Seite 65 Confirm the changes made by pressing 1 Start 00-00h20 the key (ENtEr): Now you can set the starting time of the first heating period. make the desired changes with the keys 1 Start 06-00h20 (uP) or (doWN). Confirm the changes made by pressing the key ...
- Seite 66 Now you can set the starting time of the tEmP. 2 Start 00-00h20 second heating period. Repeat the steps for periods 2 and 3. Once you have confir- med the temperature of the third period, go to the menu for tuesday.
- Seite 67 the display shows the settings for the 1 Start 00-00h20 first heating period. The procedure the same as the one explained for the monday settings. Once you confirm the temperature of the tEmP. 06-09h22 third period, the display shows the next day of the week.
- Seite 68 › if the starting and ending times of a heating period are the same, the program will not run (unit remains switched off). › You can define a period from 0 to 24 hours: this applies for the whole day. ›...
-
Seite 69: Language Selection
8.6 Language Selection you can choose from 5 languages for this unit. to change the language proceed as follows: Press the key (ENtEr): LaNGuaGE ENGLiSh the display shows the current language. SPrachE SELEct ENGLiSh ENGLiSh you can select another language by pressing key ... -
Seite 70: Energy Consumption
(non-recyclable waste). Ensure that your old appliance is disposed of in accordance with local regulati- ons. dispose of packaging material, later replacement parts or device parts properly. ETHERMA T: +43 (0) 6212 76 77 Elektrowärme GmbH F: +43 (0) 6214 76 66 Landesstraße 16... - Seite 71 EthErma Etouch hybrid thermostat Fr instructions d'utilisation et de montage Fr www.etherma.com...
- Seite 72 Les présentes instructions ont été rédigées à la lumière de nos connaissances. La société EthErma décline néanmoins toute responsabilité quant à l'exhausti- vité et l'exactitude des informations fournies. Les caractéristiques décrites sont contractuelles si cela a été explicitement...
- Seite 73 INHALTSVERZEICHNIS 1 AVANT-PROPOS ............75 1.1 À ProPoS dE cE Produit ........75 1.2 utiLiSatioN coNFormE ......... 75 1.3 mENtioNS LÉGaLES ..........76 1.3.1 conformité cE ............76 1.3.2 Fabricant ..............76 1.3.3 responsabilité ............77 1.3.4 Garantie ..............78 2 INFORMATIONS RELATIVES À...
- Seite 74 6 MISE EN SERVICE ............ 86 7 FONCTIONNEMENT ..........87 7.1 SÈchE-SErViEttES ..........87 7.2 chauFFaGE Par LE SoL.......... 88 7.3 touchE rÉtroÉcLairaGE oN/oFF ....... 90 7.4 aFFichaGE dE La datE ........... 90 8 MENU RÉGLAGES ............ 91 8.1 ProGrammE ............92 8.2 modE aPPrENtiSSaGE ...........
-
Seite 75: Avant-Propos
1 AVANT-PROPOS ETHERMA vous remercie de votre confiance et vous félicite pour l'achat de votre appareil etouch hybrid. Nous nous en- gageons en faveur d'une innovation constante, d'une qualité optimale et d'un design moderne et nous vous proposons des produits certifiés et attrayants au design moderne et soigné. -
Seite 76: Mentions Légales
Nous déclinons toute responsabilité pour les dommages qui en résulteraient. Seul l'utilisateur/l'exploitant en assume le risque. 1.3 Mentions légales 1.3.1 Conformité CE cette installation a été développée et fabriquée conformé- ment aux directives et normes applicables. 1.3.2 Fabricant EthErma Elektrowärme Gmbh Landesstraße 16 a-5302 henndorf... -
Seite 77: Responsabilité
1.3.3 Responsabilité Les informations, données et consignes fournies dans les présentes instructions étaient à jour au moment de l'impression. Les illustrations utilisées sont données à titre indicatif et ne correspondent pas nécessairement à la réalité. Les indications, illustrations et descriptions figurant dans les présentes instructions ne peuvent donner lieu à... -
Seite 78: Garantie
1.3.4 Garantie Les conditions de vente et de livraison de la société EthErma s'appliquent. Veuillez tenir compte de nos conditions générales. toute demande de recours en garantie doit être déposée auprès du fabricant pour examen dès la constatation d'un défaut ou d'une erreur. -
Seite 79: Informations Relatives À La Sécurité
2 INFORMATIONS RELATIVES À LA SÉCURITÉ 2.1 MENTIONS LÉGALES • Le système de chauffage est une installation à courant fort dont l'installation doit être confiée à un électricien agréé dans le respect des prescriptions locales en vigueur. • Le thermostat ne doit être exposé ni au rayonnement solaire direct, ni aux courants d'air, sous peine de per- turber son fonctionnement. -
Seite 80: Consignes De Sécurité
• Les enfants à partir de 8 ans, les personnes dont les facultés physiques, sensorielles ou mentales sont diminuées ou les personnes ne disposant pas d'une expérience ou de connaissances suffisantes ne sont autorisés à utiliser l'appareil que sous surveillance ou s'ils ont été... -
Seite 81: Consignes Générales
› un non-respect peut avoir pour conséquence des blessures graves voire mortelles. PRUDENCE ce pictogramme met en garde contre un risque potentiel de blessures, de lourds dégâts matériels ou de graves atteintes à l'environnement. › un non-respect peut avoir pour conséquence des blessures, des dégâts matériels ou des atteintes à... -
Seite 82: Description Du Produit
INFORMATION tenir compte de la documentation complémentaire. › Par ex. les documents fournis 3 DESCRIPTION DU PRODUIT 3.1 Éléments livrés Les composants suivants sont inclus : panneau tactile, socle 23.1° Fig. 1 : vue avant Fig. -
Seite 83: Caractéristiques Techniques
touche on/off pour le sèche-serviettes, « retour » dans le menu touche on/off pour le chauffage par le sol, monter (« haut ») dans le menu Écran oLEd touche de sélection de la température-cible pour le chauffage par le sol, descendre («... - Seite 84 réserve de marche : 3 min coloris : blanc dimensions : 90 x 90 mm indice de protection : iP 21 marque de contrôle : conforme cE Plaque signalétique : L'alimentation électrique doit être protégée par un interrupteur différentiel d'une intensité max. de 30°ma et un disjoncteur de 16 a max.
-
Seite 85: Montage
5 MONTAGE Schéma de raccordement : Programme Programm- Programme Programm- hebdo. : ateur : hebdo. : ateur : 230 V 230 V 230 V 230 V L2 L L1 N B L2 L L1 N B L2 L L1 N B L2 L L1 N B ... -
Seite 86: Risque D'électrocution
tion et pour le câble du chauffage dans la boîte avec une borne de connexion. RISQUE D'ÉLECTROCUTION › Prévoir comme sectionneur un appareil de commutation présentant une distance d'ouver- ture de contact de 3 mm min. Par ex. commuta- teur, fusible, interrupteur différentiel. Le circuit d'isolement doit être omnipolaire. -
Seite 87: Fonctionnement
7 FONCTIONNEMENT Lorsque le thermostat est désactivé, 16:29 21.2° l'écran affiche l'heure (si elle a été réglée) et la température ambiante actuelle. En cas d'activation du programme (mode 16:29 auto 21.2° automatique), l'écran affiche aussi le mot auto. 7.1 Sèche-serviettes Le sèche-serviettes se pilote à... -
Seite 88: Chauffage Par Le Sol
Pour modifier la durée de fonctionnement, appuyez sur la touche programmateur : Le programmateur passe à la valeur sui- 16:29 21.2° vante. Les valeurs possibles sont 1 heure, 2 heures ou 3 heures. Le sèche-serviettes s'éteint automatiquement une fois la durée écoulée. - Seite 89 Lorsque le mode automatique est sélectionné, l'utilisateur a toujours la possibilité d'allumer ou d'éteindre le thermostat manuellement : s'il existe un programme hebdomadaire pour la mise en marche et à l'arrêt, celui-ci est repris au moment de la commutation suivante. Pour mettre le thermostat à...
-
Seite 90: Touche Rétroéclairage On/Off
Pour éteindre le thermostat, appuyez à nouveau sur la touche on/off . Si la fonction ProGrammE de l'appareil est actiVEE, celui-ci fonctionne en mode automatique selon le planning défini. Le chauffage par le sol est alors mis en marche et à... -
Seite 91: Menu Réglages
8 MENU RÉGLAGES L'appareil permet de réaliser un certain nombre de confi- gurations pour un fonctionnement conforme à vos souhaits. Les configurations s'effectuent dans le mode MENU. Le mENu n'est accessible que si l'appareil est complètement ÉtEiNt (sèche-serviettes et chauffage à l'arrêt). Le mENu est accessible en appuyant sur la touche ... -
Seite 92: Programme
pour définir le programme de chauffage ProGrammE chauFF. pour sélectionner la langue LaNGuE aNGLaiS dans le mode menu, les touches présentent le fonctionne- ment suivant : touche rEtour touche haut touche touche ENtrÉE 8.1 Programme Vous pouvez définir un programme de température pour le fonctionnement automatique de l'appareil. -
Seite 93: Mode Apprentissage
L'écran affiche le mode actuel. horairE actiF Modifiez maintenant le réglage avec la horairE iNactiF touche (haut) ou (baS). Validez en appuyant sur la touche (ENtrÉE) : L'affichage passe à l'option suivante du choiSir aPPrENd menu. 8.2 Mode Apprentissage Le thermostat est capable d'apprendre la durée nécessaire pour atteindre la température-cible. -
Seite 94: Température Minimum
L'écran affiche le mode actuel. aPPrENd. aPPrENd. actiF Modifiez maintenant le réglage avec la aPPrENd. iNactiF touche (haut) ou (baS). Validez en appuyant sur la touche (ENtrÉE) : L'affichage passe à l'option suivante du choiSir miNimum menu. 8.3 Température minimum Le thermostat vérifie en permanence la température de la pièce. -
Seite 95: Réglage De La Date Et De L'heure
Pour régler la température minimum, procédez comme suit : appuyez sur la touche (ENtrÉE) : choiSir miNimum L'écran affiche la température minimum tEmP. miNimum 5° actuelle. Modifiez maintenant le réglage avec la tEmP. miNimum 15° touche (haut) ou (baS). Validez en appuyant sur la touche ... - Seite 96 L'heure reste identique sur tous les appareils de la maison. En réalité, l'appareil sur lequel vous réglez l'heure sera l'horloge pilote pour l'ensemble de la maison. Pour régler la date et l'heure, procédez comme suit : appuyez sur la touche (ENtrÉE) : rÉGLEr datE hEu L'écran affiche la date actuelle et vous...
- Seite 97 Vous pouvez maintenant régler le jour. Jour 19/04/01 Modifiez maintenant le réglage avec la Jour 19/04/13 touche (haut) ou (baS). Validez en appuyant sur la touche (ENtrÉE) : Vous pouvez maintenant régler les heures. hEurS Modifiez maintenant le réglage avec la hEurS 16:__ touche ...
- Seite 98 Vous pouvez maintenant régler le fuseau ZoNE --- horaire. Modifiez maintenant le réglage avec la ZoNE +1 touche (haut) ou (baS). Validez en appuyant sur la touche (ENtrÉE) : L'affichage passe à l'option suivante du ProGrammE chauFFaG menu.
-
Seite 99: Programme Hiver
› Vous pouvez sélectionner le fuseau horaire adéquat en faisant défiler les fuseaux horaires jusqu'au bout. 8.5 Programme hiver Vous pouvez définir 3 périodes de fonctionnement avec des températures différentes pour chaque jour de la semaine. ces périodes de fonctionnement peuvent se chevaucher. dans ce cas, c'est la température maximale qui est priori- taire. - Seite 100 Validez en appuyant sur la touche 1 dÉbut 00-00h20 (ENtrÉE) : Vous pouvez maintenant régler l'heure de début de la première période. Modifiez le réglage avec la touche 1 dÉbut 06-00h20 (haut) ou (baS). Validez en appuyant sur la touche (ENtrÉE) : Vous pouvez maintenant régler l'heure de arrÊt...
- Seite 101 Vous pouvez maintenant régler l'heure de tEmP. 2 dÉbut 00-00h20 début de la deuxième période. répétez la même procédure pour les périodes 2 et 3. dès que vous avez validé la température de la troisième période, vous pouvez passer au menu pour le mardi. L'écran affiche le jour de la semaine Jour SEmaiNE mardi...
- Seite 102 L'écran affiche les réglages pour la pre- 1 dÉbut 00-00h20 mière période. La procédure est identique à celle décrite pour le lundi. dès que vous avez validé la température tEmP. 06-09h22 de la troisième période, l'écran affiche le prochain jour de la semaine. Validez en appuyant sur la touche ...
- Seite 103 › Si les heures de début d'une période sont les mêmes que les heures de fin, alors cette pé- riode ne fonctionnera pas (appareil éteint). › Vous pouvez définir une seule période entre 0 et 24 heures : le réglage s'appliquera alors au jour complet.
-
Seite 104: Sélection De La Langue
8.6 Sélection de la langue 5 langues différentes sont disponibles pour l'appareil. Pour modifier la langue, procédez comme suit : appuyez sur la touche (ENtrÉE) : LaNGuE aNGLaiS L'écran affiche la langue actuelle. Vous SPrachE choiSir ENGLiSh aNGLaiS pouvez sélectionner une autre langue en appuyant sur la touche ... -
Seite 105: Consommation D'énergie
9 CONSOMMATION D'ÉNERGIE Fabriqué dans le respect des exigences d'écoconception, les caractéristiques de notre thermostat sont conformes à la réglementation européenne mettant en œuvre la directive relative à la conception écologique applicable aux produits liés à l'énergie (ErP). 10 MISE AU REBUT Les appareils électriques et électroniques usagés contien- nent encore souvent des matériaux précieux. - Seite 106 ETHERMA T : +43 (0) 6212 76 77 Elektrowärme GmbH F : +43 (0) 6214 76 66 Landesstraße 16 office@etherma.com A-5302 Henndorf www.etherma.com...
- Seite 107 EthErma Etouch hybrid thermostaat NL Gebruiks- en montagehandleiding NL www.etherma.com...
- Seite 108 EthErma geen aansprakelijkheid voor volledigheid en juistheid van de infor- matie. de beschreven prestatiekenmerken zijn alleen bindend indien deze uitdrukkelijk...
- Seite 109 INHALTSVERZEICHNIS 1 VOORWOORD ............111 1.1 oVEr dit Product ..........111 1.2 bEooGd GEbruiK ..........111 1.3 WEttELiJKE iNFormatiE ........112 1.3.1 cE-conformiteit ............ 112 1.3.2 Fabrikant .............. 112 1.3.3 aansprakelijkheid ..........112 1.3.4 Garantie ..............114 2 VEILIGHEIDSRELEVANTE INFORMATIE ....115 2.1 aLGEmENE aaNWiJZiNGEN ........
- Seite 110 6 INGEBRUIKNAME ..........121 7 BEDIENING ............122 7.1 haNddoEKradiator ..........122 7.2 VLoErVErWarmiNG ..........123 7.3 iN-/uitSchaKELEN achtErGroNdVErLicht- iNG ................125 7.4 datumWEErGaVE ..........125 8 INSTELLINGENMENU ..........126 8.1 SchEma ..............127 8.2 LErEN ..............128 8.3 miNimumtEmPEratuur ........129 8.4 datum EN tiJd iNStELLEN ........
-
Seite 111: Voorwoord
1 VOORWOORD EthErma bedankt zich voor uw vertrouwen en feliciteert u met de aankoop van de etouch hybrid. Wij staan voor cons- tante innovatie, optimale productkwaliteit en modern design en bieden u een gecertificeerd en overtuigend product met een modern en hoogwaardig design. -
Seite 112: Wettelijke Informatie
1.3 Wettelijke informatie 1.3.1 CE-conformiteit dit apparaat is ontwikkeld en geproduceerd in overeens- temming met de relevante richtlijnen en normen. 1.3.2 Fabrikant EthErma Elektrowärme Gmbh Landesstraße 16 a-5302 henndorf 1.3.3 Aansprakelijkheid de informatie, gegevens en aanwijzingen in deze gebruiksaanwijzing waren bij het ter perse gaan actueel. de... - Seite 113 overeen te komen met de werkelijkheid. aan de informatie, afbeeldingen en beschrijvingen in deze handleiding kunnen geen vorderingen worden ontleend tot aanpassingen van reeds geleverde systemen en componenten. Wij behouden ons het recht voor technische wijzigingen door te voeren. Wijzigingen, fouten en drukfouten geven geen recht op schadevergoeding.
-
Seite 114: Garantie
1.3.4 Garantie Van kracht zijn de verkoop- en leveringsvoorwaarden van EthErma. Zie onze algemene voorwaarden. Garantievorderingen moeten onmiddellijk na vaststelling van het gebrek of de fout ter controle bij de fabrikant wor- den ingediend. de garantie vervalt in alle gevallen waarin eveneens geen... -
Seite 115: Veiligheidsrelevante Informatie
2 VEILIGHEIDSRELEVANTE INFORMA- 2.1 ALGEMENE AANWIJZINGEN • het verwarmingssysteem is een sterkstroominstallatie en moet daarom door een geautoriseerde elektricien in overeenstemming met de geldende nationale voor- schriften worden geïnstalleerd. • de thermostaat mag niet worden blootgesteld aan direct zonlicht of tocht, omdat deze de thermostaat- functies kunnen beïnvloeden. -
Seite 116: Veiligheidsinstructies
den uitgevoerd als zij niet onder toezicht staan. • Kinderen van 8 jaar en ouder, alsmede personen met verminderde fysieke, zintuiglijke of mentale vermo- gens of een gebrek aan ervaring en kennis mogen het apparaat gebruiken als zij onder toezicht staan of geïns- trueerd zijn in het veilig gebruik van het apparaat en de gevaren die hieruit voortvloeien begrijpen. -
Seite 117: Algemene Aanwijzingen
› Niet-naleving kan overlijden of ernstig letsel tot gevolg hebben. VOORZICHTIG dit symbool waarschuwt voor een dreigend gevaar van letsel, aanzienlijke materiële of milieuschade. › Niet-naleving kan letsel, materiële schade of milieuschade veroorzaken. 2.3 Algemene aanwijzingen AANWIJZING informatie over installatie en bediening ›... -
Seite 118: Productbeschrijving
3 PRODUCTBESCHRIJVING 3.1 Leveringsomvang Volgende componenten zijn inbegrepen: touch panel,sokkel 23.1° afb. 1: touch panel afb. 2: touch panel afb. 3: Sokkel vooraanzicht zijaanzicht aan/uit-toets handdoekradiator; "terug" in het menu aan/uit-toets vloerverwarming; "omhoog" in het menu ... -
Seite 119: Technische Gegevens
4 TECHNISCHE GEGEVENS Nominale spanning 230 V Schakelstroom: 16 a temp.bereik: 18 tot 27ºc montage: op inbouwdoos Gangreserve: 3 min Kleur: maten: 90 x 90 mm beschermingsklasse: iP 21 Keurmerk: cE-conform Typeplaatje: de voeding moet zijn beveiligd door een aardlekschakelaar van max. -
Seite 120: Montage
5 MONTAGE Aansluitschema: Week timer: Week timer: programma: programma: 230 V 230 V 230 V 230 V L2 L L1 N B L2 L L1 N B L2 L L1 N B L2 L L1 N B ... -
Seite 121: Ingebruikname
GEVAAR DOOR STROOMSCHOK › als stroomverbreker is een scheidingsscha- kelaar met een contactopening van min. 3 mm vereist. bijv. schakelaar, zekering, aardlekscha- kelaar. de scheidingsschakelaar moet alpolig zijn. Veiligheidslaag opbrengen. (Eisen EN 60335-1; 7.12.2) (1) Voer de aansluiting uit conform de instructie op de thermostaatachterzijde (zie afb. -
Seite 122: Bediening
7 BEDIENING als de thermostaat is uitgeschakeld, toont 16:29 21.2° het display de tijd (voor zover ingesteld) en de werkelijke ruimtetemperatuur. als het temperatuurschema is geactiveerd 16:29 auto 21.2° (automatische modus) toont het display ook het woord auto. 7.1 Handdoekradiator de handdoekradiator wordt bediend met de toetsen links op het touch panel. -
Seite 123: Vloerverwarming
om de bedrijfsperiode te wijzigen drukt u op de timer-toets : de timer verandert naar de volgende 16:29 21.2° waarde. mogelijke waarden zijn 1 uur, 2 uur of 3 uur. de handdoekradiator schakelt automatisch uit nadat de tijd is verstreken. u kunt deze echter uitschakelen voordat de tijd is verstreken door opnieuw op de aan/uit-toets ... - Seite 124 de gebruiker kan de thermostaat nog steeds handmatig in- of uitschakelen als de automatische modus is geselec- teerd: als er een weekprogramma bestaat voor de in- en uitschakeltijd, wordt deze bij het volgende schakelpunt weer overgenomen. druk op de aan/uit-toets om de thermostaat handmatig in te schakelen: het display toont rechts het vloerver- 16:29...
-
Seite 125: In-/Uitschakelen Achtergrondverlichting
druk opnieuw op de aan/uit-toets om de thermostaat uit te schakelen. als de SchEma-functie op het apparaat is GEactiVEErd, werkt het automatisch volgens het vastgestelde schema. de vloerverwarming wordt naar behoefte in- en uitgeschakeld. u kunt het apparaat altijd onafhankelijk van het schema in- of uitschakelen. -
Seite 126: Instellingenmenu
8 INSTELLINGENMENU Het apparaat ondersteunt verschillende configuraties af- hankelijk van uw eisen. De configuraties worden uitgevoerd in de mENu-modus. het mENu is alleen toegankelijk als het apparaat volledig uit staat (handdoekradiator en vloer- verwarming uitgeschakeld). het menu is toegankelijk door minstens 5 seconden de toets ... -
Seite 127: Schema
om het verwarmingsprogramma in te ProGramma VErWarm stellen om de taal te selecteren taaL ENGELS in de menumodus hebben de toetsen de volgende functie: toets tEruG toets omhooG toets omLaaG toets ENtEr 8.1 Schema u kunt een temperatuurschema voor de automatische werking van het apparaat definiëren. -
Seite 128: Leren
het display toont de daadwerkelijke rooStEr rooStEr modus. Voer nu met de toetsen (omhooG) of rooStEr (omLaaG) wijzigingen uit. druk op de toets (ENtEr) om te bevestigen: het display gaat over naar het volgende SELEctErEN LErEN mENu-item. 8.2 Leren de thermostaat leert de tijd die nodig is om de streeftem- peratuur te bereiken. -
Seite 129: Minimumtemperatuur
het display toont de daadwerkelijke LErEN modus. Voer nu met de toetsen (omhooG) of LErEN (omLaaG) wijzigingen uit. druk op de toets (ENtEr) om te beves- tigen: het display gaat over naar het volgende KiEZEN miNimum mENu-item. 8.3 Minimumtemperatuur de temperatuur meet voortdurend de ruimtetemperatuur. -
Seite 130: Datum En Tijd Instellen
druk op de toets (ENtEr): KiEZEN miNimum het display toont de werkelijke minimum- miNimum tEmP 5° temperatuur. Voer nu met de toetsen (omhooG) of miNimum tEmP. 15° (omLaaG) wijzigingen uit. druk op de toets (ENtEr) om te beves- tigen: het display gaat over naar het volgende aaNPaSSEN... - Seite 131 druk op de toets (ENtEr): aaNPaSSEN dat. tiJd het display toont de werkelijke datum en Jaar 18/01/01 u kunt het jaar instellen. Voer nu met de toetsen (omhooG) of Jaar 19/01/01 (omLaaG) wijzigingen uit. druk op de toets (ENtEr) om te beves- tigen: hier kunt u de maand instellen.
- Seite 132 Voer nu met de toetsen (omhooG) of 19/04/13 (omLaaG) wijzigingen uit. druk op de toets (ENtEr) om te beves- tigen: hier kunt u de uren instellen. urEN Voer nu met de toetsen (omhooG) of urEN 16:__ (omLaaG) wijzigingen uit.
- Seite 133 Voer nu met de toetsen (omhooG) of ZoNE (omLaaG) wijzigingen uit. druk op de toets (ENtEr) om te beves- tigen: het display gaat over naar het volgende ProGramma VErWarm mENu-item. › de seconden worden automatisch op nul gezet als u de tijdzone bevestigt.
-
Seite 134: Winterprogramma
8.5 Winterprogramma u kunt voor elke dag van de week 3 bedrijfsperioden met verschillende temperaturen definiëren. Deze perioden kun- nen elkaar overlappen. in dat geval wordt de periode met de hoogste temperatuur genomen. Ga als volgt te werk om het programma te definiëren: druk op de toets ... - Seite 135 u kunt de stoptijd van de eerste periode EiNd 06-06h20 instellen. Voer met de toetsen (omhooG) of EiNd 06-09h20 (omLaaG) wijzigingen uit. druk op de toets (ENtEr) om te beves- tigen: u kunt nu de temperatuur van de eerste tEmP.
- Seite 136 het display toont de weekdag dinsdag. WEEKdaG diNSdaG u kunt desgewenst een andere dag selecteren door te drukken op de toets (omhooG) of (omLaaG). druk op de toets (ENtEr) om te beves- tigen: u kunt nu kiezen om de instellingen van KoPiE de vorige weekdag te kopiëren of deze dag te bewerken.
- Seite 137 druk op de toets (ENtEr) om te beves- tEmP. WEEKdaG WoENSd. tigen: u kunt nu kiezen om de instellingen van KoPiE de vorige weekdag te kopiëren of deze dag te bewerken. druk op de toets (ENtEr) als u instellingen wilt kopiëren: de instellingen worden gekopieerd en u WEEKdaG WoENSd.
-
Seite 138: Taalselectie
› Periodes kunnen elkaar overlappen: in dat geval wordt de periode met de hoogste tempe- ratuur genomen. › het is niet verplicht om alle bedrijfsperiodes voor een bepaalde dag te definiëren. Echter, om het programma op te slaan, moet u alle 3 perio- des volledig bevestigen. - Seite 139 druk op de toets (ENtEr): taaL NEdErLaN het display toont de daadwerkelijke taal. SPrachE KiEZEN rLaN NEdErLaN ENGLiSh u kunt een andere taal selecteren door op de toets (omhooG) of (omLaaG) te drukken. u kunt kiezen uit Engels, Frans, duits, Nederlands en italiaans.
-
Seite 140: Energieverbruik
Voer uw oude apparaat af volgens de plaatselijke milieuvoor- schriften. Voer verpakkingsmateriaal, vervangingsonderde- len en onderdelen van het apparaat op de juiste wijze af. ETHERMA T: +43 (0) 6212 76 77 Elektrowärme GmbH F: +43 (0) 6214 76 66 Landesstraße 16... - Seite 141 EthErma Etouch hybrid thermostato it instruzioni operative e di montaggio it www.etherma.com...
- Seite 142 è consentita né parzialmente, né in toto. Le presenti istruzioni sono state redatte in base alle migliori conoscenze disponibili. tuttavia EthErma non si ritiene responsabile per la completezza e la correttezza delle informazioni. Le caratteristiche di performance descritte sono vincolanti solo se espressa-...
- Seite 143 INHALTSVERZEICHNIS 1 PREFAZIONE ............145 1.1 iNFormaZioNi SuL Prodotto ......145 1.2 utiLiZZo corrEtto ..........145 1.3 iNdicaZioNi LEGaLi ..........146 1.3.1 conformità cE ............146 1.3.2 Produttore ............146 1.3.3 responsabilità ............146 1.3.4 Garanzia ............... 148 2 INFORMAZIONI IMPORTANTI PER LA SICUREZZA .. 149 2.1 SuGGErimENti GENEraLi ........
- Seite 144 6 MESSA IN FUNZIONE ..........155 7 FUNZIONAMENTO ..........156 7.1 aSciuGatorE PEr aSciuGamaNi ......156 7.2 PaVimENto radiaNtE ........... 157 7.3 accENSioNE E SPEGNimENto dELLa rEtroiL- LumiNaZioNE ............159 7.4 ViSuaLiZZaZioNE dELLa data ......159 8 MENU IMPOSTAZIONI ..........160 8.1 ProGrammaZioNE ..........
-
Seite 145: Prefazione
1.1 Informazioni sul prodotto etouch hybrid è un termostato da incasso con 2 uscite a relè e funzione touch, in grado di combinare due funzioni in una sola unità. Può essere utilizzato per regolare il portasciuga- mani o il riscaldamento elettrico a pavimento. -
Seite 146: Indicazioni Legali
1.3 Indicazioni legali 1.3.1 Conformità CE L’impianto è stato sviluppato e prodotto in conformità con le relative norme e linee guida. 1.3.2 Produttore EthErma Elektrowärme Gmbh Landesstraße 16 a-5302 henndorf 1.3.3 Responsabilità Le informazioni, i dati e i consigli presenti nelle istruzioni... - Seite 147 della stampa. Le illustrazioni utilizzate sono a scopo esemplificativo e non corrispondono alla realtà. Le informazioni, le illustrazioni e le descrizioni presenti in queste istruzioni non possono essere utilizzate per rivendicare eventuali richieste di modifica su sistemi e componenti già forniti. Ci riserviamo il diritto di apportare modifiche tecniche.
-
Seite 148: Garanzia
1.3.4 Garanzia Si intendono valide le condizioni di vendita e consegna di EthErma. Si prega di rispettare le nostre condizioni commerciali generali. Le rivendicazioni in materia di garanzia vanno sottoposte a controllo presso il produttore subito dopo aver riscontrato l’anomalia o l’errore. -
Seite 149: Informazioni Importanti Per La Sicurezza
2 INFORMAZIONI IMPORTANTI PER LA SICUREZZA 2.1 SUGGERIMENTI GENERALI • il sistema di riscaldamento è un impianto a corrente tri- fase e deve essere pertanto installato da un elettricista autorizzato in base alle norme valide a livello nazionale. • il termostato non deve essere esposto ai raggi solari diretti e alle correnti d’aria, poiché... -
Seite 150: Suggerimenti Di Sicurezza
• i bambini a partire dagli 8 anni così come le persone con facoltà ridotte a livello fisico, sensoriale o mentale, oppure con poca esperienza e competenza possono utilizzare l’apparecchio se supervisionati o se istruiti per quanto concerne l’utilizzo sicuro dell'apparecchio e sui pericoli derivanti. -
Seite 151: Suggerimenti Generali
ATTENZIONE Questo simbolo indica minaccia di pericolo di le- sioni, danni rilevanti alle cose o all’ambiente. › La mancata osservanza può comportare lesioni o danni alle cose e all’ambiente. 2.3 Suggerimenti generali SUGGERIMENTO informazione utile per l’installazione e l’uso › La mancata osservanza può... -
Seite 152: Descrizione Prodotto
3 DESCRIZIONE PRODOTTO 3.1 Volume di fornitura il volume di fornitura comprende: Pannello touch, zoccolo 23.1° Fig. 1: Pannello Fig. 2: Pannello Fig. 3: Zoccolo touch, vista anteriore touch, vista laterale tasto on/off per asciugatore per asciugamani; indietro nel menu ... -
Seite 153: Dati Tecnici
4 DATI TECNICI tensione nominale 230 V corrente di commutazione: 16 a ambito di temp.: da 18 a 27ºc Su scatola per interruttore montaggio: da incasso carica di riserva: 3 min colore: bianco dimensioni: 90 x 90 mm classe di protezione: iP 21 marchio di controllo: conformità... -
Seite 154: Montaggio
5 MONTAGGIO Schema di allaccio: Programma timer: Programma timer: settimanale: settimanale: 230 V 230 V 230 V 230 V L2 L L1 N B L2 L L1 N B L2 L L1 N B L2 L L1 N B ... -
Seite 155: Messa In Funzione
PERICOLO DA FOLGORAZIONE › È necessario utilizzare un dispositivo di com- mutazione con ampiezza dei contatti di almeno 3 mm come dispositivo di separazione. P.es. interruttore, fusibile, interruttore differenziale. il circuito isolante deve comprendere tutti i poli. applicare uno strato di protezione. (requisiti EN 60335-1;... -
Seite 156: Funzionamento
base. Vedere il punto “Menu impostazioni” al capitolo 8. 7 FUNZIONAMENTO Quando l’unità è spenta, il display indica 16:29 21.2° l’ora (se regolata) e la temperatura am- biente attuale. Se la programmazione è attiva (modalità 16:29 auto 21.2° automatica) il display mostra anche la parola auto. -
Seite 157: Pavimento Radiante
Per modificare il periodo di funzionamento premere il tasto timer : il timer passa al valore successivo. i valori 16:29 21.2° possibili sono 1 ora, 2 ore o 3 ore. L’asciugatore si disattiverà automaticamente allo scadere di tale periodo. tuttavia è possibile disattivarlo prima dello scadere del tempo premendo nuovamente il pulsante on/ off . - Seite 158 mente il termostato nel momento in cui la modalità auto- matica è stata selezionata: se è presente un programma settimanale per tempo di accensione e spegnimento, esso verrà ripristinato all’avvio successivo. Per attivare manualmente il termostato premere il tasto on/ off : il display mostra il simbolo del pavimento 16:29...
-
Seite 159: Accensione E Spegnimento Della Retroil- Luminazione
Per spegnere il termostato premere nuovamente il tasto on/off . Se l’unità presenta la funzione di ProGrammaZioNE in stato oN, essa funzionerà automaticamente il base alla pro- grammazione definita, attivando e disattivando il pavimento radiante in base alle esigenze. È possibile accenderla o spegnerla indipendentemente dalla programmazione. -
Seite 160: Menu Impostazioni
8 MENU IMPOSTAZIONI L’unità può essere configurata in modi differenti per funzionare a piacere. Le configurazioni vengono effettuate in modalità mENu. al mENu è possibile accedere solo se l’unità è completamente SPENta (asciugatore e pavimento radiante off). al mENu si accede premendo e tenendo premuto il tasto (TIMER) per oltre 5 secondi. -
Seite 161: Programmazione
Per definire il programma del riscaldatore riScaLdatorE ProGr. Per selezionare la lingua iNGLESE LiNGua Nella modalità menu, i tasti presentano le seguenti fun- zioni: tasto iNdiEtro tasto Su tasto GiÙ tasto iNVio 8.1 Programmazione È possibile definire un programma di temperature per l’unità... -
Seite 162: Modalità Apprendimento
il display mostra la modalità attuale. orario orario cambiare ora con il tasto (SU) o orario (GIÙ). Confermare premendo il tasto (INVIO): il display passa alla voce di mENu suc- SELEZioNarE aPPrENd. cessiva. 8.2 Modalità apprendimento il termostato è in grado di apprendere il tempo necessa- rio per raggiungere la temperatura target. -
Seite 163: Temperatura Minima
il display mostra la modalità attuale. aPPrENdE aPPrENdE ENd. cambiare ora con il tasto (SU) o aPPrENdE (GIÙ). confermare premendo il tasto (INVIO): il display passa alla voce di mENu suc- SELEZioNarE miNima cessiva. 8.3 Temperatura minima il termostato misura costantemente la temperatura am- biente. -
Seite 164: Regolare Data E Ora
Premere il tasto (INVIO): SELEZioNarE miNima il display mostra la temperatura minima tEmP. miNima 5° attuale. cambiare ora con il tasto (SU) o tEmP. miNima 15° (GIÙ). confermare premendo il tasto (INVIO): il display passa alla voce di mENu suc- rEGoLarE data ora cessiva. - Seite 165 Per regolare la data e l’ora, procedere nel seguente modo: Premere il tasto (INVIO): rEGoLarE data ora il display mostra la data attuale ed è pos- aNNo 18/01/01 sibile regolare l’anno. cambiare ora con il tasto (SU) o aNNo 19/01/01 (GIÙ).
- Seite 166 cambiare ora con il tasto (SU) o GiorNo 19/04/13 (GIÙ). confermare premendo il tasto (INVIO): ora è possibile regolare le ore. cambiare ora con il tasto (SU) o 16:__ (GIÙ). confermare premendo il tasto (INVIO): ora è...
-
Seite 167: Programma Invernale
il display passa alla voce di mENu suc- ProGramma riScaLd. cessiva. › i secondi vengono automaticamente portati a zero dopo aver confermato il fuso orario. › Se il fuso orario è (---) l’ora legale non viene regolata automaticamente. › Se il fuso orario non è (---), l’ora viene regolata automaticamente in base a ora legale (ultima domenica di ottobre) o solare (ultima domenica di marzo) in base al fuso orario. - Seite 168 Premere il tasto (INVIO): ProGramma riScaLd il display mostra la scritta Lunedì. È GiorNo SEttimaN LuNEdÌ possibile selezionare un giorno differente premendo il tasto (SU) o (GIÙ). confermare premendo il tasto (INVIO): 1 iNiZio ttimaN 00-00h20 ora è...
- Seite 169 confermare premendo il tasto (INVIO): tEmP. tEmP. 06-09h22 ora è possibile regolare le ore di inizio del tEmP. 2 iNiZio 00-00h20 secondo periodo. ripetere la stessa procedura per i periodi 2 e 3. una volta confermata la temperatura del terzo periodo, andare al menu con giorno martedì.
- Seite 170 il display mostra le impostazioni per il 1 aVVio 00-00h20 primo periodo. La procedura è la stessa che è stata spiegata per il lunedì. una volta confermata la temperatura del tEmP. 06-09h22 terzo periodo, il display mostra il giorno successivo. confermare premendo il tasto ...
- Seite 171 › Se le ore di inizio di un periodo sono le stesse delle ore di fine, il periodo non funziona (l’unità è disattivata). › È possibile definire un periodo da 0 a 24 ore: in questo modo l’attività sarà presente per tutto il giorno.
-
Seite 172: Selezione Lingua
8.6 Selezione lingua È possibile selezionare tra 5 lingue per l’unità. Per modifi- care la lingua, procedere come segue: Premere il tasto (INVIO): idioma itaLiaNo il display mostra la lingua attuale. È SELEZioNarE SPrachE itaLiaNo ENGLiSh possibile selezionare una lingua differente premendo il tasto ... -
Seite 173: Consumo Energetico
9 CONSUMO ENERGETICO in conformità con quanto richiesto per un termostato Ecodesign, i dati del prodotto rispettano le normative uE relative alla direttiva sulla progettazione ecocompatibile dei prodotti connessi all'energia (ErP). 10 SMALTIMENTO Gli apparecchi elettrici ed elettronici usati contengono spesso materiali ancora utilizzabili. - Seite 174 ETHERMA Tel.: +43 (0) 6212 76 77 Elektrowärme GmbH Fax: +43 (0) 6214 76 66 Landesstraße 16 office@etherma.com A-5302 Henndorf www.etherma.com...