Werbung
Verfügbare Sprachen
Verfügbare Sprachen
Quicklinks
Werbung
Kapitel

Verwandte Anleitungen für SPORTSTECH LCX800


Inhaltszusammenfassung für SPORTSTECH LCX800
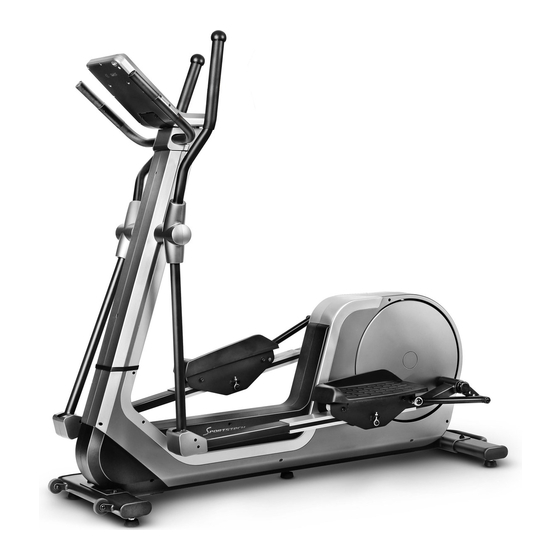
- Seite 1 LCX800 Crosstrainer...
- Seite 2 BENUTZERHANDBUCH DEUTSCH...
-
Seite 3: Video Tutorials
Video Tutorials Unsere für dich! Aufbau Benutzung Abbau In 3 einfachen Schritten zum schnellen und sicheren Start: 1. QR-Code scannen 2. Videos anschauen 3. schnell und sicher starten Link zu den Videos: https://sportstech.de/qr/lcx800.html... - Seite 4 SEHR GEEHRTER KUNDE, wir freuen uns, dass Sie sich für ein Gerät aus der SPORTSTECH Produktpalette entschieden haben. SPORTSTECH Sportgeräte bieten Ihnen höchste Qualität und neueste Technologie. Um die Leistungsfähigkeit des Gerätes voll nutzen zu können und viele Jahre Freude an Ihrem Gerät zu haben, lesen Sie bitte vor der Inbetriebnahme und dem Beginn des Trainings dieses Benutzerhandbuch sorgfältig durch und verwenden...
- Seite 5 Inhalt Wichtige Sicherheitshinweise Lieferumfang Teileliste Explosionszeichnung Montage Bedienungsanleitung für die Anzeigen Bedienungsanleitung Dehnübungen Applikation Software (App)
-
Seite 6: Wichtige Sicherheitshinweise
WICHTIGE SICHERHEITSHINWEISE Warnhinweise Um das Risiko schwerer Verletzungen zu verringern, lesen Sie die folgenden wichtigen Warnhinweise, bevor Sie das Gerät benutzen. 1. Bevor Sie ein Trainingsprogramm beginnen, sollten Sie Ihren Arzt konsultieren, um festzustellen, ob Sie unter körperlichen oder gesundheitlichen Bedingungen leiden, die ein Risiko für Ihre Gesundheit und Sicherheit darstellen könnten, oder Sie daran hindern, das Gerät ordnungsgemäß... -
Seite 7: Lieferumfang
LIEFERUMFANG... -
Seite 8: Teileliste
TEILELISTE Beschreibung Beschreibung Stückzahl Stückzahl Hauptrahmen Aluminiumplatte Drehrahmen Buchse Ø16,2xØ23x18,5 Griffstangen-Säule Ø14xØ8,5x59,7 4L/R Pendelstange 1 Paar Sicherungsring D40 Pedalstange 1 Paar Griffstangensäulen-Abdeckung 1 Paar Griffstange 1 Paar Linke Nabenabdeckung 1 Paar Handlauf Rechte Nabenabdeckung 1 Paar Pedalrahmen 1 Paar Pedalstangen-Abdeckung 2 Paar Einstellbarer Kurbelarm Aufnahmehülse... - Seite 9 Beschreibung Stückzahl Wellscheibe D12 Mutter M6 Schraubbolzen Gummiring...
-
Seite 10: Explosionszeichnung
EXPLOSIONSZEICHNUNG... - Seite 11 MONTAGE Schritt 1 1. Vorderen Stabilisator (11) mit Innensechskant-Flachkopfschraube (15), Federscheibe (22) und Unterlegscheibe (26) am Hauptrahmen (1) befestigen 2. Rückwärtigen Stabilisator (12) mit Innensechskant-Flachkopfschraube (15), Federscheibe(22) und Unterlegscheibe (26) am Hauptrahmen (1) befestigen 3. Drücken Sie den Gummiring (78) auf den Hauptrahmen (1). Schritt 2 1.
- Seite 12 Schritt 3 1. Die Pendelstange (4L/R) mit Innensechskant-Flachkopfschraube (18), Federscheibe (23) und Unterlegscheibe (27) an der Griffstangensäule (3) anbringen, bitte nicht zu fest anziehen. 2. Die Pendelstange (4L/R) und die Pedalstange (5L/R) mit Sechskantschraube (13), Unterlegscheibe (28) und Nylonmutter (32) befestigen. 3.
- Seite 13 Schritt 5 Das Pedal (59L/R) mit der Innensechskantschraube (19) am Pedalrahmen (8) befestigen. Schritt 6 1. Bitte das Kardangelenk (31) mit Innensechskant-Flachkopfschraube (14) und Manschette (71) zuerst am Pedalrahmen (8R) anbringen und dann mit Innensechskantflachkopf (48), Wellscheibe (75), Unterlegscheibe (25) und Mutter (74) am einstellbaren Kurbelarm (9) befestigen.
- Seite 14 Schritt 7 1. Hauptleitung (62) und Pulskabel (65) an die Anzeige (63) anschließen. Dann das Display (63) mit Kreuzschlitz- Flachkopfschraube (63) befestigen 2. Die Griffstangensäulen-Abdeckung (41a/b) mit Kreuzschlitz-Flachkopfblechschraube (60) an der Griffstangensäule (3) befestigen. 3. Befestigen Sie die Handlaufabdeckung (51a/b) an der Griffstangensäule (3) mittels Kreuzschlitz- Flachkopfblechschraube (60).
-
Seite 15: Einführung In Die Verschiedenen Schaltflächen
BEDIENUNGSANLEITUNG FÜR DIE ANZEIGE 1. Einführung in die verschiedenen Schaltflächen Starttaste Stop-Taste Home-Taste Zurück-Taste Widerstand erhöhen... - Seite 16 Widerstand reduzieren Anhalte-Taste Aufwärts-Taste Abwärts-Taste Taste für Links Taste für Rechts Eingabe-Taste Lautstärke erhöhen Lautstärke reduzieren Abspielen/anhalten Das Vorherige Das Nächste...
-
Seite 17: Hardware-Konfiguration
2. Hardware-Konfiguration Anzeige 7 Zoll 1024*600TFT Hauptprozessor ITE9854 Music: Mp3 Video: available for max 1280X768 resolution; Mp4, MKV files that decoded and packed by H.264 Musik: MP3 Video: Verfügbar für max. 1280x768 Auflösung; MP4, MKV-Dateien, die von H.264 dekodiert und komprimiert wurden FLASH 8M NOR + 8G EMMC... - Seite 18 Anzeige über verbrannte Kalorien, Einheit: Kcal Heart rate (Herzfrequenz): Zeigt die aktuelle Herzfrequenz an Konstante Leistung Widerstandsstufe, Im Zustand des Modus konstanter Leistung werden Aufwands- Watt angezeigt Einführung über die Symbole 2 Um das Symbol auszuwählen, drücken Sie zur Bestätigung. Zeit Countdown-Modus.
-
Seite 19: Einführung In Die Funktion Des Homepage-Symbols
III) Einführung in Multimedia-Symbole: Musik. Ausgewählt Video. Ausgewählt Setting (Einstellungen). Ausgewählt IV) Einleitung zu den Zustands-Symbolen Das USB-Symbol leuchtet nach dem Einlegen der U-Disk permanent auf. Oder es wird immer heller werden. Wenn Bluetooth erfolgreich verbunden wurde, wird das Symbol anbleiben. Oder es wird immer heller werden. Hinweis: Die Bluetooth-Funktion ist optional. - Seite 20 Drücken Sie die Taste, um das Training zu beenden. Der Trainingsdatensatz wird nach dem Drücken der Taste sofort angezeigt Countdown-Modus Wählen Sie das Zielzeit-Symbol, drücken Sie zur Bestätigung (nehmen Sie einfach den Zeit-Countdown-Modus als Beispiel): Drücken Sie die Taste zum Einstellen der Zielzeit.
-
Seite 21: Benutzererprogramm
Drücken Sie zur Bestätigung, und dann wird ein neuer Dialog angezeigt. Drücken , um mit dem Training zu beginnen. Countdown-Modus: Wählen Sie einen bestimmten Countdown-Modus, legen Sie Bewegungsdaten fest und beginnen Sie mit dem Training. In den letzten 10 Sekunden wird das System 5 Mal nach jeweils 2 Sekunden Alarm geben. Zeit-Countdown Bereich: 0:01-10 Stunden, Standardeinstellung 0:30:00 Entfernungs-Countdown-... - Seite 22 Drücken Sie die Taste, um das Symbol auszuwählen, drücken Sie Bestätigung. Drücken Sie die Taste, um den Widerstandsmodus und den Leistungsmodus umzuwandeln. Drücken Sie die Taste zum Einstellen der Daten. Drücken Sie die Taste, um den Widerstand zu ändern. Drücken Sie zur Bestätigung.
- Seite 23 Virtueller Kulissenmodus Drücken Sie die Taste , um in den virtuellen Kulissenmodus zu gelangen: Drücken Sie die Taste, um das Symbol auszuwählen, drücken Sie , um mit dem Training zu beginnen. Standardwiderstandsstufe ist 10, drücken Sie , um den Widerstand individuell einzustellen. Die Videowiedergabegeschwindigkeit wird Ihrer Trainingsgeschwindigkeit entsprechen.
- Seite 24 Drücken Sie die Taste um das Symbol auszuwählen, drücken Sie Bestätigung. Drücken Sie die Taste, um den Widerstandsmodus und den Leistungsmodus umzuwandeln. Drücken Sie die Taste zum Einstellen der Daten. Drücken Sie die Taste, um mit dem Training zu beginnen.
- Seite 25 Betriebslogik Drücken Sie die Taste, um zur vorherigen Seite zurückzukehren. Drücken Sie die Taste, um zur Startseite zu gelangen. Drücken Sie das "Racing"-Symbol auf der Startseite, um zur Übungsseite zu gelangen. Wenn Sie ein anderes Symbol drücken (z. B. virtuelle Kulissen, Benutzerprogramm usw.), wird gleich danach ein neuer Dialog angezeigt. Drücken Sie um zu stoppen, danach können Sie andere Übungen beginnen.
- Seite 26 Geschwindigkeit jedes Abschnitts von 12 voreingestellten Programmen Aerobe Regeneration Abschnitt 10 11 12 13 14 15 16 18 18 24 24 30 30 30 30 30 24 24 24 24 24 18 18 Geschwindigkeit Widerstand 10 10 18 10 10 18 10 10 18 10 10 18 10 10 10 18 Abschnitt 10 11 12 13 14 15 16 Nehmen Sie ab...
- Seite 27 Training Drücken Sie die Taste, um in den Trainingsbereich zu gelangen (z. B. Fettverbrennung): Drücken Sie die Taste um das Symbol auszuwählen, drücken Sie Bestätigung. Drücken Sie die Taste, um den Widerstandsmodus und den Leistungsmodus umzuwandeln. Drücken Sie die Taste zum Einstellen der Daten. Drücken Sie die Taste, um mit dem Training zu beginnen.
- Seite 28 Training: Wählen Sie zuerst ein bestimmtes Programm und beenden dann die Eingabe der Bewegungsdaten. Es gibt 16 Abschnitte für jedes Programm. Und in jedem Abschnitt gilt Zeit=Einstellzeit/16. Der Widerstand für jeden Abschnitt ist wie folgt: 12 voreingestellte Programmdaten Fettverbrennung Abschnitt 10 11 12 13 14 15 16 Widerstand 10 10 10 12 12 12 14 14 14 14 16 16 16 18 18 18 Geschwindigkeits-...
- Seite 29 Drücken Sie , um Daten einzustellen, drücken Sie , um verschiedene Elemente auszuwählen. Aufwärmen 2 Minuten HRC-Prozess Abkühlen...
- Seite 30 Wenn kein Herzfrequenzsignal erkannt wird, sehen Sie sich bitte die obenstehende Abbildung an. Drücken Sie , um in den Konstantleistungs-Modus zu wechseln: Statischer Konstantleistungs-Modus Drücken , um mit dem Training zu beginnen.
-
Seite 31: Einführung In Multimedia Und Einstellungen
5. Einführung in Multimedia und Einstellungen Musik Drücken Sie , um ins Musikmenü zu gelangen: Drücken Sie , um Musik auszuwählen, drücken Sie zur Wiedergabe. Abspielen/Anhalten; Lautsärke +-; ; das Vorherige ; das Nächste Video Drücken Sie , um in das Video-Menü zu gelangen:... -
Seite 32: Einstellungen
a) Playlisten werden nach 5 Sekunden ohne Bedienung ausgeblendet. Drücken Sie , um zum Vollbild zu gelangen. Drücken Sie nochmal, um zur vorherigen Seite zurückzukehren. b) Nachdem die Playlists ausgeblendet sind, drücken Sie, um die Playlists wieder aufzurufen. c) Drücken Sie , um abzuspielen/anzuhalten, drücken Sie, um die Lautstärke einstellen. - Seite 33 Drücken Sie , um in den Technik-Modus zu wechseln. Er ist für die Systemwartung konzipiert. Sie brauchen dafür einen Zugangscode. 6. Fehlercode Wenn E01 angezeigt ist, bedeutet dies einen Signalfehler. E01: Signalfehler Wenn E02 angezeigt wird, ist es höchstwahrscheinlich, dass etwas mit dem Widerstandsmotor nicht stimmt.
-
Seite 34: Zustandsrichtlinien
BEDIENUNGSANLEITUNG Zustandsrichtlinien • Die folgenden Richtlinien helfen Ihnen dabei, Ihr Trainingsprogramm zu planen. Denken Sie daran, dass richtige Ernährung und ausreichende Ruhe für erfolgreiche Ergebnisse von wesentlicher Bedeutung sind. Wenn Sie ein Trainingsprogramm beginnen, sollten Sie zunächst mit Ihrem Arzt sprechen, wenn: •... - Seite 35 • Erhöhen Sie das Tempo und den Widerstand nur leicht und trainieren Sie solange Sie können. Es kann sein, dass nur ein paar Minuten am Stück trainieren können. Dies wird sich aber ändern, wenn Sie regelmäßig trainieren. Beenden Sie jede Trainingseinheit mit einer 5 Minute Abkühlphase, indem Sie den Widerstand auf ein niedrigeres Level einstellen.
- Seite 36 DEHNÜBUNGEN Bevor Sie das Laufband benutzen, ist es am besten, 5 bis 10 Minuten zum Aufwärmen Stretching- Übungen durchzuführen. Dehnen vor dem Training hilft die Flexibilität zu verbessern und das Verletzungsrisiko zu mindern. MIT DEM KOPF ROLLEN Drehen Sie den Kopf nach rechts für eine Sekunde, fühlen Sie die Streckung auf der linken Seite des Nackens, dann drehen Sie den Kopf zurück für eine Sekunde, recken Sie Ihr Kinn nach oben und lassen Ihren Mund geöffnet.
-
Seite 37: Trainingszonen-Übung
TRAININGSZONEN-ÜBUNG Nach dem Aufwärmen erhöhen Sie bitte die Intensität entsprechend Ihrem gewünschten Trainingsprogramm. Achten Sie darauf, Ihre Intensität für maximale Leistung beizubehalten. Atmen Sie regelmäßig und tief während des Trainings - halten Sie keinesfalls den Atem an. ABKÜHLEN Beenden Sie jedes Training mit einem leichten Joggen oder Gehen Sie mindestens 1 Minute lang. Zur Vervollständigung machen Sie über 5 bis 10 Minuten hinweg Dehnungsübungen, um ganz abzukühlen. -
Seite 38: Applikation Software (App)
Applikation Software (App) Sie können die App "FitShow" über den hier abgebildeten QR-Code herunterladen. Voraussetzung für mobiles Gerät: Android 4.3 oder höher mit Bluetooth 4.0, iOS 8.0 oder höher. Bitte schalten Sie zuerst Ihre Bluetooth-Funktion auf Ihrem Gerät an. Android Android: Sie können im Google Play Store nach "FitShow"suchen, oder es über den QR-Code herunterladen. - Seite 39 USER MANUAL ENGLISH...
- Seite 40 3 simple steps for a fast and safe start: 1. scan the QR code 2. watch videos 3. start fast and safely Link to the videos: https://sportstech.de/qr/lcx800.html...
- Seite 41 DEAR CUSTOMER, We are pleased you chose a device from the SPORTSTECH product range. With sports equipment from SPORTSTECH you get the highest quality and latest technology. In order to fully use the potential of your device and be able to enjoy it for many years, please read this manual carefully before starting up and beginning of training, and use the device according to the instructions.
- Seite 42 Content Important Safety Information Package List Part list Explosive drawing Assembly Display operation manual Instruction for use Stretch Exercise Application software (app)
-
Seite 43: Important Safety Information
IMPORTANT SAFETY INFORMATION Warnings To reduce the risk of serious injury, read the following important warnings before using the Machine. 1. Before starting any exercise program you should consult your doctor to determine if you have any physical or health conditions that could create a risk to your health and safety, or prevent you from using the Machine properly. -
Seite 44: Package List
PACKAGE LIST... -
Seite 45: Part List
PART LIST description description Mainframe Aluminum plate Rotation frame Bush Ø16.2xØ23x18.5 Handlebar post Ø14xØ8.5x59.7 4L/R Reciprocating bar 1pair Circlip D40 5 L/R Pedal bar 1pair 41 a/b Handlebar post cover 1pair 6 L/R Handlebar 1pair 42 a/b Left reciprocating cover 1pair Handrail 43 a/b... - Seite 46 description Corrugated washer D12 Nut M6 Bolt Rubber ring...
- Seite 47 EXPLOSIVE DRAWING...
- Seite 48 ASSEMBLY Step 1 Fix front stabilizer (11) with inner hex pan head bolt (15), spring washer (22),washer (26) to the mainframe (1) Fix rear stabilizer (12) with inner hex pan head bolt (15), spring washer (22),washer (26) to the mainframe (1) press the rubber ring (78) onto the mainframe (1).
- Seite 49 Step 3 Install the reciprocating bar (4L/R) to the handlebar post (3) with inner hex pan head bolt (18), spring washer (23), and washer (27), please do not fix it too firmly now. Fix the reciprocating bar (4L/R) and pedal bar (5L/R) with hex bolt (13), washer (28), and nylon nut (32). At last fasten the inner hex pan head bolt (18).
- Seite 50 Step 5 Fix the pedal (59L/R) to the pedal frame (8) with inner hex cylinder head bolt (19). Step 6 please fix the universal joint (31) to the pedal frame (8R) with inner hex pan head bolt (14), sleeve (71) first, and then fasten it to the adjustable crank (9) with inner hex pan head (48), corrugated washer (75), washer (25) and nut (74).
- Seite 51 Step 7 Connect trunk wire (62), pulse wire (65) to the display (63). And the fix the display (63) with cross pan head screw (63) Fix the handlebar post cover (41a/b) to the handlebar post (3) with cross pan head self-drilling screw (60). Fix the handrail cover (51a/b) to the handlebar post (3) with cross pan head self-drilling screw (60).
- Seite 52 DISPLAY OPERATION MANUAL 1. Button introduction Start key Stop key HOME key Back key Resistance up...
- Seite 53 Resistace down Pause Up key Down key Left key Right key Enter key Volume up Volume down Play/pause The previous The next...
-
Seite 54: Hardware Configuration
2. Hardware configuration Display 7inches 1024*600TFT ITE9854 64M inside Music: Mp3 Video: available for max 1280X768 resolution; Mp4, MKV files that decoded and packed by H.264 FLASH 8M NOR + 8G EMMC 3. Icon operation and function Homepage introduction Icon introduction 1 Speed: Displays the current speed., unit::Km/h Rotation per minute Distance: Display running distance, unit: Km... - Seite 55 Display burned calorie, unit: Kcal Heart rate: display current heart rate. Constant power Resistance level. In condition of constant power mode, it shows effort watt. Icon introduction 2 to select icon, press to confirm. Time countdown mode. Selected Distance countdown mode. Selected Calorie countdown mode.
-
Seite 56: Quick Start
III) Multi-media icon introduction: Music. Selected Video Selected Setting Selected IV) Status icon introduction USB icon will be kept lightening on all the time after U disk inserted. Or it will be kept lightening out. If the blue tooth icon is paired successfully, it will be kept lightening on. -
Seite 57: Countdown Mode
Press key to stop exercise. Exercise record will be displayed after you press key immediately. Countdown mode Select Target Time icon, press to confirm (just take time countdown mode for example): Press key to set target time. -
Seite 58: User Program
Press to confirm, and then a new dialogue will be displayed. Press to begin exercise. Countdown mode: selected a certain countdown mode, set movement data and begin exercise. For the last 10 seconds system will keep alarming for 5 times per 2 seconds. Time countdown Range : 0:01-10 hour, default 0:30:00 Distance countdown... - Seite 59 Press key to select icon, press to confirm. Press key to convert resistance mode and power mode. Press key to set data. Press key to change the resistance. Press to confirm. And then system will keep the data automatically. Press key to begin exercise...
- Seite 60 Virtual scene mode Press to enter into virtual scene mode: Press key to select icon, press to begin exercise. Default resistance level is 10, press to adjust resistance. The video playing speed will be in accordance with your exercise speed. Racing Press to enter into racing mode.(there are 12 preset modes):...
- Seite 61 Press key to select icon, press to confirm. Press key to convert resistance mode and power mode. Press key to set data. Press key to begin exercise.
- Seite 62 Operation logic: Press key to go back to the previous page. Press key to go to home page. Press “Racing” icon in homepage to go to exercising page. If you press other icon (for example virtual scene, user program and so on), a new dialogue will be display soon. press to stop, after that you can begin other exercises.
- Seite 63 Speed of each section of 12 preset programs Aerobic recovery Section 10 11 12 13 14 15 16 Speed 18 18 24 24 30 30 30 30 30 24 24 24 24 24 18 18 Resistance 10 10 18 10 10 18 10 10 18 10 10 18 10 10 10 18 Section 10 11 12 13 14 15 16 Lose weight...
- Seite 64 Work-out Press key to enter into Work-Out (take fat burn for example): Press key to select icon, press to confirm. Press key to convert resistance mode and power mode. Press key to set data. Press key to begin exercise.
- Seite 65 Work-Out: first choose a certain program and then finish setting movement data. There are 16 sections inside for each program. And each section time=setting time/16. The resistance for each section is as following table: 12 preset program data Fat burn Section 10 11 12 13 14 15 16 resistance...
- Seite 66 Press to set data, press to select different items. Warm up 2min HRC process Cool down...
- Seite 67 If no heart rate signal detected, please see the picture above. Press to enter into constant power mode: Static constant power mode Press to begin exercise...
- Seite 68 5. Multi-media and setting introduction Music Press to enter into music menu: Press to select music, press . to playback. play/pause; volume+; volume-; the previous ; the next Video Press to enter into video menu:...
- Seite 69 Playlists will be hidden after 5 seconds without any operation. Press to go to full screen. Press again to go back to the previous page. After the playlists is hidden, press to wake up the playlists. Press to play/pause, press to adjust volume.
-
Seite 70: Error Code
Press to go to engineering mode. It is designed for system maintenance. You need pass code to enter into. 6. Error code If E01 happened, it means signal error. EO1:signal error If E02 happened, it is most probably that there is something wrong with resistance motor... -
Seite 71: Work-Out Tips
INSTRUCTIONS FOR USE Conditioning Guidelines The following guidelines will help you to plan your exercise program. Remember that correct nutrition and adequate rest are essential for successful results. If you’re beginning an exercise program, you should check with your doctor if: •... - Seite 72 • End each work-out with a 5 minute cool down with the resistance set to a low level. You should then stretch the muscles you’ve just worked to prevent injury and cramp. • Increase your work-out time by a few minutes each week until you can work continuously for 30 minutes per session.
-
Seite 73: Stretch Exercise
STRETCH EXERCISE No matter how you do sports, please do some stretch at first, The warm muscle will extend easily, so warm up yourself with 5-10minutes, Then We suggest the following stretch exercise, five times.10 counts for each time or longer do these exercise again after sports. HEAD ROLLS Rotate your head to the right for one count, feeling the stretch up the left side of your neck, then rotate your head back for one count, stretching your chin to the ceiling and letting your mouth open. - Seite 74 TRAINING ZONE EXERCISE After warming up, increase the intensity to your desired exercise programme. Be sure to maintain your Intensity for maximum performance. Breathe regularly and deeply as you exercise -never hold your breath. COOL DOWN Finish each workout with a light jog or walk for at least 1 minute. Then complete 5 to 10 minutes of stretching to cool down.
-
Seite 75: Application Software (App)
Application software (app) You can download the app "FitShow"via the QR code shown here. Mobile device requirement: And- roid 4.3 or higher with Bluetooth 4.0, iOS 8.0 or higher. Please turn on the Bluetooth function on your device first. Android Android: You can search in the Google Play Store for "FitShow", or download via the QR Code. - Seite 76 MANUAL DE USUARIO ESPAÑOL...
- Seite 77 Nuestros para usted! Construcción Utilizar Reducción En 3 sencillos pasos para un arranque rápido y seguro: 1. Escanear el código QR 2. Ver vídeos 3. Comienza rápido y seguro Enlace a los videos: https://sportstech.de/qr/lcx800.html...
- Seite 78 ESTIMADO CLIENTE, Nos complace que haya elegido un dispositivo de la línea de productos SPORTSTECH. Con el equipo deportivo de SPORTSTECH usted obtiene la más alta calidad y la mejor tecnología. Con el fin de usar todo el potencial de su dispositivo y para que pueda disfrutarlo durante muchos años, por favor lea este manual cuidadosamente antes de comenzar a ejercitarse, y use el dispositivo de acuerdo a las instrucciones.
-
Seite 79: Inhaltsverzeichnis
Tabla de contenido Información Importante de Seguridad Lista de los paquetes Lista de las piezas Dibujo de piezas Montaje Manual de operación del monitor Instrucciones de uso Ejercicios de estiramiento Software de la aplicacion... -
Seite 80: Información Importante De Seguridad
INFORMACIÓN IMPORTANTE DE SEGURIDAD Advertencia Para reducir el riesgo de lesiones graves, lea las siguientes advertencias importantes antes de usar la máquina. 1. Antes de comenzar cualquier programa de ejercicios, conviene consultar a un médico para determinar si usted tiene alguna condición física o de salud que pueda poner en peligro su salud y su seguridad, o impedirle usar la máquina adecuadamente. -
Seite 81: Lista De Los Paquetes
LISTA DE PAQUETES... -
Seite 82: Lista De Las Piezas
LISTA DE PIEZAS N° Descripción CANT. N° Descripción CANT. Marco principal Teniendo 608Z Marco de rotación Teniendo 2203 Publicación del manillar Plato de aluminio 4 I/D Barra 1 par Bush Ø16.2xØ23x18.5 5 I/D Barra de pedales 1 par Ø14xØ8.5x59.7 6 I/D Manillar 1 par Circlip D40... - Seite 83 N° Descripción CANT. Espuma Ø24xT3x120 Adaptador Tuerca 10 Arandela corrugada D12 Tuerca M6 Tornillo Anillo de goma...
-
Seite 84: Dibujo De Piezas
DIBUJOS DE LA PIEZAS... -
Seite 85: Montaje
MONTAJE Paso 1 1. Fije el estabilizador delantero (11) con el perno de cabeza hexagonal interna (15), la arandela elástica (22), laa arandela (26) al bastidor principal (1) 2. Fije el estabilizador trasero (12) con el perno de cabeza hexagonal interior (15), arandela elástica (22), arandela (26) al bastidor principal (1) 3. - Seite 86 Paso 3 1. Instale la barra oscilante (4 D/I) en el poste del manillar (3) con el perno de la cabeza hexagonal interna (18), la arandela elástica (23) y la arandela (27), por favor no lo arregle con firmeza ahora. 2.
- Seite 87 Paso 5 Fije el pedal (59 I/D) al marco del pedal (8) con el perno de la cabeza del cilindro hexagonal interior (19). Paso 6 1. Fie por favor la junta universal (31) al marco del pedal (8R) con el perno de cabeza hexagonal interna (14), la manga (71) primero y sujétalo a la manivela ajustable (9) con la cabeza hexagonal interna ( 48), arandela corrugada (75), arandela (25) y tuerca (74).
- Seite 88 Paso 7 1. Conecte el cable troncal (62), el cable de pulso (65) a la pantalla (63). Arregle la pantalla (63) con el tornillo de cabeza troncocónica (63). 2. Fije la cubierta del poste del manillar (41a/b) al poste del manillar (3) con el tornillo autorroscante de la cabeza de la bandeja transversal (60).
- Seite 89 MANUAL DE OPERACIÓN DEL MONITOR 1. Introducción de los botones START (para empezar) STOP (para parar) INICIO ATRÁS (para volver) Más resistencia...
- Seite 90 Menos resistencia Pausa Arriba Abajo Izquierda Derecha Entrar Más volumen Menos volumen En marcha/pausa Anterior Siguiente...
- Seite 91 2. Configuración del soporte físico Monitor 7 pulgadas 1024*600TFT ITE9854 64M dentro Música: Mp3 Vídeo: disponible para 8M NOR + 8G EMMC máx. 1280X768 resolución; Mp4MKV archivos decodificados y empaquetados por H.264 FLASH 8M NOR + 8G EMMC 3. Operación y función de los iconos Introducción a la página de inicio Introducción del icono 1 Velocidad: muestra la velocidad actual.
- Seite 92 Caloría quemada, Unidad: kcal Frecuencia cardíaca: muestra la frecuencia cardíaca actual. Potencia constante Nivel de resistencia. En condición de modo de potencia constante, muestra esfuerzo en vatios. Introducción del icono 2 Utilice para seleccionar el icono. Presione el botón para confirmar. Modo de cuenta regresiva.
- Seite 93 Introducción multimedia del icono: Música. Seleccionado Vídeo. Seleccionado Ajuste. Seleccionado IV) Introducción del estado del icono El ícono de USB se mantendrá iluminado todo el tiempo después de insertar el disco U. O se mantendrá aligerando. Si el icono de Bluetooth se empareja con éxito, se man- tendrá...
- Seite 94 Presione el botón para parar ejercicio. El registro de ejercicio se mostrará después de presionar inmediatamente. Modo de cuenta Seleccione el Ícono de tiempo objectivo, presione el botón para confirmar (simplemente tome el modo de cuenta regresiva, por ejemplo) Presione el botón para ajustar el tiempo objetivo.
- Seite 95 Presione el botón para confirmar, y luego se mostrará un nuevo diálogo. Presione el botón para comenzar el entrenamiento. Modo de cuenta: seleccionando un cierto modo de cuenta, estableciendo los datos de movimiento y comenzar el ejercicio. Durante los últimos 10 segundos, el sistema hará un sonido 5 veces cada 2 segundos. Cuenta del tiempo Distancia : 0:01-10 hora, predeterminada 0:30:00 Cuenta de la distancia...
- Seite 96 Presione el botón para seleccionar el icono, presione el botón para confirmar. Presione el botón para convertir el modo de resistencia y el modo de potencia. Presione el botón para ajustar los datos. Presione el botón para cambiar la resistencia. Presione el botón para confirmar.
- Seite 97 Modo de escena virtual Presione el botón para entrar en modo de escena virtual: Presione el botón para seleccionar el icono. Presione el botón para comenzar el entrenamiento. El nivel de resistencia predeterminado es 10, presione el botón para ajustar la resistencia. La velocidad de reproducción de video estará...
- Seite 98 Presione el botón para seleccionar el icono, presione el botón para confirmar. Presione el botón para convertir el modo de resistencia y el modo de potencia. Presione el botón para ajustar los datos. Presione el botón para comenzar el entrenamiento.
- Seite 99 Lógica de operación: Presione el botón para volver a la página anterior. Presione el botón para ir a la página de inicio Presione el botón el icono "Racing" en la página de inicio para ir a la página de ejercicios. Si presiona otro ícono (por ejemplo, escena virtual, programa de usuario, etc.), pronto se mostrará...
- Seite 100 Velocidad de cada sección de 12 programas preestablecidos Recuperación Sección 10 11 12 13 14 15 16 Velocidad 18 18 24 24 30 30 30 30 30 24 24 24 24 24 18 18 Resistencia 10 10 18 10 10 18 10 10 18 10 10 18 10 10 10 18 Sección 10 11 12 13 14 15 16 Perder peso...
- Seite 101 Rutina de ejercicio (o Work-Out) Presion e el botón para entrar en Work-Out (para quemar grasa, por ejemplo) Presione el botón para seleccionar el icono, presione el botón para confirmar. Presione el botón para convertir el modo de resistencia y el modo de potencia. Presione el botón para ajustar los datos.
- Seite 102 Rutina de ejercicio (o Work-Out): primero, elija un programa determinado y luego termine de configurar los datos de movimiento. Hay 16 secciones para cada programa. Cada tiempo de sección = tiempo de configuración/16. La resistencia para cada sección es la siguiente tabla: 12 datos de programa preestablecidos Quema grasa Sección...
- Seite 103 Presione el botón para ajustar los datos, presione para seleccionar diferentes artículos. Calentamiento de 2 minutos Proceso HRC Enfrîamento...
- Seite 104 Si no se detecta ninguna señal de frecuencia cardíaca, consulte la imagen de arriba. Presione el botón para entrar en modo de potencia constante: Modo estático de potencia constante Presione el botón para comenzar el entrenamiento...
- Seite 105 5. Introducción multimedia y Configuración Música Presione el botón para entrar al menú de música: Presione el botón para seleccionar música, presione el botón para escuchar. play/pausa; más volumen; menos volumen; anterior; siguiente Video Presione el botón para entrar al menú de video:...
-
Seite 106: Manual De Operación Del Monitor
a) Las listas de playlist son ocultadas después de 5 segundos sin ninguna operación. Presione el botón para ir a la pantalla completa. Presione el botón de nuevo para volver a la página anterior. b) Después de que las listas de playlist estén ocultas, presione el botón para abrir la listas de playlist. -
Seite 107: Códigos De Error
Presione el botón para ir al modo de ingeniería, diseñado para el mantenimiento del sistema. Se necesita un código de acceso para acceder. 6. Códigos de error Si E01 ha sucedido, es un error de señal. EO1: error de señal Si E02 ocurrió, es muy probable que haya algún problema con el motor de resistencia. -
Seite 108: Instrucciones De Uso
INSTRUCCIONES DE USO Lineamientos de condicionamiento • Las siguientes pautas lo ayudarán a planificar su programa de ejercicios. Recuerde que la nutrición correcta y el descanso adecuados son esenciales para obtener resultados exitosos. Si está comenzando un programa de ejercicios, debe consultar con su médico si: •... - Seite 109 • Finalice cada ejercicio con un enfriamiento de 5 minutos y la resistencia ajustada a un nivel bajo. A continuación, para evitar lesiones y calambres, es importante de estirar cada músculo sometido. • Aumente el tiempo de ejercicio unos minutos cada semana hasta que pueda trabajar continuamente durante 30 minutos por sesión.
-
Seite 110: Ejercicios De Estiramiento
EJERCICIOS DE ESTIRAMIENTO No importa cómo se ejercite, siempre haga algo de estiramiento primero. El calentamiento muscular hará que sus músculos se extiendan fácilmente, así que caliente al menos 5-10 minutos. Luego le sugerimos hacer los siguientes ejercicios de estiramiento cinco veces. El estiramiento antes del ejercicio le ayuda a mejorar la flexibilidad y reduce los riesgos de lesiones. -
Seite 111: Intensidad Del Ejercicio
INTENSIDAD DEL EJERCICIO Después de calentar, aumente la intensidad de su programa de ejercicio deseado. Asegúrese de mantener su intensidad para un máximo rendimiento. Respire de manera constante y profunda mientras se ejercita-nunca aguante la respiración. ENFRIAMIENTO Termine cada ejercicio con un trote ligero o camine durante al menos 1 minuto. Después complete de 5 a 10 minutos de estiramiento para el enfriamiento. -
Seite 112: Software De La Aplicacion
Software de la aplicacion Puede descargar la aplicación "FitShow" a través del código QR que se muestra aquí. Requisitos de dispositivos móviles: Android 4.3 o superior con Bluetooth 4.0, iOS 8.0 o superior. Primero active el Bluetooth en su dispositivo. Android Android: iOS: puede buscar "FitShow"... - Seite 113 MANUEL FRANÇAIS...
- Seite 114 3 étapes simples pour un démarrage rapide et sécurisé: 1. Scannez le code QR 2. Regarder les vidéos 3. Démarrez rapidement et en toute sécurité. Lien vers les vidéos: https://sportstech.de/qr/lcx800.html...
- Seite 115 CHER CLIENT, Nous sommes ravis que vous ayez choisi un appareil de la gamme de produits SPORTSTECH. Avec les équipements sportifs de SPORTSTECH, vous obtenez la plus haute qualité et la meilleure technologie. Afin d'utiliser pleinement le potentiel de votre appareil et de pouvoir l'apprécier pendant de nombreuses années, lisez attentivement ce manuel avant l'utilisation et le début de votre entraînement et utilisez l'appareil conformément aux...
- Seite 116 Table des matières Informations de sécurité importantes Liste des pièces principales Liste des composants Vue en éclaté Assemblage Manuel d’utilisation de l’interface Instructions d’utilisation Excercice d'étirement Logiciel d‘application (application)
-
Seite 117: Informations De Sécurité Importantes
INFORMATIONS DE SÉCURITÉ IMPORTANTES Avertissements Afin de réduire les risques de blessures graves, lisez les avertissements suivants avant toute utilisation de l’appareil. 1. Avant de commencer tout programme d’entraînement, veuillez consulter votre médecin afin de déterminer si votre condition physique et votre santé vous permettent d’utiliser la machine sans causer de risques pour votre santé ou votre sécurité. -
Seite 118: Liste Des Pièces Principales
PIÈCES PRINCIPALES #3 Tube de support-guidon #1 Cadre principal 1 pc. #6L/R Bras mobiles 1 paire 1 pc. #11 Stabilisateur #7 Guidon avec capteurs #10 Barre de guidage 2 pcs avant 1 pc. 1 pc. #12 Stabilisateur arrière #63 Écran d’interface 1 pc. #4L/R Bras inférieurs 1 paire #59L/R Pédale 1 paire 1 pc. -
Seite 119: Liste Des Composants
LISTE DES COMPOSANTS N° Description Qté N° Description Qté Cadre principal Écrou nylon M8 Cadre de roue d’inertie Écrou à embase M10x1.25 Roulement 6003Z Tube de support-guidon Roulement 608Z 4L/R Bras inférieur Roulement 2203 5 L/R Barre de pédale Plaque d’aluminium 6 L/R Support-guidon Douille Ø16.2xØ23x18.5 Guidon fixe... - Seite 120 N° Description Qté Manchon Écrou hexagonal M12 Manchon Ø12xØ18x14.5 Mousse Ø24xT3x120 Adaptateur Écrou 10 Rondelle ondulée D12 Écrou M6 Boulon Bague en caoutchouc...
-
Seite 121: Vue En Éclaté
VUE EN ÉCLATÉ... -
Seite 122: Assemblage
ASSEMBLAGE Étape 1 1. Fixez le stabilisateur avant (11) au cadre principal (1) à l’aide des boulons hexagonaux à tête cylindrique (15), des rondelles ressort (22) et des rondelles (26). 2. Fixez ensuite le stabilisateur arrière (12) au cadre principal (1) à l’aide des boulons hexagonaux à tête cylindrique (15), des rondelles ressort (22) et des rondelles (26). - Seite 123 Étape 3 1. Serrez légèrement les bras inférieurs (4L/R) au tube de support guidon (3) l’aide du boulon hexagonal à tête cylindrique (18), des rondelles ressort (23) et des rondelles (27). Ne la fixez pas encore fermement. 2. Fixez les bras inférieurs (4L/R) à la barre de pédale (5L/R) à l’aide du boulon hexagonal (13), de la rondelle (28) et de l’écrou nylon (32).
- Seite 124 Étape 5 Fixez les pédales (59L/R) au pédalier (8) avec les boulons hexagonaux à tête cylindrique (19). Étape 6 1. Fixez d’abord les joints universels (31) au pédalier (8R) avec les boulons hexagonaux à tête cylindrique (14) et les manchons (71) et serrez-les ensuite sur les manivelles ajustables (9) avec les boulons hexagonaux à tête cylindrique (48), les rondelles ondulées (75), les rondelles (25) et les écrous (74).
- Seite 125 Étape 7 1. Connectez le câble (62) et la câble de capteur cardiaque (65) à l’écran d’interface. Fixez ensuite l’écran d’interface (63) avec les vis cruciformes à tête cylindrique (67). 2. Fixez la cache du tube de support-guidon (41a/b) au tube de support-guidon (3) avec les vis autoperceuses (60). 3.
-
Seite 126: Manuel D'utilisation De L'interface
MANUEL D’UTILISATION DE L’INTERFACE 1. Liste des boutons Allumer Éteindre Accueil Retour Augmenter la résistance... - Seite 127 Diminuer la resistance Pause Haut Gauche Droite Entrée Augmenter le volume Diminuer le volume Lecture/pause Précédent Suivant...
-
Seite 128: Caractéristiques Du Système
2. Caractéristiques du système Écran 7inches 1024*600TFT ITE9854 64 Mb interne Musique : Mp3 Vidéo : compatible avec une 8M NOR + 8G EMMC résolution de 1280 x 768 max. et avec des fichiers MP4 et MKV décodés et compressés selon la norme de codage vidéo H.264 FLASH 8M NOR + 8G EMMC... - Seite 129 Affiche les calories brûlées. Unité : Kcal Rythme cardiaque : affiche le rythme cardiaque actuel Puissance constante Niveau de résistance : en mode puissance constante, affiche les watts Icônes d’entrainement Utilisez pour sélectionner les icones et appuyez sur pour confirmer. Compte à...
-
Seite 130: Démarrage Rapide
III) Icônes multimédia Musique. Lorsque sélectionné : Vidéo. Lorsque sélectionné : Paramètres. Lorsque sélectionné : IV) Icônes de statut L’icône est allumée lorsque qu’une clé USB est insérée. Si la connexion Bluetooth est effectuée avec succès, l’icône s’allume. 4. Fonction des icônes de la page d’accueil Démarrage rapide Appuyer sur pour que le système entre en mode manuel :... - Seite 131 Appuyer sur le bouton pour arrêter l’exercice. Les données et résultats de l’exercice s’affichent dès que vous appuyez sur le bouton Mode compte à rebours Sélectionnez votre objectif et appuyez sur pour confirmer. Exemple pour le compte à rebours de temps : Appuyez sur les boutons pour sélectionner le temps.
- Seite 132 Appuyez sur pour confirmer et une nouvelle boite de dialogue s’affiche. Appuyez sur pour commencer l’exercice.. Mode compte à rebours : sélectionnez le mode de compte à rebours souhaité, entrez votre objectif et commencez l’exercice. Durant les 10 dernières secondes, le système émettra 5 signaux sonores toutes les 2 secondes. Compte à...
- Seite 133 Utilisez les boutons pour sélectionner un emplacement de programme et appuyez sur pour confirmer et commencer à le configurer. Appuyez sur les boutons pour passer du mode résistance au mode puissance et vice versa. Appuyez sur les boutons pour sélectionner la valeur. Appuyez sur les boutons pour changer la résistance.
- Seite 134 Mode paysage virtuel Appuyez sur pour accéder au mode Paysage virtuel : Appuyez sur les boutons pour sélectionner l’icône souhaitée, puis sur pour commencer l’exercice. Le niveau de résistance par défaut est de 10, appuyez sur les boutons pour ajuster la résistance. La vitesse de lecture de la vidéo s’ajustera en fonction de votre vitesse de course.
- Seite 135 Appuyez sur les boutons pour sélectionner la course souhaitée, puis sur pour confirmer. Appuyez sur les boutons pour passer du mode résistance au mode puissance et vice versa. Appuyez sur les boutons pour entrer les valeurs souhaitées. Appuyez sur les boutons pour commencer l’exercice.
- Seite 136 Commandes de base : Appuyez sur pour retourner à la page précédente. Appuyez sur pour retourner à la page d’accueil. Appuyez sur l’icône Course sur la page d’accueil pour retourner à la page d’exercice. Si vous appuyez sur une autre icone (par exemple Paysage virtuel, Programmes personnalisés, etc.), une nouvelle boite de dialogue s’affichera.
- Seite 137 Vitesse au niveau de chaque section de chaque programme préconfiguré Aérobic Section 10 11 12 13 14 15 16 Vitesse 18 18 24 24 30 30 30 30 30 24 24 24 24 24 18 18 Résistance 10 10 18 10 10 18 10 10 18 10 10 18 10 10 10 18 Section 10 11 12 13 14 15 16 Perte de poids...
- Seite 138 Entrainement physique Appuyez sur pour accéder au mode Entrainement physique (prenez par exemple le programme Fonte de Calories) : Appuyez sur les boutons pour sélectionner le programme souhaite, puis appuyez sur pour confirmer. Appuyez sur les boutons pour passer du mode résistance au mode puissance et vice versa. Appuyez sur les boutons pour ajuster les valeurs.
- Seite 139 Entrainement : choisissez d’abord un programme et finissez d’entrer les données. Chaque programme contient 16 sections, chacune d’elle étant d’une durée égale à durée totale/16. La résistance de chaque section est comme suit : Résistance au niveau de chaque section pour chaque programme préconfiguré : Fonte de calories Section 10 11 12 13 14 15 16...
- Seite 140 Appuyez sur les boutons pour ajuster les valeurs, et sur les boutons pour sélectionner le type de valeur à ajuster. Échauffement : 2 min Entrainement HRC Fin d’entrainement...
- Seite 141 Si aucun rythme cardiaque n’est détecté, l’affichage apparait comme ci-dessus. Appuyez sur pour accéder au mode Puissance constante Mode puissance constante à l’arrêt Appuyez sur pour commencer l’exercice...
- Seite 142 5. Mode multimédia et paramètres Musique Appuyez sur pour accéder au menu de musique : Appuyez sur les boutons pour sélectionner la musique et appuyez sur . pour lancer la lecture. lecture/pause ; volume + ; volume - ; précédent ; suivant Vidéo Appuyez sur...
- Seite 143 Les playlists sont masquées au bout de 5 secondes d’inactivité. Appuyez sur pour passer en mode plein écran. Appuyez à nouveau sur pour retourner à la page précédente. Une fois la playlist masquée, appuyez sur les boutons pour la faire réapparaître. Appuyez sur pour mettre la lecture en pause et la relancer, et appuyez sur pour ajuster le...
-
Seite 144: Codes D'erreur
Appuyez sur pour accéder au menu du système. Ce menu est conçu pour la maintenance du système interne et n’est accessible qu’à l’aide d’un code. 6. Codes d’erreur Lorsque le code E01 s’affiche, cela signifie qu’il y a eu une erreur dans le système. EO1:signal d’erreur Si le code E02 s’affiche, cela signifie qu’il y a probablement un problème avec le moteur de résistance. -
Seite 145: Instructions D'utilisation
INSTRUCTIONS D’UTILISATION Règles générales d’entrainement • Les règles suivantes vont vous aider à planifier votre programme d’entrainement. Gardez à l’esprit qu’une nutrition saine et adéquate est essentielle pour obtenir de bons résultats. Avant de commencer un nouveau programme d’entrainement, veuillez consulter votre médecin si : •... - Seite 146 • Terminez chaque session d’entraînement avec 5 minutes à faible résistance. Étirez ensuite les muscles utilisés afin d’éviter toute blessure ou crampe. • Augmentez la durée de votre entraînement de quelques minutes chaque semaine jusqu’à ce que vous puissiez vous entraîner 30 minutes sans pause.
-
Seite 147: Excercice D'étirement
EXCERCICE D'ÉTIREMENT Peu importe comment vous pratiquez le sport, Veuillez faire quelques étirements avant de commencer votre entraî-nement, le muscle chaud s’étendra facilement, donc réchauffez vous durant 5-10minutes, nous suggérons l'exercice d'étirement suivant : 5 fois ,10 comptes pour chaque fois ou plus, faire ces exercices à... - Seite 148 EXERCICE DANS LA ZONE D'ENTRAÎNEMENT Après l'échauffement, augmentez l'intensité de votre programme d'exercice désiré. Assurez-vous de maintenir votre intensité pour une performance maximale. Respirez régulièrement et profondément pendant que vous faites un exercice - ne retenez jamais votre respiration. REFROIDIR Terminez chaque entraînement avec un jogging léger ou marchez pendant au moins 1 minute.
-
Seite 149: Logiciel D'application (Application)
Logiciel d‘application (application) Vous pouvez télécharger l'application "FitShow" via le code QR affiché ici Condition préalable pour appareil mobile: Android 4.3 ou supérieur avec Bluetooth 4.0, iOS 8.0 ou supérieur. Veuillez d'abord activer le Bluetooth sur votre appareil. Android Android: Vous pouvez rechercher "FitShow" dans Google Play Store, ou la télécharger en utilisant le code QR. - Seite 150 MANUALE D’USO ITALIANO...
- Seite 151 Video Tutorial Il nostro per te! Montaggio Utilizzo Smontaggio 3 semplici passaggi per un inizio veloce e sicuro: 1. Scannerizza il QR-Code 2. Guarda il Video 3. Inizia ad allenarti! Link per il Video: https://sportstech.de/qr/lcx800.html...
- Seite 152 GENTILE CLIENTE, Siamo lieti che abbiate scelto un dispositivo della gamma SPORTSTECH. Con le attrezzature sportive di SPORSTECH potrete usufruire della più alta qualità e della più recente tecnologia. Per sfruttare a pieno il potenziale del dispositivo e poterlo utilizzare per molti anni, raccomandiamo di leggere attentamente questo manuale prima di iniziare l’allenamento e di utilizzare il dispositivo seguendo le istruzioni.
- Seite 153 Indice Importanti informazioni di sicurezza Contenuto della consegna Elenco componenti Esploso Istruzioni per l’assemblaggio Utilizzo del display Istruzioni d’uso Esercizi di stretching Aplicación de software (aplicación) Declaration of Conformity...
-
Seite 154: Importanti Informazioni Di Sicurezza
IMPORTANTI INFORMAZIONI DI SICUREZZA Avvertenze Per ridurre il rischio d’incidenti, leggere attentamente le seguenti avvertenze prima di utilizzare questa attrezzatura. Prima di iniziare qualsiasi programma di esercizio consultare un medico per accertarsi sulle proprie condizioni fisiche per evitare di mettere a rischio la propria salute e sicurezza, o per impedire di utilizzare questa attrezzatura in modo non appropriato. -
Seite 155: Contenuto Della Consegna
CONTENUTO DELLA CONSEGNA... -
Seite 156: Elenco Componenti
ELENCO COMPONENTI Descrizione Quantità Descrizione Quantità Unità centrale Cuscinetto 608Z Telaio rotante Cuscinetto 2203 Sostegno manubrio Piastra in alluminio 4L/R Asta 1 paio Boccola Ø16.2xØ23x18.5 5 L/R Pedaliera 1 paio Ø14xØ8.5x59.7 6 L/R Manubrio 1 paio Anello D40 Manubrio 41 a/b Cover manubrio 1 paio 8 L/R Telaio pedaliera... - Seite 157 Descrizione Quantità Adattatore Dado 10 Rondella ondulata D12 Dado M6 Bullone Anello di gomma...
-
Seite 158: Esploso
ESPLOSO... -
Seite 159: Istruzioni Per L'assemblaggio
ISTRUZIONI PER L´ASSEMBLAGGIO Passo 1 Fissare lo stabilizzatore anteriore (11) con il bullone a testa esagonale interno (15), con la rondella elastica (22) e la rondella (26) nell’unità centrale (1). Fissare lo stabilizzatore posteriore (12) con il bullone a testa esagonale interno (15), con la rondella elastica (22) e la rondella (26) nell’unità... - Seite 160 Passo 3 Fissare l’asta (4L/R) nel sostegno manubrio (3) con il bullone a testa esagonale interno (18), la rondella elastica (23), e la rondella (27). Si prega di non fissare troppo saldamente per il momento. Fissare l’asta (4L/R) e la pedaliera (5L/R) con il bullone esagonale (13), la rondella (28) e il dado in nylon (32). Adesso è...
- Seite 161 Passo 5 Fissare il pedale (59L/R) nel telaio della pedaliera (8) con il bullone a testa esagonale interno (19). Passo 6 Fissare la giunzione universale (31) nel telaio della pedaliera (8R) con il bullone a testa esagonale interno (14) e la boccola (71). Quindi fissarla con la pedivella regolabile (9) con il bullone a testa esagonale interno (48), la rondella ondulata (75), la rondella (25) e il dado (74).
- Seite 162 Passo 7 Collegare il sensore (62) e il sensore (65) al display (63). Quindi fissare il display (63) con la vite con testa a croce (67) Fissare la cover del sostegno manubrio (41a/b) nel sostegno manubrio (3) con la vite con testa a croce (60). Fissare la cover del manubrio (51a/b) nell’apposito supporto (3) con la vite con testa a croce (60).
-
Seite 163: Utilizzo Del Display
UTILIZZIO DEL DISPLAY 1. Panoramica comandi Avvia Arresta HOME Indietro Aumenta resistenza... - Seite 164 Diminuisci resistenza Pausa Sopra Sotto Sinistra Destra Accedi Aumenta il volume Diminuisci il volume Play/Pausa Precedente Successivo...
-
Seite 165: Configurazione Hardware
2. Configurazione Hardware Display 7inches 1024*600TFT ITE9854 64M interna Musica: Mp3 Video: disponibile con una 8M NOR + 8G EMMC risoluzione massima di 1280X768; Mp4:MKV files decodificati e confezionati da H.264 FLASH 8M NOR + 8G EMMC 3. Operazioni e funzioni icone Introduzione pagina iniziale Introduzione icona 1 Velocità: mostra la velocità... - Seite 166 Mostra le calorie bruciate, unità: kcal Frequenza cardiaca: mostra la frequenza cardiaca attuale Potenza costante Livello di resistenza. In modalità di potenza costante mostra lo sforzo in watt. Introduzione icona 2 Usare per selezionare un’icona, premere per confermare. Modalità conto alla rovescia. Selezionata Modalità...
- Seite 167 Introduzione icone multimediali: Musica. Selezionata Video. Selezionato Impostazioni. Selezionate Introduzione status icone Dopo aver inserito il disco U l`icona USB rimane accesa o illuminata. Se l`icona del Bluetooth è correttamente selezionata continua a lampeggiare o rimane illuminata. Nota: la funzione Bluetooth è opzionale. 4.
- Seite 168 Premere per interrompere l´esercizio. Il risultato degli esercizi compare sul display dopo aver premuto Modalità countdown Selezionare l´icona target time e premere per confermare (tempo in modalità conto alla rovescia): Premere per selezionare il tempo.
-
Seite 169: Programma Utente
Premere per confermare, una nuova finestra di dialogo compare sullo schermo. Premere per iniziare l´esercizio. Modalità conto alla rovescia: selezionare una determinata modalità di conto alla rovescia, selezionare il tipo di movimento e iniziare l’esercizio. Durante gli ultimi 10 secondi il sistema invia un segnale per 5 volte ogni 2 secondi. conto alla rovescia - tempo Intervallo : 0:01-10 ore, impostazione predefinita 0:30:00 Conto alla rovescia - distanza Intervallo: 1.0-200Km, impostazione predefinita 5Km... - Seite 170 Premere per selezionare un`icona, premere per confermare. Premere per convertire la modalità resistenza e la modalità potenza Premere per impostare i dati. Premere per modificare la resistenza. Premere per confermare. Il sistema mantiene salvati i dati in automatico. Premere per iniziare l`esercizio.
- Seite 171 Modalità scena virtuale Premere per entrare nella modalità scena virtuale: Premere per selezionare un`icona, premere per iniziare l`esercizio. Il livello di resistenza preimpostato è di 10, premere per regolare la resistenza. La velocità di riproduzione del video dipende dalla velocità dell´esercizio. Competizione Premere per entrare nella modalità...
- Seite 172 Premere per selezionare un´icona, premere per confermare. Premere per convertire la modalità resistenza e la modalità potenza. Premere per impostare i dati. Premere per iniziare l’esercizio.
- Seite 173 Operazioni Premere per tornare alla pagina precedente. Premere per tornare alla pagina iniziale. Premere l’icona “Racing - competizione” nella pagina iniziale per tornare alla pagina degli esercizi. Se si premono altre icone (per esempio l’icona scena virtuale, l’icona programma utente e così via) viene mostrata una nuova finestra di dialogo.
- Seite 174 Velocità di ciascuna sezione dei 12 programmi preimpostati. Recupero aerobico Sezione 10 11 12 13 14 15 16 Velocità 18 18 24 24 30 30 30 30 30 24 24 24 24 24 18 18 Resistenza 10 10 18 10 10 18 10 10 18 10 10 18 10 10 10 18 Sezione 10 11 12 13 14 15 16 Perdita peso...
- Seite 175 Allenamento all’aperto Premere per entrare nella modalità allenamento all’aperto (per bruciare grassi ad esempio): Premere per selezionare un’ icona, premere per confermare. Premere per convertire la modalità resistenza e la modalità potenza. Premere per impostare i dati. Premere per iniziare l’esercizio.
- Seite 176 Allenamento all’aperto: scegliere prima un determinato programma e successivamente impostare il movimento. Ogni sezione di tempo = impostazione ora/16. La resistenza di ogni sezione viene mostrata nella seguente tabella: 12 programmi preimpostati Brucia grassi Sezione 10 11 12 13 14 15 16 Resistenza 10 10 10 12 12 12 14 14 14 14 16 16 16 18 18 18 Sfida veloce...
- Seite 177 Premere per impostare i dati, premere per selezionare differenti items. Riscaldamento 2 min. Processo HRC Raffreddamento...
- Seite 178 Se la frequenza cardiaca non viene rilevata, visualizzare l’immagine riportata sopra. Premere per entrare nella modalità di potenza costante: Modalità potenza costante Premere per iniziare l’esercizio.
- Seite 179 5. Introduzione multimedia e impostazioni Musica Premere per entrare nel menu musica: Premere per selezionare la musica, premere per riprodurre. play/pausa; volume+; volume-; precedente ; successivo Video Premere per entrare nel menu video:...
- Seite 180 a) La playlist viene nascosta dopo 5 secondi senza aver effettuato nessuna operazione. Premere per entrare in modalità schermo intero. Premere di nuovo per tornare alla pagina precedente. Una volta nascosta la playlist, premere to wake up the playlists. b) Premere to play/pausa, premere per regolare il volume..
- Seite 181 Premere per passare alla modalità engineering mode. Riguarda la manutenzione del sistema. E’ necessario un codice per entrare in questa modalità. 6. Codice errore Se compare il codice E01, si è verificato un errore. EO1:signal error Il codice E02 segnala che probabilmente la resistenza del motore non funziona correttamente.
-
Seite 182: Consigli Per L'allenamento
ISTRUZIONI D’USO Linee guida • Le seguenti linee guida aiutano a pianificare il proprio programma di allenamento. E’ importante tenere a mente che una corretta alimentazione e un riposo adeguato sono essenziali per ottenere risultati di successo. Prima di iniziare un programma di allenamento consultare il proprio medico: per accertarsi che: •... - Seite 183 • Aumentate di volta in volta la velocità e la resistenza fino a dove riuscite. Inizialmente riuscirete ad esercitarvi per pochi minuti, ma allenandovi regolarmente, riuscirete presto ad aumentare la durata. • Prevedete 5 minuti di allenamento meno intensi durante la sessione. Successivamente dovrete allungare i muscoli che avete lavorato al fine di prevenire lesioni o crampi.
-
Seite 184: Esercizi Di Stretching
ESERCIZI DI STRETCHING Non importa la ragione per cui fai sport, fai in modo di fare sempre esercizi di stretching prima di cominciare. Il uscolo riscaldato si allungherà facilmente, quindi scaldati con degli esercizi per 5-10 minuti. Ti suggeriamo di eseguire i seguenti esercizi cinque volte conta fino a dieci ogni volta o anche più lungo quando ripeti l’esercizio dopo aver praticato sport. - Seite 185 ESERCIZIO PER ZONA DI ALLENAMENTO Dopo il riscaldamento, aumenta l'intensità del tuo programma di esercizio desiderato. Assicurati di mantenere la tua intensità per ottenere una migliore performance. Respira regolarmente e profondamente durante i tuoi esercizi, non trattenere mai il respiro. RAFFREDDAMENTO Termina ogni allenamento con una corsa o una camminata breve di almeno 1 minuto.
-
Seite 186: Aplicación De Software (Aplicación)
Aplicación de software (aplicación) l'app "FitShow" è scaricabile qui col codice QR-Code mostrato in figura. Dovete però disporre di un apparecchio mobile quale: Android 4.3 oppure maggiore che possieda la funzione Bluetooth 4.0, iOS 8.0 o maggiore. In primo luogo attivate la funzione Bluetooth sul vostro telefono. Android Android: Potete cercare l'applicazione "FitShow"... -
Seite 187: Declaration Of Conformity
Declare under our sole responsibility that the following product Erklären in alleiniger Verantwortung, dass das weiter unten genannte Produkt Type of product / Geräteart: Crosstrainer Name / Handelsbezeichnung: LCX800 Trade mark / Handelsmarke: Sportstech Model /Modell: LCX800 Meets the essential requirements of the following EC directives: Die grundlegenden Anforderungen der aufgeführten EG Richtlinien erfüllt:... - Seite 188 Verkauf durch / Distributed by / Distribuido por / Distribué / Distribuito da InnovaMaxx GmbH Potsdamer Platz 11 10785 Berlin +49 30-220 66 35 69 service@innovamaxx.de http://www.sportstech.de...