Inhaltsverzeichnis
Werbung
Verfügbare Sprachen
Verfügbare Sprachen
Werbung
Kapitel
Inhaltsverzeichnis

Verwandte Anleitungen für APA 16623


Inhaltszusammenfassung für APA 16623
- Seite 1 DE Batterie-Werkstatt-Ladegerät, digital 20 A mit Starthilfe Art.-Nr. 16623 GB FR NL I EAL GmbH Otto-Hausmann-Ring 107 42115 Wuppertal Deutschland Telefon: +49 (0)202 42 92 83 0 Telefax: +49 (0)202 2 65 57 98 Internet: www.eal-vertrieb.de E-Mail: info@eal-vertrieb.com...
-
Seite 2: Inhaltsverzeichnis
Inhalt Seite 1. Bestimmungsgemäßer Gebrauch ......................... 2-3 2. Lieferumfang ..............................3 3. Spezifikationen ............................. 3 4. Sicherheitshinweise ............................3-4 5. Symbolerklärung ............................4 6. Bedienungsanleitung ........................... 4 6.1 Übersicht ..............................4-5 6.2 Aufladen einer Batterie ..........................5 6.2.1 Vorbereitung ............................5 6.2.2 Anschließen des Batterie ......................... -
Seite 3: Lieferumfang
Das Batterieladegerät ist für den Einsatz in trockener und geschützter Umgebung bei Temperaturen von -5 °C bis +40°C ausgelegt. Dieses Gerät ist nicht dafür bestimmt, durch Kinder und Personen mit eingeschränkten geistigen Fähigkeiten oder ohne Erfahrung und/oder mangels Wissen benutzt zu werden. Kinder sind von dem Gerät fernzuhalten. Das Gerät ist nicht für den gewerblichen Einsatz bestimmt. -
Seite 4: Symbolerklärung
langt, sofort wenigstens 10 Minuten unter laufendem Wasser ausspülen und Arzt aufsuchen • Decken Sie das Ladegerät nicht ab, halten Sie die Lüftungsöffnungen frei, da es sonst zur Überhitzung und somit zu einer Beschädigung kommen kann. Stellen Sie das Ladegerät im Betrieb nicht auf eine isolierende Unterlage (z.B. -
Seite 5: Aufladen Einer Batterie
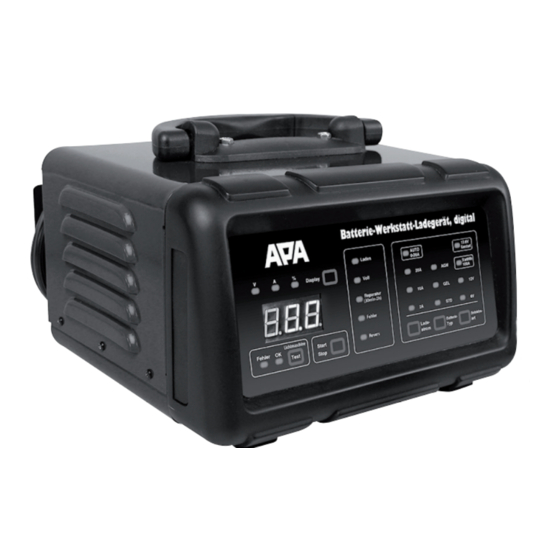
3.1 Laden, die Batterie wird geladen 3.2 voll, der Ladevorgang ist abgeschlossen 3.3 Reparatur (Programm zur Desulfatierung) 3.4 Fehler, keine, defekte Batterie, falsche Spannung ausgewählt 3.5 revers, Batteriepole falsch angeschlossen Bild 3: Kontrolleuchten Betriebszustand 4.1 Auswahlschalter für Ladestrom 2, 10, 20, Auto (0-20) [A] 4.2 Auswahlschalter für Batterietyp Standard, GEL, AGM 4.3Auswahlschalter Betriebsart 6V-Laden, 12V-Laden, Starthilfe 12V, Konstantstromquelle 13,6V... -
Seite 6: Einstellen Des Batterieladegeräts
Achtung: Wenn die rote Kontrolleuchte „revers“ (Position 3.5 in Übersicht) leuchtet, sind die Ladekabel falsch angeschlossen. Entfernen Sie die Polzangen von den Batteriepolen, und schließen Sie sie korrekt an. Achtung: Wenn die rote Kontrolleuchte „Fehler“ (Position 3.4 in Übersicht) leuchtet, kontrollieren Sie, ob das eingestellte Ladeprogramm und die angeschlossene Batterie zusammen passen. -
Seite 7: Lichtmaschinentest
Elektronik-Altgeräte informieren Sie sich bei Ihrer Gemeinde- oder Stadtverwaltung 9. Kontaktinformationen EAL GmbH Otto-Hausmann-Ring 107 42115 Wuppertal, Deutschland Telefon: +49 (0)202 42 92 83 0 Telefax: +49 (0)202 2 65 57 98 Internet: www.eal-vertrieb.de E-Mail: info@eal-vertrieb.com © EAL GmbH, 16623, Juli 2016... -
Seite 8: Proper Use Of The Product
GB Digital battery workshop charger 20 A with jump-start assistance Item number 16623 Contents Page 1. Proper use of the product .......................... 8-9 2. Scope of delivery ............................9 3. Specifications ............................9 4. Safety precautions ............................ 9 5. Explanation of symbols ..........................9 6. -
Seite 9: Scope Of Delivery
The device also has an additional 12 V jump-start function with a maximum of 100 A and can also be used as a direct current constant-current source with 13.6 V. The battery charger is designed for use in a dry and protected environment at temperatures of -5 °C to +40°C. This device is not designed to be used by children or persons with limited mental capabilities or without experience and/or lack of required specialist knowledge. -
Seite 10: Explanation Of Symbols
• Always wear suitable working clothes, protective gloves and goggles. Battery acid is corrosive! Imme- diately and thoroughly wash off any splashed acid and consult a doctor, if necessary. If battery acid gets into the eyes, immediately rinse under running water for at least 10 minutes and consult a doctor. •... -
Seite 11: Charging A Battery
3.1 Charge, the battery is being charged 3.2 Full, the charging procedure is complete 3.3 Repair (program for desulphation) 3.4 Error, no battery, defective battery, incorrect voltage selected 3.5 Inverse, battery terminals connected incorrectly Figure 3: Control lamps for operating status 4.1 Selection switch for charge current 2, 10, 20, Auto (0-20) [A] 4.2 Selection switch for battery type Standard, GEL, AGM 4.3Selection switch for operating mode, 6V charge, 12V... -
Seite 12: Setting The Battery Charger
Now, connect the power plug of the charger to the mains socket. Caution: When the red control lamp „inverse“ (Position 3.5 in the overview) lights up, the charge cables have been connected incorrectly. Remove the pole callipers from the battery terminals and connect them correctly. Caution: When the red control lamp „Error“... -
Seite 13: Generator Test
attempt, do not attempt again. Instead, check your vehicle for faults. When the engine is running, press the Start/Stop button and pull the plug of the charger from the mains socket. Then first remove the black callipers (-) and then the red callipers (+). Always maintain this sequence. 6.4 Generator test 6.4.1 Connecting the battery charger Caution: Make sure that the charger is not connected to the power socket. -
Seite 14: Domaine D'application
FR Chargeur de batterie numérique 20 A pour garages et ateliers, avec aide au démarrage N° d‘art. 16623 Sommaire Page 1. Domaine d‘application ..........................14-15 2. Contenu de la fourniture ......................... 15 3. Spécifications ............................15 4. Consignes de sécurité ..........................15 5. -
Seite 15: Matériel Fourni
plomb-acide fermées sans entretien, tels que : • Batteries humides WET (batteries plomb-acide avec électrolyte liquide) • Batterie AGM (électrolytes en vibre de verre) • Batteries plomb-acide sans entretient (MF) • Batteries gel (électrolyte sous forme de gel) D‘autres batteries ne doivent pas être rechargées avec cet appareil. En outre, l‘appareil dispose d‘une fonction d‘aide au démarrage de 12 V et de 100 A max. -
Seite 16: Explication Des Symboles
détériorations du câble, l‘appareil doit être mis à la ferraille. • Ne mettez par l‘appareil en marche ou retirez immédiatement la fiche de contact s‘il est endommagé ou si vous suspectez un défaut. Dans ces cas, veuillez contacter nos techniciens. •... -
Seite 17: Notice D'utilisation
6. Notice d‘utilisation Avant toute utilisation de l‘appareil, assurez-vous d‘avoir lu la notice d‘utilisation de la batterie ainsi que du véhicule et compris toutes les consignes de sécurité. 6.1 Vue d‘ensemble 1 Affichage 2 Réglages de l‘affichage 3 Indicateur de l‘état fonctionnel 4 Réglages des fonctions 5 Test de l‘alternateur 6 Touche Marche/Arrêt... -
Seite 18: Charging A Battery
6.2 Charging a battery 6.2.1 Préparation Nettoyez les pôles de la batterie pour enlever les poussière et les résidus de corrosion. Seulement pour batteries ouvertes : Retirez les capuchons de protection des cellules de la batterie. Remplissez d‘eau distillée jusqu‘à ce que le niveau de remplissage minimal soit atteint. Laissez les cellules ouvertes jusqu‘à ce que l‘opération de chargement soit terminée. -
Seite 19: Utilisation En Tant Qu'aide Au Démarrage Sur Des Véhicules De 12 V
Retirez maintenant la pince de la batterie de la borne positive de la batterie (pince rouge). Laissez refroidir la batterie et remplissez les cellules d‘eau distillée jusqu‘au niveau de remplissage décrit par le fabricant de la batterie. Refermez les cellules de la batterie avec les bouchons de fermeture. 6.3 Utilisation en tant qu‘aide au démarrage sur des véhicules de 12 V 6.3.1 Raccordement du chargeur de batterie Attention : Assurez-vous que le chargeur n‘est pas raccordé... -
Seite 20: Entretien Et Nettoyage
7. Entretien et nettoyage 7.1 Maintenance : La lampe n‘exige pas d‘entretien lorsqu‘elle est utilisée de manière conforme. 7.2 Nettoyage : Nettoyez les pinces après chaque opération de chargement. Éliminez toute projection d‘acide de batterie sur les pinces afin d‘éviter la corrosion. Nettoyez l‘appareil avec précaution à l‘aide d‘un chiffon sec. N‘uti- lisez aucun produit nettoyant liquide ou chimique. -
Seite 21: Reglementair Gebruik
NL Digitale acculader voor werkplaatsen 20 A met starthulp Art.nr. 16623 Inhoud Pagina 1. Reglementair gebruik .......................... 21-22 2. Leveringsomvang ..........................3. Specificaties ............................4. Veiligheidsinstructies .......................... 22-23 5. Uitleg bij de symbolen ........................6. Gebruiksaanwijzing ..........................6.1 Overzicht ............................ -
Seite 22: Leveringsomvang
Andere accu’s mogen niet met dit apparaat worden opgeladen. Het apparaat is tevens voorzien van een 12 V-starthulpfunctie van maximaal 100 A en kan worden gebruikt als een constante 13,6V-gelijkstroombron. De acculader is ontworpen om voor gebruik in een droge en veilige omgeving bij temperaturen van -5 °C tot +40 °C. Dit apparaat mag niet worden gebruikt door kinderen, personen met beperkte geestelijke vermogens of personen zonder ervaring en/of gebrek aan kennis. -
Seite 23: Uitleg Bij De Symbolen
• Bewaar de acculader op een voor kinderen en onbevoegde personen onbereikbare plaats. • Gebruik het apparaat niet in de buurt van brandbaar materiaal of in een omgeving met gevaar voor explosies. • Draag altijd geschikte werkkleding, veiligheidshandschoenen en oogbescherming. Accuzuur is bijtend! Eventuele zuurspatten onmiddellijk grondig met veel water afspoelen, eventueel een arts raadplegen. -
Seite 24: Een Accu Opladen
2.1 Display-indicatie laadspanning in volt 2.2 Display-indicatie laadstroom in ampere 2.3 Display-indicatie laadvoortgang in procent 2.4 Keuzeschakelaar Afbeelding 2: Display-instellingen 3.1 Laden, de accu wordt opgeladen 3.2 Vol, het laadproces is beëindigd 3.3 Reparatie (programma voor desulfatering) 3.4 Fout, geen, defecte accu, onjuiste spanning geselecteerd 3.5 Revers, accupolen verkeerd aangesloten Afbeelding 3: Controlelampjes bedrijfstoestand 4.1 Keuzeschakelaar voor de laadstroom: 2, 10, 20,... -
Seite 25: De Acculader Aansluiten
6.2.2 De acculader aansluiten Let op: De stekker van de acculader mag niet in het stopcontact zitten, controleer dit. Sluit altijd eerst de rode pluskabel (+) van de acculader op de pluspool van de accu aan. Sluit daarna de zwarte massakabel (-) op de minpool van de accu aan. -
Seite 26: Starthulpprocedure
6.3.3 Starthulpprocedure Druk op de Start/Stop-knop. Start de motor. Laat de starter niet langer dan 6 seconden werken. Mocht de motor niet starten, wacht dan minimaal 3 minuten tot u een hernieuwde startpoging doet. Ga na de derde mislukte startpoging niet verder, maar controleer of er een defect aan uw voertuig is. Als de motor loopt, drukt u op de Start/Stop-knop en trekt u de stekker van de acculader uit het stopcontact. -
Seite 27: Uso Conforme
I Caricabatteria da officina digitale 20 A con avviamento d‘emergenza Cod. art. 16623 Indice Pagina 1. Uso conforme ............................27-28 2. Volume di consegna ..........................28 3. Specifiche ..............................28 4. Avvertenze di sicurezza ........................... 28-29 5. Spiegazione dei simboli .......................... 29 6. -
Seite 28: Volume Di Consegna
Il dispositivo non è idoneo alla carica di altri tipi di batterie. Il dispositivo dispone inoltre della funzione di avviamento d‘emergenza a 12 V con max. 100 A e si può utilizzare anche come fonte di corrente continua a intensità costante a 13,6 V. Il caricabatterie è... -
Seite 29: Spiegazione Dei Simboli
• Non utilizzare il dispositivo nelle vicinanze di materiale infiammabile o in un ambiente a rischio di es- plosione. • Indossare sempre indumenti di lavoro idonei, guanti di protezione e occhiali protettivi. L‘acido della batteria è corrosivo! Lavare subito a fondo con acqua eventuali schizzi di acido e, se necessario, consultare un medico. Se l‘acido entra in contatto con gli occhi, lavare con acqua corrente per almeno 10 minuti e consultare un medico. -
Seite 30: Ricarica Di Una Batteria
2.1 Spia tensione di carica in volt 2.2 Spia corrente di carica in ampère 2.3 Spia livello di carica in percentuale 2.4 Selettore Figura 2: Impostazioni display 3.1 Ricarica: la batteria viene ricaricata 3.2 Caricata: la ricarica è terminata 3.3 Riparazione: programma per la desolfatazione 3.4 Errore: batteria assente, guasta, tensione selezionata errata 3.5 Revers,poli della batteria invertiti Figura 3: Spie stato operativo... -
Seite 31: Collegamento Della Batteria
Per le batterie esenti da manutenzione, seguire esattamente le istruzioni del costruttore. 6.2.2 Collegamento del caricabatteria Attenzione: assicurarsi che il caricabatterie non sia collegato alla presa di alimentazione. Collegare prima il cavo positivo rosso (+) del caricabatterie al polo positivo della batteria. Quindi collegare il cavo negativo nero (-) al polo negativo della batteria. -
Seite 32: Collegamento Del Caricabatteria
Per le possibilità di smaltimento delle apparecchiature elettriche, informarsi presso il proprio comune. 9. Come contattarci EAL GmbH Otto-Hausmann-Ring 107, 42115 Wuppertal, Germania Telefax: +49 (0)202 2 65 57 98 Telefono: +49 (0)202 42 92 83 0 Internet: www.eal-vertrieb.de E-mail: info@eal-vertrieb.com © EAL GmbH, 16623, Juli 2016...