
Verwandte Anleitungen für Klarstein STEEL PRESSO SLIM


Inhaltszusammenfassung für Klarstein STEEL PRESSO SLIM
- Seite 1 STEEL PRESSO SLIM Espressomaschine Espresso Maker Cafetera espreso Cafetière expresso Macchina per espresso 10046328 10046330 10046331 www.klarstein.com...
- Seite 3 Sehr geehrter Kunde, wir gratulieren Ihnen zum Erwerb Ihres Gerätes. Lesen Sie die folgenden Hinweise sorgfältig durch und befolgen Sie diese, um möglichen Schäden vorzubeugen. Für Schäden, die durch Missachtung der Hinweise und unsachgemäßen Gebrauch entstehen, übernehmen wir keine Haftung. Scannen Sie den folgenden QR-Code, um Zugriff auf die aktuellste Bedienungsanleitung und weitere Informationen rund um das Produkt zu erhalten:...
- Seite 4 SICHERHEITSHINWEISE Allgemeine Sicherheitshinweise • Lesen Sie die Bedienungsanleitung vor dem Gebrauch sorgfältig durch und bewahren Sie sie zum späteren Nachschlagen auf. • Benutzen Sie das Gerät und das Zubehör nur für den vorgesehenen Verwendungszweck und verwenden Sie das Gerät und das Zubehör nicht für andere Zwecke als in der Bedienungsanleitung beschrieben.
- Seite 5 • Halten Sie das Netzkabel von Hitze, Öl und scharfen Kanten fern. • Verwenden Sie das Gerät nicht, wenn das Netzkabel oder der Netzstecker beschädigt oder defekt ist. Wenn das Netzkabel oder der Netzstecker beschädigt oder defekt ist, muss es durch den Hersteller, eine autorisierte Reparaturwerkstatt oder eine qualifizierte Person ersetzt werden.Ziehen Sie nicht am Netzkabel, um den Netzstecker aus der Steckdose zu ziehen.
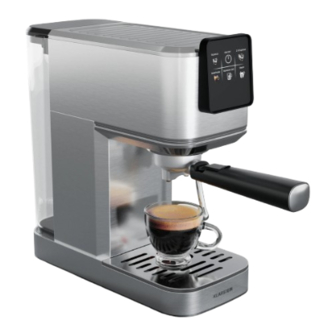
- Seite 6 PRODUKTBESCHREIBUNG Bedienfeld...
- Seite 7 Abdeckung des Wassertanks 1-Tasse heißer Espresso Wassertank ON/OFF Dampfregler 2-Tassen heißer Espresso Bedienfeld Americano Tassenhalter Kalter Espresso Dampf Dampfdüse Tropfschale 1-Tassen-Filter 2-Tassen-Filter Siebträger Filtergriff Messlöffel und Stopfer...
- Seite 8 BEDIENUNG Vergewissern Sie sich, dass die Kaffeemaschine ausgeschaltet und vom Stromnetz getrennt ist. Halten Sie den Wassertankgriff fest und nehmen Sie den Wassertank heraus. Füllen Sie den Wassertank mit frischem, kaltem Wasser. Überschreiten Sie NICHT die mit „MAX“ gekennzeichnete maximale Füllhöhe. Setzen Sie den Wassertank wieder ein, um sicherzustellen, dass er richtig sitzt.
- Seite 9 Stellen Sie eine oder zwei vorgewärmte Tassen unter den Kaffeeauslass. Drücken Sie nach dem Einstecken des Netzkabels die ON/OFF-Taste und alle Kontrollleuchten sind eingeschaltet. Kalter Espresso Legen Sie die Eiswürfel in den Wassertank und drücken Sie die Taste "Espresso Cool", um einen kalten Espresso zu erhalten. Die längste Zeit beträgt 19 Sekunden. Tipp: Verwenden Sie immer eiskaltes Wasser, um die besten Ergebnisse zu erzielen.
- Seite 10 1-Tasse heißer Espresso • Drücken Sie die Taste „Heißer Espresso“ und die Kontrollleuchte beginnt zu blinken, um anzuzeigen, dass das Gerät das Heizsystem aufheizt. • Wenn die Kontrollleuchte konstant leuchtet, sind die internen Komponenten aufgeheizt und bereit, Kaffee zu brühen; die längste Zeit beträgt 17 Sekunden. 2-Tassen heißer Espresso •...
- Seite 11 aktiviert, indem der Dampfregler auf „ON“ gestellt wird. Wenn kein Wasser mehr vorhanden ist, können Sie den Drehknopf auf die Position „OFF“ drehen. Drehen Sie das Dampfrohr auf die Seite des Geräts. Legen Sie das Dampfrohr so in die Milch, dass sich die Düse etwa 1 cm unter der Oberfläche befindet, und aktivieren Sie die Dampffunktion, indem Sie die Dampftaste drücken und den Dampfregler auf die Position „ON “stellen.
- Seite 12 Cappucino/ aufgeschäumte Milch zubereiten Eine Tasse Cappuccino erhält man, wenn man aufgeschäumte Milch zu einer Tasse Espresso hinzufügt. Bereiten Sie einen Espresso mit einem ausreichend großen Behälter zu, wie im Abschnitt „Heißer Espresso“ beschrieben, und achten Sie darauf, dass der Dampfregler in der Position „OFF“...
- Seite 13 Gießen Sie die aufgeschäumte Milch in den zubereiteten Espresso, der Cappuccino ist nun fertig. Nach Belieben süßen und eventuell mit Kakaopulver bestreuen. Drücken Sie die Netztaste, um das Gerät auszuschalten. Alle Anzeigen erlöschen. Hinweis: Wenn Sie unmittelbar nach der Dampfzubereitung einen Kaffee zubereiten möchten, blinkt die Kaffeeanzeige als Alarm, wenn Sie die Kaffeetaste berühren.
- Seite 14 Reinigung des Außengehäuses/ des Tassenhalters Verwenden Sie zur Reinigung des Außengehäuses keine gewöhnlichen oder aggressiven Reinigungsmittel. Verwenden Sie ein weiches, feuchtes Tuch, um das äußere Gehäuse und den Tassenhalter zu reinigen. Reinigung des Tropfgitters Das kleine Gitter muss häufig herausgenommen, gereinigt und geleert werden, insbesondere wenn die Tropfschale voll ist.
- Seite 15 FEHLERSUCHE UND FEHLERBEHEBUNG Problem Mögliche Ursache Lösungsvorschlag Im Wassertank befindet sich Füllen Sie den Tank mit Wasser kein Wasser. und lassen Sie das Gerät ohne Kaffeefilter durchlaufen, um sicherzustellen, dass es vollständig entlüftet ist. Kein Kaffee wird ausgegeben Der Kaffeesatz ist zu fein oder Entleeren Sie den Filter und zu fest eingedrückt spülen Sie ihn unter Wasser...
- Seite 16 SPEZIELLE ENTSORGUNGSHINWEISE FÜR VERBRAUCHER IN DEUTSCHLAND Entsorgen Sie Ihre Altgeräte fachgerecht. Dadurch wird gewährleistet, dass die Altgeräte umweltgerecht verwertet und negative Auswirkungen auf die Umwelt und menschliche Gesundheit vermieden werden. Bei der Entsorgung sind folgende Regeln zu beachten: • Jeder Verbraucher ist gesetzlich verpflichtet, Elektro- und Elek- tronikaltgeräte (Altgeräte) sowie Batterien und Akkus getrennt vom Hausmüll zu entsorgen.
- Seite 17 • Bei einem Vertrieb unter Verwendung von Fernkommunikationsmitteln ist die unentgeltliche Abholung am Ort der Abgabe auf Elektro- und Elektronikgeräte der Kategorien 1, 2 und 4 gemäß § 2 Abs. 1 ElektroG, nämlich „Wärmeüberträger“, „Bildschirmgeräte“ (Oberfläche von mehr als 100 cm²) oder „Großgeräte“...
- Seite 18 HINWEISE ZUR ENTSORGUNG Wenn es in Ihrem Land eine gesetzliche Regelung zur Entsorgung von elektrischen und elektronischen Geräten gibt, weist dieses Symbol auf dem Produkt oder auf der Verpackung darauf hin, dass dieses Produkt nicht im Hausmüll entsorgt werden darf. Stattdessen muss es zu einer Sammelstelle für das Recycling von elektrischen und elektronischen Geräten gebracht werden.
- Seite 19 Dear Customer, Congratulations on purchasing this device. Please read the following instructions carefully and follow them to prevent possible damages. We assume no liability for damage caused by disregard of the instructions and improper use. Scan the QR code to get access to the latest user manual and more product information.
- Seite 20 SAFETY INSTRUCTIONS General safety • Read the manual carefully before use and keep the manual for future reference. • Only use the appliance and the accessories for their intended purposes and do not use the appliance and the accessories for other purposes than described in the manual.
- Seite 21 • Do not pull the mains cable to disconnect the mains plug from the mains. • Disconnect the mains plug from the mains when the appliance is not in use, before assembly or disassembly and before cleaning and maintenance. Safety instructions for coffee makers •...
- Seite 22 PRODUCT DESCRIPTION Control panel...
- Seite 23 Tank cover 1-shot hot espresso Water tank ON/OFF Steam knob 2-shot hot espresso Control panel Americano Cup plate Espresso Cool Steam Steam nozzle Drip tray 1-Cup Filter 2-Cup Filter Portafilter Portafilter handle Measure spoon and tamper...
- Seite 24 OPERATION Make sure that the espresso machine is switched off and unplugged from the mains. Hold the water tank handle and remove the water tank. Fill the water reservoir with fresh, cold water. DO NOT exceed the maximum fill level marked “MAX“. Reinsert the water tank to ensure that it is properly seated.
- Seite 25 Place one or two pre-heated cups under the coffee spout. After plugging in, press the ON/OFF button, all indicators will be stable. Espresso Cool Drop the ice cubes in the water tank, press the “Espresso Cool“ button for cool espresso, the longest time is 19 seconds. Tip: Always use iced water for the best results.
- Seite 26 Single-shot hot espresso • Press the “Hot espresso“ button and the indicator light will start flashing, indicating that the machine is heating up the heating system. • When the indicator light is steady, the internal components are heated and ready to brew coffee, the longest time is 17 seconds. Double-shot hot espresso •...
- Seite 27 turning the steam control knob to on. You can turn the control knob to the OFF position when there is no more water. Turn the steam wand to the side of the machine. Place the steam wand in the milk so that the nozzle is about 1 cm below the surface and activate the steam function by pressing the STEAM button and turning the STEAM control knob to the ON position.
- Seite 28 Make Cappucino/ Frothed milk You get a cup of cappuccino when you add foamed milk to a cup of espresso. Prepare an espresso using a large enough container as described in the "Hot Espresso" section, making sure that the steam knob is in the OFF position. Press the steam warm-up button, the coffee button indicator will go out, wait until the steam warm-up button indicator lights up.
- Seite 29 Note: If you wish to make coffee immediately after making steam, the Coffee indicator will flash as an alarm when the Coffee button is touched, at this time you should turn the steam control knob to the ON position to pump hot water to allow the machine to cool down.
- Seite 30 Cleaning the drip tray The drip tray must be removed when the stand is removed. Then clean it with a soft, damp cloth (do not use abrasive cleaners or scouring agents). Note: Do not clean any parts or accessories in a dishwasher. Cleaning the steam wand You will need to clean the steam wand after steaming milk.
- Seite 31 TROUBLESHOOTING Problem Possible Cause Suggested Solution No water in the water tank Fill the tank with water, run through the appliance without a coffee filter to ensure it is fully primed No coffee pouring The coffee grounds are Empty the filter and rinse too fine or tamped down under water to clean, Wipe too hard...
- Seite 32 DISPOSAL CONSIDERATIONS If there is a legal regulation for the disposal of electrical and electronic devices in your country, this symbol on the product or on the packaging indicates that this product must not be disposed of with household waste. Instead, it must be taken to a collection point for the recycling of electrical and electronic equipment.
- Seite 33 Estimado cliente: Le felicitamos por la adquisición de este producto. Lea atentamente el siguiente manual y siga cuidadosamente las instrucciones de uso con el fin de evitar posibles daños. La empresa no se responsabiliza de los daños ocasionados por un uso indebido del producto o por haber desatendido las indicaciones de seguridad.
- Seite 34 INDICACIONES DE SEGURIDAD Indicaciones generales de seguridad • Lea atentamente todas el manual de instrucciones antes de usar el cochecito y conserve este manual de instrucciones para futuras consultas. • Utilice el aparato y los accesorios únicamente para los fines previstos y no utilice el aparato y los accesorios para fines distintos de los descritos en el manual de instrucciones.
- Seite 35 defectuosos, deben ser sustituidos por el fabricante, un taller de reparación autorizado o una persona cualificada. No tire del cable de alimentación para desconectar el enchufe de la toma de corriente. • Desconecte el enchufe de la toma de corriente cuando el aparato no esté en uso, antes de montarlo o desmontarlo y antes de proceder a su limpieza y mantenimiento.
- Seite 36 DESCRIPCIÓN DEL PRODUCTO Panel de control...
- Seite 37 Tapa del depósito de agua 1 taza de café expreso caliente Depósito de agua ON/OFF Regulador de vapor 2 tazas de café expreso caliente Panel de control Americano Soporte para tazas Espresso frío Vapor Boquilla de vapor Bandeja de goteo Filtro de 1 taza Filtro de 2 tazas Portafiltro...
- Seite 38 FUNCIONAMIENTO Asegúrese de que la cafetera esté apagada y desconectada de la red eléctrica. Sujete firmemente el asa del depósito de agua y extráigalo. Llena el depósito de agua con agua fresca y fría. NO sobrepase el nivel máximo de llenado marcado con "MAX". Vuelva a insertar el depósito de agua para asegurarse de que esté...
- Seite 39 Coloque una o dos tazas precalentadas debajo de la salida de café. Después de enchufar el cable de alimentación, pulse el botón ON/OFF y se encenderán todos los indicadores luminosos. Espresso frío. Coloque los cubitos de hielo en el depósito de agua y pulse el botón "Espresso Cool"...
- Seite 40 1- taza de café expreso caliente • Pulse el botón "Espresso caliente" y el indicador luminoso empezará a parpadear para indicar que el aparato está calentando el sistema de calefacción. • Cuando la luz indicadora se enciende constantemente, los componentes internos se calientan y están listos para preparar café;...
- Seite 41 espumadora de acero inoxidable. Al pulsar el botón de vapor, parpadea. Se enciende de forma continua cuando está listo para su uso. Retire el agua de la tubería de vapor. La función de vapor se activa colocando el mando de vapor en "ON". Si ya no hay agua, puede girar el mando giratorio a la posición "OFF".
- Seite 42 11. Retire la taza, limpie el tubo de vapor y la boquilla con un paño limpio y húmedo y libere inmediatamente una pequeña cantidad de vapor. Preparar capuchino/ espuma de leche Una taza de capuchino se prepara añadiendo espuma de leche a una taza de espresso.
- Seite 43 Nota: Limpie la salida de vapor con una esponja húmeda en cuanto deje de salir vapor, pero tenga cuidado de no hacerse daño Vierta la leche espumada en el espresso preparado, el capuchino ya está listo. Endulzar al gusto y espolvorear con cacao en polvo si se desea. Pulsa el botón de encendido para apagar el aparato.
- Seite 44 Limpieza de la carcasa exterior / portavasos No utilice productos de limpieza ordinarios o agresivos para limpiar la carcasa exterior. Utilice un paño húmedo para limpiar la carcasa. Limpieza de la rejilla de goteo La rejilla pequeña debe retirarse, limpiarse y vaciarse con frecuencia, especialmente cuando la bandeja recogegotas está...
- Seite 45 DETECCIÓN Y REPARACIÓN DE ANOMALÍAS Anomalía Posible causa Solución propuesta No hay agua en el depósito Llene el depósito con agua y de agua. haga funcionar el aparato sin el filtro de café para asegurarse de que está completamente ventilado. No se sirve café...
- Seite 46 INDICACIONES SOBRE LA RETIRADA DEL APARATO Si en su país existe una disposición legal relativa a la eliminación de aparatos eléctricos y electrónicos, este símbolo estampado en el producto o en el embalaje advierte que no debe eliminarse como residuo doméstico. En lugar de ello, debe depositarse en un punto de recogida de reciclaje de aparatos eléctricos y electrónicos.
- Seite 47 Cher client, chère cliente, Toutes nos félicitations pour l’acquisition de ce nouvel appareil. Lisez attentivement les consignes suivantes et suivez-les pour éviter d'éventuels dommages. Nous ne saurions être tenus pour responsables des dommages dus au non-respect des consignes et à la mauvaise utilisation de l’appareil.
- Seite 48 CONSIGNES DE SÉCURITÉ Consignes générales de sécurité • Lisez attentivement toutes les consignes avant d'utiliser le produit et conservez bien le mode d'emploi pour vous y référer ultérieurement. • N'utilisez l'appareil et les accessoires que pour l'usage auquel ils sont destinés et n'utilisez pas l'appareil et les accessoires à...
- Seite 49 tranchants. • N'utilisez pas l'appareil si le cordon d'alimentation ou la fiche sont endommagés ou défectueux. Si le cordon ou la fiche d'alimentation est endommagé ou défectueux, il doit être remplacé par le fabricant, un réparateur agréé ou une personne qualifiée. Ne tirez pas sur le cordon d'alimentation pour débrancher la fiche d'alimentation de la prise de courant.
- Seite 50 DESCRIPTION DU PRODUIT Panneau de commande...
- Seite 51 Couvercle du réservoir d'eau 1 tasse d’expresso chaud Réservoir d'eau ON/OFF Régulateur de vapeur 2 tasses d’expresso chaud Panneau de commande Americano Porte-tasse Expresso froid Vapeur Buse vapeur Bac d'égouttage Filtre 1 tasse Filtre 2 tasses porte-filtre Poignée du filtre Cuillère à...
- Seite 52 UTILISATION Assurez-vous que la machine à café est éteinte et débranchée du réseau électrique. Tenez la poignée du réservoir d'eau et retirez le réservoir d'eau. Remplissez le réservoir avec de l'eau fraîche. NE PAS dépasser le niveau de remplissage maximal indiqué par "MAX". Remettez le réservoir d'eau en place pour vous assurer qu'il est correctement positionné.
- Seite 53 pointer vers l'avant à un angle de 90°. Placez une ou deux tasses préchauffées sous la sortie café. Après avoir branché le câble d'alimentation, appuyez sur le bouton ON/OFF et tous les voyants lumineux sont allumés. Expresso froid Placez les glaçons dans le réservoir d'eau et appuyez sur le bouton « expresso Cool »...
- Seite 54 1 tasse d’expresso chaud • Appuyez sur la touche "expresso chaud" et le voyant lumineux se met à clignoter pour indiquer que l'appareil est en train de chauffer le système de chauffage. • Lorsque le témoin lumineux est allumé en permanence, les composants internes sont chauffés et prêts à...
- Seite 55 Lorsque vous appuyez sur le bouton vapeur, il clignote. Il reste allumé en continu lorsqu'il est prêt à l'emploi. Enlevez l'eau sur le tuyau à vapeur. La fonction vapeur est activée en plaçant le bouton de réglage de la vapeur sur ON. S'il n'y a plus d'eau, vous pouvez tourner le bouton sur la position OFF.
- Seite 56 11. Retirez la tasse, essuyez le tube à vapeur et la buse avec un chiffon propre et humide et laissez immédiatement s'échapper une petite quantité de vapeur. Préparer un cappucino/du lait mousseux Une tasse de cappuccino s'obtient en ajoutant de la mousse de lait à une tasse d'expresso.
- Seite 57 Remarque : nettoyez la sortie de vapeur avec une éponge humide dès que la production de vapeur s'arrête, mais faites attention à ne pas vous blesser ! Versez le lait moussé dans l'expresso préparé, le cappuccino est maintenant prêt. Sucrer à volonté et éventuellement saupoudrer de cacao en poudre. Appuyez sur la touche d'alimentation pour éteindre l'appareil.
- Seite 58 Nettoyez la tête d'infusion avec un chiffon humide et propre et essuyez-la bien pour éliminer tous les résidus de café. Nettoyage du boîtier extérieur/du support de tasse N'utilisez pas de produits de nettoyage courants ou agressifs pour nettoyer le boîtier extérieur. Utilisez un chiffon doux et humide pour nettoyer le boîtier extérieur et le porte-tasse.
- Seite 59 IDENTIFICATION ET RÉSOLUTION DES PROBLÈMES Problème Cause possible Solution proposée Il n'y a pas d'eau dans le Remplissez le réservoir d'eau réservoir d'eau. et faites fonctionner l'appareil sans filtre à café pour vous assurer qu'il est complètement purgé. Aucun café n'est servi Le marc de café...
- Seite 60 INFORMATIONS SUR LE RECYCLAGE S‘il existe une réglementation pour l‘élimination ou le recyclage des appareils électriques et électroniques dans votre pays, ce symbole sur le produit ou sur l‘emballage indique que cet appareil ne doit pas être jeté avec les ordures ménagères.
- Seite 61 Gentile cliente, La ringraziamo per l'acquisto del dispositivo. La preghiamo di leggere attentamente le seguenti indicazioni e di seguirle per evitare eventuali danni. Non ci assumiamo alcuna responsabilità per danni scaturiti da una mancata osservanza delle indicazioni relative alla sicurezza e da un uso improprio del dispositivo.
- Seite 62 AVVERTENZE DI SICUREZZA Avvertenze di sicurezza generiche • Leggere attentamente tutto il manuale d'uso e conservarlo per consultazioni future. • Utilizzare il dispositivo e gli accessori solo per lo scopo previsto e non per scopi diversi da quelli descritti nel manuale d'uso. •...
- Seite 63 • Scollegare la spina dalla presa di corrente quando il dispositivo non è in uso, prima del montaggio o dello smontaggio e prima della pulizia e della manutenzione. Avvertenze di sicurezza per le macchine del caffè • Non utilizzare il dispositivo all'aperto. •...
- Seite 64 DESCRIZIONE DEL PRODOTTO Pannello di controllo...
- Seite 65 Copertura del serbatoio dell'acqua 1 tazza di caffè espresso caldo Serbatoio dell'acqua ON/OFF Manopola del vapore 2 tazze di caffè espresso caldo Pannello di controllo Americano Supporto per le tazze Caffè espresso freddo Vapore Ugello del vapore Vaschetta di gocciolamento Filtro per 1 tazza Filtro per 2 tazze Portafiltro...
- Seite 66 UTILIZZO Assicurarsi che la macchina del caffè sia spenta e scollegata dalla rete elettrica. Tenere saldamente l'impugnatura del serbatoio dell'acqua e rimuoverlo. Riempire il serbatoio con acqua fredda. Non superare il livello massimo di riempimento indicato con "MAX". Reinserire il serbatoio dell'acqua per verificare che sia posizionato correttamente.
- Seite 67 angolo di 90°. Mettere una o due tazze preriscaldate sotto il beccuccio di erogazione del caffè. Dopo aver collegato il cavo di alimentazione, premere il tasto ON/OFF e tutte le spie si accendono. Caffè espresso freddo Inserire i cubetti di ghiaccio nel serbatoio dell'acqua e premere il tasto "Espresso Cool"...
- Seite 68 1 tazza di caffè espresso caldo • Premere il tasto "Espresso caldo" e la spia inizierà a lampeggiare per indicare che il dispositivo ha attivato il sistema di riscaldamento. • Quando la spia è costantemente accesa, i componenti interni sono riscaldati e pronti per l'erogazione del caffè;...
- Seite 69 può ruotare la manopola in posizione "OFF". Girare il tubo del vapore verso il lato del dispositivo. Posizionare il tubo del vapore nel latte in modo che l'ugello si trovi a circa 1 cm sotto la superficie e attivare la funzione di erogazione del vapore premendo il tasto del vapore e mettendo la manopola del vapore in posizione "ON".
- Seite 70 espresso. Preparare un espresso con una tazza sufficientemente grande come descritto nella sezione "Espresso caldo" e assicurarsi che la manopola del vapore sia in posizione "OFF". Premere il tasto del vapore, la spia del tasto del caffè si spegne, attendere che la spia del tasto del vapore si accenda.
- Seite 71 Premere il tasto dell'alimentazione per spegnere il dispositivo. Tutte le indicazioni si spengono. Nota: se si desidera preparare un caffè subito dopo l'erogazione del vapore, la spia del caffè lampeggia come allarme quando si tocca il tasto del caffè. A questo punto, è...
- Seite 72 Pulizia della griglia di gocciolamento La griglia piccola deve essere rimossa, pulita e svuotata frequentemente, soprattutto quando la vaschetta è piena. La griglia può essere lavata con acqua calda e sapone e risciacquata accuratamente. Utilizzare un detergente non abrasivo (non utilizzare detergenti, spugne o panni che potrebbero graffiare la superficie).
- Seite 73 RICERCA E CORREZIONE DEGLI ERRORI Problema Possibile causa Soluzione consigliata Non c'è acqua nel serbatoio. Riempire il serbatoio con acqua e attivare il dispositivo senza il filtro del caffè per assicurarsi che sia completamente sfiatato. Non viene erogato caffè Il caffè è troppo fine o Svuotare il filtro e sciacquarlo pressato eccessivamente sotto l'acqua per pulirlo...
- Seite 74 AVVISO DI SMALTIMENTO Se nel proprio paese si applicano le regolamentazioni inerenti lo smaltimento di dispositivi elettrici ed elettronici, questo simbolo sul prodotto o sulla confezione segnala che questi prodotti non possono essere smaltiti con i rifiuti normali e devono essere portati a un punto di raccolta di dispositivi elettrici ed elettronici.