Inhaltsverzeichnis
Werbung
Verfügbare Sprachen
Verfügbare Sprachen
Akku-Kreuzlinienlaser / Cordless Cross Line Laser /
Niveau laser en croix sans fi l PKLLP 360 A1
Akku-Kreuzlinienlaser
Originalbetriebsanleitung
Niveau laser en croix sans fi l
Traduction des instructions d'origine
Akumulatorowy laser krzyżowy
Tłumaczenie oryginalnej instrukcji obsługi
Akumulátorový krížový líniový laser
Preklad originálneho návodu na obsluhu
IAN 346569_2001
Cordless Cross Line Laser
Translation of the original instructions
Accu-kruislijnenlaser
Vertaling van de originele
gebruiksaanwijzing
Aku křížový liniový laser
Překlad originálního provozního návodu
Werbung
Kapitel
Inhaltsverzeichnis
Fehlerbehebung

Verwandte Anleitungen für Parkside Performance PKLLP 360 A1


Inhaltszusammenfassung für Parkside Performance PKLLP 360 A1
- Seite 1 Akku-Kreuzlinienlaser / Cordless Cross Line Laser / Niveau laser en croix sans fi l PKLLP 360 A1 Akku-Kreuzlinienlaser Cordless Cross Line Laser Originalbetriebsanleitung Translation of the original instructions Niveau laser en croix sans fi l Accu-kruislijnenlaser Traduction des instructions d‘origine...
- Seite 2 Klappen Sie vor dem Lesen die Seite mit den Abbildungen aus und machen Sie sich anschließend mit allen Funktionen des Gerätes vertraut. Before reading, unfold the page containing the illustrations and familiarise yourself with all functions of the device. Avant de lire le mode d‘emploi, ouvrez la page contenant les illustrations et familiarisez-vous ensuite avec toutes les fonctions de l‘appareil.
-
Seite 5: Inhaltsverzeichnis
Inhalt Einleitung ....5 Reinigung ....13 Bestimmungs- Lagerung ....14 gemäße Wartung ....14 Verwendung .... 6 Transport ....14 Allgemeine Entsorgung / Beschreibung ... 6 Umweltschutz ..14 Ersatzteile/Zubehör 15 Lieferumfang ....6 Fehlersuche .... 15 Funktions beschreibung ..7 Garantie .... -
Seite 6: Bestimmungs- Gemäße Verwendung
Die Betriebsanleitung Das Gerät ist zum Gebrauch ist Bestandteil dieses durch Erwachsene bestimmt. Jugendliche über 16 Jahre Gerätes. Sie enthält wichti- ge Hinweise für Sicherheit, dürfen das Gerät nur unter Gebrauch und Entsorgung. Aufsicht benutzen. Machen Sie sich vor der Der Hersteller haftet nicht Benutzung des Gerätes mit für Schäden, die durch allen Bedien- und Sicher-... -
Seite 7: Funktions Beschreibung
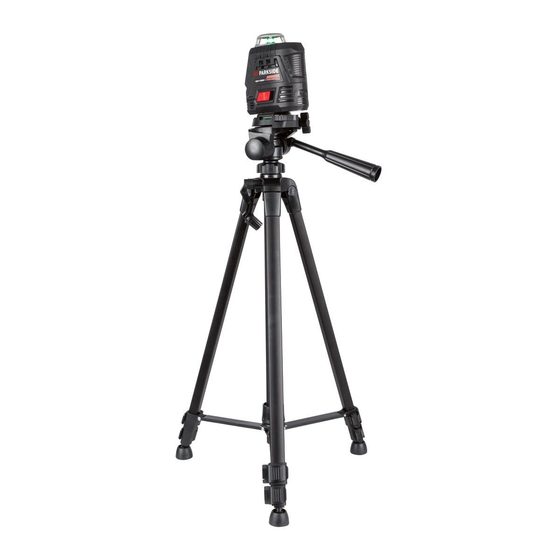
18 Ladekontroll-Lampe Funktions beschreibung 19 Nivellier-Lampe Der Akku-Kreuzlinienlaser 20 Innengewinde besitzt eine vertikale Laser- 21 Stativschraube linie und eine horizontale Technische Daten 360-Grad-Laserlinie. Die beiden Laserlinien können sowohl einzeln als auch Arbeitsbereich ..15 m* gleichzeitig genutzt wer- Gewicht den. (ohne Stativ) ..ca. 350 g Die Funktion der Bedientei- Betriebsspannung le entnehmen Sie bitte den... -
Seite 8: Sicherheits Hinweise
Sicherheits Hinweiszeichen mit hinweise Informationen zum besseren Umgang mit dem Gerät Bildzeichen auf dem Gerät Allgemeine LASER CLASS 2 Sicherheits EN 60825-1:2014 λ= 510-530 nm hinweise < 1 mW Achtung! Laserstrahlung Beachten Sie die An- • Nicht in den Strahl blicken! gaben zur Bedienung, Laserklasse 2 Reinigung, Lagerung und... -
Seite 9: Sicherheitshinweise Zum Umgang Mit Dem Laser
eine mechanische Be- Sicherheitshinweise schädigung des Akkus. zum Umgang mit Es besteht die Gefahr dem Laser eines Kurzschlusses und Achtung: Laserstrahlung es können Dämpfe aus- • Nicht in den Strahl bli- treten, die die Atemwege cken! Laserklasse 2 reizen. Sorgen Sie für Laserstrahl nicht gegen Frischluft und nehmen Sie •... -
Seite 10: Horizontale Und Vertikale Laserlinie Verwenden
den auf den Ein-/Aus- 3. Schalten Sie das Gerät schalter (14) drücken. ein. Die Nivellier-Lampe (19) Horizontale und vertikale leuchtet: Laserlinie grün: wenn eine automa- verwenden tische Nivellierung mög- lich ist. Nach dem Einschalten: Die Nivellierung ist ab- 360-Grad-Laserlinie geschlossen, wenn sich + vertikale Laserlinie die Laserlinien nicht mehr bewegen. -
Seite 11: Arbeiten Mit Stativ
1. Schieben Sie die Ni- Stativ einstellen vellier-Arretierung (13) nach links (geschlosse- nes Schloss). Die horizontale Ausrichtung 2. Schalten Sie das Gerät des Stativs können Sie an ein. der Wasserwaage ( 12) überprüfen. Arbeiten mit Stativ 1. Ziehen Sie die Stativ- Beine (6) auseinander. -
Seite 12: Ladevorgang
4. Kurbeln Sie das Stativ Stativ rotieren auf die gewünschte 1. Drehen Sie die Stell- Höhe. schraube (11) zum Lo- 5. Drehen Sie den Feststell- ckern nach links. ring (10) nach rechts, 2. Greifen Sie die Griff- um diese Stellung zu Schraube (4) und dre- arretieren. -
Seite 13: Reinigung
Reinigung Laden Sie den in das Ge- • rät eingebauten Akku vor dem ersten Gebrauch auf. Lassen Sie Arbei- Defekte, die aus unsach- ten, die nicht in • gemäßer Handhabung re- dieser Betriebsan- sultieren, unterliegen nicht leitung beschrie- der Garantie. ben sind, von Der Akku ist nicht aus- einer Fachwerk-... -
Seite 14: Lagerung
che des Gerätes mit einer Werfen Sie Ge- weichen Bürste, einem räte mit einge- Pinsel oder einem Tuch. bautem Akku nicht in den Hausmüll, ins Lagerung Feuer (Explosionsgefahr) oder ins Wasser. Beschä- Bewahren Sie das Gerät digte Akkus können der •... -
Seite 15: Ersatzteile/Zubehör
Ersatzteile/Zubehör Ersatzteile und Zubehör erhalten Sie unter www.grizzly-service.eu Sollten Sie Probleme mit dem Bestellvorgang haben, verwenden Sie bitte das Kontaktformular. Bei weiteren Fragen wenden Sie sich an das „Service-Center“ (siehe „Service-Center“ Seite 18). Position Anleitung Bezeichnung Bestell-Nr. 3-12 Stativ 91105838 Fehlersuche Achtung! Laserstrahlung. -
Seite 16: Garantie
Garantie wird, worin der Mangel besteht und wann er aufgetreten ist. Sehr geehrte Kundin, Wenn der Defekt von unserer sehr geehrter Kunde, Garantie gedeckt ist, erhalten Sie erhalten auf diesen Sie das reparierte oder ein Artikel 5 Jahre Garantie ab neues Produkt zurück. Mit Kaufdatum. - Seite 17 Abnutzung von Verschleißteilen Bitte halten Sie für alle An- • (z. B. Akkukapazität). fragen den Kassenbon und die Identifikationsnummer Diese Garantie verfällt, wenn (IAN 346569_2001) als das Produkt beschädigt, nicht sachgemäß benutzt oder nicht Nachweis für den Kauf bereit. gewartet wurde. Ebenso für Die Artikelnummer entnehmen •...
-
Seite 18: Reparatur-Service
ServiceCenter sicher, dass der Versand nicht unfrei, per Sperrgut, Express Service oder sonstiger Sonderfracht Deutschland erfolgt. Senden Sie das Gerät bitte inkl. aller beim Kauf Tel.: 0800 54 35 111 mitgelieferten Zubehörteile E-Mail: grizzly@lidl.de IAN 346569_2001 ein und sorgen Sie für eine ausreichend sichere Trans- Service portverpackung. -
Seite 19: Introduction
Content Introduction ... 19 Spare parts/ Intended purpose ... 20 Accessories .... 29 General description 20 Troubleshooting ..29 Guarantee ..... 30 Extent of the delivery ..20 Repair Service ..32 Functional description ... 20 Service-Center ..32 Overview ....21 Technical Importer .... -
Seite 20: Intended Purpose
The operating instruc- The manufacturer is not lia- tions constitute part of ble for damage caused by this product. They con- improper use or incorrect tain important information operation. on safety, use and disposal. General Before using the product, familiarise yourself with all description of the operating and safety instructions. -
Seite 21: Overview
Technical gree laser line. The laser specifications lines can be used both indi- vidually and together. Working range ..15 m* Refer to the following de- Weight scriptions for a functional (without description of the controls. tripod) ..approx. 350 g Operating voltage Overview .....4 V Nominal capacity ...2,6 Ah... -
Seite 22: Safety Information
Safety information Notice symbol with information on how Symbols on the device: to handle the device properly. LASER CLASS 2 EN 60825-1:2014 General notes on λ= 510-530 nm < 1 mW safety Caution: Leaser beam – Do not look into the beam! Observe the information •... -
Seite 23: Safety Instructions For Battery-Powered Devices
Operation Do not aim the laser beam • at people. Markings and warnings Caution! - Laser • are located on the top beam. Do not look and bottom of the device. into the beam. Turn your head away or close your eyes to Safety instructions prevent looking into for batterypowered... -
Seite 24: Working With The Automatic Leveller
Press the On/off In the event of vibra- switch (14) briefly: tions, the laser will level 360-degree laser line itself automatically; wait until the laser lines no longer move. Working with the automatic leveller Working without the automatic leveller 1. Push the automatic leveller (13) to the right (open lock). -
Seite 25: Adjusting The Tripod
Removing/inserting Setting the height, the tripod mount tripod feet 1. Open the snap faste- 1. Open the lever (5). ners (7). 2. Remove the tripod 2. Extend the tripod mount (16) in an up- legs (6) to the desired ward direction. length. -
Seite 26: Charging Process
3. Turn the handwheel solution! In the bolt (4) to the right to case of contact, lock the inclination into rinse with water or place. neutralizer. Seek medical advice if Adjusting the incli- the solution has nation, sideways come into contact 1. -
Seite 27: Cleaning
USB-C charging cable Thoroughly clean the de- • (17) from the USB port. vice after every use. 4. Then remove the USB-C Clean the discs protecting • charging cable (17) from the laser ( 1/15 )with a the device. soft jet of air, or soft cloth. Do not use heavy pressure The charge indicator (18) as this may damage the... -
Seite 28: Waste Disposal And Environmental Protection
Waste disposal and environmental protection The device, accessories and packaging should be properly recycled. Do not dispose of the device with the battery installed in household waste, fire (risk of explo- sion) or water. Damaged batteries may damage the environment and your health if toxic fumes or liq- uids leak out. -
Seite 29: Spare Parts/Accessories
Spare parts/Accessories Spare parts and accessories can be obtained at www.grizzly-service.eu If you have issues ordering, please use the contact form. If you have any other questions, please contact the service centre (see “Service Centre” on page 32). Description Position instruc- Order No. -
Seite 30: Terms Of Guarantee
Guarantee our guarantee, you will receive either the repaired Dear Customer, product or a new product. This device comes with a No new guarantee period 5-year warranty from the begins on repair or replace- date of purchase. ment of the product. statutory rights against the seller of the product. -
Seite 31: Processing In Case Of Guarantee
(IAN 346569_2001) rea- battery capacity). This guarantee shall be dy as proof of purchase invalid if the product has for all enquiries. Please find the item num- been damaged, used incor- • rectly or not maintained. ber on the rating plate. Neither does it extend to Should functional errors •... -
Seite 32: Repair Service
ServiceCenter all accessories supplied at the time of purchase and ensure adequate, safe Service Great transport packaging. Britain Tel.: 0800 404 7657 Repair Service E-Mail: grizzly@lidl.co.uk For a charge, repairs not IAN 346569_2001 covered by the guarantee can be carried out by our service Service Ireland branch, which will be happy to Tel.: 1890 930 034... -
Seite 33: Introduction
Sommaire Introduction ... 33 Procédure Fins d‘utilisation ..34 de charge ....41 Description Nettoyage....42 générale ....34 Rangement .... 42 Maintenance ..42 Volume de la livraison ... 34 Transport ....43 Description du Elimination et fonctionnement ..... 35 protection de Vue d‘ensemble .... -
Seite 34: Fins D'utilisation
un contrôle final. Le foncti- destiné à être utilisé dans onnement de votre appareil le domaine du bricolage. Il est donc ainsi garanti. n‘a pas été conçu pour une utilisation professionnelle La notice d’utilisation constante. fait partie de ce produ- L‘appareil est destiné... -
Seite 35: Description Du Fonctionnement
• Niveau laser en croix Bague de blocage sans fil Manivelle • Trépied Bague de blocage • Câble de charge USB-C Vis de réglage • Notice d‘utilisation Niveau à bulle Butée de nivellement Evacuez le matériel Interrupteur Marche/ d’emballage comme il se Arrêt doit. -
Seite 36: Sécurité
nivellement ..± 4 mm/m Symboles utilisés dans Laser le mode d’emploi: Longueur d‘onde ..510-530 nm Signes de danger Classe de laser ..... 2 avec conseils de Durée de prévention des nivellement ..env. 4 sec accidents sur les personnes ou des dégâts matériels. -
Seite 37: Consignes De Sécurité Pour La Manipulation Du Laser
N‘utilisez pas d‘appareil Consignes de endommagé. sécurité pour les appareils sans fil Couper l’alimentation en • cas de non-utilisation de Afin de réduire le risque l‘appareil. Ne laissez pas • l‘appareil sans surveillance. d‘électrocution, retirez la fiche du chargeur de la Éloignez l‘appareil des •... -
Seite 38: Opération
Opération Appui bref sur l‘interrupteur Marche/ Attention ! - Rayon Arrêt (14) : laser. Ne pas fixer ligne laser verticale le rayon. Tournez la tête ou fermez les Appui bref sur yeux pour éviter de l‘interrupteur Marche/ regarder dans le ra- Arrêt (14) : yon laser. -
Seite 39: Travailler Sans Le Dispositif De Nivellement Automatique
rot: lorsqu‘un nivellement Travailler avec le trépied automatique est im- possible. Les lignes laser clig- Visser le laser sur le notent. socle du trépied 1. Vissez l‘appareil avec le filetage intérieur (20) En cas de secousses, le laser se nivelle à à... -
Seite 40: Régler Le Trépied
4 Levez le trépied à la Régler le trépied hauteur souhaitée en tournant la manivelle. Vous pouvez vérifier 5. Tournez la bague de l‘alignement horizontal du blocage (10) vers la trépied à l‘aide du niveau à droite pour bloquer cet- 12). -
Seite 41: Procédure De Charge
Tourner le trépied La batterie doit être 1. Pour desserrer, tournez chargée unique- la vis de réglage (11) ment dans des vers la gauche. endroits secs. 2. Saisissez la poignée de serrage (4) et tournez Procédez au chargement • le trépied dans la direc- de la batterie intégrée tion souhaitée. -
Seite 42: Nettoyage
1/15) avec un souffle Le témoin lumineux de charge (18) s‘allume : d‘air faible ou un chiffon vert : si l‘appareil est doux. N‘exercez pas une chargé. forte pression pour ne pas rouge : si l‘appareil est en endommager la surface. cours de chargement. -
Seite 43: Transport
Transport en plastique et métalliques par matières et de les Éteignez le laser et verrouil- introduire ainsi dans un lez le loquet du niveau( circuit de recyclage. Pour 13) pendant le transport cela, veuillez vous adres- (position ), pour protéger ser à... -
Seite 44: Pièces De Rechange / Accessoires
Pièces de rechange / Accessoires Vous obtiendrez des pièces de rechange et des accessoires à l’adresse www.grizzly-service.eu Si vous avez des problèmes lors du passage de la commande, merci d‘utiliser le formulaire de contact. Pour toute autre question, adressez-vous au „Centre de service après-vente“... -
Seite 45: Garantie - France
Garantie France Article L217-5 du Code de la consommation Chère cliente, cher client, Le bien est conforme au Ce produit bénéficie d’une contrat : garantie de 5 ans, valable 1° S´il est propre à l‘usage à compter de la date habituellement attendu d‘un d’achat. - Seite 46 Article L217-16 du Code de Article L217-12 du Code de la consommation la consommation Lorsque l‘acheteur demande L‘action résultant du défaut au vendeur, pendant de conformité se prescrit par le cours de la garantie deux ans à compter de la commerciale qui lui a été...
- Seite 47 un neuf. Aucune nouvelle placées pendant les deux période de garantie ne premières années à compter débute à la date de la répa- de la date d’achat. Cette garantie prend fin si ration ou de l’échange du produit. le produit endommagé n’a pas été...
- Seite 48 Article 1641 du Code civil Vous trouverez le numéro • Le vendeur est tenu de la d’article sur la plaque sig- garantie à raison des dé- nalétique. fauts cachés de la chose Si des pannes de fonc- • vendue qui la rendent im- tionnement ou d’autres propre à...
-
Seite 49: Garantie - Belgique
en port dû, comme mar- vous sera réclamé comme chandises encombrantes, preuve d’achat. envoi express ou autre Si un défaut matériel ou de taxe spéciale. Veuillez fabrication apparaît dans renvoyer l’appareil, y un délai de cinq ans à compris tous les acces- compter de la date d’achat soires livrés lors de l’achat de ce produit, nous répare-... - Seite 50 aussi aux pièces rem- pas été utilisé ou entretenu placées et réparées. Les d’une façon conforme. Pour dommages et les manques une utilisation appropriée éventuellement constatés du produit, il faut impéra- dès l’achat doivent immé- tivement respecter toutes diatement être signalés les instructions citées dans après le déballage.
-
Seite 51: Service Réparations
par téléphone ou par et prenez toute mesure e-Mail, avec le service pour avoir un emballage de transport suffisamment après-vente dont les coor- données sont indiquées sûr. ci-dessous. Vous recevrez Service alors des renseignements supplémentaires sur le Réparations déroulement de votre ré- clamation. -
Seite 52: Service-Center
appareils défectueux ren- voyés. ServiceCenter Service France Tel.: 0800 919270 E-Mail: grizzly@lidl.fr IAN 346569_2001 Service Belgique Tel.: 070 270 171 (0,15 EUR/Min.) E-Mail: grizzly@lidl.be IAN 346569_2001 Importateur Veuillez noter que l’adresse sui- vante n’est pas une adresse de service après-vente. Contactez d’abord le service après-vente cité... -
Seite 53: Inleiding
Inhoud Inleiding ....53 Statief instellen ..... 59 Toepassingsgebied . 54 Laadproces .... 60 Algemene Reiniging ....61 beschrijving ... 54 Bewaring ....61 Onderhoud .... 62 Omvang van de Transport ....62 levering ....... 54 Afvalverwerking en Beschrijving van milieu bescherming . -
Seite 54: Toepassingsgebied
De gebruiksaanwijzing dan 16 jaar mogen het vormt een bestanddeel apparaat alleen onder toe- van dit apparaat. Ze omvat zicht gebruiken. belangrijke aanwijzingen De fabrikant is niet aans- voor veiligheid, gebruik en prakelijk voor schade die afvalverwijdering. Maak u het gevolg is van oneigen- vóór het gebruik van het ap- lijk gebruik of een foute paraat met alle bedienings-... -
Seite 55: Beschrijving Van De Werking
Zorg voor een reglementair Aan-/uit schakelaar voorgeschreven afvalverwij- verticale laser dering van het verpakkings- Statiefplaat materiaal. USB-C-laadkabel Laadcontrole-lamp Nivellerende lamp Beschrijving van de werking 20 Inwendige schroef- De draadloze kruislijnlaser draad heeft een verticale laser- 21 Statiefschroef lijn en een horizontale 360-graden-laserlijn. -
Seite 56: Symbolen Op Het Apparaat
Aanwijzingsteken met Veiligheidsvoor informatie voor een schriften betere omgang met Symbolen op het het apparaat. apparaat: Algemene LASER CLASS 2 veiligheids instructies EN 60825-1:2014 λ= 510-530 nm < 1 mW Raadpleeg de gebruik- • Let op! Laserstraling saanwijzing voor infor- Niet in de laserstraal ki- matie over de bediening, jken! -
Seite 57: Veiligheids Aanwijzingen Voor De Omgang Met De Laser
Open de accu niet en Veiligheids • vermijd een mechanische aanwijzingen voor beschadiging van de de omgang met de accu. Er bestaat het risico laser op kortsluiting en er kun- Opgelet: Laserstraling nen dampen ontstaan die • Niet in de laserstraal ki- de luchtwegen irriteren. -
Seite 58: Horizontale En Verticale Laserlijn Gebruikenverwenden
De nivellerende lamp (19) Horizontale en verticale laser licht op: lijn gebruiken verwenden groen: wanneer een au- tomatische nivellering Na het inschakelen: mogelijk is. 360-graden-laserlijn + verti- De nivellereing is af- cale laserlijn gerond, wanneer de laserlijnen niet meer Kort drukken op de bewegen. -
Seite 59: Werkzaamheden Met Statief
1. Schuif de nivelleer-stop Statief instellen (13) naar links (gesloten slot). 2. Schakel het apparaat in. De horizontale uitlijning van het statief kunt u met de wa- terpas ( 12) controleren. Werkzaamheden met statief 1. Trek de statief-poten (6) Laser op statiefplaat uit elkaar. -
Seite 60: Laadproces
5. Draai de borgring (10) 3. Draai de stelschroef (11) naar rechts om deze voor het borgen naar positie te blokkeren. rechts. Helling instellen, Laadproces voor/terug 1. Draai de greepschroef Stel de accu niet (4) voor het lossen naar bloot aan extreme links, om de schroef. -
Seite 61: Reiniging
men met de accu neemt itend originele u contact op met het „ser- onderdelen. vicecenter“. Gebruik geen reini- 1. Steek de USB-C-laadka- gings- of oplosmid- bel (17) in de laad-bus delen. Chemische (2) aan het apparaat. substanties kunnen 2. Sluit de USB-C-laadkabel de plastieken delen (17) aan op een USB- van het apparaat... -
Seite 62: Onderhoud
Onderhoud Geef het apparaat af op • een recyclageplaats. De Het apparaat is onder- gebruikte kunststof- en me- houdsvrij. talen delen kunnen zuiver naar soort gescheiden Transport worden om gerecycled te worden. Vraag eventueel Schakel de laser uit en ver- ons service-center om ad- grendel de nivelleer-arrete- vies. -
Seite 63: Reserveonderdelen/Accessoires
Reserveonderdelen/Accessoires Reserveonderdelen en accessoires verkrijgt u www.grizzly-service.eu Ondervindt u problemen bij het orderproces, gebruik dan het contactformulier. Bij andere vragen neemt u contact op met het „servicecenter” (zie „Service-center“ pagina 66). Pos. Gebruik- Benaming Artikel-Nr. saanwijzing Statief 91105838 3-12 Foutopsporing Let op! Laserstraling. -
Seite 64: Garantie
Garantie defect bestaat en wanneer het defect is opgetreden. Geachte cliënte, geachte klant, Als het defect door onze ga- rantie gedekt is, krijgt u het U ontvangt op dit apparaat een garantie van 5 jaar vanaf gerepareerde of een nieuw ap- datum van aankoop. - Seite 65 Deze garantie geldt niet voor Afhandeling ingeval van normale slijtage van slijtagede- garantie len (bijv. accucapaciteit).Deze Gelieve aan de volgende aan- wijzingen gevolg te geven om garantie valt weg wanneer het apparaat beschadigd, niet een snelle behandeling van uw oordeelkundig gebruikt of niet verzoek te garanderen: onderhouden werd..
-
Seite 66: Reparatieservice
waardelijk uitsluitend gebruik worden niet geaccepteerd. van het adres, dat u medege- De afvalverwerking van uw deeld wordt. Zorg ervoor dat defecte ingezonden apparaten voeren wij gratis door. de verzending niet ongefran- keerd, als volumegoed, per ServiceCenter expresse of via een andere speciale verzendingswijze plaatsvindt. -
Seite 67: Wstęp
Spis tresci Wstęp ....67 Przechowywanie urządzenia .... 76 Przeznaczenie ..68 Opis ogólny ... 68 Konserwacja ..76 Zawartość opakowania . 68 Transport ....76 Opis działania ..... 69 Usuwanie i Przegląd ...... 69 ochrona środowiska .... 77 Dane techniczne ..69 Zasady Akcesoria .... -
Seite 68: Przeznaczenie
Instrukcja obsługi jest Urządzenie jest przeznac- częścią składową pro- zone do użytku przez osoby duktu. Zawiera ona ważne dorosłe. Młodzież powyżej wskazówki dotyczące 16 roku życia może bezpieczeństwa, eksploata- używać urządzenie tylko cji i utylizacji. Przed pod nadzorem. Producent rozpoczęciem użytkowania nie odpowiada za szkody produktu należy się... -
Seite 69: Opis Działania
Prawidłowo posegreguj i Płyta statywu usuń materiały opakowania. Kabel do ładowania USB-C Opis działania Kontrolka poziomu naładowania Akumulatorowy laser Kontrolka niwelacji krzyżowy generuje jedną linię pionową i jedną 20 Gwint wewnętrzny poziomą linię lasera 21 Śruba statywu obracaną w zakresie Dane techniczne 360 stopni. -
Seite 70: Zasady Bezpieczeństwa
Zasady bezpieczeństwa Znak informacyjny ze wskazówkami Symbole na urządzeniu: ułatwiającymi posługiwanie się urządzeniem. LASER CLASS 2 EN 60825-1:2014 λ= 510-530 nm < 1 mW Ogólne zasady bezpieczeństwa Uwaga! - promienie lasera Nie patrzeć w promień Przestrzegać informacji lasera! • dotyczących obsługi, Laser klasy 2 czyszczenia, przechowy- Urządzenia z... -
Seite 71: Zasady Bezpieczeństwa Podczas Pracy Z Laserem
wybuchem. Jeżeli akumulator jest Zasady • bezpieczeństwa rozgrzany, należy przed podczas pracy z ładowaniem odczekać, laserem aż ostygnie. Nie otwierać akumu- Uwaga: Promienie lasera • • Nie patrzeć w promień latora i unikać jego uszkodzeń mechanicz- lasera! Klasa lasera 2 Nie kierować... -
Seite 72: Włączanie / Wyłączanie Urządzenia
Włączanie / Praca z syste wyłączanie mem automaty urządzenia cznej niwelacji Włączanie 1. Przesunąć blokadę 1. Włączyć urządzenie niwelacji (13) w prawą stronę (otwarta kłódka). poprzez krótkie wciśnięcie włącznika/ 2. Ustawić urządzenie wyłącznika (14). na poziomym, sta- Wyłączanie bilnym podłożu lub 2. -
Seite 73: Praca Bez Systemu Automatycznej Niwelacji
W przypadku Zdejmowanie/ zakładanie płyty sta- wstrząsów laser niwe- luje się ponownie automaty- tywu cznie, odczekać, aż linie la- 1. Otworzyć dźwignię (5). sera staną się nieruchome. 2. Wyciągnąć płytę staty- wu (16) w górę. 3. Umieścić płytę statywu Praca bez syste mu automatycz... - Seite 74 śruby. 2. Ustawić żądane nachy- Ustawianie wysokości, nóżki lenie. 3. Wkręcić śrubę uchwytu statywu 1. Otworzyć składane (4) w prawą stronę w zamknięcia (7). celu zablokowania usta- 2. Wysunąć przedłużenia wienia nachylenia. nóg statywu (6) na żądaną długość. Ustawianie nachy- 3.
-
Seite 75: Ładowanie
Ładowanie Akumulatora nie można • wymieniać. W razie pro- Nie narażać aku- blemów z akumulatorem należy zwracać się do mulatora na ekstremalne wa- „Centrum Serwisowego”. runki takie jak 1. Wetknąć kabel wysoka tempera- tura i wstrząsy. ładowania USB-C (17) Niebezpieczeństwo do gniazda ładowania obrażeń... -
Seite 76: Czyszczenie
Na naciskać zbyt mocno, Czyszczenie aby nie uszkodzić Wykonanie prac, powierzchni! które nie zostały Powierzchnię urządzenia • czyścić miękką szczotką, opisane w tej in- strukcji obsługi, pędzlem lub ściereczką. zlecać w specja- Przechowywanie listycznym warsz- urządzenia tacie. Stosować tylko oryginalne części. -
Seite 77: Usuwanie I Ochrona Środowiska
Usuwanie i ochro na środowiska Urządzenie, akcesoria i opakowanie należy oddać do punktu recyklingu. Nie wyrzucaj urządzenia z za- instalowanym akumulatorem do śmieci do- mowych, nie wrzucaj go do ognia (niebezpieczeństwo wybuchu) ani wody. Uszko- dzone akumulatory mogą być szkodliwe dla środowi- ska i Twojego zdrowia, je- żeli wydostaną... -
Seite 78: Akcesoria
Akcesoria Części zamienne i akcesoria można zakupić na www.grizzly-service.eu W przypadku problemów z zamawianiem należy skorzystać z formularza kontaktowego. W razie kolejnych pytań należy zwracać się do „Centrum Serwisowego” (patrz „Centrum serwisowe”, strona 81). Pos. Instrukcja Oznaczenie Nr. katalogowe obsługi Statyw 91105838 3-12... -
Seite 79: Gwarancja
Jeśli defekt jest objęty naszą Gwarancja gwarancją, otrzymają Państwo Szanowna Klientko, z powrotem naprawiony lub Szanowny Kliencie, nowy produkt. (Wraz z na- Na niniejszy artykuł udzielamy prawą lub wymianą produktu 5-letniej gwarancji od daty okres gwarancji nie biegnie na zakupu. nowo.) W przypadku wad tego pro- duktu przysługują... - Seite 80 szybko zużywających się (np. wy, prosimy o przestrzeganie pojemność akumulatora). poniższych wskazówek: Gwarancja przepada, jeśli W przypadku wszelkich • ał uszkodzony, zapytań prosimy o przy- produkt zost nie był zgodnie z przeznacze- gotowanie paragonu i niem użytkowany i konserwo- numeru identyfikacyjnu wany.
-
Seite 81: Serwis Naprawczy
ServiceCenter sowo lub na innych specjal- nych warunkach. Prosimy o przesłanie urządzenia wraz Serwis Polska ze wszystkimi częściami Tel.: 22 397 4996 wyposażenia otrzymanymi E-Mail: grizzly@lidl.pl IAN 346569_2001 przy zakupie i zadbanie o wystarczająco bezpieczne opakowanie. Importer Prosimy mieć na uwadze, że Serwis naprawczy poniższy adres nie jest adre- Naprawy, które nie są... -
Seite 82: Úvod
Obsah Náhradní díly / Úvod...... 82 Účel použití .... 83 Příslušenství ... 91 Hledání chyb..91 Obecný popis ..83 Záruka ....92 Rozsah dodávky ... 83 Opravna ....94 Popis funkce ....83 Přehled ......84 Service-Center ..94 Technické... -
Seite 83: Účel Použití
použitím nebo nesprávnou Návod k obsluze je součástí tohoto obsluhou. výrobku. Obsahuje důležité pokyny týkající se Obecný popis bezpečnosti, používání a likvidace. Před použitím Zobrazení nejdůležitějších výrobku se seznamte se funkčních dílů naleznete na všemi pokyny k obsluze a bezpečnosti. Výrobek výklopných stránkách. -
Seite 84: Přehled
Přehled Nabíjecí proud ... 1 A Samonivelační 360 stupňový laser rozsah ...... ± 3° nabíjecí zásuvka Nivelační křídlatý šroub přesnost ... ± 4 mm/m šroub rukojeti Laser páka Vlnová délka . 510-530 nm Třída laseru ....2 nohy stativu sklápěcí uzávěry Doba nivelace ..cca 4 s stavěcí... -
Seite 85: Symboly V Návodu
Nenechávejte přístroj Symboly v návodu: • v blízkosti lékařských Výstražné značky zařízení, magnetických záznamových nosičů a s údaji pro zabránění škodám přístrojů citlivých na mag- na zdraví anebo netické pole. věcným škodám. Bezpečnostní pokyny Příkazové značky s k manipulaci s laserem údaji pro prevenci škod. -
Seite 86: Obsluha
Vypnutí škodí akumulátoru a navíc může dojít k explozi. 2. Vypněte přístroj Nechte zahřátý akumu- stisknutím zapínače/ • látor před nabíjením vypínače (14) po dobu vychladnout. 2 sekund. Akumulátor neotevírejte a • zabraňte mechanickému Použití horizontálních a poškození akumulátoru. vertikálních Hrozí... -
Seite 87: Práce Bez Automatické Nivelace
1. Posuňte aretaci nivelace na stativ (viz „Práce se (13) doleva (zavřený stativem“). 3. Zapněte přístroj. zámek). 2. Zapněte přístroj. Nivelační žárovka (19) svítí: Práce se stativem zeleně: pokud je možná Našroubování laseru automatická nivelace. Nivelace je na desku stativu dokončena, když... -
Seite 88: Nabíjení
1. Roztáhněte nohy stativu 2. Nastavte požadovaný (6) od sebe. sklon. 3. K zaaretování sklonu 2. Zaaretujte polohu no- hou stativu stavěcím otáčejte šroubem ruko- kroužkem (8). jeti (4) doprava. Nastavení výšky nohou Nastavení sklonu do stativu boku 1. Otevřete sklápěcí 1. -
Seite 89: Čištění
Hrozí nebezpečí 3. Po úspěšném nabití zranění v důsledku nejdříve vytáhněte unikajícího elek- nabíjecí kabel USB-C trolytického ro- (17) z portu USB. ztoku! Při kon- 4. Poté vytáhněte nabíjecí taktu opláchněte kabel USB-C (17) z postižené místo vo- přístroje. dou nebo neutrali- Kontrolka nabití... -
Seite 90: Skladování
Skla, chránící lasery ( Likvidace/ochrana • životního prostředí 1/15) ), očistěte slabým proudem vzduchu nebo měkkým hadříkem. Příliš Přístroj, příslušenství a ba- netlačte, abyste lení zlikvidujte ekologickou recyklací nepoškodili povrch! Povrch zařízení čistěte • měkkým kartáčkem, Nevyhazujte ná- štětcem nebo hadříkem. stroj se zabudo- vaným akumulá- Skladování... -
Seite 91: Náhradní Díly / Příslušenství
Náhradní díly / Příslušenství Náhradní díly a příslušenství obdržíte na stránkách www.grizzly-service.eu Pokud máte problémy při objednávání, použijte kontaktní formulář. V případě dalších dotazů se obraťte na servisní středisko „Service-Center“ (viz „Service-Center“ strana 94). Označení Č. artiklu. Pol. Návod k obsluze Stativ 91105838... -
Seite 92: Záruka
Bude-li závada kryta naší Záruka zárukou, získáte zpět opra- Vážení zákazníci, vený nebo nový výrobek. Na tento výrobek získáváte Opravou nebo výměnou výrobku nezačíná záruční 5 letou záruku od data zakoupení. doba běžet od začátku. V případě závady tohoto výrobku vám vůči prodejci Záruční... - Seite 93 cích pokynů: akumulátoru). Tato záruka neplatí, je-li vý- Na důkaz, že jste výro- • robek poškozen z důvodu bek zakoupili, mějte pro neodborného používání, jakékoli případné dotazy nebo pokud u něj nebyla připravenou pokladní stvr- prováděna údržba. Rov- zenku a identifikační číslo něž...
-
Seite 94: Opravna
odeslána nevyplaceně jako nadměrné zboží, ServiceCenter expres nebo jiný, zvláštní Servis Česko druh zásilky. Přístroj zašlete včetně všech částí Tel.: 800143873 příslušenství dodaných E-Mail: při zakoupení a zajistěte grizzly@lidl.cz dostatečně bezpečný IAN 346569_2001 přepravní obal. Dovozce Opravna Prosím, respektujte, že Opravy, které... -
Seite 95: Překlad
Obsah Úvod...... 95 Náhradné diely / Účel použitia ..96 Príslušenstvo ..105 Zisťovanie závad . 105 Všeobecný popis ..96 Záruka ....106 Objem dodávky ... 96 Servisná oprava .. 107 Popis funkcie ....96 Prehľad ....... 97 Service-Center ..108 Technické... -
Seite 96: Účel Použitia
Všeobecný popis Návod na obsluhu je súčasťou tohto produk- tu. Obsahuje dôležité upo- Obrázok zornenia ohľadom najdôležitejších bezpečnosti, obsluhy a likvi- funkčných dielov nájdete dácie. Pred používaním pro- na výklopných stranách. duktu sa oboznámte so všetkými pokynmi pre obslu- Objem dodávky hu a bezpečnosť. -
Seite 97: Prehľad
livých obsluhovacích prvkov Technické údaje nájdete v nasledujúcich Pracovná oblasť ..15 m* popisoch. Hmotnosť Prehľad (bez statívu) ..cca. 350 g Prevádzkové napätie 360-stupňový laser .....4 V Nabíjacia zdierka Menovitá kapacita ..2,6 Ah Krídlová skrutka Nabíjacie napätie Skrutka držadla ......5 V Nabíjací... -
Seite 98: Všeobecné Bezpečnostné Upozornenia
Prístroj so zabu- Pred každým použitím • dovaným aku- skontrolujte zariadenie. mulátorom neo- Poškodené zariade- nie nechajte opraviť. dhadzujte do domového Nepoužívajte poškodené odpadu. zariadenie. Pri nepoužívaní zariade- Gleichspannung • nie vypnite. Nenechajte Symboly v návode: zariadenie bez dozoru. Držte zariadenie ďaleko •... -
Seite 99: Obsluha
zástrčku nabíjačky zo zá- Zapnutie/ vypnutie suvky. Akumulátor nikdy nevys- • tavujte dlhší čas silnému Zapnutie slnečnému žiareniu a 1. Zapnite prístroj tak, že krátko stlačíte vypínač nedávajte ho na vykuro- vacie telesá. Teplo škodí zap/vyp (14). akumulátoru a existuje Vypnutie nebezpečenstvo výbuchu. -
Seite 100: Práca S Nivelačnou Automatikou
Pri otrasoch sa laser Práca s nivelačnou nivelizuje znova auto- automatikou maticky, počkajte, až sa laserové čiary ne- 1. Aretáciu nivelačného budú viac pohybovať. prístroja (13) posuňte smerom doprava (otvor- Práca bez nivelačnej ený zámok). automatiky 2. Prístroj postavte na vodorovnom, pevnom podklade alebo ho Pri prácach bez... -
Seite 101: Nastavenie Statívu
2. Predĺženie nôh statívu Odobratie/nasadenie dosky statívu (6) nasuňte na želanú dĺžku. 1. Otvorte páku (5). 3. Zatvorte sklopné uzáve- 2. Dosku statívu (16) vy- ry (7). berte smerom hore. 3. Dosku statívu (16) um- Nastavenie výšky, kľuka iestnite na nasadenie na statív. -
Seite 102: Nabíjanie
prípade kontaktu Nastavenie sklonu, naboku opláchnite s vo- dou alebo použite 1. Otočte krídlovú skrutku neutralizačný (3) na uvoľnenie sme- rom doľava. roztok. Ak sa do- 2. Sklopte statív na želaný stane do kontaktu s očami a pod. sklon. vyhľadajte lekárs- 3. -
Seite 103: Čistenie
nabíjací kábel (17) z Vyčistite sklo, ktoré chráni • USB-portu. laser ( 1/15), slabým 4. Následne vytiahnite prúdom vzduchu alebo USB-C nabíjací kábel mäkkou handrou. Nevyví- (17) z prístroja. jajte silný tlak, aby ste nepoškodili povrch! Kontrolka nabíjania (18) Povrch zariadenia vyčistite •... -
Seite 104: Odstránenie A Ochrana Životného Prostredia
Odstránenie a ochrana životného prostredia Prístroj, príslušenstvo a ba- lenie prineste na ekologické zhodnotenie. Werfen Sie Ge- räte mit einge- bautem Akku nicht in den Hausmüll, ins Feuer (Explosionsgefahr) oder ins Wasser. Beschä- digte Akkus können der Umwelt und ihrer Gesund- heit schaden, wenn giftige Dämpfe oder Flüssigkeiten austreten. -
Seite 105: Náhradné Diely / Príslušenstvo
Náhradné diely / Príslušenstvo Náhradné diely a príslušenstvo nájdete na strane www.grizzly-service.eu Ak by sa mali vyskytnúť problémy s procesom objednávky, použite, prosím, kontaktný formulár. V prípade ďalších otázok sa obráťte na „Servisné centrum“ (pozri „Servisné centrum“, strana 108). Označenie Č. -
Seite 106: Záruka
Záruka S opravou alebo výmenou produktu sa nezačína nová Vážená zákazníčka, vážený záručná doba. zákazník, Záručná doba a nárok na Na tento výrobok dostávate 5očnú záruku od dátumu kúpy. odstránenie vady Ak je prístroj poškodený, Záručná doba sa poskytnutím podľa zákona máte právo ho záruky nepredlžuje. -
Seite 107: Servisná Oprava
borné používanie produktu je Následne obdržíte ďalšie nutné presne dodržiavať všetky informácie o priebehu vašej návody uvedené v návode reklamácie. na obsluhu. Bezpodmienečne Produkt evidovaný ako po- • sa vyhnite používaniu, kto- škodený môžete po dohode s našim zákazníckym servi- ré... -
Seite 108: Service-Center
Môžeme spracovať len prístro- je, ktoré boli doručené dosta- točne zabalené a so zaplate- ným poštovným. Pozor: Prístroj zašlite do našej servisnej pobočky vyčistený a s informáciami o chybe. Neprevezmeme prístroje zasla- né ako nadmerný tovar na ná- klady príjemcu, expresne alebo s iným špeciálnym nákladom. -
Seite 110: Original-Eg- Konformitäts- Erklärung
Original EGKonformitätserklärung Hiermit bestätigen wir, dass der Akku-Kreuzlinienlaser, Modell PKLLP 360 A1 Seriennummer: 202008000001 - 202008020798 folgenden einschlägigen EU-Richtlinien in ihrer jeweils gültigen Fassung entspricht: 2014/30/EU • 2011/65/EU* Um die Übereinstimmung zu gewährleisten, wurden folgende harmonisierte Normen sowie nationale Normen und Bestimmun- gen angewendet: EN 61326-1:2013 •... -
Seite 111: Translation Of The Original Ec Declaration Of Conformity
Translation of the original EC declaration of conformity We hereby confirm that the Cordless Cross Line Laser, model PKLLP 360 A1 Serial number: 202008000001 - 202008020798 conforms with the following applicable relevant version of the EU guidelines: 2014/30/EU • 2011/65/EU*... -
Seite 112: Traduction De La Déclaration De Conformité Ce Originale
Traduction de la déclaration de conformité CE originale Nous certifions par la présente que le Niveau laser en croix sans fil, de construction PKLLP 360 A1 Numéro de série: 202008000001 - 202008020798 est conforme aux directives UE actuellement en vigueur : 2014/30/EU •... -
Seite 113: Vertaling Van De Originele Ce-Conformit- Eitsverklaring
Vertaling van de originele CEconformiteitsverklaring Hiermede bevestigen wij dat de Accu-kruislijnenlaser, bouwserie PKLLP 360 A1 Serienummer: 202008000001 - 202008020798 is overeenkomstig met de hierna volgende, van toepassing zijnde EU-richtlijnen: 2014/30/EU • 2011/65/EU* Om de overeenstemming te waarborgen, werden de hierna... -
Seite 114: Tłumaczenie Oryginalnej Deklaracji Zgodności We
Tłumaczenie oryginalnej deklaracji zgodności WE Niniejszym oświadczamy, że konstrukcja Akumulatorowy laser krzyżowy Seriia produkcyjna PKLLP 360 A1 Numer seryjny 202008000001 - 202008020798 spełnia wymogi odpowiednich Dyrektyw UE w ich aktualnie obowiązującym brzmieniu: 2014/30/EU • 2011/65/EU* W celu zapewnienia zgodności z powyższymi dyrektywami zastosowano następujące normy harmonizujące oraz normy i... -
Seite 115: Překlad Originálního Prohlášení O Shodě Ce
Překlad originálního prohlášení o shodě CE Potvrzujeme tímto, že konstrukce Křížový liniový laser, konstrukční řady PKLLP 360 A1 Pořadové číslo: 202008000001 - 202008020798 odpovídá následujícím příslušným směrnicím EÚ v jejich právě platném znění: 2014/30/EU • 2011/65/EU* Aby byl zaručen souhlas, byly použity následující... -
Seite 116: Preklad Originálneho Prehlásenia O Zhode Ce
Preklad originálneho prehlásenia o zhode CE Týmto potvrdzujeme, že Akumulátorový krížovy líniový laser konštrukčnej rady řady PKLLP 360 A1 Pořadové číslo:202008000001 - 202008020798 zodpovedá nasledujúcim príslušným smerniciam EÚ v ich práve platnom znení: 2014/30/EU • 2011/65/EU* Aby bola zaručená zhoda, boli použité nasledovné harmonizo- vané... - Seite 120 GRIZZLY TOOLS GMBH & CO. KG Stockstädter Straße 20 DE-63762 Großostheim GERMANY Stand der Informationen · Last Information Update · Version des informations · Stand van de informatie · Stan informacji · Stav informací · Stav informácií: 08/2020 Ident.-No.: 72091014082020-8 IAN 346569_2001...