
Inhaltszusammenfassung für Generalmusic GEM rp-x
- Seite 1 D I G I T A L K E Y B O A R D S Owners manual rp-x •English •Italiano •Deutsch •Français...
- Seite 3 D I G I T A L K E Y B O A R D S Owners manual rp-x •English...
-
Seite 4: Important Safety And Installation Instructions
IMPORTANT NOTE: To reduce the risk related to the correct and normal use of the instrument, all Generalmusic products are accuralety tested in a safety laboratory. DO NOT modify the present unit, the safety standard and the correct instrument operativity could be compromised, and as a further consequence the warranty will be invalidated. -
Seite 5: Inhaltsverzeichnis
M A N U A L I N D E X Introduction Front Panel Rear panel and connections Getting started Power the expander Connect a speaker system Connect a midi master controller Connect pedals Using the input connection Connect The Rp-x To A Pc Connect To A Pc Via Midi Connect To A Pc Via Usb Start the rp-x... - Seite 6 rp-x Product Package • rp-x expander • Owners manual • Gem PC - Software Editor • AC Adapter • MIDI Cable...
-
Seite 7: Introduction
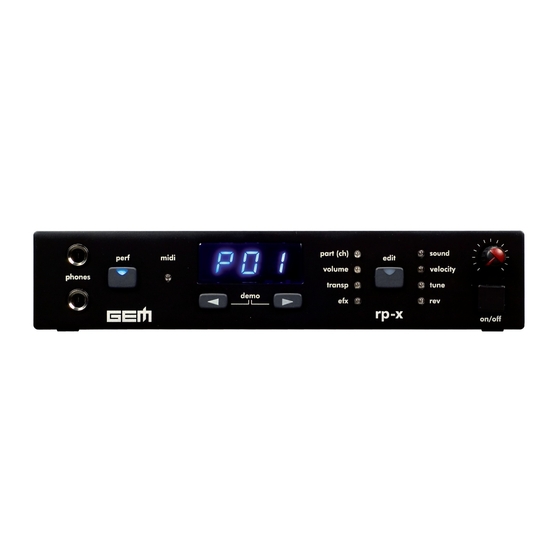
rp-x owners manual INTRODUCTION Congratulations & thank you for purchasing the GEM rp-x Expander. Utilizing our proprietary DRAKE technology, the rp-x produces a vast variety of acoustic and electric piano sounds with exceptional quality. The rp-x also incorporates an intuitive, yet easy to use operational interface that will satisfy even the most demanding live or professional studio applications. FRONT PANEL r p - x phones edit This button enter the edit mode and select the editing These jack connectors allows to plug two headphones parameters. to the module. perf volume the Volume knob, set the output level of the instru- The perf button (PERFORMANCE), select the per- ment. formance mode. See the relative chapter, in this manual. -
Seite 8: Getting Started
rp-x owners manual GETTING STARTED The Gem rp-x expander is a top quality piano sound generator, designed to be used in the following ways : Played via MIDI from a MIDI master controllers such as a digital piano, a master keyboard, a MIDI guitar, a MIDI accordion. Connected to desktop or laptop PC via MIDI or USB in a MIDI network In this chapter we will cover all the basic steps necessary to properly connect and use the instrument. -
Seite 9: Connect A Midi Master Controller
rp-x owners manual CONNECT A MIDI MASTER CONTROLLER The rp-x module can be used as a powerful piano sound expansion for any type of MIDI controller, digital piano, master keyboard, MIDI guitar and accordion. MIDI OUT MIDI MASTER KEYBOARD MIDI IN MIDI OUT MIDI Accordion MIDI IN MIDI OUT MIDI IN In order to achieve the maximum control of the rp-x, please refer to this next chapter where the different parts of the instrument will be fully explained. CONNECT PEDALS Independently of the MIDI or USB controller you're using with the rp-x, it's possible to connect directly to the module various type of pedals: single switch, multi switch, continuos control. T h e E X P R E S S I O N pedal can be con- EXPRESSION pedal SUSTAIN pedal... -
Seite 10: Connect The Rp-X To A Pc
rp-x owners manual CONNECT THE rp-x TO A PC The Rp-x expander can be connected to a PC in two different way: using the MIDI or the USB (Universal Serial Bus) interface. Using the MIDI the PC has to be equipped with a proper MIDI interface (see the note below), in case of USB it's possibile to use directly the PC USB built-in connection. In both case, MIDI or USB, the tranfer rate and the features of the protocol are complying the standard MIDI specifi cations, the only difference consist of the connections type. You can use the rp-x connected to a PC or to play its sound via MIDI from a software sequencer or to create or edit the internal performances (see the next chapter), using the PC editor included in the instrument package. -
Seite 11: Start The Rp-X
rp-x owners manual rp-x START THE Once the rp-x module is connected to your controller, it's possible to use it, in the way you prefer. Use the ON/OFF button on the front panel to switch on the module. r p - x LISTEN TO THE DEMO SEQUENCE The rp-x has an internal DEMO sequence demonstrating the musical quality & power of the instrument. Press the two DATA ENTRY buttons on the panel at the same time in order to start the DEMO. The display show the message “DE1” (Demo 1). Playing the DEMO. Adjust the instrument output VOLUME, by rotating the VOLUME r p - x r p - x knob on the panel. The DEMO sequence contains various songs from different musical styles. During playback it’s possible to select each demo song, by simply pressing the DATA button. The display will indicate the number of the selected DEMO song. In the normal DEMO mode, all the songs will r p - x... -
Seite 12: Select The Performances
rp-x owners manual SELECT THE PERFORMANCES It is possible to recall the internal 99 performances rp-x in two different way. MANUAL RECALLING Press the DATA buttons to select the internal performances. Please consult the PERF list on page 17 to visualize the performance r p - x names and theyr structure (single, layer, Split, etc.). Performance - Performance + MIDI RECALLING... -
Seite 13: Edit The Performance
rp-x owners manual EDIT THE PERFORMANCE In the rp-x it's possible quickly modify (edit) the factory pre programmed performance according to your needs. The PERFORMANCE mode possesses a very important feature, it’s possible to store (and recall), in the instrument memory 99 different settings, which are retained in the modules memory after turning off the instrument. Press the EDIT button on the panel to enter the PERF edit mode. The PART (CH) parameter is automatically selected, mean- r p - x while its current value it's visualized in the display Modifying any default parameters value��... -
Seite 14: Selecting The Parameters To Edit In The Selected Parts (Ch): Sound
rp-x owners manual SELECTING THE PARAMETERS TO EDIT IN THE SELECTED PARTS (CH): SOUND Once you have selected the PART you wish to modify (#01 in this example), the EDIT menu parameter are selected by pressing the EDIT button. Each time you press the button a different parameter is selected. r p - x The current default value of the selected parameter, is show in the display. In the part number 1 the sound is: GRAND PIANO. -
Seite 15: Selecting The Parameters To Edit In The Selected Parts (Ch): Velocity
rp-x owners manual SELECTING THE PARAMETERS TO EDIT IN THE SELECTED PARTS (CH): VELOCITY NOTE The parameter VELOCITY it's GLOBAL, then its setting will affect ALL the parts at the same time. For this reason it can be selected if the "ALL" mode has been enabled only. About the "ALL" mode please consult pages #7 and #10 . This parameter allows you to set a programmable VELOCITY offset , in order to increase or decrease the velocity value of incoming MIDI notes transmitted by a MIDI controller. Value range: -64/00/+63. Value=00 does not affects the original velocity values. -
Seite 16: Selecting The Parameters To Edit In The Selected Parts (Ch): Rev
rp-x owners manual SELECTING THE PARAMETERS TO EDIT IN THE SELECTED PARTS (CH): REV Set the REVERB (REV) level in the selected PART. Press the EDIT button to select the REV. The display indicates the current default value (REV = 024), in this example. r p - x Pressing the DATA buttons to increase or de- crease the REV send in the selected part. The display shows you in realtime the value changing. The pa- r p - x rameter range is from 0 to 127. -
Seite 17: Memorize The Performance
rp-x owners manual MEMORIZE THE PERFORMANCE STORE THE EDIT IN THE SAME PERFORMANCE LOCATION Once your PERFORMANCE edit it's complete press the blinking PERF button on the display. r p - x r p - x At this point both the PERF button and the digit "P01"... -
Seite 18: Exit The Performance Store
rp-x owners manual EXIT THE PERFORMANCE STORE Once your PERFORMANCE edit it's complete press the blinking PERF button on the display. r p - x r p - x At this point both the PERF button and the digit "P01" in the display (indicating the number of the edited performance in this example)��... -
Seite 19: Memory Management System
rp-x owners manual MEMORY MANAGEMENT SYSTEM This menu contains some important function for the global instrument setting: •COMMON CHANNEL SETTING •MIDI IDENTIFICATION NUMBER •SYSTEM RESET •MIDI DATA BULK These setting are automatically stored in the expander memory and also saved switching ON/OFF the instrument. COMMON CHANNEL SETTING The MIDI COMMON channel is a very useful function allowing a high grade of versatility in MIDI programming. In the default assign the COMMON channel allows you to control the performances playing and selection using the MIDI ch.#01 only. Many of the internal rp-x performance are programmed using different parts (and differ- ent MIDI channel) in layer or split mode. The MIDI COMMON allows to fully play and select these performances using a master MIDI controller transmitting in a single MIDI channel. To enter the MIDI COMMON channel setting mode keep al least for 2 seconds the PERF and the EDIT buttons pressed at the same time. -
Seite 20: System Reset
rp-x owners manual SYSTEM RESET This function restore the original programmed factory set up of the entire instrument. Enter the MEMORY MANAGEMENT SYSTEM mode keep- ing pressed al least for 2 seconds the PERF and the EDIT buttons at the same time. As already seen the first menu is the MIDI COMMON channel setting. r p - x Both the pressed buttons and the PART (CH) LED will blink in the instrument. -
Seite 21: Midi Data Bulk (Dump)
rp-x owners manual MIDI DATA BULK This function transmits the user data contained in the PERFORMANCE to an external MIDI device, such as a PC or a MIDI recorder to create an archive. To transmit the data BULK to an external device the rp-x MIDI OUT has to be connected to the MIDI IN of the receiving data recorder MIDI IN. Enter the MEMORY MANAGEMENT SYSTEM mode keep- ing pressed al least for 2 seconds the PERF and the EDIT buttons at the same time. -
Seite 22: Sound List
rp-x owners manual SOUND LIST Sound Name Sound# Prg.Chng Concert Piano 1 (st) Concert Piano 2 (st) Rock Concert Piano (st) Bright Concert Piano (st) Grand Piano 1 Grand Piano 2 Rock Grand Piano Bright Grand Piano Pop Piano Upright Piano Real Honky Honky Tonk CP Grand Piano... -
Seite 23: Performance List
rp-x owners manual PERFORMANCE LIST Performance Name Performance Name Mode Mode Note Note Performance Name Performance Name Mode Mode Note Note Concert Piano 1 Concert Piano 1 Single Single 50 Synth 01 50 Synth 01 Layer Layer Concert Piano 2 Concert Piano 2 Single Single 51 Sympho Strings&Choir... -
Seite 24: Technology
TECHNOLOGY The rp-x is powered by Generalmusic’s break-through technology DRAKE. DRAKE (Dsp-Risc-Advanced-Keyboard-Engine) is the ultimate DSP: probably the most advanced piece of musical hardware in the world. Its 32-bit and 50-MIPS internal structure and its totally programmable software architecture make this processor so fast and powerful that any kind of algorithm, from Wavetable to Physical Modeling, can be implemented in real time, either in generation or in post-processing. Using the Physical Modelling power offered by DRAKE, Generalmusic has created and patented a number of new algorithms which replicate some of the world’s most famous vintage instruments like Rhodes™, Wurlitzer™ and Clavinet™. DRAKE has found unanimous, enthusiastic appraisal from experts in these fields. Physical Modeling Physical Modeling is a method of sound synthesis based upon a mathematical model which describes the physical construction of the instrument be- ing simulated. Unlike sampling technology, in which an existing sound is simply recorded at a particular moment in time, (to remain essentially the same forever), the sounds produced by a Physical Model continuously react and respond to the player’s input, maintaining all the little nuances and imperfections which provide the most reliable subconscious assurance that the instrument being played is the real thing. A sampled sound can be likened to a “snapshot” of a particular moment in time during which an instrument is being played. It’s like taking a photograph. The goal of Physical Modeling is this: Instead of simply recording the final audible product of a instrument like an electric piano, we replicate all the elements which are incorporated into its construction. If the physical model is constructed carefully and accurately with meticulous attention to detail, the resulting sound should be exactly like the real thing and, more importantly, the experience of playing and interacting with the instrument should be similarly convincing. In the rp-x, all the acoustic piano sounds are created by combining sample playback with Generalmusic’s Natural String Resonance, Damper Physical Model, Advanced Release and FADE technologies, (described below). Other instruments such as RHODES, WURLI and CLAVINET are created using pure Physical Modeling. Natural String Resonance This physical modeling technology, patented by Generalmusic as Natural String Resonance, allows all of the complex harmonics normally produced by a piano’s soundboard to be faithfully reproduced. This means that a note’s individual sound will always be slightly different depending upon which... -
Seite 25: Midi Implementation Chart
rp-x owners manual MIDI IMPLEMENTATION CHART Date: ott-06 Version: 1.01 MIDI Implementation Chart Model RP-X Function Transmitted Recognized NOTE Basic Default 1-16 These data are memorized also switching the module OFF Channel Changed 1-16 Default Mode 3 Mode Messages Mode 3, 4 Altered ********** Note number... - Seite 26 GENERALMUSIC TECHNOLOGIES s.r.l. Via delle Rose, 12 47842 S.Giovanni in Marignano (RN) - Italy Tel. +39 0541 959511Fax +39 0541 957404 www.generalmusic.com...
-
Seite 27: Manuale D'istruzioni
D I G I T A L K E Y B O A R D S Manuale d'istruzioni rp-x •Italiano... - Seite 28 SPECIFICHE SOGGETTE A MODIFICA Le informazioni contenute in questo manuale sono ritenute esatte al momento della stampa. Generalmusic si riserva il diritto di modificare ogni specifica tecnica senza obbligo di preavviso o aggiornamento delle unità esistenti.
- Seite 29 I N D I C E D E L M A N U A L E Introduzione Pannello Frontale Pannello Posteriore E Connessioni Prima D'Iniziare Alimentazione Del Modulo Collegamento ad un Sistema D'amplificazione Esterno Collegare Un Midi Master Controller Collegamento Dei Pedali (Opzionali) Usare Gli Ingressi Audio "input"...
- Seite 30 rp-x contenuto dell'imballo • Expander rp-x • Manuale d'istruzioni • Gem Software Editor per PC • Alimentatore • Cavo MIDI...
-
Seite 31: Introduzione
rp-x manuale d'istruzioni INTRODUZIONE Congratulazioni per aver acquistato l'expander GEM rp-x uno dei migliori moduli sonori dedicato ai suoni di pianoforti acustici ed elettrici presenti sul mercato. GEM rp-x è basato sulla rivoluzio- naria tecnologia proprietaria DRAKE, che permette una qualità sonora ed una potenza di calcolo in tempo reale senza precedenti, per uno strumento di questa categoria. rp-x possiede una interfaccia utente estremamente semplice ed intuitiva, ma nello stesso tempo è uno stru- mento estremamente potente in grado di soddisfare l'utente professionale più esigente. Per un uso corretto dello strumento leggete con attenzione il presente manuale d'istruzioni. PANNELLO FRONTALE r p - x phones... -
Seite 32: Prima D'iniziare
rp-x manuale d'istruzioni PRIMA D'INIZIARE GEM rp-x è un expander di altissima qualità sonora concepito per essere usato nelle seguenti situzioni musicali: Controllato via MIDI da una master keyboard, un piano digitale, una fisarmonica o una chitarra MIDI, per l'uso in tempo reale. Collegato via MIDI (o USB) ad un PC (laptop o desktop) In questo capitolo vedremo i passi necessari al corretto collegamento dello strumento. ALIMENTAZIONE DEL MODULO Collegare il connettore dell'alimentatore all'apposita presa sul pannello posteriore (12V DC), collegare successivamente la spina ad una presa di corrente di... -
Seite 33: Collegare Un Midi Master Controller
rp-x manuale d'istruzioni COLLEGARE UN MIDI MASTER CONTROLLER Rp-x può essere usato come generatore sonoro collegato ad ogni tipo di MIDI controller, piani digitali, master key- boards, chitarre e fi sarmoniche MIDI. MIDI OUT MIDI MASTER KEYBOARD MIDI IN MIDI OUT MIDI ACCORDEON MIDI IN MIDI OUT MIDI IN Per ottenere il massimo controllo dall'rp-x, fate riferimento al prossimo capitolo, dove verranno ampiamente descritti tutti i livelli operativi dello strumento. COLLEGAMENTO DEI PEDALI (opzionali) Indipendentemente dalle caratteristiche del MIDI controller che state usando, rp-x permette di collegare diret- tamente due pedali (opzionali) sul pannello posteriore. I pedali possono essere di vario tipo: switch singolo, multipedal o a controllo continuo. EXPRESSION pedal SUSTAIN pedal SUSTAIN pedal PIANO TYPE MULTIPEDAL Il pedale d'espressione... -
Seite 34: Collegamento Ad Un Pc
rp-x manuale d'istruzioni COLLEGAMENTO AD UN PC Rp-x può essere collegato ad un computer in due modi diversi: via MIDI (Musical Instrument Digital Interface) oppure con la porta USB (Universal Serial Bus). Per usare il collegamento MIDI il vostro PC deve essere dotato di questo tipo di interfaccia (ved. nota sottostante). Nel caso della USB invece, è possibile collegare direttamente il modulo al vostro PC. In entrambi i casi comunque il tipo di protocollo e la velocità di trasmissione è conforme allo standard MIDI, la sola differenza è nel tipo di connessione usata per il collegamento stesso. Nel vostro PC deve essere correttamente installato un programma Sequencer per l'esecuzione o l'editing dei fi les MIDI. MIDI IN rp-x PC editor MIDI OUT r p - x Software NOTA: Normalmente i PC di tipo "Desktop" dispongono delle connessioni MIDI sulla presa "joystick" della scheda audio. Il tipo di connessione dipende dalla scheda audio installata sul PC. -
Seite 35: Accensione Dello Strumento
rp-x manuale d'istruzioni ACCENSIONE DELLO STRUMENTO Una volta correttamente collegato all'alimentazione, al sistema di amplificazione (o alle cuffie) ed al MIDI controller (MIDI o USB), potete accendere ed ascoltare lo strumento. premere l'apposito tasto ON/OFF sul pannello frontale per accendere il modulo. r p - x ASCOLTO DELLE DEMO rp-x possiede alcune DEMO interne che illustrano la sua notevole potenza e qualità sonora. Per far partire l'intera sequenza DEMO premere contemporaneamente i due tasti DATA ENTRY sul pannello. Il display mostra il messaggio "DE1" (DEMO 1). Suonando le DEMO è possibile regolare adeguatamente il volume d'uscita dello strumento r p - x r p - x agendo sul pomello del VOLUME sul pannello frontale. La sequenza DEMO è composta da una serie di brani realizzati con diversi suoni dello strumento. Durante l'esecuzione è possibile selezionare un singolo brano delle DEMO, permendo semplicemente il tasto DATA . In questo caso... -
Seite 36: Selezionare Le Performance
rp-x manuale d'istruzioni SELEZIONARE LE PERFORMANCES Su rp-x è possibile richiamare le PERFORMANCE in due modi diversi. SELEZIONE MANUALE Premendo i tasti DATA le PERFORMANCE sono selezionate in modo progressivo. Consultate a questo proposito la lista delle PERFORMANCE a Pag.17 di questo manuale, per visualizzare il nome e la struttura delle PER- r p - x FORMANCE di fabbrica (Single, Layer, Split, ecc.). -
Seite 37: Edit Delle Performance
rp-x manuale d'istruzioni EDIT DELLE PERFORMANCE Come già detto, il modo PERFORMANCE possiede di una caratteristica molto importante, cioè la possibilità di memo- rizzare e richiamare fi no a 99 diverse locazioni di memoria, ciascuna con una impostazione personale dei parametri di edit. Questi dati sono mantenuti in memoria anche spegnendo lo strumento. Premere il tasto EDIT sul pannello per entrare nell'edit delle PERFORMANCE. Il parametro PART (CH) è selezionato automaticamente r p - x ed il suo valore corrente visualizzato sul display. Modificando il valore di ogni parametro��... - Seite 38 rp-x manuale d'istruzioni SELEZIONE DEI PARAMETRI DI EDIT NELLA PARTS (CH) RICHIAMATA: SOUND Una volta selezionata la PARTS (CH) che volete modificare (la N.01 in questo esempio), il parametro da editare è sele- zionato premendo il tasto EDIT. Ad ogni pressione del tasto EDIT viene selezionato un parametro diverso del menù. r p - x Il display mostra il valore di DEFAULT del parametro selezionato. Nella PARTS (CH) N.01 del nostro esempio il suono selezionato è GRAND PIANO.
- Seite 39 rp-x manuale d'istruzioni SELEZIONE DEI PARAMETRI DI EDIT NELLA PARTS (CH): VELOCITY NOTE La VELOCITY è un parametro GLOBALE, influenza cioè tutte le PARTS contemporaneamente, per questa ragione, può essere selezionato solamente dopo aver selezionato il modo ALL nel menu PART (CH), vedere a pag. 7. Questo parametro permette di impostare un valore di VELOCITY offset, per aumentare (o diminuire) in modo costante, il valore di questo dato sui messaggi MIDI di NOTE ON, in arrivo da un controller esterno. L'ambito di regolazione varia da -64/00/+63. VELOCITY = 00 non modifica i valori ricevuti.
-
Seite 40: Il Modo "All" Nel Menu Di Edit
rp-x manuale d'istruzioni SELEZIONE DEI PARAMETRI DI EDIT NELLA PARTS (CH): REV (mandata riverbero) Regola il livello del riverbero della PARTS (CH) selezionata. Premere il tasto EDIT per selezionare il parametro REV. Il dispay indica il valore di DEFAULT della parte selezionata, REV = 24 in questo esempio. r p - x Premere i tasti DATA per aumentare o diminuire il valore di REV (riverbero) nella parte selezionata. Il display mostra in tempo reale la modifica del parametro. L'ambito di regolazione varia da 0 a 127. r p - x REV - REV + IL MODO "ALL"... -
Seite 41: Memorizzare Una Performance
rp-x manuale d'istruzioni MEMORIZZARE UNA PERFORMANCE MEMORIZZARE LA PERFORMANCE NELLA STESSA LOCAZIONE Una volta terminata la procedura di EDIT�� premete il tasto PERF lampeggiante. r p - x r p - x A questo punto sia il LED del tasto PERF sia la loca- zione della PERFORMANCE editata (P01 in questo esempio)��... -
Seite 42: Annullare La Memorizzazione Della Performance
rp-x manuale d'istruzioni ANNULLARE LA MEMORIZZAZIONE DELLA PERFORMANCE Una volta completato l'edit della PERFORMANCE premere il tasto lampeggiante PERF. r p - x r p - x A questo punto il tasto PERF ed il numero della PER- FORMANCE modificata in questo esempio "P01" sul display��... -
Seite 43: Memory Management System
rp-x manuale d'istruzioni MEMORY MANAGEMENT SYSTEM Questo menù contiene alcune importanti funzioni per l'impostazione generale dello strumento. •COMMON CHANNEL SETTING •MIDI IDENTIFICATION NUMBER •SYSTEM RESET •MIDI DATA BULK Le impostazioni di questo menù sono memorizzate automaticamente e mantenute in memoria anche spegnendo lo strumento. IMPOSTAZIONE DEL CANALE MIDI COMMON (COMMON CHANNEL) Il canale MIDI COMMON aumenta la versatilità nel controllo MIDI dello strumento. Normalmente infatti, per poter suonare con una performance multi canale (SPLIT, LAYER) da una tastiera MIDI, occorrerebbe usare una master keyboard in grado di trasmettere contemporaneamente su tutti i canali, corrispondenti ad altrettante PARTS dell'rp-x, usate nella PERFORMANCE. Questo tipo di funzioni sono disponibili solitamente in master key- board di livello professionale e quindi di costo elevato. MIDI controller o strumenti MIDI più economici, come i pianoforti digitali ad esempio, trasmettono solitamente su un solo canale MIDI alla volta. Per questo, il canale COMMON permette di usare PERFORMANCE formate da PARTS diverse usando MIDI controller con un solo canale di trasmissione. Per entrare nel MEMORY MANAGEMENT SYSTEM e rchia- mare il menù... -
Seite 44: System Reset
rp-x manuale d'istruzioni SYSTEM RESET Questa funzione ripristina le impostazioni di fabbrica (DEFAULT) dell'intero strumento. Per entrare nel menu MEMORY MANAGEMENT SYSTEM�� tenere premuti contemporaneamente per almeno 2 se- condi i tasti PERF ed EDIT sul pannello. Come già visto il primo menù ad essere selezionato è quello del canale MIDI COMMON. -
Seite 45: Midi Data Bulk (Dump)
rp-x manuale d'istruzioni MIDI DATA BULK Questa funzione permette la trasmissione dei dati personali delle PERFORMANCE ad una apparecchiatura MIDI esterna, come un PC o un MIDI recorder per la loro archiviazione. Per trasmettere i dati MIDI ad una apparecchiatura esterna la presa MIDI OUT di rp-x deve essere collegata al MIDI IN del recorder esterno. Entrare nel modo MEMORY MANAGEMENT SYSTEM tenen- do premuti contemporaneamente i tasti PERF ed EDIT per almeno 2 secondi��... -
Seite 46: Lista Dei Suoni
rp-x manuale d'istruzioni LISTA DEI SUONI Sound Name Sound# Prg.Chng Concert Piano 1 (st) Concert Piano 2 (st) Rock Concert Piano (st) Bright Concert Piano (st) Grand Piano 1 Grand Piano 2 Rock Grand Piano Bright Grand Piano Pop Piano Upright Piano Real Honky Honky Tonk CP Grand Piano... -
Seite 47: Lista Delle Performance
rp-x manuale d'istruzioni LISTA DELLE PERFORMANCE Performance Name Performance Name Mode Mode Note Note Performance Name Performance Name Mode Mode Note Note Concert Piano 1 Concert Piano 1 Single Single 50 Synth 01 50 Synth 01 Layer Layer Concert Piano 2 Concert Piano 2 Single Single... -
Seite 48: Tecnologia
6 Riverberi (Room: small, medium, large; Hall: Large, Medium; Stage) 4 Effetti : Chorus, Phaser, Tremolo, Stereo Delay) 2 Effetti Insert: Wah-Wah, Compressore Equalizzatore 5 bande parametrico programmabile D.R.A.K.E. by Generalmusic DSP technology Flash Ram 64 MB Dimensioni memoria Extra info Midi Velocity Fix IN, PC editor, interfaccia "easy to use"... -
Seite 49: Midi Implementation Chart
rp-x manuale d'istruzioni MIDI IMPLEMENTATION CHART Date: ott-06 Version: 1.01 MIDI Implementation Chart Model RP-X Function Transmitted Recognized NOTE Basic Default 1-16 These data are memorized also switching the module OFF Channel Changed 1-16 Default Mode 3 Mode Messages Mode 3, 4 Altered ********** Note number... - Seite 50 GENERALMUSIC TECHNOLOGIES s.r.l. Via delle Rose, 12 47842 S.Giovanni in Marignano (RN) - Italy Tel. +39 0541 959511Fax +39 0541 957404 www.generalmusic.com...
- Seite 51 D I G I T A L K E Y B O A R D S B e d i e n u n g s a n l e i t u n g RP-X •Deutsch...
-
Seite 52: Spezielle Hinweise
Druckwerk darf weder kopiert, photokopiert, noch in Teilen oder als Ganzes ohne vorherige, schriftliche Genehmigung durch Generalmusic. vervielfältigt werden. Generalmusic behält sich das Recht vor, auch ohne vorherige Ankündigung, für notwendig befundene Modifikationen von Design oder Funktion seiner Produkte vorzunehmen. Generalmusic lehnt jede Haftung für Personen- oder Sachschäden, die auf unsachgemäßen Gebrauch des Instrumentes zurückzuführen sind, ab. - Seite 53 Anschluss eines Masterkeyboard Pedal - Anschlüsse Input (Chinch Buchsen) des RP-X Verbindung mit einem PC über MIDI Verbindung über USB Spielen des GEM RP-X Soundmodul Demosong des GEM RP-X Der PERFORMANCE Mode Anwählen der PERFORMANCES Auswählen einer PERFROMANCE am Modul Anwählen über ein MIDI-KEYBOARD...
- Seite 54 RP-X Lieferumfang • Bedienungsanleitung • GEM RP-X -PC Editor (auf CD) • Netzteil • Midikabel...
-
Seite 55: Einleitung
Bedienungsanleitung Einleitung Herzlichen Glückwunsch zum Kauf eines GEM RP-X Soundmodul. Das RP-X ist zur Zeit das beste Pianomodul auf dem Markt. Wir wünschen Ihnen viel Spaß mit dem RP-X . Damit Sie Ihr GEM RP-X richtig benutzen können, lesen Sie bitte die folgende Anleitung. Vorderseite GEM RP-X r p - x phones edit Mit dem Edit Knopf, können Sie Änderungen an Hier können Sie 2 Kopfhörer anschließen. Sound, Perf, Kanälen ect., vornehmen. perf volume Der Volumen Regler regelt die Gesamtlautstärke ihres Der PERF-Knopf (PERFORMANCE), schaltet den Per- GEM RP-X Soundmodul. formance Mode ein. midi data entry/demo Die Pfeiltasten erlauben Ihnen das Wechseln von Hier sehen Sie, wann Midi Informationen das RP-X Performances oder das Anhören von DEMO (beide... -
Seite 56: Erste Schritte
- x Das GEM RP-X kann auf verschiedene Arten mit einem PC benutz werden: MIDI oder USB (Universal Serial Bus). Ihr PC sollte mit ausgesattet sein. Mit USB ist es möglich das RP-X direkt mit dem PC zu verbinden. In beiden Fällen: MIDI oder USB, wird der Datenaustasch als MIDI Specifi cation gesendet oder empfangen. -
Seite 57: Anschluss Eines Masterkeyboard
INPUT (Chinch Buchsen) des GEM RP-X Das GEM RP-X hat ein Stereo Eingang, an dem Sie weitere Klanquellen anschliessen können. Dieses Signal wird an die Output Buchsen (Ausgang) des RP-X weitergegeben. AUDIO OUT SPEAKER SYSTEM MIDI OUT MIDI IN Diese Beispiel zeigt den Anschluss eines Digital Piano an den GEM RP-X. Dieses Beispiel zeigt den Anschluss eines GEM GM-X (GM Sound Modul) an das RP-X. AUDIO MIDI OUT OUTPUT TO MIDI IN SPEAKER MIDI IN... -
Seite 58: Verbindung Mit Einem Pc Über Midi
rp-x Bedienungsanleitung Verbindung mit einem PC über MIDI Es muss natürlich gewährleistet sein, daß Ihr MIDI Interface und Ihr Software MIDI Player richtig installiert ist und ar- beitet.Ist dies der Fall, verbinden Sie Ihren PC (Midi Out) mit dem MIDI IN (am GEM RP-X).. MIDI IN PC MIDI OUT SPEAKER SYSTEM ACHTUNG: Das MIDI Interface übertragt keine AUDIO Signale nur Mididaten,.deshalb muss das RP-X immer mit einem Lautsprechersystem verbunden sein. Verbindung über USB D.C. adapter to the speaker system USB cable Optional... -
Seite 59: Spielen Des Gem Rp-X Soundmodul
Bedienungsanleitung Spielen des GEM RP-X Ist das GEM RP-X mit Ihrem PC oder Midicontroller (Akkordeon, Masterkeyboard, PC) verbunden, schalten Sie das GEM RP-X ein. Benutzen Sie den ON/OFF Schalter an der Frontseite Ihres RP-X. r p - x DEMOSONG Das GEM RP-X hat interne DEMO-Songs. Durch Drücken der beiden DATA ENTRY Knöpfe (beide gleichzeitig) hören Sie die DEMO-Songs. Die Lautstärke der DEMOSONGS ändern sie mit dem VOLUME Regler an der Front- r p - x r p - x seite des GEM RP-X. -
Seite 60: Anwählen Der Performances
rp-x Bedienungsanleitung Anwählen der PERFORMANCES Sie können die Performances (Registrationen) in zwei unterschiedlichen Arten anwählen: Manuelle Anwahl Drücken Sie die DATA Tasten um eine in- terne Performance auszuwählen. r p - x Performance - Performance + Anwahl über MIDI MIDI OUT MIDI IN MIDI MASTER KEYBOARD r p - x Wählen Sie am Masterkeyboard/Akkordeon die MIDI Program Change Funktion an um eine PERFORMANCE anzuwählen. -
Seite 61: Erstellen Einer Performance (Registration)
rp-x Bedienungsanleitung Erstellen einer PERFORMANCE (REGISTRATION) Um eine PERFORMANCE zu Erstellen, muss eine PERF angewählt sein. Drücken Sie den PERF Taster und Wählen Sie eine der 99 Performances aus. Drücken Sie die EDIT Taste des RP-X. Nun leuchtet das PART(CH) LED am Modul , und zeigt, r p - x welcher Kanal ( Part) angewählt ist. Wird ein WERT geändert�� so blinkt die PERF LED und Sie wissen��... -
Seite 62: Ändern Der Klangfarbe Des Angewählten Part(Ch):Sound
Drücken Sie die DATA Taste, um den nächsten Klang auszuwählen. r p - x Durch Drücken der DATA Taste kommen Sie zum nächsten Klang. Das GEM RP-X hat 50 Single TOP- Sounds. r p - x Ändern der Lautstärke des angewählten PART (CH): VOLUME Um die Lautstärke (VOLUME) eines Klanges (PART/CH) zu verändern, drücken Sie die EDIT-Taste mehrmals, bis die LED auf VOLUME ist. (Volume = 105, in diesem Beispiel). -
Seite 63: Ändern Der Anschlagdynamik :Velocity
rp-x Bedienungsanleitung Ändern der Anschlagdynamik : VELOCITY NOTE The parameter VELOCITY it's GLOBAL, then its setting will affect ALL the parts at the same time. For this reason it can be selected if the "ALL" mode has been enabled only. About the "ALL" mode please consult page 6. Die Velocity Funktion ermöglicht es, die Anschlagsstärke eines Midisignals zu verringern oder zu erhöhen, die von einem Masterkeyboard oder MidiController gesendet werden. WERT: von -64 bis +63. (00 ist original Dynamik). -
Seite 64: Ändern Des Halleffekt Des Angewählten Part (Ch):Rev
rp-x Bedienungsanleitung Ändern des HALLEFFEKT des angewählten PART (CH): REV Einstellen des Hallanteils (REV) im angewählten PART. Drücken Sie die EDIT Taste bis REV leuchted. Das Display zeigt (REV=024), in diesem Beispiel. r p - x Drücken Sie die DATA Tasten (+ oder -) um den REV (Hallanteil) in einem Part zu ändern. Der Wert wir im Display angezeigt. Der Wert kann von 0 bis 127 geändert werden. r p - x REV - REV + Der Modus "ALL" im EDIT Menü Wie schon erwähnt, ändert der "ALL Mode" alle Kanäle des RP-X gleichzeitig. zB. Transpose in ALL heisst: es werden alle Kanäle (4 Parts) transponiert. -
Seite 65: Speichern Einer Performances (Registration)
rp-x Bedienungsanleitung Speichern einer PERFORMANCE (REGISTRATION) Speichern einer Performance auf dem gleichen Platz Haben Sie Ihre PERFORMANCE geändert�� drücken Sie den blinkenden PERF- Taster. r p - x r p - x Drücken Sie die PERF -TASTE erneut. An dieser Stelle blinkt die PERF Taste und das DISPLAY "P01"... -
Seite 66: Abbrechen Des Speichervorgangs
rp-x Bedienungsanleitung Abbrechen des Speichervorgangs Sie sind dabei eine PERORMANCE zu sichern �� wollen aber nicht speichern. r p - x r p - x Die PERF-Taste und P01(in diesem Beispiel) blinken zum abspeichern. r p - x Jetzt nur nochmal die EDIT-Taste drücken und das Modul bricht den Speichvorgang ab. -
Seite 67: Memory Management System
Das Display zeigt COMMON CHANNEL (Grundwert�� �01 r p - x in diesem Beispiel). Nach Drücken beider Tasten, blinkt die PART (CH) LED ihres GEM RP-X. Um den neuen COMMON CHANNEL einzustellen�� be- nutzten Sie die DATA Tasten Es ist möglich den COMMON Cannel auf einen der 16 MIDI r p - x Kanäle einzustellen. -
Seite 68: System Reset (Werkseinstellung)
rp-x Bedienungsanleitung SYSTEM RESET Diese Funktion stellt die Werkseinstellungen wieder her. Halten Sie die PERF und EDIT Tasten für 3 Sekunden gedrückt. Nach Drücken beginnt die PART (CH) LED zu blinken. r p - x Drücken Sie die EDIT-Taste erneut�� um in das MIDI-ID Menü zu gelangen. r p - x Drücken Sie wieder die EDIT-Taste��. -
Seite 69: Midi Data Bulk
rp-x Bedienungsanleitung MIDI DATA BULK (DATENÜBETRAGUNG) Diese Funktion überträgt die PERFORMANCE Daten an einen PC oder Midirekorder um ein Archiv zu erstellen. Um die Daten zu Übertragen verbinden Sie bitte den RP-X (Midi out) mit dem MIDI in Ihres Rekorders oder Pc. Um in das MEMORY MANAGEMENT SYSTEM zu gelangen halten Sie bitte den EDIT Knopf und den EDIT Knopf für ca. 3 Sekunden gedrückt. r p - x Drücken Sie 3 mal den EDIT Knopf um in das BULK Menü zu gelangen. -
Seite 70: Sound List (Klangliste)
rp-x Bedienungsanleitung SOUNDLISTE RP-X Sound Name Sound# Prg.Chng Concert Piano 1 (st) Concert Piano 2 (st) Rock Concert Piano (st) Bright Concert Piano (st) Grand Piano 1 Grand Piano 2 Rock Grand Piano Bright Grand Piano Pop Piano Upright Piano Real Honky Honky Tonk CP Grand Piano... -
Seite 71: Performance Liste ( Registrationen)
rp-x Bedienungsanleitung PERFORMANCE LIST (REGISTRATIONEN) Performance Name Performance Name Mode Mode Note Note Performance Name Performance Name Mode Mode Note Note Concert Piano 1 Concert Piano 1 Single Single 50 Synth 01 50 Synth 01 Layer Layer Concert Piano 2 Concert Piano 2 Single Single... -
Seite 72: Technische Daten/ Technologie
4 Send Effects: Chorus, Phaser, Tremolo, Stereo Delay 2 Insert Effect: Wah-Wah, Compressor 5 band full parametric programmable Equalizer DSP technology D.R.A.K.E. by Generalmusic Flash Ram 64 MB memory size Extra info Midi Velocity Fix IN / PC editor, "easy to use" interface... -
Seite 73: Midi Implementation Chart
rp-x Bedienungsanleitung MIDI IMPLEMENTATION LISTE Date: ott-06 Version: 1.01 MIDI Implementation Chart Model RP-X Function Transmitted Recognized NOTE Basic Default 1-16 These data are memorized also switching the module OFF Channel Changed 1-16 Default Mode 3 Mode Messages Mode 3, 4 Altered ********** Note number... - Seite 74 GENERALMUSIC TECHNOLOGIES s.r.l. Via delle Rose, 12 47842 S.Giovanni in Marignano (RN) - Italy Tel. +39 0541 959511Fax +39 0541 957404 www.generalmusic.com...
- Seite 75 D I G I T A L K E Y B O A R D S Mode d'emploi rp-x •Français...
- Seite 76 Les spécifications techniques sont suceptible de changement Les informations contenues dans ce mode d'emploi sont correctes au moment de l'impression. Generalmusic se réserve le droit de changer ou modifier n'importe quelles spécifications sans avertir et sans obligation de mise à jour des unitées existentes.
- Seite 77 M A N U A L I N D E X INTRODUCTION PANNEAU FRONTAL PANNEAU ARRIERE ET CONNECTIONS PREMIERS PAS ALLUMER L'EXPANDEUR CONNECTER LE SYSTEME D'ENCEINTE CONNECTION D'UN REGULATEUR MASTER MIDI CONNECTION DE PEDALE LA CONNECTION EN ENTREE CONNECTION A UN PC CONNECTION VIA MIDI CONNECTION A UN PC VIA USB ALLUMER LE rp-x...
- Seite 78 RP-X Product Package • rp-x expander • mode demploi • Gem PC - Software Editor • AC Adaptateur Adaptateur • MIDI Cable...
-
Seite 79: Introduction
rp-x Mode d'emploi INTRODUCTION Nous vous félicitons pour avoir choisi l’Expander du piano Gem rp-x! un des meilleur modules sonores present sur le marché. GEM rp-x est basé sur le propriétaire révolutionnaire de technologie Drake, un DSP d’élevée capacité da calcul, qui permet une qualité sonore exceptionnelle dans un instrument de cette catégorie. Rp-x possède d’ailleurs une interface simple, qui satisfait en meme temps, le client professionel plus éxigeant. Afin de bien utiliser l'instrument, svp lisez attentivement ces instructions. PANNEAU FRONTAL r p - x phones edit Cette touche permet d'entrer le mode édition et de Ces connections jack permettent d'insérer 2 écouteurs sélectionner les paramètres à éditer. au module. perf volume Le poignée volume, règle le niveau en sortie de La touche perf (PERFORMANCE), selectionne le mode l'instrument. -
Seite 80: Premiers Pas
rp-x Mode d'emploi PREMIERS PAS L'expandeur Gem rp-x est un générateur de sons haut de gamme, concut pour être utilisé de la manière suivante : Joué via MIDI d'un régulateur "master" MIDI comme un piano numèrique, un clavier "master", une guitare MIDI ou un accordéon MIDI. Connecté a un ordinateur fixe ou portable via USB pour jouer des midifiles standard. Dans ce chapître nous analiserons tous les steps de base pour connecter et utiliser correctmentand l'instrument. -
Seite 81: Connection De Pedale
rp-x Mode d'emploi CONNECTION D'UN CONTROLE MASTER MIDI Le module rp-x peut être utiliser comme un puissant expandeur de sons pour n'importe quel genre de controller MIDI, pianos numérique, clavier maître, guitare et accordéon. MIDI OUT MIDI MASTER KEYBOARD MIDI IN MIDI OUT MIDI Accordeon MIDI IN MIDI OUT MIDI IN Pour avoir le meilleur contrôle du rp-x, veuillez consulter le prochain chapître, où les différents niveaux de l'instrument seront complètement expliqués. -
Seite 82: Connection A Un Pc
rp-x Mode d'emploi CONNECTION A UN PC VIA MIDI Supposant que une interface MIDI et un software MIDI sont bien installés sur votre PC. Nous vous prions de consulter les instructions de cet appareil pour une configuration correcte et que votre PC transmette correctement les MIDI file standard via la sortie MIDI. MIDI IN PC MIDI OUT Avec cette configuration en selectionnant une séquence de votre votre PC l'expander jouera directement cette meme sequence. SPEAKER SYSTEM ATTENTION! L'interface MIDI ne transmet aucun signal AUDIO mais uniquement des données control, vous devez donc toujours connecter la sortie audio de l'instrument MIDI que vous controllez à... -
Seite 83: Ecouter La Sequence Demo
rp-x Mode d'emploi rp-x ALLUNMER LE Une fois que le module rp-x est relier à votre contrôleur (via MIDI ou USB), vous pouvez l'allumer et l'utiliser de la manière désirée. Utiliser la touche ON/OFF dédiée sur le panneau frontal pour mettre en route le r p - x module. ECOUTER LA SEQUENCE DEMO Le rp-x a une séquence DEMO à l'intérieur, qui illustre la puissance du module de son. Presser simultanément les 2 touches d'entrée des données (DATA ENTRY) sur le panneau pour allumer la démo du module. L'écran affichera le message "DEM" (Demo). En jouant la DEMO il est possible de régler le VOLUME, en tournant le bouton r p - x r p - x VOLUMEN sur le panneau. La séquence DEMO est par différents MIDI files et de différents styles musicaux. Pendant l'exécution vous pouvez sélectionner chaque dossier MIDI faisant partie de la séquence DEMO, en appuyant sur la touche DATA . L'écran affiche le numéro du dossier MIDI choisi. Dans l'exé- r p - x r p - x cution DEMO normale, tous les dossiers MIDI seront joués en suite. -
Seite 84: Selection Des Performances
rp-x Mode d'emploi SELECTION DES PERFORMANCES Il est possible de rappeler les performances interne du rp-x de 2 différentes manières. RAPPEL MANUEL Pressez la touche DATA pour sélectionner la performance interne. Consultez la liste de PERF à la fin de ce mode d'emploi pour r p - x voir le nom et la structure de la performance (single, layer, Split, etc.) Performance - Performance +... -
Seite 85: Editer La Performance
rp-x Mode d'emploi EDITER LA PERFORMANCE Le mode PERFORMANCE offre une fonction très importante, qui de rendre possible le stockage (et rappel), dans la mémoire de l'instrument jusqu'à 99 settage différent, sans perdre données en allumant ou éteignant le module. Pour rentrer dans le mode d'édition de la PERF pressez la touche EDIT sur le panneau. Le paramètre PART (CH) est automatiquement sélec- tionné, pendant que sa valeur courante est visualizée r p - x à... -
Seite 86: Selection Des Parametres A Editer Dans Les Parts (Ch): Son
rp-x Mode d'emploi SELECTION DES PARAMETRES A EDITER DANS LES PARTS (CH): SON Une fois sélectionné le PART a modifié, (N°01 dans l'exem- ple), le menu d'EDITION des paramètres seront sélectionnés en appuyant la touche EDIT. chaque fois que vous presséz la touche, un paramètre différent se sélectionne. r p - x La valeur par défaut du paramètre sélectionné est affichée à l'écran. Dans le part le son est: GRAND PIANO, le DOT à coté du premier caractère indique le son BANK (n°01). - Seite 87 rp-x Mode d'emploi SELECTION DES PARAMETRES A EDITER DANS LES PARTS SELECTIONNER (CH): VITESSE NOTE Ce paramètres est GLOBALE, donc sont réglage affecte les 4 parts simultanément. Le paramètre VELOCITY peut etre modifié seulement après avoir sélectionné le ALL MODE. Ce paramètre te permet de placer un excentrage programmable de VITESSE, afin d’augmenter ou diminuer la valeur de vitesse des notes entrantes du MIDI transmises par un contrôleur du MIDI. Valeur : -64/00/+63.
-
Seite 88: Le Mode "All" Dans Le Menu D'edition
rp-x Mode d'emploi SELECTION DES PARAMETRES A EDITER DANS LES PARTS SELECTIONNER (CH): REV Régler le niveau du REVERB (REV) dans le PART sélectionné. Pressez la touche EDIT pour sélectionner le REV. L'écran affichera la valeur courante par défaut (REV=024) dans l'exemple. r p - x En appuyant la touche DATA pour augmenter ou diminuer l'envois de REV dans le part choisit. L'écran affichera la valeur qui change en temps réel. -
Seite 89: Memoriser La Performance
rp-x Mode d'emploi MEMORISER LA PERFORMANCE MEMORISER L'EDITION DANS LE MEME EMPLACEMENT DE LA PERFORMANCE une fois complètée l'édition de la PERFORMANCE�� pressez la touche PERF clignottante. r p - x r p - x Soit la touche PERF que le digit "P01" à l'écran (indi- quant le nombre de performances éditée dans cet example)��... -
Seite 90: Sortir Du Database Des Performances
rp-x Mode d'emploi SORTIR DU DATABASE DES PERFORMANCES Quand l'édition de votre PERFORMANCE est complètée pressé la touche PERF clignottante à l'écran. r p - x r p - x Là�� soit la touche PERF que le digit "P01" sur écran (qui indique le nombre de performances éditées dans cet example)��... -
Seite 91: Systeme De Gestion De La Memoire (Memory Management System)
rp-x Mode d'emploi SYSTEME DE GESTION DE LA MEMOIRE Ce menu contient certaine fonction globale telle que l’arrangement de la canalisation des MIDI COMMUN, la restaura- tion de données d’usine de l’instrument et le Bulk des données MIDI programmées dans l’EXÉCUTION. •COMMON CHANNEL SETTING •MIDI IDENTIFICATION NUMBER •SYSTEM RESET •MIDI DATA BULK Ces arrangements sont automatiquement stockés dans la mémoire du rp-x et sont maintenus meme si vous éteigner l'instrument. EDITION DES CANAUX COMMON La canal MIDI COMMON est une fonction très utile qui permet une grande versatilitée dans la programmation MIDI. Par défaut le canal COMMON permet de contrôler la performances et sa sélection en utilisant uniquement le canal MIDI n°16. beaucoup des performances interne de la rp-x sont programmées en utilisant différentes parties (et différents canaux MIDI)en mode layer ou split. Le MIDI COMMON permet de jouer et sélectionner complète- ment ces performances en utilisant une commande générale MIDI transmettant sur un seul canal MIDI. Pour accéder au mode d'édition de la canalisation des MIDI COMMON maintenir presser ensemble pendant au moin 2 secondes les touches PERF et EDIT. -
Seite 92: Reset Du Systeme
rp-x Mode d'emploi RESET DU SYSTEME Cette fonction restaure les set up programmés d'usine de tout l'instrument. Accéder au SYSTEME DE GESTION DE LA MEMOIRE en pressant au moin pendant 2 secondes les touches PERF et EDIT en meme temps. Comme déjà vus précédem- ment le premier menu est celui d'édition du canal MIDI r p - x COMMON. -
Seite 93: Bulk De Donnes Midi
rp-x Mode d'emploi BULK DE DONNEES MIDI cette fonction les données utilisateur contenues dans la "PERFORMANCE" à un appareil MIDI externe, comme un PC ou un enregistreur MIDI pour créer une archive. Pour transférer le BULK des données, a un apareil externe le rp-x MIDI OUT doit être connecté au MIDI IN de l'enregistreur MIDI qui reçoit. La transmission du Bulk de données vers un PC est aussi possible via USB. Voir Page XX Accéder au mode MEMORY MANAGEMENT SYSTEM en tenant pressé... - Seite 94 rp-x Mode d'emploi SOUND LIST Sound Name Sound# Prg.Chng Concert Piano 1 (st) Concert Piano 2 (st) Rock Concert Piano (st) Bright Concert Piano (st) Grand Piano 1 Grand Piano 2 Rock Grand Piano Bright Grand Piano Pop Piano Upright Piano Real Honky Honky Tonk CP Grand Piano...
- Seite 95 rp-x Mode d'emploi PERFORMANCE LIST Performance Name Performance Name Mode Mode Note Note Performance Name Performance Name Mode Mode Note Note Concert Piano 1 Concert Piano 1 Single Single 50 Synth 01 50 Synth 01 Layer Layer Concert Piano 2 Concert Piano 2 Single Single 51 Sympho Strings&Choir...
-
Seite 96: Specifications Techniques
4 Send Effects: Chorus, Phaser, Tremolo, Stereo Delay 2 Insert Effect: Wah-Wah, Compressor 5 band full parametric programmable Equalizer DSP technology D.R.A.K.E. by Generalmusic Flash Ram 64 MB memory size Extra info Midi Velocity Fix IN / PC editor, "easy to use" interface... -
Seite 97: Midi Implementation Chart
rp-x Mode d'emploi MIDI IMPLEMENTATION CHART Date: ott-06 Version: 1.01 MIDI Implementation Chart Model RP-X Function Transmitted Recognized NOTE Basic Default 1-16 These data are memorized also switching the module OFF Channel Changed 1-16 Default Mode 3 Mode Messages Mode 3, 4 Altered ********** Note number... - Seite 98 GENERALMUSIC TECHNOLOGIES s.r.l. Via delle Rose, 12 47842 S.Giovanni in Marignano (RN) - Italy Tel. +39 0541 959511Fax +39 0541 957404 www.generalmusic.com...
-
Seite 99: Federal Communications Commission
- Consult the dealer or an experienced radio/TV technician for help. CAUTION : Changes or modifi cations to this product not expressly approved by the manufac- turer could void the user’s authority to operate this product. Gem RP-X Owners Manual Version 1.03 / Maj 2008... - Seite 100 STOCK CODE 271480 Specifications are subject to change without prior notice. GENERALMUSIC TECHNOLOGIES s.r.l. Via delle Rose, 12 47842 S.Giovanni in Marignano (RN) - Italy Tel. +39 0541 959511Fax +39 0541 957404 www.generalmusic.com...