
Verwandte Anleitungen für TechniSat DIGITRADIO 360 CD


Inhaltszusammenfassung für TechniSat DIGITRADIO 360 CD
- Seite 1 Bedienungsanleitung DIGITRADIO 360 CD Stereo DAB+ und UKW-Radio mit USB-Anschluss, Audioeingang und MP3/CD-Player...
-
Seite 2: Abbildungen
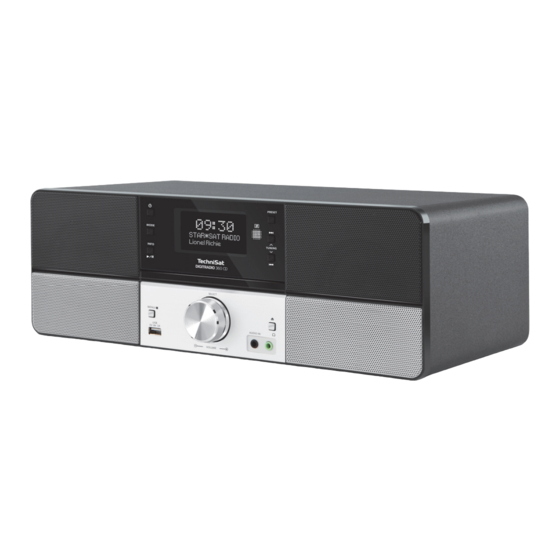
1 Abbildungen Bedienung: VORWÄRTS / TUNING / EIN/STANDBY RÜCKWÄRTS / TUNING / MODE PLAY/PAUSE / INFO IR EMPFÄNGER DISPLAY AUDIOEINGANG SELECT / VOLUME EJECT/ CD-Fach öffnen/schließen MENU / STOP KOPFHÖRERANSCHLUSS USB-ANSCHLUSS CD-Fach PRESET... - Seite 3 Rückseite: TELESKOPANTENNE...
- Seite 4 Fernbedienung: EIN/STANDBY Ein/Ausschalten des Geräts (Standby), Alarm ausschalten OPEN/CLOSE CD-Fach öffnen/schließen PRESET Programmierfunktion CLOCK Uhrzeit einstellen TIMER Weckzeit einstellen INTRO CD, USB: Anspielfunktion, 10 s je Titel RANDOM CD, USB: Zufallsfunktion MUTE Tonstummschaltung SLEEP Schlummern einschalten und wählen TUNING DAB: Sender wählen ...
- Seite 5 SCAN Automatischer Suchlauf UKW SCAN Automatischer Suchlauf DAB DISPLAY Titelinformationen CD-/USB-Wiedergabe ID3 Tags ein-/ausschalten Betriebsart USB-Wiedergabe Betriebsart CD-Wiedergabe FOLDER – CD/USB: Albumwahl PRESET DAB, UKW-TUNER: PRESET-Sender wählen VOL - Lautstärke leiser einstellen PRESET DAB, UKW-TUNER: PRESET-Sender wählen TUNING DAB: Sender wählen ...
-
Seite 6: Inhaltsverzeichnis
5.2 Die besonderen Eigenschaften des DIGITRADIO 360 CD ....... . . - Seite 7 5.4.6 Displayanzeigen aufrufen ............. . .27 5.4.7 Gerät ausschalten .
- Seite 8 9.5 Schneller Suchlauf ...............41 9.6 Wiederhol Funktion .
- Seite 9 15 Technische Daten ............... .57...
-
Seite 10: Vorwort
3 Vorwort Diese Bedienungsanleitung hilft Ihnen beim bestimmungsgemäßen und sicheren Gebrauch Ihres Radio-Systems, im folgenden DIGITRADIO oder Gerät genannt. 3.1 Die Zielgruppe dieser Bedienungsanleitung Die Bedienungsanleitung richtet sich an jede Person, die das Gerät aufstellt, bedient, reinigt oder entsorgt. 3.1.1 Bestimmungsgemäßer Gebrauch Das Gerät ist für den Empfang von DAB+/UKW Radiosendungen entwickelt. -
Seite 11: Sicherheit
3.2.1 Sicherheit Zu Ihrem Schutz sollten Sie die Sicherheitsvorkehrungen sorgfältig durchlesen, bevor Sie Ihr neues Gerät in Betrieb nehmen. Der Hersteller übernimmt keine Haftung für Schäden, die durch unsachgemäße Handhabung und durch Nichteinhaltung der Sicherheitsvorkehrungen entstanden sind. Öffnen Sie niemals das Gerät! Das Berühren Spannung führender Teile ist lebensgefährlich! Ein eventuell notwendiger Eingriff darf nur von geschultem Personal vorgenommen werden. - Seite 12 Bei Gewitter sollten Sie das Gerät von der Netzsteckdose trennen. Überspannung kann das Gerät beschädigen. Bei auffälligem Gerätedefekt, Geruchs- oder Rauchentwicklung, erheblichen Fehlfunktionen, Beschädigungen an Gehäuse sowie bei eingedrungener Flüssigkeit das Gerät ausschalten und den Service verständigen. Das Gerät darf nur an eine Netzspannung von 100 V-240 V~, 50/60 Hz angeschlossen werden. Versuchen Sie niemals, das Gerät mit einer anderen Spannung zu betreiben.
- Seite 13 Das Gerät bleibt auch in ausgeschaltetem Zustand/Standby mit dem Stromnetz verbunden. Ziehen Sie den Netzstecker aus der Steckdose, falls Sie das Gerät über einen längeren Zeitraum nicht benutzen. Ziehen Sie nur am Stecker, nicht am Kabel. Hören Sie Musik oder Radio nicht mit großer Lautstärke. Dies kann zu bleibenden Gehörschäden führen. Dieses Gerät ist nicht dafür bestimmt, durch Personen (einschließlich Kinder) mit eingeschränkten physischen, sensorischen oder geistigen Fähigkeiten oder mangels Erfahrung und/oder mangels Wissen benutzt zu werden, es sei denn, sie werden durcheine für ihre Sicherheit zuständige Person beaufsichtigt...
- Seite 14 Umgang mit Batterien Achten Sie darauf, dass Batterien nicht in die Hände von Kindern gelangen. Kinder könnten Batterien in den Mund nehmen und verschlucken. Dies kann zu ernsthaften Gesundheitsschäden führen. Bewahren Sie deshalb Batterien und Fernbedienung für Kleinkinder unerreichbar auf. In diesem Fall sofort einen Arzt aufsuchen! Normale Batterien dürfen nicht geladen, mit anderen Mitteln reaktiviert, nicht auseinandergenommen, erhitzt oder ins offene Feuer geworfen werden (Explosionsgefahr!).
-
Seite 15: Entsorgung
3.2.2 Entsorgung Die Verpackung Ihres Gerätes besteht ausschließlich aus wiederverwertbaren Materialien. Bitte führen Sie diese entsprechend sortiert wieder dem “Dualen System” Dieses Produkt darf am Ende seiner Lebensdauer nicht über den normalen Haushaltsabfall entsorgt werden, sondern muss an einem Sammelpunkt für das Recycling von elektrischen und elektronischen Geräten abgegeben werden. -
Seite 16: Rechtliche Hinweise
Anforderungen und den übrigen einschlägigen Bestimmungen der Richtlinie 2014/35/EU und 2004/108/EG befindet. Die vollständige Konformitätserklärung kann unter folgender Adresse gefunden werden: https://www.technisat.com/de_DE/Konformitaetserklaerung/352-687/?productID=11100 TechniSat ist nicht für Produktschäden auf Grund von äußeren Einflüssen, Verschleiß oder unsachgemäßer Handhabung, unbefugter Instandsetzung, Modifikationen oder Unfällen haftbar. - Seite 17 Dieses Gerät ist für die Verwendung in allen Ländern der Europäischen Union sowie in der Schweiz, in Norwegen, Liechtenstein und Island vorgesehen. Der Betrieb im Frequenzbereich 5150 MHz - 5350 MHz ist nur in geschlossenen Räumen erlaubt. DIGITRADIO 360 CD und TechniSat sind eingetragene Warenzeichen der: TechniSat Digital GmbH Julius-Saxler-Straße 3 54541 Daun...
-
Seite 18: Servicehinweise
Technische Hotline: Mo. - Fr. 8:00 - 20:00 03925/92201800 Für eine evtentuell erforderliche Einsendung des Gerätes verwenden Sie bitte ausschließlich folgende Anschrift: TechniSat Digital GmbH Service-Center Nordstr. 4a 39418 Staßfurt Namen der erwähnten Firmen, Institutionen oder Marken sind Warenzeichen oder eingetragene... -
Seite 19: Aufstellen Des Gerätes
Beachten Sie, dass die Gerätefüße u. U. farbige Abdrücke auf bestimmten Möbeloberflächen hinterlassen könnten. Verwenden Sie einen Schutz zwischen Ihren Möbeln und dem Gerät. > Sie dürfen das Gerät nur in waagerechter Position betreiben. Nicht im Freien verwenden! > Halten Sie das DIGITRADIO 360 CD von Geräten fern, die starke Magnetfelder erzeugen. - Seite 20 > Stellen Sie keine schweren Gegenstände auf das Gerät. > Wenn Sie das Gerät von einer kalten in eine warme Umgebung bringen, kann sich im Inneren des Gerätes Feuchtigkeit niederschlagen. Warten Sie in diesem Fall etwa eine Stunde, bevor Sie ihn es Betrieb nehmen.
-
Seite 21: Fernbedienung
Bitte stellen Sie sicher, dass alle nachfolgend aufgeführten Zubehörteile vorhanden sind: DIGITRADIO 360 CD 1x Fernbedienung mit Batterie 1x Bedienungsanleitung 5.2 Die besonderen Eigenschaften des DIGITRADIO 360 CD DIGITRADIO 360 CD besteht aus einem Stereo DAB+/UKW-Empfänger mit USB/AUX-Eingang, MP3/CD-Player und Timerfunktion. -
Seite 22: Digitradio 360 Cd Zum Betrieb Vorbereiten
5.3 DIGITRADIO 360 CD zum Betrieb vorbereiten 5.3.1 Netzkabel anschließen > Schließen Sie das Gerät mit dem Netzstecker an das Stromnetz an. Vergewissern Sie sich, dass die Betriebsspannung des Gerätes mit der örtlichen Netzspannung übereinstimmt, bevor Sie es in die Wandsteckdose stecken. -
Seite 23: Antennenempfang Verbessern
5.3.2 Antennenempfang verbessern Die Anzahl und Qualität der zu empfangenden Sender hängt von den Empfangsverhältnissen am Aufstellort ab. Mit der Teleskopantenne kann ein ausgezeichneter Empfang erzielt werden. > Lösen Sie die Teleskopantenne (50) aus ihrer Halterung, richten Sie sie auf und ziehen Sie sie der Länge nach aus. -
Seite 24: Batterie Einlegen
5.3.3 Batterie einlegen > Schließen Sie den Batteriefachdeckel wieder sorgfältig, so dass die Haltelaschen des Deckels im Gehäuse einrasten. Zum Betrieb der Fernbedienung benötigen Sie eine alkalische Batterie, Typ Mignon, 1,5 V, LR6/AA. Achten Sie beim Einlegen auf die richtige Polung. Wechseln Sie eine schwächer werdende Batterie rechtzeitig aus. -
Seite 25: Allgemeine Geräte-Funktionen
5.4 Allgemeine Geräte-Funktionen Sie können die Einstellungen teils mit den Tasten am Gerät, wie auch mit der Fernbedienung vornehmen. Die Beschreibung der Bedienung erfolgt mit den Tasten der Fernbedienung. 5.4.1 Gerät einschalten > Mit der Taste Ein/Standby am Gerät (1) bzw. auf der Fernbedienung (16) können Sie das Gerät einschalten bzw. -
Seite 26: Lautstärke Einstellen
5.4.3 Lautstärke einstellen > Stellen Sie die Lautstärke mit den Tasten VOL -/+ (43, 26) der Fernbedienung oder durch drehen des SELECT/VOLUME (5) Knopfes am Gerät ein. - Im Uhrzeigersinn drehen – lauter - Gegen den Uhrzeigersinn drehen – leiser Die eingestellte Lautstärke wird im Display gezeigt 5.4.4 Stummschaltung >... -
Seite 27: Displayanzeigen Aufrufen
5.4.6 Displayanzeigen aufrufen > Durch mehrmaliges Drücken der Taste INFO (3) am Gerät (bei CD/USB Modus muss die Taste einige Sekunden festgehalten werden), bzw auf der Fermbedienung die Tasten DISPLAY der jeweiligen Modi (Taste 33 für DAB, 35 für FM, 38 für CD/USB), können Sie folgende Informationen einblenden und durchschalten: DAB-Betrieb: UKW-Betrieb:... -
Seite 28: Menübedienung
6 Menübedienung Über ein Menü können verschiedene Einstellungen des DIGITRADIO 360 CD, am Gerät oder mit der Fernbedienung, vorgenommen werden. Die angezeigten Menüpunkte sind vom angewählten Betriebsmodus (DAB oder FM) abhängig. > Sie können das Menü durch Drücken der Taste MENU (34) auf der Fernbedienung oder am Gerät (6) aufrufen und auch wieder verlassen. -
Seite 29: Dab Radio
7 DAB Radio 7.1 Was ist DAB+ DAB+ ist ein neues digitales Format, durch welches Sie kristallklaren Sound ohne Rauschen hören können. Anders als bei herkömmlichen Analogradiosendern werden bei DAB mehrere Sender auf ein und derselben Frequenz ausgestrahlt. Dies nennt man Ensemble oder Multiplexe. Ein Ensemble setzt sich aus der Radiostation sowie mehreren Servicekomponenten oder Datendiensten zusammen, welche individuell von den Radiostationen gesendet werden. -
Seite 30: Dab Radioempfang
7.2 DAB Radioempfang Drücken Sie zum Einschalten des DAB-Modus die Taste M M O O D D E E (2) am Gerät so oft, bis D D A A B B R R a a d d i i o o im >... -
Seite 31: Dab-Sender Auswählen
7.4 DAB-Sender auswählen Durch Drücken der Tasten TUNING / oder TUNING / (10, 9) am Gerät, bzw. der Tasten > TUNING / oder TUNING / (45, 25) auf der Fernbedienung können Sie beim DAB Suchlauf gefunden Sender auswählen und durch Drücken des SELECT/VOLUME Knopfes am Gerät, bzw. Drücken der Taste ENTER der Fernbedienung anwählen. -
Seite 32: Dab-Sender Von Einem Speicherplatz Abrufen
Im Display wird der Vorgang abschliessend bestätigt. Belegte Speicherplätze werden Ihnen mit dem darauf abgespeichten Sendernamen angezeigt. 7.6 DAB-Sender von einem Speicherplatz abrufen > Um einen Sender, den Sie auf einen Speicherplatz abgelegt haben, wieder abzurufen, drücken Sie kurz die Taste PRESET am Gerät oder auf der Fernbedienung. -
Seite 33: Signalstärke
Beachten Sie hierzu auch den Punkt 5.3.2. > Öffnen Sie die Kanalliste über Taste MENU und wählen den Menüpunkt Manuell einstellen an. > Durch Drücken des SELECT/VOLUME Knopfes am Gerät, bzw. der Taste ENTER auf der Fernbedienung wird der Menüpunkt angewählt. Durch Drehen des SELECT/VOLUME Knopfes am Gerät, bzw. -
Seite 34: Inaktive Stationen Löschen
Die Aussteuerung des Balkens zeigt den Pegel des aktuell gewählten DAB-Senders an. Das erste Feld stellt dabei die Mindestsignalstärke für einen störungsfreien Empfang dar. Sender, deren Signalstärke unterhalb der erforderlichen Mindestsignalstärke liegt, senden kein ausreichend starkes Signal. Richten Sie die Antenne ggf. wie unter Punkt 5.3.2 beschrieben aus. 7.9 Inaktive Stationen löschen >... -
Seite 35: Ukw-Betrieb
8 UKW-Betrieb > Wählen Sie wie unter Punkt 5.4.5 beschrieben die Quelle FM Radio aus. Beim erstmaligen Einschalten ist die Frequenz 87,5 MHz eingestellt. Haben Sie bereits einen Sender eingestellt oder gespeichert, spielt das Radio den zuletzt eingestellten Sender. Im Display werden Ihnen die RDS-Informationen RT (Radiotext), PS (Sendername), PTY (Programmtyp) angezeigt, sofern der gewählte Sender diese Daten übermittelt. -
Seite 36: Manuelle Sendersuche
Über MENU > Suchlauf-Einstellung können Sie einstellen, ob der Suchlauf nur bei starken Sendern stoppt (Nur kräftige Sender) oder auch bei empfangsschwächeren (Alle Sender). 8.2 Manuelle Sendersuche Drücken Sie kurz die Tasten TUNING / oder TUNING / (10, 9) am Gerät, bzw. die Tasten >... -
Seite 37: Fm/Ukw-Sender Von Einem Speicherplatz Abrufen
> Wählen Sie den gewünschten Speicherplatz durch drehen des SELECT/VOLUME Knopfes am Gerät, bzw. mit den Tasten PRESET oder PRESET (44, 42) auf der Fernbedienung aus und bestätigen Sie den Speichervorgang durch Drücken des SELECT/VOLUME Knopfes am Gerät, bzw. Drücken der Taste ENTER der Fernbedienung. -
Seite 38: Audioeinstellung (Mono/Stereo)
Haben Sie keinen Sender auf den gewählten Programmplatz gespeichert, erscheint (Leer) hinter der Speicherplatznummer. 8.5 Audioeinstellung (Mono/Stereo) > Über MENU > Audio-Einstellung können Sie eine Vorauswahl treffen, ob der Ton nur in Mono (Nur Mono) oder auch in Stereo (Stereo möglich) ausgegeben wird. Alternativ: >... -
Seite 39: Welche Discs Sie Verwenden Können
Wenn Sie Audio-CDs anfertigen, beachten Sie die gesetzlichen Grundlagen und verstoßen Sie nicht gegen die Urheberrechte Dritter. Halten Sie das CD-Fach immer geschlossen, damit sich kein Staub auf der Laseroptik ansammelt. Das Gerät kann CDs mit MP3 Daten und normale Audio CDs (CD-DA) abspielen. Keine anderen Erweiterungen, wie z.B. - Seite 40 > Um CDs einzulegen Taste EJECT (13) am Gerät, bzw OPEN/CLOSE (17) auf der Fernbdienung drücken. Das CD-Fach (15) öffnet sich nach vorne. Dabei darf es nicht behindert werden. Bei geöffnetem CD-Fach ist darauf zu achten, dass keine Fremdgegenstände in das Gerät gelangen können.
-
Seite 41: Titel Einstellen
Wenn keine Wiedergabe erfolgt, schaltet DIGITRADIO 360 CD nach 15 Minuten in Standby. 9.4 Titel einstellen > Wählen Sie ggf. die Kategorisierung bzw. Ordner sowie anschließend die darin vorhandene Untergliederung bis hin zum gewünschten Titel aus, damit dieser wiedergegeben wird. -
Seite 42: Zufällige Wiedergabe
9.7 Zufällige Wiedergabe Mit dem Zufallsgenerator können Sie die Titel einer CD in einer beliebig gemischten Reihenfolge abspielen. > Drücken Sie bei laufender Wiedergabe die Taste RANDOM (22) auf der Fernbedienung, im Display erscheint Zufall. > Um die Funktion wieder Auszuschalten, drücken Sie die Taste RANDOM erneut. 9.8 Titel anspielen Mit dieser Funktion werden die ersten 10 Sekunden der Titel angespielt. -
Seite 43: Usb-Medien Wiedergeben
Die Titel-Eingabe erfolgt dann wie bei der Audio-CD. 10 USB-Medien wiedergeben Sie haben die Möglichkeit Audiodateien, die sich auf einem USB-Datenträger befinden, über das DigitRadio 360 CD abzuspielen. Zur Wiedergabe von einem USB-Datenträger, muss dieser an dem USB-Anschluss (7) angeschlossen sein. -
Seite 44: Audioeingang
Wenn kein Speichermedium angeschlossen ist oder nicht gelesen werden kann, erscheint die Anzeige Kein USB im Display Wenn keine Wiedergabe erfolgt, schaltet DIGITRADIO 360 CD nach 15 Minuten in Standby. 11 Audioeingang Sie können den Ton eines externen Gerätes über den Lautsprecher des DIGITRADIO 360 CD wiedergeben. -
Seite 45: Weiterte Funktionen
DIGITRADIO 360 CD schaltet sich im AUX Modus nach 4 Stunden automatisch ab. Dies wird im Display angekündigt. Der Abschaltvorgang kann durch Drücken der Taste INTRO auf der Fernbedienung abgebrochen werden.. Um die Lautstärke optimal einzustellen, verwenden Sie sowohl die Lautstärkeregelung am Radio, als auch am angeschlossenen Gerät. -
Seite 46: Zeiteinstellung
12.2 Zeiteinstellung Wird ein DAB-Signal empfangen erfolgt automatisch der Uhrzeitabgleich und die korrekte Zeit wird eingestellt. Sollte sich die Uhrzeit nicht automatisch eingestellen, gehen Sie wie folgt vor: > Schalten Sie das Gerät in Standby. > Drücken Sie die Taste CLOCK (19) auf der Fernbedienung. Die Stundenanzeige blinkt. Stellen Sie mit den Tasten TUNING /... -
Seite 47: Wecker Nach Alarm Ausschalten
Stellen Sie mit den Tasten TUNING / oder TUNING / die Ausschaltzeit in Stunden und > Minuten ein. Drücken Sie zur Bestätigung jeweils die Taste TIMER. Die Einschaltquelle blinkt. Stellen Sie mit TUNING / oder TUNING / die gewünschte Quelle >... -
Seite 48: Klangeinstellung
12.4 Klangeinstellung Um den Klang des DigitRadio 360 CD anzupassen, steht Ihnen der Equalizier mit den voreingestellten Abstimmungen zur Verfügung. > Drücken Sie die Taste EQ (47) der Fernbedienung, um direkt in die Equalizereinstellungen zu gelangen. Wählen Sie die gewünschte Equalizereinstellungen durch mehrmaliges Drücken der Taste EQ aus. -
Seite 49: Werkseinstellung
12.6 Werkseinstellung Wenn Sie den Standort des Gerätes verändern, z.B. bei einem Umzug, sind möglicherweise die gespeicherten DAB-Sender nicht mehr zu empfangen. Mit dem Zurücksetzen auf Werkseinstellungen können Sie in diesem Fall alle gespeicherten Sender löschen, um gleichzeitig einen neuen Sendersuchlauf zu starten. >... -
Seite 50: Kopfhörer Benutzen
12.8 Kopfhörer benutzen Hören Sie Musik nicht mit großer Lautstärke über Kopfhörer. Dies kann zu bleibenden Gehörschäden führen. Regeln Sie vor der Verwendung von Kopfhörern die Gerätelautstärke auf minimale Lautstärke. Wenn Sie einen Kopfhörer (nicht im Lieferumfang) anschließen, sind die Lautsprecher stumm geschaltet und die Klangwiedergabe erfolgt ausschließlich über den Kopfhörer. -
Seite 51: Hinweise Zur Cd
13.1 Hinweise zur CD Die CD stets in der Hülle aufbewahren und nur an den Kanten anfassen. Die in Regenbogenfarben schimmernde Oberfläche darf nicht berührt werden und sollte stets sauber sein. Kein Papier oder Klebeband auf die Etikettenseite der Disk kleben. Die CD sollte von praller Sonneneinstrahlung und Wärmequellen wie Heizungen ferngehalten werden. -
Seite 52: Fehler Beseitigen
14 Fehler beseitigen Wenn das Gerät nicht wie vorgesehen funktioniert, überprüfen Sie es anhand der folgenden Tabellen. 14.1 Probleme mit dem Gerät S S y y m m p p t t o o m m M M ö ö g g l l i i c c h h e e U U r r s s a a c c h h e e / / A A b b h h i i l l f f e e Das Gerät wird nicht mit Strom versorgt. -
Seite 53: Probleme Mit Usb-Medien
14.2 Probleme mit USB-Medien S S y y m m p p t t o o m m M M ö ö g g l l i i c c h h e e U U r r s s a a c c h h e e / / A A b b h h i i l l f f e e Das Gerät befindet sich nicht im USB- Modus. -
Seite 54: Probleme Mit Dem Radio
14.4 Probleme mit dem Radio S S y y m m p p t t o o m m M M ö ö g g l l i i c c h h e e U U r r s s a a c c h h e e / / A A b b h h i i l l f f e e Das Gerät befindet sich nicht im Radio- Es wird kein Radiosender empfangen. -
Seite 55: Probleme Mit Dem Cd-Player
14.5 Probleme mit dem CD-Player S S y y m m p p t t o o m m M M ö ö g g l l i i c c h h e e U U r r s s a a c c h h e e / / A A b b h h i i l l f f e e Das Gerät befindet sich nicht im CD- Modus. -
Seite 56: Probleme Mit Dem Externen Eingang
S S y y m m p p t t o o m m M M ö ö g g l l i i c c h h e e U U r r s s a a c c h h e e / / A A b b h h i i l l f f e e Die Lautstärke ist zu hoch eingestellt. - Seite 57 15 Technische Daten Technische Änderungen und Irrtümer vorbehalten. Die Abmessungen sind ungefähre Werte. Empfangswege DAB/DAB+, UKW, CD, USB, AUX UKW: 87,5-108MHz Frequenzen DAB/DAB+: 174-240MHz Netzspannung AC Input: 110-240; 50Hz USB-Versorgung DC 5V 1,0A Ausgangsleistung Lautsprecher 2x5W RMS Leistungsaufnahme Leistungsaufnahme Standby <1W AUX Eingang 500mV...
- Seite 58 CD-DA, CD-ROM, CD-R, CD-RW, ISO 9660, CD: Unterstützte Formate MPEG 3 8-320kbps, konstant und VBR ID3 wird unterstützt MP3 Decoder Max. Ordner: 99 Max. Titel: USB 999, CD-ROM 511 Max. Titel pro Ordner 128 Windows media audio 9 32-192kbps Max. Ordner: 99 WMA Decoder Max.
- Seite 60 20160824V52RM...
- Seite 61 DIGITRADIO 360 CD Stereo DAB+ and USW radio with USB connection, audio input and MP3/CD player...
- Seite 62 CONTENTS ENGLISH ................... 3-58 FRANÇAIS ..................59-114 ITALIANO ..................115-170...
- Seite 63 Instruction Manual DIGITRADIO 360 CD Stereo DAB+ and USW radio with USB connection, audio input and MP3/CD player...
-
Seite 64: Usb Connection
1 Illustrations Operation: ON/STANDBY PRESET MODE FORWARD / TUNING r/: PLAY/PAUSE /INFO BACK / TUNING s/9 DISPLAY IR RECEIVER SELECT / VOLUME AUDIO INPUT MENU / STOP EJECT/ open/close CD compartment USB CONNECTION HEADPHONE CONNECTION CD compartment... - Seite 65 Rear: Telescopic antenna...
- Seite 66 Remote control: ON/STANDBY Device on/off (Standby), Alarm off OPEN/CLOSE Open/close CD compartment PRESET Programming function CLOCK Set time TIMER Setting the alarm time INTRO CD, USB: Preview function, 10 s per track RANDOM CD, USB: Random function MUTE Mute function SLEEP Switch on and select snooze TUNINGr...
- Seite 67 SCAN Automatic USW scan SCAN Automatic DAB scan DISPLAY Track information for CD /USB playback Switch ID3 tags on/off USB playback operating mode CD playback operating mode FOLDER - CD/USB: album selection PRESET s Select DAB, USW TUNER: PRESET stations VOL - Decrease volume PRESET r...
- Seite 68 Remote control ....................................... 22 Description of the DIGITRADIO 360 CD ......................... 22 Scope of delivery ....................................22 The special features of the DIGITRADIO 360 CD ........................22 Preparing the DIGITRADIO 360 CD for operation ........................23 4.3.1 Connecting the mains cable ................................23 4.3.2 Improving the antenna reception ..............................24...
- Seite 69 Menu operation ................................29 DAB radio ..................................30 What is DAB+? ......................................30 6.1.1 Data compression ....................................30 6.1.2 Audio stream ......................................30 DAB radio reception ....................................31 Performing the automatic scan ..............................31 Selecting DAB stations ..................................32 Saving DAB stations to a memory slot ............................32 Retrieving DAB stations from a memory slot ..........................33 Manual setting ......................................33 Signal intensity ......................................
- Seite 70 Track sampling ......................................42 Programming function ..................................43 Playing USB media ..............................44 Audio input ..................................45 Other functions ................................46 11.1 Sleep function ......................................46 11.2 Time setting ......................................47 11.3 Alarm ........................................... 47 11.3.1 Switching off the alarm after being woken ..........................48 11.3.2 Switching the alarm on/off ................................48 11.4 Sound setting ......................................49...
-
Seite 71: Foreword
2 Foreword This instruction manual helps you to use your radio system properly and safely, hereinafter referred to as DIGITRADIO or device. 2.1 Target group for this instruction manual The instruction manual is intended for anyone who is installing, operating, cleaning or disposing of the device. 2.1.1 Intended use The device has been developed for the reception of DAB+/USW radio programmes. -
Seite 72: Safety
2.2.1 Safety For your own protection you should read the safety precautions carefully before using your new device. The manufacturer accepts no liability for damage caused by inappropriate handling, or by non-compliance with the safety precautions. Do not open the device under any circumstances! Touching live parts poses a danger to life! Any necessary repairs to the receiver should only be carried out by qualified personnel. - Seite 73 In the event of a thunderstorm, disconnect the device from the mains. Overvoltage can damage the device. In the event of an obvious fault with the device, emanation of odour or smoke, substantial malfunctions, damage to the housing or fluid ingress, immediately switch off the device and contact the Service department.
- Seite 74 This device is not intended to be used by people (including children) with limited physical, sensory or mental capacities or lack of experience and/or knowledge, unless they are supervised by a person responsible for their safety or they are instructed by them as to how to use the device. Children must be supervised to ensure that they do not play with the device.
- Seite 75 Using the batteries Ensure that the batteries are kept out of the reach of children. Children could put the batteries into their mouths and swallow them. This could lead to serious injuries. Therefore ensure that the batteries and remote control are out of reach of young children. Seek medical advice immediately if this occurs! Normal batteries may not be charged, reactivated using other means, disassembled, heated or disposed of in an open fire (explosion hazard!).
-
Seite 76: Disposal
2.2.2 Disposal The device packaging is exclusively comprised of recyclable materials. Please sort the components appropriately, and dispose of them in line with your local waste disposal regulations At the end of its service life, this device must not be disposed of with your regular household waste. It must be taken to a recycling collection point for electrical and electronic equipment. -
Seite 77: Legal Notices
TechniSat herewith declares that the radio system model DIGITRADIO 360 CD corresponds to Directive 2014/53/EU. The complete text of the EU declaration of conformity is available at the following website: http://konf.tsat.de/?ID=11100 TechniSat accepts no liability for product damage as a result of external influences, wear or improper handling, unauthorised repairs, modifications or accidents. - Seite 78 Changes and printing errors reserved. Version 03/18. Copy and reproduction are subject to the publisher's consent. The respective current version of the instructions can be downloaded in PDF format in the download area of the TechniSat homepage at www. technisat.de. This device is intended for use in all countries of the European Union and in Switzerland, Norway, Liechtenstein and Iceland.
-
Seite 79: Service Instructions
If you encounter a problem with this equipment, please contact our Technical Hotline initially. Mon. - Fri. 8:00 am - 8:00 pm +49 (0)3925 9220 1800 Should you wish to return the device, please do so to the following address only: TechniSat Digital GmbH Service-Center Nordstr. 4a 39418 Staßfurt, Germany The names of the companies, institutions or makes referred to are trademarks or registered trademarks of the respective owners. -
Seite 80: Setting Up The Device
Place a protective layer between your furniture and the device. > You may only operate the device in a horizontal position. Do not use outdoors! > Keep the DIGITRADIO 360 CD away from devices which emit intense magnetic fields. - Seite 81 > Do not place any heavy objects on the device. > If you move the device from a cold environment to a hot environment, moisture could accumulate inside the device. In such a case, wait approximately one hour before putting it into operation. >...
-
Seite 82: Remote Control
DIGITRADIO 360 CD 1 x remote control with battery 1 x instruction manual 4.2 The special features of the DIGITRADIO 360 CD DIGITRADIO 360 CD is comprised of a stereo DAB+/USW receiver with USB/AUX input, MP3/CD player and timer function. -
Seite 83: Preparing The Digitradio 360 Cd For Operation
4.3 Preparing the DIGITRADIO 360 CD for operation 4.3.1 Connecting the mains cable > Connect the device to the power supply using the mains plug. Ensure that the operating voltage of the device matches the mains voltage before you insert it in the wall socket. -
Seite 84: Improving The Antenna Reception
4.3.2 Improving the antenna reception The number and quality of the stations to be received depend on the reception conditions at the installation location. Excellent reception can be achieved with the telescopic antenna. > Remove the telescopic antenna from its holder, align it and extend it. The exact alignment of the telescopic antenna is often important, in particular on the outskirts of the respective broadcasting area. -
Seite 85: Inserting The Battery
4.3.3 Inserting the battery > Close the battery compartment lid carefully again to ensure that the lid retaining tabs engage in the housing. To operate the remote control, an alkaline battery (type mignon, 1.5 V, LR6/AA) is required. Ensure that the polarity is correct when inserting. Change a battery that is losing power promptly. -
Seite 86: Switching On The Device
4.4.1 Switching on the device > Use the On/Standby button on the device (1) or on the remote control (16) to switch the device on or back to standby. Fully extend the antenna before using the device. After switching on for the first time, the device is in DAB radio mode. The device automatically performs a station scan. -
Seite 87: Adjusting The Volume
4.4.3 Adjusting the volume > Adjust the volume using the VOL -/+ (43, 26) buttons on the remote control or by rotating the SELECT/ VOLUME (5) knob on the device. - Clockwise = higher - Anti-clockwise = lower The volume setting is shown on the display. 4.4.4 Switching to mute >... -
Seite 88: Retrieving Displays
4.4.6 Retrieving displays > By repeatedly pressing the INFO (3) button on the device (in CD/USB mode the button must be kept depressed for a few seconds), or on the remote control the DISPLAY buttons of the respective modes (button 33 for DAB, 35 for FM, 38 for CD/USB), you can display and scroll through the following information: DAB mode: USW mode:... -
Seite 89: Menu Operation
5 Menu operation Different settings can be adjusted on the DIGITRADIO 360 CD via a menu, on the device or by using the remote control. The menu items shown depend on the selected operating mode (DAB or FM). > You can retrieve the menu and exit it again by pressing the MENU (34) button on the remote control or on the device (6). -
Seite 90: Dab Radio
6 DAB radio 6.1 What is DAB+? DAB+ is a new digital format through which crystal clear sound with no noise can be heard. Contrary to conventional analogue radio transmitters, with DAB multiple stations are transmitted on one and the same frequency. -
Seite 91: Dab Radio Reception
6.2 DAB radio reception > To switch on DAB mode, press the MODE (2) button on the device as often as required until DAB Radio is shown in the display, or use the TUNER/DAB (30) button on the remote control. If the device is being started for the first time, a complete scan is performed and a station list added. -
Seite 92: Selecting Dab Stations
6.4 Selecting DAB stations > By pressing the TUNING s/9 or TUNING r/: (10, 9) button on the device or the TUNING s/97 or TUNING r/8: (45, 25) buttons on the remote control, you can select the stations found during the DAB scan and select by pressing the SELECT/VOLUME knob on the device or pressing the ENTER button on the remote control. -
Seite 93: Retrieving Dab Stations From A Memory Slot
6.6 Retrieving DAB stations from a memory slot > In order to retrieve a station that you have stored on a memory slot, briefly press the PRESET button on the device or on the remote control. The list now appears with the 30 available memory slots. >... -
Seite 94: Signal Intensity
> The menu item is selected by pressing the SELECT/VOLUME knob on the device or ENTER on the remote control. > You can select a channel by rotating the SELECT/VOLUME knob on the device or using the TUNING s/97 or TUNING r/8: buttons on the remote control (5A to 13F and their frequencies). >... -
Seite 95: Deleting Inactive Stations
6.9 Deleting inactive stations > By selecting MENU > Inactive stations, you can clear the station list of stations which are no longer broadcasting or can no longer be received. > When the confirmation prompt appears, use the TUNING s/9 or TUNING r/: (10, 9) buttons on the device or the TUNING s/97 or TUNING r/8: (45, 25) buttons on the remote control or YES, and confirm with ENTER to start the process. -
Seite 96: Usw Mode
7 USW mode > As described in section 4.4.5, select the FM Radio source. When switching on for the first time, the frequency 87.5 MHz is set. If you have already set or saved a station, the radio plays the last station set. The display features the RDS information RT (Radio text), PS (Station name) and PTY (Programme type), provided that the selected station is broadcasting these data. -
Seite 97: Manual Station Scan
7.2 Manual station scan > Briefly press the TUNING s/9 or TUNING r/: (10, 9) buttons on the device or the TUNING s/97 or TUNING r/8: (45, 25) buttons on the remote control as often as required until the frequency of the desired radio station has been reached. -
Seite 98: Retrieving Fm/Usw Stations From A Memory Slot
> Select the desired memory slot by rotating the SELECT/VOLUME knob on the device or by using the PRESET r or PRESET s (44, 42) buttons on the remote control. Confirm the storage process by pressing the SELECT/VOLUME knob on the device or ENTER on the remote control. Alternatively: >... -
Seite 99: Audio Setting (Mono/Stereo)
7.5 Audio setting (Mono/Stereo) > With MENU > Audio setting you can preselect whether you wish the sound to be emitted in mono only (Only mono) or also in stereo (Stereo available). Alternatively: > Press the MONO/STEREO (46) button on the remote control. With USW stations with poor reception, mono playback can lead to an audible reduction in static noise. -
Seite 100: Discs You Can Use
Due do the range of different encoder software, it cannot be guaranteed that every file can be played error-free. In the event of tracks/files being faulty, playback will continue with the next track/file. When burning the CD, it is worth doing so at low speed and creating the CD as a single session and finalising. -
Seite 101: Setting The Track
Playback is stopped by using the STOP (6) button on the device or < (32) on the remote control. The total number of tracks appears on the display. Always stop the playback prior to removing the CD. If there is no playback, the DIGITRADIO 360 CD switches to standby after 15 minutes. 8.4 Setting the track >... -
Seite 102: Quick Search
8.5 Quick search While the track is playing, you can perform a quick search forwards or backwards to find a specific section. There is no playback during the search process. > Press and hold the FORWARD or BACK buttons on the device or the TUNING s/97 or TUNING r/8: (45, 25) buttons on the remote control in order to perform a quick fast forward and rewind within the track for as long as the buttons are held down. -
Seite 103: Programming Function
8.9 Programming function With the programming function, you can play up to 32 tracks on a music CD or 64 tracks on an MP3/WMA-CD in an order determined by you. You can only carry out programming if there is a disc in the closed CD compartment and the device is in stop mode. -
Seite 104: Playing Usb Media
With MP3 CDs you also indicate the folder/album number. > After starting the programming function using the PRESET button, an F flashes on the display, followed by the folder/album number. Select the folders/albums using the FOLDER- or FOLDER+ (41, 28) buttons on the remote control. -
Seite 105: Audio Input
If no memory medium has been connected or it cannot be read, No USB appears on the display. If there is no playback, the DIGITRADIO 360 CD switches to standby after 15 minutes. 10 Audio input... -
Seite 106: Other Functions
It is recommended that you set the volume on the DIGITRADIO 360 CD on a DAB+ or USW station, for example, switch to audio input and then adjust the volume on the connected device in such a way that the overall volume of the audio input corresponds approximately to the volume of the DAB+/ USW station. -
Seite 107: Time Setting
11.2 Time setting If a DAB signal is being received, the time is synchronised automatically and the correct time is set. If the time is not set automatically, proceed as follows: > Switch the device to standby. > Press the CLOCK (19) button on the remote control. The hour display flashes: >... -
Seite 108: Switching Off The Alarm After Being Woken
> Use the TUNING s/97 or TUNING r/8: buttons to set the switch-off time in hours and minutes. Press the TIMER button each time to confirm. > The switch-on source flashes. Use TUNING s/97 or TUNING r/8: to set the desired source (DAB, FM, DISC (CD), USB). -
Seite 109: Sound Setting
11.4 Sound setting In order to adjust the sound of the DigitRadio 360 CD, you can use the equaliser with the preset tuning options. > Press the EQ (47) button on the remote control for direct access to the equaliser settings. Select the desired the equaliser settings by repeatedly pressing the EQ button. -
Seite 110: Factory Setting
11.6 Factory setting If you change the location of the device, e.g. when moving house, it is possible that the saved DAB stations can no longer be received. In this case you can reset the device to factory settings to delete all the saved stations and launch a new scan at the same time. -
Seite 111: Using Headphones
11.8 Using headphones Do not listen to music at a high volume when using headphones. Doing so can cause permanent hearing impairment. Turn down the radio volume to the lowest volume before using headphones. When you connect headphones (not included in the scope of delivery), the speakers are muted and sound is only heard via the headphones. -
Seite 112: Cd Advice
12.1 CD advice Always keep the CD in its cover and only hold it by the edges. The rainbow-coloured, shimmering surface must never be touched and must always be kept clean. Do not stick paper or adhesive tape to the label side of the disc. -
Seite 113: Troubleshooting
13 Troubleshooting If the device does not operate as intended, check the following tables for information. 13.1 Problems with the device Symptom Possible cause/remedy The device is not being supplied with power. The device cannot be switched on. Connect the mains plug correctly to the mains outlet. -
Seite 114: Problems With Usb Media
13.2 Problems with USB media Symptom Possible cause/remedy The device is not in USB mode. Switch to the respective source using MODE. No playback possible. Medium not inserted or empty. Insert the medium correctly or provide it with music data. 13.3 Problems with the remote control Symptom Possible cause/remedy... -
Seite 115: Problems With The Radio
13.4 Problems with the radio Symptom Possible cause/remedy The device is not in radio mode. No radio stations are being received. Press the MODE button. Check whether DAB reception is possible in the region. No DAB signal is received. Readjust the antenna. Try to receive other stations. -
Seite 116: Problems With The Cd Player
13.5 Problems with the CD player Symptom Possible cause/remedy The device is not in CD mode. Faulty CD inserted. The CD compartment is not closed. Close the CD compartment. The CD is incorrectly inserted. Insert the CD with the labelled side facing upwards. -
Seite 117: Problems With The External Input
Symptom Possible cause/remedy The volume is set too high. Decrease the volume. The CD is damaged or dirty. The sound is intermittent. Clean the CD or replace it. The device is being exposed to vibration. Install the device in a location with low vibration levels. -
Seite 118: Technical Data
14 Technical data Subject to technical changes and errors. The dimensions are approximate values. Reception channels DAB/DAB+, USW, CD, USB, AUX USW: 87.5-108MHz Frequencies DAB/DAB+: 174-240MHz Mains voltage AC Input: 110-240; 50Hz USB supply DC 5V 1.0A Output power Speaker 2 x 5W RMS Power consumption Power consumption on standby... - Seite 119 Mode d'emploi DIGITRADIO 360 CD Radio FM et DAB+ stéréo avec port USB, entrée audio et lecteur CD/MP3...
-
Seite 120: Prise Casque
1 Illustrations Utilisation : ON/STAND-BY PRESET MODE AVANCE/TUNING r/: PLAY/PAUSE / INFO RETOUR/TUNING s/9 ÉCRAN RÉCEPTEUR IR SELECT / VOLUME ENTRÉE AUDIO MENU / STOP EJECT/ Ouvrir/fermer le compartiment à CD PORT USB PRISE CASQUE Compartiment à CD... - Seite 121 Arrière : Antenne télescopique...
- Seite 122 Télécommande : ON/STAND-BY Mise en marche/arrêt de l'appareil (veille), Arrêt de l'alarme OPEN/CLOSE Ouvrir/fermer le compartiment à CD PRESET Fonction programmation CLOCK Réglage de l'heure TIMER Réglage de l'alarme INTRO CD, USB : fonction Préaffichage, 10 s. par titre RANDOM CD, USB : lecture aléatoire MUTE Mise en sourdine...
- Seite 123 SCAN Recherche automatique FM SCAN Recherche automatique DAB ÉCRAN Informations sur les titres Lecture CD/USB Mise en marche/arrêt des tags ID3 Mode : lecture USB Mode : lecture CD FOLDER – CD/USB : choix de l'album PRESET s DAB, TUNER FM : sélection des stations PRESET VOL - Réduire le volume...
- Seite 124 Description de la DIGITRADIO 360 CD ........................78 Contenu de la livraison ..................................78 Caractéristiques spécifiques de la DIGITRADIO 360 CD ...................... 78 Préparation de la DIGITRADIO 360 CD au fonctionnement ....................79 4.3.1 Branchement du câble d'alimentation ............................79 4.3.2 Amélioration de la réception de l'antenne ..........................80...
- Seite 125 Commande du menu ..............................85 Radio DAB ..................................86 Qu'est-ce que le DAB+ ? ..................................86 6.1.1 Compression des données ................................86 6.1.2 Flux audio ........................................86 Réception radio DAB .................................... 87 Exécution d'une recherche automatique ..........................87 Sélection des stations DAB ................................88 Mémorisation d'une station DAB sur un emplacement mémoire ..................
- Seite 126 Écouter un extrait du titre .................................. 98 Fonction programmation ...................................99 Lecture de médias USB ............................100 Entrée audio .................................101 Fonctions supplémentaires ............................. 102 11.1 Fonction de veille ....................................102 11.2 Réglage de l'heure....................................103 11.3 Réveil.......................................... 103 11.3.1 Arrêt du réveil après l'alarme .................................104 11.3.2 Activation/désactivation du réveil ..............................104 11.4 Réglage du son .....................................
-
Seite 127: Avant-Propos
2 Avant-propos Ce mode d’emploi vous aide à utiliser votre système de radio, ci-après nommé DIGITRADIO ou appareil, de manière sûre et conforme à sa destination. 2.1 Groupe cible de ce mode d’emploi Ce mode d’emploi s’adresse à toutes les personnes qui installent, utilisent, nettoient ou mettent l’appareil au rebut. -
Seite 128: Sécurité
2.2.1 Sécurité Pour votre sécurité, vous devez lire attentivement les consignes de sécurité avant de mettre en service votre nouvel appareil. Le fabricant décline toute responsabilité pour les dommages résultant d’une utilisation inappropriée de l’appareil et du non-respect des dispositions de sécurité. N’ouvrez jamais l’appareil ! Tout contact avec des pièces conductrices de tension peut entraîner la mort ! Les interventions éventuellement nécessaires doivent être uniquement effectuées par du personnel... - Seite 129 En cas d’orage, il est conseillé de débrancher l’appareil du secteur. Une surtension peut endommager l’appareil. Si l’appareil semble défectueux, s’il produit des odeurs ou fumées, s’il présente des dysfonctionnements importants, si le boîtier est endommagé, si du liquide est entré en contact avec l'appareil, arrêtez immédiatement l’appareil et contactez l’assistance technique.
- Seite 130 N’écoutez pas la musique ou la radio à plein volume. Cela peut entraîner des lésions auditives permanentes. Cet appareil n’est pas destiné à être utilisé par des personnes (y compris les enfants) dont les capacités physiques, sensorielles ou mentales sont limitées ou manquant d’expérience et/ou de connaissances, sauf si elles sont surveillées par une personne responsable de leur sécurité...
- Seite 131 Manipulation des piles Veillez à ce que les piles ne tombent pas entre les mains des enfants. Les enfants peuvent les mettre dans la bouche et les avaler, ce qui peut entraîner de graves problèmes de santé. Conservez de ce fait les piles et la télécommande hors de portée des enfants en bas âge.
-
Seite 132: Élimination
2.2.2 Élimination L’emballage de votre appareil est exclusivement composé de matériaux recyclables. Merci de les remettre dans le circuit du tri sélectif. Une fois arrivé en fin de vie, ce produit ne doit pas être mis au rebut avec les déchets ménagers ordinaires. Il doit être déposé... -
Seite 133: Mentions Légales
2014/53/UE. Le texte intégral de la déclaration de conformité européenne est disponible à l’adresse suivante : http://konf.tsat.de/?ID=11100 La société TechniSat ne peut être tenue pour responsable des dommages causés au produit dans le cas d’influences extérieures, d’une usure, d’une utilisation inappropriée, d’une réparation non autorisée, de modifications ou d’accidents. - Seite 134 Sous réserve de modifications et d’erreurs typographiques. Dernière mise à jour 03/18. Toutes copies et reproductions sont soumises à l’autorisation de l’éditeur. Vous pouvez télécharger une version actuelle du manuel au format PDF dans l'espace de téléchargement du site Internet TechniSat sur www.technisat.de.
-
Seite 135: Consignes D'entretien
Du lundi au vendredi de 8h00 à 20h00 au +49 (0) 39 25 92 20 18 00 En cas d'éventuel retour de l'appareil, merci d'adresser votre colis uniquement à l'adresse suivante : TechniSat Digital GmbH Service-Center Nordstr. 4a D-39418 Stassfurt Les noms de sociétés, institutions ou marques citées sont des marques ou des marques déposées de leurs... -
Seite 136: Installation De L'appareil
Utilisez une protection entre vos meubles et l’appareil. > L'appareil ne doit être utilisé qu'en position horizontale. Ne pas utiliser en plein air ! > Tenez la DIGITRADIO 360 CD éloignée d’appareils produisant des champs magnétiques puissants. - Seite 137 > Ne posez pas d'objets lourds sur l'appareil. > Si vous passez l'appareil d'un environnement froid à un environnement chaud, de l'humidité peut apparaître à l'intérieur de l'appareil. Dans ce cas, patientez env. une heure avant de le mettre en marche. >...
-
Seite 138: Télécommande
DIGITRADIO 360 CD 1 x télécommande avec pile 1 x mode d’emploi 4.2 Caractéristiques spécifiques de la DIGITRADIO 360 CD DIGITRADIO 360 CD est composée d'un récepteur FM/DAB+ stéréo avec une entrée USB/AUX, un lecteur MP3/ CD et une fonction d'horloge. -
Seite 139: Préparation De La Digitradio 360 Cd Au Fonctionnement
4.3 Préparation de la DIGITRADIO 360 CD au fonctionnement 4.3.1 Branchement du câble d'alimentation > Branchez l'appareil avec la fiche secteur au réseau électrique. Assurez-vous que la tension de fonctionnement de l'appareil corresponde à la tension réseau locale avant de le brancher dans la prise secteur murale. -
Seite 140: Amélioration De La Réception De L'antenne
4.3.2 Amélioration de la réception de l'antenne Le nombre et la qualité des stations reçues dépendent des conditions de réception à l’endroit où est placé l’appareil. L’antenne télescopique permet d’obtenir une excellente réception. > Enlevez l'antenne télescopique de son support, orientez-la et dépliez-la. L’orientation exacte de l’antenne télescopique est souvent importante, en particulier dans les zones de réception périphériques de chaque région de diffusion. -
Seite 141: Insertion De La Pile
4.3.3 Insertion de la pile > Refermez avec précaution le couvercle du compartiment à piles de manière à ce que les pattes de retenue du couvercle s'enclenchent dans le boîtier. Pour faire fonctionner la télécommande, vous avez besoin d'une pile alcaline, de type Mignon, 1,5 V, LR6/AA. -
Seite 142: Mise En Marche De L'appareil
4.4.1 Mise en marche de l’appareil > Avec la touche On/Stand-by de l'appareil (1) ou de la télécommande (16), vous pouvez mettre en marche, puis remettre en veille l'appareil. Avant l'utilisation de l'appareil, tirez l'antenne sur toute la longueur. Après la première mise en service, l'appareil est en mode radio DAB. L'appareil effectue une recherche de stations automatique. -
Seite 143: Réglage Du Volume
4.4.3 Réglage du volume > Réglez le volume avec les touches VOL -/+ (43, 26) de la télécommande ou en tournant le bouton SELECT/VOLUME (5) de l'appareil. - Rotation dans le sens des aiguilles d'une montre : plus fort - Rotation dans le sens inverse des aiguilles d'une montre : moins fort Le volume réglé... -
Seite 144: Ouverture De L'affichage À L'écran
4.4.6 Ouverture de l’affichage à l’écran > Vous pouvez afficher et parcourir les informations suivantes en appuyant plusieurs fois sur la touche INFO (3) de l'appareil (avec le mode CD/USB, la touche doit être maintenue enfoncée pendant quelles secondes) ou sur la télécommande avec les touches DISPLAY de chaque mode (touche 33 pour le mode DAB, 35 le mode FM, 38 pour le mode CD/USB) : Mode DAB: mode FM :... -
Seite 145: Commande Du Menu
5 Commande du menu Via un menu, différents réglages de la DIGITRADIO 360 CD peuvent être entrepris sur l'appareil ou avec la télécommande. Les options de menu affichées dépendent du mode de fonctionnement sélectionné (DAB ou FM). > Vous pouvez accéder puis à nouveau quitter le menu en appuyant sur la touche MENU (34) de la télécommande ou de l'appareil (6). -
Seite 146: Radio Dab
6 Radio DAB 6.1 Qu'est-ce que le DAB+ ? Le DAB+ est un nouveau format numérique, qui permet d’écouter un son cristallin sans aucun grésillement. Contrairement aux stations de radio analogiques, le DAB permet de diffuser plusieurs stations sur une seule et même fréquence. -
Seite 147: Réception Radio Dab
6.2 Réception radio DAB > Pour mettre en marche le mode DAB, appuyez sur la touche MODE (2) de l'appareil jusqu'à ce que Radio DAB s'affiche à l'écran ou sur la touche TUNER/DAB (30) de la télécommande. Si l'appareil est démarré pour la première fois, une recherche de stations complète est effectuée et une liste de stations définie. -
Seite 148: Sélection Des Stations Dab
6.4 Sélection des stations DAB > En appuyant sur les touches TUNING s/9 ou TUNING r/: (10, 9) de l'appareil ou sur les touches TUNING s/97 ou TUNING r/8: (45, 25) de la télécommande, vous pouvez sélectionner les stations trouvées lors de la recherche DAB et y accéder en appuyant sur le bouton SELECT/VOLUME de l'appareil ou en appuyant sur la touche ENTER de la télécommande. -
Seite 149: Accès À Une Station Dab À Partir D'un Emplacement Mémoire
Les emplacements mémoire occupés s'affichent accompagnés du nom de la station mémorisée. 6.6 Accès à une station DAB à partir d’un emplacement mémoire > Pour accéder à nouveau à une station que vous avez mémorisée sur un emplacement mémoire, appuyez brièvement sur la touche PRESET de l'appareil ou de la télécommande. -
Seite 150: Puissance Du Signal
> En appuyant sur le bouton SELECT/VOLUME de l'appareil ou sur la touche ENTER de la télécommande, l'option de menu est sélectionnée. > En tournant le bouton SELECT/VOLUME de l'appareil ou avec les touches TUNING s/97 ou TUNING r/8: de la télécommande, vous pouvez sélectionner un canal (5A à 13F et leurs fréquences). >... -
Seite 151: Suppression Des Stations Inactives
6.9 Suppression des stations inactives > En sélectionnant MENU > Stations inactives, vous pouvez supprimer de la liste de stations les stations qui ne sont plus actuellement émises ou reçues. > Dans la question de sécurité qui s'affiche, sélectionnez avec les touches TUNING s/9 ou TUNING r/: (10, 9) de l'appareil, ou avec les touches TUNING s/97 ou TUNING r/8: (45, 25) de la télécommande, OUI et confirmez avec ENTER, pour démarrer le processus. -
Seite 152: Mode Fm
7 Mode FM > Sélectionnez comme décrit au point 4.4.5 la source FM. Lors de la première mise en marche, la fréquence est réglée sur 87,5 MHz. Si vous avez déjà mémorisé ou réglé une station, la radio diffusera la dernière station réglée. Les informations RDS RT (texte radio), PS (nom de la station), PTY (type de programme) sont affichées à... -
Seite 153: Recherche Manuelle Des Stations
7.2 Recherche manuelle des stations > Appuyez brièvement sur les touches TUNING s/9 ou TUNING r/: (10, 9) de l'appareil ou sur les touches TUNING s/97 ou TUNING r/8: (45, 25) de la télécommande jusqu'à atteindre la fréquence de la station de radio souhaitée. Autre méthode : >... -
Seite 154: Accès À Une Station Fm À Partir D'un Emplacement Mémoire
> Sélectionnez l'emplacement mémoire souhaité en tournant le bouton SELECT/VOLUME de l'appareil ou avec les touches PRESET r ou PRESET s (44, 42) de la télécommande et confirmez le processus d'enregistrement en appuyant sur le bouton SELECT/VOLUME de l'appareil ou en appuyant sur la touche ENTER de la télécommande. -
Seite 155: Réglage Audio (Mono/Stéréo)
7.5 Réglage audio (mono/stéréo) > Via MENU > Réglage audio vous pouvez présélectionner si le son doit être diffusé uniquement en mono (uniquement mono) ou également en stéréo (stéréo possible). Autre méthode : > Appuyez sur la touche MONO/STEREO (46) de la télécommande. La lecture mono peut aider à... -
Seite 156: Disques Compatibles
L'appareil peut lire des CD comportant des fichiers MP3 et des CD audio normaux (CD-DA). Aucune autre extension, p. ex. *.doc, *.txt, *.pdf, ne peut être utilisée lorsque des fichiers audio sont convertis en MP3. Les fichiers musicaux au format *.AAC, *.DLF, *.M3U et *.PLS ou *.WMA ne peuvent notamment pas être lus. En raison de la diversité... -
Seite 157: Réglage Du Titre
La touche STOP (6) de l'appareil ou < (32) de la télécommande vous permet d'arrêter la lecture. Le nombre total de titres s'affiche à l'écran. Arrêtez toujours la lecture avant de retirer le CD. Si rien ne se produit, la DIGITRADIO 360 CD se met en veille après 15 minutes. 8.4 Réglage du titre >... -
Seite 158: Recherche Rapide
8.5 Recherche rapide Vous pouvez avancer ou reculer rapidement dans le titre en cours pour rechercher un moment précis. Il n'y a pas de lecture pendant la recherche. > Maintenez enfoncées les touches AVANCE ou RETOUR de l'appareil ou les touches TUNING s/97 ou TUNING r/8: (45, 25) de la télécommande pour effectuer une avance ou un retour rapide au sein du titre pendant toute la durée de pression de la touche. -
Seite 159: Fonction Programmation
8.9 Fonction programmation Grâce à la fonction programmation, vous pouvez lire jusqu'à 32 titres d'un CD de musique ou 64 titres d'un CD MP3/WMA selon un ordre défini par vos soins. Vous pouvez effectuer cette programmation uniquement si le compartiment à CD est fermé et contient un disque, et si l'appareil se trouve en mode Arrêt. -
Seite 160: Lecture De Médias Usb
Avec les CD MP3, vous indiquez également le numéro de dossier/album. > Après démarrage du processus de programmation au moyen de la touche PRESET, un F suivi du numéro de dossier/album clignote à l'écran. Sélectionnez les dossiers/albums avec les touches FOLDER- ou FOLDER+ (41, 28) de la télécommande. -
Seite 161: Entrée Audio
Sélectionnez comme décrit au point 4.4.5 la source AUX. En mode AUX, la DIGITRADIO 360 CD s'arrête automatiquement après 4 heures. Cela est annoncé à l'écran. Le processus d'arrêt peut être interrompu en appuyant sur la touche INTRO de la télécommande. -
Seite 162: Fonctions Supplémentaires
Appuyez sur la touche SLEEP (24) de la télécommande jusqu'à l'affichage à l'écran de la valeur choisie. Si la fonction veille est active, une info s'affiche à l'écran indiquant le temps encore à disposition avant que la DigitRadio 360 CD ne se mette en veille. -
Seite 163: Réglage De L'heure
11.2 Réglage de l'heure Si un signal DAB est reçu, l'heure est automatiquement harmonisée et l'heure correcte est réglée. Si l'heure n'est pas réglée automatiquement, procédez comme suit : > Mettez l'appareil en veille. > Appuyez sur la touche CLOCK (19) de la télécommande. L'affichage de l'heure clignote. >... -
Seite 164: Arrêt Du Réveil Après L'alarme
> Réglez l'heure de mise en veille, en heures et minutes, avec les touches TUNING s/97 ou TUNING r/8:. Pour confirmer, appuyez chaque fois sur la touche TIMER. > La source de mise en marche clignote. Réglez la source souhaitée avec TUNING s/97 ou TUNING r/8:, p. -
Seite 165: Réglage Du Son
11.4 Réglage du son Pour modifier le son de la DigitRadio 360 CD, vous disposez de l'égaliseur avec des réglages prédéfinis. > Appuyez sur la touche EQ (47) de la télécommande pour accéder directement aux réglages de l'égaliseur. Sélectionnez les réglages souhaités de l'égaliseur en appuyant plusieurs fois sur la touche EQ. Les réglages suivants sont possibles : FLAT (aucun effet sonore sélectionné) CLASSIC... -
Seite 166: Réglage D'usine
11.6 Réglage d’usine Si vous modifiez l’emplacement de l’appareil, p. ex. lors d’un déménagement, les stations DAB mémorisées ne seront éventuellement plus captées. Grâce à la réinitialisation des réglages d'usine, vous pouvez alors supprimer toutes les stations enregistrées et démarrer en même temps une nouvelle recherche de stations. >... -
Seite 167: Utilisation Des Écouteurs
11.8 Utilisation des écouteurs N’écoutez pas la musique à plein volume avec des écouteurs. Cela peut entraîner des lésions auditives permanentes. Avant d'utiliser des écouteurs, réglez le volume de l’appareil sur le volume minimal. Si vous branchez des écouteurs (non fournis), les haut-parleurs se mettent en sourdine et l'émission du son se fait ensuite exclusivement via les écouteurs. -
Seite 168: Remarques Sur Les Cd
12.1 Remarques sur les CD Toujours conserver le CD dans son étui et le saisir uniquement par les bords. Ne pas toucher la surface aux reflets arc-en-ciel et la conserver toujours propre. Ne coller aucun papier ou ruban adhésif du côté de l'étiquette du disque. -
Seite 169: Dépannage
13 Dépannage Si l'appareil ne fonctionne pas comme prévu, vérifiez-en le fonctionnement à l'aide des tableaux suivants. 13.1 Problèmes avec l'appareil Symptôme Cause possible/résolution L'appareil n'est pas alimenté en électricité. Brancher correctement la fiche secteur Impossible de mettre l'appareil en marche. dans la prise secteur. -
Seite 170: Problèmes Avec Les Médias Usb
13.2 Problèmes avec les médias USB Symptôme Cause possible/résolution L'appareil n'est pas en mode USB. Changer la source avec MODE. Aucune lecture possible. Le média n'est pas inséré ou est vide. Insérer correctement le média ou stocker sur le média des fichiers musicaux. 13.3 Problèmes avec la télécommande Symptôme Cause possible/résolution... -
Seite 171: Problèmes Avec La Radio
13.4 Problèmes avec la radio Symptôme Cause possible/résolution L'appareil ne se trouve pas en Aucune station de radio reçue. mode radio. Appuyer sur la touche MODE. Vérifier si la réception DAB est possible dans la région. Pas de signal DAB reçu. Orienter à... -
Seite 172: Problèmes Avec Le Lecteur Cd
13.5 Problèmes avec le lecteur CD Symptôme Cause possible/résolution L'appareil ne se trouve pas en mode CD. Mauvais CD inséré. Le compartiment à CD n'est pas fermé. Fermer le compartiment à CD. Le CD est mal inséré. Insérer le CD avec le côté étiqueté vers le haut. -
Seite 173: Problèmes Avec L'entrée Externe
Symptôme Cause possible/résolution Le volume est réglé trop fort. Baisser le volume. Le CD est abîmé ou sale. Le son s'arrête. Nettoyer le CD ou le remplacer. L'appareil est soumis à des vibrations. Placer l'appareil dans un endroit avec peu de vibrations. -
Seite 174: Données Techniques
14 Données techniques Sous réserve de modifications techniques et d’erreurs. Les dimensions sont des valeurs approximatives. Modes de réception DAB/DAB+, FM, CD, USB, AUX FM : 87,5 - 108 MHz Fréquences DAB/DAB+ : 174 - 240 MHz Tension de secteur Entrée CA : 110 - 240 ;... - Seite 175 Istruzioni per l'uso DIGITRADIO 360 CD Stereo DAB+ e radio FM con collegamento USB, ingresso audio e lettore MP3/CD...
-
Seite 176: Collegamento Usb
1 Immagini Utilizzo: ON/STANDBY PRESET MODE AVANTI / TUNING r/: PLAY/PAUSE / INFO INDIETRO / TUNING s/9 DISPLAY RICEVITORE IR SELECT / VOLUME INGRESSO AUDIO MENU / STOP EJECT/ aprire/chiudere il vano CD COLLEGAMENTO USB COLLEGAMENTO CUFFIE Vano CD... - Seite 177 Lato posteriore: Antenna telescopica...
- Seite 178 Telecomando: ON/STANDBY Accensione/spegnimento dell'apparecchio (standby), spegnimento l'allarme OPEN/CLOSE Aprire/chiudere il vano CD PRESET Funzione di programmazione CLOCK Impostare l'ora TIMER Impostare la sveglia INTRO CD, USB: funzione di breve ascolto, 10 sec. per titolo RANDOM CD, USB: funzione casuale MUTE Attivazione del muto SLEEP Accendere e selezionare snooze...
- Seite 179 SCAN Ricerca automatica FM SCAN Ricerca automatica DAB DISPLAY Informazioni titoli riproduzione CD/USB Accensione/spegnimento tag ID3 Modalità riproduzione USB Modalità riproduzione CD FOLDER – CD/USB: scelta dell'album PRESET s DAB, TUNER FM: selezionare emittente PRESET VOL - Ridurre il volume PRESET r DAB, TUNER FM: selezionare emittente PRESET...
- Seite 180 Telecomando ......................................134 Descrizione della DIGITRADIO 360 CD ......................... 134 Entità della fornitura ................................... 134 Le funzionalità speciali della DIGITRADIO 360 CD ....................... 134 Preparare DIGITRADIO 360 CD al funzionamento ....................... 135 4.3.1 Collegare il cavo di rete ..................................135 4.3.2 Migliorare la ricezione dell'antenna .............................
- Seite 181 Uso del menu ................................141 Radio DAB ..................................142 Cos'è DAB+ ......................................142 6.1.1 Compressione dei dati ..................................142 6.1.2 Stream audio ......................................142 Ricezione radio DAB ................................... 143 Eseguire ricerca automatica ................................143 Selezionare l'emittente DAB ................................144 Salvare l’emittente DAB su uno slot di memoria ........................144 Aprire l’emittente DAB da uno slot di memoria ........................
- Seite 182 Ascolta inizio titolo ....................................154 Funzione di programmazione ................................ 155 Riprodurre supporti USB ............................156 Ingresso audio................................157 Altre funzioni ................................158 11.1 Funzione sleep ...................................... 158 11.2 Impostazioni di tempo ..................................159 11.3 Sveglia ........................................159 11.3.1 Spegnere la sveglia dopo l'allarme ..............................160 11.3.2 Accendere/spegnere la sveglia ..............................160 11.4 Impostazione del suono ..................................
-
Seite 183: Introduzione
2 Introduzione Le presenti istruzioni per l’uso illustrano all’utente l’utilizzo conforme e sicuro dell’apparecchio radio, di seguito denominato DIGITRADIO o apparecchio. 2.1 A chi si rivolgono le presenti istruzioni per l’uso Le istruzioni per l’uso sono rivolte a tutti coloro che collocano, utilizzano, puliscono o smaltiscono l'apparecchio. 2.1.1 Uso conforme alle disposizioni L’apparecchio è... -
Seite 184: Sicurezza
2.2.1 Sicurezza Per la propria sicurezza, leggere attentamente le norme di sicurezza prima di mettere in funzione il nuovo apparecchio. Il produttore declina ogni responsabilità per danni derivanti da un uso non conforme e dalla mancata osservanza delle misure di sicurezza. Non aprire mai l'apparecchio! Il contatto con parti sotto tensione può... - Seite 185 In caso di temporale, staccare l'apparecchio dalla presa di corrente. La sovratensione può danneggiare l'apparecchio. In caso di evidenti difetti all’apparecchio, produzione di odori o fumo, malfunzionamenti gravi, danneggiamenti all’alloggiamento nonché in caso di penetrazione di liquidi, spegnere l’apparecchio e contattare il servizio di assistenza.
- Seite 186 Questo apparecchio non è progettato per essere utilizzato da persone (ivi compresi i bambini) con capacità fisiche, sensoriali o intellettuali limitate o carenti di esperienza e/o di conoscenze, a meno che non siano sorvegliate da una persona responsabile della loro sicurezza o abbiano ricevuto da quest'ultima indicazioni sul corretto utilizzo dell'apparecchio.
- Seite 187 Uso delle batterie Controllare che le batterie non siano maneggiate da bambini. I bambini possono portarle alla bocca e ingerirle, ciò che può causare gravi danni alla loro salute. Conservare pertanto le batterie e il telecomando fuori dalla portata dei bambini. In questo caso contattare immediatamente un medico! Le batterie normali non devono essere caricate, riattivate con altri mezzi, smontate, riscaldate o gettate in fiamme aperte (pericolo di esplosione!).
-
Seite 188: Smaltimento
2.2.2 Smaltimento L'imballaggio dell'apparecchio è composto esclusivamente da materiali riciclabili. Smaltire pertanto la confezione con il "sistema duale" , separando opportunamente i materiali. Al termine del ciclo di vita questo prodotto non può essere smaltito con i normali rifiuti domestici, deve invece essere depositato in un centro di raccolta per il riciclaggio di apparecchi elettrici ed elettronici. -
Seite 189: Avvertenze Legali
2006/66/CE. Non vanno smaltite con i normali rifiuti domestici. 2.2.3 Avvertenze legali Con la presente TechniSat dichiara che il modello di impianto radio DIGITRADIO 360 CD è conforme alla direttiva 2014/53/UE. Il testo completo della dichiarazione di conformità UE è disponibile al seguente indirizzo Internet: http://konf.tsat.de/?ID=11100... - Seite 190 Con riserva di modifiche ed errori di stampa. Ultimo aggiornamento 03/18. La copia e la riproduzione sono consentite solo con il permesso dell'editore. L'utente può ottenere la versione attuale delle istruzioni in formato PDF nell'area di Download del sito web di TechniSat: www.
-
Seite 191: Note Per L'assistenza
Lun. - Ven. 8:00 - 20:00 03925/92201800 Qualora fosse necessario spedire l'apparecchio, utilizzare esclusivamente il seguente indirizzo: TechniSat Digital GmbH Service-Center Nordstr. 4a 39418 Staßfurt I nomi delle aziende, delle istituzioni o dei marchi menzionati sono marchi di fabbrica o marchi registrati... -
Seite 192: Posizionamento Dell'apparecchio
Tenere presente che in determinate circostanze i piedi dell’apparecchio possono lasciare impronte di colore sulle superfici di mobili. Utilizzare una protezione tra i mobili e l’apparecchio. > È consentito azionare l'apparecchio solo in posizione orizzontale. Non utilizzare all'aria aperta! > Tenere DIGITRADIO 360 CD lontano da apparecchi che generano forti campi magnetici. - Seite 193 > Non collocare oggetti pesanti sull’apparecchio. > Se l’apparecchio viene spostato da un ambiente freddo ad uno caldo, all’interno dell’apparecchio si può formare della condensa. In questo caso attendere circa un’ora prima di metterlo in funzione. > Installare il cavo in modo che nessuno possa inciampare. >...
-
Seite 194: Telecomando
Assicurarsi che siano presenti tutti i componenti e accessori riportati di seguito: DIGITRADIO 360 CD 1 telecomando con batteria 1 manuale di istruzioni per l’uso 4.2 Le funzionalità speciali della DIGITRADIO 360 CD DIGITRADIO 360 CD è composta da un ricevitore stereo DAB+/FM con ingresso USB/AUX, lettore MP3/CD e funzione timer. -
Seite 195: Preparare Digitradio 360 Cd Al Funzionamento
4.3 Preparare DIGITRADIO 360 CD al funzionamento 4.3.1 Collegare il cavo di rete > Collegare l'apparecchio inserendo la spina nella rete di corrente. Accertarsi che la tensione d’esercizio dell’apparecchio sia conforme alla tensione di rete locale, prima di collegarlo alla presa. -
Seite 196: Migliorare La Ricezione Dell'antenna
4.3.2 Migliorare la ricezione dell'antenna Il numero e la qualità delle emittenti ricevute dipende dalle condizioni di ricezione sul luogo d’installazione. Con l’antenna telescopica è possibile ottenere una ricezione eccezionale. > Svitare l'antenna telescopica dal supporto, sollevarla ed estrarla in lunghezza. Spesso è... -
Seite 197: Inserire La Batteria
4.3.3 Inserire la batteria > Richiudere con cura il coperchio del vano batteria in modo che le linguette di tenuta del coperchio si innestino nell'alloggiamento. Per il funzionamento del telecomando è necessaria una batteria alcalina, tipo ministilo, 1,5 V, LR6/AA. Nell'inserimento verificare la giusta polarità. -
Seite 198: Accendere L'apparecchio
4.4.1 Accendere l'apparecchio > Con i tasti On/Standby dell'apparecchio (1) o del telecomando (16) è possibile accendere l'apparecchio oppure passare in modalità standby. Prima dell'utilizzo dell'apparecchio estrarre interamente l'antenna. Dopo la prima accensione l'apparecchio è in modalità radio DAB. L'apparecchio esegue automaticamente una ricerca delle emittenti. -
Seite 199: Impostazione Del Volume
4.4.3 Impostazione del volume > Impostare il volume con i tasti VOL -/+ (43, 26) o con il telecomando o ruotando il pulsante SELECT/ VOLUME (5) dell'apparecchio. - Ruotare in senso orario – aumentare il volume - Ruotare in senso antiorario – ridurre il volume Il volume impostato viene indicato sul display 4.4.4 Attivazione del muto >... -
Seite 200: Aprire Le Visualizzazioni Del Display
4.4.6 Aprire le visualizzazioni del display > Premendo più volte il tasto INFO (3) dell'apparecchio (nella modalità CD/USB tenere premuto il tasto alcuni secondi) oppure i tasti DISPLAY del telecomando della rispettiva modalità (tasto 33 per DAB, 35 per FM, 38 per CD/USB), è... -
Seite 201: Uso Del Menu
5 Uso del menu Mediante un menu è possibile eseguire diverse impostazioni della DIGITRADIO 360 CD, utilizzando l'apparecchio o il telecomando. Le voci di menu visualizzate dipendono dalla modalità selezionata (DAB o FM). > È possibile aprire e anche riabbandonare il menu premendo il tasto MENU (34) del telecomando o dell'apparecchio (6). -
Seite 202: Radio Dab
6 Radio DAB 6.1 Cos'è DAB+ DAB+ è un nuovo formato digitale che consente di ascoltare suoni cristallini senza alcun rumore di fondo. A differenza delle emittenti di radio analogiche tradizionali, con DAB vengono trasmesse più emittenti su una stessa frequenza. -
Seite 203: Ricezione Radio Dab
6.2 Ricezione radio DAB > Per il passaggio alla modalità DAB premere il tasto MODE (2) dell'apparecchio fin quando sul display viene visualizzato DAB Radio oppure il tasto TUNER/DAB (30) del telecomando. Alla prima accensione dell'apparecchio viene eseguita una ricerca automatica completa e viene creata una lista di emittenti. -
Seite 204: Selezionare L'emittente Dab
6.4 Selezionare l'emittente DAB > Premendo i tasti TUNING s/9 o TUNING r/: (10, 9) dell'apparecchio o i tasti TUNING s/97 o TUNING r/8: (45, 25) del telecomando è possibile selezionare l'emittente trovata durante la ricerca automatica DAB e attivarla premendo il pulsante SELECT/VOLUME dell'apparecchio o il tasto ENTER del telecomando. -
Seite 205: Aprire L'emittente Dab Da Uno Slot Di Memoria
6.6 Aprire l’emittente DAB da uno slot di memoria > Per riaprire un'emittente salvata su uno slot di memoria premere brevemente il tasto PRESET dell'apparecchio oppure del telecomando. Compare ora la lista con i 30 slot di memoria disponibili. > Selezionare lo slot di memoria con l'emittente DAB desiderata ruotando il pulsante SELECT/VOLUME dell'apparecchio oppure premendo i tasti PRESET r o PRESET s (44, 42) del telecomando e confermare la scelta con il pulsante SELECT/VOLUME dell'apparecchio o con il tasto ENTER del... -
Seite 206: Intensità Del Segnale
> Premendo il pulsante SELECT/VOLUME dell'apparecchio oppure il tasto ENTER del telecomando viene selezionata la voce di menu. > Ruotando il pulsante SELECT/VOLUME dell'apparecchio o premendo i tasti TUNING s/97 o TUNING r/8: del telecomando è possibile selezionare un canale (da 5A a 13F e la loro frequenza). >... -
Seite 207: Cancellare Stazioni Non Attive
6.9 Cancellare stazioni non attive > Selezionando dal MENU > Cancellare stazioni non attive è possibile depurare la lista delle emittenti eliminando quelle che attualmente non trasmettono o che non si ricevono più. > Selezionare nella domanda di sicurezza che appare con i tasti TUNING s/9 o TUNING r/: (10, 9) dell'apparecchio oppure con i tasti TUNING s/97 o TUNING r/8: (45, 25) del telecomando Sì... -
Seite 208: Modalità Fm
7 Modalità FM > Selezionare come descritto al punto 4.4.5 la fonte Radio FM. Al momento della prima accensione la frequenza è impostata su 87,5 MHz. Se si è già impostata o memorizzata un’emittente, la radio riproduce l’ultima emittente impostata. Sul display vengono mostrate le informazioni RDS RT (testo radio), PS (nome dell'emittente), PYT (tipo di canale), nel caso in cui l'emittente selezionata trasmetta questi dati. -
Seite 209: Ricerca Manuale Emittenti
7.2 Ricerca manuale emittenti > Premere più volte brevemente i tasti TUNING s/9 o TUNING r/: (10, 9) dell'apparecchio oppure i tasti TUNING s/97 o TUNING r/8: (45, 25) del telecomando fino a quando si raggiunge la frequenza dell'emittente radio desiderata. In alternativa: >... -
Seite 210: Aprire Le Emittenti Fm Da Uno Slot Di Memoria
> Selezionare lo slot di memoria desiderato ruotando il pulsante SELECT/VOLUME dell'apparecchio oppure utilizzando i tasti PRESET r o PRESET s (44, 42) del telecomando e confermare il processo di archiviazione con il pulsante SELECT/VOLUME dell'apparecchio o con il tasto ENTER del telecomando. In alternativa: >... -
Seite 211: Impostazione Audio (Mono/Stereo)
7.5 Impostazione audio (mono/stereo) > Tramite MENU > Impostazione audio è possibile eseguire una preselezione dell'emissione audio: solo in mono (Solo mono) o anche in stereo (Stereo possibile). In alternativa: > Premere il tasto MONO/STEREO (46) del telecomando. Nel caso di emittenti FM di debole ricezione la riproduzione mono può comportare una riduzione percettibile del fruscio. -
Seite 212: Che Tipo Di Dischi Si Possono Utilizzare
Data la molteplicità di software codificatori diversi, non può essere garantito che ogni file MP3 possa essere riprodotto senza che si verifichino anomalie. In caso di titoli/file errati la riproduzione avanza al titolo/file successivo. Nella masterizzazione di CD conviene masterizzare ad una velocità bassa e creare il CD come sessione singola e finalizzata. -
Seite 213: Impostare Titoli
Con il tasto STOP (6) dell'apparecchio o < (32) del telecomando si ferma la riproduzione. Sul display compare il numero totale di titoli. Interrompere sempre la riproduzione prima di rimuovere il CD. Se non vi sono riproduzioni in corso, dopo ca. 15 minuti la DIGITRADIO 360 CD passa in standby. 8.4 Impostare titoli >... -
Seite 214: Ricerca Rapida
8.5 Ricerca rapida Nel titolo in corso è possibile eseguire una ricerca rapida in avanti o indietro per cercare un determinato punto. Durante la ricerca non viene effettuata alcuna riproduzione. > Tenere premuti i tasti IN AVANTI o INDIETRO dell'apparecchio o i tasti TUNING s/97 o TUNING r/8: (45, 25) del telecomando per eseguire un rapido avanzamento o riavvolgimento all'interno del titolo per la durata della pressione del tasto. -
Seite 215: Funzione Di Programmazione
8.9 Funzione di programmazione Con la funzione di programmazione è possibile riprodurre, in una sequenza stabilita dall'utente, fino a 32 titoli di un CD musicale o 64 titoli di un CD MP3/WMA. È possibile effettuare la programmazione solo se nel vano CD chiuso è presente un disco e con l'apparecchio in modalità... -
Seite 216: Riprodurre Supporti Usb
9 Riprodurre supporti USB L'utente ha la possibilità di riprodurre con la DigitRadio 360 CD file audio che si trovano su un supporto dati USB. A tal fine, il supporto dati USB deve essere collegato ad una presa USB (7). -
Seite 217: Ingresso Audio
Se non sono collegati o non possono essere letti supporti di memoria, sul display compare il messaggio Nessun USB Se non vi sono riproduzioni in corso, dopo ca. 15 minuti la DIGITRADIO 360 CD passa in standby. 10 Ingresso audio... -
Seite 218: Altre Funzioni
Si consiglia ad esempio di impostare il volume della DIGITRADIO 360 CD un'emittente DAB+ o FM, di passare all'ingresso audio e poi di modificare il volume dell'apparecchio collegato in modo che il volume complessivo dell'ingresso audio corrisponda a grandi linee al volume dell'emittente DAB+/FM. -
Seite 219: Impostazioni Di Tempo
11.2 Impostazioni di tempo Se il segnale DAB viene ricevuto, automaticamente viene effettuata la regolazione dell'ora e viene impostato l'orario corretto. Nel caso in cui l'ora non si dovesse impostare automaticamente, procedere come segue: > Mettere l'apparecchio in standby. > Premere il tasto CLOCK (19) del telecomando. -
Seite 220: Spegnere La Sveglia Dopo L'allarme
> La fonte di accensione lampeggia. Con TUNING s/97 o TUNING r/8: impostare la fonte desiderata (DAB, FM, DISC (CD), USB). Premere il TIMER per la conferma. > Sul display compare VOLUME. Impostare il volume di accensione desiderato con TUNING s/97 o TUNING r/8: e terminare l'impostazione del timer premendo il tasto TIMER. -
Seite 221: Impostazione Del Suono
11.4 Impostazione del suono Per personalizzare il suono della DigitRadio 360 CD ci si può avvalere dell'equalizzatore, disponibile con le impostazioni predefinite. > Premere il tasto EQ (47) del telecomando per accedere direttamente alle impostazioni dell'equalizzatore. Selezionare le impostazioni dell'equalizzatore desiderate premendo più volte il tasto EQ. -
Seite 222: Impostazione Di Fabbrica
11.6 Impostazione di fabbrica Se l'utente cambia il punto di collocazione dell'apparecchio, ad es. in seguito a trasloco, è possibile che alcune emittenti DAB memorizzate non vengano più ricevute. Ripristinando le impostazioni di fabbrica è possibile cancellare tutte le emittenti memorizzate e avviare allo stesso tempo una nuova ricerca di emittenti. >... -
Seite 223: Utilizzare Le Cuffie
11.8 Utilizzare le cuffie Non ascoltare la musica ad alto volume con le cuffie. Un volume elevato può causare danni permanenti all'udito. Prima dell’uso delle cuffie regolare il volume dell’apparecchio al minimo. Nel caso in cui vengano collegate delle cuffie (non in dotazione) gli altoparlanti passano in modalità muto e la riproduzione del suono avviene esclusivamente tramite le cuffie. -
Seite 224: Osservazioni Sul Cd
12.1 Osservazioni sul CD Conservare il CD sempre nella custodia e afferrarlo solo dai bordi. La superficie rilucente a colori arcobaleno non va toccata e deve essere tenuta sempre pulita. Non incollare carta o adesivi sul lato del disco con l'etichetta. Il CD deve essere tenuto distante dalla piena irradiazione solare e da fonti di calore come termosifoni. -
Seite 225: Risoluzione Di Errori
13 Risoluzione di errori Se l'apparecchio non funziona come previsto, eseguire una verifica sulla base delle tabelle seguenti. 13.1 Problemi con l'apparecchio Sintomo Possibile causa/rimedio L'apparecchio non è alimentato da corrente. L'apparecchio non si accende. Collegare correttamente la spina alla presa di corrente. -
Seite 226: Problemi Con Supporti Usb
13.2 Problemi con supporti USB Sintomo Possibile causa/rimedio L'apparecchio non si trova nella modalità USB. Passare con MODE alla fonte corrispondente. Riproduzione non possibile. Supporto non inserito o vuoto. Inserire correttamente il supporto o avviare la riproduzione con dati musicali. 13.3 Problemi con il telecomando Sintomo Possibile causa/rimedio... -
Seite 227: Problemi Con La Radio
13.4 Problemi con la radio Sintomo Possibile causa/rimedio L'apparecchio non si trova in modalità Non si ricevono emittenti radio. radio. Premere il tasto MODE. Verificare se nella regione è possibile la ricezione DAB. Non si ricevono segnali DAB. Riorientare l'antenna. Provare a ricevere altre emittenti. -
Seite 228: Problemi Con Il Lettore Cd
13.5 Problemi con il lettore CD Sintomo Possibile causa/rimedio L'apparecchio non si trova nella modalità CD. Il CD introdotto è errato. Il vano CD non è chiuso. Chiudere il vano CD. Il CD è stato introdotto in modo errato. Introdurre il CD con la parte stampata rivolta verso l'alto. -
Seite 229: Problemi Con L'ingresso Esterno
Sintomo Possibile causa/rimedio Il volume impostato è troppo alto. Ridurre il volume. Il CD è danneggiato o sporco. Il suono si interrompe. Pulire il CD o sostituirlo. L'apparecchio è esposto a vibrazioni. Posizionare l'apparecchio in un luogo con poche vibrazioni. 13.6 Problemi con l'ingresso esterno Sintomo Possibile causa/rimedio... -
Seite 230: Dati Tecnici
14 Dati tecnici Con riserva di modifiche ed errori. Le dimensioni sono valori approssimativi. Modalità di ricezione DAB/DAB+, FM, CD, USB, AUX FM: 87,5-108 MHz Frequenze DAB/DAB+: 174-240 MHz Tensione di rete Ingresso AC: 110-240; 50 Hz Alimentazione USB DC 5V 1,0A Potenza in uscita altoparlanti 2 x 5W RMS Potenza assorbita...