Inhaltsverzeichnis
Werbung
Verfügbare Sprachen
Verfügbare Sprachen
Quicklinks
5
new
KOMPERNASS GMBH
BURGSTRASSE 21 · D-44867 BOCHUM
www.kompernass.com
ID-Nr.: KH2934-09/09-V2
MEDIDOR POR ULTRASONIDOS
MISURATORE DI DISTANZA AD ULTRASUONI
KH 2934
MEDIDOR POR ULTRASONIDOS
Instrucciones de uso
MISURATORE DI DISTANZA AD ULTRASUONI
Istruzioni per l'uso
DISTANCIÓMETRO POR ULTRA-SONS
Istruzioni per l'uso
ULTRASONIC DISTANCE METER
Operating instructions
ULTRASCHALL-ENTFERNUNGSMESSER
Bedienungsanleitung
Werbung
Kapitel
Inhaltsverzeichnis

Verwandte Anleitungen für Powerfix Profi KH 2934


Inhaltszusammenfassung für Powerfix Profi KH 2934
- Seite 1 MEDIDOR POR ULTRASONIDOS MISURATORE DI DISTANZA AD ULTRASUONI KH 2934 MEDIDOR POR ULTRASONIDOS Instrucciones de uso MISURATORE DI DISTANZA AD ULTRASUONI Istruzioni per l'uso DISTANCIÓMETRO POR ULTRA-SONS Istruzioni per l'uso ULTRASONIC DISTANCE METER Operating instructions ULTRASCHALL-ENTFERNUNGSMESSER KOMPERNASS GMBH Bedienungsanleitung BURGSTRASSE 21 · D-44867 BOCHUM www.kompernass.com...
- Seite 2 K K H H 2 2 9 9 3 3 4 4...
-
Seite 3: Inhaltsverzeichnis
Í Í N N D D I I C C E E P P Á Á G G I I N N A A Uso conforme al previsto Indicaciones de seguridad Datos técnicos Volumen de suministro Desembalaje Descripción de aparatos Colocar la pila Medición de distancias Suma de distancias... -
Seite 4: Uso Conforme Al Previsto
M M E E D D I I D D O O R R P P O O R R U U L L T T R R A A S S O O N N ID D O O S S K K H H 2 2 9 9 3 3 4 4 Uso conforme al previsto El telémetro ultrasónico ha sido concebido para medir distancias, así... -
Seite 5: Desembalaje
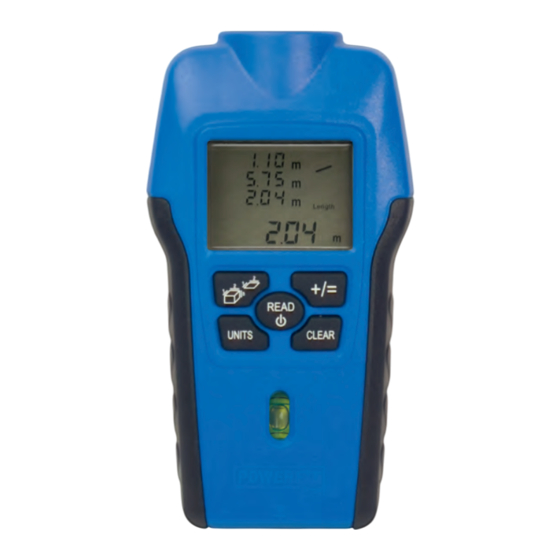
Desembalaje Saque el telémetro ultrasónico del embalaje. Retire todas las medidas de seguridad del transporte y material de embalaje. Retire el plástico protector de la pantalla 2. Descripción de aparatos 1 Emisor/receptor de ultrasonidos 2 Pantalla 3 Tecla +/= 4 Tecla READ 5 Tecla CLEAR 6 Burbuja 7 Punto de medición... - Seite 6 Observe las siguientes imágenes: MIN. 0,5 m MAX. 12 m Fig. 1 12 m a = ca. 1,5 m a = ca. 3,6 m Fig. 2 Cuanto más alejado se encuentre de la pared, más amplia será la superficie (a) que el telémetro medirá...
-
Seite 7: Suma De Distancias
Suma de distancias 1. Mida una distancia, como se describe en el capítulo "Medición de distancias". 2. Pulse en su caso varias veces la tecla Superficie/Volumen 0, hasta que aparezca en la pantalla 2 la indicación de (medición de distancia). 3. -
Seite 8: Suma De Volúmenes
Suma de volúmenes 1. Mida un volumen, como se describe en el capítulo "Medición de volumen". 2. Pulse la tecla +/= 3. En la pantalla aparece „+“. 3. Mida el siguiente volumen. 4. Vuelva a pulsar la tecla +/= 3. La suma de los volúmenes se mostrará en la parte inferior de la pantalla 2. - Seite 9 I I N N D D I I C C E E P P A A G G I I N N A A Uso conforme Avvertenze di sicurezza Dati tecnici Volume di fornitura Disimballaggio Descrizione dell'apparecchio Inserimento della pila Misurazione di distanza Addizione di distanze Misurazione di superfici...
-
Seite 10: Uso Conforme
M M I I S S U U R R A A T T O O R R E E D D I I D D I I S S T T A A N N Z Z A A A A D D U U L L T T R R A A S S U U O O N N I I K K H H 2 2 9 9 3 3 4 4 Uso conforme Il misuratore di distanze è... -
Seite 11: Disimballaggio
Disimballaggio Prelevare il misuratore di distanza dall'imballaggio. Rimuovere tutti i fissaggi del trasporto e i materiali di imballaggio. Rimuovere la pellicola protettiva dal display 2. Descrizione dell'apparecchio 1 Emittente/ricevitore a ultrasuoni 2 Display 3 Tasto +/= 4 Tasto READ 5 Tasto CLEAR 6 Livella 7 Punto di misurazione 8 Vano pile... - Seite 12 Rispettare le seguenti illustrazioni: MIN. 0,5 m MAX. 12 m Ill. 1 12 m a = ca. 1,5 m a = ca. 3,6 m Ill. 2 Più si è lontani dalla parete, maggiore è la superficie (a) che il misuratore di distanze misura trami- te gli ultrasuoni (ill.
-
Seite 13: Addizione Di Distanze
Addizione di distanze 1. Misurare una distanza come descritto al capitolo „Misurazione di distanze“. 2. Premere eventualmente più volte il tasto Superficie/volume 0, fino a ottenere nel display 2 il messaggio (misurazione del volume). 3. Premere il tasto READ 4 per eseguire la misurazione di una distanza. 4. -
Seite 14: Addizione Di Volumi
Addizione di volumi 1. Misurare un volume, come descritto al capitolo „Misurazione di volumi“. 2. Premere il tasto +/= 3. Nel display compare un „+“. 3. Misurare il volume successivo. 4. Premere nuovamente il tasto +/= 3. La somma dei volumi viene visualizzata sotto nel display 2. - Seite 15 Í Í N N D D I I C C E E P P Á Á G G I I N N A A Utilização correcta Indicações de segurança Dados técnicos Volume de fornecimento Desembalar Descrição do aparelho Colocar pilha Medição de distâncias Soma de distâncias Medição de áreas...
-
Seite 16: Utilização Correcta
D D I I S S T T A A N N C C IÓ Ó M M E E T T R R O O P P O O R R U U L L T T R R A A - - S S O O N N S S K K H H 2 2 9 9 3 3 4 4 Utilização correcta O telémetro destina-se à... -
Seite 17: Desembalar
Desembalar Retire o telémetro da embalagem. Retire todas as protecções de transporte e materiais de embalagem. Retire a película de protecção do visor 2. Descrição do aparelho 1 Emissor/receptor de ultra-sons 2 Visor 3 Tecla +/= 4 Tecla READ 5 Tecla CLEAR 6 Nível de bolha de ar 7 Ponto de medição 8 Compartimento da pilha... - Seite 18 Considere as seguintes figuras: MIN. 0,5 m MAX. 12 m Fig.1 12 m a = ca. 1,5 m a = ca. 3,6 m Fig.2 Quanto mais afastado estiver da parede, maior é a superfície (a) que o telémetro mede através de ultra-sons (fig.
-
Seite 19: Soma De Distâncias
Soma de distâncias 1. Meça uma distância como descrito no capítulo "Medição de distâncias". 2. Se necessário prima repetidamente o botão Superfície/Volume 0, até surgir no visor 2 a indicação (medição de distâncias). 3. Prima a tecla READ 4 para medir uma distância. 4. -
Seite 20: Soma De Volumes
Soma de volumes 1. Meça um volume, como descrito no capítulo "Medição de volume“. 2. Prima a tecla +/= 3. No visor surge um "+". 3. Meça o próximo volume. 4. Prima novamente a tecla +/= 3. A soma dos volumes é indicada no visor 2 em baixo. 5. - Seite 21 C C O O N N T T E E N N T T P P A A G G E E Intended Use Safety instructions Technical Data Items supplied Unpacking Device description Inserting the battery Measuring distances Adding distances together Measuring areas Adding areas together Measuring volumes...
-
Seite 22: Intended Use
U U L L T T R R A A S S O O N N I I C C D D I I S S T T A A N N C C E E M M E E T T E E R R K K H H 2 2 9 9 3 3 4 4 Intended Use The distance meter is designed to measure distances as well as for the calculation of surface areas and volumes in internal rooms. -
Seite 23: Unpacking
Unpacking Take the Ultrasonic Distance Meter from its packaging. Remove all transport restraints and packaging materials. Remove the protective foil from the display 2. Device description 1 Ultrasonic transmitter/receiver 2 Display 3 +/= button 4 READ button 5 CLEAR button 6 Spirit level 7 Measurement point 8 Battery compartment... - Seite 24 Take note of the following illustrations: MIN. 0,5 m MAX. 12 m Fig. 1 12 m a = ca. 1,5 m a = ca. 3,6 m Fig. 2 The further you are standing from the wall, the wider the area (a) is that the Distance Meter must measure by ultrasound (Fig.
-
Seite 25: Adding Distances Together
Adding distances together 1. Measure an area as described in the chapter "Measuring distances". 2. If necessary, press several times the area/volume 0 button until, in the display, 2 the notice (Distance measurement) appears. 3. Press the READ 4 button to carry out a distance measurement. 4. -
Seite 26: Addiing Volumes Together
Addiing volumes together 1. Measure a volume as described in the section "Measuring volumes". 2. Press the +/= 3 button. A "+" appears in the display. 3. Measure the next volume. 4. Press the +/= 3 button again. The sum of the volumes is shown below in the display 2. 5. - Seite 27 I I N N H H A A L L T T S S V V E E R R Z Z E E IC C H H N N I I S S S S E E I I T T E E Bestimmungsgemäßer Gebrauch Sicherheitshinweise Technische Daten...
-
Seite 28: Bestimmungsgemäßer Gebrauch
U U L L T T R R A A S S C C H H A A L L L L - - E E N N T T F F E E R R N N U U N N G G S S M M E E S S S S E E R R K K H H 2 2 9 9 3 3 4 4 Bestimmungsgemäßer Gebrauch Der Entfernungsmesser ist zum Messen von Entfernungen, sowie zum Berechnen von Flächen und Volumina in Innenräumen konzipiert. -
Seite 29: Auspacken
Auspacken Entnehmen Sie den Entfernungsmesser aus der Verpackung. Entfernen Sie alle Transport- sicherungen und Verpackungsmaterialien. Entfernen Sie die Schutzfolie vom Display 2. Gerätebeschreibung 1 Ultraschallsender/-empfänger 2 Display 3 Taste +/= 4 Taste READ 5 Taste CLEAR 6 Libelle 7 Messpunkt 8 Batteriefach 9 Taste UNITS 0 Taste Fläche/Volumen... - Seite 30 Beachten Sie folgende Abbildungen: MIN. 0,5 m MAX. 12 m Abb.1 12 m a = ca. 1,5 m a = ca. 3,6 m Abb.2 Je weiter Sie von der Wand entfernt stehen, umso breiter ist die Fläche (a) die der Entfernungsmesser mittels Ultraschall misst (Abb.
-
Seite 31: Addieren Von Entfernungen
Addieren von Entfernungen 1. Messen Sie eine Entfernung, wie im Kapitel „Messen von Entfernungen“ beschrieben. 2. Drücken Sie ggf. mehrmals die Taste Fläche/Volumen 0, bis im Display 2 die Anzeige (Entfernungsmessung) erscheint. 3. Drücken Sie die Taste READ 4, um eine Entfernungsmessung durchzuführen. 4. -
Seite 32: Addieren Von Volumina
Addieren von Volumina 1. Messen Sie ein Volumen, wie im Kapitel „Messen von Volumen“ beschrieben. 2. Drücken Sie die Taste +/= 3. Im Display erscheint ein „+“. 3. Messen Sie das nächste Volumen. 4. Drücken Sie erneut die Taste +/= 3. Die Summe der Volumina wird unten im Display 2 angezeigt.