Goobay 51277 Bedienungsanleitung
Zeitschaltuhr digital
Vorschau ausblenden
Andere Handbücher für 51277:
- Betriebsanleitung (111 Seiten) ,
- Bedienungsanleitung (20 Seiten) ,
- Bedienungsanleitung (20 Seiten)
Inhaltsverzeichnis
Werbung
Verfügbare Sprachen
Verfügbare Sprachen
Werbung
Kapitel
Inhaltsverzeichnis
Fehlerbehebung

Verwandte Anleitungen für Goobay 51277


Inhaltszusammenfassung für Goobay 51277
- Seite 1 NK ZSU 2 ZEITSCHALTUHR DIGITAL 51277 NK ZSU 3 ZEITSCHALTUHR DIGITAL IP44 51301 NK ZSU 4 ZEITSCHALTUHR DIGITAL 93256 NK ZSU 2 TIME SWITCH DIGITAL 51277 NK ZSU 3 TIME SWITCH DIGITAL IP44 51301 NK ZSU 4 TIME SWITCH DIGITAL...
-
Seite 2: Inhaltsverzeichnis
3 Lieferumfang 4 Sicherheitshinweise 5 Bedienung 6 Pflege, Wartung, Lagerung und Transport 7 Gewährleistung und Haftung 8 Problembehebung 9 Technische Daten 10 Entsorgungshinweise 11 CE-Konformitätserklärung 1 Beschreibung und Funktion: Mit den digitalen Zeitschaltuhren 51277, 51301 und 93256 können Sie Ihre Geräte ein- oder ausschalten, indem Sie die Zeitschaltuhr individuell programmieren. Das Modell 51301 ist nach IP44 spritzwassergeschützt und damit auch für den Außenbereich geeignet. Sie ist nicht für den Unterwasserbetrieb oder den Betrieb in anderen Flüssigkeiten geeignet. 2 Bestimmungsgemäßer Gebrauch: Mit Ausnahme des Modells 51301 sind alle Geräte nur für den Gebrauch in trockenen Innenräumen bestimmt. Eine andere Verwen- dung als zuvor beschrieben ist nicht zulässig, darüber... -
Seite 3: Sicherheitshinweise
4 Sicherheitshinweise: ACHTUNG! Lesen und befolgen Sie die Sicher- heitsanweisungen gründlich. Es besteht u. a. Brand- und Elektroschockgefahr! • Das Gerät darf ausschließlich über 220-240V AC ~ Wechselspannung betrieben werden. • Die maximal zulässige Gesamtleistung der angeschlossenen Geräte darf 3500W nicht übersteigen. • Ihr Produkt und dessen Zubehör ist kein Spielzeug und gehört nicht in Kinderhände, weil es zerbrechliche, kleine und verschluckbare Teile enthält, die bei unsachgemäßem Gebrauch Personen verletzen können! • Lassen Sie Verpackungsmaterial nicht einfach liegen, da sich spielende Kinder daran schneiden können. Weiterhin besteht die Gefahr des Ver- schluckens und Einatmens von Kleinmaterial und Dämmmaterial. • Setzen Sie das Produkt keiner Hitze, Kälte, Wasser oder direkter Sonneneinstrahlung aus. • Weiterhin sind Vibrationen, mechanische Einwir- kungen, magnetische und elektromagnetische Felder sowie Feuchtigkeit, Nässe und Staubeinwir-... -
Seite 4: Bedienung
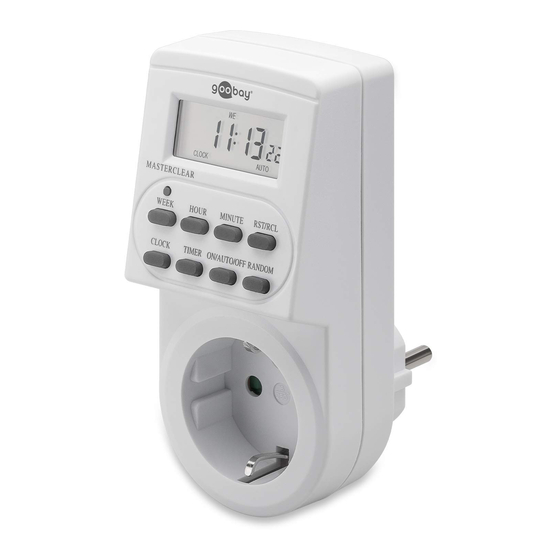
Bedienungsanleitung 5 Bedienung: GENERELLE FUNKTIONEN: 1. 10 ON/OFF Programme mit 1 Minutenschritten 2. Manuell umschaltbar zwischen ON(AN) / AUTO (Programmmodus) / OFF (aus) 3. 12/24 Stunden Modus umschaltbar. 4. Sommerzeit Funktion 5. Zufallsfunktion zwischen 18:00 Uhr und 6:00 Uhr. 6. 16 Wochentagkombinationen stehen zur Auswahl INBETRIEBNAHME: 1. Verbinden Sie die Zeitschaltuhr mit einer 230V Steckdo- se und warten Sie ca. 12 Stunden bis der Pufferakku vollständig geladen ist. 2. Setzen Sie die Zeitschaltuhr ggf. durch Drücken der MASTER/CLEAR Taste mit einem spitzen Gegenstand in den Auslieferungszustand zurück. 3. Jetzt ist die Zeitschaltuhr fertig zur Benutzung. BEDIENELEMENTE UND DISPLAY: Die Tastenanordnung kann je nach Modell variieren. a. MASTER CLEAR: Löscht alle Daten im Speicher inklusive der aktuellen Zeit und aller Programme b. RANDOM: Schalltet die Zufallsfunktion ein oder aus c. CLOCK: Zum Einstellen der Uhrzeit in Verbindung mit WEEK, HOUR, MINUTE - Wählen Sie den 12- oder 24-h Modus in Verbindung mit der TIMER Taste. Zum Aktivieren der Sommerzeitfunktion in Verbindung mit der ON/AUTO/OFF Taste. d. TIMER: Zum Einstellen der Programmschaltzeiten in Kombination mit WEEK, HOUR, MINUTE - Wählen Sie den 12- oder 24-h Modus in Verbindung mit der CLOCK Taste. e. ON/AUTO/OFF: Zum Auswählen des Funktionsmodus der Zeitschaltuhr f. WEEK: Zum Festlegen der Woche in Kombination mit... -
Seite 5: Aktuelle Uhrzeit Einstellen
den Tasten CLOCK oder TIMER g. HOUR: Zum Festlegen der Stunde in Kombination mit den Tasten CLOCK oder TIMER h. MINUTE: Zum Festlegen der Minute in Kombination mit den Tasten CLOCK oder TIMER i. RST/RCL: Zum Überschreiben und Wiederherstellen von Programmierungen j. LED: Zeigt den Status der Leistungsabgabe - Ist die LED an, fließt Strom, ist sie aus, fließt kein Strom. AKTUELLE UHRZEIT EINSTELLEN: 1. Drücken Sie die CLOCK Taste und halten Sie diese gedrückt. Drücken Sie gleichzeitig die WEEK Taste bis der korrekte Wochentag angezeigt wird. Drücken Sie danach gleichzeitig CLOCK und HOUR oder CLOCK und MINUTE bis die korrekte Uhrzeit angezeigt wird. 2. Lassen Sie alle Tasten los. Wochentag und Uhrzeit sind eingestellt. 3. Um die Einstellungen ggf. nochmals zu korrigieren wiederholen Sie die Schritte 1 bis 2. 12/24 STUNDEN MODUS: Drücken Sie gleichzeitig CLOCK und TIMER. Das Display zeigt den 12- oder 24-h Modus. SOMMERZEIT FUNKTION: 1. Drücken Sie CLOCK und ON/AUTO/OFF gleichzeitig. Das Display zeigt SUMMER. Die Uhrzeit wird um 1 Stunde verschoben. 2. Drücken Sie die Tasten erneut um zur Winterzeit zu wechseln. SCHALTZEITEN PROGRAMMIEREN: 10 ON/OFF Programme zu je minimal 1 Minutenschritten stehen zur Verfügung. Stellen Sie sicher, dass die eingestellten Programme nicht überlappen, v.a. -
Seite 6: Manuelle On/Auto/Manual Off Einstellungen
Bedienungsanleitung 2. Wählen Sie mit der WEEK Taste den/die Wochentag/e. Wählen Sie die Zeit mit der HOUR (Stunde) und MINUTE Taste. 3. Drücken Sie erneut kurz die TIMER Taste zum Abschlie- ßen der Einstellungen für ON/EIN und um mit den Einstellungen für OFF/AUS fortzufahren. Das Display zeigt nun OFF_1. Stellen Sie eine Zeit ein durch erneutes Betätigen von HOUR (Stunde) und MINUTE. 4. Drücken Sie erneut kurz die TIMER Taste zum Abschlie- ßen der Einstellungen. Das Display zeigt ON_2. Wiederholen Sie Schritt 1-3 um die nächste Programmie- rung vorzunehmen. Max. 10 Programme sind möglich. Drücken Sie CLOCK um das Programmiermenü zu verlassen. Die Zeitschaltuhr ist fertig eingerichtet. BEISPIEL: Die Zeitschaltuhr soll an jedem Wochentag um 17:15 Uhr auf ON/AN schalten und um 22:30 Uhr auf OFF/AUS. a. Drücken Sie die TIMER Taste einmal kurz. Das Display zeigt ON_1. -
Seite 7: Zufallsfunktion
ZUFALLSFUNKTION: 1. Drücken Sie die RANDOM Taste. Das Display zeigt ein R. Die RANDOM Funktion ist aktiviert. 2. Durch die RANDOM Funktion wird die Aktivierung von Programmen mit Einschalte-Punkt nach 18:30 Uhr und vor 6 Uhr zufällig vorgezogen. Der Zufallsbereich variiert zwischen einem Zeitvorzug von 10 bis 31 Minuten. BEISPIEL: Programm 1 ist mit einem Einschalte-Punkt von 19:00 Uhr und einem Ausschalte-Punkt von 20:00 Uhr programmiert, die Zeitschaltuhr befindet sich im Auto-Modus. Wird zusätzlich die „Random-Funktion“ aktiviert, variiert der Einschalte-Punkt nun im Bereich von 18:29-18:50 Uhr. Der Punkt der Abschaltung liegt in diesem Beispiel 1Stunde nach dem Einschalten. -
Seite 8: Problembehebung
ße nur bei Modell 93256 vorhanden Materialbruch -Fassen Sie das Gerät nicht an und oder offene konsultieren Sie Ihren Händler. Elektronik Beachten Sie dazu Kapitel 4 „Sicher- durch heitshinweise“ und 9 „Technische mechanische Daten“. Einwirkung 9 Technische Daten: Modell 51277 51301 Betriebsspannung 220-240V AC/ 50Hz 220-240V AC/ 50Hz Betriebsanzeige Display Display max. Leistung/Stromstärke 3500W / 16A 3500W / 16A Maße 120 x 88 x 57mm 75 x 70 x 72mm Gewicht netto / brutto 148g / 192g... -
Seite 9: Entsorgungshinweise
Betriebstemperatur -10 ~ +40°C Genauigkeit +/- 1 Minute/Monat Pufferbatterie Ni MH 1.2V ﹥100h 10 Entsorgungshinweise: Elektrische und elektronische Geräte und Batterien dürfen nach der europäischen WEEE Richtlinie nicht mit dem Hausmüll entsorgt werden. Der Verbraucher ist nach dem ElektroG verpflichtet, elektrische und elektronische Geräte am Ende ihrer Lebensdauer an den dafür eingerichteten, öffentlichen Sammelstellen oder an die Verkaufstelle kostenlos zurück- zugeben. Einzelheiten dazu regelt das jeweilige Landes- recht. Das Symbol auf dem Produkt, der Gebrauchsanlei- tung oder der Verpackung weist auf diese Bestimmungen hin. Mit dieser Art der Verwertung von Altgeräten leisten Sie einen wichtigen Beitrag zum Schutz unserer Umwelt. WEEE Richtlinie: 2002/96/EG WEEE-N 82898622 11 CE-Konformitätserklärung: Ihr Gerät entspricht den EU-Richtlinien 2004/108/EG, 2006/95/EG, EN 60730-1 und EN 61140 mit Schutzklasse I. Modell 51301 entspricht zusätzlich der Schutzart IP44: Mit dem CE Zeichen erklärt ® Goobay , eine registrierte Handelsmarke der Wentronic GmbH, dass das Gerät die grundlegenden Anforderungen und Richtlinien der europäischen Bestimmungen erfüllt. Diese können online auf www.wentronic.com angefordert werden. Die genannten Direktiven lösen alle früheren nationalen Zulassungen in der EU ab. -
Seite 10: Description And Function
2 Intended Use 3 Parts Package 4 Notes on Safety 5 Operating 6 Care, Maintenance, Storage and Transport 7 Warranty and Liability 8 Troubleshooting 9 Specifications 10 Note on Waste Disposal 11 CE Declaration 1 Description and Function: With the easyly useable and digital time switches 51277, 51301 and 93256 you can switch on and off your devices by programming them individually. Model 51301 is IP44 splash-proof, protected against contact and applicable for exterior use. It is not made for operating under water nor in other liquids. 2 Intended Use: Apart from model 51301 these products are made for interior rooms only. Another use than described before is not allowed, because this can cause dangers like electric shocks or short-circuits for example. -
Seite 11: Notes On Safety
4 Notes on Safety: ATTENTION! Read and mind the safety instructions completely and thoroughly. There is a risk of electric shocks and fire! • Use the device only with 220-240 VAC ~ voltage. • The total power of the connected devices must not exceed 3500 watts. • Your product and its accessories are no toys and children must not use it anyway, because it contains fragile, small and swallowable parts which can injure people by incorrect use! • Remove and dispose packaging materials, because playing children could cut on it. Further- more there is a danger of swallowing and inhaling incidentals and insulating materials. • Do not interrupt the product to water, extreme heat, coldness or direct sun insulation. • Furthermore avoid vibrations, mechanical, magne- tic and electro-magnetic influences, as well as liquid or dust effects. • If defects, mechanical damages, disturbances or other problems should happen, which are not solvable with this manual, take the device out of work immediately and consult your dealer for... -
Seite 12: Operating Elements And Display
Manual 5 OPERATIONG: GENERAL NOTES: 1. 10 ON/OFF programs with 1-minute steps 2. MANUAL ON/AUTO/MANUAL OFF modes selectable 3. 12/24 hours mode selectable 4. Summertime function available 5. Random function with a random advance of 0-30 minutes between 6:00PM and 6:00AM. 6. 16 combinations of day or blocks of days available INITIAL OPERATION: 1. Plug the timer into a regular 220-240 V ~ power outlet. Leave for approximately 12 hours to charge the Memory Back-Up battery completely. 2. Clear all current information by pressing MASTER CLEAR button with a sharp object such as a pen or pencil after charging. 3. The timer is now ready to be set up for use. OPERATING ELEMENTS AND DISPLAY: The order of these buttons can vary from model to model. a. MASTER CLEAR: Clears all data in memory including current time and all programs b. RANDOM: Set or cancel random function c. CLOCK: Set current time combined with buttons WEEK, HOUR, MINUTE. Select 12 or 24 hours mode combined with button TIMER. Activate summertime function combined with button ON/AUTO/OFF. d. TIMER: Set programs combined with buttons WEEK, HOUR and MINUTE. Select 12 or 24 hours mode combined with button CLOCK. e. ON/AUTO/OFF: Select operating modes of the timer. f. WEEK: Set week combined with button CLOCK or TIMER. - Seite 13 TIMER. h. MINUTE: Set minute combined with button CLOCK or TIMER. i. RST/RCL: Override programs or recall the overridden programs. SETTING CURRENT TIME: 1. Press CLOCK button and hold. Simultaneously press WEEK button until the right day is displayed. Continue by pressing HOUR or MINUTE button until the current hour or minute is displayed. When setting, the buttons WEEK, HOUR or MINUTE can be held down for rapid forward counting. 2. Release both buttons. The day and time is set. 3. To reset incorrect time, repeat above steps. 12/24 HOUR MODE: Press CLOCK and TIMER simultaneously to turn the time display between 12- and 24-hours mode. SUMMERTIME FUNCTION: 1. Press CLOCK and ON/AUTO/OFF simultaneously. LCD shows SUMMER. The clock advances 1 hour. 2. To revert to winter setting, press the two buttons again. The clock moves backward 1 hour. SUMMER disappears in LCD. SETTING PROGRAMS: 10 different ON/OFF program settings with 1 minute steps are available. When verifying your programs, ensure that the settings do not overlap, especially when using the block option.
-
Seite 14: Random Function
Manual program remaining settings. Press TIMER button and hold to enter fast advance. After completing settings, press CLOCK button. The timer is ready to operate. EXAMPLE: Timer ON at 17:15 and OFF at 22:30 everyday a. Press TIMER once and release. LCD displays ON_1 b. Press WEEK till LCD displays MO, TU, WE, TH, FR, SA, SU. c. Press HOUR till LCD displays 5:00PM or 17:00 d. -
Seite 15: Care, Maintenance, Storage And Transport
Random function can‘t be set during program settings. 6 Care, Maintenance, Storage and Transport: • The device is maintenance-free. So never open the housing. • Please clean the product only with a dry linen. Be careful with the cleaning to avoid scratches. Do not use cleaning supplies, chemicals or water, because this can corrode the plastic material and can cause short-circuits. • Please store your product in a dry and dustproof surround when not used for longer time. It must be stored out of reach for children. • Please retain the packaging to avoid damages during transport. 7 Warranty and Liability: • The producer grants a 2 years guarantee. • As the manufacturer has no influence on installation, warranty of the product only a pplies to the product itself. • If any fault or damage is detected on your device, please contact your dealer and provide your sales slip or invoice as evidence of the purchase, if necessary. Your dealer will repair the fault either o n site, or send the device to the manufacturer. You make the work of our technicians c onsiderably easier, when you describe possible faults in d etail – only then you can be a ssured... -
Seite 16: Specifications
Operation mode LED does -Use a working mains not light socket. -Time switch is set to time mode and no toggle swit- ches are activated. -Time switch is out of time. Material damage or open -Do not touch the device electronic system caused and consult your dealer. by mechanical influences -Mind the Notes of Safety in chapter 4 and the Specifi- cations in chapter 9. 9 Specifications: model 51277 51301 operating voltage 220-240V AC/ 50Hz 220-240V AC/ 50Hz operating display Display Display max. power / current 3500W / 16A 3500W / 16A dimensions 120 x 88 x 57mm 75 x 70 x 72mm net / gross weight 148g / 192g 240g / 280g clock / child protection... -
Seite 17: Note On Waste Disposal
10 Note on Waste Disposal: In according to the European WEEE directive, electrical and electronic equipment and batteries must not be disposed with consumers waste. The consumer is committed by law to reposit electrical and electronic devices to public collecting points or to the dealer at the end of the devices lifetime for free. Particulars are regulated in national right. The symbol on the product, in the manual or at the packaging alludes to these terms. With this kind of application of used devices you achieve an important share to environmental protection. WEEE Richtlinie: 2002/96/EG WEEE-N 82898622 CE Declaration: This device corresponds to EU directives 2004/108/EC, 2006/95/EC, EN 60730-1 and EN 61140 with protection class I. Model 51301 also complies with degree of protection IP44: With the CE sign Goobay ® , a registered trademark of the Wentronic GmbH ensures, that the product is conformed to the basic standards and directives. These standards can be found online on www.wentronic.com. The mentioned directives replace all former national permissions in the European Union. - Seite 18 Manual...
- Seite 20 Revision Date 2011-01-24 Version 2 Goobay is a registered ® trademark of Wentronic GmbH in Germany and/or other countries. Wentronic GmbH Pillmannstraße 12 38112 Braunschweig, Germany Designed and Developed in Germany. Assembled in China...