
Verwandte Anleitungen für Miditech Midistart 2


Inhaltszusammenfassung für Miditech Midistart 2
- Seite 1 Usermanual Bedienungsanleitung Manuel d`Utilisation MIDISTART 2 MIDISTART 2 MIDISTART 2 MIDISTART 2...
-
Seite 2: Preface
PREFACE Congratulations on purchasing the Midistart-2 master MIDI controller keyboard. It is one of the finest products of its kind, made after extensive research into what customers require from a MIDI Controller. When using your Midistart-2 in conjunction with a computer and appropriate music software, you will be able to discover the wonderful world of Computer Music, with a set of complete musical instruments from your sound card or workstation. -
Seite 3: Inhaltsverzeichnis
TABLE OF CONTENTS Preface ................. Secure Information ............. Userpanel ................Back panel connections ............Something you should know before using the MIDI functions . Something you should know before using the USB functions .. USB Driver software installation ..........Switching on ................Basic Operations .............. -
Seite 4: Secure Information
IMPORTAND SECURE INFORMATION Please read the following secure instructions first! Very Important!! 1. Never use the keyboard in the near of water like a swimming pool, bathtub or wet environment like a basement or in rain or similar. 2. Never use the keyboard in the near of heating elements like a radiator or similar, also high temperatures or direct sunbeam should be avoid. -
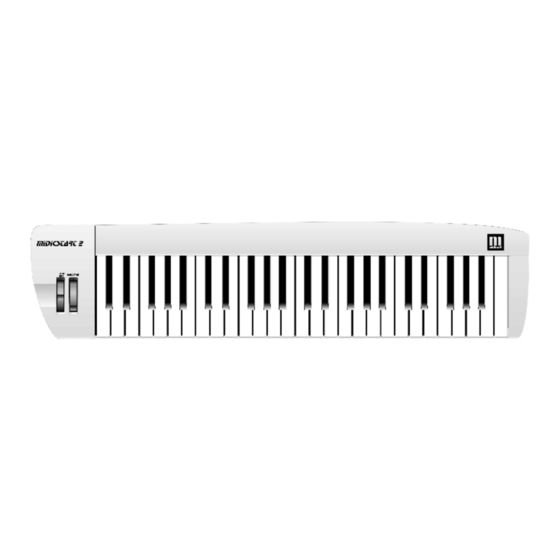
Seite 5: Userpanel
User panel: 1 = Pitch and Modulation Wheel Back panel connections: 1 = Footpedal 2 = Soundmodul 3 = Computer 4 = Power supply... -
Seite 6: Something You Should Know Before Using The Midi Functions
All Units communicate over one cable with the computer and so there is no need for many cables to connect, and this will make your work much easier. The MIDISTART 2 will give you an USB-Interface for transfer midi data to your computer. (Midi over USB) -
Seite 7: Usb Driver Software Installation
USB DRIVER SOFTWARE INSTALLATION When you use this master keyboard with Windows 98, Windows 2000 or Windows XP, you must install USB driver software into your computer with attached CD-ROM. Put the CD-ROM in CD-ROM driver tray, then you can find there are two directories in the CD-ROM: Win98 and Win2000/XP. -
Seite 8: Basic Operations
BASIC OPERATIONS PITCH BEND WHEEL Roll upward PITCH BEND wheel to increase the pitch or roll downwards the wheel to lower the pitch smoothly by transmitting pitch bend message ranging of 0 to 16383. Normally, the wheel stays on its centre position, i.e. no bending. MODULATION WHEEL Roll upward MODULATION wheel to add modulation effect ranging of 0 to 127. -
Seite 9: Trouble Shooting
Midi Device is not recognize . . . There are some misunderstandings, because a midi device is not recognizable by computer, except USB. The midi standard does not support recognizing of devices! The Midistart 2 is recognized by USB but not by midi-interface, this is normal!! - Seite 10 If the unit isn’t powered by power-supply, try to connect by USB-Connection. If it works normal, the power-supply may be damaged. If everything doesn’t help . . . You can write an e-mail to our hotline Info@Miditech.de and we try to help you.
-
Seite 11: Specifications
SPECIFICATIONS Model: MidistART 2 MidistART 2 MidistART 2 MidistART 2 Keyboard 49 touch sensitive keys Wheels Pitch Bend Wheel Modulations Wheel Function Buttons Connectors MIDI OUT (DIN) Sustain Pedal Power adaptor 9V/300mA (plus in centre) Switch backpanel ON / OFF... -
Seite 12: Midi Implementation
MIDI IMPLEMENTATION: Function Transmitted Remark Format Program Default Cn, pp Change Channel Default Change Note Default 36 - 84 Change Velocity Key down 0 - 127 Key up 0 - 127 Volume Default Change Reverb level Default Change Chorus level Default Change Pitch bend wheel... -
Seite 13: Index
INDEX Basic Operations 8 Switch on 7 Connections 5 Table of contents 3 Midi Implementation 12 Trouble shooting 9 Midi-Interface 6 USB Driver install 7 Preface 2 USB Interface 6 Secure information 4 Userpanel 5 Specification 11 Design and specifications subject to change without notice. No liability for printing mistakes... -
Seite 14: Einleitung
Einleitung Wir bedanken uns für den Erwerb des Midistart 2 MIDI Master Keyboards. In Verbindung mit einem PC und der Musiksoftware ist Ihr Midistart 2 ein komplettes Heim- Tonstudio. Diese Anleitung soll Ihnen helfen, sich mit den Möglichkeiten des Midistart 2 leicht zurecht zu finden. - Seite 15 Inhalt Einleitung ................... 14 Sicherheitshinweise ..............16 Bedienelemente ................. 17 Anschlüsse auf der Rückseite ..........17 Was Sie über MIDI wissen sollten ........... 18 Was Sie über USB wissen sollten ..........18 USB-Treiber installieren ............19 Einschalten ................19 Fehlerbehebung ................. 20 Spezifikationen ................
-
Seite 16: Sicherheitshinweise
Wichtige Sicherheitshinweise!! Bitte lesen Sie die folgenden Sicherheitshinweise genau durch Sehr wichtig!!! 16. Benutzen Sie das Keyboard niemals in der Nähe von Wasser wie z.b. einem Schwimmbecken oder einer Badewanne oder in feuchten Umgebungen wie einem Keller, Regen oder ähnlichem. 17. -
Seite 17: Bedienelemente
Bedienelemente: 1 = Drehräder Anschlüsse auf der Rückseite: 1 = Fusspedal 2 = Soundmodul 3 = Computer 4 = Netzteil... -
Seite 18: Was Sie Über Midi Wissen Sollten
über einen Bus (Kabel) mit dem Computer. Man kann so viele Kabel einsparen, und das macht die Arbeit sehr viel einfacher. Das Midistart 2 bietet daher auch eine USB-Schnittstelle über die man die Mididaten übertragen kann (Midi über USB). -
Seite 19: Usb-Treiber Installieren
USB-Treiber installieren: Wenn Sie dieses Masterkeyboard mit Windows 98, Windows 2000 oder Windows XP benutzen, müssen Sie auf Ihrem Computer die USB-Treiber Software mit der beigefügten CD installieren. Legen Sie die CD-Rom in das CD-Rom Laufwerk ein und Sie finden zwei Verzeichnisse auf der CD: Win98 und Win 2000/XP. -
Seite 20: Fehlerbehebung
Gerät ist wie z.B. bei USB – Geräten, denn dafür ist ein Midi In (Eingang) erforderlich. Midi unterstützt aber generell das „Erkennen“ nicht. Das Midistart 2 besitzt einen USB Anschluss über den es erkannt wird, aber nicht über den Midi-Anschluss. Das ist also normal. - Seite 21 Audiosignal kommt verzögert . . . Dieses Problem wird meistens dem Midigerät zugesprochen, ist aber in wirklichkeit ein Problem der Soundkarte. Bei vielen Soundkarten gibt es eine einstellbare sogenannte Latenz oder Latenzzeit, die ist dafür erforderlich, das bei langsamen Computern das Audiosignal nicht aussetzt. Beim Installieren der Soundkarte wird diese meistens auf maximalen Wert gesetzt z.b.
- Seite 22 über den USB-Anschluss arbeitet. Ist das der Fall, ist wahrscheinlich das Netzteil defekt. Wenn alle Stricke reißen . . . Falls Ihnen das alles nicht weiterhilft gibt es ja auch noch unsere freundliche Hotline die Ihnen bestimmt helfen kann: Info@Miditech.de...
-
Seite 23: Spezifikationen
Spezifikation Model: MidistART 2 Keyboard 49 anschlagsdynamische Tasten Wheels (Räder) Pitch Bend Rad Modulations Rad Program- und Funktionsknöpfe Anschlüsse MIDI OUT (DIN) Sustain Pedal Netzteil 9V/300mA (Plus in der Mitte) Netzschalter ON / OFF Anzeige Abmessungen 82,3 x 19,5 x 7 cm... -
Seite 24: Midi Implementation
MIDI IMPLEMENTATION Function Transmitted Remark Format Program Default Cn, pp Change Channel Default Change Note Default 36 - 84 Change Velocity Key down 0 - 127 9n, kk, vv Key up 0 - 127 8n, kk, vv Volume Default Bn, 07, vv Change Reverb level Default... -
Seite 25: Index
INDEX Anschlüsse 15 Midischnittstelle 16 Bedienelemente 15 Problembehebung 18 Einleitung 13 USB Schnittstelle 16 Einschalten 17 USB Treiber installieren 17 Fehlersuche 18 Spezifikation 22 Midi Implementation 21 • Änderungen der technischen Daten und des Designs sind möglich. • Für Druckfehler wird keine Haftung übernommen... -
Seite 26: Préface
Préface Merci d’avoir choisi le Midistart 2, clavier-maître de contrôle MIDI. En utilisant votre Midistart 2 avec un ordinateur et un logiciel musical approprié, vous détenez déjà un home-studio complet. Ce manuel a été rédigé pour vous aider à vous familiariser aux puissantes caractéristiques du Midistart 2. Après lecture du manuel, vous saurez parfaitement comment utiliser les diférentes fonctions... - Seite 27 Contenu Préface .........……........26 Secure Information ......……........28 Sommaire ...............…..29 Connexions du panneau arrière ........... 29 Ce que vous devez savoir sur les fonctions MIDI ..... 30 Ce que vous devez savoir sur les fonctions USB ....... 30 Installation des pilotes USB ............31 Mise en marche ..........…......
-
Seite 28: Secure Information
IMPORTAND SECURE INFORMATION Please read the following secure instructions first! Very Important!! 14. Never use the keyboard in the near of water like a swimming pool, bathtub or wet environment like a basement or in rain or similar. 15. Never use the keyboard in the near of heating elements like a radiator or similar, also high temperatures or direct sunbeam should be avoid. -
Seite 29: Sommaire
1 = Molettes Connexions du panneau arrière 1 = Pédale 2 = Module de son 3 = Ordinateur 4 = Alimentation externe... -
Seite 30: Ce Que Vous Devez Savoir Sur Les Fonctions Midi
Pour expliquer, plus en détail, comment fonctionne MIDI sur votre instrument, les illustrations suivantes exposent les fonctions MIDI du Midistart 2, qui vous autorisent à connecter le clavier à d'autres instruments MIDI. Les nombreuses possibilités MIDI du Midistart 2 vous apportent un maximum de contrôle dans l'environnement MIDI. -
Seite 31: Installation Des Pilotes Usb
nstallation des pilotes USB Si vous utilisez le clavier sous Windows 98, Windows 2000 ou Windows XP, il sera indispensable d'installer les pilotes USB fournis sur le CD joint. Insérez le CD dans le lecteur CD-Rom et vous allez trouver deux fichiers: Win98 et Win2000/XP Ensuite, ouvrez le fichier qui correspond à... -
Seite 32: En Cas De Problèmes
"demander" à l'appareil MIDI, comme le fait par exemple l'interface USB. L'interface MIDI ne prévoit pas que des périphériques soient reconnus. Il est donc normal que le Midistart 2 soit reconnu via USB et pas reconnu via MIDI. - Seite 33 La pédale de contrôle ne fonctionne pas. . . Peut-être avez-vous une pédale non adaptée au Midistart 2? Il existe deux types de pédales, celles qui ouvrent le contact électrique en les actionnant, et ceux qui ferment le contact. Ce clavier requiert une pédale laquelle, une fois actionnée, ferme le contact!!
- Seite 34 L'alimentation externe ne fonctionne pas. . . Si le clavier n'est pas alimenté, contrôlez si le clavier fonctionne en le raccordant via USB. Si il fonctionne, l'alimentation externe est probablement défectueuse. Si le problème persiste. . . vous pouvez bien sur nous contacter sous: Info@Miditech.de...
-
Seite 35: Spécifications Techniques
Spécifications techniques Model: Midistart 2 Clavier 49 touches standard dynamiques Molettes Molette de Pitch Bend Molette de Modulation Boutons de Programme et Fonction Connecteurs MIDI OUT (DIN) Pédale Sustain Adaptateur secteur Alimentation externe 9V DC/300mA (+ au milieu) Boutons du panneau arrière... -
Seite 36: Implémentation Midi
Implémentation MIDI Function Transmitted Remark Format Program Default Cn, pp Change Channel Default Change Note Default 36 - 84 Change Velocity Key down 0 - 127 Key up 0 - 127 Volume Default Change Reverb level Default Change Chorus level Default Change Pitch bend wheel... -
Seite 37: Index
INDEX Connexions 29 Mise en marche 31 En cas de problèmes 32 Préfcae 26 Implémentation MIDI 36 Secure Information 28 Interface MIDI 30 Spécification techniques 35 Interface USB 30 Installer les pilotes USB 31 • Aspects extérieurs et spécifications techniques sujets à changements sans préavis.