Werbung
Verfügbare Sprachen
Verfügbare Sprachen
Werbung
Kapitel
Fehlerbehebung

Verwandte Anleitungen für Miditech i2 Control-25


Inhaltszusammenfassung für Miditech i2 Control-25
- Seite 1 i² Control-25 Bedienungsanleitung...
-
Seite 2: Einleitung
Einleitung Wir bedanken uns für den Kauf des i² Control-25 MIDI Keyboards. In Verbindung mit einem PC und der Musiksoftware ist Ihr i² Control-25 ein komplettes Heim- Tonstudio mit Echtzeit Reglern für Klangeinstellungen oder generellem Parameter Editieren. Diese Anleitung soll Ihnen helfen, sich mit den vielseitigen Möglichkeiten des i² Control-25 leicht zurecht zu finden. -
Seite 3: Inhaltsverzeichnis
Inhaltsverzeichnis EINLEITUNG------------------------------------------------------------------------------------------- 2 SEHR WICHTIGE SICHERHEITSHINWEISE! ----------------------------------------------- 5 DAS INSTRUMENT----------------------------------------------------------------------------------- 6 WAS SIE ÜBER MIDI WISSEN SOLLTEN ---------------------------------------------------- 7 BENUTZUNG DER MIDI-FUNKTIONEN ------------------------------------------------------ 7 BENUTZUNG DES MIDI-INTERFACES -------------------------------------------------------- 8 WAS SIE ÜBER USB WISSEN SOLLTEN------------------------------------------------------ 9 USB-TREIBER INSTALLIEREN: ----------------------------------------------------------------- 9 EINSCHALTEN ---------------------------------------------------------------------------------------- 9 PITCH BEND RAD -----------------------------------------------------------------------------------10 MODULATIONSRAD -------------------------------------------------------------------------------10... - Seite 4 MIDI / POWER ANSCHLUß-----------------------------------------------------------------------15 POWER-SCHALTER --------------------------------------------------------------------------------15 PROBLEMBEHEBUNG:----------------------------------------------------------------------------16 WERKSEINSTELLUNGEN DES I² CONTROL-25-------------------------------------------20 SPEZIFIKATION -------------------------------------------------------------------------------------21 MIDI IMPLEMENTATION CHART-------------------------------------------------------------22...
-
Seite 5: Sehr Wichtige Sicherheitshinweise
Sehr wichtige Sicherheitshinweise! Bitte lesen Sie die folgenden Sicherheitshinweise genau durch!! Benutzen Sie das Keyboard niemals in der Nähe von Wasser wie z.b. einem Schwimmbecken oder einer Badewanne oder in feuchten Umgebungen wie einem Keller, Regen oder ähnlichem. 2. Benutzen Sie das Keyboard niemals in der Nähe von Heizkörpern oder Heizgeräten oder heißen Temperaturen. -
Seite 6: Das Instrument
Das Instrument Das i² Control-25 hat 25 anschlagsdynamische Pianotasten und erhält seine Stromversorgung direkt von der Soundkarte Ihres PC´s. Hierzu benötigen Sie kein separates Netzgerät. Zum Betrieb an einem Macintosh oder anderen MIDI-Geräten benötigen Sie jedoch ein optionales 15 pin 5V DC-Netzgerät. Das i²... -
Seite 7: Was Sie Über Midi Wissen Sollten
Was Sie über MIDI wissen sollten MIDI ist die Abkürzung für Musical Instrument Digital Interface, und ist der Standard für den Datenaustausch zwischen Musikinstrumenten, die mit dem MIDI-Anschluß ausgestattet sind. Um Ihnen die MIDI-Funktionen Ihres i² Control-25 näher zu erläutern, folgen Sie bitte den nachfolgenden Erklärungen. -
Seite 8: Benutzung Des Midi-Interfaces
Benutzung des Midi-Interfaces Das i² Control-25 hat ein eingebautes Midi-Interface welches die Daten vom Keyboard zum Computer überträgt, aber auch die Daten vom Computer zum Midi-Out am Keyboard. Die beiden Midi-Outs sind separat nutzbar um z.b. einen Soundexpander, ein Effektgerät usw. -
Seite 9: Was Sie Über Usb Wissen Sollten
Was Sie über USB wissen sollten USB steht für Universeller Serieller Bus und ist der Standard, für den Datenaustausch vieler Peripheriegeräte geworden d. h. alle USB-Geräte kommunizieren über einen Bus (Kabel) mit dem Computer. Man kann so viele Kabel einsparen, und das macht die Arbeit sehr viel einfacher. -
Seite 10: Bedienelemente
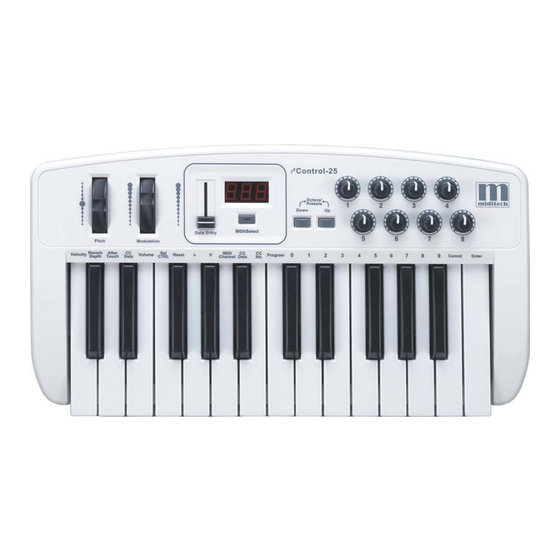
Bedienelemente Pitch Bend Rad Durch Drehen des Pitch Bend Rades werden MIDI-Pitch Bend Meldungen an angeschlossene Instrumente/Geräte gesandt. Die Tonhöhe wird dadurch nach oben oder unten verändert. Das kann Ihrem Spiel mehr Ausdruck verleihen. Die Spanne der Tonhöhen hängt von der verwendeten Soundkarte bzw.-Modul ab. -
Seite 11: Data Entry Schieber
Data Entry Schieber Dieser Schieberegler erlaubt Ihnen die Veränderung folgender Parameter: Lautstärke, Velocity, Chorus, Reverb(Hall), Panorama und Aftertouch. Midi Select Knopf Mit Hilfe dieser Taste legen Sie verschiedene MIDI-Befehle auf die Tasten Ihres Keyboards. Das i² Control-25 bietet Ihnen die folgenden Gruppen von MIDI-Befehle an:... -
Seite 12: Bedienfunktionen
Bedienfunktionen Midi Channel einstellen Drücken Sie die MIDI/SELECT Taste und dann die MIDI Channel Taste, um den Sendekanal für Ihr Keyboard festzulegen. Kanal 1 ist beim Einschalten werksseitig festgelegt. Um den Sendekanal von 1 auf 2 zu ändern, drücken Sie die MIDI/SELECT Taste, MIDI Channel Taste die 1 auf den Zehnertasten und dann wieder die MIDI/SELECT Taste. -
Seite 13: Data Entry Schieberegler Benutzen
Data Entry Schieberegler benutzen Das i² Control-25 gestattet es die Nummerntasten anstelle des Data Entry Reglers zum Editieren zu benutzen. Drücken Sie die MIDI/SELECT Taste und die CC Taste, danach die erforderliche Zahl und bestätigen Sie die Eingabe über die Entertaste. Wenn Sie zum Beispiel Control Change 7 (Level) den Wert 123 geben möchten, gehen Sie wie folgt vor: 1. -
Seite 14: Echtzeit Kontroller Zuordnen
Echtzeit Kontroller zuordnen Um einen Echtzeit Regler einem Midiparameter (Midicontroller) zuordnen zu können, geben Sie folgendes ein: Midiselect Taste drücken Set Controller Taste drücken Eine Regler Nr. via Zahlentasten eingeben und mit Enter besättigen, dieser wird dann im Display angezeigt 4. -
Seite 15: Rückansicht
Rückansicht Sustain Anschluss Hier können Sie ein optionales Sustain/Haltepedal anschließen. Midi Out Anschlusse Über diese Midi-Standard Anschlüsse senden Sie Daten an andere Midi-Instrumente (z.B. an ein Soundmodul) USB/ Power Anschluß Diesen Anschluß verbinden Sie mit Ihrem PC. Über diese Verbindung wird das Keyboard mit Strom versorgt und sendet bzw. -
Seite 16: Problembehebung
Problembehebung: Wenn es mal nicht geht . . . dann Überprüfen Sie folgende Anweisungen: Haben Sie den aktuellen Treiber von unserer Homepage? Da sich immer mal irgendwo kleinere oder größere Problemchen ergeben, optimieren und verbessern wir ständig unsere Treiber. Schauen Sie deshalb zuerst nach ob Sie auch den aktuellsten Treiber haben, und laden Sie sich sonst den neusten Treiber von unserer Homepage. - Seite 17 Midi Gerät wird nicht erkannt . . . Hier gibt es leider bei vielen Leuten ein Missverständnis, denn ein Midigerät wird nicht vom Computer „erkannt“. Viele Midigeräte haben nur einen Midi Out Anschluss (Ausgang) und deshalb kann der Computer auch nicht das Gerät fragen was es für ein Gerät ist wie z.B. bei USB –...
- Seite 18 USB funktioniert nicht . . . Ist das Keyboard eingeschaltet? Wird das Keyboard erkannt? Das Keyboard muss in jedem Fall erkannt werden sonst ist keine Kommunikation möglich. Wird Ihr Keyboard im Gerätemanager als USB-Device angezeigt? Falls nicht wird es gar nicht erst als USB-Device erkannt. Jetzt gibt es drei Möglichkeiten: Der Treiber ist defekt oder mehrfach installiert -->...
- Seite 19 Wenn das Gerät mal keinen Strom bekommen sollte Sie prüfen ob es über den USB- Anschluss arbeitet. Ist das der Fall, ist wahrscheinlich das Netzteil defekt. Wenn alle Stricke reißen . . . Falls Ihnen das alles nicht weiterhilft gibt es ja auch noch unsere freundliche Hotline die Ihnen bestimmt helfen kann: Info@Miditech.de...
-
Seite 20: Werkseinstellungen Des I² Control-25
Werkseinstellungen des i² Control-25 Beim Einschalten des Minicontrols werden die Parameter immer auf folgende Werte zurückgesetzt: Sende MIDI Kanal Nr. 1 Oktavbelegung von C2(36) to C3(76) After Touch Wert auf 0 Velocity Wert auf 0 Hall Wert auf 64 Panorama Wert auf 64 Lautstärke Wert auf 127 CC Data Wert auf 0 CC Nr. -
Seite 21: Spezifikation
Spezifikation i² Control-25 Model: Keyboard 25 anschlagsdynamische Pianotasten Polyphonie 10 Noten gleichzeitig Eingabetasten (im Midiselect MIDI Kanal Mode) Reset Velocity Reverb Chorus Pan Pos Volumen Oktave -2, -1, Center, +1, +2 Transpose Programm Wechsel CC-No. (genereller CC Zugriff) Set Controller Nummerntasten x10 Enter Cancel... -
Seite 22: Midi Implementation Chart
Midi Implementation Chart i² Control-25 Model: Function Transmitted Recognized Remarks Basic Channel Default Changed 1-16 Mode 3 Mode Default Messages Altered ************* 12-108 Note Number : With Octave Change True Voice ************* Velocity Note ON Note OFF After Key's Touch Ch's Pitch Bender Control Change... - Seite 23 i² Control-25 Mode d’emploi...
-
Seite 24: Preface
Préface Merci d’avoir choisi le i² Control-25, clavier-maître de contrôle MIDI. En utilisant votre i² Control-25 avec un ordinateur et un logiciel musical approprié, vous détenez déjà un home- studio complet, avec la possibilité de régler en temps réel les sons ainsi que les paramètres MIDI de vos instruments MIDI. -
Seite 25: La Table Des Matieres
La table des matiéres PREFACE-----------------------------------------------------------------------------------------------24 LA TABLE DES MATIERES ----------------------------------------------------------------------25 AVIS DE SECURITE---------------------------------------------------------------------------------27 LE I² CONTROL-25 ----------------------------------------------------------------------------------28 CE QUE VOUS DEVEZ SAVOIR SUR LES FONCTIONS MIDI -------------------------28 UTILISATION DES FONCTIONS MIDI--------------------------------------------------------29 UTILISATION DES INTERFACES MIDI ------------------------------------------------------30 L'INTERFACE MIDI --------------------------------------------------------------------------------30 CE QUE VOUS DEVEZ SAVOIR SUR LES FONCTIONS USB ---------------------------31 INSTALLATION DES PILOTES USB -----------------------------------------------------------31 MISE EN MARCHE----------------------------------------------------------------------------------31 SET DE COMMANDES -----------------------------------------------------------------------------32... - Seite 26 PANNEAU ARRIERE--------------------------------------------------------------------------------38 PRISE POUR PEDALE SUSTAIN ----------------------------------------------------------------38 SORTIE MIDI (KEYBOARD MIDI OUT) ------------------------------------------------------38 SORTIE MIDI "USB" (COMPUTER MIDI OUT) --------------------------------------------38 PORT USB----------------------------------------------------------------------------------------------39 INTERRUPTEUR D'ALIMENTATION ---------------------------------------------------------39 PRISE D'ALIMENTATION ------------------------------------------------------------------------39 EN CAS DE PROBLEMES -------------------------------------------------------------------------40 REGLAGES PAR DEFAUT DU I² CONTROL-25---------------------------------------------43 SPECIFICATION TECHNIQUE ------------------------------------------------------------------44 MIDI IMPLEMENTATION CHART-------------------------------------------------------------45...
-
Seite 27: Avis De Securite
Avis de sécurité Veuillez bien lire attentivement les conseils de sécurité suivants! 1. N'exposez jamais le clavier a l'eau ou a l'humidité. 2. Tâchez de ne pas utiliser ou déposer le clavier près de radiateurs ou autres sources de chaleur. N'exposez pas le clavier aux rayons de soleil. 3. -
Seite 28: Le I² Control-25
i² Control-25 Le clavier de commande MIDI i² Control-25 dispose de 25 touches dynamiques, de molettes de pitch et de modulation, d'un potentiomètre Data Entry et de 8 boutons programmables. Le i² Control-25 peut fonctionner avec un bloc d'alimentation 9V à courant continu mais aussi avec 6 piles de type AA de façon à... -
Seite 29: Utilisation Des Fonctions Midi
Utilisation des fonctions MIDI Pour transmettre des données MIDI de votre clavier à un autre instrument MIDI professionnel, veuillez faire l'achat d'un câble MIDI que vous utiliserez pour connecter la sortie MIDI marquée "Keyboard" de votre i² Control-25 à l'entrée MIDI de l'autre instrument ou votre carte de son. -
Seite 30: Utilisation Des Interfaces Midi
Utilisation des interfaces Midi L'interface MIDI Le i² Control-25 possède une interface MIDI qui envoie les données du clavier vers l'ordinateur, ainsi que les données MIDI de l'ordinateur vers la sortie MIDI USB du clavier. Vous pouvez utiliser ces deux sorties simultanément, pour par exemple connecter un module de son ou un autre périphérique MIDI. -
Seite 31: Ce Que Vous Devez Savoir Sur Les Fonctions Usb
Ce que vous devez savoir sur les fonctions USB USB, signifiant "Universal Serial Bus", est un moyen d'échange de données très répandu entre ordinateurs et appareils périphériques. Les avantages d'USB sont surtout la facilité de connections (par un seul câble) et la possibilité d'alimenter les appareils périphériques, notamment le i²... -
Seite 32: Set De Commandes
Set de commandes Molette Pitch Bend Celle-ci sert à augmenter ou baisser la hauteur tonale d’un son au cours d’une interprétation. La gamme des hauteurs possibles dépend du générateur de son (carte son d’un ordinateur ou module de son) utilisé. Pour savoir comment modifier la gamme de la molette Pitch Bend, veuillez consulter les manuels de vos périphériques. -
Seite 33: Potentionètre Data Entry
Potentionètre Data Entry Il vous permet d’ajuster, directement a partir du clavier, les valeurs de paramètres tels que le volume, la vélocité et l’aftertouch ainsi que de presque tous les paramètres de contrôle MIDI programmables. Bouton MIDI/SELECT Utilisez ce bouton pour sélectionner diverses commandes MIDI à partir de certaines touches de votre e clavier. -
Seite 34: Touche Midi Channel (Canaux Midi)
Touche MIDI Channel (canaux MIDI) Appuyez sur le bouton MIDI/SELECT puis sur la touche de canal MIDI (MIDI CHANNEL). Cela vous permet de sélectionner un canal de transmission pour votre clavier. Lorsqu’on allume le clavier, le canal par défaut est le canal 1. Pour par exemple régler le canal MIDI sur 2 vous faites: 1. -
Seite 35: Entree Des Donnees Via Les Touches Numerotees
Entrée des données via les touches numérotées Le clavier i² Control-25 vous permet d'utiliser les touches numérotées au lieu du curseur d'entrée de données (Data Entry) pour régler les différents paramètres Control Change. Pour cela, vous devez appuyer sur le bouton MIDI/SELECT et sur la touche CC data, puis sur la touche numérotée correspondant au chiffre voulu, et appuyer enfin sur la touche Enter. -
Seite 36: Touche Program (Selection De Programme)
Touche Program (sélection de programme) En appuyant sur le bouton MIDI/SELECT et sur la touche Program, puis sur les touches numérotées de 0 à 9 et sur la touche Enter, vous pouvez sélectionner n’importe quel numéro de programme entre 1 et 128. Si vous souhaitez par exemple choisir le programme 67 (TenoSax), appuyez sur le bouton MIDI/SELECT puis sur les touches 6 et 7, et appuyez pour finir sur la touche Enter et enfin sur le bouton MIDI/SELECT. -
Seite 37: Ce Que Vous Devez Savoir Sur Les Controleurs Midi
Ce que vous devez savoir sur les contrôleurs MIDI Le clavier i² Control-25 est conçu en première ligne a contrôler les paramètres MIDI standards. Ceux-ci sont nommés les contrôleurs MIDI "RP" (angl. "Registered Parameters"). Au delà il existe des contrôleurs MIDI NRP (angl. "Non Registered Parameters") et des contrôleurs Sys Ex (angl. -
Seite 38: Panneau Arriere
Panneau arrière Prise pour pédale sustain Branchez ici une éventuelle pédale sutain (non fournie). Sortie MIDI (Keyboard MIDI Out) Cette prise MIDI standard est une sortie MIDI directe du clavier et sert à envoyer des messages MIDI à d’autres dispositifs MIDI (un module de sons par exemple). Sortie MIDI "USB"... -
Seite 39: Port Usb
Port USB Ce connecteur USB sert à relier le i² Control-25 et le port USB de l’ordinateur à l’aide d’un câble USB standard (fourni). Interrupteur d'alimentation Cet interrupteur a trois positions: 1. l’alimentation du clavier sur 9V/piles, 2. hors tension ou 3. -
Seite 40: En Cas De Problemes
Pour garantir une fonctionnalité parfaite du clavier, nous nous engagons continuellement a améliorer nos pilotes USB, ci nécessaire. Regardez donc régulièrement sur nôtre site web (www.miditech.de) s'il existe un pilote USB plus récent que celui que vous avez déjà installé. L'interface MIDI ne fonctionne pas. . . - Seite 41 Si ce n'est pas le cas, installez les pilotes USB les plus récents! Vous trouverez ceux-ci sur nôtre site web (www.miditech.de). Si le problème persiste, essayez de raccorder le clavier uniquement par un câble MIDI a vôtre ordinateur ou un autre périphérique MIDI. Dans le cas ou ceci ne marche toujours pas, il s'agit probablement d'un problème plus important.
- Seite 42 L'alimentation externe ne fonctionne pas. . . Si le clavier n'est pas alimenté, contrôlez si le clavier fonctionne en le raccordant via USB. S'il fonctionne, l'alimentation externe est probablement défectueuse. Si le problème persiste… vous pouvez bien sur nous contacter sous: Info@Miditech.de...
-
Seite 43: Reglages Par Defaut Du I² Control-25
Réglages par défaut du i² Control-25 En allumant le i² Control-25 (sauf en utilisant des piles), les paramètres du clavier serons les suivants: Canal de transmission MIDI n° 1. 1. Octave par défaut de C4 (60) à C6 (84) After Touch par défaut d’une valeur de 0 Vélocité... -
Seite 44: Specification Technique
Spécification technique i² Control-25 Model: Keyboard 25 dynamic keys Simultaneous Note Output 10 Notes (Reverse priority) Control switches MIDI Channel Reset Velocity Reverb Chorus Pan Pos Volume Octave -2, -1, Centre, +1, +2 Transpose Program Change CC-No. Set Controller Numeric Keys x 10 Enter Cancel Pitch Bend Wheel... -
Seite 45: Midi Implementation Chart
Midi Implementation Chart i² Control-25 Model: Function Transmitted Recognized Remarks Basic Channel Default Changed 1-16 Mode Default Mode 3 Messages ************* Altered Note Number : 12-108 With Octave Change True Voice ************* Velocity Note ON Note OFF After Key's Touch Ch's Pitch Bender Control Change... - Seite 46 i² Control-25 Owner's Manual...
-
Seite 47: Preface
Preface Congratulations on purchasing the i² Control-25 master MIDI controller keyboard. It is one of the finest products of its kind, made after extensive research into what customers require from a MIDI Controller. When using your i² Control-25 in conjunction with a computer and appropriate music software, you will be able to discover the wonderful world of Computer Music, with a set of complete musical instruments from your sound card or workstation. - Seite 48 CONTENTS PREFACE-----------------------------------------------------------------------------------------------47 IMPORTAND SECURE INFORMATION ------------------------------------------------------50 MAIN FEATURE -------------------------------------------------------------------------------------51 SOMETHING YOU SHOULD KNOW BEFORE USING THE MIDI FUNCTIONS --51 USING THE MIDI FUNCTIONS------------------------------------------------------------------52 USING THE MIDI-INTERFACE------------------------------------------------------------------53 DEFAULT SETTING OF THE I² CONTROL-25 ----------------------------------------------54 OVERALL DIAGRAM PREVIEW ---------------------------------------------------------------55 PITCH BEND WHEEL ------------------------------------------------------------------------------55 MODULATION WHEEL ---------------------------------------------------------------------------56 DATA ENTRY SLIDE -------------------------------------------------------------------------------56 MIDI / SELECT BUTTON --------------------------------------------------------------------------56...
- Seite 49 SUSTAIN JACK ---------------------------------------------------------------------------------------59 MIDI OUT JACKS------------------------------------------------------------------------------------59 USB PORT / POWER PORT -----------------------------------------------------------------------59 POWER SWITCH ------------------------------------------------------------------------------------59 TROUBLE SHOOTING -----------------------------------------------------------------------------60 SPECIFICATIONS -----------------------------------------------------------------------------------63 MIDI IMPLEMENTATION CHART-------------------------------------------------------------64...
-
Seite 50: Importand Secure Information
IMPORTAND SECURE INFORMATION Please read the following secure instructions first! Very Important!! 1. Never use the keyboard in the near of water like a swimming pool, bathtub or wet environment like a basement or in rain or similar. 2. Never use the keyboard in the near of heating elements like a radiator or similar, also high temperatures or direct sunbeam should be avoid. -
Seite 51: Main Feature
Main Feature The i² Control-25 MIDI master controller keyboard provides 25dynamic Piano keys, which can draw 5V DC power directly from your PC sound card. Therefore, you don't need an external power-supply or batteries to activate your instrument when used with a PC. i²... -
Seite 52: Using The Midi Functions
Using the MIDI Functions 1. Connecting the keyboard to other MIDI instruments: To transmit MIDI data from your keyboard to other professional MIDI instruments, please purchase a MIDI cable and use it to connect the MIDI OUT jack of your i² Control-25 to the MIDI IN jack of the other instrument. -
Seite 53: Using The Midi-Interface
Using the Midi-Interface The Minicontrol-2 Keyboard has a build in midi-interface; witch transfers the midi data from the keyboard to the computer, but also from the computer to the midi-out at the keyboard. The booth midi-outs are separate usable, to control a sound expander or maybe an effect device. -
Seite 54: Default Setting Of The I² Control-25
i² Control-25 Default Setting of the The i² Control-25 will always select the following values for their parameters when the power is turned on. *Transmit MIDI Channel no. 1. *Default Octave will be from C2 (36) to C4 (62) *Default After Touch value will be 0 *Default Velocity value will be 0 *Default Reverb Depth value will be 64 *Default Pan Pot value will be 64... -
Seite 55: Overall Diagram Preview
Overall Diagram Preview Operation panel: Pitch Bend Wheel The Pitch Bend wheel is used for raising or lowering the pitch of a voice during performance. The range of pitch values depends on the sound generator (sound card or module) being used. Please refer to the manuals of your devices for information on how to change the Pitch Bend range. -
Seite 56: Modulation Wheel
Modulation Wheel It is very common to use the modulation wheel to change the intensity of effects: mainly Vibrato( pitch change), Tremolo (change the volume), and Modulation (change the tone). The Modulation wheel produces a vibrato effect shortly after the sound is generated. It is most effective for voice such as Saxophone Strings and Oboe. -
Seite 57: Transposer Group
Transposer Group Pressing the MIDI/SELECT button and the TRANSPOSE Key you increase or decrease the notes by halftones. If you want to transpose by 3 semitones: Press the MIDI/SELECT button and the ”#” key, (in the display you see 3 for three semitones) than press MIDI/SELECT to finish the change. -
Seite 58: Program Key
Program key Pressing MIDI/SELECT button and the Program key, then numeric keys then enter key, you can select any patch number between 1 to 128. For example, if you want to change voice to 67 (Tenor Sax): Press MIDI/SELECT button and 67 on numeric keys, then enter key and MIDI/SELECT button again to finish this action. -
Seite 59: Rear Panel
Rear Panel Sustain jack This jack allows you to connect an optional Sustain Footswitch to the keyboard. MIDI OUT jacks This standard MIDI jacks is used to send MIDI messages to another MIDI instrument (such as sound module). USB Port / power port This jack is used to connect the keyboard with the computer, to get power and send MIDI messages directly to the sound card. -
Seite 60: Trouble Shooting
Trouble Shooting If anything doesn’t work . . . Please check following points: Midi connection fault . . . Do you have installed your midi drivers from your soundcard ? Look at START --> Settings --> System control --> Multimedia --> Tab Midi For installed Drivers. - Seite 61 USB doesn’t work . . . Is power switch on power-on position? Are you sure that the computer found the keyboard or an unknown USB-Device? In the first case everything is Ok. In the second case there is a problem of the Hardware of the keyboard.
- Seite 62 Or try to download a Midimonitor like Midiox --> WWW.MIDIOX.COM to test the correct working of the keyboard. Important: You must set-up the input and output devices! If everything doesn’t help . . . You can write an e-mail to our hotline Info@Miditech.de and we try to help you...
-
Seite 63: Specifications
Specifications i² Control-25 Model: Keyboard 25 dynamic keys. Simultaneous Note output 10 notes (Reverse priority) MIDI Channel Reset Transpose -,+ Program Change CC-No.(Generic CC Assignment) CC-Data Control switches Data Entry Velocity Assignment, Data Entry Reverb Send Level Assignment, Data Entry Chorus Send Level Assignment, Pan Pot Assignment(CC-10), Volume Assignment(CC-07) CC-Data... -
Seite 64: Midi Implementation Chart
MIDI Implementation Chart i² Control-25 Model: Function Transmitted Recognised Remarks Basic Channel Default 1-16 Changed Mode Default Mode 3 Messages ************* Altered Note Number : 12-108 With Octave Change ************* True Voice Velocity Note ON Note OFF After Key's Touch Ch's Pitch Bender Control Change...