
Verwandte Anleitungen für Gemini GMX-Drive


Inhaltszusammenfassung für Gemini GMX-Drive
- Seite 1 W W W. G E M I N I S O U N D . C O M OPERATIONS MANUAL | MANUAL DE INSTRUCCIONES MANUEL D’ INSTRUCTIONS | BEDIENUNGSHANDBUCH...
- Seite 2 Thank you for purchasing our GMX Drive Media Controller. We are confident that the Gemini platform of products will not only make your life easier through the use of the latest technological advancements in cross-platform connectivity and sound reproduction but will raise the bar for DJ and pro audio products.
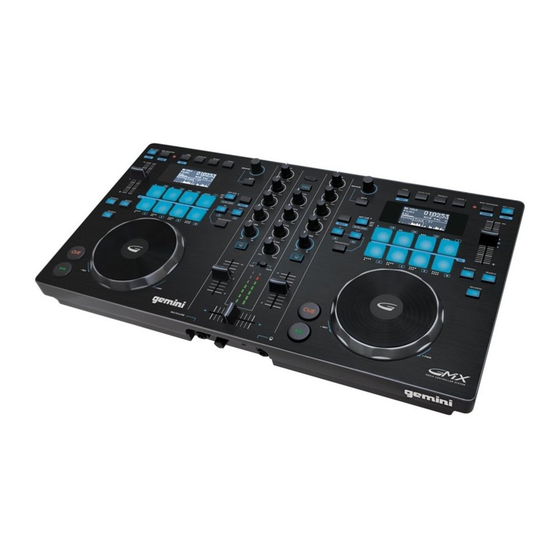
- Seite 3 t o p v i e w d i s p l a y Time Remaining/ Elapsed Pitch Loop Points/ Range Track Progress Track Name Waveform r e a r v i e w f r o n t v i e w W W W.
- Seite 4 c o n n e c t i o n s M a s t e r o u t p u t - Plug one end of the XLR or RCA cables into the MASTER OUTPUT (D) on the rear panel. Plug the other end of the XLR or RCA connectors into any available inputs on your mixer or PA system.
- Seite 5 R E P E AT - To repeat a track press REPEAT (14). If it is illuminated the track will repeat from it’s beginning or its cue point upon completion. B P M TA P/ M O D E - Press and hold the BPM (11) button to toggle between different BPM modes: BPM ID3 / AUTO BPM / MANUAL BPM.
-
Seite 6: Master Vo Lume
l o o p c o n t r o l s AU TO LO OP - During playback, press SHIFT (19) + AUTO LOOP (18) to switch the performance pads to auto loop mode. Press a PERFORMANCE PAD (8) to set the loop in point. -
Seite 7: Midi Messages
Some USB devices may not operate properly with the GMX Drive. Gemini accepts no resposibility for any possible data loss that may occur. To ensure that data is not permanently lost, please make sure to backup any data prior to connecting the USB device to the the unit. - Seite 8 Felicidades y gracias por comprar el Controlador Multimedia GMX Drive. Estamos seguros de que nuestra gama de productos Gemini no solo le facilitará la vida por medio del uso de los últimos avances tecnológicos en cuanto a conectividad inter-plataformas y reproducción de sonido sino que subirá...
- Seite 9 v i s t a s u p e r i o r p a n t a l l a Tiempo Restante/ Transcurrido Pitch Puntos Loop/ Rango Progreso Pista Nombre Pista Forma de Onda v i s t a t r a s e r a v i s t a f r o n t a l W W W.
- Seite 10 c o n e x i o n e s S A L I D A M A S T E R - Conectar uno de los extremos de un cable XLR o RCA en la SALIDA MASTER (D) en la parte trasera. Conectar el otro extremo del cable XLR o RCA en cualquiera de las entradas disponibles en tu mezclador o sistema PA.
- Seite 11 Manteniendo pulsado el botón SHIFT (19) y pulsando el botón RANGE (10) te permitirá establecer el ajuste del rango del tempo disponible. R E P E T I C I Ó N ( R E P E AT ) - Pulse REPEAT (14) para repetir una pista.
- Seite 12 LOOP AUTO MÁTI CO - Durante la reproducción, pulsar el botón SHIFT (19) + AUTO LOOP (18) para cambiar el pad de la parte superior a modo loop automático. Pulsar el pad durante la reproducción para determinar el punto de inicio y la duración del loop indicado. A cada pad le corresponde una longitud de loop predeterminada entre 1/8 y 16.
- Seite 13 ER RORES D E DIS POSI TI VOS DE M EM O RI A U SB - Algunos dispositivos USB puede que no funcionen correctamente con el GMX Drive. Gemini no acepta ninguna responsabilidad por las posibles pérdidas de datos que se puedan producir. Para asegurarse de que no se produzca una pérdida de datos irreparable, asegúrese de hacer una copia de...
- Seite 14 Merci d’avoir choisi le contrôleur Gemini GMX Drive. Les produits Gemini font appel aux dernières avancées technologiques en termes de connectivité inter plateformes et de re- production sonore, dans le but de vous simplifier la vie, tout en faisant évoluer le do- maine des produits DJ et audio professionnels.
- Seite 15 v u e d e d e s s u s a f f i c H a g e Time Remaining/ Elapsed Pitch Loop Points/ Range Track Progress Track Name Waveform v u e a r r i è r e v u e d e f a c e W W W.
- Seite 16 c o n n e x i o n s s o r t i e p r i n c i pa l e - Veuillez connecter un cordon XLR ou RCA à la SORTIE PRINCIPALE (D) située en face arrière de l’appareil. Reliez l’autre extrémité à l’entrée (XLR ou RCA) de votre console de mixage ou de votre système de diffusion.
- Seite 17 piste finira sa lecture, puis se répètera depuis le début ou son point CUE. B P M TA P/ M O D E - Maintenez la touche BPM (11) enfoncée pour sélectionner le mode BPM : BPM ID3 / AUTO BPM / MANUAL BPM. Lorsque le mode BPM est ID3, les informations de tempo des données ID3 sont affichées.
- Seite 18 MENT (SHIFT) (19), ainsi que sur le pad (8) où vous souhaitez effacer le point HOT CUE. G E S T I O N D E S B O U C L E S B OU C LE AUTOMATI Q UE - Durant la lecture, veuillez appuyer sur la touche SHIFT (19) + BOU- CLE AUTOMATIQUE (AUTO LOOP) (18) afin de commuter les pads en mode boucle automatique (auto loop).
- Seite 19 E R R EU RS AV E C D E S C LEFS U S B - Certains périphériques USB risquent de ne pas fonctionner correctement avec le GMX Drive. Gemini n’accepte aucune responsabilité pour toute perte de données. Pour éviter la perte permanente de données, faites des sauvegardes de vos données avant de connecter le périphérique USB au produit.
- Seite 20 Herzlichen Dank für den Kauf unseres Gemini GMX Drive. Mit ihren fortschrittlichen und modernen Technologien auf dem Gebiet plattformübergreifender Konnektivität und Soundreproduktion erleichtert Ihnen die Gemini Produktlinie nicht nur die Arbeit, sondern setzt auch neue Maßstäbe für DJ- und Pro Audio-Geräte.
- Seite 21 o B e r s e i t e a n z e i g e Time Remaining/ Elapsed Pitch Loop Points/ Range Track Progress Track Name Waveform r ü c k s e i t e f r o n t a n s i c H t W W W.
- Seite 22 a n s c H l ü s s e M a s t e r a u s g a n g - Verbinden Sie das eine Ende eines XLR- oder Cinch-Kabels mit dem MASTER AUSGANG (D) auf der Rückseite. Das andere Ende des Kabels schließen Sie an die passenden Line-Eingänge an Ihrem Mischpult oder Ihrer PA-Anlage an.
- Seite 23 K E Y L O C K - Mit KEY-LOCK (10) können Sie das Song-Tempo verändern, ohne dass sich dessen Tonhöhe verändert. Drücken Sie bei gehaltener SHIFT-Taste (19) die RANGE-Taste (10), um den Regelbereich der Tempo-Veränderungen festzulegen. R E P E AT - Drücken Sie REPEAT (14), um einen Track zu wiederholen.
- Seite 24 Pause-Modus die HOT-CUE-Taste (Performance-Pad)(8) drücken, startet die Wiedergabe sofort von dem zu diesem HOT CUE gespeicherten Punkt. C U E LÖS CH EN - Wenn Sie sich im Hot-Cue-Modus befinden, halten Sie SHIFT (19) gedrückt und drücken das Performance-Pad (8), auf dem der Hot-Cue liegt, den Sie löschen möchten.
- Seite 25 U S B M E M ORY ST IC K- F EHLER - Manche USB-Geräte funktionieren eventuell nicht korrekt mit dem GMX Drive. Gemini übernimmt keine Verantwortung für eventuell auftretende Datenverluste. Um einen endgültigen Datenverlust zu verhindern, erstellen Sie eine Sicherheitskopie, bevor Sie das USB-Gerät an den Player anschließen.