Inhaltsverzeichnis
Werbung
Verfügbare Sprachen
Verfügbare Sprachen
Werbung
Kapitel
Inhaltsverzeichnis

Verwandte Anleitungen für Olympia Luna


Inhaltszusammenfassung für Olympia Luna
- Seite 1 Luna Kurzanleitung Quick Reference Manual Istruzioni sommarie Die ausführliche Bedienungsanleitung fi nden Sie im Internet. A detailed operating manual is available online. Le istruzioni d’uso complete sono disponibili su internet. www.olympia-vertrieb.de...
-
Seite 2: Inhaltsverzeichnis
Inhalt Sicherheitshinweise .....3 Sicherheitshinweise Sicherheitshinweise ..... Sicherheitshinweise . -
Seite 3: Sicherheitshinweise
Sicherheitshinweise Bewahren Sie sich vor körperlichen Schäden und beachten Sie die Bewahren Sie sich vor körperlichen Schäden und beachten Sie die Bewahren Sie sich vor körperlichen Schäden und beachten Sie die Bewahren Sie sich vor körperlichen Schäden und beachten Sie die Hinweise! ! Es besteht die Gefahr eines elektrischen Schlags! Es besteht die Gefahr eines elektrischen Schlags! - Seite 4 ! Explosionsgefahr durch unsachgemäßes Austau- Explosionsgefahr durch unsachgemäßes Austau- Explosionsgefahr durch unsachgemäßes Austau- ORSICHT schen oder Entnehmen des Akkus! Ersetzen Sie den Akku nur schen oder Entnehmen des Akkus! Ersetzen Sie den Akku nur schen oder Entnehmen des Akkus! Ersetzen Sie den Akku nur schen oder Entnehmen des Akkus! Ersetzen Sie den Akku nur durch einen vom Hersteller freigegebenen Typ und entsorgen durch einen vom Hersteller freigegebenen Typ und entsorgen...
- Seite 5 ! Reduzieren Sie die Belastung durch Funkwellen. Reduzieren Sie die Belastung durch Funkwellen. Reduzieren Sie die Belastung durch Funkwellen. ORSICHT Verwenden Sie bei längeren Telefonaten ein passendes Verwenden Sie bei längeren Telefonaten ein passendes Verwenden Sie bei längeren Telefonaten ein passendes Verwenden Sie bei längeren Telefonaten ein passendes Headset.
- Seite 6 ! Schützen Sie Ihr Gerät gegen Nässe, Staub, Schützen Sie Ihr Gerät gegen Nässe, Staub, Schützen Sie Ihr Gerät gegen Nässe, Staub, ICHTIG Flüssigkeiten, Chemikalien, Dämpfe, Hitze und direkte Sonne- Flüssigkeiten, Chemikalien, Dämpfe, Hitze und direkte Sonne- Flüssigkeiten, Chemikalien, Dämpfe, Hitze und direkte Sonne- Flüssigkeiten, Chemikalien, Dämpfe, Hitze und direkte Sonne- neinstrahlung.
-
Seite 7: Erste Schritte
Erste Schritte Lesen Sie die Bedienungsanleitung aufmerksam und gehen Sie wie beschrieben vor. So können Sie alle Funktionen zu Ihrer Zufriedenheit nutzen. Bestimmungsgemäße Verwendung Dieses Mobiltelefon ist geeignet für die Verwendung innerhalb eines Mobilfunknetzes. Jede andere Verwendung gilt als nicht bestim- mungsgemäß. -
Seite 8: Übersicht
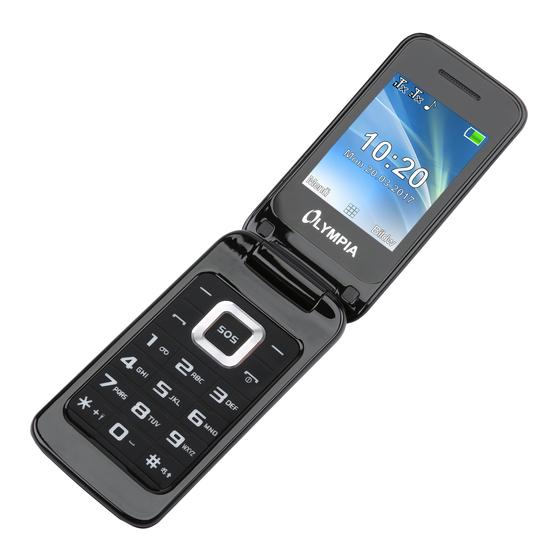
Übersicht Die nebenstehende Abbildung zeigt Ihnen Ihr Mobiltelefon im Detail. Machen Sie sich mit allen Bedienelementen vertraut, bevor Sie Ihr Mobiltelefon in Betrieb nehmen. Navigations-Taste Lautsprecher Display Taste Auflegen Softkey links Raute-Taste SOS-Taste (Notruf-Funktion) 12 Lautsprecher Taste Annehmen microUSB-Anschlussbuchse Tastatur Kamera Stern-Taste Taschenlampe (LED) -
Seite 10: Verpackungsinhalt
Verpackungsinhalt Prüfen Sie den Verpackungsinhalt Ihres Mobiltelefons, bevor Sie Ihr Mobiltelefon in Betrieb nehmen. Sollte etwas fehlen oder beschädigt sein, wenden Sie sich an unseren Service. Mobiltelefon Luna Ladeschale Akku USB-Anschlusskabel Kurzanleitung Ladeadapter... -
Seite 11: Sim-Karte Einlegen
SIM-Karte einlegen Bevor Sie Ihr Mobiltelefon verwenden können, müs- sen Sie Ihre SIM-Karte (nicht im Lieferumfang ent- halten) in Ihr Mobiltelefon einlegen. Verwenden Sie nur SIM-Karten im abgebildeten Format (Mini-SIM). Bereits ausgebrochene micro- oder nano-SIM-Kar- ten können zu Kontaktproblemen oder Funkti- onsausfällen führen. -
Seite 12: Microsd-Speicherkarte Einlegen
microSD-Speicherkarte einlegen Wenn Sie den Speicher Ihres Mobiltelefons er- weitern möchten, können Sie eine microSD-Spei- cherkarte (nicht im Lieferumfang enthalten) mit bis zu 32 GB Speicher in Ihr Mobiltelefon einlegen. Eine microSD-Speicherkarte benötigen Sie bspw., wenn Sie die Kamera verwenden möchten. Legen Sie die microSD-Speicherkarte wie ab- gebildet mit den Kontakten nach unten in das Fach ein. -
Seite 13: Akku Einlegen
Akku einlegen Bevor Sie Ihr Mobiltelefon verwenden können, legen Sie den mitgelieferten Akku in Ihr Mobiltele- fon ein. Legen Sie den Akku wie abgebildet ein. Achten Sie dabei auf die Ausrichtung des Akkus. Setzen Sie die Akkufachabdeckung auf. Die Akkufach abdeckung rastet hörbar ein. -
Seite 14: Akku Aufladen
Akku aufl aden Schließen Sie das Netzteil des Ladeadapters an eine ordnungsgemäß installierte Steckdose an. Schließen Sie den microUSB-Stecker an die microUSB-Anschlussbuchse Ihres Mobiltelefons an. Der microUSB-Stecker ist verpolungssicher. ! Entfernen Sie den Akku nicht, ORSICHT während das Mo biltelefon geladen wird. Entfernen Sie das Ladekabel von Ihrem Mobiltelefon, bevor Sie den Akku austau- schen oder entnehmen. -
Seite 15: Akku Aufl Aden Mit Ladeschale
Akku aufl aden mit Ladeschale Schließen Sie das Netzteil des Ladeadapters an eine ordnungsgemäß installierte Steckdose an. Schließen Sie den microUSB-Stecker an die microUSB-Anschlussbuchse der Ladeschale an. Der microUSB-Stecker ist verpolungssicher. Stellen Sie das Mobiltelefon in die Ladeschale. ! Entfernen Sie den Akku nicht, ORSICHT während das Mo biltelefon geladen wird. -
Seite 16: Mobiltelefon Einschalten
Mobiltelefon einschalten Drücken Sie die Taste Aufl egen für 3 Sekunden. Ihr Mobiltelefon wird eingeschaltet. Nach kurzer Zeit zeigt das Display den Startbildschirm. Mobiltelefon ausschalten Drücken Sie die Taste Aufl egen für 3 Sekunden. Ihr Mobiltelefon wird ausgeschaltet. Das Display er lischt. Wenn Ihr Mobiltelefon ausgeschaltet ist, können Sie die Notruf-Funktion (über die SOS-Taste Ihres Mobiltele- fons) nicht nutzen. -
Seite 17: Mobiltelefon Bedienen
Navigieren Sie mit den folgenden Tasten durch das Menü Ihres Mobil- telefons. Einige Tasten haben je nach Menü eine doppelte Belegung. Detaillierte Informationen erhalten Sie in der ausführlichen Bedie- nungsanleitung unter www.olympia-vertrieb.de Navigieren Sie im Menü. Verwerfen Sie Einstellungen oder navigieren Sie eine Menüebene zurück. - Seite 18 Wenn Sie Anrufe annehmen, beenden oder abweisen möchten, verwenden Sie dafür die folgenden Tasten: Nehmen Sie einen eingehenden Anruf an oder beginnen Sie ein Gespräch. Beenden Sie ein laufendes Gespräch. Weisen Sie einen eingehenden Anruf ab. Wenn Sie Rufnummern bzw. Ziffern eingeben oder Eingaben löschen möchten, verwenden Sie dafür die folgenden Tasten: Geben Sie Ziffern bzw.
- Seite 19 Die Bedienelemente an der Seite bzw. an der Unterseite Ihres Telefons haben die folgenden Funktionen: Lösen Sie einen Schalten Sie die Notruf an gespei- Taschenlampe Ihres cherte Rufnummern Mobiltelefons ein aus. bzw. aus. Laden Sie den Akku Verbinden Sie Ihres Mobiltelefons Kopfhörer, bspw.
-
Seite 20: Die Wichtigsten Funktionen Im Überblick
Die wichtigsten Funktionen im Überblick In den folgenden Bedienschritten sehen Sie eingerahmte Texte. Diese Rahmen symbolisieren Texte, die Sie im Display Ihres Mobiltelefons sehen. Sprache einstellen Drücken Sie den linken Softkey, um das Hauptmenü zu öffnen. Navigieren Sie zum Menüpunkt ┣Einstellungen┫ ┣Telefon┫ ┣Sprache┫. Wählen Sie Ihre Sprache aus. -
Seite 21: Kontakte Zum Telefonbuch Hinzufügen
Kontakte zum Telefonbuch hinzufügen Speichern Sie bis zu 300 Kontakte in Ihrem Telefonbuch. Drücken Sie den linken Softkey, um das Hauptmenü zu öffnen. Navigieren Sie zum Menüpunkt ┣Telefonbuch┫ ┣Neuer Kontakt┫ ┣OK┫. Wählen Sie einen Speicherort (┣Zu SIM┫ bzw. ┣Zum Telefon┫) . Geben Sie den Namen und die Rufnummer ein. - Seite 22 Bilder werden im Bildwahl-Menü angezeigt. Durch Auswählen dieser Bilder wird die dem Kontakt zugeordnete Rufnummer angerufen. De- taillierte Informationen erhalten Sie in der ausführlichen Bedienungs- anleitung unter www.olympia-vertrieb.de. Kontakte zur Bildwahl hinzufügen Drücken Sie den rechten Softkey, um das Menü der Bildwahl zu öffnen.
- Seite 23 Über Bildwahl anrufen Drücken Sie den rechten Softkey, um das Menü der Bildwahl zu öffnen. Wählen Sie den gewünschten Bildwahl-Kontakt. Drücken Sie den linken Softkey und wählen Sie ┣Anrufen┫. Bild zu Bildwahl-Kontakt hinzufügen Wenn Sie einem Bildwahl-Kontakt ein Bild hinzufügen möchten, können Sie entweder die Kamera Ihres Mobiltelefons verwenden oder ein Bild von Ihrem Computer auf Ihr Mobiltelefon übertragen.
-
Seite 24: Sos-Taste (Notruf-Funktion)
Notruf-Kurzmitteilungen an die für diesen Zweck gespeicherten Ruf- nummern gesendet. Anschließend werden die gespeicherten Rufnum- mern im Freisprechmodus nacheinander angerufen. Speichern Sie bis zu 5 Rufnummern, die Sie der Notruf-Funktion zuweisen möchten. Detaillierte Informationen zur Notruf-Funktion erhalten Sie in der ausführlichen Bedienungsanleitung unter www.olympia-vertrieb.de. - Seite 25 Notruf-Funktion einschalten Drücken Sie den linken Softkey, um das Hauptmenü zu öffnen. Navigieren Sie zum Menüpunkt ┣Einstellungen┫ ┣Notruf-Einstellungen┫ ┣Status┫. Drücken Sie den linken Softkey und wählen Sie ┣Einschalten┫. Rufnummer zur Notruf-Funktion hinzufügen Drücken Sie den linken Softkey, um das Hauptmenü zu öffnen. Navigieren Sie zum Menüpunkt ┣Einstellungen┫...
- Seite 26 Drücken Sie den linken Softkey, um das Hauptmenü zu öffnen. Navigieren Sie zum Menüpunkt ┣Einstellungen┫ ┣Bluetooth┫ ┣Status┫. Drücken Sie den linken Softkey und schalten Sie die Funktion Bluetooth ┣Ein┫. Detaillierte Informationen zu Bluetooth erhalten Sie in der ausführli- chen Bedienungsanleitung unter www.olympia-vertrieb.de...
-
Seite 27: Technische Eigenschaften
Technische Eigenschaften GSM: 850 / 900 / 1800 / 1900 MHz Frequenzband Bluetooth: 2,402 - 2,480 GHz GSM: 1,55 W Sendeleistung Bluetooth: 3,7 mW (max.) Stromversorgung Eingang: 100 - 240 V, 50 - 60 Hz, 0,5 A, Ausgang: 5 V, 500 mA 3,7 V, 600 mAh, bis zu 350 h Stand-by, bis zu 6 h Akku Gesprächsdauer, max. -
Seite 28: Entsorgung
Entsorgung Wollen Sie Ihr Gerät entsorgen, bringen Sie Ihr Gerät zur Sammelstelle Ihres kommunalen Entsorgungsträgers (z. B. Wertstoffhof). Nach dem Elektro- und Elektronikgerätege- setz sind Besitzer von Altgeräten gesetzlich verpflichtet, alte Elektro- und Elektronikgeräte einer getrennten Abfallerfassung zuzuführen. Das Symbol bedeutet, dass Sie das Gerät auf keinen Fall in den Hausmüll werfen dürfen! Gefährdung von Gesundheit und Umwelt durch Akkus! Akkus nie öffnen, beschädigen, verschlucken oder in die Umwelt gelangen lassen. -
Seite 29: Garantie
Garantie Die Garantiezeit beträgt 24 Monate. Die Garantiezeit beginnt ab Kaufdatum. Bitte bewahren Sie den Kauf- beleg und die Originalverpackung auf. Sollte ein Problem auftreten, wenden Sie sich an unseren Service-Partner Transimex Service GmbH Krabbenweg 14 26388 Wilhelmshaven Telefon 0180 5 007514 (Kosten aus dem dt. -
Seite 30: Konformitätserklärung
Konformitätserklärung Hiermit erklärt die Olympia Business Systems Vertriebs GmbH, Zum Kraftwerk 1, 45527 Hattingen, dass sich dieses Gerät in Überein- stimmung mit den grundlegenden Anforderungen und den anderen relevanten Vorschriften der Richtlinie 2014/53/EG befindet. Das CE-Kennzeichen auf den Geräten bestätigt die Konformi- tät. - Seite 31 Safety Instructions .....32 First Steps ......36 General View .
-
Seite 32: Safety Instructions
Safety Instructions Avoid any personal injury by paying attention to the following informa- Avoid any personal injury by paying attention to the following informa- Avoid any personal injury by paying attention to the following informa- Avoid any personal injury by paying attention to the following informa- tion! ! Risk of electric shock! Never attempt to open and Risk of electric shock! Never attempt to open and... - Seite 33 ! Risk of explosion through improper replacement or Risk of explosion through improper replacement or Risk of explosion through improper replacement or AUTION removal of the battery! Only replace the battery by a type removal of the battery! Only replace the battery by a type removal of the battery! Only replace the battery by a type removal of the battery! Only replace the battery by a type approved by the manufacturer and dispose of the battery...
- Seite 34 ! Reduce exposure to radio waves! Use an appropri- Reduce exposure to radio waves! Use an appropri- Reduce exposure to radio waves! Use an appropri- AUTION ate headset in the case of longer calls. Do not keep the mobile ate headset in the case of longer calls. Do not keep the mobile ate headset in the case of longer calls.
- Seite 35 ! Protect the device from moisture, dust, liquids, Protect the device from moisture, dust, liquids, Protect the device from moisture, dust, liquids, MPORTANT chemicals, vapours, heat and direct sunlight. The phone is not chemicals, vapours, heat and direct sunlight. The phone is not chemicals, vapours, heat and direct sunlight.
-
Seite 36: First Steps
First Steps Read the instruction manual carefully and proceed as de- scribed. This will enable you to use all the functions to your full satisfaction. Intended Use This mobile phone is designed for use within a mobile phone network. Any other use is considered unintended use. Unauthorised modifica- tion or reconstruction is not permitted. -
Seite 37: General View
General View The following illustration shows details of the mobile phone. Familiar- ise yourself with all the operating elements before starting to use the mobile phone. Loudspeaker Navigation key Display On-hook key Softkey, left Hash key SOS key (emergency call function) Loudspeaker Call key MicroUSB connection por... -
Seite 39: Package Contents
Package Contents Before starting up the mobile phone, check the package contents. If anything is missing or damaged, please contact our Service depart- ment. Mobile phone Luna Charging cradle Battery USB connection cable Charging adapter Quick Reference Manual... -
Seite 40: Inserting The Sim Card
Inserting the SIM Card Before you can start to use the mobile phone, you must insert your SIM card (not included in the equipment supplied) in the phone. Only use SIM cards of the size illustrated (mini SIM). Micro or nano cards which have already been broken out can cause contact problems or malfunctions. - Seite 41 Inserting the MicroSD Memory Card If you want to increase the memory capacity of the mobile phone, you can insert a microSD memory card (not included in the equipment supplied) with a memory of up to 32 GB in the mobile phone. A microSD memory card is necessary, for in- stance, when you want to use the camera.
-
Seite 42: Inserting The Battery
Inserting the Battery Before you can use the mobile phone, you must insert the battery supplied in the mobile phone. Insert the battery as illustrated. Pay attention the battery is aligned correctly. Replace the battery compartment cover. The battery compartment cover latches audibly into place. -
Seite 43: Charging The Battery
Charging the Battery Connect the power adapter plug on the charging adapter to a properly installed power socket. Connect the microUSB plug to the microUSB connection port on the mobile phone. The mi- croUSB plug is protected against reverse polarity. ! Do not remove the battery while AUTION the mobile phone is being charged. - Seite 44 Charging the Battery, Charging Cradle Connect the power adapter plug on the charging adapter to a properly installed power socket. Connect the microUSB plug to the microUSB connection port on the charging cradle. The microUSB plug is protected against reverse polarity. Place the mobile phone in the charging cradle.
- Seite 45 Switching On the Mobile Phone Press the On-hook key for 3 seconds. The mobile phone is switched on. The start screen appears in the display after a short time. Switching Off the Mobile Phone Press the On-hook key for 3 seconds. The mobile phone is switched off.
-
Seite 46: Operating The Mobile Phone
Use the following keys to navigate through the menus provided by the mobile phone. Some keys are assigned two functions depending on the menu. Further information is available online in the detailed oper- ating manual at www.olympia-vertrieb.de Navigate in the menu. Discard the settings or navigate one menu level back. - Seite 47 When you want to take, end or reject calls, use the following keys: Take an incoming call or begin a conversation. End a call in progress. Reject an incoming call. When you want to enter phone numbers and digits or delete entries, use the following keys: Delete entries.
- Seite 48 The operating elements on the sides or rear of the phone are assigned the following functions: Switch the torch Trigger an emergen- cy call to the stored integrated in the phone on and off. phone numbers. Connect the head- Charge the mobile phones, e.g.
-
Seite 49: Overview Of The Most Important Functions
Overview of the Most Important Functions Framed texts are provided in the following operating steps. These frames indicate texts which can appear in the display of the mobile phone. Setting the Language Press the left-hand softkey to open the main menu. Navigate to the menu options ┣Settings┫... - Seite 50 Adding a Contact to the Phone Book You can store up to 300 contacts in the phone book. Press the left-hand softkey to open the main menu. Navigate to the menu options ┣Phonebook┫ ┣Add new contact┫ ┣OK┫. Select a storage location (┣To SIM┫ or ┣To phone┫) . Enter the name and phone number.
- Seite 51 Further information is available online in the detailed operating manual at www.olympia-vertrieb.de. Adding Contacts to the Caller Picture Menu Press the right-hand softkey to open the Caller Picture menu.
- Seite 52 Dialling Via the Caller Picture Menu Press the right-hand softkey to open the Caller Picture menu. Select the required picture contact. Press the left-hand softkey and select ┣Call┫. Adding a Picture to the Caller Picture Contacts When you want to assign a picture to a contact, you can either use the camera integrated in the mobile phone or transfer a picture stored on your computer to the mobile phone.
-
Seite 53: Sos Key (Emergency Call Function)
After that, the respective phone numbers stored are dialled in succession in Handsfree mode. You can store up to 5 phone numbers which can be assigned to the emergency call function. Further information on the SOS function is available online in the detailed operating manual at www.olympia-vertrieb.de. - Seite 54 Activating the Emergency Call Function Press the left-hand softkey to open the main menu. Navigate to the menu options ┣Settings┫ ┣Emergency settings┫ ┣Switch┫. Press the left-hand softkey and select ┣Activate┫. Adding a Phone Number to the SOS Function Press the left-hand softkey to open the main menu. Navigate to the menu options ┣Settings┫...
- Seite 55 Press the left-hand softkey to open the main menu. Navigate to the menu option ┣Settings┫ ┣Bluetooth┫ ┣Status┫. Press the left-hand softkey and switch the Bluetooth function ┣On┫. Further information on the Bluetooth function is available online in the detailed operating manual at www.olympia-vertrieb.de...
-
Seite 56: Technical Properties
Technical Properties GSM: 850 / 900 / 1800 / 1900 MHz Frequency band Bluetooth: 2,402 - 2,480 GHz GSM: 1,55 W Sending power Bluetooth: 3,7 mW (max.) Input: 100 - 240 V, 50 - 60 Hz, 0.5 A, Power supply Output: 5 V, 500 mA 3.7 V, 600 mAh, up to 350 h standby, up to 6 h Battery... -
Seite 57: Disposal
Disposal In order to dispose of your device, take it to a collection point provided by your local public waste authorities (e.g. recycling centre). According to laws on the disposal of electronic and electrical devices, owners are obliged to dispose of old electronic and electrical devices in a separate waste container. -
Seite 58: Guarantee
In the case of a defect, please return the device together with the receipt and original packing material to the point-of-sale. Declaration of Conformity Olympia Business Systems Vertriebs GmbH, Zum Kraftwerk 1, 45527 Hattingen hereby declares that this device in fulfils the basic requirements and other relevant provisions stipulated in the Directive 2014/53/EC. -
Seite 59: Care Instructions
Care Instructions Clean the housing surfaces with a soft, fluff-free cloth. Do not use any solvents or cleaning agents. - Seite 60 Indicazioni di sicurezza..... . 61 Primi passi ....... . 65 Vista generale .
-
Seite 61: Indicazioni Di Sicurezza
Indicazioni di sicurezza Indicazioni di sicurezza Evitare lesioni fi siche e osservare le indicazioni! Evitare lesioni fi siche e osservare le indicazioni! Evitare lesioni fi siche e osservare le indicazioni! Evitare lesioni fi siche e osservare le indicazioni! VVERTENZA ! Pericolo di scosse elettriche! Non aprire o Pericolo di scosse elettriche! Non aprire o Pericolo di scosse elettriche! Non aprire o Pericolo di scosse elettriche! Non aprire o... - Seite 62 ! Pericolo di esplosione dovuto alla sostituzione o Pericolo di esplosione dovuto alla sostituzione o Pericolo di esplosione dovuto alla sostituzione o TTENZIONE all’estrazione non corretta della batteria ricaricabile! Sostituire la all’estrazione non corretta della batteria ricaricabile! Sostituire la all’estrazione non corretta della batteria ricaricabile! Sostituire la all’estrazione non corretta della batteria ricaricabile! Sostituire la batteria ricaricabile solo con un tipo di batteria autorizzato dal batteria ricaricabile solo con un tipo di batteria autorizzato dal...
- Seite 63 ! Ridurre le sollecitazioni dovute alle onde radio. Ridurre le sollecitazioni dovute alle onde radio. Ridurre le sollecitazioni dovute alle onde radio. TTENZIONE Utilizzare durante la conduzione di lunghe conversazioni un Utilizzare durante la conduzione di lunghe conversazioni un Utilizzare durante la conduzione di lunghe conversazioni un Utilizzare durante la conduzione di lunghe conversazioni un headset idoneo.
- Seite 64 ! Proteggere l'apparecchio da umidità, polvere, Proteggere l'apparecchio da umidità, polvere, Proteggere l'apparecchio da umidità, polvere, MPORTANTE liquidi, sostanze chimiche, vapori, calore e raggi solari diretti. Il liquidi, sostanze chimiche, vapori, calore e raggi solari diretti. Il liquidi, sostanze chimiche, vapori, calore e raggi solari diretti. Il liquidi, sostanze chimiche, vapori, calore e raggi solari diretti.
-
Seite 65: Primi Passi
Primi passi Leggere attentamente e osservare le istruzioni d'uso. In questo modo sarà possibile usufruire di tutte le funzioni in modo soddisfacente. Impiego conforme agli usi previsti Il presente telefonino è preposto all'uso in una rete di telefonia mobile. Qualsiasi altro impiego è considerato improprio. Non sono ammes- se modifiche o variazioni arbitrarie. -
Seite 66: Vista Generale
Vista generale La seguente figura illustra il telefonino in dettaglio. Si consiglia di familiarizzare con gli elementi di comando prima di mettere in funzione il telefonino. Tasto di navigazione Altoparlante Display Tasto Riaggancia Softkey a sinistra Tasto cancelletto Tasto SOS (funzione di Altoparlante chiamata d’emergenza) Tasto Accetta... -
Seite 68: Contenuto Della Confezione
Verificare il contenuto della confezione del telefonino prima di metterlo in funzione. In caso dovesse mancare qualcosa o risultare danneggia- to, si prega di rivolgersi al nostro servizio di assistenza. Telefonino Luna Basetta di carica Cavo di allacciamento USB Batteria... -
Seite 69: Inserire La Scheda Sim
Inserire la scheda SIM Prima di poter utilizzare il telefonino è necessario inserire la propria scheda SIM (non inclusa nella confezione) nel telefonino. Utilizzare solo schede SIM nel formato raffi gurato (mini SIM). Schede micro SIM o nano SIM già staccate potrebbero causare problemi di contatto o pregiudicare il corretto fun- zionamento del dispositivo. -
Seite 70: Inserire La Scheda Microsd
Inserire la scheda microSD Se si intende ampliare la memoria del proprio telefonino, è consentito inserire una scheda memoria microSD supplementare (non inclusa nella confezione) con fi no a 32 GB di memoria. La scheda memoria microSD è ad esempio necessa- ria qualora si volesse utilizzare la fotocamera. -
Seite 71: Inserire La Batteria
Inserire la batteria Prima di poter utilizzare il telefonino è necessario inserire nel telefonino la batteria ricaricabile forni- ta in dotazione. Inserire la batteria come raffi gurato. Tenere in particolare conto dell’orientamento della batteria. Applicare il coperchio del vano batteria. Il coperchio del vano batteria scatta in posizione in maniera udibile. -
Seite 72: Caricare La Batteria
Caricare la batteria Collegare l’alimentatore dell’adattatore di carica ad una presa elettrica installata correttamente. Collegare il connettore microUSB alla porta microUSB del proprio telefonino. Il connet- tore microUSB è realizzato in modo da escludere un’inversione della polarità. ! Non rimuovere la batteria TTENZIONE mentre il telefonino è... - Seite 73 Caricare la batteria con basetta di ricarica Collegare l’alimentatore dell’adattatore di carica ad una presa elettrica installata correttamente. Collegare il connettore microUSB alla porta microUSB della basetta di carica. Il connet- tore microUSB è realizzato in modo da escludere un’inversione della polarità. Riporre il telefonino nella basetta di ricarica.
- Seite 74 Accendere il telefonino Premere il tasto Riaggancia per 3 secondi. Il telefonino viene inserito. Poco dopo il display visualizza la scher- mata iniziale. Spegnere il telefonino Premere il tasto Riaggancia per 3 secondi. Il telefonino viene disinserito. Il display si spegne. Con telefonino disinserito non è...
-
Seite 75: Comandare Il Telefonino
Navigare con i seguenti tasti nel menu del proprio telefonino. A se- conda del menu in cui ci si trova, ad alcuni tasti sono abbinate doppie funzioni. Ulteriori informazioni sono riportate nelle istruzioni d'uso complete disponibili su www.olympia-vertrieb.de Navigare nel menu. Annullare le impostazioni oppure navigare nel menu indietro di un livello. - Seite 76 Per accettare, concludere o respingere telefonate, utilizzare i seguenti tasti: Accettare una chiamata in arrivo o avviare una conver- sazione. Concludere una chiamata in corso. Respingere una chiamata in arrivo. Per immettere un numero telefonico o delle cifre o per cancellare immissioni errate, utilizzare i seguenti tasti: Immettere cifre o Cancellare le...
- Seite 77 Gli elementi di comando presenti al lato o in basso al telefonino hanno le seguenti funzioni: Lanciare una Accendere o chiamata d'emer- spegnere la torcia genza chiamando i del proprio telefoni- numeri memorizzati. Caricare la batteria Collegare l'auricolare ad es. per ascoltare del telefonino o instaurare un la radio o per...
-
Seite 78: Impostare La Lingua
Riepilogo delle funzioni più importanti Nei seguenti passaggi ricorrono alcuni testi incorniciati. Queste cornici simbolizzano testi visualizzati sul display del proprio telefonino. Impostare la lingua Premere il softkey a sinistra per aprire il menu principale. Navigare alla voce di menu ┣Impostazioni┫ ┣Telefono┫ ┣Lingua┫. Selezionare la propria lingua. -
Seite 79: Chiamare Contatti Presenti In Rubrica
Aggiungere contatti alla rubrica Salvare fino a 300 contatti nella propria rubrica. Premere il softkey a sinistra per aprire il menu principale. Navigare alla voce di menu ┣Rubrica┫ ┣Nuovo contatto┫ ┣OK┫. Selezionare la posizione di memoria (┣a SIM┫ o ┣a telefono┫) . Inserire il nome e il numero telefonico. - Seite 80 Alla selezione di queste foto corrisponde la composizione del numero telefonico rispettivamente abbinato. Ulteriori informazioni sono riportate nelle istruzioni d'uso complete disponibili su www.olympia-vertrieb.de. Aggiungere contatti per la chiamata contatto con foto Premere il softkey a destra per aprire la funzione di chiamata contatto con foto.
- Seite 81 Chiamare il contatto con foto Premere il softkey a destra per aprire la funzione di chiamata contatto con foto. Selezionare il contatto desiderato selezionando la rispettiva foto. Premere il softkey a sinistra e selezionare ┣Chiama┫. Aggiungere la foto alla funzione di chiamata contatto con foto In caso si volesse usufruire della funzione di chiamata contatto con foto, è...
-
Seite 82: Tasto Sos (Funzione Di Chiamata D'emergenza)
Salvare fino a 5 numeri di chiamata che si intendono abbinare alla funzione di chiamata d’emergenza. Ulteriori informazioni sulla fun- zione di chiamata d'emergenza sono riportate nelle istruzioni d'uso complete disponibili su www.olympia-vertrieb.de. - Seite 83 Attivare la funzione di chiamata d'emergenza Premere il softkey a sinistra per aprire il menu principale. Navigare alla voce di menu ┣Impostazioni┫ ┣Impostazioni chiamata d‘emergenza┫ ┣Stato┫. Premere il softkey a sinistra e selezionare ┣Attiva┫. Aggiungere un numero telefonico alla funzione di chiama- ta d'emergenza Premere il softkey a sinistra per aprire il menu principale.
- Seite 84 Premere il softkey a sinistra per aprire il menu principale. Navigare alla voce di menu ┣Impostazioni┫ ┣Bluetooth┫ ┣Stato┫. Premere il softkey a sinistra e passare con la funzione Bluetooth su ┣Acceso┫. Ulteriori informazioni su Bluetooth sono riportate nelle istruzioni d'uso complete disponibili su www.olympia-vertrieb.de...
-
Seite 85: Dati Tecnici
Dati tecnici GSM: 850 / 900 / 1800 / 1900 MHz Banda di frequenza Bluetooth: 2,402 - 2,480 GHz GSM: 1,55 W Potenza di Bluetooth: 3,7 mW trasmissione (max.) Ingresso: 100 - 240 V, 50 - 60 Hz, 0,5 A, Alimentazione Uscita: 5 V, 500 mA elettrica... -
Seite 86: Smaltimento
Smaltimento Per smaltire l'apparecchio, consegnarlo in un punto di raccolta istituito dalla propria società di smaltimento rifiuti comunale (ad es. centro di riciclo materiali). Secondo quanto previsto dalla legge sugli apparecchi elettrici ed elettronici, i proprietari di apparecchi esauriti sono per legge tenuti alla consegna di tutti gli apparecchi elettrici ed elettronici presso un centro di rilievo rifiuti in raccolta differenziata. -
Seite 87: Consigli Per La Cura
riciclo utilizzando gli appositi contenitori di raccolta e provvedendo in tal modo al corretto smaltimento. Lo smaltimento è gratuito. Smaltire confezioni ed imballaggi in base a quanto indicato dalle norme in vigore a livello locale. Consigli per la cura Pulire le superfici degli apparecchi con un panno morbido e antipeluc- chi. -
Seite 88: Garanzia
è stato effettuato l‘acquisto. Dichiarazione di conformità Olympia Business Systems Vertriebs GmbH, Zum Kraftwerk 1, 45527 Hattingen dichiara che il presente apparecchio è conforme ai requisiti essenziali e alle altre norme pertinenti stabiliti dalla Direttiva 2014/53/CE. -
Seite 89: Consigli Per La Cura
Consigli per la cura Pulire le superfici degli apparecchi con un panno morbido e antipeluc- chi. Non utilizzare mai detergenti o solventi. - Seite 90 Con riserva di modifiche tecniche e al contenuto. Art. Nr. 2210 (schwarz), 2211 (rot), 2212 (gold) / Version 2017.05 Art. No. 2210 (black), 2211 (red), 2212 (golden) / Version 2017.05 Codice 2210 (nero), 2211 (rosso), 2212 (oro) / Versione 2017.05 www.olympia-vertrieb.de...