Werbung
Verfügbare Sprachen
Verfügbare Sprachen
Quicklinks
Technical Support
If you need any technical help, please visit our official support site and
contact our support team before returning the products:
https://support.reolink.com.
Technische Unterstützung
Wenn Sie technische Hilfe benötigen, besuchen Sie bitte unsere offizielle Support-Website und
kontaktieren Sie unser Support-Team, bevor Sie die Produkte zurückschicken, https://support.
reolink.com.
Support technique
Si vous avez besoin d'aide, veuillez contacter Reolink avant de
retourner votre produit. La plupart des questions peuvent être
répondues via notre centre de support en ligne à l'adresse
https://support.reolink.com.
Assistenza Tecnica
Se avete bisogno di assistenza tecnica, visitate il nostro sito ufficiale di Centro Assistenza e
contattate il team di supporto prima di restituire i prodotti, https://support.reolink.com.
Soporte técnico
Si necesita cualquier ayuda técnica, por favor, consulte nuestro sitio
oficial de soporte y póngase en contacto con nuestro equipo de soporte antes de devolver el
producto: https://support.reolink.com.
REOLINK INNOVATION LIMITED
FLAT/RM 705 7/F FA YUEN COMMERCIAL BUILDING 75-77 FA YUEN
STREET MONG KOK KL HONG KONG
CET PRODUCT SERVICE SP. Z O.O.
EC REP
Ul. Dluga 33 102 Zgierz, Polen
CET PRODUCT SERVICE LTD.
UK REP
Beacon House Stokenchurch Business Park, Ibstone
Rd, Stokenchurch High Wycombe, HP14 3FE, UK
A p r i l 2 024
Q S G 1 _ A
58.03.006.0113
Operational Instruction
Apply to: Argus 4 Pro
@ R e o l i n kTe c h
h t t p s ://re o l i n k . c o m
E N/D E /FR /I T/E S
I te m N o . : B74 0X
Werbung

Verwandte Anleitungen für Reolink Argus 4 Pro


Inhaltszusammenfassung für Reolink Argus 4 Pro
- Seite 1 Operational Instruction Se avete bisogno di assistenza tecnica, visitate il nostro sito ufficiale di Centro Assistenza e contattate il team di supporto prima di restituire i prodotti, https://support.reolink.com. Soporte técnico Si necesita cualquier ayuda técnica, por favor, consulte nuestro sitio Apply to: Argus 4 Pro oficial de soporte y póngase en contacto con nuestro equipo de soporte antes de devolver el...
- Seite 2 Contents What's in the Box What’s in the Box · · · · · · · · · · · · · · · · · · · · · · · · · · · · · · · · · · · · · · · · · · · · · · · · · · · · · · · · · · · · · · · · · · · · · · · · · · · · 2 Camera Introduction ·...
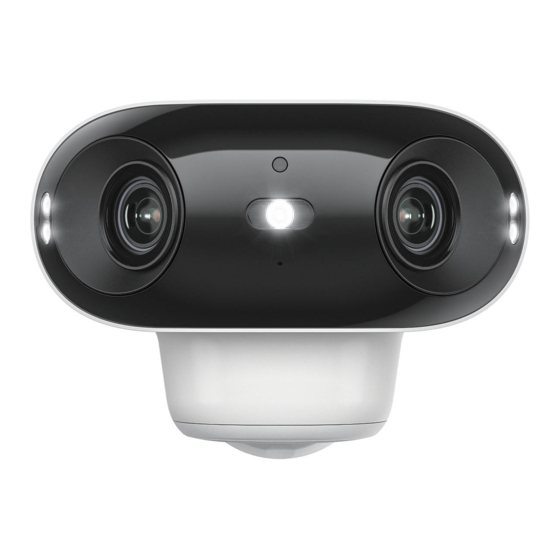
- Seite 3 Camera Introduction Set up the Camera Set up the Camera Using a Smartphone Step 1 Scan to download the Reolink App from the App Store or Google Play store. Daylight Sensor Spotlight Spotlight USB-C Port PIR Sensor Power Switch* Speaker microSD Card Slot Step 2 Press and hold the power switch for two seconds to power on the camera.
- Seite 4 Charge the Camera Step 3 Launch the Reolink App, click the “ ” button in the top right corner to add the camera. Scan the QR code on the device. It’s recommended to fully charge the camera before installing it.
- Seite 5 Install the Camera Mount the Camera Install the camera in residential areas with faint ambient lighting at night or wild areas with moon- light or starlight, so it can deliver Rotate to separate the base from true full-color night vision. Even the bracket.
- Seite 6 Install the Camera with Loop Strap Screw the camera to the bracket. Adjust the camera angle to get the best field of view. Secure the bracket’s mounting plate to the base with screws. Secure the camera by turning the part on the bracket identified in the chart clockwise.
- Seite 7 Powering on Argus 4 Pro is not designed for running 24/7 at full capacity or around-the-clock live streaming. It’s designed to record motion events and to live view remotely only when you need it. Learn useful tips on how to extend the battery life in this post: If your camera is not turning on, please apply the following solutions: https://support.reolink.com/hc/en-us/articles/360006991893...
- Seite 8 (1) this device may not cause harmful interference, and (2) this device must accept any interference received, including interference that may cause undesired operation. Changes Reolink declares that this device is in compliance with the essential requirements and other or modifications not expressly approved by the party responsible for compliance could void the relevant provisions of Directive 2014/53/EU.
- Seite 9 End User License Agreement ISED Radiation Exposure statement By using the Product Software that is embedded on the Reolink product, you agree to the terms of This equipment complies with IC RSS-102 radiation exposure limits set forth for an uncontrolled this End User License Agreement (“EULA”) between you and Reolink.
- Seite 10 RLANs) within the band 5150-5350 MHz for this device are restricted to indoor use only within all European Union countries (BE/BG/CZ/DK/DE/EE/IE/EL/ES/FR/HR/ IT/CY/LV/ LT/LU/HU/MT/NL/AT/PL/PT/RO/SI/SK/FI/SE/TR/N O/CH/IS/LI/UK(NI) Technical Support If you need any technical help, please visit our official support site and contact our support team before returning the products, https://support.reolink.com. English English...
- Seite 11 Inhaltsverzeichnis Lieferumfang Lieferumfang · · · · · · · · · · · · · · · · · · · · · · · · · · · · · · · · · · · · · · · · · · · · · · · · · · · · · · · · · · · · · · · · · · · · · · · · · · · · · · · 20 Über die Kamera ·...
- Seite 12 Über die Kamera Einrichten der Kamera Einrichten der Kamera mit dem Smartphone Schritt 1. Scannen Sie den QR-Code, um die Reolink App aus dem App Store oder Google Play Store herunterzuladen. Tageslichtsensor Spotlight Spotlight Mikrofon USB-C-Anschluss PIR-Sensor Stromschalter* Lautsprecher microSD-Kartenslot Schritt 2.
- Seite 13 Aufladen der Kamera Schritt 3. Starten Sie die Reolink App, klicken Sie auf die Schaltfläche “ ” in der oberen rechten Ecke, um die Kamera hinzuzufügen. Scannen Sie den QR-Code auf dem Gerät. Es wird empfohlen, die Kamera vor der Installation vollständig aufzuladen.
- Seite 14 Installation der Kamera Kamera montieren Installieren Sie die Kamera in Wohngebieten mit schwacher nächtlicher Umgebungsbeleuch- tung oder im Freien mit Mond- oder Sternenlicht, damit sie echte Drehen Sie den Sockel, um ihn Nachtsicht in Vollfarbe liefern kann. von der Halterung zu trennen. Bei extremer Dunkelheit und ohne Lichtquelle bieten ihre Spotlights Montagehöhe:...
- Seite 15 Kamera mit Schlaufengurt installieren Befestigen Sie die Kamera, indem Sie den in der Abbildung gekennzeichneten Teil der Halterung im Uhrzeigersinn drehen. Befestigen Sie die Montageplatte der Halterung mit Schrauben an dem Sockel. Befestigen Sie die Kamera, indem Sie das in der Abbildung gekennzeichnete Teil der Halterung im Uhrzeigersinn drehen.
- Seite 16 Fehlerbehebung Kamera lässt sich nicht einschalten Argus 4 Pro ist nicht für den 24/7 Betrieb mit voller Leistung oder Rund-um-die-Uhr-Live-Stream- ing. Sie ist für die Aufzeichnung von Bewegungsereignissen und die Live-Ansicht aus der Ferne nur dann, wenn Sie sie brauchen. Im folgenden Beitrag finden Sie nützliche Tipps, wie Sie die Akkulauf- Wenn sich Ihre Kamera nicht einschalten lässt, versuchen Sie bitte die folgenden Lösungen:...
- Seite 17 Konformitätserklärung Vereinfachte EU-Konformitätserklärung FCC-Konformitätserklärung Reolink erklärt, dass dieses Gerät mit den grundlegenden Anforderungen und anderen relevanten Dieses Gerät entspricht Abschnitt 15 der FCC-Richtlinien. Der Betrieb unterliegt zwei Bedingungen: Bestimmungen der Richtlinien 2014/53/EU übereinstimmt. (1) Dieses Gerät darf keine schädlichen Interferenzen bewirken; (2) und dieses Gerät muss alle empfangenen Interferenzen akzeptieren, einschließlich Interferenzen, die einen unerwünschten...
- Seite 18 Dieses Produkt wird mit einer beschränkten 2-Jahres-Garantie geliefert, die nur beim Kauf im Dieses Gerät enthält lizenzbefreite(n) Sender/Empfänger, die den lizenzbefreiten RSS-Standard(s) offiziellen Reolink-Shop oder bei einem autorisierten Reolink-Händler gültig ist. Mehr erfahren: von Innovation, Science and Economic Development Canada entsprechen. Der Betrieb unterliegt https://reolink.com/warranty-and-return/.
- Seite 19 RLANs) im Frequenzband 5150-5350 MHz für dieses Gerät sind in allen Ländern der Europäischen Union (BE/BG/CZ/DK/DE/EE/IE/EL/ES/FR/HR/ IT/CY/LV/LT/LU/HU/MT/ NL/AT/PL/PT/RO/SI/SK/FI/SE/TR/NO/CH/IS/LI/UK(NI)) auf den Innenraumbetrieb beschränkt. Technischer Support Wenn Sie technische Hilfe benötigen, besuchen Sie bitte unsere offizielle Support-Website und kontaktieren Sie unser Support-Team auf https://support.reolink.com, bevor Sie die Produkte zu- rückschicken. Deutsch Deutsch...
- Seite 20 Table des Matières Contenu de la Boîte Contenu de la Boîte · · · · · · · · · · · · · · · · · · · · · · · · · · · · · · · · · · · · · · · · · · · · · · · · · · · · · · · · · · · · · · · · · · · · · · · · · 38 Présentation de la Caméra ·...
- Seite 21 Présentation de la Caméra Configuration de la Caméra Configurer la Caméra avec un Smartphone Étape 1 Scannez pour télécharger l’application Reolink à partir de l’App Store ou du Google Play store. Détecteur de Lumière du Jour Spot Spot Micro Port USB-C...
- Seite 22 Chargement de la Caméra Étape 3 Lancez l’application Reolink, cliquez sur le bouton “ “ dans le coin supérieur droit pour ajouter la caméra. Scannez le code QR sur l’appareil. Il est recommandé de charger complètement la caméra avant de l’installer.
- Seite 23 Installation de la Caméra Montage de la Caméra Installez la caméra dans des zones résidentielles avec un faible éclairage ambiant la nuit ou dans des zones sauvages au clair de lune ou d’étoiles, afin Faites pivoter pour séparer la qu’elle puisse offrir une véritable base du support.
- Seite 24 Installez la Caméra avec la Sangle à Boucle Vissez la caméra au support. Ajustez l’angle de la caméra pour obtenir le meilleur champ de vision. Fixez la plaque de montage du support à la base avec des vis. Fixez la caméra en tournant la pièce du support identifiée dans le tableau dans le sens des aiguilles d’une montre.
- Seite 25 Batterie La Caméra ne S’Allume Pas L’Argus 4 Pro n’est pas conçue pour fonctionner 24h/24 et 7j/7 à pleine puissance ou pour la diffu- Si votre caméra ne s'allume pas, veuillez appliquer les solutions suivantes : sion en direct 24 heures sur 24. Elle a été conçue pour enregistrer des événements de mouvement et pour permettre la visualisation en direct à...
- Seite 26 : (1) cet appareil ne doit pas causer d'interférences nuisibles et (2) cet appareil Reolink déclare que ce dispositif est conforme aux exigences essentielles et aux autres dispositions doit accepter toute interférence reçue, y compris les interférences susceptibles de provoquer un pertinentes de la directive 2014/53/UE.
- Seite 27 L’ émetteur/récepteur exempt de licence contenu dans le présent appareil est conforme aux CNR dans la boutique officielle de Reolink ou auprès d'un revendeur agréé par Reolink. En savoir plus : d’Innovation, Sciences et Développement économique Canada applicables aux appareils radio https://reolink.com/warranty-and-return/.
- Seite 28 Européenne (BE/BG/CZ/DK/DE/EE/IE/EL/ES/FR/ HR/ IT/CY/LV/LT/LU/HU/MT/NL/AT/PL/PT/RO/SI/SK/FI/SE/TR/N O/CH/IS/LI/UK(NI) Assistance Technique Si vous avez besoin d’une aide technique, veuillez consulter notre site d’assistance officiel et con- tacter notre service-client avant de renvoyer les produits, https://support.reolink.com. Français Français...
- Seite 29 Contenuti Cosa c’è nella Confezione Cosa c’è nella Confezione · · · · · · · · · · · · · · · · · · · · · · · · · · · · · · · · · · · · · · · · · · · · · · · · · · · · · · · · · · · · · · · · · · · 56 Introduzione alla Telecamera ·...
- Seite 30 Introduzione alla Telecamera Configurare la Telecamera Configurare la Telecamera Utilizzando uno Smartphone Passaggio 1 Scansionare per scaricare l’ app Reolink dall’App Store o da Google Play Store. Sensore Diurno Faretto Faretto Microfono Porta USB-C Sensore PIR Interruttore* Altoparlante Slot Scheda microSD Passaggio 2 Tenere premuto l’interruttore di accensione per due secondi per...
- Seite 31 Caricare la Telecamera Passaggio 3 Avviare l’ app Reolink , fare clic sul pulsante “ “ nell’angolo in alto a destra per aggiungere la telecamera. Scansionare il codice QR sul dispositivo. Si consiglia di caricare completamente la telecamera prima di installarla.
- Seite 32 Installare la Telecamera Montare la Telecamera Installa la telecamera in aree res- idenziali con scarsa illuminazione ambientale di notte o in aree sel- Ruotare per separare la base vagge con luce lunare o stellare, dalla staffa. in modo che possa offrire una vera visione notturna a colori.
- Seite 33 Installare la telecamera con la cinghia ad anello Avvitare la telecamera alla staffa. Regolare l’angolazione della telecamera per ottenere il miglior campo visivo. Fissare la piastra di montaggio della staffa alla base con le viti. Fissare la telecamera ruotando in senso orario la parte sulla staffa identificata nella tabella.
- Seite 34 Risoluzione Problemi La telecamera non si accende Argus 4 Pro non è progettato per funzionare 24 ore su 24, 7 giorni su 7 a piena capacità o per lo streaming live 24 ore su 24. È progettato per registrare eventi di movimento e per visualizzare dal vivo in remoto solo quando Se la telecamera non si accende, applica le seguenti soluzioni: ne hai bisogno.
- Seite 35 Il dispositivo è stato valutato per soddisfare i requisiti generali di esposizione alle radiofrequenze. Il dispositivo può essere utilizzato in condizioni di esposizione portatile senza restrizioni. Reolink dichiara che questo dispositivo è conforme ai requisiti essenziali e ad altre disposizioni Dichiarazione di Conformità FCC pertinenti della Direttiva 2014/53/UE.
- Seite 36 20 cm tra il radiatore e il corpo. Utilizzando il software del prodotto incorporato nel prodotto Reolink , accetti i termini del presente Contratto di licenza con l'utente finale ("EULA") tra te e Reolink . Saperne di più: Cet équipement est conforme aux limites d’exposition aux radiations IC CNR-102 établies pour un...
- Seite 37 5150-5350 MHz per questo dispositivo sono limitate al solo uso interno in tutti i paesi dell'Unione Europea (BE/BG/CZ/DK/DE/EE/IE/EL/ES/FR/HR/ IT/CY/LV/LT/LU/HU/MT/ NL/AT/PL/PT/RO/SI/SK/FI/SE/TR/N O/CH/IS/LI/UK(NI) Supporto Tecnico Se hai bisogno di assistenza tecnica, visita il nostro sito di supporto ufficiale e contatta il nostro team di supporto prima di restituire i prodotti, https://support.reolink.com. Italiano Italiano...
- Seite 38 Contenido Volumen de suministro Volumen de suministro · · · · · · · · · · · · · · · · · · · · · · · · · · · · · · · · · · · · · · · · · · · · · · · · · · · · · · · · · · · · · · · · · · · · · · 74 Introducción a la cámara ·...
- Seite 39 Introducción a la cámara Configurar la cámara Configurar la cámara con un smartphone Paso 1 Escanee para descargar la aplicación Reolink desde App Store o Google Play store. Sensor de luz diurna Foco Foco Micrófono Puerto USB-C Sensor PIR Interruptor de encendido*...
- Seite 40 Cargar la cámara Paso 3 Inicie la aplicación Reolink, pulse el botón “ ” en la esquina superior derecha para añadir la cámara. Escanee el código QR en el dispositivo. Se recomienda cargar completamente la cámara antes de instalarla. NOTA: Este dispositivo es compatible con redes WiFi de 2,4 GHz y 5 GHz. Se recomienda conectar el dispositivo a WiFi de 5 GHz para disfrutar de una mejor experiencia de red.
- Seite 41 Instalar la cámara Montar la cámara Instale la cámara en zonas resi- denciales con poca luz ambiental por la noche o en zonas salvajes con luz de luna o estrellas, para que pueda ofrecer una auténti- Girar para separar la base del soporte. ca visión nocturna a todo color.
- Seite 42 Instalar la cámara con la correa de lazo Enrosque la cámara en el soporte. Ajuste el ángulo de la cámara para obtener el mejor campo de visión. Fije la placa de montaje del soporte a la base con tornillos. Fije la cámara girando la pieza del soporte que aparece en el gráfico en el sentido de las agujas del reloj.
- Seite 43 La cámara no se enciende Argus 4 Pro no está diseñada para funcionar 24/7 a pleno rendimiento ni para transmitir en di- recto las 24 horas del día. Está diseñada para grabar eventos de movimiento y ver en directo de forma remota sólo cuando lo necesite.
- Seite 44 Este dispositivo cumple con el apartado 15 de las normas de la FCC. Su funcionamiento está sujeto Reolink declara que este dispositivo cumple los requisitos esenciales y otras disposiciones a las dos condiciones siguientes: (1) este dispositivo no puede causar interferencias perjudiciales, pertinentes de la Directiva 2014/53/UE.
- Seite 45 Al utilizar el software del producto que está integrado en el producto Reolink, usted acepta entre el radiador y su cuerpo. los términos de este Acuerdo de licencia de usuario final ("EULA") entre usted y Reolink. Más información: Cet équipement est conforme aux limites d’exposition aux radiations IC CNR-102 établies pour un https://reolink.com/eula/.
- Seite 46 únicamente dentro de todos los países de la Unión Europea (BE/BG/CZ/DK/DE/EE/IE/EL/ES/FR/HR/ IT/CY/LV/LT/LU/HU/MT/NL/AT/PL/PT/RO/SI/SK/FI/ SE/TR/N O/CH/IS/LI/UK(NI) Soporte técnico Si necesita ayuda técnica, visite nuestro sitio oficial de asistencia y póngase en contacto con nues- tro equipo de soporte antes de devolver los productos, https://support.reolink.com. Español Español...