Inhaltsverzeichnis
Werbung
Verfügbare Sprachen
Verfügbare Sprachen
®
Trampolinnetz für Jumper 430
Montage, Aufbau, Pflege, Wartung und Betriebsanleitung
Trampoline Net for the Jumper 430
TRAMPOLINNETZ
Assembly, set-up, care, maintenance and operating instructions
TRAMPOLIN JUMPER 430
FÜR DAS
Filet Trampoline pour le Jumper 430
Montage, Aufbau, Pflege, Wartung und Betriebsanleitung
Montage, emplacement, entretien, maintenance et instructions de
GEBRAUCHSANWEISUNG
service
Werbung
Inhaltsverzeichnis

Verwandte Anleitungen für Ultrasport 430


Inhaltszusammenfassung für Ultrasport 430
- Seite 1 ® Trampolinnetz für Jumper 430 Montage, Aufbau, Pflege, Wartung und Betriebsanleitung Trampoline Net for the Jumper 430 TRAMPOLINNETZ Assembly, set-up, care, maintenance and operating instructions TRAMPOLIN JUMPER 430 FÜR DAS Filet Trampoline pour le Jumper 430 Montage, Aufbau, Pflege, Wartung und Betriebsanleitung...
- Seite 2 WARNUNG DIE TRAMPOLINVERKLEIDUNG DARF NUR ALS VERKLEIDUNG FÜR EIN TRAMPOLIN BENUTZT WERDEN. SIE MÜSSEN DIE ANLEITUNGEN IN DIESER GEBRAUCHSANWEISUNG SORGFÄLTIG LESEN UND VERSTEHEN, BEVOR SIE DIE TRAMPOLINVERKLEIDUNG ZUSAMMEN- BAUEN UND BENUTZEN. BEWAHREN SIE DIESE GEBRAUCHSANLEITUNG ZUM SPÄTEREN NACHSCHLAGEN AUF.
-
Seite 3: Warnungen Für Das Trampolinnetz
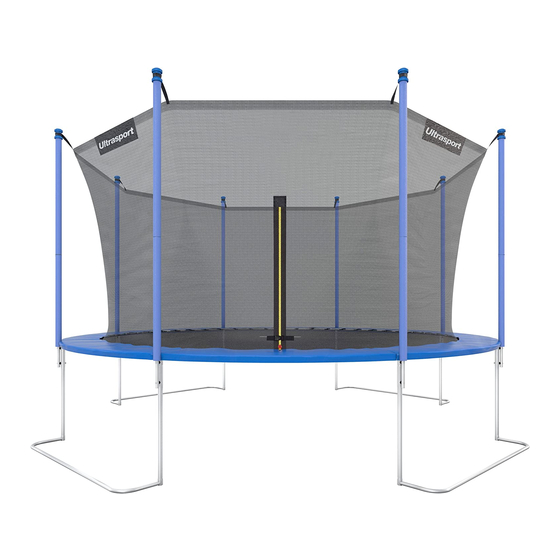
NIE MEHR ALS EINE PER- WENN SIE AUF DEM KOPF SON GLEICHZEITIG AUF ODER NACKEN LANDEN, DEMTRAMPOLIN! MEHRE- KANN DIES ZU EINER LÄ- RE SPRINGER ERHÖHEN MUNG ODER ZUM TOD DIE VERLETZUNGSGEFAHR FÜREN! WIE Z.B. DER BRUCH DES MACHEN SIE KEINE SALTOS, GENICKS, BEINES ODER... - Seite 4 WARNUNG BITTE BEACHTEN SIE ALLE BEVORSTEHENDEN ANWEISUNGEN, WENN SIE DAS NETZ MIT DEM TRAMPOLIN BENUTZEN. TEILELISTE ID Beschreibung Anzahl in Stück schaumstoffummanteltes Rohr (oben) schaumstoffummanteltes Rohr (unten) Endkappe Endkappe für Schraube Mutter für Schraube (F) Schraube Abstandhalter Gummiband mit Haken Sicherheitsnetz Schritt 1 Stecken Sie die Endkappe (C) auf das ober Rohr (A). Führen Sie diesen Schritt für alle oberen Rahmenrohre durch. Schritt 2 Stecken Sie nun das obere Rohr (A) und das untere Rohr (B) zusammen wie in der nebenstehenden Abbildung gezeigt. Führen Sie auch diesen Schritt für alle Rohre durch.
- Seite 5 Schritt 4 Für diesen Schritt empfehlen wir Ihnen, sich durch eine weitere Person helfen zu lassen, da es ansonsten zu schwierig ist, die Rohre zu halten und am Trampolin zu befestigen. Befestigen Sie nun die Rohre am Trampolin mit den Schrauben (F) und den Muttern (E). Beachten Sie bitte, dass Sie die Abstandhalter (G) zwischen dem Rohr des Netzes und dem Standbein des Trampolin‘s befestigen. Die Abstandhalter passen nur in eine Richtung zwischen Standbein und dem Rohr des Netzes. Stecken Sie nun die Endkappe wieder auf die Mutter (E). Die obere Schelle sollte sich nun ca. 5 cm unter dem Trampolin befinden. Ziehen Sie die Schrauben noch nicht fest. Befestigen Sie nun zunächst die weiteren 7 Rohre in der gleichen Weise am Trampolin. Sind alle Rohre angebracht, können Sie nun alle Schrauben nach und nach festziehen. Schritt 5 Ziehen Sie die elastischen Bänder mit den Haken (H) an den Enden des Sicherheitsnetzes über den Trampolinrand und haken Sie diese am Ende einer Trampolinfeder ein so wie auch den folgenden Abbildungen gezeigt. Machen Sie das gleichmäßig verteilt mit allen Gummibändern, so dass das Netz (I) gespannt ist.
-
Seite 6: Auseinander Bauen
Schritt 6 Beginnend vom Eingang aus, gehen Sie nach links im Uhrzeigersinn von einem Rohr zum nächsten. Schließen nun den Reiß- verschluss des Sicherheitsnetzes (I) zu. Der Einlass muss sich zwischen zwei Stützbeinen befinden wie auf der unteren Abbil- dung zu sehen ist. Schritt 7 Befestigen Sie oben am Sicherheitszaun wie dargestellt die Schnappverschlüsse an den Rohrendstücken (C). Befestigen Sie die oberen Schnappverschlüsse an allen Stahlrohren des Rahmens. Vergewissern Sie sich, dass der Halter des Rohrendstückes nach außen weist. AUSEINANDER BAUEN Folgen Sie zum Auseinanderbauen einfach den SCHRITTEN 1 bis 6 in umgekehrter Reihenfolge, bis Sie die Verkleidung ausei- nandergebaut haben. -
Seite 7: Pflege Und Wartung
WARNUNG PFLEGE UND WARTUNG Dieses Trampolin wurde mit Qualitätsmaterialien und handwerklichem Können entworfen und hergestellt. Wenn es richtig gepflegt und gewartet wird, dient es allen Springern jahrelang zum Üben, Spaß und Vergnügen sowie ein geringeres Verletzungsrisiko. Bitte befolgen Sie die nachstehenden Anweisungen: Dieses Trampolin ist dafür geeignet, einer bestimmten Menge an Gewicht und Benutzung zu widerstehen. Stellen Sie bitte sicher, dass immer nur eine Person gleichzeitig das Trampolin benutzt. Springer sollten während der Benutzung des Trampolins entweder Socken oder Gymnastikschuhe tragen oder barfuss sein. Seien Sie sich bewusst, dass während der Benutzung des Trampolins KEINE Straßen- oder Tennisschuhe getragen werden sollten. Zur Vermei-... - Seite 8 WARNING THE TRAMPOLINE ENCLOSURE MAY ONLY BE USED AS AN ENCLOSURE FOR A TRAM- POLINE. YOU MUST CAREFULLY READ AND UNDERSTAND THESE OPERATING INSTRUCTIONS BEFORE PUTTING TOGETHER AND USING THE TRAMPOLINE ENCLOSURE. KEEP THESE OPERATING INSTRUCTIONS.
- Seite 9 THE TRAMPOLINE SHOULD FALLING ON YOUR HEAD ONLY BE USED BY ONE PER- OR NECK MAY RESULT IN SON AT A TIME. IF THERE PARALYSIS OR DEATH! DO ARE SEVERAL TRAMPOLI- NOT PERFORM ANY SO- NISTS, THERE IS A GREATER MERSAULTS AS THIS INCRE- RISK OF HEAD AND BACK- ASES THE RISK OF FALLING...
-
Seite 10: List Of Parts
LIST OF PARTS Description Number of items Foam-covered tube (top) Foam-covered tube (bottom) End cap of net tube End cap of screw Screw nut Screw Spacer Elastic with hook Safety Net Step 1 Place the end cap (C) on the top tube (A). Perform this step for all top frame tubes. Step 2 Now put the top tube (A) and the bottom tube (B) together as shown in the adjacent illustration. Perform this step for all tubes. Step 3 Spread this out on the trampoline and make sure that the zipper is on the outside. Now stretch the tube into the special designed covers of the safety net. - Seite 11 Step 4 For this step, we recommend you get help from another person as it is otherwise too difficult to hold the tube and fasten it to the trampoline. Fasten the tube to the trampoline with the screws (F) and nuts (E) provided. Please make sure that you attach the spacer (G) between the tube of the net and the standing leg of the trampoline‘ . The spacers only fit in one direction between the standing leg and tube of the net. Now place the end cap back on the nut (E). The top clip should now be about 5 cm below the trampoline. Do not tighten the screws yet. Now first fasten the next seven tubes in the same way to the trampoline. Once all tubes have been attached, you can now tighten all screws step by step. Step 5 Pull the elastic with the hooks (H) at the ends of the safety net over the edge of the trampoline and hook this over the end of a trampoline spring as shown in the following illustrations. Do this so that all elastic is evenly distributed and the net (I) is stretched out.
- Seite 12 Step 6 Starting from the entrance, go left in a clockwise direction from one tube to the next. Now close the zipper of the safety net (I). The entrance must be between two supportive legs as shown in the bottom illustration. Step 7 DISMANTLING To dismantle the net, simply follow STEPS 1 to 6 in the reverse order until you have dismantled the enclosure.
-
Seite 13: Care And Maintenance
WARNING CARE AND MAINTENANCE This trampoline was designed and manufactured with quality materials and handcraftsmanship. If proper care and mainte- nance is performed, all trampolinists can benefit from this with years of practice, fun and enjoyment, as well as a lower risk of injury. Please follow the instructions below: This trampoline is suitable for withstanding a certain amount of weight and usage. Please ensure that the trampoline is only used by one person at a time. When using the trampoline, trampolinists should either wear socks or gym shoes or go barefoot. Be aware that you shouldn’t wear ANY walking or tennis shoes when using the trampoline. To avoid cuts and other damage on the trampoline mat, keep animals away from the mat. When using the trampoline, trampolinists may not carry any sharp objects with them. No sharp or pointed objects may be placed near the trampoline mat. Check the trampoline before every use for worn, mistreated or missing parts. Certain circumstances can increase the risk of an injury, in particular: • Tears, rips or holes in the trampoline mat • A drooping trampoline mat • A loose seam or a worn mat • Twisted or broken frame parts, such as legs • Broken, missing or damaged springs • Damaged, missing or insufficiently attached frame padding • Any kinds of parts sticking out (in particular those with sharp edges) on the frame, springs or mat IF YOU COME ACROSS ANY OF THE ABOVE CONDITIONS OR ANYTHING ELSE THAT YOU THINK COULD LEAD TO ANY DAMAGE TO A USER, THE TRAMPOLINE MUST BE DISMANTLED OR PUT OUT OF OPERATION UNTIL THE PROBLEM(S) HAS/HAVE BEEN SOLVED. - Seite 14 AVERTISSEMENT LA PROTECTION POUR TRAMPOLINE NE DOIT ETRE UTILISEE QUE COMME PROTEC- TION POUR UNE SEULE TRAMPOLINE. VOUS DEVEZ LIRE ATTENTIVEMENT – ET COMPRENDRE – LES INSTRUCTIONS CON- TENUES DANS CE MODE D’EMPLOI, AVANT DE MONTER ET D’UTILISER LA PROTEC- TION POUR TRAMPOLINE. CONSERVEZ CETTE NOTICE D’EMPLOI POUR TOUTE REFERENCE ULTERIEURE.
- Seite 15 PAS PLUS D’UNE PERSON- LES SUITES D’UNE CHUTE NE NE DOIT UTILISER LE SUR LA TETE OU SUR LE TRAMPOLINE EN MEME COU PEUVENT ETRE LA PA- TEMPS. LA PRESENCE DE RALYSIE OU LA MORT ! NE PLUSIEURS SAUTEURS FAITES PAS DE GALIPETTES AUGMENTE LE RISQUE DE CAR CELA AUGMENTE LE BLESSURES A LA TETE ET...
-
Seite 16: Liste Des Pieces
LISTE DES PIECES Description Quantité Barre revêtue mousse (haut) Barre revêtue mousse (bas) Capuchon Capuchon pour vis Ecrou pour vis (F) Vis Entretoise Bande de caoutchouc avec agrafe Filet de sécurité Etape 1 Enfilez le capuchon (C) sur la barre supérieure (A). Répétez cette étape pour toutes les barres de cadre supérieures. Etape 2 Ensuite, assemblez la barre supérieure (A) et la barre inférieure (B) ainsi que montré sur la figure ci-contre. Répétez également cette étape pour toutes les barres. Etape 3 Etendez le filet sur le trampoline en prêtant attention que la fermeture éclair se trouve dehors. Enfilez maintenant les barres dans les manchons du filet de sécurité prévus à cet effet. - Seite 17 Etape 4 Nous vous recommandons d’exécuter cette étape en vous faisant aider par une autre personne, car autrement il est trop difficile de maintenir les barres, et en même temps de les fixer au trampoline. Fixez maintenant les barres au trampoline avec les vis (F) et les écrous (E). Veillez à fixer les entretoises (G) entre la barre du filet et le support du trampoline. Les entretoises ne peuvent être insérées que dans un sens entre le support et la barre du filet. Remettez maintenant le capuchon sur l’écrou (E). La bride supérieure doit maintenant se trouver à env. 5 cm au-dessous du trampoline. Ne serrez toujours pas les vis. Fixez maintenant d’abord les 7 autres barres au trampoline en procédant de la même façon. Une fois que toutes les barres sont à leur place, vous pouvez serrer toutes les vis, l’une après l’autre. Etape 5 Tirez les bandes élastiques, avec les agrafes (H) situées aux extrémités du filet de sécurité, jusqu’au bord du trampoline, puis accrochez-les au bout des ressorts de trampoline ainsi que montré sur les figures suivantes. Faites de même avec chaque bande de caoutchouc de manière à tendre uniformément le filet (I).
- Seite 18 Etape 6 Commencez par l’entrée, puis passez d’une barre à l’autre en allant vers la gauche (dans le sens des aiguilles d’une montre). Fermez maintenant la fermeture éclair du filet de sécurité (I). L’entrée doit se trouver entre deux supports ainsi que montré sur la figure ci-dessous. Etape 7 Befestigen Sie oben am Sicherheitszaun wie dargestellt die Schnappverschlüsse an den Rohrendstücken (C). Befestigen Sie die oberen Schnappverschlüsse an allen Stahlrohren des Rahmens. Vergewissern Sie sich, dass der Halter des Rohrendstückes nach außen weist. DEMONTAGE Répétez en sens inverse les ETAPES 1 à 6 jusqu’au démontage complet de la protection.
-
Seite 19: Entretien Et Maintenance
AVERTISSEMENT ENTRETIEN ET MAINTENANCE Ce trampoline a été conçu et fabriqué avec des matériaux de qualité et un savoir-faire artisanal. S’il est correctement entretenu et maintenu, il offrira, pour des années, à tous les sauteurs la possibilité de s’exercer, de s’amuser et de se divertir, tout en limi- tant le risque de blessures. Suivez les consignes suivantes : Ce trampoline a été conçu pour résister à un certain poids et pour une certaine utilisation. Assurez-vous toujours que pas plus d’une personne à la fois n’utilise le trampoline. Lors de l’utilisation du trampoline, les sauteurs doivent porter ou des chaussettes ou des chaussures de gymnastique, ou alors être pieds nus. Veillez QUE lors de l’utilisation du trampoline, PER- SONNE NE PORTE DE CHAUSSURES DE VILLE OU DE TENNIS. Pour éviter de couper ou d’autrement endommager le tapis du trampoline, empêchez que les animaux puissent y accéder. Lors de l’utilisation du trampoline, les sauteurs ne doivent pas nos plus avoir d’objets tranchants sur soi. Jamais il ne doit y avoir d’objets tranchants ou pointus à proximité du tapis du trampoline. Avant toute utilisation, vérifiez toujours si les pièces du trampoline sont usées, ont été abîmées ou si elles sont manquantes. Le risque de se blesser peut grandir si certaines circonstances sont réunies, et notamment dans l’un des cas suivants : des piqûres, des déchirures ou des trous dans le tapis du trampoline un tapis du trampoline pas tendu une couture qui lâche ou toute autre usure du tapis des pièces de cadre déformées ou cassées, par ex. les supports des ressorts cassés, manquants ou endommagés... -
Seite 20: Jahre Garantie
® GARANTIESCHEIN 2 JAHRE GARANTIE Sollte ein Garantiefall eintreten, kontaktieren Sie bitte zuerst unsere Service Hotline oder schreiben Sie uns eine e-m@ail Servicerufnummer: 0180 5 014 586 (14 ct/min aus dem deutschen Festnetz, Mobilfunkhöchstpreis 42 ct/min) e-m@il: service.de@ultrafit.de Internet: www.ultrafit.de WARRANTY CARD 2 YEARS WARRANTY In the event of a warranty claim, please first contact our service team or send us an e-m@il Service Hotline: 00800 880 880 08 e-m@il: service.uk@ultrafit.de Internet: www.ultrafit.de BON DE GARANTIE GARANTIE 2 ANS En cas de dommage relevant de la garantie, veulliez contacter tout d’abord notre service après-vente. Tél S.A.V.: 00800 880 880 08 e-m@il: service.fr@ultrafit.fr Internet: www.ultrafit.fr Hersteller / Manufacturer / Fabricant Summary GmbH Feldmannstrasse 1 25524 Itzehoe Germany...