CCV Pad Next Erste Schritte
Vorschau ausblenden
Andere Handbücher für Pad Next:
- Erste schritte (48 Seiten) ,
- Kurzanleitung (8 Seiten)
Inhaltsverzeichnis
Werbung
Verfügbare Sprachen
Verfügbare Sprachen
Quicklinks
Werbung
Inhaltsverzeichnis

Verwandte Anleitungen für CCV Pad Next


Inhaltszusammenfassung für CCV Pad Next
- Seite 1 CCV Pad Next Erste Schritte Für jede Branche die perfekte Lösung! www.ccv.eu/de...
-
Seite 2: Sicherheitshinweise
Sicherheits- hinweise Stromversorgung • Vergewissern Sie sich, dass Sie zuerst das Netzteil des Netzteil sicher. Benutzen Sie das Netzteil nicht an Terminals in die Steckdose stecken und erst dann das Orten mit eingeschränkter Luftzirkulation. Netzteil mit dem Terminal verbinden. Das Netzteil ist mit einer Eingangsleistung von 100 - 240 VAC 50/ 60 •... -
Seite 3: Reparaturen
Transaktionen • Das Terminal ist ausschließlich für bargeldlose verwendet werden. Die Akzeptanz der Karten ist Zahlungen gültigen Debit-/Kredit- abhängig von Ihrem Vertrag mit dem Acquirer/ Kundenkarten (Magnetstreifen/Chip/kontaktlos) Netzbetrieb. konstruiert darf für diese Karten Reparaturen • Versuchen Sie unter keinen Umständen das Gerät sicherheitsrelevanten Daten gelöscht und das Gerät selbst zu reparieren. -
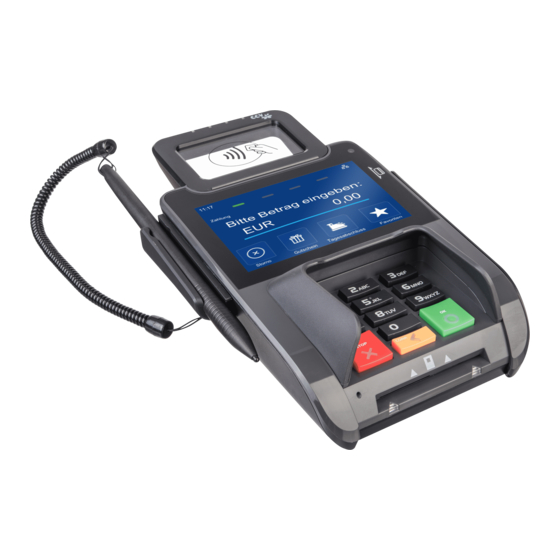
Seite 4: Produktbeschreibung
Produkt- beschreibung Kontaktlos LEDs Kontaktlosfeld Stift für Signaturerfassung Display Magnetstreifen-Leser Tastatur Chipkarten-Leser Reset Button Kensington-Lock Schraube Terminaldeckel Terminaldeckel Wandaufhängung... - Seite 5 Inbetrieb- nahme Inhalt Terminal CCV Pad Next Externes Netzteil 5VDC,1A Dokumentation Stylus Pen (Zubehör) Kommunikationskabel „Erste Schritte“ Verbinden RS232 Kasse Power...
-
Seite 6: Kommunikation Einrichten
Ablauf Verbinden Sie das Terminal über das Netzteil 1. Verbinden mit der Stromquelle. Das Gerät fährt hoch. 2. Einschalten Starten Sie die Inbetriebnahme mit „JA“. Wählen Sie die gewünschte Terminalsprache. 3. Inbetriebnahme starten Geben Sie die von Ihrem Netzbetreiber genannte 8stellige Terminal-ID wiederholen Sie diese. -
Seite 7: Initialisierung
Initialisierung Grundzustand Das Terminal startet am Ende der Inbetrieb- Statusleiste nahme automatisch eine Initialisierung, eine (Kontaktlos-Anzeige, erweiterte Diagnose und eine EMV-Konfigura- Uhrzeit, Kommuni- tionsdiagnose. kations-Status) Bitte kontrollieren Belege. erkennen die erfolgreiche Abarbeitung am Anzeige Text „Erfolgreich durchgeführt“. Das Terminal „Terminal bereit“ befindet sich danach im Grundzustand und kann verwendet werden. -
Seite 8: Bedienung
Bedienung Tagesabschluss 1. Funktion Tagesabschluss 2. Beleg kontrollieren („gebucht“) Zahlung 1. Betrag eingeben 2. Karte einlesen 3. PIN-Eingabe (opt.) 4. Beleg kontrollieren Chip-, Magnet- oder und Bestätigung Kontaktlos- Karte (siehe Kartenleser) Kartenleser Chip-Karte stecken Magnetstreifen-Karte Kontaktlose Karte (Chip nach oben) Zügig durchziehen Karte an Antenne vorhalten. -
Seite 9: Umsatzinformationen
Storno 1. Funktion Storno 2. Transaktionsnummer 3. Karte einlesen 4. PIN-Eingabe (opt.) eingeben Chip-, Magnet- oder und Bestätigung Kontaktlos-Karte (siehe Kartenleser S.8) Zahlungsverfahren (optional) Sofern freigeschaltet, kann das Zahlungsverfahren select select im Zuge der Zahlung gewählt werden. ODER „Karte bitte“ Bildschirm › Anwendungsauswahl CORR aktivieren (select-Button oder gelbe CORR -Taste) ›... - Seite 10 Bitte beachten Sie, dass die Softkey-Bele- gung vom Netzbetreiber definiert wird. Softkeys Bestimmte Funktionen müssen vor Nut- zung freigeschaltet werden. Menü-Aufruf (Passworteingabe Kassierer, MENU Manager oder Techniker) Favoriten-Aufruf (Anzeige der möglichen Anwendungsauswahl (Wahl des Zahlungsverfahrens) Softkey-Funktionen) select Belegwiederholung (druckt Händler– und Softkey-Reihenfolge ändern Kundenbeleg nochmals aus)
-
Seite 11: Technische Daten
CE Declaration of Conformity Hereby declares CCV Germany GmbH the accordance of the radio equipment CCV Pad Next and its power supply to the directive 2014/53/EU. The complete texts of the EU declarations of conformity are available on following internet address:... - Seite 12 Prüfen Sie dieses Siegel bitte regelmäßig auf Beschädigungen. Bei dem Siegel handelt es sich um ein Hologramm, das aus verschiedenen Blickwinkeln die Farbe ändert. Sollte das Siegel gebrochen oder verletzt sein, kontaktieren Sie bitte unverzüglich Ihren Netzbetreiber! © CCV GmbH https://www.ccv.eu Alle Rechte vorbehalten. Änderungen vorbehalten.
-
Seite 13: First Steps
CCV Pad Next First Steps The perfect solution for every industry! www.ccv.eu/de... -
Seite 14: Safety Notes
Safety notes Power • Before you connect the terminal power pack to an • Allow adequate ventilation around the adapter. electrical outlet, check that the on/off power switch Avoid locations with restricted airflow. on the terminal is off. If the terminal does not have an on/off switch, check that the power cable •... - Seite 15 Payment • The terminal is designed only for cashless payments stripe/ chip/ contactless) and must be used only for using debit, credit, and customer cards (magnetic these cards. Repair • Never try to open the terminal. In case of • The removal of or damage to type plates and seals unauthorised opening, all safety-related data is attached to the device lead to the expiration of any...
-
Seite 16: Product Description
Product- description Contactless LEDs Contactless area Stylus Pen Display Magnetic stripe reader Keypad Chip card reader Reset button Kensigton lock Screw backover Backcover Mounting... - Seite 17 Startup Content - Terminal CCV Pad Next - Power supply 5VDC,1A - Manual „First steps“ - Stylus Pen (accessory) - Communication cable Connection RS232 Cash register Power...
- Seite 18 Procedure Connect the terminal to the power source via 1. Connect the power adapter. The device starts up. 2. Turn on Start the commissioning with „YES“. Select the desired terminal language. 3. Start startup Enter and repeat the 8-digit terminal ID provi- ded by your network operator.
-
Seite 19: Initial State
Initialization Initial state Please proof your receipts for a successful Status bar (concact- initialization, diagnosis and EMV diagnosis. less reader ready, After that the terminal is ready to use. time and communi- cation information) If neccessary you can start the initialization directly with a softkey button or via the menu. -
Seite 20: Card Reader
Handling Reconsiliation with closure 1. Softkey reconsiliation with closure 2. Proof your receipt Payment 1. Enter amount 2.Card please … (chip 3. Enter PIN 4. Proof your receipt card, magnetic stripe or contactless) Card reader Smart card Magnetic stripe Contactless card (Chip upside) Tap to contactless area (draw quickly and magne-... - Seite 21 Cancellation 1. Softkey Reversal 2. Enter transaction 3. Card please … (chip 4. Enter PIN number card, magnetic stripe or contactless) (see card reader p. 8) Select transaction type (optional) If enabled you can choose your payment select select application. CORR Transaction information Softkey intermediate...
- Seite 22 softkeys defined your payment provider. Some functions must be Softkeys activated before the first use. Menu (password level merchant, MENU manager or technician) Select payment application (select your Favourites (show all possible softkeys) payment application) select Receipt Copy (reprints merchant and Softkey order (change your softkeys) customer receipt) Reconsiliation with closure (start of...
-
Seite 23: Technical Data
CE Declaration of Conformity Hereby declares CCV Germany GmbH the accordance of the radio equipment CCV Pad Next and its power supply to the directive 2014/53/EU. The complete texts of the EU declarations of conformity are available on following internet address:... - Seite 24 Seal sticker On the side of your terminal, you will find a seal sticker that guarantees that the device is intact and unopened. If the seal is broken, contact your network provider immediately! © CCV GmbH www.ccv.eu All rights reserved.