Inhaltsverzeichnis
Werbung
Verfügbare Sprachen
Verfügbare Sprachen
Quicklinks
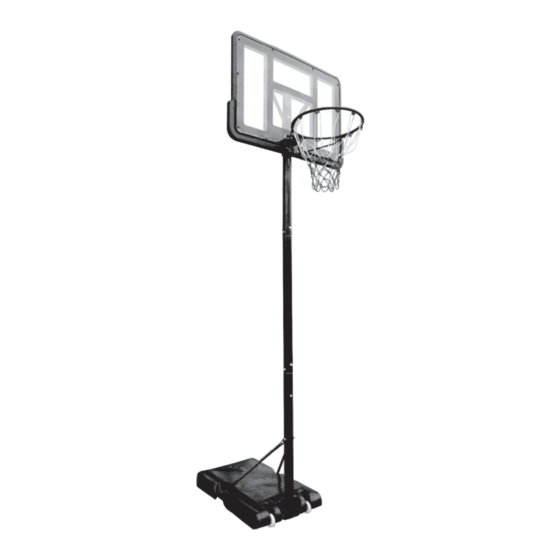
Basketball Stand
Basketballständer
Panier de Basket-Ball
Soporte para Baloncesto
Canestro da Basket
Wolnostojący kosz do koszykówki
SP37743
USA office: Fontana
AUS office: Truganina
GBR office: Ipswich
ITA office: Milano
POL office: Gdańsk
DEU office: FDS GmbH, Neuer Höltigbaum 36, 22143 Hamburg, Deutschland
FRA office: Saint Vigor d'Ymonville
THIS INSTRUCTION BOOKLET CONTAINS IMPORTANT SAFETY INFORMATION. PLEASE READ AND KEEP FOR FUTURE REFERENCE.
Werbung
Inhaltsverzeichnis

Verwandte Anleitungen für Costway SP37743


Inhaltszusammenfassung für Costway SP37743
- Seite 1 Basketball Stand Basketballständer Panier de Basket-Ball Soporte para Baloncesto Canestro da Basket Wolnostojący kosz do koszykówki SP37743 USA office: Fontana AUS office: Truganina GBR office: Ipswich ITA office: Milano POL office: Gdańsk DEU office: FDS GmbH, Neuer Höltigbaum 36, 22143 Hamburg, Deutschland FRA office: Saint Vigor d'Ymonville THIS INSTRUCTION BOOKLET CONTAINS IMPORTANT SAFETY INFORMATION.
-
Seite 2: Before You Start
Before You Start Avant de Commencer Please read all instructions carefully. Veuillez lire attentivement toutes les instructions. Retain instructions for future reference. Conservez les instructions pour vous y référer ultérieurement. Separate and count all parts and hardware. Vérifiez toutes les pièces et les accessoires. Read through each step carefully and follow the proper order. -
Seite 3: Prima Di Iniziare
Prima di Iniziare WARNING: Si prega di leggere attentamente tutte le istruzioni. IMPROPER INSTALLATION OR Conservare le istruzioni per riferimento futuro. SWINGING ON THE RING MAY CAUSE SERIOUS INJURY OR DEATH Separare e contare tutte le parti e gli accessori. Leggere attentamente ogni passo e seguire l'ordine corretto. -
Seite 4: Parts List
Parts list 1.Suggest two or more adults to install, and forbid children to install and climb. 2.Check the base for water leakage, screw fastening, small flow of water leakage may lead to product collapse. 3.The product is suitable for recreation and fitness, not for fierce M8*120MM M8*50MM M8*20MM... - Seite 5 2) Install bottom pole, base and base support: Pole Brace As shown, fix one end of the pole braces (H) on bottom pole (Y) by Wheel bolt (G). Then fix another end of the pole braces (H) on base (O) by Wheel Shaft bolt (C).
- Seite 6 4) Install top pole to the board bracket: 5) Mounting to the base bracket: As shown, use bolts (D) to fix the top of board bracket (K) on the As shown, fix top pole (W) and back of backboard (N) tightly. After that, insert top pole (W) into middle pole (X) together by 2 pcs board bracket (K), fix them by bolts (E).
-
Seite 7: Installationswarnung
6) Install the ball net ACHTUNG! UNSACHGEMÄSSE INSTALLATION ODER SCHWINGEN AUF DEM RING KANN ZU SCHWEREN VERLETZUNGEN ODER ZUM TOD FÜHREN Installationswarnung: * Bevor Sie den Basketballständer montieren, wiegen, aufstellen und demontieren, lesen Sie bitte die Anleitung sorgfältig durch und If the product does not need to be moved frequently, we recommend überprüfen Sie alle Zubehörteile in der Verpackung, um Zeit zu filling the base with sand instead of water. -
Seite 8: Teileliste
1.Empfehlen Sie zwei oder mehr Erwachsene für die Montage und verbieten Sie Kindern die Montage und das Klettern. 2.Prüfen Sie den Sockel auf Wasserleckagen, Schraubenbefestigung, kleine Wasserleckagen können zum Zusammenbruch des Produkts führen. 3.Das Produkt ist für Freizeit und Fitness geeignet, nicht für harte Höhenkontrolle Wettkämpfe. - Seite 9 2)Montieren Sie die untere Stange, den Sockel und die Sockelstütze: Stange Strebe Wie gezeigt, befestigen Sie ein Ende der Maststreben (H) mit der Schraube (G) am unteren Mast (Y). Befestigen Sie dann das andere Ende der Maststreben (H) mit der Schraube (C) am Sockel (O). Radwelle Brett Halterung Ring...
- Seite 10 5)Montieren Sie das Gerät an der Basishalterung: Wie gezeigt, befestigen Sie den obere Stangen (W) und die mittlere Stange (X) mit 2 Bolzen (F) zusammen. Danach befestigen Sie den mittleren Stange (X) und die untere Stange (Y) mit 2 Bolzen (F). WXY Rohr Verbindungsmodus 4)Montieren Sie die oberste Stange an der Bretthalterung: Wie gezeigt, verwenden Sie die Bolzen (D), um den oberen Teil der...
-
Seite 11: Instructions De Sécurité Pour L'utilisation
6)Montieren Sie das Ballnetz AVERTISSEMENT : UNE MAUVAISE INSTALLATION OU UN BALANCEMENT SUR L'ANNEAU PEUT PROVOQUER DES BLESSURES GRAVES OU LA MORT. Alerte d'Installation : Wenn das Produkt nicht häufig bewegt werden muss, empfehlen wir, * Pour gagner votre temps et assurer votre sécurité, veuillez lire den Sockel mit Sand und nicht mit Wasser zu füllen. -
Seite 12: Liste Des Pièces
Liste des Pièces 1. Il est conseillé de procéder à l'installation à deux ou plusieurs adultes, et d'interdire aux enfants de procéder à l'installation et à l'escalade. 2.Vérifiez la base pour voir s'il y a des fuites d'eau, la fixation des vis, une petite fuite d'eau peut entraîner l'effondrement du produit. - Seite 13 2) Installez le poteau inférieur, la base et le support de base : Support de poteau Comme indiqué, fixez une extrémité des supports de poteau (H) sur Roue le poteau inférieur (Y) à l'aide du boulon (G). Fixez ensuite l'autre Arbre de roue extrémité...
- Seite 14 4) Installez le poteau supérieur sur le support de panneau : 5) Montez sur le support de base : Comme indiqué, utilisez les boulons (D) pour fixer fermement le Comme indiqué, fixez le poteau haut du support de panneau (K) à l'arrière du panneau arrière (N). supérieur (W) et le poteau central (X) à...
- Seite 15 6) Installez le filet à balles ADVERTENCIA UNA INSTALACIÓN INCORRECTA O EL BALANCEO EN EL ANILLO PUEDEN CAUSAR LESIONES GRAVES O LA MUERTE Alerta de Montaje: Si le produit n'a pas besoin d'être déplacé fréquemment, nous * Para ahorrar su tiempo y garantizar su seguridad, por favor lea las recommandons de remplir la base de sable au lieu d'eau.
-
Seite 16: Lista De Piezas
Lista de Piezas 1. Se recomienda que el montaje lo realicen dos o más adultos, y se prohíbe a los niños montar y trepar. 2. Compruebe si hay fugas de agua en la base, la fijación de los tornillos, el pequeño flujo de fuga de agua puede provocar el colapso del producto. - Seite 17 2) Monte el poste inferior, la base y el soporte de la base: Soporte del Poste Como se muestra, fije un extremo de los soportes del poste (H) en Rueda el poste inferior (Y) con el perno (G). A continuación, fije otro Eje de Rueda extremo de los soportes del poste (H) en la base (O) con perno (C).
- Seite 18 4) Monte el poste superior en el soporte del tablero: 5) Montaje en el soporte de base: Como se muestra, utilice los pernos (D) para fijar la parte superior Como se muestra, fije el poste superior del soporte del tablero (K) en la parte posterior del tablero (N) (W) y el poste central (X) con 2 pernos firmemente.
- Seite 19 6) Monte la red de balones: AVVERTENZA: L'INSTALLAZIONE O L'OSCILLAZIONE IMPROPRIA DEL CERCHIONE PUÒ CAUSARE GRAVI LESIONI O MORTE. Avviso di Installazione: Si no es necesario mover el producto con frecuencia, *Per risparmiare tempo e garantire la sicurezza, leggere recomendamos llenar la base con arena en lugar de agua. Como el attentamente le istruzioni e controllare tutti gli accessori presenti agua se congela por debajo de 0℃, puede dañar la base.
- Seite 20 1.Suggerire l'installazione da parte di due o più adulti e vietare ai bambini di installare e arrampicarsi. 2.Controllare che la base non presenti perdite d'acqua, il fissaggio a vite, un piccolo flusso di perdite d'acqua può portare al collasso del prodotto.
- Seite 21 2) Installare il palo inferiore, la base e il supporto della base: Supporto del palo Come mostrato, fissare un'estremità dei sostegni del palo (H) sul Ruota palo inferiore (Y) con il bullone (G). Quindi fissare un'altra estremità Albero della ruota dei sostegni per pali (H) sulla base (O) mediante il bullone (C).
- Seite 22 4) Installare l'asta superiore sulla staffa del tabellone: 5) Montaggio sulla staffa di base: Come mostrato, utilizzare i bulloni (D) per fissare saldamente la Come mostrato, fissare il palo superiore parte superiore della staffa del pannello (K) sul retro del tabellone (W) e il palo centrale (X) con 2 bulloni (N).
-
Seite 23: Bezpieczeństwo Użytkowania
6) Installare la retina da basket OSTRZEŻENIE: NIEPRAWIDŁOWY MONTAŻ LUB ZAWISANIE NA OBRĘCZY KOSZA DO KOSZYKÓWKI MOŻE SPOWODOWAĆ POWAŻNE OBRAŻENIA, A NAWET ŚMIERĆ. Uwagi dotyczące montażu: * Aby zaoszczędzić czas i zapewnić bezpieczeństwo, przed Se il prodotto non deve essere spostato frequentemente, si consiglia przystąpieniem do montażu lub demontażu produktu dokładnie di riempire la base con sabbia anziché... -
Seite 24: Regulacja Wysokości
1.Zalecamy montaż przez minimum dwie osoby dorosłe. Nie należy pozwalać dziecku na montaż produktu ani wspinanie się na produkt. 2.Przed każdym użyciem należy sprawdzać śruby oraz podstawę pod kątem wycieku wody/ubytku piasku. Ubytek piasku/wody może spowodować nieoczekiwane przewrócenie się produktu. Regulacja wysokości 3.Produkt jest przeznaczony do celów rekreacyjnych oraz do użytku prywatnego. - Seite 25 2)Montaż dolnego słupka, podstawy i wsporników: Wspornik Jak pokazano na rysunku: Przymocuj jeden koniec każdego wspornika (H) do dolnego słupka (Y) za pomocą śrub G. Następnie Kółko przymocuj drugi koniec każdego wspornika (H) do podstawy (O) za Oś kółek pomocą śrub C. Wspornik tablicy Obręcz Siatka...
- Seite 26 5)Montaż wsporników podstawy: Jak pokazano na rysunku: Przymocuj górny słupek (W) do środkowego słupka (X) za pomocą 2 śrub (F). Następnie przymocuj środkowy słupek (X) do dolnego słupka (Y) za pomocą 2 śrub (F). Łączenie słupków WXY 4)Montaż górnego słupka do wspornika tablicy: Jak pokazano na rysunku: Za pomocą...
-
Seite 27: Rücksendung / Beschädigung Anweisungen
6)Mocowanie siatki Return / Damage Claim Instructions DO NOT discard the box / original packaging. In case a return is required, the item must be returned in original box. Without this your return will not be accepted. Take a photo of the box markings. A photo of the markings (text) on the side of the box is required in case a part is needed for replacement. - Seite 28 Instructions De Retour / Réclamation De Dommages Istruzioni Per La Restituzione / Reclamo Per Danni NE PAS jeter la boîte/l'emballage d'origine. NON scartare la scatola / confezione originale. Dans le cas où un retour est requis, l'article doit être retourné dans sa boîte Nel caso in cui sia richiesto un reso, l'articolo deve essere restituito nella scatola d'origine.