Inhaltsverzeichnis
Werbung
Verfügbare Sprachen
Verfügbare Sprachen
Werbung
Kapitel
Inhaltsverzeichnis

Verwandte Anleitungen für IROX CUBO-T


Inhaltszusammenfassung für IROX CUBO-T
- Seite 1 (GER) CUBO-T Comfort Funkwecker - 1 -...
-
Seite 2: Inhaltsverzeichnis
(GER) Inhaltsverzeichnis 1. LCD Anzeige und Tasten............................................3 2. Inbetriebnahme und Einstellungen........................................4 3. Zeit Anzeige................................................6 4. Weckzeit Anzeige..............................................6 5. Weckzeit einstellen..............................................7 6. Wecker und Snooze............................................... 7 7. Batteriewechsel..............................................8 8. Pflege des Gerätes.............................................. 8 9. Support..................................................8 - 2 -... -
Seite 3: Lcd Anzeige Und Tasten
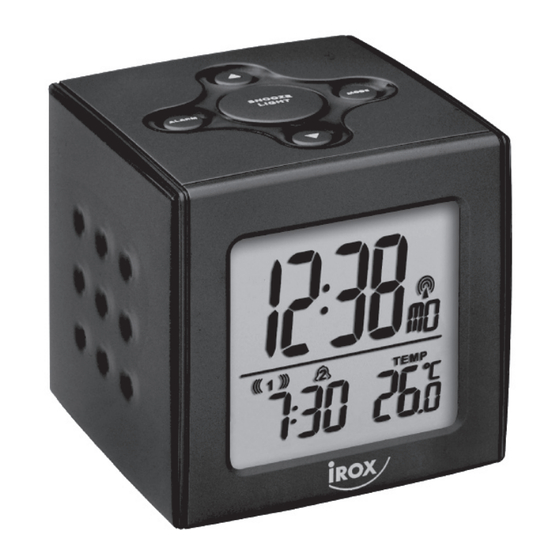
(GER) 1. LCD Anzeige und Tasten VOLLSEGMENT ANZEIGE - Nach dem aktivieren der Batterien erscheint für ein paar Sekunden eine Vollsegment Anzeige und ein Ton wird kurz aktiviert. MODE Taste - Wechseln der Zeitanzeige (laufende Sekunden oder Wochentag). - 3 Sek. gedrückt halten um in die Zeit- und Grundeinstellungen zu gelangen. ALARM Taste - um den Wecker auszuwählen (ALARM1, ALARM 2 oder das Datum). -
Seite 4: Inbetriebnahme Und Einstellungen
(GER) 2. Inbetriebnahme und Einstellungen Die Inbetriebnahme des CUBO-T ist denkbar einfach. Gehen Sie deshalb genau nach folgenden Punkten vor. 1) Aktivieren Sie die Batterien. Als erstes erscheint auf der LCD eine Vollsegment-Anzeige während ein paar Sekunden und kurz ertönt ein “BEEP”. 2) Danach beginnt das Gerät mit dem Empfang der Zeit vom Zeitzeichensender DCF77. Warten Sie bis die Zeit auf dem Gerät korrekt angezeigt wird. 3) Nun können Sie im CUBO-T folgenden Einstellvorgang ausführen: - 4 -... - Seite 5 (GER) ANMERKUNG ZUR FUNKUHR Das Zeitzeichen DCF 77 wird von der Atomuhr in Mainflingen bei Frankfurt am Main ausgestrahlt. Der LW Sender hat eine Reichweite von bis zu 1500km. Wird das Zeit-Empfangssymbol ohne Wellen dargestellt, haben Sie bei sich Empfangsprobleme. Beachten Sie dann folgende Punkte: - Während der Nacht hat es weniger Störungen in der Atmosphäre und somit wird die Empfangswahrscheinlichkeit erhöht. Ein Empfang pro Tag reicht vollkommen aus, um die Genauigkeit von +/- 1 Sekunde der Uhr zu gewährleisten. - Achten Sie darauf, dass Gerät mindestens 2 Meter Abstand hat von möglichen Störquellen wie TV, Computer Monitor, Mikrowelle etc.
-
Seite 6: Zeit Anzeige
(GER) 3. Zeit Anzeige 4. Weckzeit Anzeige - 6 -... -
Seite 7: Weckzeit Einstellen
(GER) 5. Weckzeit einstellen 6. Wecker und Snooze - 7 -... -
Seite 8: Batteriewechsel
- Vermeiden Sie am Gerät starke Schläge oder Schocks jeder Art. - Benutzen Sie für die Reinigung ein trockenes, sanftes Tuch, das Sie mit einer Mischung aus Wasser und sehr mildem Reinigungsmittel benetzt haben. Sie dürfen niemals flüchtige Substanzen wie Benzol, Verdünner, Reinigungsmittel in Sprühdosen, usw. einsetzen. - Lagern Sie das Gerät wenn es nicht benutzt wird an einem trockenen Ort und ausserhalb der Reichweite von Kleinkindern. Entfernen Sie in einem solchen Fall unbedingt die Batterien! - Bei extremer Kälte kann es vorkommen, dass die Anzeige unlesbar wird. Sobald das Gerät sich erneut in einer wärmeren Umgebung befindet, wird das Gerät wieder ordnungsgemäss funktionieren. - Bewahren Sie die Gebrauchsanweisung und die sonstigen Unterlagen aus dem Lieferumfang bitte sorgfältig auf, um sie auch später noch lesen zu können. - Wichtig: Bei allen Irox Geräten sind sämtliche Entsorgungsgebühren in der Schweiz (vRG) sowie in der EU (WEEE) abgegolten. 9. Support Dieses Gerät ist eine Neuentwicklung der Irox Development Technology. Alle Angaben wurden anhand eines funktionstüchtigen Gerätes gemacht und überprüft. Es kann vorkommen, dass Anpassungen und Verbesserungen im Gerät vorgenommen werden, die aus drucktechnischen Abläufen nicht mehr in diese Anleitung einfliessen konnten. Sollten Sie Abweichungen feststellen, die Ihnen die Bedienung und den Betrieb des Gerätes erschweren, können Sie über www.irox.com immer die letzte gültige Anleitung gratis auf Ihren PC laden. © Irox Development Technology - 8 -... - Seite 9 (FRE) CUBO-T Réveil Radio Piloté Confort - 9 -...
- Seite 10 (FRE) Sommaire 1. Affichage et touches LCD............................................ 1 1 2. Mise en service et réglages.......................................... 1 2 3. Affichage de l’heure............................................. 1 4 4. Affichage de l’heure de réveil..........................................14 5. Régler l’heure de réveil............................................ 1 5 6. Réveil et Snooze..............................................15 7. Changement des piles............................................16 8. Entretien de l’appareil............................................ 1 6 9. Support.................................................. 16 - 10 -...
-
Seite 11: Affichage Et Touches Lcd
(FRE) 1. Affichage et touches LCD AFFICHAGE A SEGMENTS PLEINS - Après l’activation des piles, un affichage à segments pleins apparaît pendant quelques secondes et un son retentit brièvement. Touche MODE - Changement de l’affichage de l’heure (secondes défilantes ou jour de la semaine). - La maintenir appuyée pendant 3 sec. pour accéder aux réglages de l’heure et de base. Touche ALARME - Pour sélectionner le réveil (ALARME1, ALARME 2 ou la date). - La maintenir appuyée pendant 3 sec. pour accéder au réglage de l’heure du réveil. Touches ▲ / ▼ - En mode de réglage, les valeurs de réglage sont modifiées à l’aide de ces touches. Pour procéder à un réglage rapide, vous pouvez maintenir les touches ▲ ou ▼ appuyées. - Dans l’affichage ALARME 1 ou ALARME 2 : Allumage/extinction de l’alarme du réveil correspondante. - dans l’affichage de la date et si le récepteur radio est en marche (ON) : maintenir la touche ▲ appuyée pendant 3 sec. pour démarrer manuellement la réception radio. Une pression brève de la touche ▲ interrompt à nouveau la réception. Touche LIGHT/SNOOZE - Rétro éclairage : A l’aide de cette touche, l’éclairage de l’affichage est enclenché pendant 8 sec. Si une touche est pressée au cours de cette période, la lumière de rétro éclairage restera active pendant 8 sec. supplémentaires. - En cas d’alarme de réveil retentissante : début du cycle Snooze de 8 min. COMPARTIMENT DES PILES Pour deux piles de type AAA, 1.5V. Veuillez absolument respecter la polarité lorsque vous placez les piles dans le compartiment. Important: Au cours d’une réception de signal active ( la tour clignote), tous les réglages sont bloqués via les touches MODE ou ALARME et vous devez attendre que la réception soit terminée pour procéder aux réglages. -
Seite 12: Mise En Service Et Réglages
(FRE) 2. Mise en service et réglages La mise en service du CUBO-T est très simple. Pour cette raison, suivez exactement les points suivants. 1) Activez les piles. Un affichage à segments pleins apparaît tout d’abord à l’écran LCD pendant quelques secondes et un “BIP” retentit brièvement. 2) L’appareil commence ensuite la réception de l’heure provenant de l’émetteur de signal DCF77. Attendez jusqu’à ce que l’heure soit affichée correctement sur l‘appareil. 3) Vous pouvez maintenant exécuter le réglage suivant dans CUBO-T : - 12 -... - Seite 13 (FRE) REMARQUE RELATIVE A L‘HORLOGE Le signal horaire DCF 77 est émis par l’horloge atomique située à Mainflingen près de Francfort sur le Main. L‘émetteur grandes ondes a une portée allant jusqu’à 1500 km. Si le symbole de réception de l’heure est représenté sans ondes, vous aurez des problèmes de réception. Veuillez prendre en considération les points suivants: - Au cours de la nuit, l’atmosphère contient moins de perturbations et la probabilité de réception est ainsi accrue. Une réception par jour suffit largement pour garantir une précision de l’heure de +/- 1 seconde. - Veillez à respecter un écart de l’appareil d’au moins 2 mètres (8 pas) par rapport à des sources parasites éventuelles comme la TV, l’écran d’ordinateur, le micro- ondes etc. - Dans des locaux possédant des murs en béton ou en métal (par ex. des caves, des bureaux modernes etc.), la réception du signal peut être aggravée par l‘antiparasitage. Dans un tel cas, cherchez un lieu plus adapté à proximité d’une fenêtre. Il peut parfois être utile de pivoter l’appareil de 90° pour mieux orienter l’antenne de réception. LOGIQUE DE RECEPTION DE L’HORLOGE RADIOPILOTEE 1. Comme le décrit le chapitre 3, l’heure de l’émetteur du signal horaire DCF77 est reçue automatiquement après l’activation des piles. La réception horaire dure env. 3 à 10 minutes. Au cours de la réception, le symbole clignote. En cas de bonne réception avec les ondes, en cas de mauvaise réception sans. Très faible Faible Bon Très bon 2. Si vous souhaiter activer, puis désactiver la réception automatique de l’heure, vous pouvez le faire dans le « réglage » ou avec la touche ▲ (chapitre 1). 3. En mode normal, une réception automatique de l’heure est démarrée à 3:00, 4:00, 5:00 et 6:00. 4. Dès qu’une réception a eu lieu, l’heure est réglée correctement et le symbole est actif.
-
Seite 14: Affichage De L'heure
(FRE) 3. Affichage de l’heure 4. Affichage de l’heure de réveil - 14 -... -
Seite 15: Régler L'heure De Réveil
(FRE) 5. Régler l’heure de réveil 6. Réveil et Snooze - 15 -... -
Seite 16: Changement Des Piles
8. Entretien de l’appareil - Ne soumettez pas l’appareil à des températures extrêmes ou au rayonnement direct du soleil pendant une période prolongée. - Evitez des coups ou des chocs violents de tout type sur l’appareil. - Utilisez pour le nettoyage un chiffon sec, doux que vous avez humecté avec un mélange d’eau et de produit nettoyant très léger. Vous ne devez jamais utiliser des substances volatiles, telles que du benzène, un diluant, des produits nettoyants en bombe. - Entreposez votre appareil lorsqu’il n’est pas utilisé dans un endroit sec et hors de portée des enfants. Dans ce cas, retirez impérativement les piles ! - En cas de froid extrême, il se peut que l’affichage soit illisible. Dès que l’appareil se trouve de nouveau dans un environnement plus chaud, l’appareil fonctionnera à nouveau correctement. - Conservez soigneusement le mode d’emploi et les autres documents fournis à la livraison pour pouvoir les relire ultérieurement si nécessaire. - Important : Pour tous les appareils Irox, toutes les taxes d’élimination en Suisse (TAR) et dans l’UE (WEEE) sont acquittées. 9. Support Cet appareil est un nouveau produit de Irox Development Technology. Toutes les données ont été fournies et contrôlées au moyen d’un appareil fonctionnel. Il se peut que des ajustements et améliorations soient effectués sur l’appareil, n’ayant pas pu être ajoutés à ce mode d’emploi pour des raisons liées à la technique d’impression. Si vous constatez des divergences qui vous compliquent la manipulation et l’utilisation de l’appareil, vous pouvez toujours télécharger gratuitement sur www.irox.com le dernier mode d’emploi en vigueur sur votre PC. © Irox Development Technology - 16 -... - Seite 17 (ITA) CUBO-T Sveglia Radiocontrollato Comfort - 17 -...
- Seite 18 (ITA) Indice 1. Display LCD e tasti............................................... 19 2. Funzionamento e impostazioni........................................... 20 3. Visualizzazione dell’ora............................................22 4. Visualizzazione dell’orario della sveglia......................................22 5. Impostazione dell’orario della sveglia....................................... 23 6. Sveglia e Snooze..............................................23 7. Sostituzione delle batterie..........................................24 8. Manutenzione............................................... 24 9. Assistenza................................................24 - 18 -...
-
Seite 19: Display Lcd E Tasti
(ITA) 1. Display LCD e tasti DISPLAY A SEGMENTI INTERI - Dopo l’attivazione delle batterie, per qualche secondo appaiono tutti i segmenti sul display e l’apparecchio emette un breve segnale acustico. Tasto MODE - Consente di passare dalla visualizzazione dei secondi al giorno della settimana e viceversa. - Tenere premuto 3 sec. per accedere alle impostazioni dell’orario e alle impostazioni di base. Tasto ALARM - Consente di selezionare la sveglia (ALARM1, ALARM 2 o data). - Tenere premuto 3 sec. per accedere alle impostazioni della sveglia. Tasti ▲ / ▼ - Questi due tasti servono nella modalità d’impostazione per modificare i valori da impostare. Per un’impostazione rapida, tenere premuti i tasti ▲ o ▼. - Visualizzazione in ALARM 1 o ALARM 2: attivazione/disattivazione del relativo allarme sveglia. - Nella visualizzazione della data e quando la ricezione radio è attiva (ON): per avviare manualmente la ricezione radio, tenere premuto il tasto ▲ per 3 sec. -
Seite 20: Funzionamento E Impostazioni
(ITA) 2. Funzionamento e impostazioni La messa in funzione di CUBO-T è molto semplice. Basta seguire con precisione i seguenti punti. 1) Attivare le batterie. Come prima cosa, il display LCD visualizza per qualche secondo tutti i segmenti e viene emesso un segnale acustico (BIP). 2) Poi l’apparecchio inizia a ricevere il segnale orario dal trasmettitore DCF77. Attendere che l’orario sia visualizzato correttamente sull’apparecchio. 3) A questo punto è possibile effettuare la seguente procedura d’impostazione su CUBO-T: - 20 -... - Seite 21 (ITA) NOTA SULL’OROLOGIO RADIOCONTROLLATO Il segnale orario DCF 77 è trasmesso dall’orologio atomico di Mainflingen presso Francoforte sul Meno. Il trasmettitore LW ha una portata fino a 1500 km. Se l’icona della ricezione del segnale orario appare senza onde, significa che ci sono problemi di ricezione. Si prega di osservare quanto segue: - Durante la notte ci sono meno interferenze nell’atmosfera, pertanto la probabilità di ricezione è maggiore. Una ricezione al giorno è pienamente sufficiente per garantire la precisione di +/- 1 secondo dell’ora. - Verificare che l’apparecchio sia almeno a 2 metri (8 piedi) di distanza da possibili fonti di disturbo come TV, schermo di computer, microonde ecc. - Negli ambienti con pareti in cemento o metallo (es. scantinati, uffici moderni ecc.), la ricezione del segnale può essere schermata ed ostacolata. In tali casi, ricercare un luogo migliore vicino a una finestra. A volte è sufficiente ruotare l’apparecchio di 90° e posizionare meglio l’antenna. LOGICA DI RICEZIONE DELL’OROLOGIO RADIOCONTROLLATO 1. Dopo l’attivazione delle batterie il segnare orario DCF77 viene ricevuto automaticamente. La ricezione dell’orario dura dai 3 ai 10 minuti. Durante questa procedura, l’icona lampeggia: con le onde se il segnale è buono, senza onde se il segnale non è buono. Molto debole Debole Buono Ottimo 2. Dalla modalità “Impostazioni” o con il tasto ▲ (vede capitolo 1) è possibile disattivare la ricezione automatica e riattivarla.
-
Seite 22: Visualizzazione Dell'ora
(ITA) 3. Visualizzazione dell’ora 4. Visualizzazione dell’orario della sveglia - 22 -... -
Seite 23: Impostazione Dell'orario Della Sveglia
(ITA) 5. Impostazione dell’orario della sveglia 6. Sveglia e Snooze - 23 -... -
Seite 24: Sostituzione Delle Batterie
- Non esporre l’apparecchio a temperature estreme o direttamente al sole per un lungo periodo. - Evitare urti violenti o colpi di qualunque tipo all’apparecchio. - Per la pulizia utilizzare un panno morbido, inumidito con acqua e un detergente molto delicato. Non utilizzare MAI sostanze volatili, come benzolo, diluenti, detergenti spray e simili. - Quando non è in uso, riporre l’apparecchio in un luogo asciutto e fuori dalla portata dei bambini. In tal caso è assolutamente necessario togliere le batterie! - In presenza di temperature estremamente basse, può accadere che il display non sia leggibile. L’apparecchio riprenderà a funzionare correttamente non appena viene collocato in un ambiente più caldo. - Conservare accuratamente le istruzioni per l’uso e l’ulteriore documentazione contenuta nella confezione, per poterla consultare anche successivamente. - Importante: per gli apparecchi Irox, tutte le imposte di smaltimento rifiuti in Svizzera (TRA) e nell’Unione Europea (WEEE) sono già corrisposte. 9. Assistenza Quest’apparecchio è un nuovo prodotto di Irox Development Technology. Tutte le indicazioni sono state fornite e verificate sulla base di un apparecchio perfettamente funzionante. È possibile che siano apportate modifiche e migliorie all’apparecchio, non incluse nella presente documentazione per motivi legati alle esigenze di stampa. In caso di incongruenze o indicazioni incomplete, che rendono difficoltoso l’uso o il funzionamento dell’apparecchio, è possibile scaricare gratuitamente in ogni momento le ultime istruzioni aggiornate dal sito. www.irox.com © Irox Development Technology - 24 -... - Seite 25 (ENG) CUBO-T Comfort Radio Controlled Alarm Clock - 25 -...
- Seite 26 (ENG) Table of contents 1. LCD (display) and keys............................................27 2. Start-up and set-Up.............................................. 28 3. Time Display Options............................................30 4. Alarm Display Options............................................30 5. Wake-Up Alarm Setting............................................31 6. Alarm and Snooze..............................................31 7. Battery Change..............................................32 8. Care of the device..............................................32 9.
-
Seite 27: Lcd (Display) And Keys
(ENG) 1. LCD (display) and keys FULL SEGMENT DISPLAY - After inserting the batteries, the full segment display is shown for a few seconds and a short beep sound is heard. MODE key - to change the time display (with running seconds or day of the week). - Press and hold 3 secs to enter setting mode. ALARM key - to select the ALARM1, ALARM 2 or DATE display. - Press and hold 3 secs to enter the alarm setting mode. ▲ / ▼ keys - In setting modes, these keys are used to adjust the value. To quickly change a value in the setting, press and hold ▲ or ▼. -
Seite 28: Start-Up And Set-Up
(ENG) 2. Start-up and set-Up Setting-up the CUBO-T is easy. Just follow the steps below: 1) Activate the batteries. After inserting the batteries, a full segment display is shown for a few seconds and a beep sound is heard. 2) After this, the CUBO-T will start to receive the time from the time signal transmitter DCF77. This may take a few minutes Wait until the time is indicated correctly on the device. 3) Now you may set-up the CUBO-T by following below steps. - 28 -... - Seite 29 (ENG) SPECIAL NOTES ABOUT THE RADIO CONTROLLED CLOCK The time signal DCF 77 is transmitted by the atomic clock in Mainflingen near Frankfurt/Main. The long-wave transmitter has a range of up to 1500km. If the time icon is displayed without waves you have reception problems. Please observe following points: - There are fewer disturbances in the atmosphere during the night which increases the likeliness of reception. One reception per day is completely sufficient to ensure the preciseness of the clock by +/- 1 second. - Make sure that the device is at least 2 meters (8 feet) away from possible sources of disturbance such as TV, computer, monitor, microwave etc. - In rooms with concrete or metal walls (e.g. cellar rooms, modern office buildings etc.) the receipt of the signal may be more difficult due to the shielding. In such cases find a better location for the device near a window. Sometimes it also helps to simply turn the device by 90°, thereby improving the alignment of the receiving antenna. RECEIVING LOGIC 1. The time transmitted by the time signal transmitter DCF77 is automatically received when the batteries are activated. The time signal reception takes about 3-10 minutes. During receiving the icon will blink, if reception is good with waves, if reception is poor without. 2. If you would like to switch the automatic time reception off and then on again you can do so in the “set-up” or with the ▲ key (see chapter 1). 3. During normal operation an automatic time reception will be activated daily at 3:00, 4:00, 5:00 and 6:00. 4. As soon as the device has received a signal the time will be correctly adjusted and the icon is active. 5.
-
Seite 30: Time Display Options
(ENG) 3. Time Display Options 4. Alarm Display Options - 30 -... -
Seite 31: Wake-Up Alarm Setting
(ENG) 5. Wake-Up Alarm Setting 6. Alarm and Snooze - 31 -... -
Seite 32: Battery Change
- When the device is not being used store it in a dry area and out of the reach of small children. In such cases it is important to remove the batteries! - If the device is activated under extreme coldness it may occur that the display becomes illegible. As soon as it is returned to a warm environment the device will function normally again. - Please keep the Instruction Manual and other documents delivered with the device stored carefully so that you can reference them at a later point if necessary. - Important: All disposal fees in Switzerland (vRG) as well as in the EU (WEEE) for all Irox devices are covered. 9. Support This device is a new development of Irox Development Technology. All information was made and checked by means of a functioning device. It may occur that adjustments and improvements of the device will take place that due to typographical procedures were not able to be listed in this manual. Should you notice deviations which make it difficult for you to operate and use of the device you may at any time download the latest manual onto your PC free of charge at www.irox.com...