Inhaltsverzeichnis
Werbung
Verfügbare Sprachen
Verfügbare Sprachen
Quicklinks
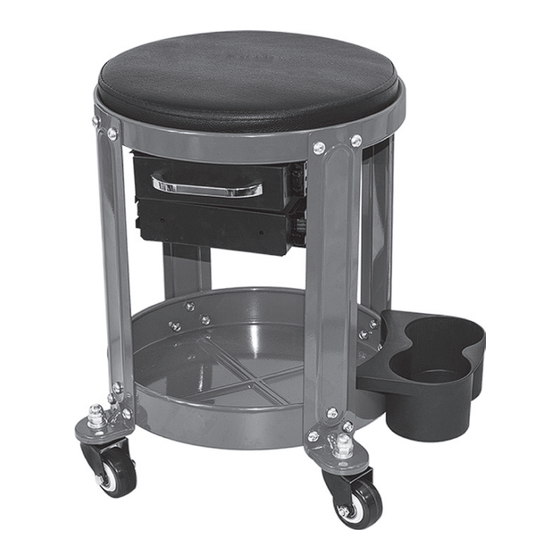
Workshop Creeper Seat
Werkstattkriechsitz
Tabouret d'Atelier à Roulettes
Taburete de Taller con Ruedas
Sgabello da Officina con Ruote
Taboret warsztatowy
AU10008
USA office: Fontana
AUS office: Truganina
GBR office: Ipswich
ITA office: Milano
POL office: Gdańsk
DEU office: FDS GmbH, Neuer Höltigbaum 36, 22143 Hamburg, Deutschland
FRA office: Saint Vigor d'Ymonville
THIS INSTRUCTION BOOKLET CONTAINS IMPORTANT SAFETY INFORMATION. PLEASE READ AND KEEP FOR FUTURE REFERENCE.
Werbung
Inhaltsverzeichnis

Verwandte Anleitungen für Costway AU10008


Inhaltszusammenfassung für Costway AU10008
- Seite 1 Workshop Creeper Seat Werkstattkriechsitz Tabouret d'Atelier à Roulettes Taburete de Taller con Ruedas Sgabello da Officina con Ruote Taboret warsztatowy AU10008 USA office: Fontana AUS office: Truganina GBR office: Ipswich ITA office: Milano POL office: Gdańsk DEU office: FDS GmbH, Neuer Höltigbaum 36, 22143 Hamburg, Deutschland FRA office: Saint Vigor d'Ymonville THIS INSTRUCTION BOOKLET CONTAINS IMPORTANT SAFETY INFORMATION.
-
Seite 2: Before You Start
Before You Start Avant de Commencer Please read all instructions carefully. Veuillez lire attentivement toutes les instructions. Retain instructions for future reference. Conservez les instructions pour vous y référer ultérieurement. Separate and count all parts and hardware. Vérifiez toutes les pièces et les accessoires. Read through each step carefully and follow the proper order. -
Seite 3: Prima Di Iniziare
WARNING The following safety information is provided as a guideline to help Prima di Iniziare you operate your product under the safest possible conditions. Any tool or piece of equipment can be potentially dangerous to Si prega di leggere attentamente tutte le istruzioni. use when safety or safe handling instructions are not known or Conservare le istruzioni per riferimento futuro. -
Seite 4: Product Specifications
2. NEVER stand on, lie on or operate the Workshop Creeper Seat PRODUCT SPECIFICATIONS at any speed, on rough/exposed uneven surfaces. Weight Capacity: 300 lbs/150 kg 3. DO NOT stand on this product. You may fall, which may lead to personal injury. - Seite 5 ASSEMBLY 3. Using one of the support leg(4), Figure 4 align the 3 holes in the support 1. Lay out all the contents and ensure there are no leg with the holes of the missing/damaged parts (Fig. 1). Underseat storage base(5), using Figure 1 M6 Round head inner hexagon screw(7) and M6 Lock nut(8).
- Seite 6 Figure 7 Figure 11 6. Assemble the remaining three 9. Assemble the castors with M8 support legs(4) to the seat cap nut(9), flat washer(10), spring cushion base and hand tighten. washer(11). Repeat for all castors. (Fig. 7) (Fig. 11) Figure 8 10.
- Seite 7 2. Stellen Sie sich NIEMALS auf den Werkstatt-Kriechsitz, legen Sie sich nicht darauf und benutzen Sie ihn nicht bei jeder WARNUNG Geschwindigkeit und auf rauen/unebenen Oberflächen. Die folgenden Sicherheitshinweise sollen Ihnen helfen, Ihr 3. Stellen Sie sich NICHT auf dieses Produkt. Sie könnten Produkt unter möglichst sicheren Bedingungen zu betreiben.
-
Seite 8: Produktspezifikationen
MONTAGE 11. Achten Sie auf Unebenheiten und Risse auf dem Arbeitsboden. 1. Legen Sie den gesamten Inhalt aus und stellen Sie sicher, dass keine fehlende/beschädigte Teile (Abb. 1). Abbildung 1 PRODUKTSPEZIFIKATIONEN Gewichtskapazität: 150 kg TEILEBESCHREIBUNG Beschreibung Menge Sitzkissen Sitzkissen-Basis Kugelgelagerter Schubladensatz Stützbein 2. - Seite 9 3. Richten Sie einen der Stützfüße (4) Abbildung 4 Abbildung 7 mit den 3 Löchern des Stützfußes an 6. Montieren Sie die den Löchern der Untersitzablage (5) verbleibenden drei Stützbeine (4) aus und verwenden Sie die an der Sitzkissenbasis und ziehen M6-Rundkopf-Innensechskantschraube Sie sie handfest an.
- Seite 10 Abbildung 11 9. Montieren Sie die Rollen mit AVERTISSEMENT M8 Hutmutter(9), Les informations de sécurité suivantes sont fournies à titre Unterlegscheibe(10), indicatif pour vous aider à utiliser votre produit dans les Federscheibe(11). Wiederholen conditions les plus sûres possibles. Tout outil ou pièce Sie den Vorgang für alle Rollen.
-
Seite 11: Spécifications Du Produit
2. Ne JAMAIS se tenir debout, s'allonger ou utiliser le tabouret 11. Faites attention aux imperfections et aux fissures du sol de d'atelier à n'importe quelle vitesse, sur des surfaces travail. rugueuses/exposées et inégales. 3. NE PAS se tenir debout sur ce produit. Vous risquez de tomber, ce qui peut entraîner des blessures corporelles. - Seite 12 ASSEMBLAGE 3. À l'aide de l'un des pieds de support Fig.4 (4), alignez les 3 trous du pied de 1. Disposez tout le contenu et assurez-vous qu'il n'y a pas de support avec les trous de la base de pièces manquantes ou endommagées (Fig.1). rangement sous le siège (5), à...
- Seite 13 Fig.7 Fig.11 9. Assemblez les roulettes avec 6. Assemblez les trois autres l'écrou borgne M8 (9), la rondelle pieds de support (4) à la base du plate (10) et la rondelle élastique coussin de siège et serrez-les à la (11). Répétez l'opération pour main.
- Seite 14 2. NUNCA se ponga de pie, ni se acueste, ni haga funcionar el taburete de taller a cualquier velocidad, en superficies irregulares ADVERTENCIA ásperas/expuestas. La siguiente información de seguridad se proporciona como una 3. NO se ponga de pie sobre este producto. Puede caerse, lo que guía para ayudarle a operar su producto en las condiciones más puede provocar lesiones personales.
-
Seite 15: Especificaciones Del Producto
MONTAJE 11. Tenga cuidado con las imperfecciones y grietas del suelo de trabajo. 1. Disponga todo el contenido y asegúrese de no tener piezas faltantes o dañadas. Fig.1 ESPECIFICACIONES DEL PRODUCTO Capacidad de carga: 150 kg DESCRIPCIÓN DE PIEZAS Número Descripción Cantidad Cojín de asiento... - Seite 16 3. Utilizando una de las patas de Fig.4 Fig.7 soporte (4), alinee los 3 agujeros de 6. Monte las tres patas de soporte la pata de soporte con los agujeros de restantes (4) en la base del cojín la base de almacenamiento bajo el de asiento y apriete a mano.
- Seite 17 Fig.11 AVVERTENZA 9. Monte las ruedas con la tuerca de sombrerete M8 (9), la arandela Le seguenti informazioni sulla sicurezza sono fornite come linea plana (10) y la arandela elástica guida per aiutare l'utente a utilizzare il prodotto nelle condizioni (11).
-
Seite 18: Specifiche Del Prodotto
2. Non stare MAI in piedi, sdraiarsi o azionare sullo Sgabello da 11. Attenzione alle imperfezioni e alle crepe sul pavimento di Officina con Ruote a qualsiasi velocità, su superfici lavoro. ruvide/esposte e irregolari. 3. NON stare in piedi su questo prodotto. Si rischia di cadere, con conseguenti lesioni personali. - Seite 19 MONTAGGIO 3. Utilizzando una delle gambe di Fig.4 supporto (4), allineare i 3 fori della 1. Sistemare tutto il contenuto e verificare che non vi siano parti gamba di supporto con i fori della base mancanti o danneggiate. di stoccaggio del sottosella (5), Fig.1 utilizzando la vite esagonale interna a testa tonda M6(7) e il dado di...
- Seite 20 Fig.7 Fig.11 9. Assemblare le ruote con dado 6. Assemblare le altre tre gambe M8(9), rondella piatta (10), di supporto (4) alla base del rondella elastica (11). Ripetere cuscino del sedile e stringere a l'operazione per tutte le ruote. mano. (Fig. 7) (Fig.
-
Seite 21: Informacje Dotyczące Bezpieczeństwa I Ostrzeżenia
2. Nie stawaj i nie kładź się na taborecie warsztatowym. Nie przesuwaj taboretu warsztatowego po nierównej nawierzchni. OSTRZEŻENIE 3. Nie stawaj na produkcie. Upadek z taboretu warsztatowego Poniższe informacje dotyczące bezpieczeństwa stanowią może prowadzić do powstania poważnych obrażeń. wyłącznie wskazówki, które mają pomóc w użytkowaniu produktu 4. -
Seite 22: Specyfikacja Produktu
MONTAŻ 11. Zachowaj szczególną ostrożność na obszarach, w których podłoga może być uszkodzona. 1. Wyjmij z opakowania wszystkie części. Sprawdź, czy nie brakuje żadnej części, oraz czy żadna część nie uległa uszkodzeniu (rys. 1) Rys.1 SPECYFIKACJA PRODUKTU Maksymalne obciążenie: 150 kg LISTA CZĘŚCI Nazwa Ilość... - Seite 23 3. Wyrównaj 3 otwory w nóżce (4) z Rys.4 Rys.7 otworami w dolnym schowku (5) i zamocuj nóżkę za pomocą śrub z 6. Przymocuj trzy pozostałe nóżki łbami sześciokątnymi M6 (7) i (4) do podstawy siedziska (2). nakrętek zabezpieczających M6 (8). Ręcznie dokręć...
-
Seite 24: Rücksendung / Beschädigung Anweisungen
Rys.11 9. Zamocuj 4 kółka za pomocą nakrętek kołpakowych (9), podkładek Return / Damage Claim Instructions płaskich (10) i podkładek DO NOT discard the box / original packaging. sprężystych (11). (Rys. 11). In case a return is required, the item must be returned in original box. Without this your return will not be accepted. - Seite 25 Instructions De Retour / Réclamation De Dommages Istruzioni Per La Restituzione / Reclamo Per Danni NE PAS jeter la boîte/l'emballage d'origine. NON scartare la scatola / confezione originale. Dans le cas où un retour est requis, l'article doit être retourné dans sa boîte Nel caso in cui sia richiesto un reso, l'articolo deve essere restituito nella scatola d'origine.