
Verwandte Anleitungen für VANTRUE Falcon 1


Inhaltszusammenfassung für VANTRUE Falcon 1
- Seite 1 Falcon 1 English/Deutsch/Français/Polski 4K+1080P Dual Dashcam for Motorcycle User Guide Model No.: F1 2023.3.1 更新内容 78mmX120mm 封面产品机器...
- Seite 3 Hey, find us here: www.vantrue.net/contact facebook.com/vantrue.live Skontaktuj się z nami:...
-
Seite 4: Inhaltsverzeichnis
CONTENTS VERZEICHNIS CONTENU SPIS TREŚCI Installation Guide Installationsanleitung Installation Instrukcja instalacji Structure Diagram Installationsdiagramm Schéma de combinaison d'installation Schemat strukturalny Basic operation Betrieb Opération Podstawowa obsługa Troubleshooting Allgemeine Fehlerbehebung Dépannage courant Rozwiązywanie problemów Specifications Parameter Paramètres du produit Dane techniczne Warranty &... - Seite 5 Warm tips: Please read this User Manual carefully before using the camera. This product is a motorcycle-specific recorder and is limited to connecting to a 12V battery. Please turn off the power of the motorcycle before installation, and turn on the power after installation is completed.
-
Seite 6: Installation Guide
1. Installation Guide 1.1 Inserting a Memory Card (Recommended: Vantrue U3 high-speed microSD card). After inserting the SD card for the first time, please press and hold the remote control record button for 10 seconds to start formatting the card. - Seite 7 of the main unit. Please do not install it facing down when installing the logo side of the main unit or under the metal parts of the motorcycle. Wi-Fi signal transmitting direction <2>. F1 dash cam main unit needs to be fixed with 3M adhesive (shipped as standard).
-
Seite 8: Installing The Remote Control
1.3 Installing the remote control You can choose a suitable installation position according to your own usage habits and install the remote control on the handlebars, the front part of the car, the side of the fuel tank, etc. Motorcycle Motorcycle Fuel tank side handlebars... - Seite 9 1.4 Installing the Power Cord Connect the power cord to the fuse box as follows. Step 1: The red power cable is connected to the positive terminal of the battery. Step 2: The ACC signal wire (yellow wire) is connected to the ACC power fuse of the battery. Step 3: The black ground wire is connected to the negative terminal of the battery or the override position.
- Seite 10 1.5 Installing the Front and Rear camera The front and rear cameras can be loosened by the hexagonal screw to adjust the camera recording angle, as well as the recording direction. Camera mount holder head cap screws: loosened, you can adjust the camera angle up and down, can be inverted, side-mounted rotation to adjust the direction of the camera recording.
- Seite 11 Motorcycle head Motorcycle rear mounting position mounting position (We recommend mounting the front and rear cameras on the motorcycle body instead of the handlebars to reduce camera shake and improve the stability of the video) <3>. The line of the camera is a high frequency data line.
-
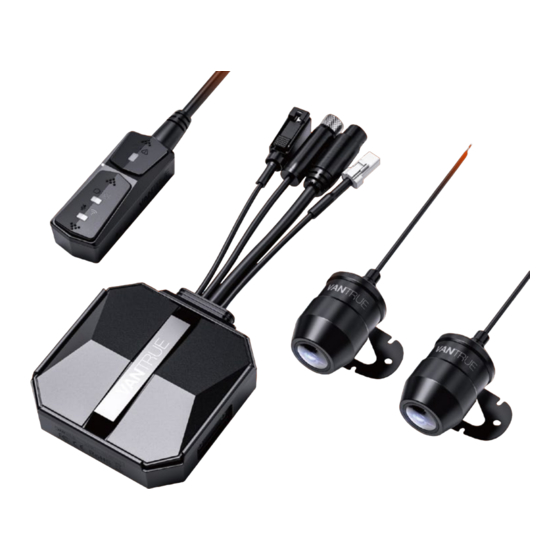
Seite 12: Structure Diagram
After the camera is installed, you can enter the VANTRUE App real-time preview to correct the cameraorientation. After entering the live preview, click on the word [ 田] calibration line at the bottom left of the screen to confirm the camera direction. - Seite 13 ⑪ Red power cable (positive power supply) ⑫ ACC signal wire (yellow wire) ⑬ Black ground wire (power negative) ⑭ Protective housing Note: When connecting the front camera cable, until you hear the "click" sound, indicating that the cable buckle has been installed in place. You can use a screwdriver to lift the end of the snap to make the snap easier to snap into the slot.
-
Seite 14: Basic Operation
3. Basic operation (App operation/remote control operation) Remote control button function introduction ① Power/Emergency button Long press function: Power off Short press function: Power on; After power on, short press to lock the file, and short press again when locking the file to capture the picture. - Seite 15 LED Indicator ① Power Light(Red Light) Status Steady Light Normal power supply Blinking Light Fast flashing, emergency recording Power off ② Recording light(Green Light) Status Steady Light Standby; in emergency recording. Blinking Light Fast flash: In formatting the card. Slow Flash: In Recording ③...
-
Seite 16: App Operation
5G Wi-Fi by default, and there will be "Wi-Fi on" prompt after power on. <2>. Open Vantrue App, click "+" to add the device, the App will jump to the cell phone Wi-Fi settings interface, please find the F1_VANTRUE_... - Seite 17 - 12 -...
- Seite 18 Note: <1>. For Wi-Fi connection operation, please refer to Figure 1~3. <2>. After the first successful connection, when you turn on F1 again in the future, you can connect automatically by clicking the App. If you turn off the function that Wi-Fi starts when you turn on the motorcycle dashcam, you need to manually turn on Wi-Fi to connect.
- Seite 19 Note: <1>. The mileage statistics function is enabled by default. For the GPS mileage information saved in the memory card of the camera, you can view the txt file in the GPS folder in the memory card through the computer, or export pictures or PDF files through the mileage statistics function in the APP.
- Seite 20 Front + Back: Default resolution is 2160P+1080P(HDR)30fps Front : Default resolution is 3840*2160P 30FPS Video 2-in-1 Off by default. When turned on, you can integrate the front and rear camera recording video into one segment. Loop The default is 1 minute, other Recording options can be selected.
- Seite 21 Time-lapse Default is off, you can choose 1FPS, recording 5FPS, 10FPS, 15FPS frame rate to start time-lapse recording Parking The default is off. When turned on, Mode it is collision detection mode. It needs to be connected with ACC function before it can be used. Low-light The default is on.
- Seite 22 Beep Turn on all tones by default, respectively, switch on/off sound, key tone, lock tone, format reminder tone, abnormal stop recording reminder Frequency 50Hz/60Hz Certificated View all F1 certification information Info System Check F1 model, software version Information information, official website Default Restore the default factory settings, Information...
- Seite 23 Note: <1>. No data traffic consumption is generated for playback and downloading files within the App. <2>. You need to download the video to local to view the GPS track information. After the video is downloaded successfully. If the GPS track information is not displayed, please disconnect the Wi-Fi connection and refresh it to display the GPS track information on the map.
- Seite 24 Note: Data traffic is required for sharing, so you need to disconnect the Wi-Fi connection with F1. (Required for some Android users) OTA Upgrade F1 main camera upgrade supports OTA upgrade in App. There are two types of OTA upgrade pushes: <1>.
- Seite 25 <2>. In the "About" screen, click OTA update to check for updates. When the upgrade file is detected in the above 2 ways, click OK, it will enter the upgrade screen, click "Download". Once the download is complete, install the dashcam immediately. - 20 -...
- Seite 26 Note: <1>. If the upgrade fails, please check whether the Wi-Fi connection is normal. During the upgrade, please do not disconnect the Wi-Fi, and make sure the recorder host is powered on properly. <2>. If the OTA upgrade has been failed, you can use SD card upgrade, remove the SD card, copy the upgrade software into the SD card, then insert the SD card into the host computer, and then...
-
Seite 27: Troubleshooting
4. Troubleshooting Tip: The system supports a maximum of 512G SD card storage, in order to ensure normal video, we recommend the use of genuine storage cards. As the recording system keeps reading and writing data, you must use a high-speed card that reaches the standard of Class10 and U3 or above. - Seite 28 sensitivity adjustment of G-sensor is above 1st gear. If the crash sensitivity is higher than 1 stop, please further adjust the sensitivity level of the G-sensor higher. Please also note that if time lapse mode is turned on, the video cannot be locked and only pictures can be taken.
-
Seite 29: Specifications
5. Specifications The specifications of this product may change without prior notice due to product improvements. Model Chips Novatek high-performance processor Image Front Camera: Sony 8MP CMOS Sensor Sensor Rear Camera: Sony 2MP CMOS Sensor G-sensor Built-in Sensor Camera Front: 160°wide viewing angle; Angle Rear: 145°... - Seite 30 Picture Format JPEG Memory External: 32GB-512GB Micro SD Card, U3, Class 10(not included in Storage the package) IP67 Waterproof Power Source Built-in super capacitor Power Supply 12V, 2A Support Wi-Fi Working -4°F to 140°F(-20°C to 60°C) Temperature Storage -13°F to 158°F(-25°C to 70°C) Temperature - 25 -...
-
Seite 31: Warranty & Support
Support new If you have any questions regarding your product, please do not hesitate to contact us at support@vantrue.net, or drop us a message through the live chat box at www.vantrue.net. Queries are typically answered within 12-24hours. Your opinion matters VANTRUE is firmly committed to always improving ®... - Seite 32 Freundliche Tipps: Lesen Sie die folgenden Anweisungen sorgfältig durch. Dieses Produkt ist eine Dashcam für Motorräder und kann nur an einer 12-V-Batterie installiert werden. Bitte schalten Sie das Motorrad vor der Installation aus und schalten Sie es nach Abschluss der Installation wieder ein.
-
Seite 33: Installation Der Sd-Karte
1. Installationsanleitung 1.1 Installation der SD-Karte Wenn Sie die SD-Karte zum ersten Mal einlegen, halten Sie bitte die Video-Taste auf der Fernbedienung 10 Sekunden lang gedrückt, um die Karte zu formatieren. Entfernen Sie die Verschlusskappe mit einem Schraubendreher Speicherkarte einlegen Notiz: Nachdem die Abdeckung des SD-Kartensteck- platzes entfernt wurde, bewahren Sie die gesicher-... - Seite 34 Notiz: <1>. Das WLAN-Signalübertragungsteil befindet sich auf der Vorderseite der Haupteinheit. Bitte legen Sie bei der Installation das Logo der Haupteinheit nicht nach unten und installieren Sie es nicht unter den Metallteilen des Motorrads. WiFi-Startrichtung <2>. Die F1-Haupteinheit muss mit 3M-Kleber (Standardlieferung) befestigt werden.
-
Seite 35: Installieren Sie Die Fernbedienung
1.3 Installieren Sie die Fernbedienung Die Fernbedienung kann je nach Nutzungs- gewohnheiten an geeigneter Stelle angebracht werden, z. B. am Lenker, am Kopf des Motorrads, seitlich am Kraftstofftank usw. Am Lenker Auf der Vorderseite Kraftstofftankseite des Motorrads des Motorrads Notiz: <1>. - Seite 36 1.4 Schließen Sie das Netzkabel an Schließen Sie das Netzkabel wie folgt an den Sicherungskasten an: Schritt 1: Verbinden Sie das rote Netzkabel mit dem Pluspol der Batterie; Schritt 2: Die ACC-Signalleitung (gelbe Leitung) wird an die ACC-Stromsicherung der Batterie angeschlossen;...
- Seite 37 1.5 Installieren Sie die vordere und hintere Linse des Autos Die vorderen und hinteren Linsen können durch Lösen der Sechskantschrauben eingestellt werden, um den Aufnahmewinkel und die Aufnahmerich- tung einzustellen. Wenn die Schrauben im Bajonett gelöst sind, können Sie den Objektivwinkel nach oben und unten einstellen.
- Seite 38 Einbauposition des Einbauposition des Motorrads vorne Motorrads hinten (Es wird empfohlen, die vorderen und hinteren Linsen des Autos an der Motorradkarosserie zu installieren, was das Wackeln reduzieren und die Stabilität verbessern kann.) <3>. Der Anschluss des Objektivs ist ein Hochfre- quenz -Datenkabel.
-
Seite 39: Installationsdiagramm
2. Installationsdiagramm ① F1-Host ② 4K-Frontkamera ③ 1080P Rückkamera ④ Fernbedienung ⑤ Netzkabel ⑥ Anschluss für die Rückfahrkamera ⑦ Frontkameraanschluss ⑧ Schließen Sie die Fernbedienung an ⑨ Schließen Sie das Netzkabel an ⑪ Rotes Netzkabel (Pluspol der Stromversorgung) ⑩ Sicherung ⑫... - Seite 40 Anmerkung: Beim Anschließen des Frontkamerakabels ist ein Klickton zu hören, das anzeigt, dass die Kabelschnalle installiert wurde. Die Rückseite des Druckknopfes kann mit einem Schraubendreher angehoben werden, um das Einrasten des Druckknopfes in den Schlitz zu erleichtern. ▲ F1-Kameralinie vermeidet scharfe Winkelbie- gungen, da eine spitze Winkelbiegung die Abschirmschicht beschädigt, eine abnormale Signalübertragung verursacht oder andere...
-
Seite 41: Betrieb
3. Betrieb (APP-Betrieb/Fernbedienungs- betrieb) Funktion der Fernbedienungstaste ① Power/SOS Taste Lange Druckfunktion: Ausschalten Kurzdruckfunktion: Einschalten; nach dem Einschalten kurz drücken, um die Datei zu sperren, erneut kurz drücken, wenn die Datei gesperrt ist, Sie können Schnappschuss. ②Aufnahme Taste Lang drücken: Nach dem Einschalten 10 Sekunden lang gedrückt halten, um die SD-Karte zu formatieren. - Seite 42 Anzeiger ① Power-Licht (rotes Licht) LED-Status Normale Dauerlicht Stromversorgung Blinken Schnelles Blinken: Notfallaufnahme Dunkel Ausschalten ② Aufnahme-Licht (grünes Licht) LED-Status Dauerlicht Standby; Notfallaufnahme Blinken Schnelles Blinken: formatieren… Blinkt langsam: aufnehmen… ③ Stummlicht (blaues Licht) LED-Status Dauerlicht Ton an Dunkel Ton aus Im Parkmodus sind die Kontrollleuchten wie folgt: Parkmodus LED-Status...
- Seite 43 Erstmalige Verbindung: <1>. Schalten Sie das Gerät ein, F1 öffnet standardmäßig 5-GHz-WLAN. <2>. Öffnen Sie die Vantrue APP, klicken Sie auf „+“, um ein Gerät hinzuzufügen. Die APP springt zur Oberfläche für die WLAN-Einstellungen des Telefons, suchen Sie das WLAN mit dem Namen F1_VANTRUE _XXXX und geben Sie das Standard- passwort 12345678 ein.
- Seite 44 - 39 -...
- Seite 45 Notiz: <1>. WiFi-Verbindung kann sich auf Abbildung ①~ ③ beziehen <2>. Schalten Sie nach der ersten erfolgreichen Verbindung F1 ein und klicken Sie auf die APP, um automatisch eine Verbindung herzustellen. Wenn die Wi-Fi-Startfunktion deaktiviert ist, müssen Sie das Wi-Fi manuell einschalten, um eine Verbind- ung herzustellen.
- Seite 46 sowie Kilometerstatistiken und -analysen über die APP durchführen. Notiz: <1>. Die Funktion der Kilometerstatistik ist standard- mäßig eingeschaltet, und die GPS-Kilometerinfor- mationen werden auf der Speicherkarte gespe- ichert. Der Kunde kann das txt-Dokument im GPS-Ordner auf der SD-Karte anzeigen oder das Bild oder PDF-Datei in der Kilometerstatistikfunktion in der APP exportieren.
- Seite 47 Auflösung Die Auflösung hat zwei Modi zur Auswahl, vorne + hinten und vorne. Standardauflösung vorne+hinten 2160P+1080P(HDR) 30FPS Standardauflösung vorne ist 3840x2160P 30FPS Standardmäßig aus; wenn Videos 2 in 1 aktiviert, können die Videos der Vorder-und Rückkamera in einem Video integriert werden. Dauer Der Standardwert ist 1 Minute, -aufnahme...
- Seite 48 Etikettenstempel Standardmäßig werden Datums- und Zeitangaben, Marken- und Modellbezeichnungen, Nummernschildbezeichnungen, Fahrzeuggeschwindigkeitsbeze- ichnungen und GPS-Standortbe- zeichnungen angezeigt Zeitraffer Die Standardeinstellung ist aus, Sie können 1 FPS, 5 FPS, 10 FPS, 15 FPS Bildnummer wählen, um die Zeitraffer-Videoaufnahme zu starten Park Es ist standardmäßig ausges- -überwachung chaltet.
- Seite 49 WLAN Das anfängliche WLAN-Passwort -Verbindungs lautet 12345678, das geändert -kennwort werden kann Formatieren SD-Karte formatieren Datum/Zeit Die automatische GPS-Aktualis- ierungszeit ist standardmäßig aktiviert; nachdem sie deaktiviert wurde, können Uhrzeit und Datum manuell geändert werden Das Standarddatumsformat ist YY/MM/DD Lautstärke Stellen Sie die Lautstärke des Lautsprechers auf der Fernbedi- enung ein Prompter Ton...
- Seite 50 APP-Wiedergabe, Löschen, Dateidownload Geben Sie die Dateisuche in der APP ein, Sie können die täglichen Videodateien anzeigen, wiedergeben, löschen, herunterladen und lokal speichern. 9:41 2023116_115036_0079_N_A.MP4 Horizontaler Bildschirm 16/1/2023 11:5:35 E1 000.000000. 000.000000. 36MK/H Hinweis: Um GPS-Informationen anzuzeigen, müssen Sie zuerst die Videodatei in den lokalen Ordner der APP herunterladen und dann im lokalen Ordner abspielen.
- Seite 51 Teilen Die heruntergeladenen Dateien können durch Clipping in der APP in sozialen Medien geteilt Die Video Teilen Zeit liegt innerhalb von 5-30 Sekunden Teilen Videos mit oder ohne Einstellungen für die Größe Videodatei Videoclips Notiz: Das Teilen verbraucht Datenverkehr, daher müssen Sie die WLAN-Verbindung mit F1 trennen.
- Seite 52 OTA-Upgrade F1 führt OTA-Upgrades in der APP durch. Es gibt zwei Typen von OTA-Upgrade-Pushs: ① Nach dem Öffnen der APP erscheint eine Aufforderung zur Aktualisierung. - 47 -...
- Seite 53 ② Klicken Sie in der „Info“-Oberfläche auf OTA- Upgrade. Wenn die obige Methode die Upgrade-Datei erkennt, klicken Sie auf OK, um die Upgrade-Ober- fläche aufzurufen, klicken Sie auf „Herunterladen“. Nachdem der Download abgeschlossen ist, installieren Sie ihn für die Dashcam. - 48 -...
- Seite 54 Notiz: ① Wenn das Upgrade fehlschlägt, überprüfen Sie bitte, ob die WLAN-Verbindung normal ist, und trennen Sie während des Upgrades bitte nicht das WLAN und stellen Sie sicher, dass die Dashcam an die Stromversorgung angeschlossen ist. ② Wenn das OTA-Upgrade fehlschlägt, können Sie die SD-Karte zum Upgrade verwenden, die SD- Karte entfernen, die Upgrade-Software auf die SD-Karte kopieren, die SD-Karte wieder einlegen...
-
Seite 55: Allgemeine Fehlerbehebung
4. Allgemeine Fehlerbehebung Tipps: Es unterstützt bis zu 512 G SD-Kartenspeicher. Um eine normale Videoaufnahme zu gewährleis- ten, wird empfohlen, eine echte Speicherkarte zu verwenden, die eine Hochgeschwindigkeitskarte der Klasse 10 und U3 oder höher sein muss. Stecken Sie sie nicht ein oder entfernen Sie sie nicht SD-Karte, wenn das System eingeschaltet ist, um Schäden zu vermeiden. - Seite 56 Kollisionsempfindlichkeit. Hinweis: Wenn die Zeitrafferaufnahme aktiviert ist, kann keine gesperrte Aufnahme durchgeführt werden, sondern nur ein Schnappschuss. ⑨ Die WLAN-Verbindung ist nicht normal. Bitte überprüfen Sie, ob das WLAN eingeschaltet ist. Nach dem Einschalten des WLANs zeigt das WLAN des Telefons den WLAN-Namen des F1 F1_ VANTRUE_XXXX an (Anfangspasswort ist 12345678).
-
Seite 57: Parameter
5. Parameter Modell Chip Novatek -Prozessor Hochleistungsprozessor Bildsensor Front: Sony 8-Millionen-Pixel- Prozessor Rück: Sony 2-Millionen-Pixel- Prozessor G-sensor Eingebauter dreiachsiger Sensor Weitwinkel Frontkamera 160° Rückkamera 145° Blende Frontkamera F1.8 RückkameraF1.8 Sprache Englisch, Französisch, Spanisch, Deutsch, Italienisch, verein- fachtes Chinesisch, Russisch, Japanisch, Koreanisch Auflösung Front+Rück:... -
Seite 58: Kundendienst
-20℃ ~60℃ -temperatur Lagertemperatur -25℃ ~70℃ 6. Kundendienst Die Garantiezeit der Marke VANTRUE beträgt 12 Monate. Wenn Sie Fragen zum Produkt haben, können Sie sich an die Kundendienstmitarbeiter Ihres Einkaufskanals wenden oder eine E-Mail an unsere offizielle E-Mail-Adresse support@vantrue. net senden. Wir werden engagierte Mitarbeiter haben, die innerhalb von 12-24 Stunden auf Fragen antworten. - Seite 59 Conseils aimables : Lisez attentivement les instructions suivantes. Ce produit est un enregistreur spécial pour motos, qui ne peut être installé que sur des batteries 12V. Veuillez éteindre la moto avant l'installation et rallumer une fois l'installation terminée. Le nom WiFi est F1_VANTRUE_XXXX et le mot de passe WiFi initial est 12345678.
-
Seite 60: Installation De La Carte Sd
1. Installation 1.1 Installation de la carte SD Après avoir inséré la carte SD pour la première fois, veuillez appuyer sur le bouton vidéo de la télécommande et le maintenir enfoncé pendant 10 secondes pour commencer à formater la carte. Utilisez un tournevis pour retirer le couvercle d'étanchéité... - Seite 61 Remarquer: 1) La partie de transmission du signal WiFi se trouve à l'avant de l'hôte, veuillez ne pas installer l'hôte avec le logo vers le bas, ou l'installer sous les parties métalliques de la moto. Direction de transmission du signal wifi 2) L'unité...
-
Seite 62: Installer La Télécommande
1.3 Installer la télécommande La télécommande peut être installée dans un endroit approprié selon les habitudes d'utilisation, comme sur le guidon, la partie avant de la voiture, le côté du réservoir de carburant, etc. Guidon de moto Tête de moto Côté... - Seite 63 1.4 Installer le câble d'alimentation Connectez le cordon d'alimentation à la boîte à fusibles comme suit : Étape 1 : Connectez le cordon d'alimentation rouge au pôle positif de la batterie ; Étape 2 : la ligne de signal ACC (ligne jaune) est connectée au fusible d'alimentation ACC de la batterie ;...
- Seite 64 nécessaire, veuillez l'envelopper avec du ruban isolant et le fixer. 1.5 Installez les lentilles avant et arrière Les objectifs avant et arrière peuvent être ajustés en desserrant les vis hexagonales intérieures pour régler l'angle d'enregistrement et la direction d'enregistrement de l'objectif. Après avoir desserré...
- Seite 65 ② Les lentilles avant/arrière sont toutes équipées d'adhésif 3M, qui peut être collé et fixé après avoir sélectionné une position appropriée à l'avant/ar- rière de la moto. Position d'installation avant Position d'installation arrière (Il est recommandé d'installer les objectifs avant et arrière sur la carrosserie de la voiture, ce qui peut réduire le tremblement de l'objectif et améliorer la stabilité...
-
Seite 66: Schéma De Combinaison D'installation
à la fonction de prévisualisation en temps réel sur l'APP. Une fois l'objectif installé, vous pouvez accéder à l'application VANTRUE CAM pour un aperçu en temps réel, puis cliquer sur la ligne d'étalonnage [田] en bas à gauche de l'écran pour confirmer la direction de l'objectif. - Seite 67 ⑥ Connectez la lentille arrière ⑦ Connectez la lentille avant ⑧ Connectez la télécommande ⑨ Connectez le cordon d'alimentation ⑪ Cordon d'alimentation rouge (pôle positif de ⑩ Fusible ⑫ Ligne de signal ACC (ligne jaune) l'alimentation) ⑬ Fil de terre noir (pôle négatif de l'alimentation) ⑭...
-
Seite 68: Opération
3. Opération (Application/ Télécommande) Introduction à la fonction du bouton de la télécommande ① Bouton Appui long : éteindre Appui court : mise sous tension ; après la mise sous tension, appuyez brièvement pour verrouiller le fichier, appuyez à nouveau brièvement lors du verrouillage du fichier, vous pouvez capturer des images. - Seite 69 Voyant Lumineux ① Voyant d'alimentation(Rouge) État Toujours Alimentation normale allumé Clignotant Clignote rapidement, indiquant que la vidéo est en cours d'enregis- trement urgent Éteint Éteindre ② Voyant d'enregistrée(Vert) État Toujours Veille, en enregistrement allumé d'urgence Clignotant Clignotement rapide: formatage Clignotant lentement: enregistrement ③...
- Seite 70 ① Allumez l'alimentation et allumez le F1 pour activer le WiFi 5G par défaut, et il y aura une invite disant "WiFi activé" après l'allumage. ② Ouvrez l'application Vantrue, cliquez sur "+" pour ajouter un appareil. L'APP passera à l'interface de réglage WiFi du téléphone portable, veuillez trouver le WiFi nommé...
- Seite 71 - 66 -...
- Seite 72 Remarquer: ▲ L'opération de connexion WiFi peut se référer à la figure ①~③ ▲ Après la première connexion réussie, activez F1 et cliquez sur l'APP pour vous connecter automatiquement. ▲ Si la fonction de mise sous tension Wi-Fi est désactivée, vous devez allumer manuellement le Wi-Fi pour vous connecter.
- Seite 73 paramètres, lire des fichiers, afficher des pistes GPS vidéo, partager des fichiers, ainsi que des statistiques et des analyses de kilométrage via l'APP. Remarquer: 1) Les statistiques de kilométrage sont activées par défaut, les informations GPS sont enregistrées sur la carte mémoire, vous pouvez afficher les fichiers txt sur la carte SD ou exporter des images ou des fichiers PDF dans l'APP.
- Seite 74 Vidéo 2 en 1 Il est désactivé par défaut et lorsqu'il est activé, les vidéos des caméras avant et arrière peuvent être intégrées dans une seule vidéo. Enregis- Par défaut est 1 minute. Lorsque le trement en fichier de la carte SD est plein, il boucle écrasera automatiquement le cycle.
- Seite 75 Surveillance Il est désactivé par défaut. Une fois du parking allumé, c'est le mode de détection de collision. Il doit être connecté à la fonction ACC avant de pouvoir être utilisé. Vision Activé par défaut, lorsqu'il est nocturne en activé, prend effet lors de l'entrée basse lumière en mode parking Protection...
- Seite 76 tension, son d'appui sur les touches, son d'invite de verrouil- lage, son d'invite de formatage, rappel d'arrêt anormal de l'enregistrement Fréquence 50Hz/60Hz Informations Voir toutes les informations sur la de certifica- certification F1 tion Informations Afficher le modèle, les informations système sur la version du logiciel, l'URL du site Web officiel...
- Seite 77 Lecture APP, supprimer, télécharger des fichiers Entrez dans la navigation des fichiers dans l'APP, vous pouvez afficher les fichiers vidéo quotidiens, les lire, les supprimer, les télécharger et les enregistrer localement. 9:41 2023116_115036_0079_N_A.MP4 Lire le fichier horizontalement 16/1/2023 11:5:35 E1 000.000000.
- Seite 78 Partager des fichiers Les fichiers téléchargés peuvent être partagés sur les réseaux sociaux grâce à l'écrêtage dans l'APP. Durée de partage vidéo: 5 à 30 secondes Sélectionnez l'audio Sélectionnez la taille du fichier vidéo Bouton de confirmation du clip Remarquer: ▲...
- Seite 79 Mise à niveau OTA La mise à niveau de l'ordinateur central F1 prend en charge la mise à niveau OTA dans l'APP. ① Après avoir ouvert l'APP, une invite de mise à niveau apparaîtra. - 74 -...
- Seite 80 ② Dans l'interface "À propos", cliquez sur Mise à niveau OTA pour vérifier les mises à jour. Lorsque la méthode ci-dessus détecte le fichier de mise à niveau, cliquez sur OK pour accéder à l'interface de mise à niveau, cliquez sur "Télécharger".
- Seite 81 Remarquer: ①Si la mise à niveau échoue, veuillez vérifier si la connexion WiFi est normale, et pendant la mise à niveau, veuillez ne pas déconnecter le WiFi et assurez-vous que l'hôte de l'enregistreur est allumé normalement. ②Si la mise à niveau OTA échoue tout le temps, vous pouvez utiliser la carte SD pour la mise à...
-
Seite 82: Dépannage Courant
4. Dépannage courant Conseils : ce système prend en charge le stockage sur carte SD jusqu'à 512 Go. Afin d'assurer un enregistrement vidéo normal, il est recommandé d'utiliser une carte mémoire authentique. Étant donné que le système d'enregistrement lit et écrit constamment des données, une carte haute vitesse qui répond aux normes. - Seite 83 Veuillez vérifier que le microphone est éteint. ⑦ De nombreuses vidéos sont verrouillées pendant la conduite normale : Veuillez ajuster la sensibilité du capteur de gravité, la valeur par défaut est de 3 niveaux, veuillez ajuster à 1 niveau. ⑧ Le fichier de l'enregistreur n'est pas verrouillé lorsque la moto tombe en panne : Veuillez vérifier si le réglage de la sensibilité...
-
Seite 84: Paramètres Du Produit
serré ou le presser trop étroitement avec la coque de la voiture. 5. Paramètres du produit Modèle Processeur Processeur haute performance de puce Novatek Capteur Lentille frontale : Processeur Sony 8 millions de pixels d'image Lentille arrière : Processeur Sony 2 millions de pixels G-sensor Capteur à... -
Seite 85: Service Après-Vente
6. Service après-vente La période de service de garantie de la marque VANTRUE est de 12 mois.Si vous avez des questions sur le produit, vous pouvez contacter le service clientèle de votre canal d'achat ou envoyer un e-mail à notre e-mail officiel support@vantrue.net. - Seite 86 Wskazówki: Przeczytaj uważnie niniejszą instrukcję obsługi przed rozpoczęciem korzystania z kamery. Ten produkt jest rejestratorem przeznaczonym dla motocykli i jest ograniczony do podłączenia do akumulatora 12 V. Proszę wyłączyć zasilanie motocykla przed instalacją i włączyć zasilanie po zakończeniu instalacji. Nazwa Wi-Fi to F1_VANTRUE_XXXX, a początkowe hasło Wi-Fi to 12345678.
-
Seite 87: Instrukcja Instalacji
1. Instrukcja instalacji 1.1 Wkładanie karty pamięci (zalecane: szybka karta microSD Vantrue U3). Po włożeniu karty SD po raz pierwszy, naciśnij i przytrzymaj przycisk nagrywania na pilocie przez 10 sekund, aby rozpocząć formatowanie karty. Użyj pasującego śrubokręta, aby zdjąć pokrywę... - Seite 88 Uwaga: <1>. Część transmitująca sygnał Wi-Fi znajduje się z przodu jednostki głównej. Nie instaluj go ekranem do dołu podczas instalowania strony z logo jednostki głównej lub pod metalowymi częściami motocykla. Kierunek transmisji sygnału Wi-Fi <2>. Rama główna F1 musi być przymocowana za pomocą...
- Seite 89 1.3 Instalacja pilota Możesz wybrać odpowiednią pozycję instalacji zgodnie z własnymi przyzwyczajeniami użytkowa- nia i zainstalować pilota na kierownicy, przedniej części pojazdu, boku zbiornika paliwa itp. Kierownice Pozycja przodu Strona zbiornika motocyklowe motocykla paliwa Uwaga : <1>. Podczas instalowania rejestratora motocyklo- wego należy skierować...
- Seite 90 1.4 Instalowanie przewodu zasilającego Podłącz przewód zasilający do skrzynki bezpiec- zników w następujący sposób. Krok 1: czerwony kabel zasilający jest podłączony do dodatniego bieguna akumulatora, stałe zasilanie. Krok 2: przewód sygnałowy ACC (żółty przewód) jest podłączony do bezpiecznika zasilania ACC akumulatora który ma napięcie po zapłonie.
- Seite 91 długich kabli zasilających. W razie potrzeby użyj taśmy izolacyjnej, aby je owinąć i zamocować. 1.5 Instalowanie przedniej i tylnej kamery Przedni i tylny obiektyw można poluzować za pomocą sześciokątnej śruby, aby dostosować kąt nagrywania obiektywu, a także kierunek nagrywania. Śruby z końcówką walcową uchwytu kamery: poluzowane, można regulować...
- Seite 92 <2>. Przednie/tylne kamery są dostarczane z klejem 3M, wystarczy przykleić go z przodu/tyłu motocykla po wybraniu odpowiedniej pozycji. Pozycja montażu Tylna pozycja montażowa głowicy motocykla motocykla (Zalecamy zamontowanie przedniej i tylnej kamery na karoserii motocykla zamiast na kierownicy, aby zredukować drgania kamery i poprawić...
-
Seite 93: Schemat Strukturalny
Po zainstalowaniu obiektywu możesz przejść do podglądu w czasie rzeczywistym aplikacji VANTRUE, aby poprawić orientację obiektywu. Po przejściu do podglądu na żywo kliknij linię kalibracji [] w lewym dolnym rogu ekranu, aby potwierdzić kierunek obiektywu. - Seite 94 ⑥ Port tylnej kamery ⑦ Port kamery przedniej ⑧ Podłączenie pilota ⑨ Podłączenie przewodu zasilającego ⑪ Czerwony przewód zasilający (zasilanie ⑩ Bezpiecznik ⑫ Przewód sygnałowy ACC (żółty przewód, dodatnie, stałe) ⑬ Czarny przewód uziemiający (zasilanie ujemne, zasilanie po zapłonie) ⑭ Obudowa ochronna uziemienie) Uwaga: Podczas podłączania kabla przedniej kamery...
-
Seite 95: Podstawowa Obsługa
3. Podstawowa obsługa (obsługa aplikacji/obsługa pilota) Wprowadzenie do funkcji przycisku pilota ① Przycisk zasilania/awaryjnego Funkcja długiego naciśnięcia: Wyłącz urządzenie Funkcja krótkiego naciśnięcia: włączanie; Po włączeniu naciśnij krótko, aby zablokować plik i ponownie naciśnij krótko, aby zablokować plik, aby zrobić zdjęcie. ②... - Seite 96 Status diody LED ① tło zasilania (czerwone światło) Status Stałe światło Normalne zasilanie Migające Szybkie miganie, nagrywanie awaryjne światło WYŁ Wyłączenie zasilania ② Światło nagrywania (zielone światło) Status Stałe Czuwanie; w trybie światło nagrywania awaryjnego. Migające Szybkie miganie: podczas formatowania światło karty.
- Seite 97 Działanie aplikacji Pobieranie aplikacji Zeskanuj poniższy kod QR, aby pobrać najnowszą aplikację z Google Play i App Store. Lub możesz wyszukać „Vantrue” w Google Play i App Store, aby go pobrać. Kroki pierwszego połączenia. <1>. Włącz kamerę motocyklową, F1 domyślnie otworzy Wi-Fi 5G, a po włączeniu pojawi się...
- Seite 98 PL PL - 93 -...
- Seite 99 Uwaga: <1>. Aby uzyskać informacje na temat działania połączenia Wi-Fi, patrz Rysunek 1~3. <2>. Po pierwszym udanym połączeniu, kiedy ponownie włączysz F1 w przyszłości, możesz połączyć się automatycznie, klikając aplikację. Jeśli wyłączysz funkcję uruchamianą przez Wi-Fi po włączeniu kamery motocyklowej, musisz ręcznie włączyć...
- Seite 100 przeglądać analizę statystyk przebiegu i inne funkcje za pośrednictwem aplikacji. Uwaga: <1>. Funkcja statystyki przebiegu jest domyślnie włączona. Aby uzyskać informacje o przebiegu GPS zapisane na karcie pamięci aparatu, możesz wyświetlić plik txt w folderze GPS na karcie pamięci za pośrednictwem komputera lub wyeksportować...
- Seite 101 Wi-Fi 5G, możesz przełączyć się na Wi-Fi 2,4G Informacje Wi-Fi: sprawdź nazwę Wi-Fi, hasło Wi-Fi i inne informacje. Rozdzielczość Do wyboru są dwa tryby rozdzielczości, rozdzielczość przód+ tył i rozdzielczość przód. Domyślna rozdzielczość przód+tył to 2160P+1080P(HDR) 30 kl./s Przód pojazdu domyślnie ma rozdzielczość...
- Seite 102 Odbicie Domyślnie jest włączone, pojazd za ekranem wyświetlacza dla odbicia lustrzane lustrzanego, poza ekranem tylnej kamery wyświetlacza dla oryginalnego obrazu. Ustawienia Obsługa ustawienia tablicy tablic rejestracyjnej w języku chińskim, pojazdu angielskim i japońskim Dodaj do Domyślnie wyświetlana jest data i nagrania godzina, marka i model, tablica rejestracyjna, prędkość, lokalizacja...
- Seite 103 Otwórz domyślnie, możesz zmienić ustawienia jednostkę prędkości i zobaczyć siłę sygnału GPS Wi-Fi hasło Początkowe hasło Wi-Fi to 12345678, możesz je zmienić na inne hasło Forma- Formatowanie karty pamięci towanie Automatyczna aktualizacja czasu ustawienia GPS jest domyślnie włączona. Po wyłączeniu można ręcznie zmienić godzinę...
- Seite 104 Odtwarzaj, usuwaj i pobieraj pliki w aplikacji Wejdź do przeglądania plików w aplikacji, możesz przeglądać codzienne pliki nagrań, odtwarzać, usuwać, pobierać do lokalnego folderu. 9:41 2023116_115036_0079_N_A.MP4 Kliknij go, aby odtworzyć plik w orientacji 16/1/2023 11:5:35 E1 000.000000. 000.000000. 36MK/H poziomej. Uwaga: Aby wyświetlić...
- Seite 105 Udostępnianie plików aplikacji Już pobrane pliki można udostępniać w mediach społecznościowych, edytując je w aplikacji. Długość udostępniania wideo w zakresie 5-30s Udostępnianie wideo może odbywać się z dźwiękiem lub Rozmiar udostępnio- nego pliku wideo Potwierdź edycję wideo, po udanej edycji aplikacje mediów społecznościowych, które można udostępniać, pojawią...
- Seite 106 Aktualizacja OTA Aktualizacja głównego modułu F1 obsługuje aktualizację OTA w aplikacji. Istnieją dwa rodzaje aktualizacji OTA: <1>. Po otwarciu aplikacji pojawi się monit o aktualizację. - 101 -...
- Seite 107 <2>. Na ekranie „Informacje” kliknij opcję Aktual- izacja OTA, aby sprawdzić dostępność aktualizacji. Gdy plik aktualizacji zostanie wykryty na 2 powyższe sposoby, kliknij OK, przejdzie do ekranu aktualizacji, kliknij „Pobierz”. Po zakończeniu pobierania natychmiast zainstaluj kamerę. - 102 -...
- Seite 108 Uwaga: <1>. Jeśli aktualizacja się nie powiedzie, sprawdź, czy połączenie Wi-Fi działa normalnie. Podczas aktualizacji nie odłączaj Wi-Fi i upewnij się, że host rejestratora jest prawidłowo włączony. <2>. Jeśli aktualizacja OTA nie powiodła się, możesz użyć aktualizacji karty SD, wyjąć kartę SD, skopiować...
-
Seite 109: Rozwiązywanie Problemów
4. Rozwiązywanie problemów Wskazówka: system obsługuje maksymalnie 512 GB pamięci na kartach SD, aby zapewnić normalne wideo, zalecamy korzystanie z oryginalnych kart pamięci. Ponieważ system rejestrujący ciągle odczytuje i zapisuje dane, należy użyć szybkiej karty, która spełnia standardy klasy 10 i U3 lub wyższej. Nie należy również podłączać... - Seite 110 <8>. Kiedy dochodzi do kolizji motocykla, plik wideo nie jest blokowany: Sprawdź, czy regulacja czułości G-sensor jest powyżej 1. . Jeśli czułość zderzeniowa jest wyższa niż 1 stopień, dostosuj wyższy poziom czułości czujnika G. Należy również pamiętać, że jeśli tryb poklatkowy jest włączony, nie można zablokować...
-
Seite 111: Dane Techniczne
5. Dane techniczne Specyfikacje tego produktu mogą ulec zmianie bez wcześniejszego powiadomienia ze względu na ulepszenia produktu. Model Procesor Novatek high-performance procesor Sensor Przednia kamera: Sony 8MP CMOS Tylna kamera: Sony 2MP CMOS obrazu G-sensor Wbudowany Kąt widzenia Przód: 160° obiektywów Tył: 145°... - Seite 112 Memory Zewnętrzna: 32GB-512GB Micro Storage SD Card, U3, Class 10(brak w Obsługiwana zestawie) pamięć Wodoodporność IP67 Zasilanie Wbudowany kondensator Napięcie 12V, 2A Obsługiwane Wi-Fi Temp. pracy -4°F do 140°F(-20°C to 60°C) Temp. -13°F do 158°F(-25°C to 70°C) pamięci - 107 -...
-
Seite 113: Gwarancja & Wsparcie
Gwarancja Kamera VANTRUE F1 jest objęta pełną ® 12-miesięczną gwarancją. Zarejestruj swój produkt na naszej oficjalnej stronie (www.vantrue.net/ register) aby być na bieżąco z aktualizacjami. Wsparcie Jeśli masz jakiekolwiek pytania dotyczące produktu, nie wahaj się skontaktować z nami pod adresem biuro@vantrue.pl Zapytania są... - Seite 114 Skontaktuj się z nami: www.vantrue.pl facebook.com/vantruePolska - 109 -...