Inhaltsverzeichnis
Werbung
Verfügbare Sprachen
Verfügbare Sprachen
Quicklinks
Werbung
Inhaltsverzeichnis
Fehlerbehebung

Verwandte Anleitungen für Anker NEBULA Capsule 3 Laser


Inhaltszusammenfassung für Anker NEBULA Capsule 3 Laser
- Seite 1 User Manual Nebula Capsule 3 Laser Model: D2426 Nebula Capsule 3 Laser...
- Seite 2 English Deutsch Español Français Italiano Nederlands Português 日本語 한국어 繁体中文 لع َ ر َ ب ِ ية...
-
Seite 3: Inhaltsverzeichnis
Table of Contents Important Safety Instructions What's Included At a Glance 1. Projector 2. Remote Control 3. LED Light Guide Getting Started 1. Prepare the Remote 2. Position Your Projector 3. Charge Your Projector 4. Power On / Off 5. Auto Focus and Keystone 6. -
Seite 4: Important Safety Instructions
Important Safety Instructions Read all instructions before you use this product. Do not make any changes or create settings that are not described in this manual. If physical injury, loss of data, or damage is caused by failure to follow instructions, the warranty does not apply. - Seite 5 Using an unauthorized adapter may be dangerous and violate the Terms of Use and product warranty. • User should comply with the laws and regulations of the corresponding countries and regions where the equipment is located (used), abide by professional ethics, pay attention to safety obligations, and strictly prohibit the use of our products or equipment for any illegal purposes.
- Seite 6 • Replace the remote control batteries only with the same or an equivalent type. • Batteries contain chemical substances and they should be disposed of properly. • Charge this device regularly. Do not store this device with a completely discharged battery. Warning •...
- Seite 7 Caution • Possibly hazardous optical radiation emitted from this product may be harmful to eyes. • Do not stare at the operating beam. Laser Safety • RG1 IEC 62471-5:2015 • Complies with IEC 60825-1:2014 Class 1 and IEC 62471-5:2015 Risk Group 1. •...
-
Seite 8: What's Included
What’s Included Nebula Capsule 3 Laser Adapter Charging Cable Remote Control AAA Battery × 2 Quick Start Guide... -
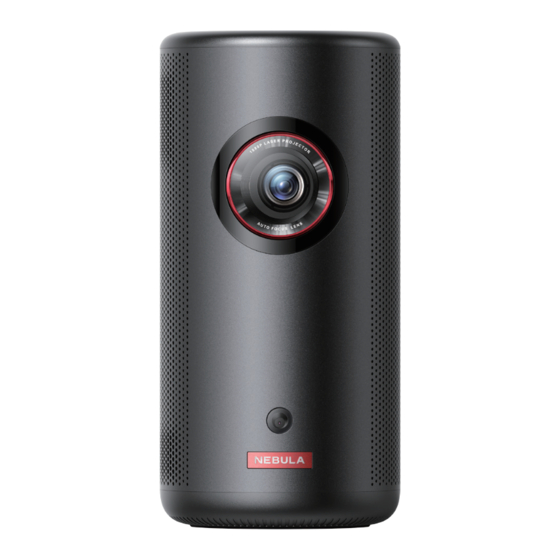
Seite 9: At A Glance
At a Glance 1. Projector Front View Lens Camera (for autofocus and auto keystone correction) -
Seite 10: Rear View
Rear View Speaker AUX-OUT Socket • Connect to an external sound output device. Infrared Receiver Mode Button • Press to switch between Bluetooth speaker mode and projector mode. Power Button • Press and hold for 3 seconds to power on / off. •... -
Seite 11: Top View
Top View Volume Up / Down Buttons Confirmation Button Return Button Navigation Buttons Bottom View 1/4" Tripod Socket... - Seite 12 Dimensions 167.5 (H) x 83.0 (D) mm / 6.6 (H) × 3.3 (D) in 83.0mm...
-
Seite 13: Remote Control
2. Remote Control Adjust focus Navigation Return to the previous menu Power on / off or switch to standby mode Activate the Google Assistant Confirm a selection / Pause / Resume Access more options Access the home menu Volume up / down... -
Seite 14: Led Light Guide
3. LED Light Guide Button LED Status Description Steady blue Powered on Light off Powered off Steady orange Standby mode / Charging Steady green Fully charged Flashing red Low battery Ready to pair / Bluetooth pairing / Flashing blue Bluetooth disconnected (Bluetooth speaker mode) Bluetooth connected (Bluetooth Steady blue... -
Seite 15: Getting Started
Getting Started 1. Prepare the Remote ① Slide to open the battery compartment. ② Insert new batteries matching the polarity (+/-) and close the battery compartment. ③ For first-time use, follow the on-screen instructions to pair the remote with your projector. The distance between the remote and the projector should not exceed 10 m / 33 ft. - Seite 16 • It is unnecessary to tilt the projector towards the projection surface. You can correct the projection image with the built-in autofocus and auto-keystone correction. • You may also install the projector onto a tripod (sold separately). • The distance between the projector and the projection surface determines the projection image size.
-
Seite 17: Charge Your Projector
3. Charge Your Projector For first-time use, fully charge your projector using the provided adapter and charging cable. 4. Power On / Off Press and hold the projector power button for 3 seconds to power on / off. 3” • You can also press and hold the power button on the remote for 3 seconds to power off. -
Seite 18: Auto Focus And Keystone
5. Autofocus and Auto Keystone Correction To enable autofocus and auto keystone correction, slightly move the projector or press the on the remote. 6. Setup When using the projector for the first time, follow the on-screen display (OSD) instructions to complete the basic setup. •... -
Seite 19: Nebula Connect App
Nebula Connect App To easily control the projector, we recommend you download the Nebula Connect app. ① Download the Nebula Connect app from the App Store (iOS devices) or Google Play (Android devices). ② Enable Bluetooth on your smartphone. ③ Open the Nebula Connect app and select [Capsule 3 Laser] > [XXXXXX] as the device to be connected. -
Seite 20: Projector
2. Projector On the home page, select > [Projector Settings] and press [Brightness] Adjust brightness based on your environment. [Picture Mode]: The projector is preset with several predefined picture modes so that you can choose one to suit your environment and input source. •... - Seite 21 [Manual Keystone Correction Access]: Manually perform keystone correction. [Zoom]: Zoom in or out of the projection image from 50% to 100%. [Auto Focus at Startup]: Automatically adjust the focus when the projector powers on. [Auto Focus After Movement]: Automatically adjust [Focus Settings] the focus when you move the projector.
- Seite 22 [Bluetooth Speaker Enable Bluetooth speaker mode. Mode] [Projector Mode]: Select a way of placing the projector. • [Auto]: Automatically detects whether the projector is inverted. Automatically switch between these options. • [Front]: The device is located in front of the projection surface.
-
Seite 23: Apps
3. Apps ① On the home page, select > [Apps], and press ② Select an app and check the current version, open or force stop the app, check the storage used, clear data or cache, uninstall the app, or enable or disable notifications and permissions. 4. -
Seite 24: Others
Choose to show notifications on all Android devices [Chromecast built- connected to your Wi-Fi and let them control media casting to this device. [Screen Saver] Change the screen saver settings. [Location] Permit apps to estimate locations. Automatically send diagnostic information to Google, [Usage &... -
Seite 25: Using Your Projector
You can wirelessly cast movies, games, music, and entire screen from your iOS, macOS, Android, or Windows device to Nebula Capsule 3 Laser. Make sure Nebula Capsule 3 Laser and your device are connected to the same wireless network. The network can be a WiFi network or your phone's hotspot. -
Seite 26: Play From Hdmi Playback Devices
Certain content cannot be cast on Nebula Capsule 3 Laser due to copyright restrictions. You can stream the content via the same app installed on your projector. 3.2 Cast Device Screen You can cast the entire screen from your device to the projector. -
Seite 27: Play From A Usb Drive
② Press to access the settings menu, then select [Device Preferences] > [Input] > [HDMI]. (Not included) The projector will automatically start HDMI playback once connected to an HDMI playback device for the first time. 5. Play from a USB Drive With this projector, you can enjoy music, video, and pictures, or install apps that are stored on a USB 2.0 drive. -
Seite 28: Play Through External Sound Devices
6. Play Through External Sound Devices This projector can also be connected to external sound output devices, including headphones and speakers; when connected to external speakers, the built-in speaker system is disabled. ① Use a 3.5 mm audio cable or an adapter (not provided) to connect your headphones or external speakers. -
Seite 29: Bluetooth Speaker Mode
② Enable Bluetooth on your smartphone and select Nebula Capsule 3 Laser to connect. < Settings Bluetooth Bluetooth Device Nebula Capsule 3 Laser Connected Pairing Connected To exit Bluetooth speaker mode, press on the projector or press and hold on the remote for two seconds. -
Seite 30: Specifications
Specifications Specifications are subject to change without notice. 3A or 9V 3A or 12V 3A or 15V Input 3A or 20V 2.25A Power Consumption < 45W Standby Power < 0.5W Consumption Resolution 1920 × 1080 480p (60 Hz), 576p (50 Hz), 720p (30 Hz), 720p (50 Hz), 720p (60 Hz), 1080p (24 Hz), 1080p (30 Hz), 1080p (50 Hz), 1080p (60 Compatible Resolutions... - Seite 31 Speaker Output Power Noise 28 dB Wi-Fi Wi-Fi 2.4 GHz/5.0 GHz 802.11 a/b/g/n/ac Bluetooth Version Bluetooth Range 25 m / 82 ft USB Format FAT, FAT32 For Europe and UK, 0°C to 25°C Operating Temperature For other countries and regions, 0°C to 35°C / 32°F to 95°F Remote Control Batteries AAA x 2...
-
Seite 32: Troubleshooting
Troubleshooting ① Fails to Power On • The projector may be out of power. Charge the projector for 15-30 minutes and see if the power button light turns on. ② Cannot Charge • Use the included adapter and charging cable to charge the projector. - Seite 33 • Connect your projector with another HDMI playback device. • Connect the HDMI playback device to your TV via HDMI cable to check if the device or cable malfunctions. • Adjust the HDMI playback device's output resolution / frequency to be the same as the projector's.
-
Seite 34: Notice
This product complies with the radio interference requirements of the European Community. Declaration of Conformity Hereby, Anker Innovations Limited. declares that this device is in compliance with the essential requirements and other relevant provisions of Directive 2014/53/EU. For the Declaration of Conformity, visit the Web site https://uk.seenebula.com/. - Seite 35 Anker Innovations Deutschland GmbH I Georg-Muche-Strasse 3, 80807 Munich, Germany The following importer is the responsible party (contract for UK matters): Anker Technology (UK) Limited I GNR8, 49 Clarendon Road, Watford, Hertfordshire, WD17 1HP, United Kingdom Your product is designed and manufactured with high-quality...
- Seite 36 This symbol means the product must not be discarded as household waste, and should be delivered to an appropriate collection facility for recycling. Proper disposal and recycling helps protect natural resources, human health and the environment. For more information on disposal and recycling of this product, contact your local municipality, disposal service, or the shop where you bought this product.
-
Seite 37: Trademarks
Trademarks The Bluetooth® word mark and logos are registered trademarks owned by the Bluetooth SIG, Inc. and any use of such marks by Anker Innovations Limited is under license. Other trademarks and trade names are those of their respective owners. -
Seite 38: Warranty
Manufactured under license from Dolby Laboratories. Dolby, Dolby Audio and the double-D symbol are trademarks of Dolby Laboratories Licensing Corporation. Warranty 30-Day Money-Back Guarantee for Any Reason You may return your undamaged product and packaging within 30 days of purchase to receive a FULL REFUND for any reason. If the reason for the return isn’t quality-related, the customer must pay for the return shipping. - Seite 39 Inhaltsverzeichnis Wichtige Sicherheitsinformationen Lieferumfang Auf einen Blick 1. Projektor 2. Fernbedienung 3. Anleitung zu LED-Anzeigen Erste Schritte 1. Vorbereiten der Fernbedienung 2. Positionieren des Projektors 3. Aufladen des Projektors 4. Ein/Aus 5. Autofokus und Keystone-Korrektur 6. Einrichtung Nebula Connect App Einstellungen 1.
-
Seite 40: Wichtige Sicherheitsinformationen
Wichtige Sicherheitsinformationen Lesen Sie die gesamte Gebrauchsanweisung, bevor Sie dieses Produkt verwenden. Nehmen Sie keine Änderungen oder Einstellungen vor, die nicht in diesem Handbuch beschrieben sind. Wenn Personenschäden, Datenverluste oder Schäden auf eine Missachtung der Anweisungen zurückzuführen sind, greift die Garantie nicht. Einrichtung •... - Seite 41 • Stellen Sie keine schweren oder scharfen Gegenstände auf dieses Produkt. • Zerlegen Sie das Produkt nicht, um einen Stromschlag zu vermeiden. • Vermeiden Sie extreme Erschütterungen, da diese die internen Komponenten beschädigen können. • Verwenden Sie ausschließlich den vom Hersteller angebotenen Adapter.
- Seite 42 • Stellen Sie dieses Gerät während des Ladevorgangs in einer Umgebung mit normaler Raumtemperatur (5 °C bis 25 °C) und angemessener Belüftung auf. Akku • Die Fernbedienung enthält Batterien, die eine Erstickungsgefahr darstellen. Bewahren Sie die Fernbedienung außerhalb der Reichweite von Kindern auf. •...
- Seite 43 Reinigungsmittel. • Verwenden Sie zur Reinigung des Objektivs keine flüssigen Reinigungsmittel, um die Beschichtung des Objektivs nicht zu beschädigen. • Wischen sie die Oberflächen vorsichtig ab. Achten Sie darauf, die Oberfläche nicht zu verkratzen. • Verwenden Sie Objektivreinigungspapier, um die Linse zu reinigen. Reparaturen •...
- Seite 44 • Öffnen Sie nicht das Gehäuse des Lasermoduls im Inneren des Produkts. • Wenn das Gehäuse des Lasermoduls im Inneren des Produkts beschädigt ist, verwenden Sie es nicht mehr. • Laser im Inneren. Es besteht die Gefahr von Haut- oder Hornhautverbrennungen.
-
Seite 45: Lieferumfang
IM LIEFERUMFANG Nebula Capsule 3-Laser Adapter Ladekabel Fernbedienung Zwei AAA-Batterien Kurzanleitung... -
Seite 46: Auf Einen Blick
Auf einen Blick 1. Projektor Vorderseite Objektiv Kamera (für Autofokus und automatische Keystone- Korrektur) -
Seite 47: Rückseite
Rückseite Lautsprecher AUX-OUT-Anschluss • Anschluss an ein externes Soundausgabegerät. Infrarot-Empfänger Modus-Taste • Drücken Sie diese Taste, um zwischen Bluetooth- Lautsprechermodus und Projektormodus zu wechseln. Ein-/Aus-Taste • Zum Ein-/Ausschalten 3 Sekunden lang gedrückt halten. • Drücken Sie diese Taste, um den Projektor zu aktivieren/im Projektormodus in den Standby-Modus zu wechseln. -
Seite 48: Unterseite
Oberseite Leiser-/Lauter-Tasten Bestätigungstaste Zurück-Taste Navigationstasten Unterseite 1/4"-Stativgewinde... - Seite 49 Maße 167,5 (H) x 83,0 (D) mm 83.0mm...
-
Seite 50: Fernbedienung
2. Fernbedienung Schärfe einstellen Navigation Zurück zum vorherigen Menü. Ein-/Ausschalten oder in den Standby-Modus wechseln Google Assistant aktivieren Auswahl bestätigen/anhalten/ fortsetzen Auf weitere Optionen zugreifen Auf das Startmenü zugreifen Laut/Leise... -
Seite 51: Anleitung Zu Led-Anzeigen
3. Anleitung zu LED-Anzeigen Taste LED-Status Beschreibung Leuchtet blau Eingeschaltet Licht ist aus Ausgeschaltet Dauerhaft orange Standby-Modus/Laden Leuchtet grün Vollständig aufgeladen Blinkt rot Akkustand niedrig Bereit zum Koppeln/Bluetooth- Blinkt blau Kopplung/Bluetooth getrennt (Bluetooth-Lautsprechermodus) Aktive Bluetooth-Verbindung Leuchtet blau (Bluetooth-Lautsprecher-Modus) -
Seite 52: Erste Schritte
Erste Schritte 1. Vorbereiten der Fernbedienung ① Schieben Sie das Batteriefach nach unten, um es zu öffnen. ② Legen Sie die neuen Batterien unter Beachtung der Polarität (+/–) ein und schließen Sie das Batteriefach. ③ Befolgen Sie bei der erstmaligen Verwendung die Anweisungen auf dem Bildschirm, um die Fernbedienung mit Ihrem Projektor zu koppeln. - Seite 53 • Es ist nicht erforderlich, den Projektor auf die Projektionsfläche zu richten. Sie können das Projektionsbild mit dem integrierten Autofokus und der automatischen Keystone-Korrektur korrigieren. • Sie können den Projektor bei Bedarf auch auf einem Stativ (separat erhältlich) aufstellen. • Der Abstand zwischen dem Projektor und der Projektionsfläche bestimmt die Projektionsbildgröße.
-
Seite 54: Aufladen Des Projektors
3. Aufladen des Projektors Laden Sie den Projektor bei der erstmaligen Verwendung mit dem mitgelieferten Adapter und Ladekabel vollständig auf. 4. Ein/Aus Drücken Sie die Ein-/Aus-Taste des Projektors und halten Sie sie zum Ein- und Ausschalten 3 Sekunden lang gedrückt. 3” •... -
Seite 55: Autofokus Und Keystone-Korrektur
5. Autofokus und automatische Keystone-Korrektur Um den Autofokus und die automatische Keystone-Korrektur zu aktivieren, bewegen Sie den Projektor leicht oder drücken Sie die Taste auf der Fernbedienung. 6. Einrichtung Wenn Sie den Projektor zum ersten Mal verwenden, befolgen Sie die Anweisungen auf dem Bildschirm, um die grundlegende Einrichtung abzuschließen. -
Seite 56: Nebula Connect App
Nebula Connect App Zur einfachen Steuerung des Projektors empfehlen wir Ihnen, die Nebula Connect-App herunterzuladen. ① Laden Sie die Nebula Connect-App aus dem App Store (iOS-Geräte) oder bei Google Play (Android) herunter. ② Aktivieren Sie Bluetooth auf Ihrem Smartphone. ③ Öffnen Sie die Nebula Connect-App und wählen Sie [Capsule 3 Laser] >... -
Seite 57: Projektor
2. Projektor Wählen Sie auf der Startseite > [Projektoreinstellungen] aus und drücken Sie [Helligkeit] Passen Sie die Helligkeit an Ihre Umgebung an. [Bildmodus]: Der Projektor ist mit mehreren vordefinierten Bildmodi voreingestellt, sodass Sie einen Modus auswählen können, der Ihrer Umgebung und Eingangsquelle entspricht. •... - Seite 58 [Manuelle Keystone-Korrektur]: Aktivierung der manuellen Keystone-Korrektur.Diese Option ist nur verfügbar, wenn die automatische Keystone- Korrektur deaktiviert ist. [Bildkorrektur] [Zugriff auf manuelle Keystone-Korrektur]: Führt manuell eine Keystone-Korrektur durch. [Zoom]: Vergrößern oder Verkleinern des Projektionsbilds von 50 % auf 100 %. [Autofokus beim Start]: Passt automatisch den Fokus an, wenn der Projektor eingeschaltet wird.
- Seite 59 [Bluetooth- Aktivierung des Bluetooth-Lautsprechermodus. Lautsprechermodus] [Projektormodus]: Wählen Sie eine Art der Platzierung des Projektors aus. • [Autom.]: Erkennt automatisch, ob der Projektor invertiert ist.Wechselt automatisch zwischen diesen Optionen. • [Vorderseitig]: Das Gerät wird vor der Projektionsfläche aufgestellt. • [Vorderseitig deckenmontiert]: Das Gerät wird verkehrt herum an der Decke aufgehängt.Das Bild wird um 180 Grad gedreht.
-
Seite 60: Apps
3. Apps ① Wählen Sie auf der Startseite > [Apps] aus und drücken Sie ② Wählen Sie eine App aus und überprüfen Sie die aktuelle Version, öffnen oder erzwingen Sie das Beenden der App. Überprüfen Sie den verwendeten Speicherplatz, löschen Sie Daten oder den Cache. Deinstallieren Sie die App oder aktivieren oder deaktivieren Sie Benachrichtigungen und Berechtigungen. -
Seite 61: Andere
[Speicher] Überprüfen Sie den Gerätespeicher. Legen Sie die Kanäle und Apps auf dem [Startbildschirm] Startbildschirm fest oder überprüfen Sie Open- Source-Lizenzen. [Google Assistant] Ändern Sie die Einstellungen für Google Assistant. Legen Sie fest, Benachrichtigungen auf allen [Chromecast Android-Geräten anzuzeigen, die mit Ihrem integriert] WLAN verbunden sind, und lassen Sie sie die Medienübertragung auf dieses Gerät steuern. -
Seite 62: Verwendung Des Projektors
Verwendung des Projektors 1. App auswählen Sobald eine Verbindung mit einem WLAN-Netzwerk besteht, können Sie auf Online-Services zugreifen, Filme, Musik und Bilder genießen und im Internet surfen. Sie können weitere Apps von Google Play herunterladen. ① Drücken Sie , um auf die Startseite zuzugreifen. ②... -
Seite 63: Abspielen Über Hdmi-Wiedergabegeräte
③ Spielen Sie einen Videoclip ab und tippen Sie auf das Übertragungssymbol auf dem Videobildschirm. ④ Wählen Sie zum Herstellen der Verbindung „D2426“ aus. Der Projektor spiegelt den Videobildschirm auf Ihrem Gerät. Bestimmte Inhalte können aufgrund von Urheberrechtsbeschränkungen nicht auf den Nebula Capsule 3-Laser übertragen werden. -
Seite 64: Wiedergabe Über Ein Usb-Laufwerk
angeschlossen werden, z. B. TV-Boxen, TV-Sticks, Set-Top-Boxen (STB), Spielekonsolen oder andere Geräte. ① Schließen Sie den Projektor mit einem HDMI-Kabel (nicht im Lieferumfang enthalten) an ein HDMI-Wiedergabegerät an. ② Drücken Sie , um auf das Einstellungsmenü zuzugreifen. Wählen Sie dann [Geräteeinstellungen] > [Eingang] > [HDMI] aus. (Not included) Der Projektor startet automatisch die HDMI-Wiedergabe, sobald er zum ersten Mal an ein HDMI-Wiedergabegerät... -
Seite 65: Wiedergabe Über Externe Audiogeräte
USB-C 6. Wiedergabe über externe Audiogeräte Dieser Projektor kann auch an externe Soundausgabegeräte angeschlossen werden, z. B. Kopfhörer und Lautsprecher. Beim Anschluss an externe Lautsprecher ist das integrierte Lautsprechersystem deaktiviert. ① Verwenden Sie zum Anschließen von Kopfhörern oder externen Lautsprechern ein 3,5-mm-Audiokabel oder einen Adapter. ②... -
Seite 66: Bluetooth-Lautsprechermodus
Projektor. B: Wählen Sie auf der Startseite > [Bluetooth-Lautsprechermodus] aus und drücken Sie ② Aktivieren Sie Bluetooth auf Ihrem Smartphone und wählen Sie den Nebula Capsule 3 Laser zum Verbinden aus. < Settings Bluetooth Bluetooth Device Nebula Capsule 3 Laser... -
Seite 67: Technische Daten
Technische Daten Änderungen der technischen Daten sind ohne Vorankündigung vorbehalten. 5 V 3 A oder 9 V 3 A oder 12 V 3 A Leistungsaufnahme oder 15 V 3 A oder 20 V 2,25 A Stromverbrauch < 45 W Stromverbrauch im < 0,5 W Standby-Modus Auflösung 1920 × 1080 480p (60 Hz), 576p (50 Hz), 720p (30 Hz), 720p (50 Hz), 720p (60 Hz), 1080p (24 Hz), 1080p (30 ... -
Seite 68: Fehlerbehebung
Lautsprecher- 8 W Ausgangsleistung Betriebsgeräusch 28 dB WLAN WLAN 2,4 GHz/5,0 GHz, 802.11 a/b/g/n/ac Bluetooth-Version Bluetooth-Reichweite 25 m USB-Format FAT, FAT32 Für Europa und Vereinigtes Königreich: 0 °C to 25 °C Betriebstemperatur Für andere Länder und Regionen: 0 °C bis 35 °C Batterien für die AAA x 2 Fernbedienung Fehlerbehebung ①... - Seite 69 Sie es erneut. • Starten Sie Ihren Projektor und Router neu und versuchen Sie es erneut. • Versuchen Sie es mit einem anderen WLAN-Netzwerk oder mit dem Hotspot Ihres Telefons. ④ Unscharfes Bild • Bewegen Sie den Projektor leicht oder drücken Sie auf der Fernbedienung, um den Autofokus zu starten.
-
Seite 70: Hinweis
Dieses Produkt erfüllt die Anforderungen der Europäischen Gemeinschaft an Funkstörungen. Konformitätserklärung Hereby, Anker Innovations Limited. declares that this device is in compliance with the essential requirements and other relevant provisions of Directive 2014/53/EU. Die Konformitätserklärung finden Sie auf der Website https://uk.seenebula.com/. - Seite 71 Anker Innovations Deutschland GmbH I Georg-Muche-Straße 3, 80807 München, Deutschland Der folgende Importeur ist verantwortlich (Vertrag für UK-Belange): Anker Technology (UK) Limited I GNR8, 49 Clarendon Road, Watford, Hertfordshire, WD17 1HP, United Kingdom Das Produkt wurde aus hochwertigen Materialien und Komponenten entwickelt und hergestellt, die recycelt und wiederverwendet werden können.
-
Seite 72: Marken
Hongkong Marken Die Bluetooth®-Wortmarke und -Logos sind eingetragene Marken von Bluetooth SIG, Inc., und ihre Verwendung durch Anker Innovations Limited erfolgt unter Lizenz. Andere Marken und Markennamen sind Eigentum ihrer jeweiligen Inhaber. HDMI, das HDMI-Logo und High-Definition Multimedia Interface sind... -
Seite 73: Garantie
Marken oder eingetragene Marken von HDMI Licensing LLC in den USA und anderen Ländern. Hergestellt unter Lizenz von Dolby Laboratories. Dolby, Dolby Audio und das Doppel-D-Symbol sind Marken der Dolby Laboratories Licensing Corporation. Garantie Klare 30-Tage-Geld-zurück-Garantie Wenn Sie das unbeschädigte Produkt in der unbeschädigten Originalverpackung innerhalb von 30 Tagen ab Kaufdatum zurückgeben, wird Ihnen der GESAMTE KAUFPREIS ERSTATTET. - Seite 74 Índice Instrucciones de seguridad importantes Contenido Vista general 1. Proyector 2. Mando a distancia 3. Guía de luz LED Puesta en marcha 1. Preparación del mando a distancia 2. Colocación del proyector 3. Carga del proyector 4. Encendido y apagado 5.
-
Seite 75: Instrucciones De Seguridad Importantes
Instrucciones de seguridad importantes Lea todas las instrucciones antes de usar el producto. No realice cambios ni cree ajustes que no estén descritos en este manual. En caso de que se produzcan lesiones, pérdida de datos o daños por no seguir las instrucciones, no se aplicará... - Seite 76 componentes internos. • Utilice únicamente el adaptador facilitado por el fabricante. Usar un adaptador no autorizado puede ser peligroso e invalidar las Condiciones de uso y la garantía del producto. • El usuario debe cumplir la ley y la normativa del país y región donde esté...
- Seite 77 Batería • El mando a distancia funciona con pilas y estas pueden suponer peligro de asfixia. Mantenga el mando a distancia fuera del alcance de los niños. • Saque las pilas cuando el mando a distancia no se haya usado durante mucho tiempo.
- Seite 78 • Utilice toallitas especiales para limpiar la lente. Reparaciones • No repare el producto por su cuenta. • Si se realiza un mantenimiento inadecuado, esto podría provocar lesiones o daños en el producto. • Todas las tareas de mantenimiento las debe llevar a cabo un técnico cualificado.
-
Seite 79: Contenido
Contenido Nebula Capsule 3 Laser Adaptador Cable de carga Mando a distancia 2 pilas AAA GUÍA DE INICIO RÁPIDO... -
Seite 80: Vista General
Vista general 1. Proyector Vista frontal Lente Cámara (para el enfoque automático y la corrección trapezoidal automática) -
Seite 81: Vista Posterior
Vista posterior Altavoz Toma de salida AUX • Aquí se puede conectar un dispositivo de sonido externo de salida. Receptor de infrarrojos Botón de modo • Púlselo para cambiar entre el modo de altavoz Bluetooth y el modo de proyector. Botón de encendido •... -
Seite 82: Vista Superior
Vista superior Botones para subir y bajar el volumen Botón de confirmación Botón para ir atrás Botones de navegación Vista inferior Soporte de trípode 1/4"... - Seite 83 Dimensiones 167,5 (alto) x 83,0 (fondo) mm / 6,6 (alto) × 3,3 (fondo) pulg. 83.0mm...
-
Seite 84: Mando A Distancia
2. Mando a distancia Ajustar el enfoque Navegación Volver al menú anterior Encender o apagar o cambiar al modo de espera Activar el Asistente de Google Confirmar una selección / Pausar / Reanudar Acceder a más opciones Acceder al menú de inicio Subir/Bajar volumen... -
Seite 85: Guía De Luz Led
3. Guía de luz LED Botón Estado de LED Descripción Azul fijo Encendido Luz apagada Apagado Naranja fijo Modo de espera / Carga Verde fijo Carga completa Rojo Batería baja intermitente Listo para emparejar / Azul Emparejamiento por Bluetooth / intermitente Bluetooth desconectado (modo de altavoz Bluetooth) -
Seite 86: Puesta En Marcha
Puesta en marcha 1. Preparación del mando a distancia ① Deslice la tapa para abrir el compartimento de las pilas. ② Introduzca las pilas nuevas según la polaridad (+/-) y cierre el compartimento. ③ Cuando lo use por primera vez, siga las instrucciones en pantalla para emparejar el mando a distancia con el proyector. - Seite 87 • No es necesario inclinar el proyector hacia la superficie de proyección. Puede corregir la imagen de proyección con el enfoque automático y la corrección trapezoidal automática integrados. • También puede instalar el proyector en un trípode (se vende por separado). •...
-
Seite 88: Carga Del Proyector
110 pulgadas 2,92 m / 9,58 pies 120 pulgadas 3,18 m / 10,43 pies 3. Carga del proyector Cuando lo use por primera vez, cargue el proyector al máximo con el adaptador y el cable de carga incluidos. 4. Encendido y apagado Mantenga pulsado el botón de encendido del proyector durante 3 segundos para encenderlo o apagarlo. -
Seite 89: Enfoque Automático Y Corrección Trapezoidal
• También puede dejar pulsado el botón de encendido del mando a distancia durante 3 segundos para apagar el proyector. • Cuando esté encendido, pulse el botón de encendido en el proyector o el mando a distancia para activar el modo de espera. -
Seite 90: Configuración
Para activar el enfoque automático y la corrección trapezoidal automática, mueva ligeramente el proyector o pulse en el mando a distancia. 6. Configuración Cuando utilice el proyector por primera vez, siga las instrucciones de visualización en pantalla (OSD) para completar la configuración básica. •... -
Seite 91: Configuración
Configuración Siga el proceso de configuración cuando encienda el proyector por primera vez. 1. Red Es posible conectar el proyector a Internet a través de una conexión inalámbrica (Wi-Fi). ① En la página de inicio, seleccione > [Red e Internet] y pulse ②... - Seite 92 [Configuración avanzada]: Permite aplicar ajustes de configuración avanzados para mejorar la calidad de la imagen. • [DNR]: Reduce el ruido digital en la pantalla. • [MPEG NR]: Elimina el ruido de la imagen al reproducir un vídeo MPEG comprimido. [Imagen] •...
- Seite 93 [Modo de sonido]: El proyector tiene ajustes predeterminados con varios modos de sonido predefinidos para que pueda elegir uno que se adapte a su entorno y fuente de entrada. • [Música]: Mejora los agudos cuando se escucha música. • [Película]: Crea una sensación auditiva de sonido envolvente para ver películas.
- Seite 94 • [Delante]: El dispositivo se coloca delante de la superficie de proyección. • [Delante en el techo]: El dispositivo está colgado del techo en posición invertida.La imagen se gira 180 grados. • [Detrás]: El dispositivo se coloca detrás de la superficie de proyección.
-
Seite 95: Aplicaciones
3. Aplicaciones ① En la página de inicio, seleccione > [Aplicaciones] y pulse ② Seleccione una aplicación y consulte la versión actual, abra la aplicación o fuerce para detenerla, compruebe el almacenamiento usado, borre los datos o la caché, desinstale la aplicación o habilite o deshabilite las notificaciones y permisos. -
Seite 96: Otras Configuraciones
Aquí se puede comprobar el almacenamiento del [Almacenamiento] dispositivo. Aquí se pueden ajustar los canales y las [Pantalla de inicio] aplicaciones en la pantalla de inicio o comprobar las licencias de código abierto. [Asistente de Aquí se puede cambiar la configuración del Asistente Google] de Google. -
Seite 97: Uso Del Proyector
Android o Windows en el Nebula Capsule 3 Laser. Asegúrese de que el Nebula Capsule 3 Laser y su dispositivo estén conectados a la misma red inalámbrica. La red puede ser una red Wi-Fi o el punto de acceso de su teléfono. -
Seite 98: Reproducción Desde Dispositivos Hdmi
Hay determinados contenidos que no se pueden transmitir y reproducir en el Nebula Capsule 3 Laser debido a restricciones por derechos de autor. Puede reproducir el contenido a través de la misma aplicación instalada en el proyector. -
Seite 99: Reproducción Desde Una Unidad Usb
reproductor de DVD, un decodificador (STB), una videoconsola u otros dispositivos. ① Conecte el proyector a un dispositivo de reproducción con HDMI mediante un cable HDMI (no incluido). ② Pulse para acceder al menú de configuración y después seleccione [Preferencias del dispositivo] > [Entrada] > [HDMI]. (Not included) El proyector reproducirá... -
Seite 100: Reproducir Con Dispositivos De Sonido Externos
USB-C 6. Reproducir con dispositivos de sonido externos Este proyector también se puede conectar a dispositivos de salida de sonido externos, como auriculares y altavoces; cuando se conecta a altavoces externos, el sistema de altavoces integrado se desactiva. ① Utilice un cable de audio de 3,5 mm o un adaptador (no incluido) para conectar los auriculares o unos altavoces externos. -
Seite 101: Actualización Del Sistema
② Habilite el Bluetooth en su teléfono inteligente y seleccione Nebula Capsule 3 Laser para conectarlo. < Settings Bluetooth Bluetooth Device Nebula Capsule 3 Laser Connected Pairing Connected Para salir del modo de altavoz Bluetooth, pulse en el proyector o deje pulsado en el mando a distancia durante dos segundos. -
Seite 102: Especificaciones
Especificaciones Las especificaciones están sujetas a cambios sin previo aviso. 5 V 3 A, 9 V 3 A, 12 V 3 A, 15 V 3 A Entrada o 20 V 2,25 A Consumo de energía < 45 W Consumo de energía en < 0,5 W espera Resolución 1920 × 1080 480p (60 Hz), 576p (50 Hz), 720p (30 Hz), 720p (50 Hz), 720p (60 Hz), 1080p (24 Hz), 1080p (30 Hz), 1080p (50 Hz), 1080p (60 Resoluciones compatibles... -
Seite 103: Solución De Problemas
Potencia de salida del 8 W altavoz Ruido 28 dB Wi-Fi Wi-Fi 2,4 GHz/5,0 GHz 802.11 a/b/g/n/ac Versión de Bluetooth Alcance de Bluetooth 25 m Formato USB FAT, FAT32 En Europa y Reino Unido, de 0 °C a 25 °C Temperatura de En otros países y regiones, de 0 °C a 35 °C funcionamiento (32 °F-95 °F) - Seite 104 • Pruebe con otra red Wi-Fi o el punto de acceso de su teléfono. ④ La imagen se ve borrosa • Mueva ligeramente el proyector o pulse en el mando para activar el enfoque automático. • Para ajustar manualmente el enfoque, vaya a [Configuración] > [Configuración del proyector] >...
-
Seite 105: Aviso
Este producto cumple con los requisitos de radiointerferencias de la Comunidad Europea. Declaración de conformidad Hereby, Anker Innovations Limited. declares that this device is in compliance with the essential requirements and other relevant provisions of Directive 2014/53/EU. Para consultar la declaración de conformidad, visite el sitio web... - Seite 106 La siguiente empresa importadora es la parte responsable (contacto en la UE): Anker Innovations Deutschland GmbH I Georg-Muche-Strasse 3, 80807 Múnich, Alemania La siguiente empresa importadora es la parte responsable (contacto en Reino Unido): Anker Technology (UK) Limited I GNR8, 49 Clarendon Road, Watford, Hertfordshire, WD17 1HP, United Kingdom...
-
Seite 107: Marcas Comerciales
La marca denominativa y los logotipos de Bluetooth® son marcas registradas propiedad de Bluetooth SIG, Inc. y cualquier uso de dichas marcas por parte de Anker Innovations Limited se realiza bajo licencia. El resto de marcas y nombres comerciales son de sus respectivos... -
Seite 108: Garantía
HDMI, el logotipo de HDMI y High-Definition Multimedia Interface son marcas registradas o marcas registradas de HDMI Licensing LLC en Estados Unidos y otros países. Fabricado bajo la licencia otorgada por Dolby Laboratories. Dolby, Dolby Audio y el símbolo de la doble D son marcas comerciales de Dolby Laboratories Licensing Corporation. - Seite 109 Table des matières Consignes de sécurité importantes Contenu Aperçu 1. Projecteur 2. Télécommande 3. Signification des voyants Premiers pas 1. Préparation de la télécommande 2. Positionnement de votre projecteur 3. Chargement de votre projecteur 4. Mise sous tension/hors tension 5. Mise au point automatique et trapèze 6.
-
Seite 110: Consignes De Sécurité Importantes
Consignes de sécurité importantes Lisez toutes les instructions avant d’utiliser ce produit. N'apportez pas de modifications et ne procédez pas à des configurations qui ne sont pas décrites dans ce manuel. En cas de lésions corporelles, de pertes de données ou de dommages pour cause de non-respect des instructions, la garantie ne s'applique pas. - Seite 111 • Pour éviter tout choc électrique, ne démontez pas le produit. • Évitez les vibrations extrêmes car elles peuvent endommager les composants internes. • Veillez à utiliser uniquement l’adaptateur proposé par le fabricant. L’utilisation d’un adaptateur électrique non autorisé peut entraîner un danger et enfreindre les Conditions d’utilisation et la garantie de l’appareil.
- Seite 112 Batterie • La télécommande contient des piles qui présentent un risque d’étouffement. Tenir la télécommande hors de portée des enfants. • Retirez les piles lorsque la télécommande n’a pas été utilisée pendant une longue période. • Remplacez les piles de la télécommande uniquement par des piles identiques ou équivalentes.
- Seite 113 Réparations • N’effectuez aucune réparation sur ce produit vous-même. • Un entretien incorrect peut entraîner des blessures ou endommager le produit. • Confiez toutes les réparations à un personnel qualifié. Attention • Le rayonnement optique émis par ce produit peut être dangereux pour les yeux.
-
Seite 114: Contenu
CONTENU Nebula Capsule 3 Laser Adaptateur Câble d'alimentation Télécommande Pile AAA × 2 GUIDE DE DÉMARRAGE RAPIDE... -
Seite 115: Aperçu
Aperçu 1. Projecteur Vue avant Objectif Appareil photo (pour la mise au point automatique et la correction trapézoïdale automatique) -
Seite 116: Vue Arrière
Vue arrière Haut-parleur Prise AUX-OUT • Connexion à un périphérique de sortie sonore externe. Récepteur infrarouge Bouton de mode • Appuyez pour passer du mode haut-parleur Bluetooth au mode projecteur. Bouton d’alimentation • Appuyez et maintenez pendant 3 secondes pour allumer / éteindre. -
Seite 117: Vue De Dessus
Vue de dessus Boutons de volume haut/bas Bouton de confirmation Bouton de retour Boutons de navigation Vue de dessous 1/4" Prise pour trépied... - Seite 118 Dimensions 167,5 (H) x 83,0 (P) mm / 6,6 (H) × 3,3 (P) po 83.0mm...
-
Seite 119: Télécommande
2. Télécommande Réglage de la mise au point Navigation Retour au menu précédent Mise sous tension / hors tension ou passage en mode veille Activer l’assistant Google Confirmer une sélection / Pause / Reprise Accéder à plus d’options Accéder au menu d’accueil Volume haut / bas... -
Seite 120: Signification Des Voyants
3. Signification des voyants Bouton État LED Description Bleu fixe Allumé Lumière éteinte Hors tension Orange fixe Mode veille / Charge Vert fixe Chargement terminé Rouge Batterie faible clignotant Prêt pour le couplage / couplage bleu clignotant Bluetooth / Bluetooth déconnecté (mode haut-parleur Bluetooth) Bluetooth connecté... -
Seite 121: Premiers Pas
Premiers pas 1. Préparation de la télécommande ① Faites glisser pour ouvrir le compartiment des piles. ② Insérez de nouvelles piles en respectant la polarité (+/-) et fermez le compartiment à piles. ③ Pour une première utilisation, suivez les instructions à l’écran pour coupler la télécommande avec votre projecteur. - Seite 122 • Il est inutile d’incliner le projecteur vers la surface de projection. Vous pouvez corriger l’image de projection avec la mise au point automatique intégrée et la correction automatique de la distorsion trapézoïdale. • Vous pouvez également installer le projecteur sur un trépied (vendu séparément).
-
Seite 123: Chargement De Votre Projecteur
3. Chargement de votre projecteur Pour la première utilisation, chargez complètement votre projecteur à l’aide de l’adaptateur et du câble de charge fournis. 4. Mise sous tension/hors tension Appuyez et maintenez le bouton d’alimentation du projecteur pendant 3 secondes pour allumer / éteindre. 3”... -
Seite 124: Mise Au Point Automatique Et Trapèze
• Vous pouvez également appuyer sur le bouton d’alimentation de la télécommande et le maintenir enfoncé pendant 3 secondes pour éteindre l’appareil. • Lorsque le projecteur est sous tension, appuyez sur le bouton d’alimentation du projecteur ou de la télécommande pour passer en mode veille. •... -
Seite 125: Configuration
Pour activer la mise au point automatique et la correction trapézoïdale automatique, déplacez légèrement le projecteur ou appuyez sur la touche de la télécommande. 6. Configuration Lors de l'utilisation du projecteur pour la première fois, suivez les instructions de l'affichage à l'écran (OSD) pour terminer la configuration de base. -
Seite 126: Paramètres
④ Suivez les instructions à l’écran pour terminer la configuration de la connexion. Paramètres Passez par le processus de configuration lorsque vous allumez le projecteur pour la première fois. 1. Réseau Ce projecteur peut être connecté à Internet via une connexion sans fil (Wi-Fi). - Seite 127 [Paramètres experts] : personnalise les paramètres avancés pour améliorer la qualité de l’image. • [DNR] : réduit le bruit numérique à l’écran. • [MPEG NR] : élimine le bruit de l’image lors de la lecture d’une vidéo compressée au format MPEG. [Image] • [Mode DI Film] : création d’images haute définition encodées à...
- Seite 128 [Mode sonore] : le projecteur est préréglé avec plusieurs modes sonores prédéfinis afin que vous puissiez en choisir un en fonction de votre environnement et de la source d’entrée. • [Musique] : renforce les aigus pour l’écoute de la musique. • [Film] : crée une expérience d’écoute surround pour regarder des films.
- Seite 129 • [Plafond avant] : l’appareil est suspendu au plafond en position inversée.L'image est tournée de 180 degrés. • [Arrière] : l’appareil est placé derrière la surface de projection. • [Plafond arrière] : l’appareil est suspendu au plafond en position inversée, derrière la surface de projection.L'image est tournée à 180 degrés et inversée horizontalement.
-
Seite 130: Applications
3. Applications ① Sur la page d’accueil, sélectionnez > [Apps] et appuyez sur ② Sélectionnez une application et vérifiez la version actuelle, ouvrez ou arrêtez de force l’application, vérifiez le stockage utilisé, effacez les données ou le cache, désinstallez l’application, ou activez ou désactivez les notifications et les autorisations. -
Seite 131: Autres
Définissez les chaînes et les applications sur l’écran [Écran d’accueil] d’accueil ou vérifiez les licences de logiciels libres. [Assistant Google] Modifiez les paramètres de l’Assistant Google. Choisissez d’afficher les notifications sur tous [Chromecast les appareils Android connectés à votre Wi-Fi et intégré] laissez-les contrôler la diffusion de médias sur cet appareil. -
Seite 132: Utilisation De Votre Projecteur
Android ou Windows sur la Nebula Capsule 3 Laser. Assurez-vous que l’appareil Nebula Capsule 3 Laser et votre appareil sont connectés au même réseau sans fil. Le réseau peut être un réseau Wi-Fi ou le point d'accès de votre téléphone. -
Seite 133: Lecture À Partir Des Dispositifs De Lecture Hdmi
④ Sélectionnez D2426 pour vous connecter. Le projecteur reflétera l’écran vidéo sur votre appareil. Certains contenus ne peuvent pas être diffusés sur l’appareil Nebula Capsule 3 Laser en raison de restrictions de droits d’auteur. Vous pouvez diffuser le contenu via la même application installée sur votre projecteur. -
Seite 134: Lecture À Partir D'une Clé Usb
① Connectez le projecteur à un appareil de lecture HDMI avec un câble HDMI (non fourni). ② Appuyez sur pour accéder au menu des paramètres, puis sélectionnez [Préférences de l’appareil] > [Entrée] > [HDMI]. (Not included) Le projecteur démarre automatiquement la lecture HDMI une fois connecté... -
Seite 135: Lecture Via Des Périphériques Audio Externes
USB-C 6. Lecture via des périphériques audio externes Ce projecteur peut également être connecté à des périphériques de sortie audio externes, notamment des casques et des haut-parleurs ; lorsqu'il est connecté à des haut-parleurs externes, les hauts-parleurs intégrés sont désactivés. ① Utilisez un câble audio de 3,5 mm ou un adaptateur (non fourni) pour connecter votre casque ou vos haut-parleurs externes. -
Seite 136: Mode Enceinte Bluetooth
② Activez Bluetooth sur votre smartphone et sélectionnez Nebula Capsule 3 Laser pour vous connecter. < Settings Bluetooth Bluetooth Device Nebula Capsule 3 Laser Connected Pairing Connected Pour quitter le mode haut-parleur Bluetooth, appuyez sur la touche sur le projecteur ou appuyez et maintenez enfoncée la touche... -
Seite 137: Spécifications
de l’appareil] > [À propos] > [Mise à jour du système]. Spécifications Les spécifications sont susceptibles d'être modifiées sans préavis. 5 V 3 A ou 9 V 3 A ou 12 V 3 A ou Entrée 15 V 3 A ou 20 V 2,25 A Consommation < 45 W Consommation d’énergie <... -
Seite 138: Dépannage
Puissance de sortie du 8 W haut-parleur Bruit 28 dB Wi-Fi Wi-Fi 2,4 GHz/5,0 GHz 802.11 a/b/g/n/ac Version Bluetooth Portée Bluetooth 25 m / 82 pieds Formatage USB FAT, FAT32 Pour l’Europe et le Royaume-Uni, 0 °C à 25 °C Température de fonctionnement Pour les autres pays et régions, 0 °C à 35 °C Piles de la télécommande AAA x 2... - Seite 139 ④ Image floue • Déplacez légèrement le projecteur ou appuyez sur sur la télécommande pour démarrer la mise au point automatique. • Pour régler manuellement la mise au point, accédez à [Paramètres] > [Paramètres du projecteur] > [Paramètres de mise au point] > [Correction manuelle de la mise au point], et utilisez les touches •...
-
Seite 140: Avis
Ce produit est conforme aux exigences en matière d'interférences radio de la Communauté européenne. Déclaration de conformité Hereby, Anker Innovations Limited. declares that this device is in compliance with the essential requirements and other relevant provisions of Directive 2014/53/EU. Pour consulter la Déclaration de conformité, consultez le site web suivant :... - Seite 141 Munich, Allemagne L’importateur suivant est la partie responsable (contact pour les questions relatives au Royaume-Uni) : Anker Technology (UK) Limited I GNR8, 49 Clarendon Road, Watford, Hertfordshire, WD17 1HP, United Kingdom Votre produit est conçu et fabriqué avec des matériaux et des composants de haute qualité...
- Seite 142 5150~5250 MHz peut être utilisé à l'intérieur uniquement. RG1 IEC 62471-5:2015 Conforme aux normes IEC 60825-1:2014 Classe 1 et IEC 62471-5:2015 Groupe de risque 1. Télécommande : Modèle Nebula RC : D0413X Anker Innovations Limited Room 1318-19, Hollywood Plaza, 610 Nathan Road, Mongkok, Kowloon, Hong Kong...
-
Seite 143: Marques Commerciales
Marques commerciales La marque et les logos Bluetooth® sont des marques déposées de Bluetooth SIG, Inc. et toute utilisation de ces marques par Anker Innovations Limited s'effectue sous licence. Les autres marques et noms commerciaux sont ceux de leurs détenteurs respectifs. - Seite 144 Indice Istruzioni importanti sulla sicurezza Contenuto del prodotto Descrizione del prodotto 1. Proiettore 2. Telecomando 3. Guida luce LED Per iniziare 1. Preparazione del telecomando 2. Posizionamento del videoproiettore 3. Ricarica del videoproiettore 4. Accensione/spegnimento 5. Messa a fuoco automatica e correzione trapezoidale 6.
-
Seite 145: Istruzioni Importanti Sulla Sicurezza
Istruzioni importanti sulla sicurezza Leggere tutte le istruzioni prima di utilizzare il prodotto. Non apportare modifiche, né creare impostazioni che non siano descritte nel presente manuale. La garanzia non si applica in caso di lesioni fisiche, perdita di dati o danni causati dal mancato rispetto delle istruzioni. Configurazione •... - Seite 146 • Evitare vibrazioni estreme in quanto potrebbero danneggiare i componenti interni. • Accertarsi di utilizzare solo l'alimentatore offerto dal produttore. L'uso di un alimentatore non autorizzato può essere pericoloso e violare i Termini d'uso e la garanzia del prodotto. • L'utente è tenuto a rispettare le leggi e le normative dei paesi e delle regioni in cui l'apparecchiatura è...
- Seite 147 rischio di soffocamento. Tenere il telecomando lontano dalla portata dei bambini. • Rimuovere le batterie quando il telecomando non viene utilizzato per lunghi periodi. • Sostituire le batterie del telecomando solo con batterie dello stesso tipo o equivalenti. • Le batterie contengono sostanze chimiche e devono essere smaltite correttamente.
- Seite 148 Riparazioni • Non eseguire personalmente alcuna riparazione sul prodotto. • Una manutenzione impropria può provocare lesioni o danni al prodotto. • Affidare tutte le operazioni di manutenzione a personale di assistenza qualificato. Attenzione • Radiazioni ottiche potenzialmente pericolose emesse dal prodotto possono risultare dannose per gli occhi.
-
Seite 149: Contenuto Della Confezione
CONTENUTO DELLA CONFEZIONE Nebula Capsule 3 Laser Adattatore Cavo di ricarica Telecomando 2 batterie AAA GUIDA RAPIDA... -
Seite 150: Descrizione Del Prodotto
Descrizione del prodotto 1. Proiettore Vista anteriore Obiettivo Telecamera (per messa a fuoco automatica e correzione trapezoidale automatica) -
Seite 151: Vista Posteriore
Vista posteriore Altoparlante Presa AUX-OUT • Collegare a un dispositivo di uscita audio esterno. Ricevitore a infrarossi Pulsante delle modalità • Premere per passare dalla modalità Altoparlante Bluetooth alla modalità Proiettore. Pulsante di accensione • Tenere premuto per 3 secondi per accendere/spegnere. •... -
Seite 152: Vista Dall'alto
Vista dall’alto Pulsanti per alzare/abbassare il volume Pulsante di conferma Pulsante Indietro Pulsanti di navigazione Vista dal basso Presa per treppiede da 1/4". - Seite 153 Dimensioni 167,5 (A) x 83,0 (P) mm 83.0mm...
-
Seite 154: Telecomando
2. Telecomando Regolare la messa a fuoco Navigazione Tornare al menu precedente Accendere/spegnere o passare alla modalità Standby Attivare Assistente Google Confermare una selezione/ mettere in pausa/riprendere Accedere a più opzioni Accedere al menu principale Alzare/abbassare il volume... -
Seite 155: Guida Luce Led
3. Guida luce LED Pulsante Stato LED Descrizione Blu fisso Acceso Spia spenta Spento Arancione fisso Modalità Standby/Ricarica Verde fisso Ricarica completata Rosso Batteria scarica lampeggiante Pronto per l'abbinamento/ abbinamento Bluetooth/Bluetooth lampeggiante disconnesso (modalità Altoparlante Bluetooth) Connesso al Bluetooth (modalità Blu fisso altoparlante Bluetooth) -
Seite 156: Per Iniziare
Per iniziare 1. Preparazione del telecomando ① Scorrere per aprire il vano batteria. ② Inserire nuove batterie facendo corrispondere la polarità (+/-) e chiudere il vano batterie. ③ Al primo utilizzo, seguire le istruzioni visualizzate per abbinare il telecomando al videoproiettore. La distanza tra il telecomando e il videoproiettore non deve essere maggiore di 10 metri (33 piedi). - Seite 157 • Non è necessario inclinare il videoproiettore rispetto alla superficie di proiezione. È possibile correggere l'immagine proiettata con la messa a fuoco automatica integrata e la correzione trapezoidale automatica. • È possibile installare il videoproiettore su un treppiede (venduto separatamente). •...
-
Seite 158: Ricarica Del Videoproiettore
110 pollici 2,92 m 120 pollici 3,18 m 3. Ricarica del videoproiettore Al primo utilizzo, caricare completamente il videoproiettore utilizzando l'alimentatore e il cavo di ricarica in dotazione. 4. Accensione/spegnimento Tenere premuto il pulsante di accensione del videoproiettore per 3 secondi per accendere/spegnere. -
Seite 159: Messa A Fuoco Automatica E Correzione Trapezoidale
• È anche possibile tenere premuto il pulsante di accensione sul telecomando per 3 secondi per spegnere. • A dispositivo acceso, premere il pulsante di accensione sul videoproiettore o sul telecomando per passare alla modalità Standby. • In modalità Sorgente HDMI, il videoproiettore passa alla modalità... -
Seite 160: Configurazione
Per abilitare la messa a fuoco automatica e la correzione trapezoidale automatica, spostare leggermente il videoproiettore o premere telecomando. 6. Configurazione Al primo utilizzo del videoproiettore sarà necessario seguire le istruzioni su schermo per completare la configurazione di base. • Abbinare il telecomando al videoproiettore •... -
Seite 161: Impostazioni
Impostazioni Procedere con i passaggi di configurazione la prima volta che si accende il videoproiettore. 1. Rete Questo proiettore può essere connesso a Internet tramite una connessione wireless (Wi-Fi). ① Nella home page, selezionare > [Rete e Internet] e premere ②... - Seite 162 [Impostazioni avanzate]: consente di personalizzare le impostazioni avanzate per migliorare la qualità dell'immagine. • [DNR]: riduce il rumore digitale sullo schermo. • [MPEG NR]: elimina il rumore dell'immagine durante la riproduzione di un video compresso in [Immagine] formato MPEG. • [Modalità film DI]: crea immagini ad alta definizione codificate a 24 fotogrammi/secondo.
- Seite 163 [Modalità audio]: il videoproiettore è preimpostato con diverse modalità audio predefinite per consentire di scegliere quella più adatta all'ambiente circostante e alla sorgente di ingresso in uso. • [Musica]: migliora gli alti per l'ascolto della musica. • [Film]: crea un'esperienza di ascolto con audio surround per la visione di film.
- Seite 164 [Modalità Proiettore]: consente di selezionare un modo per posizionare il videoproiettore. • [Auto]: rileva automaticamente se il videoproiettore è capovolto.Consente di passare automaticamente tra queste opzioni. • [Frontale]: il dispositivo si trova davanti alla superficie di proiezione. • [Frontale, a soffitto]: il dispositivo è appeso al soffitto in posizione capovolta.L’immagine è...
-
Seite 165: App
3. App ① Nella home page, selezionare > [App] e premere ② Selezionare un'app e controllare la versione corrente, aprire o forzare l'arresto dell'app, controllare lo spazio di archiviazione utilizzato, cancellare i dati o il contenuto della cache, disinstallare l'app oppure abilitare o disabilitare le notifiche e le autorizzazioni. -
Seite 166: Altre
[Memoria] Consente di controllare la memoria del dispositivo. Consente di impostare i canali e le app sulla [Schermata iniziale] schermata iniziale o controllare le licenze open source. Consente di modificare le impostazioni per [Assistente Google] l'Assistente Google. È possibile scegliere di mostrare le notifiche su [Chromecast tutti i dispositivi Android collegati alla rete Wi-Fi integrato]... -
Seite 167: Uso Del Videoproiettore
Android o Windows compatibile direttamente su Nebula Capsule 3 Laser. Accertarsi che Nebula Capsule 3 Laser e il dispositivo in uso siano collegati alla stessa rete wireless. Può trattarsi di una rete Wi-Fi o dell'hotspot del tuo telefono. -
Seite 168: Riproduzione Da Dispositivi Di Riproduzione Hdmi
④ Selezionare D2426 per connettersi. Il videoproiettore eseguirà il mirroring della schermata video sul dispositivo. Alcuni contenuti non possono essere trasmessi su Nebula Capsule 3 Laser a causa di restrizioni sul copyright. È possibile eseguire lo streaming dei contenuti tramite la stessa app installata sul videoproiettore. -
Seite 169: Riproduzione Da Un'unità Usb
una set-top box (STB), una console di gioco o altri dispositivi. ① Collegare il videoproiettore a un dispositivo di riproduzione HDMI con un cavo HDMI (non in dotazione). ② Premere per accedere al menu delle impostazioni, quindi selezionare [Preferenze dispositivo] > [Ingresso] > [HDMI]. (Not included) Il videoproiettore avvierà... -
Seite 170: Riproduzione Tramite Dispositivi Audio Esterni
USB-C 6. Riproduzione tramite dispositivi audio esterni Questo videoproiettore può essere collegato a dispositivi di uscita audio esterni, ad esempio cuffie e altoparlanti; quando è collegato ad altoparlanti esterni, il sistema di altoparlanti integrato viene disabilitato. ① Utilizzare un cavo audio da 3,5 mm o un alimentatore (non in dotazione) per collegare le cuffie o gli altoparlanti esterni. -
Seite 171: Aggiornamento Del Sistema
② Abilitare il Bluetooth sullo smartphone e selezionare Nebula Capsule 3 Laser per stabilire una connessione. < Settings Bluetooth Bluetooth Device Nebula Capsule 3 Laser Connected Pairing Connected Per uscire dalla modalità Altoparlante Bluetooth, premere sul videoproiettore o tenere premuto sul telecomando per due secondi. -
Seite 172: Specifiche
Specifiche Le specifiche sono soggette a modifiche senza preavviso. 3 A o 9 V 3 A o 12 V 3 A o 15 V Ingresso 3 A o 20 V 2,25 A Consumo energetico < 45 W Consumo energetico in <... -
Seite 173: Risoluzione Dei Problemi
Potenza di uscita dell'altoparlante Rumore 28 dB Wi-Fi Wi-Fi 2,4 GHz/5,0 GHz 802.11 a/b/g/n/ac Versione Bluetooth Portata Bluetooth 25 m/82 piedi Formato USB FAT, FAT32 Per Europa e Regno Unito, da 0°C a 25°C Temperatura di esercizio Per altri paesi e aree geografiche, da 0°C a 35°C 2 AAA Batterie del telecomando... - Seite 174 • Provare con una rete Wi-Fi diversa o l'hotspot del proprio telefono. ④ Immagine sfocata • Spostare leggermente il videoproiettore o premere telecomando per avviare la messa a fuoco automatica. • Per regolare manualmente la messa a fuoco, andare su [Impostazioni] >...
-
Seite 175: Avviso
Questo prodotto è conforme ai requisiti della Comunità europea relativi alle interferenze radio. Dichiarazione di conformità Hereby, Anker Innovations Limited. declares that this device is in compliance with the essential requirements and other relevant provisions of Directive 2014/53/EU. Per la Dichiarazione di conformità, visitare il sito Web... - Seite 176 Il seguente importatore è la parte responsabile (contratto esclusivamente per le questioni pertinenti al Regno Unito): Anker Technology (UK) Limited I GNR8, 49 Clarendon Road, Watford, Hertfordshire, WD17 1HP, United Kingdom Il prodotto è progettato e realizzato con materiali e componenti...
-
Seite 177: Marchi Registrati
Marchi registrati Il marchio e il logo Bluetooth® sono marchi registrati di proprietà di Bluetooth SIG, Inc. e qualsiasi utilizzo di tali marchi da parte di Anker Innovations Limited è concesso in licenza. Gli altri marchi e nomi commerciali sono proprietà dei rispettivi titolari. -
Seite 178: Garanzia
Prodotto su licenza di Dolby Laboratories. Dolby, Dolby Audio e il simbolo della doppia D sono marchi di Dolby Laboratories Licensing Corporation. Garanzia 30 giorni di garanzia “soddisfatti o rimborsati” per qualsiasi motivo È possibile restituire il prodotto integro e la sua confezione entro 30 giorni dalla data di acquisto per ricevere un RIMBORSO COMPLETO per qualsiasi motivo. - Seite 179 Inhoudsopgave Belangrijke veiligheidsinstructies In de doos In één oogopslag 1. Projector 2. Afstandsbediening 3. Statusaanduiding indicatieled AAN DE SLAG 1. Uw afstandsbediening klaarmaken 2. Uw projector plaatsen 3. Uw projector opladen 4. Aan- en uitzetten 5. Autofocus en keystone 6. Instellen De Nebula Connect-app Instellingen 1.
-
Seite 180: Belangrijke Veiligheidsinstructies
Belangrijke veiligheidsinstructies Lees alle instructies voordat u dit product gebruikt. Breng geen wijzigingen aan en maak geen instellingen die niet in deze handleiding worden beschreven. Indien lichamelijk letsel, het verlies van gegevens of schade wordt veroorzaakt door het niet opvolgen van instructies, is de garantie niet van toepassing. - Seite 181 • Vermijd extreme trillingen, want die kunnen de interne onderdelen beschadigen. • Gebruik alleen de door de fabrikant geleverde adapter. Het gebruik van een niet-geautoriseerde adapter kan gevaar opleveren, de gebruiksvoorwaarden overtreden en de productgarantie tenietdoen. • De gebruiker moet zich houden aan de wetten en regelgeving van de landen en regio’s waar het apparaat zich bevindt (wordt gebruikt), zich houden aan de beroepsethiek, veiligheidsverplichtingen in acht nemen en het gebruik van onze producten of apparatuur voor...
- Seite 182 opleveren. Houd de afstandsbediening buiten het bereik van kinderen. • Verwijder de batterijen als de afstandsbediening lange tijd niet wordt gebruikt. • Vervang de batterijen van de afstandsbediening alleen door hetzelfde of een gelijkwaardig type. • Batterijen bevatten chemische stoffen en moeten op de juiste manier worden weggegooid.
- Seite 183 Reparaties • Voer zelf geen reparaties aan dit product uit. • Onjuist onderhoud kan letsel en schade aan het product veroorzaken. • Laat al het onderhoud over aan gekwalificeerd onderhoudspersoneel. Opgelet • De optische straling die door dit product wordt uitgezonden, kan schadelijk voor de ogen zijn.
-
Seite 184: In De Doos
WAT ZIT ER IN DE DOOS? Nebula Capsule 3 Laser Adapter Oplaadkabel Afstandsbediening 2 AAA-batterijen BEKNOPTE HANDLEIDING... -
Seite 185: In Één Oogopslag
In één oogopslag 1. Projector Vooraanzicht Lens Camera (voor autofocus en automatische keystone- correctie) -
Seite 186: Achteraanzicht
Achteraanzicht Luidspreker AUX-uitgang • Voor verbinding met externe audioapparatuur. Infraroodontvanger Modusknop • Druk om te schakelen tussen de Bluetooth-luidsprekermodus en de projectormodus. Aan-uitknop • Drie seconden ingedrukt houden om aan of uit te zetten. • Indrukken om de projector uit de slaapstand te halen of tijdens de projectormodus in stand-by te zetten. -
Seite 187: Bovenaanzicht
Bovenaanzicht Volume omhoog en omlaag Bevestigingsknop Terugknop Navigatieknoppen Onderaanzicht 1/4″-statiefschroefdraad... - Seite 188 Afmetingen 167,5 (h) x 83,0 (d) mm 83.0mm...
-
Seite 189: Afstandsbediening
2. Afstandsbediening De focus aanpassen Navigatie Terugkeren naar het vorige menu Aan-/uitzetten of naar stand- bymodus De Google Assistent activeren Een selectie bevestigen / pauzeren / hervatten Meer opties Hoofdmenu Volume omhoog / omlaag. -
Seite 190: Statusaanduiding Indicatieled
3. Statusaanduiding indicatieled Knop Led-status Beschrijving Brandt blauw Ingeschakeld Lampje uit Uitgeschakeld Brandt oranje Stand-bymodus/opladen Brandt groen Volledig opgeladen Knippert rood Batterij bijna leeg Klaar om te koppelen / bluetooth wordt gekoppeld / bluetooth Knippert blauw niet verbonden (bluetooth- luidsprekermodus) Verbonden via Bluetooth (Bluetooth- Brandt blauw luidsprekermodus) -
Seite 191: Aan De Slag
AAN DE SLAG 1. Uw afstandsbediening klaarmaken ① Schuif het batterijklepje open. ② Plaats nieuwe batterijen (let op de polariteit (+/-)) en sluit het batterijvakje. ③ Volg bij het eerste gebruik de instructies op het scherm om de afstandsbediening aan uw projector te koppelen. De afstand tussen de afstandsbediening en de projector moet niet meer dan 10 m zijn. - Seite 192 • Het is niet nodig om de projector naar het projectieoppervlak te kantelen. U kunt het geprojecteerde beeld corrigeren met de ingebouwde autofocus en automatische keystone-correctie. • U kunt de projector ook op een statief monteren (afzonderlijk verkrijgbaar). • De afstand tussen de projectorlens en het projectieoppervlak bepaalt de grootte van het geprojecteerde beeld.
-
Seite 193: Uw Projector Opladen
3. Uw projector opladen Voor het eerste gebruik moet u uw projector met de meegeleverde adapter en oplaadkabel volledig opladen. 4. Aan- en uitzetten Houd de aan-uitknop drie seconden ingedrukt om de projector aan of uit te zetten. 3”... -
Seite 194: Autofocus En Keystone
• U kunt ook de aan-uitknop op de afstandsbediening drie seconden ingedrukt houden om hem uit te schakelen. • Als de projector aanstaat, kunt u de aan-uitknop op de projector of afstandsbediening indrukken om naar de stand-bymodus over te schakelen. •... -
Seite 195: Instellen
6. Instellen Als u de projector voor het eerst gebruikt, volgt u de instructies op het scherm om de basisinstelling te voltooien. • Koppel de afstandsbediening met uw projector • Uw taal selecteren • Stel uw tv in met uw Android-telefoon (optioneel) •... -
Seite 196: Instellingen
Instellingen Als u de projector voor het eerst inschakelt, doorloopt u het installatieproces. 1. Netwerk Deze projector kan via een draadloze (wifi-)verbinding worden verbonden met het internet. ① Selecteer op de startpagina > [Netwerk en internet] en druk op ② Volg de instructies op het scherm om het instellen van de netwerkverbinding te voltooien. - Seite 197 [Expertinstellingen]: geavanceerde instellingen aanpassen op de beeldkwaliteit te verbeteren. • [DNR]: vermindert digitale ruis op het scherm. • [MPEG-NR]: elimineert beeldruis bij het afspelen van een video met MPEG-compressie. [Beeld] • [DI-filmmodus]: creëert high-definition beelden die met 24 beelden/seconde zijn gecodeerd.
- Seite 198 [Geluidsmodus]: de projector wordt geleverd met verschillende geluidsmodi waaruit u kunt kiezen om het geluid aan uw omgeving en invoerbron aan te passen. • [Muziek]: verbetert de hoge tonen voor het luisteren naar muziek. • [Film]: creëert een surroundsound- luisterervaring voor het kijken van films. •...
- Seite 199 • [Hangend voor het scherm]: het apparaat hangt ondersteboven aan het plafond;Het beeld wordt 180 graden gedraaid. • [Achter het scherm]: het apparaat staat achter het projectieoppervlak. • [Hangend achter het scherm]: het apparaat hangt achter het projectieoppervlak ondersteboven aan het plafond;Het beeld wordt 180 graden gedraaid en horizontaal gespiegeld.
-
Seite 200: Apps
3. Apps ① Selecteer op de startpagina > [Apps] en druk op ② Selecteer een app en controleer de huidige versie, open de app of stop hem geforceerd, controleer de gebruikte opslagruimte, wis gegevens of de cache, verwijder de app of schakel meldingen en machtigingen in of uit. -
Seite 201: Overige
[Google Assistent] De instellingen voor de Google Assistent wijzigen. Kies deze optie om op alle Android-apparaten die [Ingebouwde zijn verbonden met uw wifinetwerk een melding Chromecast] weer te geven en het casten van media naar dit apparaat te laten regelen. [Schermbeveiliging] De instellingen van de schermbeveiliging wijzigen. -
Seite 202: Uw Projector Gebruiken
U kunt films, games, muziek en het hele scherm draadloos vanaf uw iOS-, macOS-, Android- of Windows-apparaat naar de Nebula Capsule 3 Laser casten. Zorg dat de Nebula Capsule 3 Laser en uw apparaat met hetzelfde draadloze netwerk zijn verbonden. Dit kan een wifinetwerk of een hotspot op uw telefoon zijn. -
Seite 203: Afspelen Vanaf Hdmi-Afspeelapparaten
④ Selecteer D2426 om verbinding te maken. De projector spiegelt het videoscherm op uw apparaat. Bepaalde inhoud kan vanwege auteursrechtelijke beperkingen niet naar de Nebula Capsule 3 Laser worden gecast. U kunt de inhoud streamen via dezelfde app die op uw projector is geïnstalleerd. -
Seite 204: Afspelen Vanaf Een Usb-Stick
① Sluit de projector met een HDMI-kabel (niet meegeleverd) aan op een HDMI-afspeelapparaat. ② Druk op om het instellingenmenu te openen en selecteer vervolgens [Apparaatvoorkeuren] > [Invoer] > [HDMI]. (Not included) De eerste keer dat de projector op een HDMI-afspeelapparaat wordt aangesloten, wordt automatisch de HDMI-weergave gestart. -
Seite 205: Afspelen Via Externe Geluidsapparaten
USB-C 6. Afspelen via externe geluidsapparaten D e z e p r o j e c t o r k a n o o k w o r d e n a a n g e s l o t e n o p e x t e r n e geluidsuitvoerapparaten, waaronder hoofdtelefoons en luidsprekers. -
Seite 206: Bluetooth-Luidsprekermodus
② Schakel op uw smartphone bluetooth in en selecteer Nebula Capsule 3 Laser om verbinding te maken. < Settings Bluetooth Bluetooth Device Nebula Capsule 3 Laser Connected Pairing Connected Om de bluetoothluidsprekermodus af te sluiten, drukt u op de projector op... -
Seite 207: Specificaties
Specificaties Specificaties zijn onderhevig aan verandering zonder kennisgeving. 5 V 3 A of 9 V 3 A of 12 V 3 A of 15 V Ingang 3 A of 20 V 2,25 A Energieverbruik < 45 W Stroomverbruik in stand-by < 0,5 W Resolutie 1920 × 1080 480p (60 Hz), 576p (50 Hz), 720p (30 Hz), 720p (50 Hz), 720p (60 Hz), 1080p (24 Hz), 1080p (30 Hz), 1080p (50 Hz), 1080p (60 Compatibele resoluties... -
Seite 208: Problemen Oplossen
Geluidsniveau 28 dB Wifi 2,4 GHz / 5,0 GHz 802.11 a/b/g/n/ac Bluetoothversie Bluetoothbereik 25 m USB-bestandssystemen FAT, FAT32 Voor Europa en het VK, 0 °C tot 25 °C Bedrijfstemperatuur Voor andere landen en regio’s 0 °C tot 35 °C Batterijen voor 2 x AAA afstandsbediening Problemen oplossen ①... - Seite 209 • Verplaats de projector een beetje of druk op de afstandsbediening om autofocus te activeren. • Om de focus handmatig aan te passen, gaat u naar [Instellingen] > [Projectorinstellingen] > [Focusinstellingen] > [Handmatige focuscorrectie] en gebruikt u de knoppen sbediening. •...
-
Seite 210: Kennisgeving
Dit product voldoet aan de EU-vereisten met betrekking tot radio-interferentie. Verklaring van conformiteit Hereby, Anker Innovations Limited. declares that this device is in compliance with the essential requirements and other relevant provisions of Directive 2014/53/EU. De verklaring van conformiteit vindt u op de website https://uk.seenebula.com/. - Seite 211 Anker Innovations Deutschland GmbH I Georg-Muche-Strasse 3, 80807 München, Duitsland De volgende importeur is de verantwoordelijke partij (contactpartij voor VK): Anker Technology (UK) Limited I GNR8, 49 Clarendon Road, Watford, Hertfordshire, WD17 1HP, United Kingdom Uw product is ontworpen en geproduceerd met hoogwaardige materialen en componenten die kunnen worden gerecycled en hergebruikt.
-
Seite 212: Handelsmerken
H e t B l u e t o o t h ® - w o o r d m e r k e n - l o g o's z i j n g e r e g i s t r e e r d e handelsmerken die eigendom zijn van Bluetooth SIG, Inc. en elk gebruik van dergelijke merken door Anker Innovations Limited is onder licentie. Andere handelsmerken en handelsnamen zijn eigendom van de desbetreffende eigenaren. -
Seite 213: Garantie
LLC in de Verenigde Staten en andere landen. Vervaardigd onder licentie van Dolby Laboratories. Dolby, Dolby Audio en het dubbel-D-symbool zijn handelsmerken van de Dolby Laboratories Licensing Corporation. Garantie 30 dagen geld-terug garantie om welke reden dan ook U kunt uw onbeschadigde product en verpakking binnen 30 dagen na aankoop om welke reden dan ook retourneren om een volledige terugbetaling te ontvangen. - Seite 214 Índice Instruções de segurança importantes O que está incluído Breve descrição 1. Projetor 2. Controlo remoto 3. Guia de indicadores LED COMEÇAR 1. Preparar o controlo remoto 2. Posicionar o projetor 3. Carregar o projetor 4. Ligar/desligar 5. Focagem automática e correção de trapézio 6.
-
Seite 215: Instruções De Segurança Importantes
Instruções de segurança importantes Leia todas as instruções antes de utilizar este produto. Não faça alterações e não crie configurações que não estejam descritas neste manual. Se ocorrerem lesões físicas, perda de dados ou danos devido ao incumprimento das instruções, a garantia não será aplicável. Configuração •... - Seite 216 • Evite vibrações extremas, pois podem danificar os componentes internos. • Certifique-se de que utiliza apenas o transformador fornecido pelo fabricante. A utilização de um transformador não autorizado pode ser perigosa e violar os Termos de utilização e a garantia do produto.
- Seite 217 Bateria • O controlo remoto contém pilhas, que constituem um risco de asfixia. Mantenha o telecomando fora do alcance das crianças. • Retire as pilhas quando o controlo remoto não for utilizado por um longo período. • Substitua as pilhas do controlo remoto apenas por pilhas do mesmo tipo ou de tipo equivalente.
- Seite 218 Reparações • Não efetue reparações neste produto por conta própria. • Uma manutenção inadequada pode resultar em lesões ou danos no produto. • Solicite sempre assistência junto de pessoal técnico qualificado. Atenção • A radiação ótica potencialmente perigosa emitida por este produto pode ser prejudicial para os olhos.
-
Seite 219: O Que Está Incluído
ESTÁ INCLUÍDO Nebula Capsule 3 Laser Adaptador Cabo de carregamento Controlo remoto Pilha AAA × 2 GUIA DE INÍCIO RÁPIDO... -
Seite 220: Breve Descrição
Breve descrição 1. Projetor Vista frontal Lente Câmara (para focagem automática e correção de trapézio auto) -
Seite 221: Vista Traseira
Vista traseira Altifalante Tomada AUX-OUT • Ligue a um dispositivo de saída de som externo. Recetor de infravermelhos Botão de modo • Prima para alternar entre o modo de coluna Bluetooth e o modo de projetor. Botão para ligar/desligar • Prima sem soltar durante 3 segundos para ligar/desligar. •... - Seite 222 Vista superior Botões de aumentar/diminuir o volume Botão de confirmação Botão para retroceder Botões de navegação Vista inferior Tomada de tripé de 1/4 pol.
- Seite 223 Dimensões 167,5 (A) x 83,0 (P) mm 83.0mm...
-
Seite 224: Controlo Remoto
2. Controlo remoto Ajustar o foco Navegação Voltar ao menu anterior Ligar/desligar ou mudar para o modo de espera Ativar o Assistente Google Confirmar uma seleção/pausar/ retomar Aceder a mais opções Aceder ao menu inicial Aumentar/Diminuir volume... -
Seite 225: Guia De Indicadores Led
3. Guia de indicadores LED Botão Estado do LED Descrição Azul fixo Ligado Luz desligada Desligado Laranja fixo Modo de espera/a carregar Verde fixo Carga total Vermelho Bateria fraca intermitente Pronto para emparelhar/ Azul emparelhamento Bluetooth/ intermitente Bluetooth desligado (modo de altifalante Bluetooth) Bluetooth ligado (modo de altifalante Azul fixo... -
Seite 226: Começar
COMEÇAR 1. Preparar o controlo remoto ① Deslize para abrir o compartimento das pilhas. ② Introduza pilhas novas de acordo com a polaridade (+/-) e feche o compartimento das pilhas. ③ Na primeira utilização, siga as instruções apresentadas no ecrã para emparelhar o controlo remoto com o projetor. - Seite 227 • Não é necessário inclinar o projetor na direção da superfície de projeção. Pode corrigir a imagem de projeção com a focagem automática e a correção de trapézio auto incorporadas. • Também pode instalar o projetor num tripé (vendido em separado).
-
Seite 228: Carregar O Projetor
3. Carregar o projetor Para a primeira utilização, carregue totalmente o projetor com o transformador e o cabo de carregamento fornecidos. 4. Ligar/desligar Prima sem soltar o botão de ligar/desligar do projetor durante 3 segundos para ligar/desligar. 3”... -
Seite 229: Focagem Automática E Correção De Trapézio
• Também pode premir sem soltar o botão de ligar/desligar no controlo remoto durante 3 segundos para desligar. • Quando ligado, prima o botão de ligar/desligar no projetor ou controlo remoto para mudar para o modo de espera. • No Modo de fonte HMDI, o projetor muda para o modo de espera após 10 minutos de inatividade do botão ou quando não for detetado qualquer sinal. -
Seite 230: Configuração
ligeiramente o projetor ou prima no controlo remoto. 6. Configuração Ao utilizar o projetor pela primeira vez, siga as instruções no ecrã (OSD) para completar a configuração básica. • Emparelhe o controlo remoto com o projetor • Selecione o idioma •... -
Seite 231: Definições
Definições Efetue o processo de configuração quando ligar o projetor pela primeira vez. 1. Rede Este projetor pode ser ligado à Internet através de uma ligação sem fios (Wi-Fi). ① Na página inicial, selecione > [Rede e Internet] e prima ②... - Seite 232 • [MEMC]: insere um fotograma adicional entre os [Imagem] fotogramas originais para movimentos suaves. [Correção automática de trapézio ao iniciar]: efetue automaticamente a correção de trapézio quando o projetor é ligado. [Correção automática de trapézio após movimento]: efetue automaticamente a correção de trapézio quando mover o projetor.
- Seite 233 [Definições especializadas]: personalize as definições avançadas para melhorar a qualidade do áudio. • [Saída digital]: selecione um formato de áudio de saída. [Áudio] • [eARC]: permite à TV enviar áudio ao dispositivo de origem através de um único cabo HDMI. •...
-
Seite 234: Aplicações
[Soluções Inteligentes]: ligue/desligue os alertas auto quando o projetor detetar um problema. • [Alerta de ângulo de projeção]: mostra um alerta quando o ângulo de projeção máximo é atingido. [Definições avançadas] • [Alerta de carregamento lento]: mostra um alerta quando a fonte de alimentação é insuficiente. - Seite 235 [Teclado] Verifique e efetue a gestão dos teclados. Selecione HDMI como fonte de entrada ou altere as definições de Controlo eletrónico do consumidor (CEC). [Entrada] O CEC permite que o dispositivo HDMI e a Android TV se controlem mutuamente. Altere as definições de suspensão auto, desligue o [Energia] ecrã...
-
Seite 236: Outros
Android ou Windows para o Nebula Capsule 3 Laser. Certifique-se de que o Nebula Capsule 3 Laser e o seu dispositivo estão ligados à mesma rede sem fios. A rede pode ser uma rede Wi-Fi ou o hotspot do seu telemóvel. - Seite 237 3.1 Transmitir conteúdo da aplicação Pode transmitir conteúdo a partir de aplicações compatíveis com o Chromecast, como o YouTube e o Prime Video. ① Ligue o dispositivo e o projetor à mesma rede sem fios. ② Abra a aplicação de streaming no dispositivo. ③...
-
Seite 238: Reproduzir A Partir De Dispositivos De Reprodução Por Hdmi
4. Reproduzir a partir de Dispositivos de reprodução por HDMI O projetor pode ser ligado a vários dispositivos de reprodução HDMI, como um dispositivo de Smart TV, um dongle de TV, um leitor de DVD, um descodificador (STB), uma consola de jogos ou outros dispositivos. ①... -
Seite 239: Reproduzir Através De Dispositivos De Som Externos
④ Prima para parar a reprodução. USB-C 6. Reproduzir através de Dispositivos de som externos Este projetor também pode ser ligado a dispositivos externos de saída de áudio, incluindo auscultadores e colunas; quando é ligado a colunas externas, o sistema de colunas incorporado é desativado. ①... -
Seite 240: Modo De Altifalante Bluetooth
② Ative o Bluetooth no smartphone e selecione Nebula Capsule 3 Laser para estabelecer ligação. < Settings Bluetooth Bluetooth Device Nebula Capsule 3 Laser Connected Pairing Connected Para sair do modo de altifalante Bluetooth, prima projetor ou prima sem soltar no controlo remoto durante dois segundos. -
Seite 241: Especificações
Especificações As especificações estão sujeitas a alteração sem aviso prévio. 3 A ou 9 V 3 A ou 12 V 3 A ou 15 Entrada 3 A ou 20 V 2,25 A Consumo de energia < 45 W Consumo de energia em <... -
Seite 242: Resolução De Problemas
Ruído 28 dB Wi-Fi Wi-Fi 2,4 GHz/5,0 GHz 802.11 a/b/g/n/ac Versão do Bluetooth Alcance do Bluetooth 25 m/82 pés Formato USB FAT, FAT32 Para a Europa e o Reino Unido, 0 °C a 25 °C Temperatura de funcionamento Para outros países e regiões, 0 °C a 35 °C AAA x 2 Pilhas do controlo remoto Resolução de problemas... - Seite 243 • Para ajustar manualmente o foco, aceda a [Definições] > [Definições do projetor] > [Definições de foco] > [Correção manual da focagem], e utilize no controlo remoto. • Ajuste o ângulo e a direção de projeção, bem como a altura do projetor, se necessário.
-
Seite 244: Aviso
Este produto cumpre as normas de interferências de rádio da Comunidade Europeia. Declaração de Conformidade Hereby, Anker Innovations Limited. declares that this device is in compliance with the essential requirements and other relevant provisions of Directive 2014/53/EU. Para consultar a Declaração de conformidade, visite o site... - Seite 245 Munique, Alemanha O importador seguinte é a entidade responsável (contacte para questões no âmbito do Reino Unido) Anker Technology (UK) Limited I GNR8, 49 Clarendon Road, Watford, Hertfordshire, WD17 1HP, United Kingdom O produto foi concebido e fabricado com materiais e componentes de alta qualidade, que podem ser reciclados e reutilizados.
-
Seite 246: Marcas Comerciais
A palavra, marca e logótipos Bluetooth® são marcar comerciais registadas da Bluetooth SIG, Inc., e qualquer utilização destas marcas pela Anker Innovations Limited é sob licença. Outras marcas comerciais e nomes comerciais são propriedade dos respetivos donos. HDMI e o logótipo HDMI e High-Definition Multimedia Interface são marcas comerciais ou registadas da HDMI Licensing LLC nos Estados Unidos e em outros países. -
Seite 247: Garantia
Fabricado sob licensa da Dolby Laboratories. Dolby, Dolby Audio e o símbolo de duplo D são marcas comerciais da Dolby Laboratories Licensing Corporation. Garantia Garantia de devolução do dinheiro dentro de 30 dias por qualquer motivo Poderá devolver o seu produto e a embalagem sem danos dentro de 30 dias após a compra para receber um REEMBOLSO TOTAL por qualquer motivo. - Seite 248 目次 安全にご使用いただくために パッケージ内容 各部分の名称 1. プロジェクター 2. リモコン 3. LED インジケーター はじめに 1. リモコンのセットアップ 2. プロジェクターの設置 3. プロジェクターの充電 4. 電源のオン / オフ 5. オートフォーカスと自動台形補正 6. セットアップ Nebula Connect アプリ 設定 1. Wi-Fi ネットワーク 2. プロジェクター 3. アプリ 4. デバイス設定 5. その他 製品の使用方法...
- Seite 249 安全にご使用いただくために 本製品を使用する前に、本取扱説明書を全てお読みください。本取扱 説明書で説明されていない変更や設定を行わないでください。本取扱 説明書の指示に従わなかったことが原因で起こった怪我やデータの損 失、破損は保証の対象外となります。 設置について • 火災や感電の危険を避けるため、本製品を雨や湿気にさらさない でください。 花瓶など、液体の入ったものを本製品の上に置かな いでください。 • 本製品をテーブルクロスやカーペットなどの上で使用しないでく ださい。火災が発生する危険があります。 • 本製品をほこりや汚れが付きやすい場所や、強い磁場を発生する 機器の近くに置かないでください。 • 過熱を防ぐため、本製品の換気を妨げたり換気口をふさいだりし ないでください。 • 本製品を密閉された場所に置かないでください。 換気のため、本 製品の周りには常に十分なスペースを確保してください。 • 本製品の上に重いものや鋭利なものを置かないでください。 使用環境について • 本製品は 5° C 〜 25° C の環境で使用することを推奨します。 • 本製品は通気性の良い環境でご使用ください。 • 極端に高温または低温の環境で本製品を使用しないでください。 強い日差しの下や水気の多い場所で本製品を使用しないでくださ い。 使用時の注意事項 • 怪我や物的損害を避けるために、本取扱説明書に記載された以外...
- Seite 250 • 本製品を長時間使用すると、表面が熱くなることがあります。表 面が熱くなった場合には電源をオフにし、プラグを抜いてくださ い。表面の温度が下がってから、ご使用を再開してください。 • 本製品のお取り扱いには常に注意を払い、レンズに触れないでく ださい。 • 本製品を、大人による監視なしにお子様だけで使用することがな いようにしてください。 • 内部の部品が損傷する恐れがあるため、激しい振動を避けてくだ さい。 • 必ず同梱の AC アダプタのみを使用してください。それ以外のア ダプタを使用したことによる故障や不具合は、保証の対象外とな る場合があります。 • 本製品の使用者は、 本製品が使用される国・地域の法令を遵守し、 職業倫理を守り、安全義務に留意するものとし、本製品の違法な 目的での使用を固く禁じられています。当社は、いかなる場合に おいても、違反者の法的責任について一切の責任を負いません。 充電について • 同梱の AC アダプタは、屋内でのみご使用ください。 • AC アダプタは本製品の近くに設置し、手の届きやすい状態にして ください。 • 本製品の充電には、 USB 2.0 以上の USB ケーブルをご使用ください。 • 本製品の充電は、周辺温度が...
- Seite 251 故障の原因となることがあります。 • 乾電池を交換する際は、プラスとマイナスの向きを正しくセット してください。向きを間違えると思わぬ事故につながる恐れがあ ります。 • 乾電池を落下させたり、傷つけたりして強い衝撃を与えないでく ださい。電池が漏液、発熱、破裂する恐れがあります。 • 乾電池を火中へ投入したり、充電したりしないでください。破裂 する恐れがあります。 • 使用済み乾電池は、各自治体の指定の方法で処分してください。 警告 • お客様ご自身で内蔵バッテリーの交換はしないでください。誤っ た種類のバッテリーと交換すると安全装置が作動しなくなり、思 わぬ事故につながる可能性があります。 • 本製品および内蔵バッテリーを火中や高温のオーブンに投入した り、機械的に押し潰したりしないでください。爆発する恐れがあ ります。 • 本製品や内蔵バッテリーを非常に高温の環境や極端に気圧の低い 環境に放置すると、爆発または引火性の液体やガスが発生する恐 れがあります。 • 感電防止のため、本製品を分解しないでください。 お手入れについて • 柔らかく、糸くずの出ない布を使用してください。液体、気体、 可燃性の洗浄剤 ( スプレー、研磨剤、アルコールなど ) を使用しな いでください。 • レンズのコーティング材の損傷を防ぐため、液体洗浄剤でレンズ を洗浄しないでください。 • 表面を優しく拭いてください。表面に傷を付けないように注意し てください。...
- Seite 252 修理について • 本製品をご自身で修理しないでください。 • 修理が不適切な場合、怪我をしたり、本製品が損傷したりする恐 れがあります。 • 本製品に不具合が生じた場合は、ご自身もしくは第三者による修 理を行わず、カスタマーサポートまでお問い合わせください。 レーザーに関する注意事項 • 動作時や投影中は本体のレンズを覗き込まないでください。本体 が発するレーザーは、皮膚や角膜の火傷の原因となる恐れがあり ます。 • 修理を行う者は、本製品のレーザーの危険性をよく理解し、安全 に留意して修理を行う必要があります。 • 本製品に不具合が生じた場合は、ご自身もしくは第三者による修 理を行わず、カスタマーサポートまでお問い合わせください。 • 本製品の筐体を開けないでください。 • 本製品の筐体が破損した場合は、使用を中止してください。 • 本製品にはレーザーが入っています。本体が発するレーザーは、 皮膚や角膜の火傷の原因となる恐れがあります。 本機のレーザーに関して • RG1 IEC 62471-5:2015 • 本製品のレーザーセンサーは、IEC 60825-1:2014 のクラス 1 およ び IEC 62471-5:2015 のリスクグループ 1 の規格を満たしています。...
- Seite 253 パッケージ内容 Nebula Capsule 3 Laser AC アダプタ 充電ケーブル リモコン 単 4 形乾電池 (x2) クイックスタートガイド...
- Seite 254 各部分の名称 1. プロジェクター 正面図 レンズ オートフォーカスおよび自 動台形補正用センサー...
- Seite 255 背面図 スピーカー AUX 出力ソケット • AUX ケーブル ( 別売り ) を使って、ヘッドホンやスピーカー などの外部オーディオ出力機器を接続します。 赤外線レシーバー モード切り替えボタン • このボタンを押すと、Bluetooth スピーカーモードとプロジ ェクターモードが切り替わります。 電源ボタン • 3 秒間長押しすると、電源のオン / オフ / スタンバイが切り 替わります。 • 1 回押すと、プロジェクターが起動します。プロジェクター モードの時に押すと、スタンバイモードに入ります。 USB-C ポート • 付属の AC アダプタと充電ケーブルで電源に接続します。 • USB ドライブに接続します。 HDMI ポート • HDMI 出力経由で再生機器に接続します。...
- Seite 256 上面図 音量アップ / ダウンボタン 決定ボタン 戻るボタン ナビゲーションボタン 底面図 1/4" 三脚用ソケット...
- Seite 257 サイズ 167.5 (H) × 83.0 (D) mm 83.0mm...
- Seite 258 2. リモコン オートフォーカス ナビゲーションボタン 戻るボタン 電源のオン / オフ / スタンバイの 切り替え Google アシスタントの起動 決定 / 一時停止 / 再開 その他のオプションの表示 ホームボタン 音量アップ / ダウン...
- Seite 259 3. LED インジケーター LED イ ン ジ ケ ー ボタン 状態 ター 青色に点灯 電源がオン 消灯 電源がオフ オレンジ色に点灯 スタンバイモード / 充電中 緑色に点灯 満充電 赤色で点滅 バッテリー残量が低下 ペアリング準備完了 / ペアリング 青色で点滅 中 / 接続解除 (Bluetooth スピー カーモード ) Bluetooth で接続済み (Bluetooth 青色に点灯 スピーカーモード )
- Seite 260 はじめに 1. リモコンのセットアップ ① 背面の電池カバーを開けます。 ② 単 4 形乾電池 2 本をプラス (+) とマイナス (-) が合うように入れ、 カバーを閉じます。 ③ 初めて使用する場合は、画面の指示に従ってリモコンとプロジェ クターをペアリングします。 リモコンとプロジェクターの間の距離は 10 m を超えないよ うにしてください。 2. プロジェクターの設置 プロジェクターを、投影面の前の安定した平らな場所に置きます。よ り綺麗に投影するには、白く平らな壁もしくはスクリーンに投影して ください。...
- Seite 261 • 本製品を投影面に向けて傾ける必要はありません。オー トフォーカスと自動台形補正によって、投影画像を自動 で補正できます。 • 本製品を三脚 ( 別売り ) に取り付けることもできます。 • 投影画像の大きさは、本製品と投影面との距離で決まり ます。より鮮明な映像を映すには、プロジェクターを投 影面から 1.06 〜 3.18 m の距離に設置し、40 〜 120 イン チの画面サイズに調整します。 スクリーンのサイズ 投影距離 40 インチ 1.06 m 50 インチ 1.33 m 60 インチ 1.60 m 70 インチ 1.86 m 80 インチ 2.13 m 90 インチ 2.39 m 100 インチ...
- Seite 262 3. プロジェクターの充電 初めてご使用になる前に、付属の AC アダプタを使って満充電してく ださい。 4. 電源のオン / オフ プロジェクターの電源ボタンを 3 秒間押しすると、電源のオン / オフ / スタンバイが切り替わります。 3” • リモコンの電源ボタンを 3 秒間長押ししても、電源をオ フにすることができます。 • 電源がオンの状態でプロジェクターまたはリモコンの電 源ボタンを押すと、スタンバイモードに切り替わります。 • HMDI モードでは、10 分間ボタンの操作がされないか、 信号が検出されないと、本製品はスタンバイモードに切 り替わります。 • スタンバイモードが 30 分間続くと、本製品の電源は自 動的にオフになります。...
- Seite 263 5. オートフォーカスと自動台形補正 オートフォーカスと自動台形補正を起動させるには、プロジェクター を少し動かすか、リモコンの [ ] を押します。 6. セットアップ 初めてお使いになる時は、画面の指示に従って以下のセットアップを 行ってください。必要に応じて、プロジェクターの「設定」メニュー で設定をご変更いただけます。 • リモコンとプロジェクターをペアリングする • 言語を選択する • Android スマートフォンでテレビを設定する ( オプション ) • Wi-Fi に接続する • Google アカウントでログインする...
- Seite 264 Nebula Connect アプリ 本製品を操作する上で、Nebula Connect アプリをスマートフォンに ダウンロードいただくことをお勧めします。 ① App Store (iOS 機器の場合 ) または Google Play (Android 機器の場 合 ) から Nebula Connect アプリをダウンロードします。 ② お使いのスマートフォンの Bluetooth をオンにします。 ③ Nebula Connect アプリを開き、接続する機器として [Capsule 3 Laser] > [XXXXXX] を選択します。 画面の指示に従って、接続のセットアップを完了します。 設定 初めて本製品の電源をオンにした際は、以下のセットアップおよび必 要に応じて設定の変更を行ってください。 1. Wi-Fi ネットワーク 本製品は、ワイヤレス (Wi-Fi) 接続を使用してインターネットに接続 できます。 ① ホーム画面で、 [ ] > [ ネットワークとインターネット ] を選択し、 を押します。 ② 画面の指示に従って、ネットワーク接続を完了させます。...
- Seite 265 2. プロジェクター ホーム画面で、[ ] > [ プロジェクター設定 ] を選択し、 を押し ます。 [ 輝度 ] 環境に応じて明るさを調整します。 [ 画像モード ]: プリセットされた画像モードから、 環境や入力ソースに合わせてお好みのモードを選 択できます。 ・ [ 標準 ]: 暖色と寒色のバランスをとって自然な 色を保ちます。 • [ ムービー ]: 映画鑑賞に最適な色を再現します。 • [ ゲーム ]: ビデオゲームをプレイしやすいように 輝度を高め、応答時間を短くします。 • [ 画像カスタム ]: コントラスト、彩度、鮮明度、 色温度、ガンマを手動で設定するか、それらの値 [ 画像 ] をリセットします。 [ エキスパート設定 ]: 詳細設定をカスタマイズし て、画質を向上させます。...
- Seite 266 [ 手動台形補正の起動 ]: 台形補正を手動で実行 します。 [ 画像補正 ] [ ズーム ]: 投影画像を 50% から 100% の間でズ ームインまたはズームアウトします。 [ 起動時のオートフォーカス ]: プロジェクターの 電源がオンになった時にフォーカスを自動で調整 します。 [ フォーカス設定 ] [ 移動後のオートフォーカス ]: プロジェクターを 移動させた時に、フォーカスを自動で調整します。 [ 手動フォーカス補正 ]: 手動によるフォーカスの 補正を有効にします。 [ サウンドモード ]: プリセットされたサウンド モードから、環境や入力ソースに合わせてお好 みのモードを選択できます。 • [ ミュージック ]: 音楽を聴くために高音域を強 調します。 • [ ムービー...
- Seite 267 [Bluetooth スピーカ Bluetooth スピーカーモードを有効にします。 ーモード ] [ プロジェクターモード ]: プロジェクターの設 置方法を選択します。 • [ 自動 ]: プロジェクターが反転しているかどう かを検出し、投影方式を自動で切り替えます。 • [ 前面 ]: 本製品を投影面の前に置きます。 • [ 前面天井 ]: 本製品を投影面の前に天井から逆 さまに吊り下げます。画像が 180°回転します。 • [ 背面 ]: 本製品を投影面の後ろに置きます。 • [ 背面天井 ]: 本製品を投影面の後ろに天井から 逆さまに吊り下げます。画像が 180°回転し、左 右が反転します。 [ 動作設定 ]: オートフォーカスと自動台形補正 [ 詳細設定 ] を起動するためのセンサー感度を調整します。 [ 台形補正 ]: 台形補正が正しく機能しない場合 は、プロジェクターを再調整します。...
- Seite 268 4. デバイス設定 ホーム画面で、[ ] > [ デバイス設定 ] を選択し、 を押します。 製品情報の確認やシステムの更新、本製品のリセッ [ デバイス情報 ] ト、本製品の名前変更を行います。 日付と時刻の自動設定を有効 / 無効にします。日 [ 日付と時刻 ] 付と時刻を手動で設定するか、タイム ゾーンを 選択するか、時刻形式を設定します。 [ タイマー ] オートパワーオフの設定を変更します。 [ 言語 ] 画面に表示する言語を選択します。 [ キーボード ] キーボードを確認および管理します。 HDMI を入力ソースとして選択するか、Consumer Electronic Control (CEC) 設定を変更します。 [ 入力 ] CEC を使用すると、HDMI 機器と Android TV が互 いを制御できます。...
- Seite 269 機 器、 ア プ リ、Chromecast built-in か ら の ク ラ ッ [ 使用状況と診断情 シュレポートや使用状況データなどの診断情報を 報 ] Google に自動的に送信します。 [ アクセシビリテ キャプション設定の変更や、アクセスビリティサ ィ ] ービスの有効化を行います。 [ 再起動 ] システムの再起動またはキャンセルを行います。 5. その他 ホーム画面で [ ] を選択し、 その他の設定オプションを表示します。 ログインして Android TV を最大限に活用 [ アカウントとログイン ] します。...
- Seite 270 3. ワイヤレスキャスティング iOS、macOS、Android、または Windows 機器から本製品にムービー、 ゲーム、 ミュージック、 スクリーンをワイヤレスでキャストできます。 プロジェクターとお客様の機器が同じワイヤレスネットワ ークに接続されている必要があります。ネットワークは、 Wi-Fi もしくはスマートフォンのホットスポットでも構い ません。 3.1 アプリ内コンテンツのキャスト YouTube や Prime Video など、Chromecast に対応するアプリからコ ンテンツをキャストできます。 ① デバイスとプロジェクターを同じワイヤレスネットワークに接続 します。 ② デバイスでストリーミングアプリを開きます。 ③ ビデオを再生し、 ビデオ画面でキャストアイコン をタップします。 ④ D2426 を選択して接続します。プロジェクターは、デバイスのビ デオ画面をミラーリングします。...
- Seite 271 著作権の制限により、特定のコンテンツは本製品でキャス トできません。同じアプリを本製品にインストールしてそ のアプリからコンテンツを再生することはできます。 3.2 デバイスの画面のキャスト デバイスの画面全体をプロジェクターにキャストできます。 ① デバイスとプロジェクターを同じワイヤレスネットワークに接続 します。 ② AirScreen アプリをプロジェクターにインストールします。 ③ AirScreen アプリを開き、画面の指示に従って操作を完了します。 4. HDMI 再生機器から再生する 本製品は、TV ボックス、TV スティック、DVD プレーヤー、セットト ップボックス (STB)、ゲーム機など、さまざまな HDMI 再生機器に接 続することができます。 ① HDMI ケーブル ( 別売り ) を使用して、本製品を HDMI 再生機器に 接続します。 ② を押して設定メニューにアクセスし、[ デバイス設定 ] > [ 入力 ] > [HDMI] を選択します。 (別売り)
- Seite 272 初めて HDMI 再生機器に接続すると、本製品は HDMI 再生 を自動的に開始します。 5. USB ドライブから再生する 本製品では、USB 2.0 ドライブに保存されている音楽、ビデオ、画像 を再生 / 投影することができます。また、ドライブに保存されている アプリをインストールすることもできます。 ① Google Play から File Explorer アプリをダウンロードします。 ② USB-A ドライブ (USB コンバーター付き ) または USB-C ドライブ を USB ポートに挿入します。 ③ USB ドライブから、再生する音楽、ビデオ、または写真を選択し、 を押します。 ④ を押すと再生が停止します。 USB-C 6. 外部オーディオ機器で再生する 本製品は、ヘッドホンやスピーカーなど、外部のオーディオ機器に接 続することもできます。外部のオーディオ機器に接続すると、内蔵ス ピーカーシステムは無効になります。 ① 3.5 mm オーディオケーブルまたはアダプター ( 別売り ) を使用し て、ヘッドホンまたは外部スピーカーを接続します。...
- Seite 273 別売り ヘッドホンを接続して装着する前に、耳を痛めないように 音量を下げてください。 7. Bluetooth スピーカーモード 本製品は、 Bluetooth スピーカーとしてご使用いただくことができます。 ① Bluetooth スピーカーモードに切り替えるには、次の 2 つの方法が あります。 A: プロジェクターの を押します。 B: ホーム画面で、 [ ] > [Bluetooth スピーカーモード ] を選択し、 を押します。 ② お 使 い の ス マ ー ト フ ォ ン の Bluetooth を 有 効 に し、Nebula Capsule 3 Laser を選択して接続します。...
- Seite 274 < Settings Bluetooth Bluetooth Device Nebula Capsule 3 Laser Connected Pairing Connected Bluetooth スピーカーモードを終了するには、プロジェク ターの を押すか、リモコンの を 2 秒間長押しします。 ファームウェアの更新 本製品の最新の機能をご利用いただくには、必要に応じてファームウ ェアの更新を行い、システムを最新の状態にしていただくことをお勧 めします。 システムをアップデートするには、[ 設定 ] > [ デバイス設定 ] > [ バー ジョン情報 ] > [ システムの更新 ] に移動します。 製品の仕様...
- Seite 275 解像度 1920 × 1080 480p (60 Hz)、576p (50 Hz)、720p (30 Hz)、720p (50 Hz)、720p (60 Hz)、1080p (24 Hz)、1080p (30 Hz)、1080p (50 Hz)、 1080p (60 Hz)、 4K2K (23,976 Hz)、 4K2K (25 対応解像度 Hz)、4K2K (30 Hz)、4K2K (50 Hz)、4K2K (60 Hz)、4096 (23,976 Hz)、4096 (25 Hz)、 4096 (30 Hz)、4096 (50 Hz)、4096 (60 Hz) コントラスト比 500:1 アスペクト比 16:9 スクリーンのサイズ 40 〜 120 インチ スローレシオ 1.2:1 投影距離 1.06 〜 3.18 m 光源 レーザー フォーカス 自動 台形補正 自動 スピーカー出力 騒音レベル 28 dB Wi-Fi 2.4 GHz/5.0 GHz 802.11 a/b/g/n/ac...
- Seite 276 ヨーロッパおよび英国の場合、0° C 〜 25° C 動作温度 その他の国および地域の場合、0° C 〜 35° C 単 4 形乾電池 (x2) リモコン電池 トラブルシューティング ① 電源が入らない場合 • プロジェクターの充電が切れている可能性があります。 プロジェ クターを 15 〜 30 分間充電し、電源ボタンのライトが点灯するか どうかを確認してください。 ② 充電できない場合 • 充電には、付属の AC アダプタと充電ケーブルを使用します。 • 付属の AC アダプタと充電ケーブルで充電できない場合は、別の アダプタ (30W 以上 ) と USB-C 充電ケーブルをお試しください。 ③ Wi-Fi ネットワークに接続できない場合 • プロジェクターを...
- Seite 277 ⑤ 画像が歪む場合 • 次の手順に従って、ファームウェアを最新バージョンに更新し てください ([ 設定 ] > [ デバイス設定 ] > [ バージョン情報 ] > [ シ ステムの更新 ] > [ アップデートの確認 ] )。 • 次の手順に従って、手動で台形補正を行ってください ( [ 設定 ] > [ プロジェクター設定 ] > [ 画像補正 ] > [ 手動台形補正 ] をオン > [ 手動台形補正を起動...
- Seite 278 注意 本製品は、リサイクルおよび再利用可能な高品質の材料とコ ンポーネントを使用して、設計および製造されています。 本製品を廃棄する際は、お住まいの自治体のルールに従って ください。 本製品の内蔵バッテリーをお客様ご自身で交換しないでくだ さい。爆発の恐れがあります。 ご使用済みの電池は、お住まいの自治体のルールに従って廃 棄してください。 RG1 IEC 62471-5:2015 IEC 60825-1:2014 クラス 1 および IEC 62471-5:2015 リスクグループ 1 に準拠しています リモコン : Nebula RC モデル : D0413X 商標 Bluetooth® のワードマークおよびロゴは Bluetooth SIG, Inc. が所有す る登録商標であり、Anker Innovations Limited. は使用許諾の下でこ れらのマークおよびロゴを使用しています。その他の商標および登録 商標は、それぞれの所有者に帰属します。 HDMI、HDMI ロゴ、および High-Definition Multimedia Interface は、 米国およびその他の国における HDMI licensing LLC の商標または登録 商標です。...
- Seite 279 ドルビーラボラトリーズからの実施権に基づき製造されています。 Dolby、Dolby Audio、 お よ び ダ ブ ル D 記 号 は、Dolby Laboratories Licensing Corporation の商標です。 保証 最大 24 ヶ月保証 ご注文日から 18 ヶ月の間 ( 注 ) 、ご使用いただいている製品に不具 合と思われる事象が生じた場合、当該事象を弊社が不具合であると確 認した後、同一製品との交換、又は修理対応等当社にて適切と判断す る対応をお承り致します。その際の送料は弊社が負担いたします。加 えて、Anker Japan 公式サイト会員を対象に、通常 18 ヶ月の製品保 証を 24 ヶ月へ自動延長致します。 ( 注:予約注文を除く。予約注文に限り、発送日から起算させて頂き ます。) ただし、在庫切れ、販売終了等、弊社の都合で同一製品との交換、又 は修理対応等当社にて適切と判断する対応ができない場合、同等品の 後継品に交換させていただくか、もしくは、システム上で製品代金を 返金させていただく等の対応となる場合がございますので、あらかじ めご了承ください。...
- Seite 280 목차 중요한 안전 지침 구성품 요약 1. 프로젝터 2. 리모컨 3.LED 표시등 가이드 시작하기 1. 리모컨 준비 2. 프로젝터 배치 3. 프로젝터 충전 4. 전원 켜짐 / 꺼짐 5. 자동 초점 및 키스톤 6. 조립 Nebula Connect 앱 설정 1. 네트워크 2. 프로젝터 3. 앱 4. 기기 기본 설정 5.
- Seite 281 중요한 안전 지침 이 제품을 사용하기 전에 모든 지침을 읽으십시오 . 이 매뉴얼에 기재되지 않 은 설정을 임의로 변경하거나 생성하지 마십시오 . 지침을 준수하지 않아 신체 적 상해나 데이터 손실 또는 손상이 발생할 경우 보증이 적용되지 않습니다 . 조립 • 부상이나 재산 피해를 방지하기 위해 여기에 안내된 방법이 아닌 다른 방 법으로...
- Seite 282 는 장비를 불법적인 용도로 사용하는 것을 엄격히 금지해야 합니다 . 당사 는 어떠한 경우에도 권고사항 위반에 관한 법적 책임을 지지 않습니다 . 전력 공급 • 이 제품은 온도 범위가 5° C~25° C 인 환경에서 공급하는 것이 좋습니다 . • 전원이 공급되고 있을 때는 정상 범위의 실내 온도이고 통풍이 잘 되는 환경에...
- Seite 283 경고 • 맞지 않는 타입의 배터리로 교체하는 경우 안전 장치가 제대로 작동하지 않아 위험할 수 있습니다 . • 배터리 / 기기를 불이나 뜨거운 오븐 , 또는 그 외 상당한 열원에 넣어 폐 기하거나 , 기계적으로 분쇄하거나 , 배터리 / 기기를 절단하는 경우 폭발 이...
- Seite 284 레이저 안전 • RG1 IEC 62471-5:2015 • IEC 60825-1:2014 클래스 1 및 IEC 62471-5:2015 위험 그룹 1 을 적합 제품입니다 . • 램프 또는 제품 서비스 중에 잠재적인 위험이 있을 수 있습니다 . • 서비스는 교육을 받은 인증된 서비스 담당자만 수행해야 합니다 . •...
- Seite 285 제품 구성 Nebula Capsule 3 Laser 어댑터 충전 케이블 리모컨 AAA 배터리 × 2 빠른 시작 가이드...
- Seite 286 요약 1. 프로젝터 정면 렌즈 카메라 ( 자동 초점 및 자동 키스톤 보정용 카메라 )
- Seite 287 후면 스피커 AUX-OUT 소켓 • 외부 사운드 출력 장치에 연결합니다 . 적외선 수신기 모드 버튼 • 누르면 Bluetooth 스피커 모드와 프로젝터 모드 사이를 오가는 스 위치입니다 . 전원 버튼 • 3 초 동안 누르고 있으면 전원이 켜지거나 꺼집니다 . • 프로젝터를 깨우거나 프로젝터 모드에서 대기 모드로 들어가려 할 때...
- Seite 288 상단 볼륨 높임 / 낮춤 버튼 확인 버튼 돌아가기 버튼 탐색 버튼 하단 1/4" 삼각대 소켓...
- Seite 289 치수 167.5(H) x 83.0(D)mm / 6.6(H) × 3.3(D) 인치 83.0mm...
- Seite 290 2. 리모컨 초점 조정 탐색 이전 메뉴로 돌아가기 전원을 켜고 끄거나 대기 모드로 전 환합니다 Google 어시스턴트를 활성화합니다 선택 확인 / 일시 중지 / 재개 더 많은 옵션에 액세스 홈 메뉴에 액세스 볼륨 높이기 / 낮추기...
- Seite 291 3. LED 표시등 가이드 버튼 LED 상태 설명 파란색 유지 전원 켜짐 꺼짐 전원 꺼짐 주황색 등 대기 모두 / 충전 중 녹색불로 유지됨 완충됨 빨간색으로 점멸 배터리 부족 페어링 준비 됨 /Bluetooth 페어링 / 파란색으로 점멸 Bluetooth 연결 해제됨 (Bluetooth 스 피커...
- Seite 292 시작하기 1. 리모컨 준비 ① 배터리 칸을 밀어서 엽니다 . ② 새 AAA 배터리 2 개를 극성 (+/-) 에 맞게 삽입한 후 배터리 칸 덮개를 닫 습니다 . ③ 처음 사용하는 경우 화면에 표시되는 안내에 따라 리모컨을 프로젝터에 페어링합니다 . 리모컨과...
- Seite 293 • 프로젝터를 투사면 쪽으로 기울일 필요는 없습니다 . 내장된 자 동 초점 및 자동 키스톤 보정 기능을 사용해 투사 이미지를 조 정할 수 있습니다 . • 삼각대 ( 별도 판매 ) 에 프로젝터를 설치할 수도 있습니다 . • 프로젝터와 투사 표면 사이의 거리에 따라 투사되는 이미지 크 기가...
- Seite 294 3. 프로젝터 충전 처음 사용하는 경우 제품에 들어 있는 어댑터와 충전 케이블을 사용해 프로 젝터를 완전히 충전하세요 . 4. 전원 켜짐 / 꺼짐 전원을 켜거나 끄려면 프로젝터 전원 버튼을 3 초간 길게 누릅니다 . 3” • 리모컨의 전원 버튼을 3 초간 눌러도 전원을 끌 수 있습니다 . •...
- Seite 295 5. 자동 초점 및 자동 키스톤 보정 자동 초점과 자동 키스토 보정 기능을 사용하려면 프로젝터를 살짝 움직이거 나 리모컨에서 을 누릅니다 . 6. 조립 프로젝터를 처음 사용하는 경우 OSD( 화면 표시 ) 지침에 따라 기본 설정을 완료하십시오 . • 리모컨을 프로젝터에 페어링합니다 •...
- Seite 296 Nebula Connect 앱 프로젝터를 손쉽게 제어할 수 있도록 Nebula Connect 앱을 다운로드하는 것이 좋습니다 . ① App Store(iOS 기기 ) 또는 Google Play(Android 기기 ) 에서 Nebula Connect 앱을 다운로드합니다 . ② 스마트폰에서 Bluetooth 를 활성화합니다 . ③ Nebula Connect 앱을 열고 [Capsule 3 Laser] 선택 > [XXXXXX] 를 연 결할...
- Seite 297 2. 프로젝터 홈페이지에서 > [ 프로젝터 설정 ] 선택 후 를 누릅니다 . [ 밝기 ] 환경에 따라 밝기를 조정합니다 . [ 사진 모드 ]: 이 프로젝터에는 다양한 사진 모드가 사 전 설정되어 있어 사용자의 환경과 입력 소스에 맞게 선택할 수 있습니다 . •...
- Seite 298 [ 시작 시 자동 초점 ]: 프로젝터 전원을 켤 때 초점을 자 동으로 조정합니다 . [ 초점 설정 ] [ 이동 후 자동 초점 ]: 프로젝터를 옮긴 경우 초점을 자 동으로 조정합니다 . [ 수동 초점 교정 ]: 수동 초점 교정을 허용합니다 . [ 사운드...
- Seite 299 • [ 뒤쪽 ]: 기기가 투사면 뒤쪽에 있습니다 . • [ 뒤쪽 천장 ]: 기기가 투사면 뒤쪽 천장에 거꾸로 매달 려 있습니다 . 이미지가 180 도 및 수평 회전됩니다 . [ 모션 설정 ]: 자동 초점 및 자동 카스톤 보정을 개시 할...
- Seite 300 [ 언어 ] 화면의 표시 언어를 선택합니다 . [ 키보드 ] 키보드를 확인하고 관리합니다 . 입 력 소 스 로 HDMI 를 선 택 하 거 나 CEC(Consumer Electronic Control) 설정을 변경합니다 . [ 입력 ] CEC 를 이용하면 HDMI 기기와 Android TV 에서 서로 제어할...
- Seite 301 호환되는 iOS, macOS, Android 또는 Windows 기기에서 Nebula Capsule 3 Laser 로 영화 , 게임 , 음악 및 전체 화면을 무선으로 전송할 수 있습니다 . Nebula Capsule 3 Laser 와 기기가 같은 무선 네트워크에 연결 되어 있는지 확인하세요 . 네트워크는 Wi-Fi 네트워크 또는 휴대...
- Seite 302 저작권 제한에 따라 특정 콘텐츠는 Nebula Capsule 3 Laser 에 서 캐스트할 수 없습니다 . 프로젝터에 설치된 동일한 앱을 통해 콘텐츠를 스트리밍할 수 있습니다 . 3.2 기기 화면 캐스트 기기의 전체 화면을 프로젝터로 캐스트할 수 있습니다 . ① 기기와 프로젝터를 같은 무선 네트워크에 연결합니다 .
- Seite 303 (Not included) 일단 HDMI 재생 장치에 처음 연결하면 프로젝터가 자동으로 HDMI 재생을 시작합니다 . 5. USB 드라이브에서 재생하기 이 프로젝터를 사용해 USB 2.0 드라이브에 저장되어 있는 음악 , 동영상 및 사진을 즐기거나 앱을 설치할 수 있습니다 . ① Google Play 에서 File Explorer 앱을 다운로드합니다 . ②...
- Seite 304 6. 외부 사운드 장치를 통해 사운드 재생 이 프로젝터는 헤드폰 및 스피커를 포함한 외부 사운드 출력 장치에도 연결 할 수 있습니다 . 외부 스피커에 연결하면 내장 스피커 시스템이 비활성화됩 니다 . ① 3.5mm 오디오 케이블 또는 어댑터 ( 별도 구매 ) 를 사용하여 헤드폰이나 외부...
- Seite 305 < Settings Bluetooth Bluetooth Device Nebula Capsule 3 Laser Connected Pairing Connected Bluetooth 스피커 모드를 종료하려면 프로젝터에서 을 누르 거나 리모컨에서 를 2 초간 길게 누릅니다 . 시스템 업데이트 최신 기능을 통해 이 제품의 경험을 최대한 향상시키려면 시스템을 수시로 업데이트하실 것을 권장합니다 .
- Seite 306 해상도 1920 × 1080 480p(60 Hz), 576p(50 Hz), 720p(30 Hz), 720p(50 Hz), 720p(60 Hz), 1080p(24 Hz), 1080p(30 Hz), 1080p(50 Hz), 1080p(60 Hz), 호환 가능한 해상도 4K2K(23.976 Hz), 4K2K(25 Hz), 4K2K(30 Hz), 4K2K(50 Hz), 4K2K(60 Hz), 4096(23.976 Hz), 4096(25 Hz), 4096(30 Hz), 4096(50 Hz), 4096(60 Hz) 명암비...
- Seite 307 USB 포맷 FAT, FAT32 유럽 및 영국 : 0° C~25° C 작동 온도 기타 국가 및 지역 : 0° C~35° C/32° F~95° F 원격 제어 배터리 AAA x 2 문제 해결 ① 전원이 켜지지 않습니다 • 프로젝터 배터리가 소진되었을 수 있습니다 . 프로젝터를 15~30 분간 충전한...
- Seite 308 • [ 설정 ] > [ 프로젝터 설정 ] > [ 이미지 보정 ] 을 차례로 선택한 다음 , [ 수 동 키스톤 보정 ] 기능을 켜고 [ 수동 키스톤 보정 액세스 ] 를 선택합니 다 . • 필요한 경우 프로젝터를 왼쪽이나 오른쪽으로 옮기거나 기울기를 조정 합니다...
- Seite 309 용한 배터리는 해당 지역의 배터리 폐기 지침에 따라 처리하십시오 . RG1 IEC 62471-5:2015 IEC 60825-1:2014 클래스 1 및 IEC 62471-5:2015 위험 그룹 1 을 적합 제품 입니다 . 리모컨 : Nebula RC 모델 : D0413X Anker Innovations Limited Room 1318-19, Hollywood Plaza, 610 Nathan Road, Mongkok, Kowloon, Hong Kong...
- Seite 310 상표 Bluetooth® 워드마크와 로고는 Bluetooth SIG, Inc. 소유의 등록 상표이며 , Anker Innovations Limited 는 사용 허가 하에 이러한 모든 마크를 사용합 니다 . 기타 상표 및 상호는 해당 소유자의 자산입니다 . 기타 상표 및 상호는 해당 소유자의 자산입니다 .
- Seite 311 目錄 重要安全須知 內容物 繁 概觀 体 中 1. 投影機 文 2. 遙控器 3. LED 導光板 開始使用 1. 準備遙控器 2. 放置投影機 3. 為投影機充電 4. 電源開啟 / 關閉 5. 自動對焦和梯形校正 6. 設定 Nebula Connect 應用程式 設定 1. 網路 2. 投影機 3. 應用程式 4. 裝置喜好設定 5.
- Seite 312 重要安全須知 繁 在使用此產品之前,請閱讀所有說明。請勿進行任何未在本手冊中說明 体 的變更或建立設定。如果因未遵循說明而造成物質損害、資料遺失或損 中 壞,則不在保固範圍內。 文 設定 • 請勿以本文所述以外的任何方式使用產品,以免造成人身傷害或財 產損失。 • 為降低火災和 ( 或 ) 觸電的風險,請勿讓產品淋到雨或受潮。不應將 裝滿液體的物體 ( 如花瓶 ) 置於本產品上。 • 請勿將本產品放置在桌布或地毯等柔軟的表面上,否則可能會引起 火災。 • 請勿將本產品放置在易受過多灰塵和污垢影響的區域或任何產生強 磁場的裝置附近。 • 為防止過熱,請勿堵塞通風口。 • 切勿將本產品放置在密閉空間內。始終在本產品周圍留出足夠的空 間以便通風。 • 不要在溫度過高或過低的環境中使用產品。切勿將產品暴露在烈日 或潮濕的環境中。 • 當本產品長時間運行時,表面可能會變熱。如果發生這種情況,請 立即將其關閉並拔下充電器。產品冷卻後恢復運行。 •...
- Seite 313 電源供應 • 建議在溫度範圍為 5° C~25° C / 41° F~77° F 的環境中供應產品電源。 • 供電時,請將裝置放置在室溫正常且通風良好的環境中。 繁 体 中 聽力安全 文 • 為防止聽力受損,請勿長時間以高音量收聽。將音量設定在安全範 圍內。 充電 • 適配器僅供室內使用。 • 適配器應裝在產品附近,且便於連接。 • 由於外殼材料的原因,產品只能連接到 USB 2.0 或更新版本連線。 • 建議在溫度範圍為 5° C-25° C 的環境中供產品電源。供電時,請將 裝置放置在室溫正常且通風良好的環境中。 電池 • 遙控器包含電池, 有窒息危險。 請將遙控器放在兒童無法接觸的地方。 •...
- Seite 314 清潔 • 使用柔軟的無絨布清潔。 切勿使用液體、 氣體或易燃清潔劑進行清潔。 • 請勿使用任何液體清潔劑清潔鏡片,以免損壞鏡片上的鍍膜。 繁 体 • 輕輕擦拭表面。小心不要刮傷表面。 中 • 使用拭鏡紙清潔鏡頭。 文 維修 • 請勿自行對該產品進行任何維修。 • 維護不當可能導致人身傷害或產品損壞。 • 請將所有維修工作交給合格的維修人員處理。 注意 • 本產品發出的光學輻射可能有危險,或許會對眼睛造成傷害。 • 請勿凝視運作中的光束。 雷射安全 • RG1 IEC 62471-5:2015 • 符合 IEC 60825-1:2014 Class 1 和 IEC 62471-5:2015 Risk Group 1。 •...
- Seite 315 內容物 繁 体 中 文 Nebula Capsule 3 Laser 轉接器 充電線 遙控器 AAA 電池 × 2 快速入門指南...
- Seite 316 概觀 1. 投 影機 繁 体 前視圖 中 文 鏡頭 自動對焦和自動 梯形修正相機...
- Seite 317 後視圖 繁 体 中 文 揚聲器 AUX-OUT 插座 • 連接到外部聲音輸出裝置。 紅外線接收器 模式按鈕 • 按下按鈕可在藍牙喇叭模式和投影機模式之間切換。 電源按鈕 • 長按 3 秒開機 / 關機。 • 在投影機模式下按下可喚醒投影機 / 進入待機模式。 USB-C 連接埠 • 使用提供的適配器和充電線連接到電源。 • 連接到 USB 驅動器。 HDMI 連接埠 • 連接到透過 HDMI 輸出的播放裝置。...
- Seite 318 上視圖 繁 体 音量增加 / 降低按鈕 中 文 確認按鈕 返回按鈕 導覽按鈕 底視圖 1/4" 三腳架轉接座...
- Seite 319 尺寸 167.5 ( 高 ) x 83.0 ( 深 ) 公釐 /6.6 ( 高 ) × 3.3 ( 深 ) 英寸 繁 体 中 文 83.0mm...
- Seite 320 2. 遙 控器 繁 調整焦點 体 中 導航 文 返回上一個功能表 打開 / 關閉電源或切換到待機模 式。 啟動 Google 助理 確認選擇 / 暫停 / 繼續 存取更多選項 存取主功能表 音量增加 / 降低...
- Seite 321 3. L ED 導光板 按鈕 LED 燈狀態 說明 繁 体 恆亮藍燈 已開機 中 熄滅 已關機 文 恆亮橘燈 待機模式 / 充電中 恆亮綠燈 已完全充飽 閃爍紅燈 電池電量不足 準備配對 / 藍牙配對中 / 藍牙中斷連 閃爍藍燈 接 ( 藍牙喇叭模式 ) 恆亮藍燈 藍牙已連接 ( 藍牙喇叭模式 ) 開始使用 1. 準 備遙控器 ①...
- Seite 322 遙控器和投影機之間的距離不應超過 10 公尺 /33 英尺。 繁 体 2. 放 置投影機 中 文 將投影機放在投影面前面的穩定、平坦的表面上。為獲得最佳效果,投 影表面應為白色且平坦。 • 無需將投影機向投影面傾斜。您可以使用內建的自動對焦 和自動梯形校正來校正投影影像。 • 您也可以將投影機安裝在三腳架 ( 單獨出售 ) 上。 • 投影機與投影面之間的距離決定了投影影像的大小。為獲 得最佳效果,請將投影機放置在距離投影面 1.06~3.18 公 尺 / 3.37~10.43 英呎的位置,以獲得 40~120 英寸的畫面 大小。 螢幕尺寸 投影機鏡頭與畫面之間的距離 40 英寸 1.06 公尺...
- Seite 323 90 英寸 2.39 公尺 /7.84 英呎 100 英寸 2.65 公尺 /8.69 英呎 繁 110 英寸 2.92 公尺 /9.58 英呎 体 120 英寸 3.18 公尺 /10.43 英呎 中 3. 為 投影機充電 文 首次使用時,請使用提供的適配器和充電線為投影機充滿電。 4. 電源開啟 / 關閉 按住投影機電源按鈕約 3 秒以開啟 / 關閉電源。 3”...
- Seite 324 5. 自 動對焦和自動梯形校正 繁 体 中 文 要啟用自動對焦和自動梯形校正,請稍微移動投影機或按遙控器上的 。 6. 設 定 首次使用投影機時,請按照螢幕顯示 (OSD) 說明完成基本設定。 • 將遙控器與投影機配對 • 選擇語言 • 使用 Android 手機設定電視 ( 選用 ) • 連接到 Wi-Fi • 使用您的 Google 帳戶登入...
- Seite 325 Nebula Connect 應用程式 為了輕鬆控制投影機,建議您下載 Nebula Connect 應用程式。 繁 体 中 文 ① 從 App Store (iOS 裝置 ) 或 Google Play (Android 裝置 ) 下載 Nebula Connect 應用程式。 ② 在您的智慧手機上啟用藍牙。 ③ 打開 Nebula Connect 應用程式, 選取 [Capsule 3 Laser] > [XXXXXX] 作為要連接的裝置。 ④ 依照螢幕上的指示完成連接設定。 設定 第一次打開投影機電源時,請完成設定流程。 1. 網 路 本投影機可以透過無線網路...
- Seite 326 2. 投 影機 在首頁上,選擇 > [ 投影機設定 ],然後按 。 繁 体 [ 亮度 ] 根據您的環境調整亮度。 中 [ 圖片模式 ]:投影機預設了幾種預先定義的影像模 文 式,以便選擇適合您環境和輸入來源的模式。 • [ 標準 ]:在平衡的暖色調和冷色調中保持自然色 彩。 • [ 電影 ]:提供最適合觀賞電影的色彩。 • [ 遊戲 ]:提升遊玩電子遊戲的亮度和回應時間等 級。 • [ 自訂圖片 ]:手動設定對比度、飽和度、清晰度、 色溫和伽瑪,或重設值。 [ 圖片...
- Seite 327 [ 音效模式 ]:投影機預設了幾種預先定義的音效 模式,以便選擇適合您環境和輸入來源的模式。 • [ 音樂 ]:聆聽音樂時強化高音。 繁 体 • [ 電影 ]:為觀賞電影創造環繞音效聆聽體驗。 中 • [ 戶外 ]:增加在戶外播放音訊 / 視訊的音量。 文 • [ 自訂 ]:手動設定音效設定,例如平衡、低音 和高音。 [ 聲音 ] [ 系統音效 ]:開啟 / 關閉系統音效通知。 [ 專家設定 ]:自訂進階設定以提高音訊品質。 • [ 數位輸出 ]:選擇輸出音訊格式。 •...
- Seite 328 [ 智慧解決方案 ]:當投影機偵測到問題時開啟 / 關閉自動警示。 • [ 投影角度警示 ]:達到最大投影角度時顯示警 繁 示。 [ 進階設定 ] 体 • [ 緩慢充電警示 ]:電源不足時顯示警示。 中 文 • [ 微調警示 ]:在自動梯形校正後顯示存取微調 的提示。 3. 應 用程式 ① 在首頁上,選擇 > [ 應用程式 ],然後按 。 ② 選擇應用程式並查看目前版本、開啟或強制停止應用程式、查看已 用儲存空間、清除資料或快取、卸載應用程式、啟用或禁用通知和 權限。...
- Seite 329 在主螢幕上設定頻道和應用程式或檢查開放原始碼 [ 主畫面 ] 授權。 繁 [Google 助理 ] 變更 Google 助理的設定。 体 選擇在所有連接到您 Wi-Fi 的 Android 裝置上顯示 中 [ 內建 Chromecast] 通知,並讓他們控制媒體投射到此裝置。 文 [ 螢幕保護程式 ] 變更螢幕保護程式設定。 [ 位置 ] 允許應用程式到估計位置。 自動向 Google 傳送診斷資訊,例如來自您的裝置、 [ 使用情況和診斷 ] 應用程式和內建 Chromecast 的崩潰報告和使用資料。 [ 無障礙輔助 ] 變更字幕設定或啟用無障礙輔助服務。...
- Seite 330 對話並下達命令。 体 中 3. 無 線投射 文 您可以將電影、遊戲和音樂和整個螢幕從相容的 iOS、macOS、 Android 或 Windows 裝置無線投射到 Nebula Capsule 3 Laser。 確定 Nebula Capsule 3 Laser 和裝置連接至同一個無線網路。 網路可以是 WiFi 網路或手機的熱點。 3.1 投射應用程式內的內容 您可以從支援 Chromecast 的應用程式 ( 例如 YouTube 和 Prime Video) 投射內容。 ① 將您的裝置和投影機連接到同一個無線網路。...
- Seite 331 由於版權限制,某些內容無法在 Nebula Capsule 3 Laser 上投 射。您可以透過投影機上安裝的相同應用程式串流傳輸內容。 繁 体 中 3.2 投射裝置畫面 文 您可以將裝置的整個畫面投射到投影機。 ① 將您的裝置和投影機連接到同一個無線網路。 ② 在您的投影機上安裝 AirScreen 應用程式。 ③ 打開 AirScreen 並按照畫面上的說明完成該流程。 4. 從 HDMI 播放裝置播放 投影機可以連接到各種 HDMI 播放裝置,例如電視盒、電視棒、DVD 播 放器、機上盒 (STB)、遊戲主機或其他裝置。 ① 使用 HDMI 纜線 ( 未提供 ) 將投影機連接到 HDMI 播放裝置。...
- Seite 332 5. 從 USB 磁碟機播放 使用此投影機,您可以欣賞音樂、影片和圖片,或安裝儲存在 USB 2.0 繁 隨身碟上的應用程式。 体 ① 從 Google Play 下載 File Explorer 應用程式。 中 ② 將 USB-A 隨身碟 ( 包含 USB 轉換器 ) 或 USB-C 隨身碟插入 USB 連 文 接埠。 ③ 從 USB 隨身碟中選擇要播放的音樂、影片或圖片,然後按下 。 ④ 按下 停止播放。...
- Seite 333 A:按下投影機上的 。 B:在首頁上,選擇 > [ 藍牙喇叭模式 ],然後按下 。 ② 啟用智慧型手機上的藍牙,選擇 Nebula Capsule 3 Laser 進行連接。 < Settings Bluetooth Bluetooth Device Nebula Capsule 3 Laser Connected Pairing Connected 要退出藍牙喇叭模式,請按投影機上的 ,或按住遙控器 上的 兩秒鐘。 系統更新 為充分提升您對本產品最新功能的體驗,建議您不時更新系統。 要更新系統,請前往 [ 設定 ] > [ 裝置喜好設定 ] > [ 關於 ] > [ 系統更新 ]。...
- Seite 334 規格 繁 規格可能隨時變更,恕不另行通知。 体 3A 或 9V 3A 或 12V 3A 或 15V 中 輸入 或 20V 2.25A 文 耗電量 < 45W 待機耗電量 < 0.5W 解析度 1920 × 1080 480p (60 Hz)、576p (50 Hz)、720p (30 Hz)、720p (50 Hz)、720p (60 Hz)、1080p (24 Hz)、1080p (30 Hz)、1080p (50 Hz)、...
- Seite 335 噪音 28 分貝 繁 無線上網 Wi-Fi 2.4 GHz/5.0 GHz 802.11 a/b/g/n/ac 体 中 藍牙版本 文 藍牙範圍 25 公尺 /82 英尺 USB 格式 FAT, FAT32 如果是歐洲和英國,0° C 至 25° C 運作溫度 如 果 是 其 他 國 家 和 地 區,0 ° C 至 35 ° C / 32°...
- Seite 336 ④ 影像模糊 • 稍微移動投影機或按遙控器上的 開始自動對焦。 繁 • 要手動調整焦距, 請前往 [ 設定 ] > [ 投影機設定 ] > [ 對焦設定 ] > [ 手 体 動對焦校正 ],然後使用遙控器上的 和 。 中 • 如有必要,可調整投影角度和方向以及投影機的高度。 文 ⑤ 影像失真 • 透過 [ 設定 ]>[ 裝置喜好設定 ]>[ 關於 ]>[ 系統更新 ]>[ 檢查更新 ] 將韌體更新到最新版本。...
- Seite 337 注意 繁 產品採用高品質材料及元件設計製造,可回收再利用。 体 中 此符號表示產品不得做為家庭廢棄物丟棄,應運送至適當收集 文 設施進行回收。正確處置和回收利用有助於保護自然資源、人 類健康和環境。如需有關處置和回收利用本產品的詳細資訊, 請聯絡您當地市政府、廢棄物處置服務或出售本產品的商店。 注意事項:如果將電池更換為不正確類型的電池,會有爆炸的 危險。請按照指示棄置用過的電池。 低功率射頻器材技術規範: 取得審驗證明之低功率射頻器材,非經核准,公司、商號或使用者均不 得擅自變更頻率、加大功率或變更原設計之特性及功能。 低功率射頻器材之使用不得影響飛航安全及干擾合法通信;經發現有干 擾現象時,應立即停用,並改善至無干擾時方得繼續使用。前述合法通 信,指依電信管理法規定作業之無線電通信。低功率射頻器材須忍受合 法通信或工業、科學及醫療用電波輻射性電機設備之干擾。 * 應避免影響附近雷達系統之操作 * 高增益指向性天線只得應用於固定式點對點系統 進口商:群光電子股份有限公司 地址:新北市三重區光復路二段 69 號 免付費客服專線:0800-828-772 製造商:安克創新有限公司 地址:香港九龍旺角彌敦道 610 號荷李活商業中心 1318-19 室 Nebula 膠囊雷射投影儀 型號:D2426 警告: 用錯誤型號的電池組替換,可能會使安全防護失效,會有爆炸的危險; 將電池或產品投入到火中或加熱爐中,或對電池進行機械擠壓或切割的 處理可能會導致爆炸;...
- Seite 338 繁 体 中 文...
- Seite 339 繁 体 中 文 nebulataiwantw@gmail.com...
- Seite 340 限用物質含有情況標示聲明書 Declaration of the Presence Condition of the Restricted Substances Marking 繁 證書號碼 / 受理編號: 体 (No.) 中 Certificate No/Application No. 商品標籤及商品檢驗標識: 文 (Picture) Product Label and Commodity Inspection Mark. 樣張及其標示位置: (Description and Picture) Sample and its location 設備名稱: Nebula膠囊雷射投影儀, 型號 (型式) : D2426 Equipment name Type designation (Type) 限用物質及其化學符號...
- Seite 341 4. 本充電器僅用於 IT 類產品 5. 室內使用 6. 請匆擅自破壤外殼及維修本產品 7. 插頭作為電源斷開裝置,插座應當處於便於觸及的位置 8. 生產工廠:深圳市新斯寶科技有限公司 地址 : 深圳市寶安區福海街道橋頭社區鑫豪第二工業區廠房二棟 201/301/401 9. 进口商:群光電子股份有限公司 地址:新北市三重區光復路 2 段 69 號 遙控器:Nebula RC 型號:D0413X Anker Innovations Limited Room 1318-19, Hollywood Plaza, 610 Nathan Road, Mongkok, Kowloon, Hong Kong...
- Seite 342 体 中 Bluetooth® 字標示和標誌屬 Bluetooth SIG, Inc. 所擁有的註冊商標, 文 Anker Innovations Limited 對此標示和標誌的任何使用情形均已獲授 權。其他商標和商品名稱皆屬各自所有者。 HDMI 與 HDMI 標誌和高畫質多媒體介面是 HDMI Licensing LLC 在美國 及其他國家 / 地區的商標或註冊商標。 經 杜 比 實 驗 室 授 權 製 造。Dolby、Dolby Audio 和 雙 D 符 號 是 Dolby Laboratories Licensing Corporation 的商標。...
- Seite 343 جدول المحتويات تعليمات السالمة المهمة المرفقات نظرة سريعة 1. البروجيكتور 2. جهاز التح ك ّ م عن ب ُعد LED 3. دليل مصباح بدء االستخدام 1. حضر جهاز التحكم عن ب ُعد 2. حدد وضع جهاز العرض الخاص بك 3. اشحن جهاز العرض الخاص بك 4.
- Seite 344 تعليمات السالمة المهمة اقرأ جميع التعليمات قبل استخدام هذا المنتج. ال تقم بإجراء أي تغييرات أو إعدادات غير موضحة في هذا الدليل. في حالة وقوع إصابة جسدية، أو فقدان بيانات، أو حدوث ضرر بسبب عدم اتباع .اإلرشادات؛ فلن ينطبق الضمان اإلعداد...
- Seite 345 مصدر الطاقة • 25 ي ُوصى بتوصيل المنتج بالطاقة في بيئة بدرجة حرارة تتراوح من 5 درجات مئوية إلى .درجة مئوية / 14 درجة فهرنهايت إلى 77 درجة فهرنهايت • .عند اإلمداد بالطاقة، ي ُرجى وضع الجهاز في بيئة بدرجة حرارة الغرفة العادية وبتهوية جيدة سالمة...
- Seite 346 .السوائل أو الغازات القابلة لالشتعال التنظيف ،استخدم قطعة قماش ناعمة وخالية من النسالة. ال تستخدم مطل ق ً ا المنظفات السائلة، أو الغازية • .أو القابلة لالشتعال بسهولة لغرض التنظيف • .ال تستخدم أي مواد تنظيف سائلة لتنظيف العدسة لتجنب إتالف طبقة الطالء على العدسة •...
- Seite 347 اللوازم المض م ّ نة Nebula Capsule 3 Laser محوّ ل كبل الشحن جهاز التح ك ّ م عن ب ُعد AAA بطاريتان من نوع دليل البدء السريع...
- Seite 348 نظرة سريعة البروجيكتور المنظر األمامي عدسة كاميرا (للتركيز التلقائي وتصحيح المحور )التلقائي المنظر الخلفي...
- Seite 349 السماعة AUX-OUT مأخذ توصيل • .قم بالتوصيل بجهاز إخراج صوت خارجي م ُستقب ِ ل باألشعة تحت الحمراء زر الوضع • . ووضع جهاز العرضBluetooth اضغط للتبديل بين وضع مكبر صوت زر الطاقة • .اضغط لمدة 3 ثوان ٍ للتشغيل / إليقاف التشغيل •...
- Seite 350 المنظر السفلي مقبس ثالثي القوائم مقاس 4/1 بوصة األبعاد 5.761 (طول) × 0.38 (عمق) مم / 6.6 (طول) × 3.3 (عمق) بوصة 83.0mm...
- Seite 351 جهاز التح ك ّ م عن ب ُ عد ضبط التركيز التنقل العودة إلى القائمة السابقة التشغيل/إيقاف التشغيل أو التبديل إلى وضع االستعداد Google Assistant تنشيط قم بتأكيد التحديد / إيقاف مؤقت / استئناف الوصول إلى المزيد من الخيارات الوصول إلى القائمة الرئيسية رفع...
- Seite 352 LED دليل مصباح الوصف LED حالة مؤشر الزر قيد التشغيل أزرق ثابت قيد إيقاف التشغيل اإلضاءة مطفأة وضع االستعداد / الشحن برتقالي ثابت اكتمال الشحن أخضر ثابت شحن البطارية منخفض أحمر وامض / Bluetooth جاهز لإلقران / االقتران عبر (وضع مكبر صوتBluetooth غير متصل بـ وميض...
- Seite 353 33/يجب أال تتجاوز المسافة بين جهاز التح ك ّ م عن ب ُعد وجهاز العرض مسافة 01 م .قد م ًا حدد وضع جهاز العرض الخاص بك ضع جهاز العرض على سطح ثابت ومستو ٍ أمام سطح العرض. للحصول على أفضل النتائج، يجب أن .يكون...
- Seite 354 المسافة بين عدسة جهاز العرض والشاشة حجم 60.1 متر / 74.3 أقدام 04 بوصة 33.1 متر / 63.4 أقدام 05 بوصة 06.1 متر / 42.5 أقدام 06 بوصة 68.1 متر / 01.6 أقدام 07 بوصة 31.2 متر / 89.6 أقدام 08 بوصة...
- Seite 355 3 يمكنك أي ض ًا الضغط مع االستمرار على زر الطاقة في جهاز التحكم عن ب ُعد لمدة .ثوان ٍ إليقاف التشغيل عند التشغيل، اضغط على زر الطاقة بجهاز العرض أو جهاز التحكم عن ب ُعد للتبديل .إلى وضع االستعداد ،...
- Seite 356 اإلعداد ) إلكمالOSD( عند استخدام جهاز العرض ألول مرة، اتبع التعليمات التي تظهر على الشاشة .اإلعداد األساسي • قم بإقران جهاز التحكم عن ب ُعد بجهاز العرض • اختر لغتك • ) (اختياريAndroid قم بإعداد التلفزيون الخاص بك باستخدام هاتف •...
- Seite 357 اإلعدادات .تابع عملية اإلعداد عند تشغيل جهاز العرض ألول مرة الشبكة .)Wi-Fi( يمكن توصيل جهاز العرض هذا باإلنترنت عبر اتصال السلكي ① في الصفحة الرئيسية، حدد > ]الشبكة واإلنترنت[ واضغط على .② اتبع اإلرشادات التي تظهر على الشاشة إلكمال اتصال الشبكة البروجيكتور...
- Seite 358 ]تصحيح المحور التلقائي عند بدء التشغيل[: إجراء عملية تصحيح .المحور التلقائي عند تشغيل جهاز العرض ]تصحيح المحور التلقائي بعد الحركة[: إجراء عملية تصحيح []تصحيح الصورة .المحور التلقائي عند تحريك جهاز العرض ]تصحيح المحور يدو ي ً ا[: تمكين تصحيح المحور يدو ي ًا.ال يتوفر إال .عند...
- Seite 359 .]وضع جهاز العرض[: تحديد طريقة وضع جهاز العرض • ]تلقائي[: يكتشف تلقائ ي ًا ما إذا كان جهاز العرض معكو س ًا أم .ال.التبديل تلقائ ي ًا بين هذه الخيارات .• ]أمامي[: يقع الجهاز أمام سطح عرض الصورة • ] التركيب بالسقف من األمام[: تعليق الجهاز بالسقف رأ س ًا على .عقب.يتم...
- Seite 360 لتمكين التاريخ والوقت التلقائيين أو تعطيلهما.قم بتعيين التاريخ والوقت []التاريخ والوقت .يدو ي ًا أو حدد المنطقة الزمنية أو اضبط تنسيق الوقت .قم بتغيير اإلعدادات إليقاف التشغيل التلقائي []المؤقت .لتحديد لغة العرض على الشاشة []اللغة .فحص وإدارة لوحات المفاتيح []لوحة المفاتيح ...
- Seite 361 أوmacOS أوiOS يمكنك بث األفالم واأللعاب والموسيقى والشاشة بأكملها السلك ي ًا من أجهزة .Nebula Capsule 3 Laser المتوافقة لديك إلىWindows أوAndroid وجهازك متصالن بالشبكة الالسلكيةNebula Capsule 3 Laser تأكد من أن . أو نقطة اتصال بهاتفكWiFi نفسها. يمكن أن تكون الشبكة شبكة...
- Seite 362 Nebula Capsule 3 Laser ال يمكن عرض بعض المحتويات المعينة على بسبب قيود حقوق النشر. يمكنك بث المحتوى عبر نفس التطبيق المثبت على جهاز .العرض الخاص بك 2.3 بث شاشة الجهاز .يمكنك بث الشاشة بأكملها من جهازك إلى جهاز العرض...
- Seite 363 (Not included) HDMI تلقائ ي ًا بمجرد توصيله بجهاز تشغيلHDMI سيبدأ جهاز العرض تشغيل .ألول مرة USB التشغيل من محر ّ ك أقراص باستخدام جهاز العرض هذا، يمكنك االستمتاع بالموسيقى والفيديو والصور أو تنزيل التطبيقات .USB 2.0 المخزنة على محرك أقراص .Google Play ...
- Seite 364 :، يتوفر لديك خيارانBluetooth ① بالنسبة للتبديل إلى وضع مكبر صوت .على جهاز العرض أ: اضغط على ] واضغط علىBluetooth < ]وضع مكبر صوت ب: في الصفحة الرئيسية، حدد . لالتصالNebula Capsule 3 Laser على هاتفك الذكي وحددBluetooth ② قم بتمكين...
- Seite 365 < Settings Bluetooth Bluetooth Device Nebula Capsule 3 Laser Connected Pairing Connected بجهاز العرض أو ، اضغط علىBluetooth للخروج من وضع مكبر صوت .بجهاز التحكم عن ب ُعد لمدة ثانيتين اضغط مع االستمرار على تحديث النظام .نوصي بتحديث النظام من وقت آلخر لتحسين تجربتك مع المنتج بشكل كامل بأحدث الميزات...
- Seite 366 720 ،)084 بكسل (06 هرتز)، 675 بكسل (05 هرتز بكسل (03 هرتز)، 027 بكسل (05 هرتز)، 027 بكسل (06 هرتز)، 0801 بكسل (42 هرتز)، 0801 بكسل (03 هرتز)، 0801 بكسل (05 هرتز)، 0801 بكسل 25( 4K2K ،)4 (679.32 هرتزK2K ،)(06 هرتز دقة...
- Seite 367 USB تنسيق FAT32 وFAT بالنسبة ألوروبا والمملكة المتحدة، من 0 درجة مئوية إلى 52 درجة مئوية بالنسبة للبلدان والمناطق األخرى، من 0 درجة مئوية إلى درجة حرارة التشغيل 53 درجة مئوية / ومن 23 درجة فهرنهايت إلى 59 درجة فهرنهايت بطاريات...
- Seite 368 إشعار .يتوافق هذا المنتج مع متطلبات التداخل الالسلكي في االتحاد األوروبي إعالن المطابقة Hereby, Anker Innovations Limited. declares that this device is in compliance with the essential requirements and other . لالطالع على إعالنrelevant provisions of Directive 2014/53/EU المطابقة، تفضل بزيارة موقع الويب...
- Seite 369 :)المستورد التالي هو الطرف المسؤول (عقد شؤون االتحاد األوروبي Anker Innovations Deutschland GmbH I Georg-Muche-Strasse 3, 70808، ألمانياMunich :)المستورد التالي هو الطرف المسؤول (عقد شؤون المملكة المتحدة Anker Technology )UK( Limited I GNR8, 49 Clarendon Road, Watford, Hertfordshire, WD17 1HP, United Kingdom...
- Seite 370 العالمات التجارية Bluetooth SIG, هي عالمات تجارية مسجلة مملوكة لشركةBluetooth® عالمة وشعارات . يخضع للترخيصAnker Innovations Limited وأي استخدام لهذه العالمات من ق ِ بلInc. .العالمات التجارية واألسماء التجارية األخرى هي ملك ألصحابها المعنيين هي عالماتHigh-Definition Multimedia Interface وHDMI وشعارHDMI ...
- Seite 371 الضمان ضمان مع إمكانية استرداد المال مهما كانت األسباب لمدة 0 يو م ً ا يمكنك إرجاع منتجك وعبوته غير التال ف َ ين في غضون 03 يو م ًا من تاريخ الشراء واسترداد المال بالكامل مهما كانت األسباب. إذا لم يكن سبب اإلرجاع متعل ق ً ا بالجودة، فيجب على العميل الدفع .مقابل...