
Verwandte Anleitungen für Sonnenkönig KLIMA KING+


Inhaltszusammenfassung für Sonnenkönig KLIMA KING+
- Seite 1 KLIMA KING+ MONO KLIMAGERÄT Bedienungsanleitung Artikelnummer KLIMA KING+: 10020112...
-
Seite 2: Inhaltsverzeichnis
Inhaltsverzeichnis 1 Sicherheitsvorkehrungen ��������������������������������������������������������������������������������������������������������������������3 2 Technische Details �������������������������������������������������������������������������������������������������������������������������������5 3 Teilebeschreibung ��������������������������������������������������������������������������������������������������������������������������������6 4 Zubehör ������������������������������������������������������������������������������������������������������������������������������������������������6 5 Installation �������������������������������������������������������������������������������������������������������������������������������������������7 6 Bedienung ������������������������������������������������������������������������������������������������������������������������������������������� 11 7 Reinigung ��������������������������������������������������������������������������������������������������������������������������������������������13 8 Fehlerbehebung ���������������������������������������������������������������������������������������������������������������������������������14 9 Garantie / Entsorgung / Technische Änderungen ���������������������������������������������������������������������������15... -
Seite 3: Sicherheitsvorkehrungen
1. SICHERHEITSVORKEHRUNGEN WICHTIG: Warten Sie mindestens 12 Stunden nach dem Auspacken des Gerätes, bevor Sie es verwenden! Bitte lesen Sie vor erster Inbetriebnahme die Gebrauchsanweisung genau durch und beachten Sie die Si- cherheitshinweise, um Schäden durch falsche oder unsachgemässe Bedienung sowie unzulässige Umge- bungsbedingungen zu vermeiden. - Seite 4 • Wird das Gerät in einem nicht belüfteten Raum gelagert, aufgestellt oder betrieben, muss dafür Sorge getragen werden, dass sich durch ein mögliches Auslaufen das Kältemittel nicht aufgrund von Zündquel- len wie bspw. einem Heizkörper oder Ofen entzündet oder explodiert. •...
-
Seite 5: Technische Details
• Die Lüftungsöffnungen müssen frei sein. • Jede Person, die mit Kältemitteln arbeitet oder den Kältemittelkreislauf öffnet, muss eine von dem entsprechenden Industrieverband erteilte Zertifizierung nachweisen, die ihr den erlaubten und sicheren Umgang mit Kältemitteln gemäss den gültigen Vorschriften des Industrieverbandes bescheinigt. •... -
Seite 6: Teilebeschreibung
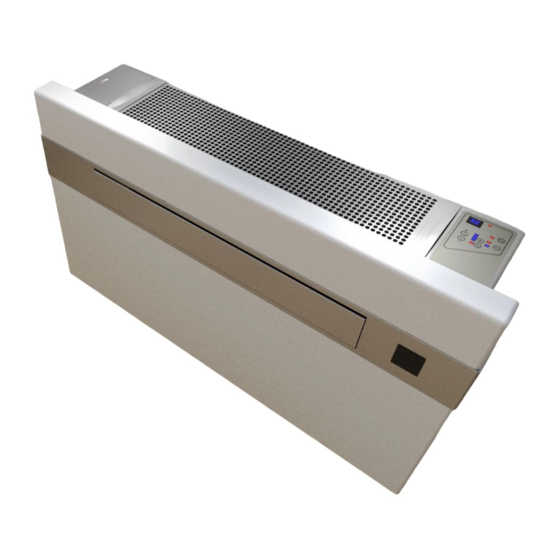
3. TEILEBESCHREIBUNG Filter Abdeckung Fernbedienung Box Grill oben Abflussrohr Heizung Bedienfeld Luftleitklappe LED Displayanzeige Frischluftsystem Netzkabel 4. ZUBEHÖR Abb� 2 Zubehörteil Name Wandhalterung Nebennierenrost 160 / 150 mm Ring 2 x Kunststoffplatte Luftrohr Abflussrohr Papierschablone zum Bohren Schrauben Set Fernbedienung und Halterung... -
Seite 7: Installation
5. INSTALLATION Klimagerät Positionieren Papierschablone Um die beste Leistung Ihres Klimageräts zu erhalten Befestigen Sie die Schablone an der Wand, nach- und Ausfälle oder Gefahren zu vermeiden, müssen dem Sie die folgenden Richtlinien sorgfältig über- Sie es richtig aufstellen. Bitte befolgen Sie die prüft haben. - Seite 8 Wand Bohren Abflussrohr Bitte beachten Sie: Wenn Sie das Loch oberhalb des Dieses Klimagerät verfügt über ein doppeltes System Erdgeschosses bohren, sorgen Sie bitte dafür, dass zur automatischen Ableitung der Kondensatfeuch- ein Bereich gesichert ist und der Aussenbereich tigkeit. Wählen Sie vor der Installation des Klima- während der Bohrung überwacht wird, bis die gerätes das für Sie geeignete System aus.
-
Seite 9: Rohre Installieren
Rohre Installieren System «A» wird häufiger verwendet, und das Abflussrohr geht nach draussen, wo es kein Problem Nachdem Sie die Löcher gebohrt haben, müssen Sie gibt, es anzuschliessen oder abzuleiten, diese Lösung die mit der Klimaanlage gelieferte Plastikfolie durch ist OK für heisse Länder und normale kalte Tempera- die Löcher stecken. - Seite 10 Einbau der Gitterroste Klimagerät an Halterung montieren Um die beiden äusseren Gitterroste zu montieren, Nachdem Sie sich nochmals vergewissert haben, gehen Sie bitte wie folgt vor: Machen Sie sich vor der dass der Befestigungsbügel sicher an der Wand be- Installation mit der Montage des Gitterrostes am festigt ist und alle notwendigen Vorbereitungen für Rohr vertraut.
-
Seite 11: Bedienung
6. BEDIENUNG Fernbedienung Funktion 1: MODE-TASTE: Einstellen des Betriebsmodus 2: EIN/AUS-TASTE 3: Erhöhen der Temperatur und der Zeit 4: Verringern der Temperatur und der Zeit 5: FAN SPEED: Einstellen der Gebläsegeschwindigkeit 6: Einstellen der Startzeit/Timer der Klimaanlage 7: TIMER OFF: Einstellen der Zeit, wo die Klimaanlage stoppt 8: Einstellen der Uhr 9: SWING BUTTON: Einstellen der Luftstromrichtung... - Seite 12 Bedienung am Gerät 1: LED Signalisiert den Betriebszustand des Gerätes. 2: ON/OFF Button für Betrieb des Gerätes 3: Modus Taste für die Betriebsart des Gerätes 4: Kühl LED Signalisiert den Kühlzustand 5: Heiz LED Signalisiert den Heizzustand 6: Elektrische Heizung ON/OFF 7: Heizung LED Signalisiert den Heizzustand 8: Senkt die Temperatur und Zeit 9: Erhöht die Temperatur und Zeit...
-
Seite 13: Externe Reinigung
7. REINIGUNG Reinigung der Filter Die Filter sollten regelmässig gereinigt werden, da- mit das Klimagerät effizient arbeitet. Reinigen Sie die Filter alle zwei Wochen. Wie Sie vorgehen müssen: • Trennen Sie das Klimagerät von der Stromzufuhr • Ziehen Sie das Filtergitter in Pfeilrichtung heraus. Nehmen Sie den Filter wie gezeigt heraus. -
Seite 14: Fehlerbehebung
8. FEHLERBEHEBUNG Mögliche Ursachen • Das Klimagerät funktioniert nicht. • Das Klimagerät kühlt den Raum nicht. Wenn das Kabel beschädigt ist, muss es durch den • Seltsamer Geruch im Raum. Hersteller oder seinen Kundendienst oder eine ähn- • Wasser tropft aus der Klimaanlage. lich qualifizierte Person ersetzt werden, um eine •... -
Seite 15: Garantie / Entsorgung / Technische Änderungen
9. GARANTIE / ENTSORGUNG / TECHNISCHE ÄNDERUNGEN Garantie Die Geräte werden vor der Auslieferung genau kontrolliert. Sollte trotzdem einmal ein Mangel an Ihrem Gerät auftreten, wenden Sie sich vertrauensvoll an Ihren Verkäufer. Bitte bringen Sie den Kaufbeleg mit, denn dieser ist für jede Garantieleistung vorzulegen. -
Seite 16: Entsorgungshinweise Für Den Elektrischen Teil Des Produkts
ENTSORGUNGSHINWEISE FÜR DEN ELEKTRISCHEN TEIL DES PRODUKTS Gemäss Artikel 26 des Gesetzeserlass vom 14. März 2014 zur Umsetzung der Richtlinie 2012/19/EG und des Erlasses vom 31. März 2015 zur Umsetzung der Richtlinie 2015/863/EU zur Verringerung der Verwendung gefährlicher Stoffe in Elektro- und Elektronikgeräten und zur Abfallentsorgung. Das Symbol der durchgestrichenen Mülltonne auf dem Gerät oder der Verpackung weist da- rauf hin, dass das Gerät am Ende seiner Lebensdauer getrennt von anderen Abfällen über entsprechende Sammelstellen zu entsorgen ist. - Seite 17 Notizen | Notes | Nota...
- Seite 18 Firma Armin Schmid Olensbachstrasse 9–15 CH-9631 Ulisbach Tel. Int. +41 (0) 58 611 60 00 Tel. Nat. 0848870850 info@sonnenkoenig.ch www.sonnenkoenig.ch Firma Armin Schmid Peter-Henlein-Strasse 5 D-89331 Burgau Tel: 0180 500 64 35 info@sonnenkoenig.ch www.sonnenkoenig.ch Festnetz 14 Cent/Minute Lokalnetz bis 42 Cent/Minute...
- Seite 19 KLIMA KING+ CLIMATISEURS MONO Mode d’emploi Articlenr. KLIMA KING+: 10020112...
- Seite 20 Table des matières 1 Consignes de sécurité �������������������������������������������������������������������������������������������������������������������������21 2 Détails techniques ������������������������������������������������������������������������������������������������������������������������������23 3 Description des pièces �����������������������������������������������������������������������������������������������������������������������24 4 Accessoires �����������������������������������������������������������������������������������������������������������������������������������������24 5 Installation �����������������������������������������������������������������������������������������������������������������������������������������25 6 Utilisation �������������������������������������������������������������������������������������������������������������������������������������������29 7 Nettoyage ������������������������������������������������������������������������������������������������������������������������������������������� 31 8 Dépannage ������������������������������������������������������������������������������������������������������������������������������������������32 9 Garantie / Elimination / Modifications techniques ��������������������������������������������������������������������������33...
-
Seite 21: Consignes De Sécurité
1. CONSIGNES DE SÉCURITÉ IMPORTANT: Attendez avant d‘utiliser au moins 12 heures après le déballage de l‘équipement! Avant la première mise en service, veuillez lire scrupuleusement le mode d‘emploi dans son Intégralité et tenir compte des consignes de sécurité afin d‘éviter les dommages liés à une commande mauvaise ou non conforme ainsi qu‘à... - Seite 22 • Si l’appareil est installé, utilisé ou conservé dans une zone non ventilée, la salle doit être conçue de manière à prévenir l’accumulation de fuites de gaz réfrigérant, car celles-ci peuvent présenter un risque d’incendie ou d’explosion. En effet, les radiateurs électriques, les cuisinières ou toute autre source de feu risquent d’enflammer le réfrigérant.
-
Seite 23: Détails Techniques
Toute personne travaillant sur ou perçant le circuit de refroidissement doit détenir un certificat valide délivré par une autorité d’évaluation accréditée du secteur garantissant un niveau de compétences suffi- sant pour manipuler les réfrigérants, conformément aux règles d’évaluation reconnues dans le secteur. 18. -
Seite 24: Description Des Pièces
3. DESCRIPTION DES PIÉCES Couvercle de filtre télécommande box Gril en haut tuyau d‘évacuation Chauffage Panneau de commande Volet de guidage d‘air Affiache à LED systéme d‘air frais câble d‘alimentation 4. ACCESSOIRES Abb� 2 Accessoire Support mural grille surrénale 160 / 150 mm Anneu 2 x plaque en plastique tube d’air tuyau d‘évacuation gabarit en papier pour percer... -
Seite 25: Installation
5. INSTALLATION Positionner le climatiseur Pochoir en papier Pour obtenir les meilleures performances de votre Fixez le gabarit au mur après avoir soigneusement climatiseur et éviter les pannes ou les dangers, vous vérifié les directives suivantes. devez le positionner correctement. Veuillez suivre in- Ne percez pas de trous avant d’être certain qu’il n’y a tégralement les directives et instructions ci-dessous, pas d’obstacles dans la zone où... - Seite 26 Percer un mur Trou d’évacuation Veuillez noter que si vous percez le trou au-dessus Ce climatiseur dispose d’un double système d’éva- du rez-de-chaussée, veillez à ce qu’une zone soit cuation automatique de l’humidité de condensation. sécurisée et que l’extérieur soit surveillé pendant le Avant d’installer le climatiseur, choisissez le système perçage jusqu’à...
- Seite 27 Installer les tuyaux Le système «A» est plus souvent utilisé et le tuyau d’évacuation va à l’extérieur, où il n’y a pas de pro- Après avoir percé les trous, vous devez insérer le blème pour le raccorder ou l’évacuer, cette solution film plastique fourni avec le climatiseur à...
- Seite 28 Montage des caillebotis Monter le climatiseur sur le support Pour monter les deux caillebotis extérieurs, veuillez Après avoir vérifié une nouvelle fois que l’étrier de procéder comme suit : Avant l’installation, familiari- fixation est bien fixé au mur et que tous les prépa- sez-vous avec le montage du caillebotis sur le tube.
-
Seite 29: Utilisation
6. UTILISATION Fonction de la télécommande 1: TOUCHE MODE : Réglage du mode de fonctionnement 2: TOUCHE MARCHE/ARRÊT 3: Augmentation de la température et de la durée 4: Diminuer la température et le temps 5: FAN SPEED : régler la vitesse du ventilateur 6: régler l’heure de démarrage/la minuterie de la climatisation 7: TIMER OFF : Réglage de la durée,... - Seite 30 Utilisation sur l’appareil 1: LED Signale l’état de fonctionnement de l’appareil 2: Bouton ON/OFF pour le fonctionnement de l’appareil 3: Bouton mode pour le mode de fonctionnement de l’appareil 4: LED de refroidissement Signale l’état de refroidisse- ment 5: LED de chauffage Signale l’état de chauffage 6: Chauffage électrique ON/OFF 7: LED de chauffage Signale l’état de chauffage 8: Abaisse la température et la durée...
-
Seite 31: Nettoyage
7. NETTOYAGE Nettoyage des filtres Les filtres doivent être nettoyés régulièrement pour que le climatiseur fonctionne efficacement. Nettoyez les filtres toutes les deux semaines. Comment procéder pour le faire : • Débranchez le climatiseur de l’alimentation électrique. • Tirez la grille du filtre dans le sens de la flèche. •... -
Seite 32: Dépannage
8. DÉPANNAGE Causes possibles • Le climatiseur ne fonctionne pas. • Le climatiseur ne refroidit pas la pièce. Si le câble est endommagé, il doit être remplacé par • Odeur étrange dans la pièce. le fabricant ou son service après-vente ou par une •... -
Seite 33: Garantie / Elimination / Modifications Techniques
9. GARANTIE / ÉLIMINATION / MODIFICATIONS TECHNIQUES Garantie L‘appareil sont contrôlés de manière précise avant la livraison. Si malgré tout un vice devait être constaté sur votre appareil, adressez-vous en toute confiance à notre revendeur. Veuillez joindre la preuve d‘achat, car celle-ci doit être présentée pour la prestation de garantie. -
Seite 34: Élimination Des Piles Et Des Batteries
INSTRUCTIONS D’ÉLIMINATION DES COMPOSANTS ÉLECTRIQUES DU PRODUIT Conformément à l’article 26 du décret-loi du 31 mars 2015 portant application de la directive 2015/863/EU et à la loi du 4 mars 2014 portant application de la directive 2011/65/CE concernant la réduction de l’utilisation de substances dangereuses dans les équipements électriques et électroniques et la gestion des déchets. - Seite 35 Notizen | Notes | Nota...
- Seite 36 Maison Armin Schmid Olensbachstrasse 9–15 CH-9631 Ulisbach Tel. Int. +41 (0) 58 611 60 00 Tel. Nat. 0848870850 info@sonnenkoenig.ch www.sonnenkoenig.ch Maison Armin Schmid Peter-Henlein-Strasse 5 D-89331 Burgau Tel: 0180 500 64 35 info@sonnenkoenig.ch www.sonnenkoenig.ch Festnetz 14 Cent/Minute Lokalnetz bis 42 Cent/Minute...
- Seite 37 KLIMA KING+ CONDIZIONATORI MONO Manuale dell’utente Nr. articolo KLIMA KING+: 10020112...
- Seite 38 Tabella dei contenuti 1 avvertenze per la sicurezza ��������������������������������������������������������������������������������������������������������������39 2 Dettagli tecnici �����������������������������������������������������������������������������������������������������������������������������������41 3 Descrizione delle parti �����������������������������������������������������������������������������������������������������������������������42 4 Accessori ��������������������������������������������������������������������������������������������������������������������������������������������42 5 Installazione ��������������������������������������������������������������������������������������������������������������������������������������43 6 Operazione �����������������������������������������������������������������������������������������������������������������������������������������47 7 Pulizia �������������������������������������������������������������������������������������������������������������������������������������������������49 8 Risoluzione dei problemi �������������������������������������������������������������������������������������������������������������������50 9 Garanzia / Smaltimento / Modifiche tecniche ���������������������������������������������������������������������������������� 51...
-
Seite 39: Avvertenze Per La Sicurezza
1. AVVERTENZE PER LA SICUREZZA IMPORTANTE: Attendere almeno 12 ore dopo aver disimballato l‘apparecchio prima di utilizzarlo! Prima di mettere in funzione per la prima volta il prodotto, si raccomanda di leggere con cura le istruzioni d’uso e di rispettare le avvertenze di sicurezza al fine di evitare un utilizzo improprio o sbagliato come pure condizioni ambientali non idonee. - Seite 40 • Il gas R290 è un gas refrigerante conforme alle direttive ambientali europee. Non perforare alcuna parte del sistema di raffreddamento. • Se l’apparecchio è installato, utilizzato o stoccato in un’area non ventilata, il locale deve essere pro- gettato in modo da prevenire l’accumulo di perdite di gas refrigerante, in quanto possono presentare un rischio di incendio o esplosione.
-
Seite 41: Dettagli Tecnici
15. Non tirare, deformare o modificare il cavo di alimentazione, né immergerlo in acqua. Tirare o utilizzare impropriamente il cavo di alimentazione può causare danni all’unità e provocare scosse elettriche. 16. Rispettare le normative nazionali in materia di gas. Non ostruire le aperture di ventilazione. 18. -
Seite 42: Descrizione Delle Parti
3. DESCRIZIONE DELLE PARTI coperchio del filtro scatola di controllo remoto griglia superiore tubo di scarico riscaldamento pannello di controllo Deflettore d‘aria display a led sistema di aria fresca cavo di alimentazione 4. ACCESSORI Abb� 2 accessori nome montaggio a parete grata surrenale 160 / 150 mm anello 2 x piastra di plastica tubo dell’aria... -
Seite 43: Installazione
5. INSTALLAZIONE Posizionamento del condizionatore d’aria Stencil di carta Per ottenere le migliori prestazioni dal vostro condi- Attaccare lo stencil al muro dopo aver attentamente zionatore d’aria ed evitare guasti o pericoli, dovete avete controllato attentamente le seguenti linee gui- posizionarlo correttamente. - Seite 44 Foratura del muro Tubo di scarico Nota bene: se state praticando il foro sopra il livello Questo condizionatore d’aria ha un doppio sistema del suolo, assicuratevi che un’area sia messa in sicu- per lo scarico automatico dell’umidità della conden- rezza e che l’area esterna sia monitorata durante la sa.
-
Seite 45: Installazione Dei Tubi
Installazione dei tubi Il sistema «A» è più comunemente usato e il tubo di scarico va all’esterno dove non ci sono problemi di Dopo aver fatto i fori, dovete mettere il foglio di plas- collegamento o di scarico, questa soluzione va bene tica fornito con il condizionatore d’aria attraverso i per i paesi caldi e le normali temperature fredde es- fori. - Seite 46 Montaggio delle griglie Montare il condizionatore d’aria sulla staffa Per installare le due griglie esterne, procedere come Dopo aver controllato nuovamente che la staffa di segue: Prima dell’installazione, familiarizzate con il montaggio sia saldamente fissata alla parete e che modo di montare la griglia sul tubo. Far passare le siano state fatte tutte le preparazioni necessarie per corde attraverso il centro delle griglie.
-
Seite 47: Operazione
6. OPERAZIONE Funzione di controllo remoto 1: PULSANTE MODALITÀ: Impostazione della moda- lità di funzionamento 2: PULSANTE ON/OFF 3: Aumentare la temperatura e il tempo 4: Diminuire la temperatura e il tempo 5: VELOCITÀ DEL VENTILATORE: impostazione della velocità del ventilatore 6: Impostazione del tempo di avvio/timer del condizionatore d’aria 7: TIMER OFF: impostazione dell’ora,... -
Seite 48: Funzionamento Dell'unità
Funzionamento dell‘unità 1: LED Indica lo stato di funzionamento dell’unità. 2: pulsante ON/OFF per il funzionamento dell’unità 3: Tasto Mode per la modalità di funzionamento dell’unità 4: LED di raffreddamento Segnala lo stato di raffreddamento 5: LED del riscaldamento Segnala lo stato del riscaldamento 6: Riscaldamento elettrico ON/OFF 7: LED del riscaldamento Segnala lo stato del... -
Seite 49: Pulizia
7. PULIZIA Pulizia dei filtri I filtri devono essere puliti regolarmente per mante- nere il condizionatore d’aria efficiente. Pulire i filtri ogni due settimane. Come procedere: • Scollegare il condizionatore d’aria dall’alimenta- zione. • Estrarre la griglia del filtro nella direzione della freccia. -
Seite 50: Risoluzione Dei Problemi
8. RISOLUZIONE DEI PROBLEMI Possibili cause • Il condizionatore d‘aria non funziona. • Il condizionatore non raffredda la stanza. Se il cavo è danneggiato, deve essere sostituito dal • Strano odore nella stanza. produttore o dal suo servizio post-vendita o da una •... -
Seite 51: Garanzia / Smaltimento / Modifiche Tecniche
9. GARANZIA / SMALTIMENTO / MODIFICHE TECNICHE Garanzia I prodotti vengono controllati attentamente prima della spedizione. Se dovesse comunque presentarsi un vizio sul vostro apparecchio, vi invitiamo a rivolgervi in tutta tranquillità al vostro rivenditore. Vi rammentiamo di portare appresso la ricevuta d’acquisto, che deve essere presentata per ogni prestazione in garanzia. Il periodo di garanzia è... - Seite 52 INFORMATIVA SMALTIMENTO RELATIVA ALLA PARTE ELETTRICA DEL PRODOTTO Ai sensi del D.L. 31 marzo 2015 art. 26, di attuazione della direttiva 2015/863/EU e del D.L. 27 del 31 marzo 2015, di attuazi- one della direttiva 2015/863/EU relativa alla riduzione dell‘uso di sostanze pericolose nelle apparecchiature elettriche ed elettroniche, nonché...
- Seite 53 Notizen | Notes | Nota...
- Seite 54 Ditta Armin Schmid Olensbachstrasse 9–15 CH-9631 Ulisbach Tel. Int. +41 (0) 58 611 60 00 Tel. Nat. 0848870850 info@sonnenkoenig.ch www.sonnenkoenig.ch Ditta Armin Schmid Peter-Henlein-Strasse 5 D-89331 Burgau Tel: 0180 500 64 35 info@sonnenkoenig.ch www.sonnenkoenig.ch Festnetz 14 Cent/Minute Lokalnetz bis 42 Cent/Minute...
- Seite 55 KLIMA KING+ LOCAL AIR CONDITIONERS User Manual Item number KLIMA KING+: 10020112...
- Seite 56 Tabel of contents 1 Safty instructions �������������������������������������������������������������������������������������������������������������������������������57 2 Technical details ��������������������������������������������������������������������������������������������������������������������������������59 3 Pars description �������������������������������������������������������������������������������������������������������������������������������� 60 4 Accessories ���������������������������������������������������������������������������������������������������������������������������������������� 60 5 Installation �����������������������������������������������������������������������������������������������������������������������������������������61 6 Operation ��������������������������������������������������������������������������������������������������������������������������������������������65 7 Cleaning ����������������������������������������������������������������������������������������������������������������������������������������������67 8 Troubleshooting �������������������������������������������������������������������������������������������������������������������������������� 68 9 Warranty / Disposal / Technical modifications ������������������������������������������������������������������������������� 69...
-
Seite 57: Safety Instructions
1. SAFETY INSTRUCTIONS Please read before first commissioning the safety instructions carefully and observe the safety instructions to prevent damage due to misuse, improper operation, and improper environmental conditions to be avoided. Keep these for later reference. Check the device after removing the packaging for damage . Do not put the unit in case of suspected corruption in operation and consult a specialist. - Seite 58 • Individuals who operate or work on the refrigerant circuit must have the appropriate certification issued by an accredited organisation that ensures competence in handling refrigerants according to a specific evaluation recognised by the associations in the industry. • Repairs must be performed based on the recommendation from the manufacturing company. Mainte- nance and repairs that require the assistance of other qualified personnel must be performed under the supervision of an individual specified in the use of flammable refrigerants.
-
Seite 59: Technical Details
20. Do not operate or stop the device by inserting or pulling out the power plug, as it may cause electric shock or fire due to heat generation. 21. Unplug the device if strange sounds, smell, or smoke come from it. Notes •... -
Seite 60: Part Description
3. PART DESCRIPTION Filter Cover remotecontrol box Frill top drainpipe Heating control panel Air guide flap led display Fresh air system main cable 4. ACCESSORIES Abb� 2 accessories name fastening brtacket external grating 160 / 150 mm ring 2 x plastic sheet air pipe drainage pipe paper template for wall drilling kit of screws... -
Seite 61: Installation
5. INSTALLATION POSITIONING THE AIR CONDITIONER PAPER TEMPLATE To maintain the best performance from your Fasten the template to the wall once the fol lowing air conditioner, prevent breakdowns or haz ards, you guidelines have been thoroughly checked. must position it correctly. Please fol low the guide- Do not drill any holes until you are com pletely confi- lines and instruction below in full, as failure to do so dent that there are no obstacles in the area you wish... - Seite 62 Wall Drilling Drain pipe Please note: If you are drilling the hole above ground This air conditioner has a double system for automa- level, please ensure that one area is secured and the tic condensate moisture drainage. Before installing outside area is monitored during drilling until the the air conditioner, select the system that is suitable hole is completed.
- Seite 63 Installing the pipes System «A» is more commonly used and the drain pipe goes outside where there is no problem to After you have drilled the holes, you must put the connect or drain it, this solution is OK for hot coun- plastic sheet supplied with the air conditioner tries and normal cold temperatures outside.
- Seite 64 Fitting the gratings Mount the air conditioner on the bracket To install the two outer gratings, please proceed as After checking again that the mounting bracket is se- follows: Before installation, familiarise yourself with curely fastened to the wall and all necessary prepa- how to mount the grating on the pipe.
-
Seite 65: Operation
6. OPERATION Remote control function 1: MODE BUTTON: Setting the operating mode 2: ON/OFF BUTTON 3: Increasing the temperature and time 4: Decrease temperature and time 5: FAN SPEED: Setting the fan speed 6: Setting the start time/timer of the air conditioner 7: TIMER OFF: Setting the time, where the air conditioner stops 8: Setting the clock... - Seite 66 Operation on the unit 1: LED Indicates the operating status of the unit. 2: ON/OFF button for operating the unit. 3: Mode Button for operating mode of the unit 4: Cooling LED Signals the cooling status 5: Heating LED Signals the heating status 6: Electrical heating ON/OFF 7: Heating LED Signals the heating status 8: Decreases the temperature and time...
-
Seite 67: External Cleaning
7. CLEANING Cleaning the filters The filters should be cleaned regularly to keep the air conditioner working efficiently. Clean the filters every fortnight. How to proceed: • Disconnect the air conditioner from the power supply. • Pull out the filter grille in the direction of the arrow. -
Seite 68: Troubleshooting
7. TROUBLESHOOTING Possible causes • The air conditioner does not work. • The air conditioner does not cool the room. If the cable is damaged, it must be replaced by the • Strange smell in the room. manufacturer or its after-sales service or a similarly •... -
Seite 69: Warranty / Disposal / Technical Modifications
8. WARRANTY / DISPOSAL / TECHNICAL MODIFICATIONS Warranty The Products are controlled just before delivery. If despite a lack of your product, try trustfully your seller. Please bring your receipt, as this is to be submitted for each warranty. The guarantee period is 24 months from date of purchase. - Seite 70 DISPOSAL INSTRUCTIONS FOR THE ELECTRICAL PART OF THE PRODUCT In accordance with Article 26 of the Decree-Law of 14 March 2014 implementing Directive 2012/19/EC, and the Law of 31 March 2015 implementing Directive 2015/863/EU on the reduction of the use of hazardous substances in electrical and electronic equipment and on waste management.
- Seite 71 Company Armin Schmid Olensbachstrasse 9–15 CH-9631 Ulisbach Tel. Int. +41 (0) 58 611 60 00 Tel. Nat. 0848870850 info@sonnenkoenig.ch www.sonnenkoenig.ch Company Armin Schmid Peter-Henlein-Strasse 5 D-89331 Burgau Tel: 0180 500 64 35 info@sonnenkoenig.ch www.sonnenkoenig.ch Festnetz 14 Cent/Minute Lokalnetz bis 42 Cent/Minute...