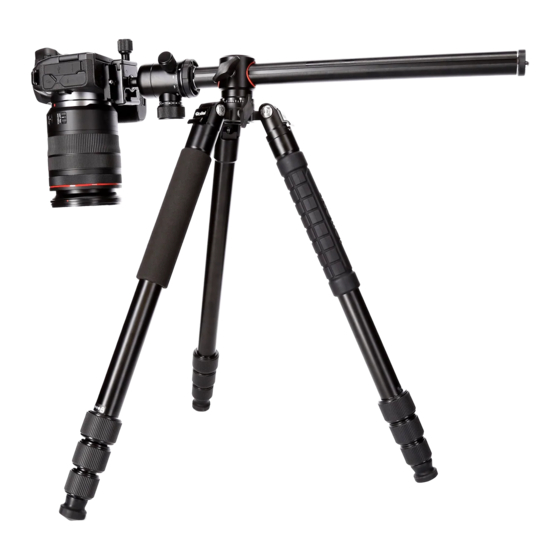
Inhaltszusammenfassung für Rollei C5i Makro Aluminium
- Seite 1 C5i Makro Aluminium Stativ mit Kugelkopf | Tripod with Ball Head Anleitung auf Deutsch Manual in English www.rollei.de...
-
Seite 2: Inhaltsverzeichnis
Inhalt Vor dem ersten Gebrauch . . . . . . . . . . . . . . . . . . . . . . . . . . . . 4 Übersicht Kugelkopf . - Seite 3 Content Before the First Use . . . . . . . . . . . . . . . . . . . . . . . . . . . . . . . . 12 Overview Ball Head .
-
Seite 4: Vor Dem Ersten Gebrauch
Vor dem ersten Gebrauch Vielen Dank, dass Sie sich für dieses Rollei-Produkt entschieden haben . Bitte le- sen Sie vor dem ersten Gebrauch die Bedienungsanleitung aufmerksam durch . Bewahren Sie die Bedienungsanleitung zusammen mit dem Stativ für den späteren Gebrauch auf . Sollten andere Personen dieses Stativ nutzen, so stellen Sie ihnen diese Anleitung zur Verfügung . -
Seite 5: Bedienung
Bedienung Platte montieren 1 . Lösen Sie die Feststellschraube [3] Positionieren Sie die Schnellwechsel platte [8] wie im Bild beschrieben . Lösen Fixieren 2 . Winkeln Sie die Platte [1] so an, dass sie zuerst die eine und dann die andere Seite einlegen können . -
Seite 6: Technische Daten Kugelkopf
Technische Daten Kugelkopf Kopfart Kugelkopf Steuerung Schwenken, feststellen und neigen Höhe 9 cm (ohne Schnellwechselplatte) Basis-Breite 7,2 cm Kugelkopf-Durchmesser 3 cm Körper-Durchmesser 4 cm Basisplatte-Durchmesser 4,3 cm Gewicht 0,31 kg Traglast maximal 8 kg Stativanschluss 3/8“-Schrauben-Verbindung Material Aluminium *Änderungen von Design und technischen Daten bleiben vorbehalten und bedürfen keiner Ankündigung . Hinweise 1 . -
Seite 7: Übersicht Stativ
Übersicht Stativ Grundplatte Sicherheitsplatte zum Zentrieren mit Feststellschraube Horizontale Mittelsäulen-Halterung Moosgummi-Griff Versteckter Haken zum Beschweren und zur Erhöhung der Stabilität Kunststoff-Verschluss-Ummantelung Mittelsäulen-Feststellschraube Mittelsäulen-Panorama-Feststellschraube Silikon-Griff Mittelsäule Abnehmbare Gummifüße / Spikes... -
Seite 8: Bedienung Stativ
Bedienung Stativ Beinwinkel ändern 1 . Drücken Sie den Winkel-Einstell-Knopf nach unten und halten diesen dort . 2 . Um den Winkel einzustellen, bewegen Sie das Bein in die gewünschte Position . 3 . Kippen Sie die Beine komplett nach oben, um das Stativ für den Transport zusammenzufalten . - Seite 9 Bedienung Stativ Zentrale Achse schnell auf 90°-Position bringen In der 90°-Position ist es leichter, tief- gelegene Shootings, Makrofotografie oder andere tiefliegende Shootingvarianten durchzuführen . 1 . Lösen Sie die Mittelsäulen-Panorama- Feststellschraube [8] für eine 360°-Bewegung . 2 . Lösen Sie die Mittelsäulen- Festellschraube [7], schrauben Sie den Haken [5] ab und ziehen Sie die...
-
Seite 10: Technische Daten Stativ
Technische Daten Stativ Stativ Material Aluminium Höhe minimal 9,5 cm Höhe maximal 147,6 cm Arbeitshöhe maximal 129,7 cm Packmaß 44 cm Gewicht 1,3 kg Traglast maximal 15 kg Beinsegmente Stativbein-Durchmesser Ø 2,5 cm Monopod Höhe minimal 40 cm Höhe maximal 122,8 cm Gewicht 0,33 kg... -
Seite 11: Hinweise Stativ
Hinweise 1 . Eine Überladung ist nicht erlaubt . 2 . Verwenden Sie das Produkt nur in einem Temperaturbereich zwischen -40 °C und +70 °C . 3 . Eine Nutzung für längere Zeit in voller Sonne ist nicht zu empfehlen . 4 . -
Seite 12: Before The First Use
Before the First Use Thank you for purchasing this Rollei product . Please read the operating instruc- tions carefully before using the tripod for the first time . Keep the operating instructions together with the tripod for later use . If other people use this tripod, make these instructions available to them . -
Seite 13: Operation
Operation Mounting the Plate 1 . Loosen the locking screw [3] . Position the quick release plate [8] as described in the picture . Loosen Tighten 2 . Angle the plate [1] so that you can first insert one side and then the other . 3 . -
Seite 14: Technical Data Ball Head
Technical Data Ball Head Head type Ball head Control Pan, lock and tilt Ball head Ø 3 cm Height 9 cm (without quick release plate) Base width 7 .2 cm Body diameter 4 cm Base plate diameter 4 .3 cm Weight 0 .31 kg Maximum load... -
Seite 15: Tripod Overview
Tripod Overview Base plate Safety plate for centring with locking screw Horizontal centre column mount Foam rubber handle Hidden hook for weighting and increasing stability Plastic locking sleeve Centre column locking screw Centre column panorama locking screw Silicone handle Centre column Removable rubber feet / spikes... -
Seite 16: Tripod Operation
Tripod Operation Changing the Leg Angle 1 . Push the angle adjustment button and keep it there . 2 . To adjust the angle, move the leg to the desired position . 3 . Tilt the legs completely upwards to fold the tripod for transport . Conversion to a Monopod 4 . - Seite 17 Tripod Operation Quickly adjust the Central Axis to 90° Position In the 90° position, it is easier to do low-angle shooting, macro photography or other low-angle shooting . 1 . Loosen the centre column panorama locking screw [8] for 360° movement . 2 .
-
Seite 18: Technical Data Tripod
Technical Data Tripod Tripod Material Aluminium Minimum height 9 .5 cm Maximum height 147 .6 cm Maximum working height 129 .7 cm Folded 44 cm Weight 1 .3 kg Maximum load 15 kg Leg segments Tripod leg diameter Ø 2 .5 cm Monopod Minimum height 40 cm... -
Seite 19: Notes Tripod
Notes 1 . Exceeding the maximum weight limit is not permitted . 2 . Use the product only in a temperature range between -40 °C and +70 °C . 3 . Use for extended periods in full sun is not recommended . 4 . -
Seite 20: Service-Hotline
Rollei GmbH & Co. KG In de Tarpen 42 D-22848 Norderstedt Service Hotline: +49 40 270750277 /rollei.foto.de @rollei_de www.rollei.com...


