Inhaltsverzeichnis
Werbung
Verfügbare Sprachen
Verfügbare Sprachen
Werbung
Inhaltsverzeichnis

Verwandte Anleitungen für Duronic HS90


Inhaltszusammenfassung für Duronic HS90
- Seite 1 HS90 - Handheld Steam Iron PLEASE READ ALL THE INSTRUCTIONS BEFORE USE...
-
Seite 3: Inhaltsverzeichnis
Contents English Manual Manuel d’utilisation en français Gebrauchsanleitung auf Deutsch Manual de Instrucciones en Español Manuale D’istruzioni In Italiano Instrukcja obsługi. Polski Gebruikershandleiding Nederlands... -
Seite 5: English Manual
English Manual... -
Seite 6: Features And Specifications
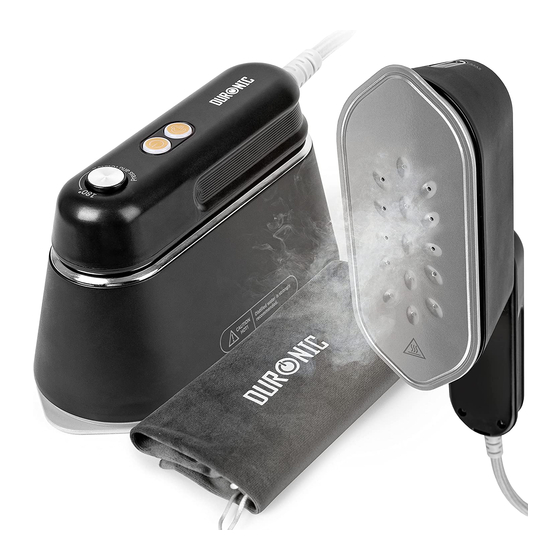
Features and Specifications MODEL POWER VOLTAGE WATER TANK RATING CAPACITY HS90 1000-1190W 220-240V ~ 90ml 50/60Hz • 2 steam functions • Size: L17.7 x W7.5 x H10 cm • Water tank capacity: 90ml • Weight: 871g • Temperature range: 90-180°c •... -
Seite 7: Safety Instructions
• Do not operate this appliance if the power cable or plug is damaged. If either is damaged return it to Duronic for service or repair by a professional technician. • Please ensure the mains power supply is 220-240V ~ 50/60Hz. - Seite 8 • Ensure that the iron is switched off and unplugged from the electrical mains socket and fully cooled down before storing away. • Do not use any attachments which are not listed in this manual. • Always hold the iron by the handle. Keep the hot soleplate away from body parts and heat-sensitive objects.
- Seite 9 • During operation do not use the iron when the light is flashing, this means the iron is heating up. When the light stays constantly lit up the iron has reached the correct temperature and you can use the iron. •...
-
Seite 10: How To Use
Ironing Temperatures Garment Label Fabric Type Thermostat Regulation Synthetic Low temperature Silk-wool Medium temperature Cotton-linen High temperature Fabric not to be ironed How to Use FIRST USE Fill the water tank using the jug provided. Plug in and switch on the iron and allow it to heat up for 5 minutes before using at the first time. - Seite 11 3. Open the water tank cap on the top of the iron and slowly pour the water in from the jug. 4. Close the cap. IRONING FUNCTIONS There are three different functions the iron to choose from. These can be selected by pressing the steam button.
- Seite 12 Using the Iron 1. Place the iron onto the heatproof stand or on the designated heatproof iron-resting surface on your ironing board. 2. Press the handle rotation button and turn the handle until it locks in place. 3. If choosing to use the steam function, fll up the iron with water using the jug provided.
- Seite 13 9. Iron your garment as you normally would on an ironing board. 10. If you are using the Steam Mode and notice that the water level goes too low and you haven’t finished ironing, switch off and unplug the iron. Refill it using the water jug.
-
Seite 14: Steam Function
Steam Function The steam function is mainly used for thick materials or fabrics with stubborn creases. If you want to use the steam function, you will need to select the appropriate setting as illustrated. Fill the tank with full water and turn on the iron. Select a steam function and hold the iron horizontally for a few seconds to allow the steam to flow through and clean the steam vents. -
Seite 15: Ironing Tips
Ironing Tips • For heat-sensitive fabric, cover the clothing with a piece of cotton fabric to avoid damage. • If you are unsure about how this iron will work on a particular fabric, test the iron on a small discrete part of the fabric first. •... - Seite 16 The power board is Contact Duronic for damaged. advice. The iron fails to No water in the tank. Refill the tank using the steam, but the light jug provided.
- Seite 17 Refund or replacement is at the discretion of that company. Duronic Products are offered with a 1 year guarantee under the following conditions: The product must be returned to the retailer with original proof of purchase.
-
Seite 18: Manuel D'utilisation En Français
Manuel d’utilisation en français... -
Seite 19: Features And Specifications
Features and Specifications MODÈLE TENSION PUISSANCE CAPACITE DU RESERVOIR HS90 1000-1190W 220-240V ~ 90ml 50/60Hz • • Taille : 17.7 x 7.5 x 10 cm 2 Fonctions vapeur • • Ecart de températures : 90 – 180°C Poids : 871 g •... - Seite 20 • N’utilisez pas l’appareil si le câble ou la prise sont endommagés et/ou ne fonctionnent pas correctement. Si l’un des deux est abimé, contactez Duronic ou faites réparer l’appareil par un professionnel.
- Seite 21 • Tenez toujours le fer à vapeur par sa poignée. Gardez la semelle chaude à distance du corps et des objets sensibles à la chaleur. • Ne retournez pas le fer à vapeur car il pourrait y avoir de l’eau chaude dans le réservoir.
- Seite 22 • Ne placez pas le fer dans son sac de rangement ou dans une armoire alors qu’il est encore chaud. Attendez qu’il ait refroidi avant de le ranger.
- Seite 23 Températures de repassage Etiquette du vêtement Type de tissu Régulation du thermostat Synthétique Température basse Soie et laine Température moyenne Cotton et lin Température élevée Tissu à ne pas repasser Préparer le fer à repasser PREMIÈRE UTILISATION Remplissez le réservoir d’eau à l’aide de la cruche fournie. Branchez l’appareil, allumez le fer à...
- Seite 24 3. Ouvrez le bouchon de l’arrivée d’eau sur le haut du fer à vapeur et versez doucement l’eau de la carafe. 4. Fermez le bouchon. FONCTIONS DE REPASSAGE Il y a trois fonctions différentes que vous pouvez sélectionner en appuyant sur la touche de vapeur.
- Seite 25 Utiliser le fer à repasser Placez le fer à repasser sur la surface résistante à la chaleur de votre planche à repasser. 2. Appuyez sur la touche de rotation de la poignée et tournez la poignée jusqu’à ce qu’elle se verrouille en place. 3.
- Seite 26 9. Repassez votre vêtement normalement sur votre planche à repasser. 10. Si vous utilisez la vapeur et que vous remarquez que le niveau d’eau baisse alors que vous n’avez pas fini de repasser, éteignez et débranchez le fer à repasser. Remplissez à nouveau le réservoir d’eau et suivez les étapes 5 à 8 pour continuer à...
-
Seite 27: Fonction Vapeur
Fonction vapeur La fonction vapeur est principalement utilisée sur des tissus épais ou avec des plis coriaces. Si vous souhaitez utiliser la fonction vapeur, vous devez sélectionner le mode comme expliqué plus haut. Remplissez le réservoir d’eau et allumez le fer à repasser. -
Seite 28: Conseils De Repassage
Conseils de repassage Pour les tissus sensibles à la chaleur, couvrez le vêtement avec une pièce de tissu en coton afin d’éviter de l’endommager. Si vous n’êtes pas sûr de savoir comment le fer à vapeur fonctionne sur un tissu particulier, commencez en utilisant une température basse sur une petite partie cachée du tissu. - Seite 29 à une prise. dans une prise murale. tout, les indicateurs lumineux ne Le tableau de bord est Contactez Duronic pour s’allument pas. endommagé. de l’assistance. Remplissez le réservoir Le fer ne produit Il n’y a pas d’eau dans le d’eau.
- Seite 30 Garantie Garantie et service après-vente 1 an de garantie de la part de Shine-Mart Ltd, propriétaire de la marque Duronic. NOTE : CES DÉCLARATIONS N’AFFECTENT EN RIEN VOTRE DROIT STATUTAIRE EN TANT QUE CONSOMMATEUR Ce produit a été produit en suivant les procédures de contrôle de qualité les plus strictes en utilisant des matériaux de qualité...
-
Seite 31: Gebrauchsanleitung Auf Deutsch
Gebrauchsanleitung auf Deutsch... -
Seite 32: Merkmale Und Spezifikationen
Merkmale und Spezifikationen MODELL LEISTUNG SPANNUNGS WASSERTANK WERT KAPAZITÄT HS90 1000-1190W 220-240V ~ 90ml 50/60Hz • • 2 Dampffunktionen Größe: 17.7 x 7.5 x 10 cm • • Wassertankkapazität: 90 ml Gewicht: 871g Temperaturbereich: 90-180 ° C. • • Netzkabel: 200cm Bügelsohle: 17.7 x 7.5cm... -
Seite 33: Sicherheitshinweise
Nutzen Sie dieses Gerät nicht, wenn das Netzkabel oder der Stecker beschädigt ist. Wenn einer der beiden beschädigt ist, senden Sie ihn zur Wartung oder Reparatur durch einen professionellen Techniker an Duronic zurück. • Verwenden Sie dieses Gerät nicht an einem Verlängerungskabel oder einem Mehrwegesteckeradapter. - Seite 34 • Verwenden Sie kein Zubehör, das nicht in diesem Handbuch aufgeführt sind. • Halten Sie das Bügeleisen immer am Griff. Halten Sie die heiße Bügelsohle von Körperteilen und wärmeempfindlichen Gegenständen fern. • Drehen Sie das Bügeleisen nicht um. Es könnte sich heißes Wasser im Wassertank befindet.
- Seite 35 • Nicht direkt auf synthetischen Stoff oder Seidenstoff bügeln, sondern den Stoff von innen nach außen bügeln oder mit dem synthetischen Stoff, der mit einem anderen Material bedeckt ist, um ihn zu schützen. • Wenn das Dampfbügeleisen umfällt, überprüfen Sie es auf sichtbare Anzeichen von Beschädigung oder Undichtigkeit.
-
Seite 36: Bügeltemperaturen
Bügeltemperaturen Kleidungsetikett Gewebe-Art Temperaturregelung Synthetik Niedrige Temperatur Seidenwolle Mittlere Temperatur Baumwolle Hohe und Leinen Temperatur Stoff nicht bügeln Gebrauch Erste Benutzung Füllen Sie den Wassertank mit dem mitgelieferten Einfüllbecher. Schalten Sie das Bügeleisen ein und lassen Sie es 5 Minuten lang aufheizen, bevor Sie es zum ersten Mal verwenden. - Seite 37 3. Öffnen Sie den Wassertankdeckel oben auf dem Bügeleisen und gießen Sie das Wasser langsam ein. 4. Schließen Sie den Deckel. Bügelfunktionen Es gibt drei verschiedene Funktionen, aus denen Sie auswählen können. Diese können durch Drücken der Dampftaste ausgewählt werden. 1.
- Seite 38 Using the Iron Stecken Sie das Kabel in die Steckdose und schalten Sie es ein. Drücken Sie die Griffdrehungstaste und drehen Sie den Griff, bis er einrastet. Wenn Sie die Dampffunktion verwenden möchten, füllen Sie das Bügeleisen mit dem mitgelieferten Krug mit Wasser. 4.
- Seite 39 9. Bügeln Sie Ihr Kleidungsstück wie gewohnt auf einem Bügelbrett. Wenn Sie den Dampfmodus verwenden und feststellen, dass der Wasserstand zu niedrig ist und Sie das Bügeln noch nicht beendet haben, schalten Sie das Bügeleisen aus und ziehen Sie den Netzstecker.
- Seite 40 Dampffunktion Die Dampffunktion wird hauptsächlich für dicke Materialien oder Stoffe mit hartnäckigen Falten verwendet. Wenn Sie die Dampffunktion verwenden möchten, müssen Sie die entsprechende Einstellung wie oben dargestellt auswählen. Füllen Sie den Tank mit vollem Wasser und schalten Sie das Bügeleisen ein. Wählen Sie eine Dampffunktion und halten Sie das Bügeleisen einige Sekunden lang horizontal, damit der Dampf durch die Dampfentlüftungsöffnungen...
-
Seite 41: Ironing Tips
Ironing Tips • Decken Sie die Kleidung bei wärmeempfindlichen Stoffen mit einem Stück Baumwollstoff ab, um Beschädigungen zu vermeiden. • Wenn Sie sich nicht sicher sind, wie das Bügeleisen auf einem bestimmten Stoff funktioniert, verwenden Sie zunächst eine niedrige Hitzeeinstellung. •... - Seite 42 Bügeleisen erwärmt, Es verschwindet lässt es eine kleine nach ungefähr Menge Wasser sprühen einer Minute. Kessel funktioniert Wenden Sie sich an nicht. Duronic, um Hilfe zu erhalten. Wasserleck Wenden Sie sich Wassertank ist kaputt. an Duronic, um Hilfe zu erhalten.
-
Seite 43: Gewährleistung
Gewährleistung Shine-Mart Ltd, der Markeninhaber von Duronic Produkten, bietet 1 Jahr Gewährleistung. HINWEIS: DIESE BEDINGUNGEN BEEINFLUSSEN IHRE GESETZLICHE RECHTE ALS VERBRAUCHER NICHT Dieses Produkt wurde unter strengen Qualitätskontrollen produziert und aus hochwertigen Materialien hergestellt, um ausgezeichnete Leistung und Zuverlässigkeit zu gewährleisten. -
Seite 44: Manual De Instrucciones En Español
Manual De Instrucciones En Español... - Seite 45 Características y especificaciones MODELO POTENCIA VOLTAJE CAPACIDAD DEPÓSITO AGUA HS90 1000-1190 W 220-240 V ~ 90 ml 50/60 Hz • • Dos funciones de vapor Dimensiones: 17.7 x 7.5 x 10 cm • • Capacidad del depósito de agua: 90 ml Peso: 871 g Rango de temperatura: 90 - 180 ºC...
-
Seite 46: Instrucciones De Seguridad
Nunca utilice el aparato si el cable o la unidad no funcionan correctamente. Si la máquina o el cable se ha estropeado, devuélvalo al servicio de Duronic o póngase en contacto con un técnico profesional para repararlo. Conecte la máquina sólo a una toma de corriente con la tensión y la •... - Seite 47 • Asegúrese de que la plancha está desconectada y completamente fría antes de almacenarla. • No utilice ningún accesorio que no se incluya con el aparato, ya que puede suponer un riesgo de lesiones o puede dañar el aparato. • Agarre siempre la plancha por el mago.
- Seite 48 • Si la luz indicadora está parpadeando, no use la plancha. Esto significa que se está calentando. Empiece a usarla una vez la luz se mantenga fija. • No se recomienda pasar directamente la plancha en telas sintéticas o de seda ya que podría dañarlas. Recomendamos que las planche del revés o en su defecto, coloque algún tipo de tela en medio como protección.
-
Seite 49: Modo De Uso
Temperaturas de planchado Imagen de Tipo de tela Temperatura la etiqueta Sintética Baja Lana, seda Media Algodón, lino Alta La tela no se puede planchar Modo de uso PRIMER USO Llene el depósito de agua con ayuda del vasito. Enchufe la plancha y enciéndala, dejando que se caliente durante 5 minutos. Después, apáguela, desenchufela y espera hasta que se enfríe para poder vaciar el depósito de agua. - Seite 50 3. Abra el tapón de la entrada del agua y viértala con cuidado. 4. Cierre el tapón. FUNCIONES DE PLANCHADO Esta plancha de vapor dispone de 3 funciones diferentes de planchado, las cuales se pueden elegir pulsando el botón de vapor. 1.
- Seite 51 Cómo usar la plancha Coloque la plancha sobre una superficie resistente al calor o sobre una tabla de planchado. Pulse el botón de rotación del mango y gírelo hasta que se bloquee. Si va a usar la función de vapor, rellene el depósito de agua con ayuda de la jarra proporcionada.
- Seite 52 9. Planche su prenda como normalmente hace. 10. Si está usando el modo de planchado con vapor y se queda sin agua durante el planchado, tendrá que apagar y desconectar la plancha para poder rellenarla. Tras hacer eso, vuelva a seguir los pasos 5,6, 7 y 8. 11.
- Seite 53 Función de vapor La función de planchado a vapor está diseñada para tejidos gruesos o telas con arrugas persistentes. Si va a usar la función de vapor, asegúrese de escoger la función adecuada como se ha explicado en el apartado anterior. Llene el depósito de agua y encienda la plancha.
-
Seite 54: Limpieza Y Mantenimiento
Consejos para el planchado • Para las prendas más delicadas, use una toalla o un trapo para evitar el contacto directo. • Si no está seguro de que pueda usar esta plancha en una prenda determinada, pruebe primero en una parte discreta de la prenda. •... -
Seite 55: Resolución De Problemas
El motor se ha Contacte con el servicio estropeado. técnico de Duronic. Rellene el depósito de No echa vapor a No hay agua en el agua. depósito. pesar de que la luz está... - Seite 56 Reembolso o reemplazo es a discreción de la compañía. Productos Duronic se ofrecen con una garantía de 1 año bajo las siguientes condiciones: El producto debe ser devuelto al vendedor con comprobante de compra original.
-
Seite 57: Manuale D'istruzioni In Italiano
Manuale D’istruzioni In Italiano... - Seite 58 Caratteristiche e specifiche MODELLO POTENZA VOLTAGGIO SERBATOIO D'ACQUA HS90 1000-1190W 220-240V ~ 90ml 50/60Hz • • 2 funzioni vapore Dimensioni: 17.7 x 7.5 x 10 cm • • Serbatoio dell'acqua: 90 ml Peso: 871 g Intervallo di temperatura: 90-180 ° c •...
-
Seite 59: Istruzioni Di Sicurezza
• Non utilizzare questo apparecchio se il cavo di alimentazione o la spina sono danneggiati. Se uno dei due è danneggiato, restituirlo a Duronic per assistenza o riparazione da parte di un tecnico professionista. • Assicurarsi che l'alimentazione di rete sia 220-240 V ~ 50/60 Hz. - Seite 60 • Assicurarsi che il ferro sia spento e scollegato dalla presa di corrente e che si sia raffreddato prima di riporlo. • Non utilizzare accessori non elencati in questo manuale. • Tenere sempre il ferro per il manico. Tenere la piastra calda lontana da parti del corpo e oggetti sensibili al calore.
- Seite 61 • Durante il funzionamento non utilizzare il ferro quando la spia lampeggia, questo significa che il ferro si sta riscaldando. Quando la spia rimane costantemente accesa il ferro ha raggiunto la giusta temperatura e si può utilizzare il ferro. • Non stirare direttamente su tessuto sintetico o di seta, ma stirare il tessuto al rovescio o con il tessuto sintetico ricoperto da un altro materiale per proteggerlo.
- Seite 62 Temperature per stirare Etichetta Tipo di tessuto Regolazione del dell'indumento termostato Sintetico Temperatura bassa Lana e seta Temperatura media Cotone-lino Temperatura alta Tessuto da non stirare Come utilizzare il ferro Primo utilizzo Riempire il serbatoio dell'acqua utilizzando la caraffa in dotazione. Collegare e accendere il ferro e lasciarlo riscaldare per 5 minuti prima di utilizzarlo per la prima volta.
- Seite 63 3. Apri il tappo del serbatoio dell'acqua sulla parte superiore del ferro e versa lentamente l'acqua. 4. Chiudere il coperchio. FUNZIONI DI STIRATURA Ci sono tre diverse funzioni tra cui scegliere. Queste possono essere selezionati premendo il pulsante vapore. 1. Premere una volta il pulsante del vapore per ridurre il vapore. 2.
- Seite 64 Come utilizzare il ferro Posiziona il ferro sul supporto o sull'apposita superficie di appoggio dell'asse da stiro. Premere il pulsante di rotazione della maniglia e ruotare la maniglia finché non si blocca in posizione. Se si sceglie di utilizzare la funzione vapore, riempire d'acqua il ferro utilizzando la caraffa in dotazione.
- Seite 65 9. Stirare il capo su un asse da stiro. Se si utilizza la modalità vapore e il livello dell'acqua è troppo basso, spegni e scollega il ferro. Riempilo usando la brocca dell'acqua. Quindi seguire nuovamente i passaggi 5-8 per continuare a stirare. 11.
- Seite 66 Funzione vapore La funzione vapore viene utilizzata principalmente per materiali spessi o tessuti con pieghe ostinate. Se si desidera utilizzare la funzione vapore, sarà necessario selezionare l'impostazione appropriata come illustrato. Riempi il serbatoio con acqua piena e accendi il ferro. Selezionare una funzione vapore e tenere il ferro in posizione orizzontale per alcuni secondi per consentire al vapore di fluire attraverso e pulire le...
-
Seite 67: Pulizia E Manutenzione
Suggerimenti per la stiratura • Per i tessuti sensibili al calore, coprire gli indumenti con un pezzo di tessuto di cotone per evitare danni. • Se non si è sicuri di come sitare un particolare tessuto, provare prima il ferro su una piccola parte del tessuto. •... -
Seite 68: Risoluzione Dei Problemi
L'apparecchio non è Collegare il cavo di funziona affatto, collegato. alimentazione alla l'indicatore presa di rete. luminoso non si La scheda di Contatta Duronic accende. potenza è per ricevere danneggiata. assistenza. Riempire il serbatoio Il ferro non emette Non c'è acqua nel utilizzando la caraffa in serbatoio. - Seite 69 Inoltre, non possiamo garantire l’apparecchio se è stato modificato o riparato dall’acquirente o da terzi. 1 anno di garanzia da Shine-Mart Ltd, proprietari del marchio commerciale Duronic. NOTA: QUESTE DICHIARAZIONI NON INFLUISCONO SUI DIRITTI LEGALI DEL CONSUMATORE Questo prodotto è...
-
Seite 70: Instrukcja Obsługi. Polski
Instrukcja obsługi. Polski... - Seite 71 Specyfikacja i Ogólna Charakterystyka MODEL Napięcie Poj. zbiornika znam. na wodę HS90 1000-1190W 220-240V ~ 90 ml 50/60Hz • • 2 poziomy pary Wymiary: 17.7 x 7.5 x 10 cm • Poj. zbiornika na wodę: 90 • 871g Waga: •...
-
Seite 72: Bezpieczeństwo Użytkowania
Bezpieczeństwo użytkowania Uważnie zapoznaj się z instrukcją obsługi i zachowaj do wglądu. • Urządzenie jest przeznaczone do użytkowania w pomieszczeniach, wyłącznie w gospodarstwach domowych Urządzenie nie zostało zaprojektowane dla profesjonalnych pralni. • Urządzenie nie zostało zaprojektowane do użytku osoby (w tym dzieci) o ograniczonych zdolnościach fizycznych, sensorycznych lub umysłowych, lub braku doświadczenia i wiedzy, o ile nie otrzymali oni nadzoru lub instrukcji dotyczących użytkowania urządzenia przez osobę... - Seite 73 • Przed odstawieniem urządzenia do przechowywania upewnij się, że jest wyłączone i odłączone od zasilana i całkowicie ostudzone. • Nie stosuj innych akcesoriów niż wymienione w instrukcji. • Zawsze przytrzymuj żelazko za uchwyt. Trzymaj stopę żelazka z dala od ciała i obiektów wrażliwych na gorąco. •...
- Seite 74 • Nie przystępuj do prasowania, gdy lampka kontrolna mruga, oznacza to, że żelazko dalej się nagrzewa. Kiedy żelazko osiągnie odpowiednią temperaturę prasowania, lampka wyłączy się. • Tkanin syntetycznych lub jedwabnych nie prasuj bezpośrednio. Przewróć materiał na lewą stronę lub prasuj przez inną tkaninę. •...
- Seite 75 Temperatura Prasowania Oznaczenie na metce Rodzaj materiału Temperatura Syntetyczna Niska temperatura Jedwab - wełna Średnia temperatura Bawełna - len Wysoka temperatura Materiał, którego nie można prasować Użytkowanie PRZED PIERWSZYM UŻYCIEM Napełnij zbiornik na wodę przy użyciu dołączonego pojemnika. Podczas pierwszego użycia podłącz urządzenie do zasilania i pozwól żelazku nagrzewać...
- Seite 76 3. Otwórz zawleczkę pojemnika na wodę znajdująca się na górze żelazka i powoli wlewaj wodę do zbiornika. 4. Zamknij zawleczkę zbiornika na wodę. TRYBY ŻELAZKA Żelazko wyposażone jest w trzy tryby pracy. Zmiana trybu następuje po przyciśnięciu przycisku pary wodnej. 1.
- Seite 77 Użytkowanie żelazka Umieść żelazko na żaroodpornej podstawce lub odpornym na wysokie temperatury części deski do prasowania. Naciśnij przycisk rotacji uchwytu i obróć go aż do momentu zablokowania w miejscu. Jeżeli chcesz skorzystać z funkcji pary, napełnij żelazko wodą przy użyciu załączonego pojemnika.
- Seite 78 9. Prasuj odzież tak jak zwykle, na desce do prasowania. Jeżeli korzystasz z trybu pary wodnej i zauważyłeś, że poziom wody w zbiorniku jest zbyt niski zanim skończyłeś prasowanie wyłącz urządzenie i odłącz od zasilania. Uzupełnij wodę do odpowiedniego poziomu przy pomocy dołączonego pojemnika.
- Seite 79 Funkcja pary Funkcja pary jest używana głównie do grubych materiałów lub tkanin z uporczywymi zagnieceniami. Aby uruchomić tryb pary przyciśnij przycisk pary wodnej, zgodnie z instrukcją opisaną w dziale "Tryby żelazka". Napełnij zbiornik na wodę i włącz urządzenie. Po wybraniu właściwego trybu pary wodnej przytrzymaj żelazko w pozycji horyzontalnej przez kilka sekund, aby para mogła przepłynąć...
-
Seite 80: Czyszczenie I Pielęgnacja
Porady dotyczące prasowania • W przypadku delikatnych tkanin, dodatkowo przykryj prasowaną odzież fragmentem bawełnianej tkaniny, aby uniknąć ryzyka zniszczenia materiału. • Jeżeli nie jesteś pewny, jak żelazko będzie oddziaływało na dany materiał, zacznij prasować ustawiając niską temperaturę. • Używaj deski do prasowania. Używanie innego rodzaju deski może spowodować... -
Seite 81: Rozwiązywanie Problemów
Prawidłowo podłącz lampka kontrolna podłączone przewód zasilający do nie świeci się. głównego gniazdka. Układ kontrolny jest Skontaktuj się z uszkodzony Duronic, aby uzyskać pomoc. Napełnij zbiornik przy Żelazko nie Brak wody w zbiorniku. pomocy złączonego produkuje pary, ale pojemnika. lampka kontrolna Uszkodzony system świeci się. -
Seite 82: Gebruikershandleiding Nederlands
Gebruikershandleiding Nederlands... - Seite 83 Features and Specifications MODEL POWER VOLTAGE WATER TANK RATING CAPACITY HS90 1000-1190W 220-240V ~ 90ml 50/60Hz • 2 steam functions • Size: L37 x W77 xH95 mm • Water tank capacity: 90ml • Weight: 871g • Temperature range: 90-180°c •...
- Seite 84 • Do not operate this appliance if the power cable or plug is damaged. If either is damaged return it to Duronic for service or repair by a professional technician. • Please ensure the mains power supply is 220-240V ~ 50/60Hz.
- Seite 85 • Ensure that the iron is switched off and unplugged from the electrical mains socket and fully cooled down before storing away. • Do not use any attachments which are not listed in this manual. • Always hold the iron by the handle. Keep the hot soleplate away from body parts and heat-sensitive objects.
- Seite 86 • During operation do not use the iron when the light is flashing, this means the iron is heating up. When the light stays constantly lit up the iron has reached the correct temperature and you can use the iron. •...
- Seite 87 Ironing Temperatures Garment Label Fabric Type Thermostat Regulation Synthetic Low temperature Silk-wool Medium temperature Cotton-linen High temperature Fabric not to be ironed How to Use FIRST USE Fill the water tank using the jug provided. Plug in and switch on the iron and allow it to heat up for 5 minutes before using at the first time.
- Seite 88 3. Open the water tank cap on the top of the iron and slowly pour the water in from the jug. 4. Close the cap. IRONING FUNCTIONS There are three different functions the iron to choose from. These can be selected by pressing the steam button.
- Seite 89 Using the Iron 1. Place the iron onto the heatproof stand or on the designated heatproof iron-resting surface on your ironing board. 2. Press the handle rotation button and turn the handle until it locks in place. 3. If choosing to use the steam function, fill up the iron with water using the jug provided.
- Seite 90 9. Iron your garment as you normally would on an ironing board. 10. If you are using the Steam Mode and notice that the water level goes too low and you haven’t finished ironing, switch off and unplug the iron. Refill it using the water jug.
- Seite 91 Steam Function The steam function is mainly used for thick materials or fabrics with stubborn creases. If you want to use the steam function, you will need to select the appropriate setting as illustrated. Fill the tank with full water and turn on the iron. Select a steam function and hold the iron horizontally for a few seconds to allow the steam to flow through and clean the steam vents.
- Seite 92 Ironing Tips • For heat-sensitive fabric, cover the clothing with a piece of cotton fabric to avoid damage. • If you are unsure about how this iron will work on a particular fabric, test the iron on a small discrete part of the fabric first. •...
- Seite 93 The power board is Contact Duronic for damaged. advice. The iron fails to No water in the tank. Refill the tank using the steam, but the light jug provided.
- Seite 94 Garantie 1 Jaar Garantie van Shine-Mart Ltd Handelsmerk eigenaars van Duronic Producten. LET OP: DEZE STELLINGEN HEBBEN GEEN INVLOED OP UW WETTELIJKE RECHTEN ALS CONSUMENT Dit product is vervaardigd onder de strengste kwaliteitscontrole procedures, met materialen van de hoogste kwaliteit, om uitstekende werking en betrouwbaarheid te verzekeren. Het zal zeer goed en langdurig dienstdoen, naar gelang het correct gebruikt en onderhouden wordt.