Inhaltsverzeichnis
Werbung
Verfügbare Sprachen
Verfügbare Sprachen
Quicklinks
Werbung
Kapitel
Inhaltsverzeichnis
Fehlerbehebung

Verwandte Anleitungen für Progress PBN23102X


Inhaltszusammenfassung für Progress PBN23102X
- Seite 1 User Manual Benutzerinformation Oven Backofen PBN23102X...
-
Seite 2: Inhaltsverzeichnis
2 Progress CONTENTS Safety information Clock functions Safety instructions Using the accessories Installation Additional functions Product description Hints and tips Control panel Care and cleaning Before first use Troubleshooting Daily use Energy efficiency Subject to change without notice. VISIT OUR WEBSITE TO:... -
Seite 3: General Safety
Progress 3 If the appliance has a child safety device, it should be • activated. Children shall not carry out cleaning and user maintenance • of the appliance without supervision. General Safety Only a qualified person must install this appliance and •... -
Seite 4: Electrical Connection
4 Progress • Always take care when moving the appliance as it is heavy. Always use Mounting screws 4x25 mm safety gloves and enclosed footwear. • Do not pull the appliance by the handle. Electrical connection • Install the appliance in a safe and... - Seite 5 Progress 5 • This appliance is supplied with a main • Open the appliance door carefully. The plug and a main cable. use of ingredients with alcohol can cause a mixture of alcohol and air. • Do not let sparks or open flames to...
-
Seite 6: Internal Lighting
6 Progress Care and cleaning separately: These lamps are intended to withstand extreme physical WARNING! Risk of injury, fire, conditions in household appliances, or damage to the appliance. such as temperature, vibration, humidity, or are intended to signal • Before maintenance, deactivate the... -
Seite 7: Product Description
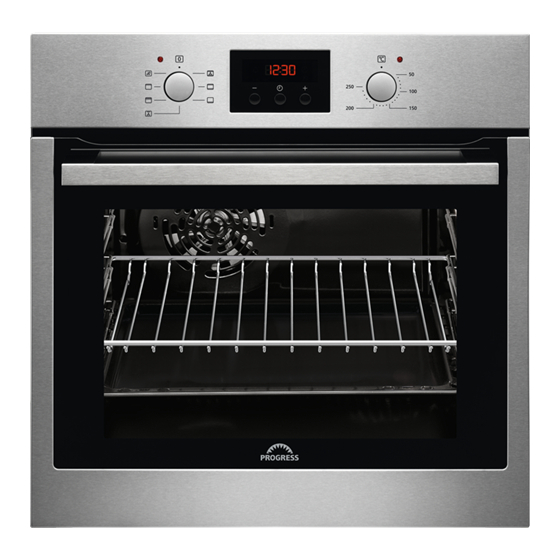
Progress 7 (*mm) min. 550 min. 560 Securing the oven to the cabinet PRODUCT DESCRIPTION General overview Control panel Power lamp / symbol Knob for the heating functions Display Control knob (for the temperature) Temperature indicator / symbol Air vents for the cooling fan... -
Seite 8: Control Panel
8 Progress CONTROL PANEL Retractable knobs To use the appliance press the knob. The knob comes out. Sensor fields / Buttons To set the time. To set a clock function. To set the time. Display A. Clock functions B. Timer... -
Seite 9: Daily Use
Progress 9 1. Remove all accessories 1. Set the maximum tem‐ - press to set the and removable shelf perature for the function: time. After approximate‐ supports from the oven. ly 5 sec., the flashing 2. Clean the oven and the stops and the display Time: 1 h. -
Seite 10: Clock Functions
10 Progress requirements according to EU 65/2014 and EU 66/2014. Tests according to EN Heating Application 60350-1. function The oven door should be closed during This function is designed to cooking so that the function is not save energy during cooking. -
Seite 11: Using The Accessories
Progress 11 How to change: Time of Day Step 2 - press to set the time. After approximately 5 sec., the flashing stops and the display shows the time. How to set: Duration Step 1 Set an oven function and the temperature. -
Seite 12: Additional Functions
12 Progress Wire shelf: Push the shelf between the guide bars of the shelf support and make sure that the feet point down. Baking tray: Push the tray between the guide bars of the shelf support. Wire shelf, Baking tray:... -
Seite 13: Hints And Tips
Progress 13 HINTS AND TIPS If you use two baking trays at the same Refer to Safety chapters. time, keep one empty level between them. Cooking meat and fish Leave the meat for approximately 15 Cooking recommendations minutes before carving so that the juice The oven has four shelf positions. -
Seite 14: Conventional Cooking
14 Progress Conventional Fan Cooking Cooking CAKES (min) (°C) (°C) Fruit cake 50 - 60 Cake mould, Ø 26 cm Christmas 50 - 60 Cake mould, cake Ø 20 cm Plum cake, 20 - 30 Bread tin preheat the empty oven Biscuits, pre‐... - Seite 15 Progress 15 Conventional Fan Cooking Cooking BREAD AND PIZZA (min) (°C) (°C) Rye bread, pre‐ 30 - 45 Bread tin heating is not needed Bread rolls, 6 - 8 2 (1 25 - 40 Baking tray rolls and 3) Pizza...
- Seite 16 16 Progress Conventional Cook‐ Fan Cooking MEAT (min) (°C) (°C) English roast beef, 44 - 50 rare English roast beef, 51 - 55 medium English roast beef, 55 - 60 well done Conventional Cook‐ Fan Cooking MEAT (min) (°C) (°C)
- Seite 17 Progress 17 Conventional Cook‐ Fan Cooking FISH (min) (°C) (°C) Tuna / Salmon, 4 - 6 2 (1 and 35 - 60 fillets Grill Preheat the empty oven. Use the third shelf position. Set the temperature to 250 °C. GRILL...
- Seite 18 18 Progress (min) (kg) 1st side 2nd side Rolled joint, turkey 30 - 40 20 - 30 Chicken, half, 2 25 - 30 20 - 30 Chicken drumsticks, 6 pieces 15 - 20 15 - 18 Quail, 4 pieces 25 - 30...
- Seite 19 Progress 19 (°C) (min) Rolls, 9 pieces baking tray or dripping 35 - 40 Pizza, frozen, wire shelf 35 - 40 0.35 kg Swiss roll baking tray or dripping 30 - 40 Brownie baking tray or dripping 30 - 40 Soufflè, 6 pieces...
- Seite 20 20 Progress (°C) (min) Vegetables, baking tray or dripping 35 - 40 poached, 0.4 kg Vegetarian ome‐ pizza pan on wire shelf 30 - 45 lette Mediterranean baking tray or dripping 35 - 40 vegetables, 0.7 Information for test institutes Tests according to IEC 60350-1.
-
Seite 21: Care And Cleaning
Progress 21 (°C) (min) Beef Grill Wire max. 20 - 30 Put the wire burger, shelf shelf on the third level and the pieces, dripping dripping pan on 0.6 kg the second level of the oven. Turn the food halfway through the cooking time. - Seite 22 22 Progress How to remove: Shelf supports Remove the shelf supports to clean the oven. Step 1 Turn off the oven and wait un‐ til it is cold. Step 2 Pull the front of the shelf sup‐ port away from the side wall.
- Seite 23 Progress 23 Step 5 Turn the fasteners by 90° and Step 6 First lift carefully and then re‐ remove them from their seats. move the glass panel. 90° Step 7 Clean the glass panels with water and soap. Dry the glass panels carefully. Do not clean the glass panels in the dishwasher.
-
Seite 24: Troubleshooting
We recommend that you write the data here: Model (MOD.) ......... Product number (PNC) ......... Serial number (S.N.) ......... ENERGY EFFICIENCY Product Information and Product Information Sheet* Supplier's name Progress Model identification PBN23102X 944068139 Energy Efficiency Index 94.9... -
Seite 25: Energy Saving
Progress 25 Energy efficiency class Energy consumption with a standard load, conventional 0.83 kWh/cycle mode Energy consumption with a standard load, fan-forced 0.75 kWh/cycle mode Number of cavities Heat source Electricity Volume 57 l Type of oven Built-In Oven Mass 28.3 kg... -
Seite 26: Environmental Concerns
26 Progress ENVIRONMENTAL CONCERNS not dispose of appliances marked with the Recycle materials with the symbol . Put symbol with the household waste. the packaging in relevant containers to Return the product to your local recycling recycle it. Help protect the environment facility or contact your municipal office. -
Seite 27: Sicherheitshinweise
Progress 27 INHALTSVERZEICHNIS Sicherheitshinweise Uhrfunktionen Sicherheitsanweisungen Verwendung des Zubehörs Montage Zusatzfunktionen Gerätebeschreibung Tipps und Hinweise Bedienfeld Reinigung und Pflege Vor der ersten Inbetriebnahme Fehlersuche Täglicher Gebrauch Energieeffizienz Änderungen vorbehalten. BESUCHEN SIE UNSERE WEBSITE, UM: Anwendungshinweise, Prospekte, Informationen zu Fehlerbehebung, Service und Reparatur zu erhalten: www.progress-hausgeraete.de/support... -
Seite 28: Allgemeine Sicherheit
28 Progress Halten Sie sämtliches Verpackungsmaterial von Kindern • fern und entsorgen Sie es ordnungsgemäß. WARNUNG: Halten Sie Kinder und Haustiere während des • Betriebs oder der Abkühlphase vom Gerät fern. Die zugänglichen Geräteteile werden beim Betrieb sehr heiß. Falls Ihr Gerät mit einer Kindersicherung ausgestattet ist, •... -
Seite 29: Sicherheitsanweisungen
Progress 29 Führen Sie zum Einsetzen der Einhängegitter die oben aufgeführten Schritte in umgekehrter Reihenfolge durch. SICHERHEITSANWEISUNGEN Montage Höhe der Geräte‐ 579 mm WARNUNG! Die Montage des rückseite Geräts darf nur von einer qualifizierten Fachkraft Breite der Gerätevor‐ 594 mm durchgeführt werden. -
Seite 30: Bedienung
30 Progress • Verwenden Sie keine Mehrfachsteckdosen oder Einsetzbare Kabeltypen für Einbau oder Verlängerungskabel. Austausch in Europa: • Achten Sie darauf, Netzstecker und H07 RN-F, H05 RN-F, H05 RRF, H05 VV- Netzkabel nicht zu beschädigen. Falls F, H05 V2V2-F (T90), H05 BB-F das Netzkabel des Geräts ersetzt... -
Seite 31: Innenbeleuchtung
Progress 31 • Öffnen Sie die Gerätetür vorsichtig. Bei ansammeln und das Gerät, Gehäuse der Verwendung von Zutaten, die oder den Boden beschädigen. Alkohol enthalten, kann ein Alkohol- Schließen Sie die Möbelfront nicht, Luftgemisch entstehen. bevor das Gerät nach dem Gebrauch •... -
Seite 32: Entsorgung
32 Progress Entsorgung in anderen Geräten vorgesehen und nicht für die Raumbeleuchtung WARNUNG! Verletzungs- und geeignet. Erstickungsgefahr. • Verwenden Sie nur Lampen mit der gleichen Leistung . • Trennen Sie das Gerät von der Stromversorgung. Service • Schneiden Sie das Netzkabel in der •... -
Seite 33: Gerätebeschreibung
Progress 33 Befestigung des Ofens am Möbel GERÄTEBESCHREIBUNG Gesamtansicht Bedienfeld Betriebskontrolllampe/-symbol Einstellknopf für die Ofenfunktionen Display Einstellknopf (für die Temperatur) Temperaturanzeige/-symbol Lüftungsöffnungen für das Kühlgebläse Heizelement Lampe Ventilator Einhängegitter, herausnehmbar Einschubebenen Zubehör • Backblech Für Kuchen und Plätzchen. • Kombirost Für Kochgeschirr, Kuchenformen,... -
Seite 34: Vor Der Ersten Inbetriebnahme
34 Progress Sensorfelder/Tasten Einstellen der Zeit. Einstellen einer Uhrfunktion. Einstellen der Zeit. Display A. Uhrfunktionen B. Timer VOR DER ERSTEN INBETRIEBNAHME WARNUNG! Siehe Kapitel Sicherheitshinweise. Vor der ersten Inbetriebnahme Der Backofen kann während des Aufheizens Geruch und Rauch verströmen. Stellen Sie sicher, dass der Raum belüftet ist. -
Seite 35: Täglicher Gebrauch
Progress 35 Schalten Sie den Backofen aus und warten Sie, bis er abgekühlt ist. Setzen Sie die Zubehör‐ teile und die herausnehmbaren Einhängegitter in den Backofen. TÄGLICHER GEBRAUCH WARNUNG! Siehe Kapitel Ofen‐ Anwendung Sicherheitshinweise. funktion Einstellung: Ofenfunktion Zum Braten großer Fleisch‐... -
Seite 36: Uhrfunktionen
36 Progress Die Kochanleitungen finden Sie im Kapitel Energieeinsparung finden Sie im Kapitel "Hinweise und Tipps", Feuchte Umluft. „Energieeffizienz“, Energie sparen. Allgemeine Empfehlungen zur UHRFUNKTIONEN Uhrfunktionen Uhrfunktion Anwendung Zum Einstellen, Ändern oder Abfragen der Uhrzeit. Uhrzeit Einstellen der Einschaltdauer für den Backofen. -
Seite 37: Verwendung Des Zubehörs
Progress 37 Einstellung: Dauer Schritt – zum Einstellen der Dauer drücken. Im Display wird Folgendes angezeigt: – blinkt, wenn die eingestellte Zeit abgelaufen ist. Der Signalton ertönt, und der Backofen wird ausgeschaltet. Schritt Drücken Sie eine beliebige Taste, um das Signal abzustellen. -
Seite 38: Zusatzfunktionen
38 Progress Kombirost: Schieben Sie den Kombirost zwischen die Führungsschienen der Einhängegit‐ ter mit den Füßen nach unten zeigend. Backblech: Schieben Sie das Blech zwischen die Führungsstäbe der Einhängegitter. Kombirost, Backblech: Schieben Sie das Backblech zwischen die Führungsstäbe der Einhängegitter und dem Kombirost auf die Führungsstä‐... -
Seite 39: Tipps Und Hinweise
Progress 39 TIPPS UND HINWEISE Wenn Sie zwei Backbleche gleichzeitig Siehe Kapitel nutzen, lassen Sie eine Ebene Sicherheitshinweise. dazwischen frei. Garen von Fleisch und Fisch Garempfehlungen Lassen Sie das Fleisch vor dem Der Backofen hat vier Einschubebenen. Anschneiden etwa 15 Minuten ruhen, damit der Fleischsaft nicht ausläuft. - Seite 40 40 Progress Ober-/Unterhitze Umluft KU‐ CHEN (Min.) (°C) (°C) Marmeladen‐ 2 (1 30 – 40 Kuchenform, torte und 3) Ø 26 cm Früchtekuchen 50 – 60 Kuchenform, Ø 26 cm Christstollen 50 – 60 Kuchenform, Ø 20 cm Rosinenku‐ 20 – 30...
- Seite 41 Progress 41 Ober-/Unterhitze Umluft BROT UND PIZZA (Min.) (°C) (°C) Weißbrot, 1 - 2 60 – 70 – Stück, je 0,5 kg Roggenbrot, 30 – 45 Brotform Vorheizen ist nicht erforderlich Brot/Brötchen, 6 2 (1 25 – 40 Backblech - 8 Brötchen...
- Seite 42 42 Progress Ober-/Unterhitze Umluft FLEISCH (Min.) (°C) (°C) Kalb 90 – 120 Roastbeef, englisch, 44 – 50 blutig Roastbeef, englisch, 51 – 55 rosa Roastbeef, englisch, 55 – 60 durch Ober-/Unterhitze Umluft FLEISCH (Min.) (°C) (°C) Schweineschulter, mit 120 – 150...
-
Seite 43: Heißluftgrillen
Progress 43 Ober-/Unterhitze Umluft FISCH (Min.) (°C) (°C) Thunfisch / Lachs, 4 - 2 (1 und 35 – 60 6 Filets Grill Leeren Backofen vorheizen. Nutzen Sie die dritte Einschubebene. Stellen Sie die Temperatur auf 250 °C ein. GRILL (kg) (Min.) -
Seite 44: Feuchte Umluft - Empfohlenes Zubehör
44 Progress (Min.) (kg) Erste Seite Zweite Seite Rollbraten, Pute 30 - 40 20 - 30 Hähnchen, halbiert, 2 25 - 30 20 - 30 Hähnchenunterschenkel, 6 Stück 15 - 20 15 - 18 Wachtel, 4 Stück 25 - 30 20 - 25 Gemüsegratin... - Seite 45 Progress 45 (°C) (Min.) Brötchen, 9 Backblech oder tiefes 35 - 40 Stück Blech Pizza, gefroren, Kombirost 35 - 40 0,35 kg Biskuitrolle Backblech oder tiefes 30 - 40 Blech Brownie Backblech oder tiefes 30 - 40 Blech Soufflé, 6 Stück Keramikförmchen auf...
-
Seite 46: Informationen Für Prüfinstitute
46 Progress (°C) (Min.) Törtchen, 8 Backblech oder tiefes 20 - 30 Stück Blech Gemüse, po‐ Backblech oder tiefes 35 - 40 chiert, 0,4 kg Blech Vegetarisches Pizzapfanne auf Kom‐ 30 - 45 Omelett birost Mediterranes Backblech oder tiefes 35 - 40 Gemüse, 0,7 kg... -
Seite 47: Reinigung Und Pflege
Progress 47 (°C) (Min.) Hambur‐ Grill Kombi‐ Max. 20 - 30 Kombirost in die ger aus rost dritte und Fett‐ Rind‐ pfanne in die fleisch, Fett‐ zweite Einschub‐ 6 Stück, pfanne ebene des Back‐ 0,6 kg ofens einschie‐ ben. Wenden Sie das Lebens‐... -
Seite 48: Entfernen: Einhängegitter
48 Progress Entfernen: Einhängegitter Entfernen Sie Einhängegitter zur Reinigung des Backofens. Schritt Schalten Sie den Backofen aus und warten Sie, bis er ab‐ gekühlt ist. Schritt Ziehen Sie das Einhängegit‐ ter vorne von der Seitenwand weg. Schritt Ziehen Sie das Einhängegit‐... -
Seite 49: Austausch: Lampe
Progress 49 Schritt Schließen Sie die Backofen‐ Schritt 4 Legen Sie die Backofentür auf tür halb bis zur ersten Rast‐ eine stabilen Fläche und lösen stellung. Anschließend heben Sie das Verriegelungssystem, und ziehen Sie die Tür nach um die innere Glasscheibe zu vorn aus der Aufnahme he‐... -
Seite 50: Hintere Lampe
50 Progress Bevor Sie die Lampe austauschen: Schritt 1 Schritt 2 Schritt 3 Schalten Sie den Backofen Trennen Sie den Ofen von Breiten Sie ein Tuch auf aus. Warten Sie, bis der der Netzversorgung. dem Garraumboden aus. Ofen kalt ist. -
Seite 51: Energieeffizienz
Progress 51 Wir empfehlen, hier folgende Daten zu notieren: Seriennummer (S.N.) ......... ENERGIEEFFIZIENZ Produktinformationen und Produktdatenblatt* Herstellername Progress Modellidentifikation PBN23102X 944068139 Energieeffizienzindex 94.9 Energieeffizienzklasse Energieverbrauch bei Standardbeladung, Ober-/Unter‐ 0.83 kWh/Programm hitze Energieverbrauch bei Standardbeladung, Umluft 0.75 kWh/Programm Anzahl der Garräume Wärmequelle... - Seite 52 52 Progress Restwärme Restwärme zum Warmhalten von Speisen Beträgt die Garzeit mehr als 30 Minuten, nutzen möchten. reduzieren Sie die Ofentemperatur 3 - 10 Feuchte Umluft Min. vor Ablauf des Garvorgangs. Durch Diese Funktion ist entwickelt worden, um die Restwärme des Backofens werden die während des Garvorgangs Energie zu...
- Seite 56 867359730-B-342020...