Inhaltsverzeichnis
Werbung
Verfügbare Sprachen
Verfügbare Sprachen
Quicklinks
Werbung
Kapitel
Inhaltsverzeichnis
Fehlerbehebung

Verwandte Anleitungen für Progress PBN43102X


Inhaltszusammenfassung für Progress PBN43102X
- Seite 1 User Manual Benutzerinformation Oven Backofen PBN43102X...
-
Seite 2: Inhaltsverzeichnis
2 Progress CONTENTS Safety information Automatic programmes Safety instructions Using the accessories Installation Additional functions Product description Hints and tips Control panel Care and cleaning Before first use Troubleshooting Daily use Energy efficiency Clock functions Subject to change without notice. -
Seite 3: General Safety
Progress 3 Children shall not carry out cleaning and user maintenance • of the appliance without supervision. General Safety Only a qualified person must install this appliance and • replace the cable. WARNING: The appliance and its accessible parts •... -
Seite 4: Electrical Connection
4 Progress Electrical connection • Install the appliance in a safe and suitable place that meets installation WARNING! Risk of fire and requirements. electric shock. • Keep the minimum distance from other appliances and units. • All electrical connections should be •... - Seite 5 Progress 5 • Do not let sparks or open flames to come in contact with the appliance Cable types applicable for installation or when you open the door. replacement for Europe: • Do not put flammable products or items H07 RN-F, H05 RN-F, H05 RRF, H05 VV-...
-
Seite 6: Internal Lighting
6 Progress • Before maintenance, deactivate the • The type of light bulb or halogen lamp appliance and disconnect the mains used for this appliance is for household plug from the mains socket. appliances only. Do not use it for house •... - Seite 7 Progress 7 Building In min. 550 min. 560 min. 550 min. 560 Securing the oven to the cabinet...
-
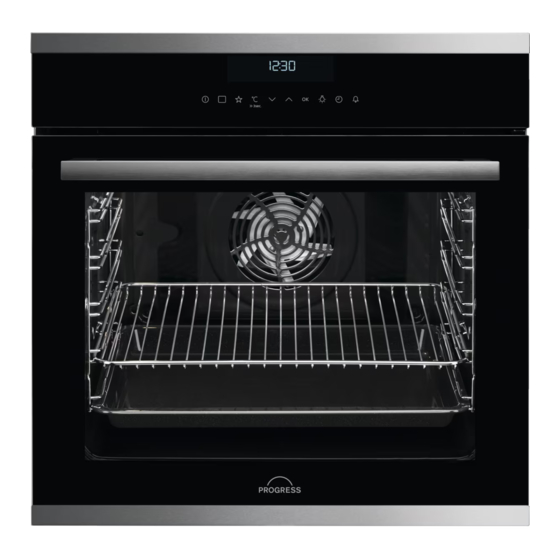
Seite 8: Product Description
8 Progress PRODUCT DESCRIPTION General overview Control panel Electronic programmer Heating element Lamp Shelf support, removable Shelf positions Accessories • Combi pan For cakes and biscuits. To bake and • Wire shelf roast or as a pan to collect fat. - Seite 9 Progress 9 Sensor Function Description Field Options To set a heating function or an automatic pro‐ gramme. My Favourite Pro‐ To store your favourite programme. Use it to have gramme access to your favourite programme directly or when the oven is off.
-
Seite 10: Before First Use
10 Progress Symbol Name Description Automatic programme You can choose an automatic programme. My favourite programme The favourite programme operates. kg / g An automatic programme with a weight in‐ put operates. h / min A clock function operates. Temperature / Fast heat up The function operates. - Seite 11 Progress 11 Heating functions Oven func‐ Application tion Oven func‐ Application tion This function is designed to save energy during To bake on up to three cooking. For the cooking shelf positions at the Moist Fan instructions refer to same time and to dry...
-
Seite 12: Clock Functions
12 Progress The display shows the set temperature, Press again to change the set the symbol and the number of the heating temperature. function. 2. Press or the display shows again 2. Press to set a heating the set temperature automatically after function. -
Seite 13: Setting The Duration
Progress 13 Clock function Application 00:00 Count Up Timer To set the count up, which shows how long the oven works. It is on immediately when the oven starts to heat. The Count Up Timer is not turned on if Duration and End Time are set. -
Seite 14: Automatic Programmes
14 Progress The display shows flashing and "00". When the Time Delay function is turned on, the display shows 2. Press to switch between options. a symbol of the heating First you set the seconds, then the minutes and the hours. -
Seite 15: Using The Accessories
Progress 15 6. Touch a sensor field to stop the acoustic signal. Programme name 7. Deactivate the appliance. DOUGH PROVING Automatic programmes with POTATO GRATIN weight input LASAGNE If you set the weight of the meat, the CANNELLONI appliance calculates the roasting time. -
Seite 16: Additional Functions
16 Progress Wire shelf and baking tray / deep pan together: Small indentation at the top increase safety. The Push the baking tray / deep pan between indentations are also anti-tip the guide bars of the shelf support and the devices. -
Seite 17: Using The Settings Menu
Progress 17 Using the settings menu display shows SET and the number of the setting. The settings menu lets you turn on or turn off functions in the main menu. The Description Value to set SET+GO ON / OFF RESIDUAL HEAT INDICATOR... -
Seite 18: Safety Thermostat
18 Progress the oven, the cooling fan can continue to dangerous overheating. To prevent this, operate until the oven cools down. the oven has a safety thermostat which interrupts the power supply. The oven Safety thermostat turns on again automatically when the temperature drops. -
Seite 19: Baking And Roasting
Progress 19 Baking and roasting CAKES Conventional True Fan Cook‐ Cooking (min) (°C) (°C) Whisked rec‐ 3 (2 45 - 60 Cake mould ipes and 4) Shortbread 3 (2 20 - 30 Cake mould dough and 4) Buttermilk 80 - Cake mould, Ø... - Seite 20 20 Progress CAKES Conventional True Fan Cook‐ Cooking (min) (°C) (°C) Rich fruit cake 110 - Cake mould, Ø 24 Victoria sand‐ 30 - 50 Cake mould, Ø 20 wich Preheat the empty oven. BREAD AND PIZZA Conventional Cook‐ True Fan Cooking (min) (°C)
- Seite 21 Progress 21 FLANS Conventional Cook‐ True Fan Cooking (min) (°C) (°C) Pasta flan, preheating is 40 - 50 not needed Vegetable flan, preheat‐ 45 - 60 ing is not needed Quiches 50 - 60 Lasagne 180 - 190 180 - 190...
- Seite 22 22 Progress MEAT Conventional Cook‐ True Fan Cooking (min) (°C) (°C) Pork shoulder, with rind 120 - 150 Pork shin, 2 pieces 100 - 120 Leg of lamb 110 - 130 Whole chicken 70 - 85 Whole turkey 210 - 240...
- Seite 23 Progress 23 GRILL (kg) (min) (min) 1st side 2nd side Fillet steaks, 4 pieces 12 - 15 12 - 14 Beef steak, 4 pieces 10 - 12 6 - 8 Sausages, 8 12 - 15 10 - 12 Pork chops, 4 pieces...
-
Seite 24: Slow Cooking
24 Progress VEAL POULTRY (°C) (min) (°C) (min) Roast veal, 1 kg 160 - 90 - 120 Goose, 3.5 - 5 kg 160 - 120 - Veal knuckle, 1.5 160 - 120 - Turkey, 2.5 - 3.5 160 - 120 -... - Seite 25 Progress 25 Set the temperature to 120 °C. (kg) (min) Steaks 0.2 - 0.3 20 - 40 Fillet of beef 1 - 1.5 90 - 150 Roast beef 1 - 1.5 120 - 150 Roast veal 1 - 1.5 120 - 150...
- Seite 26 26 Progress When the liquid in the jars starts to simmer (after approximately 35 - 60 minutes with one-litre jars), stop the oven or decrease VEGETABLES the temperature to 100 °C (see the table). Set the temperature to 160 - 170 °C.
- Seite 27 Progress 27 FRUIT FRUIT Plums 8 - 10 Pears 6 - 9 Apricots 8 - 10 Moist Fan Baking - recommended accessories Apple slices 6 - 8 Use the dark and non-reflective tins and containers. They have better heat absorption than the light colour and reflective dishes.
- Seite 28 28 Progress (°C) (min) Brownie baking tray or dripping 25 - 30 Soufflè, 6 pieces ceramic ramekins on 25 - 30 wire shelf Sponge flan flan base tin on wire 15 - 25 base shelf Victoria sand‐ baking dish on wire...
- Seite 29 Progress 29 Information for test institutes Tests according to IEC 60350-1. (°C) (min) Small Conven‐ Baking 20 - 30 cakes, tional tray 20 per Cooking tray Small True Fan Baking 150 - 20 - 35 cakes, Cooking tray 20 per...
-
Seite 30: Care And Cleaning
30 Progress (°C) (min) Short True Fan Baking 140 - 25 - 45 bread Cooking tray Short Conven‐ Baking 140 - 25 - 45 bread tional tray Cooking Toast, 4 Grill Wire max. 2 - 3 minutes Preheat the oven shelf first side;... - Seite 31 Progress 31 Clean all accessories after each use and let them dry. Use a soft cloth with warm water and a cleaning agent. Do not clean the accessories in a dish‐ washer. Do not clean the non-stick accessories using aggressive agents, sharp- Accessories edged objects or in a dishwasher.
- Seite 32 32 Progress 2. Lift and turn the levers fully on both 6. Pull the door trim to the front to hinges. remove it. 7. Hold the door glass panels by their top edge and carefully pull them out one by one. Start from the top panel. Make sure the glass slides out of the supports completely.
-
Seite 33: Replacing The Lamp
Progress 33 2. Disconnect the oven from the mains. 3. Put a cloth on the bottom of the cavity. CAUTION! Always hold the halogen lamp with a cloth to prevent grease residue from burning on the lamp. Replacing the lamp... -
Seite 34: Service Data
The rating plate is We recommend that you write the data here: Model (MOD.) ......... Product number (PNC) ......... Serial number (S.N.) ......... ENERGY EFFICIENCY Product Information Sheet Product information according to EU 65-66/2014 Supplier's name Progress Model identification PBN43102X 949497018... -
Seite 35: Energy Saving
Progress 35 Energy Efficiency Index 81.2 Energy efficiency class Energy consumption with a standard load, conventional 0.93 kWh/cycle mode Energy consumption with a standard load, fan-forced 0.69 kWh/cycle mode Number of cavities Heat source Electricity Volume 72 l Type of oven... -
Seite 36: Environmental Concerns
36 Progress Deactivating the display You can turn off the display. Press and hold at the same time. To turn it on repeat this step. ENVIRONMENTAL CONCERNS not dispose of appliances marked with the Recycle materials with the symbol . Put symbol with the household waste. -
Seite 37: Sicherheit Von Kindern Und Schutzbedürftigen Personen
Progress 37 INHALTSVERZEICHNIS Sicherheitshinweise Automatikprogramme Sicherheitsanweisungen Verwendung des Zubehörs Montage Zusatzfunktionen Gerätebeschreibung Tipps und Hinweise Bedienfeld Reinigung und Pflege Vor der ersten Inbetriebnahme Fehlersuche Täglicher Gebrauch Energieeffizienz Uhrfunktionen Änderungen vorbehalten. SICHERHEITSHINWEISE Lesen Sie vor der Montage und dem Gebrauch des Geräts zuerst die Bedienungsanleitung. -
Seite 38: Allgemeine Sicherheit
38 Progress Halten Sie Kinder und Haustiere während des Betriebs • oder der Abkühlphase vom Gerät fern. Die zugänglichen Geräteteile werden beim Betrieb sehr heiß. Falls Ihr Gerät mit einer Kindersicherung ausgestattet ist, • empfehlen wir, diese einzuschalten. Kinder dürfen keine Reinigung und Wartung ohne •... -
Seite 39: Sicherheitsanweisungen
Progress 39 SICHERHEITSANWEISUNGEN Montage Breite der Gerätevor‐ 595 mm WARNUNG! Die Montage des derseite Geräts darf nur von einer Breite der Geräte‐ 559 mm qualifizierten Fachkraft durchgeführt werden. rückseite Gerätetiefe 569 mm • Entfernen Sie das gesamte Verpackungsmaterial. Geräteeinbautiefe 548 mm •... -
Seite 40: Verwendung
40 Progress • Achten Sie darauf, dass das Netzkabel die Gerätetür oder die Nische unter Gesamtleistung Kabelquerschnitt dem Gerät nicht berührt oder in ihre (mm²) Nähe gelangt, insbesondere wenn das Maximal 1380 3 x 0.75 Gerät eingeschaltet oder die Tür heiß... -
Seite 41: Innenbeleuchtung
Progress 41 Reinigung und Pflege in das Gerät und stellen Sie solche nicht in die Nähe oder auf das Gerät. WARNUNG! Verletzungs-, WARNUNG! Risiko von Brandgefahr sowie Risiko von Schäden am Gerät. Schäden am Gerät. • Um Beschädigungen und Verfärbungen •... -
Seite 42: Entsorgung
42 Progress Service • Trennen Sie das Gerät von der Stromversorgung. • Wenden Sie sich zur Reparatur des • Schneiden Sie das Netzkabel in der Geräts an den autorisierten Nähe des Geräts ab, und entsorgen Kundendienst. Sie es. • Verwenden Sie ausschließlich •... -
Seite 43: Befestigung Des Ofens Am Möbel
Progress 43 min. 550 min. 560 Befestigung des Ofens am Möbel... -
Seite 44: Gerätebeschreibung
44 Progress GERÄTEBESCHREIBUNG Gesamtansicht Bedienfeld Elektronischer Programmspeicher Heizelement Backofenbeleuchtung Ventilator Einhängegitter, herausnehmbar Einschubebenen Zubehör • Universalblech Für Kuchen und Plätzchen. Zum • Kombirost Backen und Braten oder zum Für Kochgeschirr, Kuchenformen, Auffangen von austretendem Fett. Braten. • Backblech Für Kuchen und Plätzchen. - Seite 45 Progress 45 Sen‐ Funktion Beschreibung sorfeld Optionen Einstellen einer Ofenfunktion oder eines Automa‐ tikprogramms. Mein Favoriten- Speichern Ihres bevorzugten Programms. Über Programm dieses Feld können Sie direkt auf Ihr bevorzugtes Programm zugreifen, selbst wenn der Backofen ausgeschaltet ist. Temperatur / Einstellen oder Anzeigen der Temperatur.
-
Seite 46: Anzeige Für Die Schnellaufheizung
46 Progress Weitere Anzeigen auf dem Display: Symbol Name Bezeichnung Funktionen Auswahl einer Ofenfunktion. Automatikprogramm Auswahl eines Automatikprogramms. Favoriten-Programm Das Favoriten-Programm wird ausgeführt. kg/g Ein Automatikprogramm mit Gewichtsein‐ gabe ist eingeschaltet. Std./Min. Es ist eine Uhrfunktion eingeschaltet. Temperatur / Schnellaufheizung Die Funktion ist eingeschaltet. -
Seite 47: Täglicher Gebrauch
Progress 47 Das Zubehör kann heißer werden als bei Rauch verströmen. Sorgen Sie für eine normalem Gebrauch. Der Backofen kann ausreichende Raumbelüftung. während des Vorheizens Geruch und TÄGLICHER GEBRAUCH WARNUNG! Siehe Kapitel Ofenfunkti‐ Anwendung Sicherheitshinweise. Ofenfunktionen Zum Braten größerer Fleischstücke oder von Geflügel mit Knochen auf... -
Seite 48: Einstellen Der Ofenfunktion
48 Progress Ofenfunkti‐ Anwendung Ofenfunkti‐ Anwendung Diese Funktion ist entwi‐ Zum Warmhalten von ckelt worden, um wäh‐ Speisen. rend des Garvorgangs Feuchte Um‐ Warmhalten Energie zu sparen. Die luft Kochanleitungen finden Einstellen der Ofenfunktion Sie im Kapitel „Hinweise und Tipps“, Feuchte Um‐... -
Seite 49: Schnellaufheizung
Progress 49 Schnellaufheizung „Verwenden des Menüs Einstellungen“ im Kapitel „Zusatzfunktionen“. Geben Sie kein Gargut in den Backofen, Die Schnellaufheizung verkürzt die wenn die Schnellaufheizung eingeschaltet Aufheizzeit. ist. Halten Sie zum Einschalten der Die Schnellaufheizung steht nur bei einigen Ofenfunktionen zur Verfügung. -
Seite 50: Einstellen Von Dauer
50 Progress Einstellen von Dauer 3. Drücken Sie zum Einstellen der Minuten von die Taste oder 1. Wählen Sie eine Ofenfunktion und die Dauer. Temperatur. 4. Drücken Sie 2. Drücken Sie wiederholt, bis anfängt zu blinken. 5. Drücken Sie oder , um die Stunden für die Dauer einzustellen. -
Seite 51: Einstellung: Kurzzeit-Wecker
Progress 51 Anzeige gibt an, welche Uhrfunktion 4. Drücken Sie oder derKurzzeit- eingeschaltet ist. Wecker wird automatisch nach 5 5. Drücken Sie ein beliebiges Sensorfeld Sekunden eingeschaltet. (außer EIN/AUS) zum Starten der Nach Ablauf der eingestellten Zeit ertönt 2 Funktion Set + Go. -
Seite 52: Automatikprogramme Mit Gewichtseingabe
52 Progress 3. Berühren Sie oder , um das 3. Berühren Sie oder , um das Automatikprogramm auszuwählen. Programm mit Gewichtseingabe einzustellen. 4. Berühren Sie oder warten Sie fünf Das Display zeigt folgendes an: die Sekunden, bis das Gerät automatisch eingeschaltet wird. -
Seite 53: Zusatzfunktionen
Progress 53 Die kleine Einkerbung auf der Oberseite erhöht die Sicherheit. Diese Einkerbungen dienen auch als Kippsicherung. Durch den umlaufend erhöhten Rand des Rosts ist das Kochgeschirr gegen Abrutschen vom Rost gesichert. ZUSATZFUNKTIONEN Verwenden der Funktion Halten Sie gleichzeitig 2 „Bevorzugtes Programm“:... -
Seite 54: Automatische Abschaltung
54 Progress Beschreibung Mögliche Einstelloptionen SET+GO EIN/AUS RESTWÄRMEANZEIGE EIN/AUS KLICK/BEEP/AUS TASTENTÖNE ALARMSIGNALE EIN/AUS DEMO MODUS Aktivierungscode: 2468 HELLIGKEIT NIEDRIG/MITTEL/HOCH SERVICE-MENÜ ZURÜCK ZUM AUSLIEFERZUSTAND JA/NEIN 1) Der Ton des Sensorfelds EIN/AUS lässt sich nicht ausschalten. Dauer, Zeitvorwahl, Ende, 1. Halten Sie 3 Sekunden gedrückt. -
Seite 55: Tipps Und Hinweise
Progress 55 Sicherheitsthermostat Sicherheitsthermostat ausgestattet, der die Stromzufuhr unterbrechen kann. Die Ein unsachgemäßer Gebrauch des Ofens Wiedereinschaltung des Backofens erfolgt oder defekte Bestandteile können zu einer automatisch bei Temperaturabfall. gefährlichen Überhitzung führen. Um dies zu verhindern, ist der Backofen mit einem... -
Seite 56: Backen Und Braten
56 Progress Backen und Braten KUCHEN Ober-/Unterhit‐ Heißluft (Min.) (°C) (°C) Rührteig 3 (2 45 - 60 Kuchenform und 4) Mürbeteig 3 (2 20 - 30 Kuchenform und 4) Buttermilch- 80 - Kuchenform, Ø 26 Käsekuchen Strudel/Stollen 60 - 80 Backblech Marmeladen‐... - Seite 57 Progress 57 KUCHEN Ober-/Unterhit‐ Heißluft (Min.) (°C) (°C) Törtchen 45 - 70 Kuchenform, Ø 20 Üppiger Obst‐ 110 - Kuchenform, Ø 24 kuchen Englischer 30 - 50 Kuchenform, Ø 20 Sandwichku‐ chen à la Vic‐ toria Leeren Backofen vorheizen. BROT UND PIZZA Ober-/Unterhitze Heißluft...
- Seite 58 58 Progress FLANS Ober-/Unterhitze Heißluft (Min.) (°C) (°C) Nudelauflauf, Vorheizen 40 - 50 ist nicht erforderlich Gemüseauflauf, Vorhei‐ 45 - 60 zen ist nicht erforderlich Quiche 50 - 60 Lasagne, frisch 180 - 190 180 - 190 25 - 40...
- Seite 59 Progress 59 FLEISCH Ober-/Unterhitze Heißluft (Min.) (°C) (°C) Schweineschulter, mit 120 - 150 Schwarte Schweinshaxe, 2 Stück 100 - 120 Lammkeule 110 - 130 Hähnchen, ganz 70 - 85 Pute, ganz 210 - 240 Ente, ganz 120 - 150 Gans, ganz 150 - 200 Kaninchen, in Stücke ge‐...
-
Seite 60: Heißluftgrillen
60 Progress GRILL (kg) (Min.) (Min.) Erste Seite Zweite Seite Filetsteaks, 4 Stück 12 - 15 12 - 14 Rindersteak, 4 Stück 10 - 12 6 - 8 Würstchen, 8 12 - 15 10 - 12 Schweinekoteletts, 4 Stück 12 - 16 12 - 14 Hähnchen, halbiert, 2... -
Seite 61: Niedertemperaturgaren
Progress 61 SCHWEINEFLEISCH GEFLÜGEL (°C) (Min.) (°C) (Min.) Hackbraten, 0,75 160 - 50 - 60 Hähnchen, hal‐ 190 - 35 - 50 - 1 kg biert, je 0,4 - 0,5 Schweinshaxe, 150 - 90 - 120 vorgegart, 0,75 - Hähnchen, Pou‐... - Seite 62 62 Progress 3. Wählen Sie die Funktion 4. Nach 10 Minuten reduziert der Niedertemperatur Garen. . Sie können Backofen die Temperatur automatisch für die ersten 10 Minuten eine auf 80 °C. Temperatur zwischen 80 °C und 150 °C einstellen. Voreingestellt ist 90 °C.
-
Seite 63: Einkochen
Progress 63 Einkochen Verwenden Sie nur handelsüblichs Einmachgläser mit denselben STEINOBST Abmessungen. Verwenden Sie keine Einmachgläser mit Schraub- und Bajonettdeckeln oder (Min.) (Min.) Metalldosen. Gardauer Kochen Nutzen Sie die erste Einschubebene. bis zum Sie weiter Köcheln bei 100 °C Stellen Sie nicht mehr als sechs Ein-Liter- Einmachgläser auf das Backblech. -
Seite 64: Feuchte Umluft - Empfohlenes Zubehör
64 Progress GEMÜSE OBST (°C) (Std. (Std.) Aprikosen 8 - 10 Bohnen 60 - 70 6 - 8 Apfelscheiben 6 - 8 Paprika 60 - 70 5 - 6 Birnen 6 - 9 Suppengemüse 60 - 70 5 - 6... - Seite 65 Progress 65 (°C) (Min.) Brötchen, süß, Backblech oder tiefes 20 - 30 16 Stück Blech Brötchen, 9 Backblech oder tiefes 30 - 40 Stück Blech Pizza, gefroren, Kombirost 10 - 15 0,35 kg Biskuitrolle Backblech oder tiefes 25 - 35...
-
Seite 66: Informationen Für Prüfinstitute
66 Progress (°C) (Min.) Mürbeteigplätz‐ Backblech oder tiefes 25 - 35 chen, 20 Stück Blech Törtchen, 8 Backblech oder tiefes 20 - 30 Stück Blech Gemüse, po‐ Backblech oder tiefes 35 - 45 chiert, 0,4 kg Blech Vegetarisches Pizzapfanne auf Kom‐... - Seite 67 Progress 67 (°C) (Min.) Apfelku‐ Heißluft Kombi‐ 70 - 90 chen, 2 rost Formen à Ø 20 Biskuit, Ober-/ Kombi‐ 40 - 50 Backofen 10 Ku‐ Unterhitze rost Min. vorheizen. chen‐ form Ø 26 cm Biskuit, Heißluft Kombi‐ 40 - 50 Backofen 10 Ku‐...
-
Seite 68: Reinigung Und Pflege
68 Progress (°C) (Min.) Ham‐ Grill Kombi‐ Max. 20 - 30 Kombirost in die burger rost und vierte und Fett‐ Fett‐ pfanne in die Rind‐ pfanne dritte Einschub‐ fleisch, ebene des Back‐ 6 Stück, ofens einschie‐ 0,6 kg ben. Wenden Sie das Lebensmittel nach der Hälfte... -
Seite 69: Öfen Mit Edelstahl- Oder Aluminiumfront
Progress 69 Öfen mit Edelstahl- oder Aluminiumfront Reinigen Sie die Backofentür nur mit einem feuchten Tuch oder Schwamm. Trocknen Sie sie mit einem weichen Tuch Verwenden Sie keine Stahlwolle, Säuren Führen Sie zum Einsetzen der entfernten oder Scheuermittel, da diese die Zubehörteile die oben beschriebenen... - Seite 70 70 Progress 6. Ziehen Sie die Türabdeckung nach vorne, um sie abzunehmen. 7. Halten Sie die Oberkanten der Türglasscheiben fest und ziehen Sie sie vorsichtig nacheinander heraus. Beginnen Sie mit der obersten Glasscheibe. Achten Sie darauf, dass die Glasscheiben vollständig aus den Halterungen gezogen werden.
-
Seite 71: Ersetzen Der Lampe
Progress 71 1. Schalten Sie den Backofen aus. Warten Sie, bis der Backofen abgekühlt ist. 2. Trennen Sie den Ofen von der Netzversorgung. 3. Breiten Sie ein Tuch auf dem Garraumboden aus. VORSICHT! Halogenlampen immer mit einem Tuch anfassen, um ein Einbrennen von Fett (Fingerabdrücke) zu... - Seite 72 72 Progress Störung Mögliche Ursache Abhilfe Der Backofen heizt nicht. Die Uhr ist nicht eingestellt. Stellen Sie die Uhr ein. Der Backofen heizt nicht. Die notwendigen Einstellun‐ Vergewissern Sie sich, dass gen wurden nicht vorgenom‐ die Einstellungen korrekt men. sind.
-
Seite 73: Servicedaten
......... Produktnummer (PNC) ......... Seriennummer (S.N.) ......... ENERGIEEFFIZIENZ Produktdatenblatt Produktdatenblatt und Informationen gemäß EU 65-66/2014 Herstellername Progress Modellidentifikation PBN43102X 949497018 Energieeffizienzindex 81.2 Energieeffizienzklasse Energieverbrauch bei Standardbeladung, Ober-/Unter‐ 0.93 kWh/Programm hitze Energieverbrauch bei Standardbeladung, Umluft 0.69 kWh/Programm Anzahl der Garräume Wärmequelle Strom Fassungsvermögen... -
Seite 74: Energie Sparen
74 Progress EN 60350-1 - Elektrische Kochgeräte für ausschalten, wird im Display die den Hausgebrauch - Teil 1: Herde, Restwärme angezeigt. Die Restwärme Backöfen, Dampfgarer und Grillgeräte - kann zum Warmhalten von Speisen Verfahren zur Messung der genutzt werden. Gebrauchseigenschaften Beträgt die Garzeit mehr als 30 Minuten,... - Seite 75 Progress 75...
- Seite 76 867355697-B-322019...