Inhaltsverzeichnis

Verwandte Anleitungen für M-Audio M-Track Solo

Inhaltszusammenfassung für M-Audio M-Track Solo
- Seite 1 User Guide English ( 2 – 8 ) Guía del usuario Español ( 9– 15 ) Guide d'utilisation Français ( 16 – 22 ) Guida per l'uso Italiano ( 23 – 29 ) Benutzerhandbuch Deutsch ( 30– 36 ) Appendix English ( 37 –...
- Seite 2 Introduction Box Contents M-Track Solo User Guide USB-B–to–USB-A Cable Safety & Warranty Manual Software Download Cards Support For the latest information about this product (system requirements, compatibility information, etc.) and product registration, visit m-audio.com. For additional product support, visit m-audio.com/support.
-
Seite 3: Quick Start
After installation, most DAWs will not load virtual instrument plugins automatically. In order to access the virtual instrument plugins with Pro Tools | First M-Audio Edition, you will need to choose the plugin folder for the software to scan:... - Seite 4 To set M-Track Solo as your default playback device, follow the directions below based on your computer’s operating system. Windows: 1. Use the included USB cable to connect the M-Track Solo to your computer. 2. In the Taskbar, locate the Volume Control "speaker" icon. Right-click the speaker and open Sound Settings >...
-
Seite 5: Connection Diagram
Connection Diagram Items not listed under Introduction > Box Contents are sold separately. Guitar Monitors Computer Microphone Headphones Rear Panel Front Panel Note: Use the +48V (Phantom Power) Switch only if a microphone requires phantom power. Most dynamic microphones and ribbon microphones do not require phantom power, but most condenser microphones do. - Seite 6 Select your Sample Rate and then click OK to close the Setup window. You can now add tracks to send and receive audio from sources connected to M-Track Solo inputs and stream recorded audio back through the M-Track Solo outputs.
-
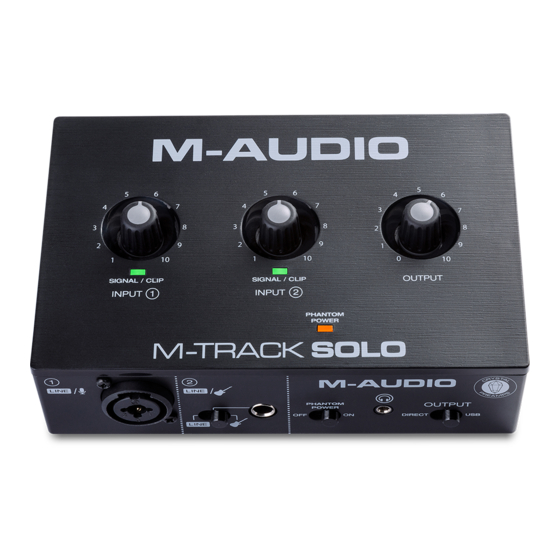
Seite 7: Top Panel
Use the included USB-B-to-USB-A cable to connect the M-Track Solo to a computer. The M-Track Solo requires a USB 2.0 connection (or higher). Main Outputs: Use standard RCA cables to connect these outputs to your powered monitors, amplifier system, etc. -
Seite 8: Front Panel
Front Panel Combo Input: Connect a microphone, a guitar or bass with an active pickup, or a line-level device to this input. For microphones, use an XLR or 1/4” (6.35 mm) TRS cable. For a guitar or bass with an active pickup, use a standard 1/4”... -
Seite 9: Contenido De La Caja
Manual sobre la seguridad y garantía Tarjetas de descarga de software Soporte Para obtener la información más completa acerca de este product (los requisitos del sistema, compatibilidad, etc) y registro del producto, visite m-audio.com. Para soporte adicional del producto, visite m-audio.com/support. - Seite 10 Siga las instrucciones de la pantalla para instalar los drivers. Software: Hemos incluido Pro Tools | First M-Audio Edition y MPC Beats con su M-Track Solo de modo que puede comenzar a hacer música con software profesional en cuanto lo saca de la caja.
- Seite 11 Windows: Utilice el cable USB incluido para conectar el M-Track Solo a su ordenador. Localice en la barra de tareas el icono del "altavoz" del control de volumen. Haga clic derecho en el altavoz y abierto Ajustes de sonido >...
-
Seite 12: Diagrama De Instalación
Diagrama de instalación Los elementos que no se enumeran en Introducción > Contenido de la caja se venden por separado. Guitarra Monitores alimentados Computadora Micrófono Auriculares Panel trasero Panel frontal Nota: Utilice el interruptor +48 V (potencia fantasma) solamente si un micrófono requiere potencia fantasma. - Seite 13 Ahora puede añadir pistas para enviar y recibir audio desde las fuentes conectadas a las entradas del M-Track Solo y transmitir el audio grabado de regreso por las salidas del M-Track Solo. Instalación del M-Track Solo con MPC Beats Utilice el cable USB incluido para conectar el M-Track Solo a su ordenador.
-
Seite 14: Características
Utilice los cable USB-B–a–USB-A para conectar el M-Track Solo a un ordenador. El M-Track Solo requiere una conexión USB 2.0 (o superior). Salidas principales: Utilice cables RCA para conectar estas salidas a sus monitores alimentados, sistema de amplificación, etc. -
Seite 15: Panel Frontal
Panel frontal Entrada combinada: Conecte un micrófono, guitarra o bajo con captador activo o un dispositivo de nivel de línea a esta entrada. Para micrófonos, utilice un cable XLR o TRS de 6,35 mm (1/4 pulg.). Entrada de 1/4": para señales de nivel de línea, use un cable TRS de 1/4"... -
Seite 16: Présentation
Cartes de téléchargement de logiciel Assistance Pour les dernières informations concernant ce produit (la configuration système minimale requise, la compatibilité, etc) et l’enregistrement du produit, veuillez visitez le site m-audio.com. Pour toute assistance supplémentaire, veuillez visiter le site m-audio.com/support. -
Seite 17: Utilisation Rapide
Logiciel : Nous avons inclus l’application Pro Tools | First M-Audio Edition et MPC Beats avec l'M-Track Solo afin que vous puissiez commencer à créer de la musique avec un logiciel de qualité professionnelle aussitôt que vous le sortez de la boîte. Veuillez enregistrer l'M-Track Solo sur le site m-audio.com/softwaredownload... - Seite 18 Pour définir le M-Track Solo comme périphérique de lecture par défaut, veuillez suivre les instructions ci-dessous, selon le système d'exploitation de votre ordinateur. Windows : Utilisez le câble USB inclus pour brancher le M-Track Solo à votre ordinateur. Dans la barre des tâches, recherchez l’icône de la commande de volume (haut-parleur). Faites un clic droit sur l'icône du haut-parleur et ouvrir Paramètres son>...
-
Seite 19: Schéma De Connexion
Schéma de connexion Les éléments qui ne figurent pas dans la section Présentation > Contenu de la boîte sont vendus séparément. Guitare Moniteurs amplifiés Casque Microphone Ordinateur d'écoute Panneau arrière Panneau avant Important : Utiliser la touche d'alimentation fantôme (+48V) uniquement lorsqu’un microphone nécessite une alimentation fantôme. - Seite 20 Setup. Vous pouvez maintenant ajouter des pistes et recevoir un signal audio des sources branchées aux entrées de l'M-Track Solo et transmettre en continu des fichiers par le biais des sorties de l'M-Track Solo. Installation de M-Track Solo avec MPC Beats Utilisez le câble USB fourni pour brancher l’interface M-Track Solo à...
-
Seite 21: Panneau Supérieur
Utilisez le câble USB-B–vers–USB-A fourni pour brancher l'M- Track Solo à un ordinateur. L'M-Track Solo requiert une connexion USB 2.0 (ou version ultérieure). Sorties principales : Utilisez des câbles RCA pour relier ces sorties à vos moniteurs amplifiés, à... -
Seite 22: Panneau Avant
Panneau avant Entrée combo : Cette entrée permet de brancher un microphone, une guitare ou une basse avec un micro actif, ou un appareil à niveau ligne. Pour brancher un microphone, utilisez un câble XLR ou TRS 6,35 mm. Entrée 1/4" : pour les signaux de niveau ligne, utilisez un câble TRS 1/4"... -
Seite 23: Contenuti Della Confezione
Schede di download del software Assistenza Per conoscere le ultime informazioni in merito a questo prodotto (i requisiti di sistema complete, compatibilità, ecc) e per la registrazione del prodotto, recarsi alla pagina m-audio.com. Per ulteriore assistenza, recarsi alla pagina m-audio.com/support. -
Seite 24: Inizio Rapido
2. Aprire il file scaricato e fare doppio clic sul file di installazione dei driver. 3. Seguire le istruzioni su schermo per installare i driver. Software: Con l'M-Track Solo abbiamo incluso il Pro Tools | First M-Audio Edition e MPC Beats in modo da consentirvi di iniziare immediatamente a fare musica con software professionale. - Seite 25 Per configurare l’M-Track Solo come dispositivo di riproduzione predefinito, seguire le indicazioni seguenti, basandosi sul proprio sistema operativo. Windows: Servirsi del cavo USB in dotazione per collegare l’M-Track Solo al computer. Nella Barra delle applicazioni, individuare l'icona "Speaker" di controllo del Volume. Fare clic col tasto destro del mouse e aperto Impostazioni audio>...
-
Seite 26: Schema Dei Collegamenti
Schema dei collegamenti Elementi non elencati sotto Introduzione > Contenuti della confezione sono venduti separatamente. Chitarra Monitor Microfono Computer Cuffie Pannello posteriore Pannello anteriore Importante: Servirsi dell'interruttore +48V (l’alimentazione phantom) solo se un microfono richiede l'alimentazione phantom. La maggior parte microfoni dinamici e i microfoni a nastro non richiedono alimentazione phantom, mentre la maggior parte dei microfoni a condensatore sì. - Seite 27 Per utenti Windows: Nella finestra Audio, selezionare ASIO nel menu a discesa Audio Device Type. Nel menu a discesa Device selezionare M-Track Solo and Duo ASIO. Per utenti MacOS: Nella finestra Audio, selezionare USB Audio Codec sotto i menu a discesa Output e Input.
-
Seite 28: Caratteristiche
Servirsi dei cavo da USB-B–a–USB-A in dotazione per collegare l'M-Track Solo al computer. L'M-Track Solo richiede un collegamento USB 2.0 (o superiore). Uscite principali: servirsi di cavi RCA per collegare queste uscite a monitor, impianto di amplificazione, ecc. -
Seite 29: Pannello Anteriore
Pannello anteriore Ingresso combo: collegare un microfono, una chitarra o un basso con pickup attivo o un dispositivo a livello di linea a questo ingresso. Per i microfoni, servirsi di un cavo TRS XLR o da 1/4” (6,35 mm). Ingresso 1/4": per segnali a livello di linea, utilizzare un cavo TRS da 1/4"... -
Seite 30: Einführung
Benutzerhandbuch (Deutsch) Einführung Lieferumfang M-Track Solo Benutzerhandbuch USB-B-zu-USB-A Kabel Sicherheitshinweise undantieinformationen Software Download-Karten Kundendienst Für aktuelle Informationen diesem Produkt (Systemanforderungen, Informationen zur Kompatibilität etc.) und zur Produktregistrierung besuchen Sie m-audio.com. Um weitere Unterstützung zu Ihrem Produkt zu erhalten besuchen Sie... -
Seite 31: Schnellstart
Befolgen Sie die Anweisungen am Bildschirm, um die Treiber zu installieren. Software: Wir liefern M-Track Solo mit Pro Tools | First M-Audio Edition und MPC Beats aus, damit Sie Ihre Musikproduktion gleich mit professioneller Software starten können. Registrieren Sie Ihren M- Track Solo zuerst auf m-audio.com/softwaredownload... - Seite 32 Anweisungen je nach Betriebssystem Ihres Computers. Windows: Schließen Sie Ihr M-Track Solo mit dem mitgelieferten USB-Kabel an Ihren Computer an. Suchen Sie das Lautsprechersymbol für die Lautstärke in der Taskleiste. Klicken Sie mit der rechten Maustaste auf den Lautsprecher und öffnen Soundeinstellungen > Sounds.
-
Seite 33: Anschlussdiagramm
Anschlussdiagramm Teile, die nicht unter Einführung > Lieferumfang angegeben sind, sind separat erhältlich. Gitarre Aktivemonitore Computer Mikrofon Kopfhörer Rückseite Vorderseite Wichtig: Verwenden Sie den +48V (Phantomspeisung)-Schalter nur dann, wenn ein Mikrofon eine Phantomspeisung benötigt. Die meisten dynamischen Mikrofone und Bändchenmikrofone benötigen keine Phantomspeisung. -
Seite 34: Einrichten Von M-Track Solo Mit Ihrer Software
Gehen Sie zu Edit > Preferences…. Für Windows-Anwender: Wählen Sie im Audio-Fenster die Option ASIO im Dropdown-Menü Audio Device Type aus. Im Dropdown-Menü Device wählen Sie die Option M-Track Solo and Duo ASIO. Für MacOS-Anwender: Wählen Sie im Audio-Fenster die Option USB Audio Codec unter den Output - und Input-Dropdown-Menüs aus. -
Seite 35: Funktionen
Rückseite USB-Port (Typ B): Über diesen Anschluss können Sie Audio- an und vom Computer senden. Verwenden Sie die im Lieferumfang enthaltenen USB-B-auf-USB-A-Kabel, um Ihr M-Track Solo an einen Computer anzuschließen. M-Track Solo benötigt einen USB 2.0-Anschluss (oder höher). Hauptausgäng: Verwenden handelsübliche... -
Seite 36: Vorderseite
Vorderseite Combo-Eingang: Schließen Sie ein Mikrofon, eine Gitarre, einen Bass mit einem aktiven Pickup oder ein Line-Level-Gerät an diesen Eingang an. Für Mikrofone verwenden Sie ein XLR- oder 1/4" (6,35 mm) TRS- Kabel. 1/4" Eingang: Verwenden Sie für Signale mit Line- Pegel ein 6,35 mm (1/4") TRS-Kabel. -
Seite 37: Appendix (English)
Appendix (English) Technical Specifications All specifications are measured at 20 kHz bandwidth. Specifications are subject to change without notice. Mic Input (balanced XLR) Frequency Response 20 Hz – 20 kHz (+0.1 dB) Signal-to-Noise Ratio 109 dB (A-weighted) 0.003% (min. gain, 0 dBu out, A-weighted) THD+N -128 dBu (max. - Seite 38 Instrument Input (unbalanced 1/4" [6.35 mm] TS) 20 Hz – 20 kHz (+0.1 dB) Frequency Response THD+N 0.005% (min. gain, 0 dBu output, A-weighted) 1 MΩ Input Impedance Gain Range -10 dB to +44 dB RCA Outputs 20 Hz – 20 kHz (+0.1 dB) Frequency Response Signal-to-Noise Ratio 109 dB (A-weighted)
- Seite 39 Weight 0.66 lbs. / 0.30 kg Trademarks & Licenses M-Audio and MPC Beats are trademarks of inMusic Brands, Inc., registered in the U.S. and other countries. Windows is a registered trademark of Microsoft Corporation in the United States and other countries.
- Seite 40 Manual Version 1.4...