Inhaltsverzeichnis
Werbung
Verfügbare Sprachen
Verfügbare Sprachen
Werbung
Kapitel
Inhaltsverzeichnis

Verwandte Anleitungen für HNF-NICOLAI XF3 Adventure


Inhaltszusammenfassung für HNF-NICOLAI XF3 Adventure
- Seite 1 XF3 Adventure Originalbetriebsanleitung Manual (page 67)
- Seite 3 Hersteller / manufacturer: HNF GmbH Bahnhofstraße 14 16359 Biesenthal Mail: info@hnf-nicolai.com Web: hnf-nicolai.com Phone: 03337 73900 50 V1, November 2020 Layout, Fotos und Text: HNF GmbH, Biesenthal, Deutschland de: Die erwähnten Markennamen unterliegen Schutzrechten und sind auch ohne weitere Kennzeichnung Eigentum ihrer rechtmäßigen Besitzer. Nachdruck, auch auszugsweise, nur mit schriftlicher Genehmigung.
-
Seite 4: Inhaltsverzeichnis
Inhaltsverzeichnis Ihr Fahrzeug 1.1. Bestimmungsgemäßer Gebrauch 1.2. Fahrzeugübersicht 1.3. Lieferumfang Inbetriebnahme 2.1. Pedale montieren 2.2. Vorbau gerade stellen 2.3. Sattelhöhe einstellen 2.4. Federgabelsetup 2.5. Akkus eingebaut laden 2.6. Entnehmen / Einsetzen der Akkus 2.7. Ein-/Ausschalten des Antriebs 2.8. Unterstützungslevel anpassen 2.9. - Seite 5 Ergonomieeinstellung 5.1. Horizontale Sattelposition und -neigung einstellen 5.2. Bremshebelabstand anpassen Instandhaltung 6.1. Liste der Verschleißteile 6.2. Empfohlene Wartungsintervalle 6.3. Nach einem Unfall/Sturz 6.4. Akkus 6.5. Reifen 6.6. Reifen-/Schlauchwechsel 6.6.1. Vorderrad ausbauen 6.6.2. Hinterrad ausbauen 6.6.3. Reifen/Schlauch wechseln 6.6.4. Vorderrad einbauen 6.6.5.
-
Seite 6: Wichtige Information
Information Hier finden Sie nützliche Informationen zur Handhabung des Produkts. Wichtige Information! Die Bedienungsanleitung Ihres HNF-NICOLAI wird laufend auf Aktualität überprüft. Die vorliegende Anleitung spiegelt den Wissensstand zur Zeit der Drucklegung wider. Wir empfehlen Ihnen daher einen Besuch auf unserer Webseite www.hnf-nicolai.com/handbuecher, um sich über eventuelle Än- derungen zu informieren. -
Seite 7: Ihr Fahrzeug
Versicherung handelt! 1.1. Bestimmungsgemäßer Gebrauch Das XF3 Adventure ist für den Transport einer Person auf befestigten und unbefes- tigten Wegen und Trails bestimmt. Das zulässige Fahrergewicht (incl. Bekleidung und Ausrüstung) beträgt 115 kg. Der Gepäckträger hat eine Tragfähigkeit von 25 kg. Bei Fahrten in unebenen Gelände sollten Sie diese Tragfähigkeit nicht ausnutzen, da der Gepäckträger ungefedert ist. - Seite 8 Ein Pedelec beschleunigt schneller als ein Fahrrad. Bedenken Sie immer, dass andere Verkehrsteilnehmer nicht mit Ihrem Beschleunigungsvermö- gen rechnen könnten. → Üben Sie den Umgang mit Ihrem neuen XF3 Adventure zunächst an ei- nem verkehrsberuhigten Ort, bevor Sie sich damit in den Straßenverkehr begeben.
-
Seite 9: Fahrzeugübersicht
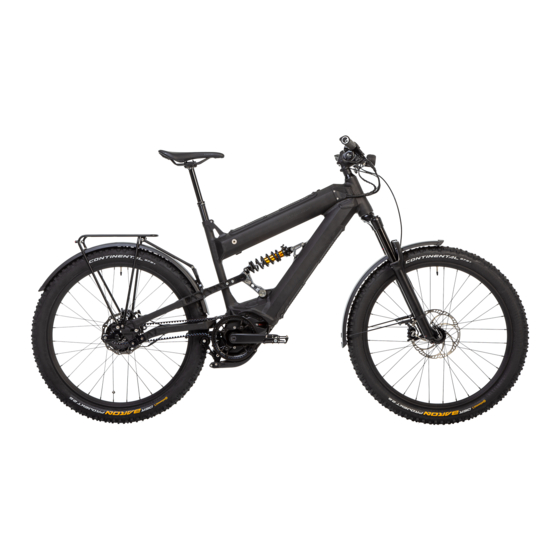
Ihr Fahrzeug 1.2. Fahrzeugübersicht 1 Rohloff Nabenschaltung 2 Bosch Motor 3 Ladebuchse Akku 4 Bosch PowerTube Akku Oberrohr 5 Bosch PowerTube Akku Unterrohr 6 Rahmennummer (linksseitig) 7 Bosch Display 1.3. Lieferumfang • Bosch-Ladegerät •... -
Seite 10: Inbetriebnahme
Ziehen Sie das Pedal mit einem passenden Inbusschlüssel mit 30 bis 35 Newton- meter fest. 2.2. Vorbau gerade stellen Dieser Punkt ist nur zu beachten wenn Sie Ihr XF3 Adventure mit ver- drehten Lenker erhalten haben. • Lockern Sie beide seitlichen Schrauben (1) am Vorbau mit einem Innensechskant- schlüssel. -
Seite 11: Sattelhöhe Einstellen
Inbetriebnahme 2.3. Sattelhöhe einstellen Die richtige Sattelhöhe sorgt dafür, dass Ihre Kraft effizient in Vorwärtsbewegung umgewan- delt wird: Bei senkrechten Kurbelarmen sollte Ihr Bein nahezu durchgestreckt sein. Zum Überprüfen der Sattelhöhe lehnen Sie sich z.B. auf dem Pedelec sitzend gegen eine Wand. Zum Einstellen der Sattelhöhe fahren Sie die Sattelstütze über den Hebel auf der linken Lenkerseite zunächst vollständig aus. -
Seite 12: Akkus Eingebaut Laden
Schieben Sie den Gummiring auf der Gabel zurück • Setzen Sie sich in Fahrposition auf das XF3 Adventure und lesen Sie den SAG an der Gabel ab. Dort findet sich eine %-Skala. Verändern Sie ggf. den Luftdruck an der Gabel, bis der SAG im angegebenen Bereich liegt. -
Seite 13: Entnehmen / Einsetzen Der Akkus
Inbetriebnahme 2.6. Entnehmen / Einsetzen der Akkus Schalten Sie die Akkus / das eBike-System immer aus, wenn Sie die Akkus in den Rahmen einsetzen oder daraus entnehmen. Entnahme oberer Akku: • Drehen Sie den Schlüssel im Akkuschloß im Uhrzeigersinn. Der Akku wird entriegelt. • Ziehen Sie den Akku wenn notwendig an der oberen Gummilippe nach oben, er wird jetzt von der Rückhaltesicherung gestoppt. -
Seite 14: Ein-/Ausschalten Des Antriebs
Im Auslieferungszustand besitzt Ihr Bremssystem zunächst nur eine schwache Brems- wirkung, da die Oberflächen von Bremsscheibe und Bremsbelägen noch nicht einge- bremst sind. Bei Ihrem neuen XF3 Adventure und beim Wechsel von Bremsscheibe oder Bremsbelägen, sollten Sie die Scheibenbremsen wie folgt einbremsen:... -
Seite 15: Vor Jeder Fahrt
Vor jeder Fahrt • Pedelec auf ca. 25 km/h beschleunigen. • Mit beiden Bremsen kräftig bis zum Stillstand abbremsen • Vorgang so häufig wiederholen bis eine spürbare Verbesserung der Bremsleis- tung auftritt Überschlagsgefahr oder Gefahr des Wegrutschen des Vorderrads bei kraft- vollen Betätigen der Vorderradbremse! →... -
Seite 16: Bremsanlage Überprüfen
Vor jeder Fahrt 3.2. Bremsanlage überprüfen • Führen Sie vor jeder Fahrt eine Bremsprobe im Stillstand durch. Ziehen Sie dazu die Bremshebel. Diese dürfen nicht den Lenkergriff berühren. • Bewegen Sie das Pedelec mit gezogener Bremse vor- und zurück. Es darf kein starkes Spiel fühlbar sein. -
Seite 17: Federgabel Und Dämpfer Überprüfen
• Ölaustritt → Wenn Risse/Verformungen oder Ölaustritt vorliegen, kontaktieren Sie den HNF-NICOLAI Service oder suchen Sie eine Fahrradwerkstatt zur Diagnose auf. • Schmutz auf den Standrohre der Gabel oder Kolben des Dämpfers → Sind die Standrohre der Gabel verschmutzt, wischen Sie diese mit einem Lap- pen sauber. -
Seite 18: Bedienung Bosch Kiox
Bedienung Bosch Kiox Bedienung 4.1. Bosch-Antriebssystem 4.1.1. Kiox Bordcomputer (17) 1 270 020 XBK | (17.03.2020) Bosch eBike Systems... - Seite 19 Bedienung Bosch Kiox (12) (10) (11) (13) (19) (18) (15) (14) (16)
-
Seite 20: Sicherheitshinweise
Bedienung Bosch Kiox Deutsch – 1 Sicherheitshinweise Der Bordcomputer ist mit einer Funkschnittstelle aus- gestattet. Lokale Betriebseinschränkungen, z.B. in Lesen Sie alle Sicherheitshinweise und Flugzeugen oder Krankenhäusern, sind zu beachten. Anweisungen. Versäumnisse bei der Einhal- Datenschutzhinweis tung der Sicherheitshinweise und Anweisun- gen können elektrischen Schlag, Brand und/ Wird der Bordcomputer im Servicefall an den Bosch Service oder schwere Verletzungen verursachen. -
Seite 21: Konformitätserklärung
Bedienung Bosch Kiox Deutsch – 2 Technische Daten Betrieb Bordcomputer Kiox Vor der ersten Inbetriebnahme Produkt-Code BUI330 Kiox wird mit einem teilgeladenen Akku ausgeliefert. Vor Ladestrom USB-Anschluss 1000 dem ersten Gebrauch muss dieser Akku über den USB-An- max. schluss (siehe „Energieversorgung des Bordcomputers“, Ladespannung USB-An- Seite Deutsch –... -
Seite 22: Energieversorgung Des Bordcomputers
Bedienung Bosch Kiox Deutsch – 3 – Drücken Sie bei eingesetztem Bordcomputer die Ein-/ App und einer erfolgreichen GPS-Ortung auf dem Smart- Aus-Taste des eBike-Akkus (es sind Fahrradhersteller- phone Datum und Uhrzeit neu gesetzt. spezifische Lösungen möglich, bei denen kein Zugang zur Hinweis: Kiox wird nur im eingeschalteten Zustand geladen. -
Seite 23: Unterstützungslevel Einstellen
Bedienung Bosch Kiox Deutsch – 4 (mindestens 8 s) der Ein-/Aus-Taste (4) ein Rücksetzen. Die Funktion Schiebehilfe darf ausschließlich beim Nach dem Rücksetzen startet der Bordcomputer automa- Schieben des eBikes verwendet werden. Haben die Rä- tisch nach ca. 5 s neu. Sollte Kiox nicht neu starten, drücken der des eBikes beim Benutzen der Schiebehilfe keinen Sie die Ein-/Aus-Taste (4) für 2 s. - Seite 24 Bedienung Bosch Kiox Deutsch – 5 Software-Updates Drücken Sie 5 s auf die Taste (3). Der Bordcomputer akti- viert die Bluetooth®-Low-Energy-Verbindung automatisch Software-Updates werden im Hintergrund von der App auf und wechselt in den Pairing-Modus. den Bordcomputer übertragen, sobald die App mit dem Folgen Sie den Anweisungen auf dem Bildschirm.
-
Seite 25: Anzeigen Und Einstellungen Des Bordcomputers
Bedienung Bosch Kiox Deutsch – 6 Anzeigen und Einstellungen des Bordcomputers Hinweis: Alle Oberflächendarstellungen und Oberflächen- texte der folgenden Seiten entsprechen dem Freigabestand der Software. Nach einem Software-Update kann es sein, dass sich die Oberflächendarstellungen und/oder Oberflä- chentexte geringfügig verändern. Bedienlogik Mit den Tasten < (10) und > (8) können die verschiedenen Screens mit den Informationen der Fahrwerte auch während... -
Seite 26: Status-Screen
Bedienung Bosch Kiox Deutsch – 7 Vom ersten Start-Screen erreichen Sie den Status-Screen – <Systemeinst. (Systemeinstellungen)> – eine Liste über die Taste < (10). von Optionen zur Einstellung Ihres Bordcomputers: Sie können Geschwindigkeit und Entfernung in Kilome- Status-Screen tern oder Meilen, die Uhrzeit im 12-Stunden- oder im 24- Stunden-Format anzeigen lassen, die Uhrzeit, Datum und Auf dem Status-Screen wer- Zeitzone auswählen und Ihre bevorzugte Sprache einstel-... - Seite 27 Bedienung Bosch Kiox Deutsch – 8 Anzeige Fehlercode Abhängig von der Art des Fehlers wird der Antrieb gegebe- nenfalls automatisch abgeschaltet. Die Weiterfahrt ohne Un- Die Komponenten des eBike-Systems werden ständig auto- terstützung durch den Antrieb ist aber jederzeit möglich. Vor matisch überprüft.
- Seite 28 Bedienung Bosch Kiox Deutsch – 9 Code Ursache Abhilfe Konfigurationsfehler Starten Sie das System neu. Falls das Problem weiterhin besteht, kontaktieren Sie Ihren Bosch eBike-Händler. Temperaturfehler Das eBike befindet sich außerhalb des zulässigen Temperaturbe- reichs. Schalten Sie das eBike-System aus, um die Antriebseinheit entweder auf den zulässigen Temperaturbereich abkühlen oder aufwärmen zu lassen.
- Seite 29 Bedienung Bosch Kiox Deutsch – 10 Code Ursache Abhilfe unplausible Signale am Radgeschwindig- Kontaktieren Sie Ihren Bosch eBike-Händler. keits-Sensor Fehler an Leitung zum vorderen Radge- Kontaktieren Sie Ihren Bosch eBike-Händler. schwindigkeits-Sensor 821 ... 826 unplausible Signale am vorderen Radge- Starten Sie das System neu und führen Sie mindestens 2 Minuten schwindigkeits-Sensor lang eine Probefahrt durch.
-
Seite 30: Wartung Und Service
Bedienung Bosch Kiox Deutsch – 11 Wartung und Service Wartung und Reinigung Alle Komponenten dürfen nicht mit Druckwasser gereinigt werden. Halten Sie den Bildschirm Ihres Bordcomputers sauber. Bei Verschmutzungen kann es zu fehlerhafter Helligkeitserken- nung kommen. Verwenden Sie für die Reinigung Ihres Bordcomputers ein weiches, nur mit Wasser befeuchtetes Tuch. -
Seite 31: Bedienung Bosch Cx
Bedienung Bosch CX 4.1.2. Drive Unit CX 0 275 007 XD4 | (18.03.2020) Bosch eBike Systems... -
Seite 32: Datenschutzhinweis
Bedienung Bosch CX Deutsch – 1 Sicherheitshinweise ter Schiebehilfe darauf, dass Ihre Beine genügend Ab- stand zu den sich drehenden Pedalen haben. Es besteht Lesen Sie alle Sicherheitshinweise und Verletzungsgefahr. Anweisungen. Versäumnisse bei der Einhal- An Teilen des Antriebs können unter Extrem- tung der Sicherheitshinweise und Anweisun- bedingungen, wie z.B. -
Seite 33: Produkt- Und Leistungsbeschreibung
Bedienung Bosch CX Deutsch – 2 Produkt- und Abgebildete Komponenten Einzelne Darstellungen in dieser Betriebsanleitung können, Leistungsbeschreibung je nach Ausstattung Ihres eBikes, von den tatsächlichen Ge- gebenheiten geringfügig abweichen. Bestimmungsgemäßer Gebrauch Die Nummerierung der abgebildeten Komponenten bezieht Die Antriebseinheit ist ausschließlich zum Antrieb Ihres sich auf die Darstellungen auf den Grafikseiten zu Beginn der eBikes bestimmt und darf nicht für andere Zwecke verwen- Anleitung. -
Seite 34: Betrieb
Bedienung Bosch CX Deutsch – 3 fällt die Tachometeranzeige aus, und der eBike-Antrieb ar- erreicht haben, wird die Unterstützung durch den eBike-An- beitet im Notlaufprogramm. trieb abgeschaltet. Der Antrieb wird automatisch wieder ak- Lösen Sie in diesem Fall die Schraube des Speichenmagne- tiviert, sobald Sie in die Pedale treten und die Geschwindig- ten (3) und befestigen Sie den Speichenmagnet so an der keit unter 25/45 km/h liegt. - Seite 35 Bedienung Bosch CX Deutsch – 4 Unterstützungslevel Unterstützungsfaktor Performance Line Performance Line CX Cargo Line (BDU490P) (BDU450 CX) 60 % 60 % 60 % TOUR 140 % 140 % 140 % SPORT/eMTB 240 % 240/140...340 % 240 % TURBO 340 % 340 % 400 % Der Unterstützungsfaktor kann bei einzelnen Ausführungen abweichen.
- Seite 36 Bedienung Bosch CX Deutsch – 5 Entsorgung – Schaltverhalten, – Art der Reifen und Reifendruck, Antriebseinheit, Bordcomputer inkl. Bedienein- – Alter und Pflegezustand des Akkus, heit, Akku, Geschwindigkeitssensor, Zubehör – Streckenprofil (Steigungen) und -beschaffenheit (Fahr- und Verpackungen sollen einer umweltgerech- bahnbelag), ten Wiederverwertung zugeführt werden.
-
Seite 37: Bedienung Bosch Powertube
Bedienung Bosch PowerTube 4.1.3. PowerTube Akku ( ( 1 1 2 2 ) ) ( ( 1 1 3 3 ) ) ( ( 6 6 ) ) ( ( 1 1 6 6 ) ) ( ( 5 5 ) ) ( ( 1 1 4 4 ) ) ( ( 1 1 4 4 ) ) ( ( 1 1 5 5 ) ) - Seite 38 Bedienung Bosch PowerTube ( ( 1 1 4 4 ) ) ( ( 6 6 ) ) ( ( 5 5 ) ) ( ( 1 1 5 5 ) ) ( ( 1 1 5 5 ) ) ( ( 6 6 ) ) ( ( 5 5 ) ) ( ( 1 1 4 4 ) ) ( ( 1 1 5 5 ) )
- Seite 39 Bedienung Bosch PowerTube Deutsch – 1 Sicherheitshinweise Akkus dürfen keinen mechanischen Stößen ausge- setzt werden. Es besteht die Gefahr, dass der Akku be- Lesen Sie alle Sicherheits- schädigt wird. hinweise und Anweisun- Bei Beschädigung oder unsachgemäßem Gebrauch gen. Versäumnisse bei der des Akkus können Dämpfe austreten.
- Seite 40 Bedienung Bosch PowerTube Deutsch – 2 Alle Darstellungen von Fahrradteilen außer den Akkus und (7) Obere Halterung des Standard-Akkus ihren Halterungen sind schematisch und können bei Ihrem (8) Standard-Akku eBike abweichen. (9) Untere Halterung des Standard-Akkus Neben den hier dargestellten Funktionen kann es sein, dass (10) Abdeckkappe (Lieferung nur bei eBikes mit 2 Akkus) jederzeit Softwareänderungen zur Fehlerbehebung und Funktionsänderungen eingeführt werden.
- Seite 41 Bedienung Bosch PowerTube Deutsch – 3 Drücken Sie dazu die Ein-/Aus-Taste (4) zum Einschalten Öffnen Sie niemals vom Hersteller verschlossene La- des Akkus. Leuchtet keine LED der Ladezustandsanzeige (3) debuchsen. Das Laden an einer zuvor verschlossenen La- auf, dann ist der Akku möglicherweise beschädigt. debuchse kann zu irreparablen Schäden führen.
- Seite 42 Bedienung Bosch PowerTube Deutsch – 4 Ein-/Ausschalten Zum Einsetzen des Gepäckträger-Akkus (2) schieben Sie ihn mit den Kontakten voran in die Halterung (1) im Gepäck- Das Einschalten des Akkus ist eine der Möglichkeiten, das träger, bis er deutlich hörbar einrastet. eBike-System einzuschalten.
-
Seite 43: Transport
Bedienung Bosch PowerTube Deutsch – 5 Lagerungsbedingungen Transport Lagern Sie den Akku möglichst an einem trockenen, gut be- Wenn Sie Ihr eBike außerhalb Ihres Autos z.B. auf ei- lüfteten Platz. Schützen Sie ihn vor Feuchtigkeit und Wasser. nem Autogepäckträger mit sich führen, nehmen Sie Bei ungünstigen Witterungsbedingungen ist es z.B. -
Seite 44: B Edienung Bosch Ladegerät
B edienung Bosch Ladegerät 4.1.4. Ladegerät Standard Charger eBike Battery Charger 36-4/230 Standard Charger BCS220 0 275 007 907 Input: 230V 50Hz 1.5A Li-Ion Output: 36V Use ONLY with BOSCH Li-Ion batteries Made in PRC Robert Bosch GmbH, Reutlingen eBike Battery Charger 36-6/230 Fast Charger BCS250 0 275 007 918 Input: 230V... - Seite 45 Bedienung Bosch Ladegerät Deutsch – 1 Sicherheitshinweise Auf der Unterseite des Ladegerätes befindet sich ein Auf- kleber mit einem Hinweis in englischer Sprache (in der Lesen Sie alle Sicherheits- Darstellung auf der Grafikseite mit Nummer (4) gekenn- hinweise und Anweisun- zeichnet) und mit folgendem Inhalt: NUR mit BOSCH Li- gen.
- Seite 46 B edienung Bosch Ladegerät Deutsch – 2 Technische Daten Ladegerät Standard Charger Compact Charger Fast Charger (36–4/230) (36–2/100-230) (36–6/230) Produkt-Code BCS220 BCS230 BCS250 Nennspannung 207 … 264 90 … 264 207 … 264 Frequenz 47 … 63 47 … 63 47 … 63 Akku-Ladespannung Ladestrom (max.) 6 Ladezeit –...
- Seite 47 Bedienung Bosch Ladegerät Deutsch – 3 Während des Ladevorgangs leuchten die LEDs der Ladezu- Beim Trennen des Akkus vom Ladegerät wird der Akku auto- standsanzeige (9) am Akku. Jede dauerhaft leuchtende LED matisch abgeschaltet. entspricht etwa 20 % Kapazität Aufladung. Die blinkende Hinweis: Wenn Sie am Fahrrad geladen haben, verschließen LED zeigt die Aufladung der nächsten 20 % an.
-
Seite 48: Bedienung
Bedienung 4.2. Rohloff E-14 • Geschaltet wird über die beiden Tasten ne- ben dem rechten Lenkergriff. • Ein einzelner Druck schaltet einen Gang. • Ein längerer Druck schaltet 3 Gänge auf einmal. • Das Bosch eBike-System erkennt den Schaltvorgang und reduziert kurzzeitig die Motorunterstützung, so dass ein Schalten unter Last oder am Berg möglich ist. -
Seite 49: Bremsanlage
Bedienung knicken verdrehen nach hinten biegen umstülpen zusammenbinden als Bandschlüssel verwenden mit Zahnkranz aufziehen mit Hebel aufziehen 4.4. Bremsanlage Der linke Bremshebel wirkt auf die Vorderradbremse, der rechte Bremshebel auf die Hinterradbremse. Benutzen Sie beide Bremsen gleichzeitig für optimales Bremsen. Die Vorderradbremse hat eine stärkere Verzögerungswirkung als die Hin- terradbremse. -
Seite 50: Zug- Und Druckstufe An Den Federelementen
Bedienung Beim starken Betätigen der Vorderradbremse besteht Überschlagsgefahr: Ihr Hinterrad könnte sich anheben, so dass Sie über den Lenker stürzen. → Ziehen Sie den linken Bremshebel weniger stark oder geben Sie den Bremshebel frei, wenn Sie bemerken, dass das Hinterrad ansteigt. Die Bremsanlage verfügt über einen vollautomatischen Belagsausgleich. -
Seite 51: Sattelstütze
Bedienung An der Gabel können Sie das Verstellrad rechts auf der Gabelkrone in Richtung „+“ drehen, um die Druckstufe zu schließen. Die Zugstufenverstellung reguliert die Ausfede- rungsgeschwindigkeit des Federelements und befindet sich an der Gabel am rechten Tauch- rohr unten (rot markiert). Es gilt: Drehen in Richtung des Hasen erhöht die Aus- federgeschwindigkeit, Drehen in Richtung der Schildkröte senkt die Ausfedergeschwindigkeit. -
Seite 52: Ergonomieeinstellung
Beachten Sie bitte vor jeder Instandhaltungsmaßnahme die nachfolgenden Informationen. Die Instandhaltung setzt technische Fähigkeiten voraus. Sie sind selbst ver- antwortlich für die korrekte Durchführung der Instandhaltung. → Sollten Sie sich die Arbeiten nicht zutrauen, geben Sie das Rad bei ei- nem HNF-NICOLAI Händler zur Wartung ab. -
Seite 53: Liste Der Verschleißteile
Instandhaltung Verletzungsgefahr bei Wartungen am eingeschaltetem Antriebssystem! Ihre Hände können bei laufendem Antrieb zwischen Riemen und Rie- menscheiben geraten. → Entnehmen Sie vor jeder Instandhaltungsmaßnahme die Akkus. So ist die Ruhestellung des Antriebsystems sichergestellt. Bei Wartungsarbeiten besteht ein Klemm- und Quetschrisiko. Ihre Finger könnten zwischen sich bewegende Teile geraten. -
Seite 54: Nach Einem Unfall/Sturz
Durch einen Unfall/Sturz können tragende Teile Ihres Pedelec so beschä- digt werden, dass Bruchgefahr besteht. → Suchen Sie nach einem Unfall eine HNF-NICOLAI Händler auf, um be- schädigte Teile wie Rahmen, Gabel, Lenker, Vorbau, Sattelstütze, Tretkur- bel und Pedale überprüfen und ggf. austauschen zu lassen. -
Seite 55: Reifen
Instandhaltung Während der Lagerung/Nichtnutzung sind folgende Faktoren relevant für die Lebensdauer: • Lagerungstemperatur. Optimal: 0-20 °C. Temperaturen über 30 °C bzw. das Abstellen des Bikes mit Akku in der prallen Sonne reduzieren die Lebensdauer des Akkus. • Ladezustand. Optimaler Ladezustand: 30-60% (=2-3 LEDs) Lagerung in vollem oder leerem Zustand reduzieren die Lebensdauer. -
Seite 56: Hinterrad Ausbauen
Instandhaltung • Öffnen Sie den Schnellspanner an der Steck- achse durch Umlegen des Hebels. • Drehen Sie den Schnellspannhebel gegen den Uhrzeigersinn, bis sich die Steckachse aus der Nabe ziehen lässt. • Entnehmen Sie das Vorderrad und schieben Sie die Transportsicherung zwischen die Bremsbeläge. -
Seite 57: Reifen/Schlauch Wechseln
Instandhaltung 6.6.3. Reifen/Schlauch wechseln • Schrauben Sie Ventilkappe und große Rändelmutter vom Ventil ab. • Lassen Sie die Luft durch Druck auf den Ventilstift in der Mitte des Ventils ab. • Lösen Sie mit Reifenhebern den Reifen auf einer Seite von der Felge. Verwenden Sie ggf. -
Seite 58: Bremsen
Wir zeigen Ihnen im folgenden einige Schritte zur Prüfung von Belag- und Brems- scheibenverschleiß. Für alle weiteren Arbeiten am Bremssystem gilt: Die Wartung des Hydrauliksystems, z.B. bei Undichtigkeit oder schwan- kendem Druckpunkt setzt fundierte technische Fähigkeiten voraus. → Kontaktieren Sie in diesem Fall einen HNF-NICOLAI Händler. -
Seite 59: Verschleiß Von Bremsbelägen Und -Scheiben
Instandhaltung 6.7.1. Verschleiß von Bremsbelägen und -scheiben Bremsbeläge und Bremsscheiben unterliegen funktionsbedingtem Verschleiß, der durch Reibung der beiden Teile gegeneinander entsteht. Der Verschleiß hängt von Fahrstil, Gelände, Wetter und Untergrundbedingungen ab, so dass sich keine ver- bindliche Angabe des notwendigen Wechselzeitpunkts machen lässt. Bremsscheiben müssen erst nach ca. 4 bis 5 gewechselten Bremsbelagspaaren ge- tauscht werden, da sie aus härterem Material bestehen. -
Seite 60: Reinigung Und Pflege
Die Akkus stellen ein Risiko für andere Verkehrsteilnehmer dar. → Bauen Sie die Akkus, aus sowie nicht fest verschraubte Zubehörteile Ihres XF3 Adventure ab, bevor Sie es auf dem Heck- oder Dachgepäckträ- ger eines Autos transportieren. Wenn Sie das XF3 Adventure bei Regen und hohen Geschwindigkeiten am oder auf dem Auto transportieren, kann Wasser in den Bosch-Motor, die Akkus, die Rohloff-Nabe und das Display gelangen. -
Seite 61: Technische Daten
Technische Daten Technische Daten 9.1. Komponentenliste Rahmen HNF-Nicolai XF3 Adventure Chassis Gabel RockShox Lyrik Select+ 160mm, SA, Boost 15*110, 29“ Dämpfer Cane Creek DBCOIL-IL - 210/55 - FACTORY TUNE Motor Performance Line CX Bosch Antriebs- Batterien PowerTube 500Wh vertikal + 625Wh horizontal... -
Seite 62: Gewichte
Technische Daten 9.2. Gewichte Leergewicht inkl. Akkus (abhängig von Rahmengröße) 33,4 ± 0,3 kg Gewicht PowerTube 625 ca. 3,5 kg Gewicht PowerTube 500 ca. 3 kg Zulässiges Fahrergewicht (Fahrer+Bekleidung+Rucksack) 115 kg Zulässiges Gesamtgewicht 150 kg 9.3. Anzugsdrehmoment der Schrauben Teil Kommentar M /Nm Bosch Bedieneinheit / Display an Lenker unkritisch - leicht anziehen Bremsbelag-Sicherungsschraube... -
Seite 63: Garantie / Sachmängelhaftung
Garantie / Sachmängelhaftung Garantie / Sachmängelhaftung Es gilt die gesetzliche Sachmängelhaftung von 2 Jahren. Für die Inanspruchnahme der Sachmängelhaftung sind die Originalrechnung vorzulegen und wenn möglich durchgeführte Inspektionen nachzuweisen. Sie haben Anspruch auf die Gewährleistung unter folgenden Voraussetzungen: • Es liegt ein Herstellungs-, Material- oder Informationsfehler vor. •... -
Seite 64: Entsorgung
Entsorgung Entsorgung Dieses Symbol auf Ihrem Pedelec weist darauf hin, dass das Produkt gemäß WEEE-Richtlinie (2012/19/EU), Batterie-Richt- linie (2006/66/EG) und nationalen Gesetzen zur Umsetzung dieser Richtlinien nicht über den Hausmüll entsorgt werden darf. Bitte führen Sie das Pedelec am Ende seiner Lebensdauer einer örtlichen Sammel- stelle zu. -
Seite 65: Eg-Konformitätserklärung
HNF GmbH Bahnhofstraße 14 16359 Biesenthal Wir, die HNF GmbH, erklären, dass die Maschine HNF-NICOLAI XF3 Adventure in der Ausführung als Pedelec allen einschlägigen Bestimmungen der Maschinenrichtlinie 2006/42/EG entspricht. Weiterhin entspricht die Maschine den folgenden Richtlinien: Richtlinie der elektromagnetischen Verträglichkeit 2014/30/EU •... - Seite 66 Notizen...
- Seite 67 XF3 Adventure Manual...
- Seite 68 Table of contents Your vehicle 1.1. Intended use 1.2. Vehicle overview 1.3. Scope of delivery Comissioning 2.1. Mounting the pedals 2.2. Straighten the stem 2.3. Adjusting the saddle height 2.4. Suspension fork setup 2.5. Charging built-in batteries 2.6. Removing/inserting the batteries 2.7. Switching the drive on/off 2.8. Adjust support levels 2.9. Push assistance 2.10. Bedding-in brakes Before every ride 3.1.
- Seite 69 Ergonomic setting 5.1. Adjusting the horizontal saddle positi on and tilt 5.2. Adjusting the brake lever distance Maintenance 6.1. List of wear parts 6.2. Recommended maintenance intervals 6.3. After an accident/fall 6.4. Batteries 6.5. Tyres 6.6. Changing a tyre/tube change 6.6.1. Removing the front wheel 6.6.2. Removing the rear wheel 6.6.3. Change tyre/tube 6.6.4. Fitting the front wheel 6.6.5. Fitting the rear wheel 6.7. Brakes 6.7.1. Wear of brake pads and discs 6.7.2. Checking the brake pads 6.7.3. Checking the thickness of the brake discs Cleaning Transport on the car Technical data 9.1.
- Seite 70 Contents and symbols used in this operating instructions This instruction manual contains important information that will increase your safety, enable a long service life of the vehicle and increase the fun of driving your HNF-NICOLAI. Failure to observe the contents of the operating instructions may result in damage to the vehicle and injury. The following symbols are used in the operating instructions: Watch out! The symbol indicates a possible danger. Observe the safety relevant instructions! Information Here you will find useful information on how to use the product. Important information! The operating instructions of your HNF-NICOLAI are continuously checked to ensure that they are up to date. These instructions reflect the state of knowledge at the time of printing. We therefore recommend that you visit our website www.hnf-nicolai.com/handbuecher to find out about any chan- ges. There you will also find the current manual as a PDF download.
-
Seite 71: Your Vehicle
Your vehicle Your vehicle We are pleased that you have chosen a HNF-NICOLAI eBike. The pedelec is legally equal to the bicycle in Europe. The XF3 Adventure supports the rider with an electric motor. The adjustment of the assistance is done by a control unit which evaluates data from three sensors (speed, cadence, torque) and regulates the motor according to the selected degree of assistance. When a speed of 25 km/h is reached, the electric motor switches off. However, you can ride faster than 25 km/h under your own power without electric motor assistance. The XF3 Adventure has two batteries that are alternately discharged during the ride. You can also use the bike with only one battery installed. For your own safety we recommend that you always wear a suitable helmet and goggles for protection Increasing the maximum support speed (= tuning) to more than 25 km/h on your XF3 Adventure turns the vehicle into a moped. There are serious consequences in case of a vehicle inspection or an accident, as it has become a vehicle without operating license and insurance! 1.1. Intended use The XF3 Adventure is designed to transport one person on paved and unpaved roads and trails. The permissible rider weight (including clothing and equipment) is 115 kg. The luggage carrier has a load capacity of 25 kg. When riding on uneven terrain, you should not use this load capacity, since the carrier is unsprung. - Seite 72 Your vehicle The XF3 Adventure is not designed for the following: • Race/competition use • Cleaning with a jet of water • Transport on the outside of a car in the rain without covering the motor and removing the batteries • Charging the vehicle outdoors in wet conditions The intended use is further limited by: • The safety instructions in this manual • The “Technical specifications” chapter in this manual • The country-specific regulations for road traffic Use of the vehicle is not recommended for the following groups: • People with limited physical, sensory or mental capabilities • People who cannot operate the vehicle safely due to their height Rotating parts, such as wheels, pulleys, cranks or pedals, can pull in clothing and stowed items. This can cause serious accidents! → Always wear tight-fitting clothing.
-
Seite 73: Vehicle Overview
Your vehicle 1.2. Vehicle overview 1 Rohloff Hub gear 2 Bosch drive unit 3 BatteryCharging socket 4 Bosch PowerTube battery top tube 5 Bosch PowerTube battery down tube 6 Frame number (on the left) 7 Bosch Kiox display 1.3. Scope of delivery • Bosch charger • 4 identical keys to secure the batteries to the pedelec • 2 transport locks for Magura disc brakes • Operating manuals of some component manufacturers • Bosch-dangerous goods carton for battery shipping • 4 spoke reflectors... -
Seite 74: Comissioning
Commissioning Comissioning In this chapter you will learn how to get your XF3 Adventure ready to ride. First you should inflate the tires. The recommended air pressure can be found in section 3.1. 2.1. Mounting the pedals The right pedal has a right-hand thread and the left pedal has a left-hand thread on the pedal axle. The right pedal is screwed clockwise and the left pedal is screwed anticlockwise. For installation, proceed as follows: • Grease the thread of the pedal axle and the crank sparingly. •... -
Seite 75: Adjusting The Saddle Height
Comissioning 2.3. Adjusting the saddle height The right saddle height ensures that your power is efficiently converted into for- ward movement: With vertical crank arms, your leg should be almost straight. To check the saddle height, lean against a wall while sitting on your pedelec, for example. To adjust the saddle height, first fully extend the seat post using the lever on the left-hand side of the handlebars. Then loosen the clamp on the seat tube with an Allen key so that you can change the insertion depth of the seat post. Tighten the clamp on the seat tube with 6-8 Nm. If the seat post is not inserted deep enough into the seat tube, the seat tube can be damaged and break. → Only pull the seat post out of the frame up to the distance mentioned below: Frame size distance /cm 2.4. -
Seite 76: Charging Built-In Batteries
Comissioning Measure the SAG at the fork as follows: • Push back the rubber ring on the fork • Sit on the XF3 Adventure in riding position and read the SAG on the fork. There you will find a % scale. If necessary change the air pressure at the fork until the SAG is within the indicated range. A recommended air pressure can be found in the table on the left stand tube (+10 psi) for E-MTB. • Unscrew the cover cap on the top left of the fork crown. • Screw on a shock absorber or suspension fork pump and read the existing pressure. • Increase or decrease the pressure to the pressure determined for you. • Check the SAG again. 2.5. Charging built-in batteries The batteries can be charged in the installed sta- te via the charging socket above the motor. To do this, remove the rubber cover on the left- hand side from the charging socket. Insert the charging cable into the charging socket. -
Seite 77: Switching The Drive On/Off
Comissioning Remove the top tube battery: • Turn the key in the battery lock clockwise. The battery becomes unlocked. • If necessary, pull the battery upwards by the upper rubber lip, it will now be stopped by the retaining device. • Press the clip of the retention device (marked red) with one finger and remove the battery. Remove the down tube battery: • Unlock the down tube battery with the key. • Press on the retaining device and remove the battery. -
Seite 78: Adjust Support Levels
Comissioning 2.8. Adjust support levels To increase the support level, press the „+“ key until the desired support level appears in the display. To reduce the support level press the „-“ key. 2.9. Push assistance The pushing assistance is located above the „+“ button and supports you when pushing the pedelec at a maximum speed of 6 km/h (in the highest gear). The speed of the pushing aid depends on the selected gear. -
Seite 79: Before Every Ride
Before every ride Before every ride 3.1. Checking the tyres The correct air pressure in the tyre is crucial for traction! We recommend as a starting value: rider weight /kg air pressure front wheel /bar air pressure rear wheel /bar 75 kg 1,3 bar 1,5 bar 110 kg 1,8 bar 2,0 bar Get a pump with pressure gauge and vary the air pressure unti l you are satisfied with the traction and rolling resistance. The advantages of the 27.5+ tyres, namely extremely high grip and good shock absorption, can only be fully exploited with low pressure. As a general rule: • High air pressure leads to low rolling resistance on the road. • Lower air pressure greatly increases the traction and slightly increases the rolling resistance. Too low air pressure can lead to the following: • Spongy/unstable handling in curves • Snakebites. Consequence: “flats”, damage to rim. → If you notice any of these symptoms, increase the tyre pressure! A tyre damaged by cracks or foreign objects may lose its pressure. There is a risk of accident! → Check for cracks or foreign objects in the tyre. We recommend that you check the pressure regularly, as bike inner tubes continuously and inevitably lose air. 3.2. Checking the brake system •... -
Seite 80: Checking The Belt
→ Remove them. • Is the belt heavily soiled? → Rinse it clean with water. 3.4. Batteries: checking the attachment Check whether the batteries are firmly in place in the locks. 3.5. Check suspension fork and damper Check the suspension fork and rear shock before every ride for: • Cracks and deformations / Oil leaks → If there are any cracks/deformations or oil leaks, please contact the HNF-NICOLAI Service or visit a bicycle repair shop for diagnosis. • Dirt on the stanchion tubes of the fork or the rear shock piston → If the stanchion tubes of the fork are dirty, wipe them clean with a rag. 3.6. Checking the screw fittings Before each journey, check that front an rear axle are tightened securely and that the following parts do not twist: Seat post, Handlebars, Stem. Lift the vehicle and let it fall to the ground on the tyres. Check if you can see or hear any loose parts. If necessary, check where the loose parts are and ensure they are tightened to the correct tightening torque. 3.7. Checking the lighting Check that the lighting is working before every ride. Make sure that the headlamp is... -
Seite 81: Use
Bosch Kiox 4.1. Bosch drive system 4.1.1. Kiox on-board computer (17) 1 270 020 XBK | (17.03.2020) Bosch eBike Systems... - Seite 82 Bosch Kiox (12) (10) (11) (13) (19) (18) (15) (14) (16) Bosch eBike Systems 1 270 020 XBK | (17.03.2020)
-
Seite 83: Safety Instructions
Bosch Kiox English – 1 Safety instructions Product description and specifications Read all the safety information and in- structions. Failure to observe the safety in- Intended use formation and follow instructions may result in electric shock, fire and/or serious injury. The Kiox on-board computer is designed to control Bosch eBike systems and display riding data. -
Seite 84: Declaration Of Conformity
Bosch Kiox English – 2 Technical data Operation On-board computer Kiox Before initial commissioning Product code BUI330 The Kiox is supplied with a partially charged battery. Before Max. charging current of USB 1000 using it for the first time, this battery must be charged for at port least one hour via the USB port (see "Power supply of the on- USB port charging voltage... -
Seite 85: Battery Charge Indicator
Bosch Kiox English – 3 – With the on-board computer inserted, push the on/off the smartphone has successfully identified the current loca- button on the eBike battery (bicycle manufacturer-spe- tion via GPS. cific solutions are possible when there is no access to the Note: The Kiox only charges while it is switched on. - Seite 86 Bosch Kiox English – 4 after approx. 5 seconds. If the Kiox does not restart, press Note: The push assistance cannot be activated at assistance the on/off button (4) for 2 seconds. level OFF. To reset the Kiox to its factory settings, select <Settings> → The push assistance is switched off as soon as one of the <Sys settings> →...
-
Seite 87: Activity Tracking
Bosch Kiox English – 5 Activity tracking Charging requires the on-board computer to be mounted and a sufficiently charged battery to be inserted in the eBike. In order to record activities, you must be registered with and Open the protective cap (17) for the USB port on the on- logged into the eBike Connect portal or the eBike Connect board computer. -
Seite 88: Operating Logic
Bosch Kiox English – 6 Displays and settings of the on- board computer Please note: All screenshots showing the display and text on the following pages are from the approved software ver- sion. The display and/or text may change slightly following a software update. - Seite 89 Bosch Kiox English – 7 Status screen – <Sys settings> – A list of setting options for your on- board computer As well as the status bar, the You can display the speed and distance in kilometres or status page also shows you miles, display the clock in 12- or 24-hour format, adjust the current time and the state the time, date and time zone and select your preferred...
- Seite 90 Bosch Kiox English – 8 Error code display will always be able to do so without assistance from the drive. Before undertaking any other journeys, the eBike The eBike system's components are continuously and auto- should be checked. matically monitored. If an error is detected, the correspond- Have all repairs performed only by an authorised bike ing error code is displayed on the on-board computer.
- Seite 91 Bosch Kiox English – 9 Code Cause Corrective measures Temperature error The eBike is outside of the permissible temperature range. Switch off the eBike system and allow the drive unit to either cool down or heat up to the permissible temperature range. Restart the system. If the problem persists, contact your Bosch eBike dealer.
- Seite 92 Bosch Kiox English – 10 Code Cause Corrective measures situation, e.g. riding solely on the rear wheel Fault in the wire to the rear wheel speed Contact your Bosch eBike dealer. sensor Implausible signals from the rear wheel Restart the system and carry out a test ride lasting at least two 833 to 835 speed sensor minutes.
-
Seite 93: Maintenance And Servicing
Bosch Kiox English – 11 Maintenance and servicing Maintenance and cleaning Do not clean any of the components with pressurised water. Keep the screen of your on-board computer clean. Dirt can cause faulty brightness detection. Clean your on-board computer using a soft cloth dampened only with water. -
Seite 94: Drive Unit Cx
Bosch Performance CX 4.1.2. Drive Unit CX 0 275 007 XD4 | (18.03.2020) Bosch eBike Systems... - Seite 95 Bosch Performance CX English – 1 Safety instructions low speed when riding up hills or transport- ing loads. Read all the safety information and in- After a ride, do not allow your unprotected hands or structions. Failure to observe the safety in- legs to come into contact with the housing of the drive formation and follow instructions may result unit.
-
Seite 96: Product Description And Specifications
Bosch Performance CX English – 2 Product description and The numbering of the components shown refers to the illus- trations on the graphics pages at the beginning of the specifications manual. (1) Drive unit Intended use (2) Speed sensor The drive unit is intended exclusively for driving your eBike (3) Speed sensor spoke magnet and must not be used for any other purpose. - Seite 97 Bosch Performance CX English – 3 Speedsensor (slim) The following options are available for switching off the eBike system: The speedsensor (slim) (4) and its magnet (5) must be – Press the on/off button of the on-board computer. mounted in such a manner that the magnet, after a turn of –...
- Seite 98 Bosch Performance CX English – 4 Assistance level Assistance factor Performance Line Performance Line CX Cargo Line (BDU490P) (BDU450 CX) 60 % 60 % 60 % 140 % 140 % 140 % TOUR SPORT/eMTB 240 % 240/140...340 % 240 % TURBO 340 % 340 % 400 % The assistance factor may vary in some models.
- Seite 99 Bosch Performance CX English – 5 For this reason, it is not possible to predict the range accur- separately and recycled in an environmentally ately before and during a trip. However, as a general rule: friendly manner. – With the same assistance level on the eBike drive: The Please return Bosch eBike components that are no longer less energy you need to exert in order to reach a certain usable to an authorised bicycle dealer.
-
Seite 100: Powertube Akku
Bosch PowerTube 4.1.3. PowerTube Akku ( ( 1 1 2 2 ) ) ( ( 1 1 3 3 ) ) ( ( 6 6 ) ) ( ( 1 1 6 6 ) ) ( ( 5 5 ) ) ( ( 1 1 4 4 ) ) ( ( 1 1 4 4 ) ) ( ( 1 1 5 5 ) ) - Seite 101 Bosch PowerTube ( ( 1 1 4 4 ) ) ( ( 6 6 ) ) ( ( 5 5 ) ) ( ( 1 1 5 5 ) ) ( ( 1 1 5 5 ) ) ( ( 6 6 ) ) ( ( 5 5 ) ) ( ( 1 1 4 4 ) ) ( ( 1 1 5 5 ) )
- Seite 102 Bosch PowerTube English – 1 Safety instructions ence any adverse effects. The fumes may irritate the respiratory system. Read all the safety and Only charge the battery using original Bosch chargers. general instructions. Fail- When using chargers that are not made by Bosch, the risk ure to observe the safety of fire cannot be excluded.
- Seite 103 Bosch PowerTube English – 2 In addition to the functions shown here, changes to software (8) Standard battery relating to troubleshooting and functional modifications may (9) Lower standard battery holder be introduced at any time. (10) Cover (supplied only on eBikes with two battery (1) Rack-mounted battery holder packs) (2) Rack-mounted battery...
- Seite 104 Bosch PowerTube English – 3 If at least one (but not all) of the LEDs on the battery charge If you want to use an eBike that is designed for two batteries indicator (3) lights up, the battery will need to be fully with only one battery, cover the contacts of the unused socket using the cover (10) provided.
- Seite 105 Bosch PowerTube English – 4 from being removed by unauthorised third parties when the Whether the eBike system is switched on is only visible on eBike is not in use. the on-board computer. To remove the rack-mounted battery (2), switch it off and To switch off the battery, press the on/off button (4) again.
- Seite 106 Bosch PowerTube English – 5 Store the batteries at temperatures between 10 °C Do not ship batteries if the housing is damaged or the re- chargeable battery is not fully functional. Use only the ori- and 20 °C. Never store them at temperatures below –10 °C ginal Bosch packaging for transport.
-
Seite 107: Charger
Bosch Charger 4.1.4. Charger Standard Charger eBike Battery Charger 36-4/230 Standard Charger BCS220 0 275 007 907 Input: 230V 50Hz 1.5A Li-Ion Output: 36V Use ONLY with BOSCH Li-Ion batteries Made in PRC Robert Bosch GmbH, Reutlingen eBike Battery Charger 36-6/230 Fast Charger BCS250 0 275 007 918 Input: 230V... - Seite 108 Bosch Charger English – 1 Safety instructions Product description and specifications Read all the safety and general instructions. Fail- Intended Use ure to observe the safety and general instructions In addition to the functions shown here, changes to software may result in electric shock, relating to troubleshooting and functional modifications may fire and/or serious injury.
- Seite 109 Bosch Charger English – 2 Technical data Charger Standard charger Compact charger Fast charger (36–4/230) (36–2/100-230) (36–6/230) Product code BCS220 BCS230 BCS250 Rated voltage 207 to 264 90 to 264 207 to 264 Frequency 47 to 63 47 to 63 47 to 63 Battery charging voltage Charging current (max.) Charging time – PowerPack 300, approx. –...
- Seite 110 Bosch Charger English – 3 proximately 20 % of the charging capacity. The flashing LED When the battery is disconnected from the charger, the bat- indicates the next 20 % currently charging. tery is automatically switched off. Once the eBike battery is fully charged, the LEDs go out im- Note: If you have charged the battery on the bike, carefully mediately and the on-board computer is switched off.
-
Seite 111: Rohloff E
4.2. Rohloff E-14 • The two buttons next to the right handlebar grip are used to change gears. • A single press shifts one gear. • A longer press shifts 3 gears at once. • The Bosch eBike system detects the gear change and briefly reduces the engine assistance, so that gear changes are possible under load or up a hill. If the pedelec is brought to a standstill from a speed of more than 10 km/h, the system can automatically switch back to a set „starting gear“. This can be set as follows: • Switch on the system • Navigate in the Kiox menu as follows: → Settings → my eBike → eShift → Starting gear ...and then set the starting gear there. Due to the construction of the Rohloff hub, a freewheeling noise can be heard in some gears. In gears 5, 6 and 7 the noise is most clearly audible. If the pedalling force or cadence is high, a buzzing noise typical of precis- ion gears with straight teeth can be heard in gears 1 to 7 (getting louder). In the course of the first 1,000 km the Rohloff hub retracts and the riding noises become quieter as well as the gear changes softer. 4.3. Gates Carbon Drive system On delivery, the belt is optimally tensioned and does not need to be retensioned even after long use of the drive. Correctly installed, the belt is extremely resilient in the direction of tension. The carbon fibres embedded in the belt are very flexible, but react sensitively to subsequent mishandling:... -
Seite 112: Brake System
bending twisting bending backwards turn inside out bind together use as strap spanner mount with sprocket pull on with lever 4.4. Brake system The left brake lever acts on the front brake, the right brake lever on the rear brake. Use both brakes simultaneously for optimum braking. -
Seite 113: Rebound And Compression Adjustment Of Suspension
The front brake has a stronger retarding effect than the rear brake. Practice the targeted use of the front brake to familiarise yourself with its power. If you apply the front brake strongly, there is a risk of rollover: your rear wheel could lift up, causing you to fall over the handlebars. → Pull the left brake lever less strongly or release the brake lever if you notice that the rear wheel rises. -
Seite 114: Seat Post
At the fork you can turn the adjustment wheel on the right side of the fork crown in direction „+“ to close the compression stage. The rebound adjuster regulates the re- bound speed of the spring element and is located on the fork at the bottom of the right dip tube (marked red). It applies: Turning towards the hare increases the rebound speed, turning towards the turtle decreases the rebound speed. For rebound adjustment of the shock please refer to the enclosed manual. 4.6. -
Seite 115: Ergonomic Setting
„knee plumb line“ by dropping a string with a weight from the front of your knee down. The knee plumb bob should fall through the pedal axle or in front of it. Sit on the pedelec in the position shown with the crank arms horizontal and let a second per- son determine the knee plumb line. The upper side of the saddle should be aligned horizontally slightly tilted forward. To adjust the saddle position and inclination, loosen the two screws of the saddle clamp, which are located under the head of the seat post. Adjust the horizontal saddle position and inclination and then tighten the two bolts evenly with 7 Nm. 5.2. Adjusting the brake lever distance You can adjust the distance between the brake levers and the handlebars with a Torx-25 key on the screw marked red. Maintenance To keep the pedelec functional and safe, it must be regularly maintained. Please note the following information before each maintenance measure. Maintenance requires technical skills. You yourself are responsible for the correct execution of the maintenance. → If you do not feel confident enough to do the work, return the bike to an HNF-NICOLAI dealer for maintenance. The frame does not offer any intended possibilities for geometry adjust- ment. → Do not adjust the ET-Key (eccentric component behind the shock absorber) and do not adjust the ratchet of the strut! -
Seite 116: List Of Wear Parts
Maintenance Risk of injury during maintenance work on the drive system when it is switched on! Your hands can get between the belt and the pulleys when the drive is running. → Remove the batteries before every maintenance measure. This ensu- res that the drive system is in the rest position. There is a risk of jamming and crushing during maintenance work. Your fingers could get caught between moving parts. → Take care of your hands and work carefully. 6.1. List of wear parts The following parts on your pedelec are subject to functional wear. This wear is not covered by the warranty. • Battery • Tyres and tubes • brake pads, brake discs • Belts and pulleys • Rubber seals and rings (e.g. in suspension fork and shock absorber) • All moving parts (e.g. bearings) • Hydraulic oil and lubricants • Handlebar grips • Painting and all surfaces • Parts of the Rohloff hub (see enclosed orange slip of paper) Detailed explanations of the wear of some parts are given in the following sec- tions. For most parts it is true that they wear out due to friction. 6.2. Recommended maintenance intervals The need for maintenance of your pedelec depends on its use and therefore can- not be stated precisely. You should have your pedelec serviced at least once a year. -
Seite 117: After An Accident/Fall
If parts of the drive system (display, cables, motor, battery) are vi- sibly damaged by an accident/fall, there is a risk of electric shock. → In this case, remove the batteries immediately. Have the drive system checked by a Bosch eBike Expert dealer or HNF-NICOLAI dealer. An accident/fall can damage load-bearing parts of your pe- delec to such an extent that there is a risk of breakage. -
Seite 118: Tyres
Maintenance To achieve the maximum life of the trip computer battery, the trip com- puter battery should be recharged for one hour every three months. 6.5. Tyres The tyres are subject to unavoidable wear due to friction. You can reduce tread wear if you avoid blocking the tyres during braking. You must replace your tyres when the rubber tread is worn so much that the mesh underneath becomes visible, or when the tyres have become porous due to ageing and frequent exposure to sunlight. 6.6. Changing a tyre/tube change This section explains how to remove and install the wheels and change tyres or inner tubes. 6.6.1. Removing the front wheel The wheels can be removed more easily if you hang the pedelec in a maintenance stand or place it on the saddle and handlebars. Remove the batteries and display before placing the bike on the saddle and handlebars! Hydraulic disc brakes must not be operated with the wheel re-... -
Seite 119: Removing The Rear Wheel
Maintenance 6.6.2. Removing the rear wheel • Turn off the Bosch eBike System. • Pull the belt tensioner back by hand so that you can insert an Allen key in the place shown to lock it. • Open the plug connection behind the E14 box by pulling both socket and plug apart. • If necessary, undo existing cable ties so that you can remove the rear wheel. Danger of cable / plug defects on Rohloff E14 due to incorrect operation! → Only pull the socket and plug, never the cable. → Pull the plug and socket apart in a straight line without twisting or ben- ding them. • Open the quick release. • Pull the rear wheel out downwards. • Remove the belt from the rear pulley without twisting it. • Slide the transport lock between the brake pads. 6.6.3. Change tyre/tube • Unscrew the valve cap and large knurled nut from the valve. • Release the air by pressing on the valve pin in the middle of the valve. • Use tyre levers to remove the tyre from the rim on one side. If necessary, use detergent and water to make the tyre easier to lift off. -
Seite 120: Fitting The Front Wheel
Maintenance • Use tyre levers to lift the other side of the tyre onto the rim. • Screw the knurled nut onto the valve until it touches the rim. • Inflate the inner tube with 3 bar so that the tyre sits evenly on the rim. A „pop- ping“ sound is normal. • Then reduce the pressure to the desired level (see section 3.1.). • Screw the valve cap onto the valve. 6.6.4. Fitting the front wheel • Remove (if inserted) the transport lock between the brake pads. • Carefully thread the front wheel into the fork. Make sure that the brake disc slides between the brake pads. • Push the removable axle into the fork and hub. • Tighten the axle clockwise with the quick release lever. At the end, fold the tension lever down. Risk of accident if the quick-release axle in the front wheel is not tighte- ned firmly. → Always tighten the quick-release firmly enough so that the tension lever leaves a force-related imprint in the palm of your hand when you fold it up. 6.6.5. Fitting the rear wheel Hold the rear wheel near the dropouts and carefully lift the belt onto the rear pulley. • Turn the hub so that the Rohloff support block is in alignment with the opening of the dropouts. -
Seite 121: Brakes
• The marked arrows must be aligned. • Turn the plug and socket slightly back and forth in front of each other without apply- ing much pressure until the plug connec- tion engages. • Push the plug connection into each other as far as it will go. • Use cable ties if necessary to avoid contact of the E14 cable with the rear wheel. 6.7. Brakes In the following we will show you some steps to check pad and brake disc wear. The following applies to all further work on the brake system: The maintenance of the hydraulic system, e.g. in case of leakage or fluc- tuating pressure point, requires sound technical skills. → In this case contact an HNF-NICOLAI dealer. 6.7.1. Wear of brake pads and discs Brake pads and brake discs are subject to functional wear, which is caused by fric- tion between the two parts. The wear depends on driving style, terrain, weather and underground conditions, so that no binding indication of the necessary repla- cement time can be given. Brake discs only need to be replaced after approx. 4 to 5 changed pairs of brake pads, as they are made of harder material. A regular check of the brake pads is recommended every 500 km. -
Seite 122: Checking The Brake Pads
Maintenance / Cleaning 6.7.2. Checking the brake pads The brake pads must be replaced if they • are less than 2.5 mm thick (height of carrier plate and friction lining) • have come into contact with oil (leads to low braking power) For checking: • Pull one brake lever firmly towards the hand- lebars. • Then insert the back of the transport lock bet- ween the carrier plates of the corresponding brake caliper. • If the transport lock fits between the brake pads, they are not worn out. • Alternatively you can put the removed brake pads into the small notch in the transport lock. The pads are worn out if they fit into the notch. 6.7.3. Checking the thickness of the brake discs The brake discs should be replaced if they are less than 1.8 mm thick. You can de- termine the thickness with the caliper gauge. -
Seite 123: Transport On The Car
Transport on the car Transport on the car The batteries pose a risk to other road users. → Remove the batteries and any accessories that are not firmly screwed to your XF3 Adventure before transporting it on the rear or roof rack of a car. If you transport the XF3 Adventure in the rain and at high speeds behind or on top of the car, water can get into the Bosch engine, batteries, Roh- loff hub and display. → Remove the batteries and the display. → Use a protective cover that covers the motor and hub. The weight of the pedelec places increased demands on a car rear or roof rack. Unsuitable bike racks can break while riding or not reliably secure your pedelec! → Check the permitted loads in the car and bicycle carrier instructions. Li-Ion batteries are classified as dangerous goods. Private users can transport the battery on the road without restrictions. -
Seite 124: Technical Data
Technical data Technical data 9.1. List of components Frame HNF-Nicolai XF3 Adventure Chassis Fork RockShox Lyrik Select+ 160mm, SA, Boost 15*110, 29“ Rear shock Cane Creek DBCOIL-IL - 210/55 - FACTORY TUNE Drive unit Performance Line CX Bosch Drive Batteries PowerTube 500Wh vertical + 625Wh horizontal System Display Kiox Crank Miranda Delta, 55Q:16 ISIS FC 170mm Front sprocket Gates CDX 50T Riding Belt Gates CDX 125T & Braking Rear sprocket Gates CDX für Rohloff 20T Front brake Magura MT5, 203 mm MDR-C Rear brake Magura MT5, 180 mm MDR-C Rear Hub Rohloff Speedhub CC DB 135mm E14, 32h... -
Seite 125: Weights
Technical data 9.2. Weights Unladen weight including batteries (depending on frame size) 33,4 ± 0,3 kg Weight PowerTube 625 ca. 3,5 kg Weight PowerTube 500 ca. 3 kg Permissible rider weight (rider+clothing+backpack)) 115 kg Permissible total weight 150 kg 9.3. Tightening torque of the screws Part Comment M /Nm Bosch remote or display on handlebars uncritical - tighten easily Brake pad locking screw uncritical - tighten easily Handlebar grips Tighten to prevent twisting Brake levers on handlebar Tighten to prevent twisting Brake discs (6x T25 screw) max. 4 Stem on steerer tube Stem on handlebar Brake adapter on fork or frame Brake calliper on brake adapter Saddle to seat post Seatpost into seat tube Spider Nut of front sprocket 25-30 Pedals... -
Seite 126: Liability For Material Defects
Liability for material defects Liability for material defects The statutory liability for material defects of 2 years applies. The original invoice must be presented and, if possible, proof of inspections carried out must be provided in order to make use of the liability for material defects. You are entitled to the warranty under the following conditions: • There is a manufacturing, material or information defect. • The claimed damage was already present at the time of delivery. • The product was not modified due to functional wear and tear or ageing. • The damage was not caused by the violation of the intended use. • Battery: This battery has a residual capacity of less than 60% of the nominal capacity within two years (from the date of purchase) and a maximum of 500 charging cycles. A charge cycle is the complete charging of the battery with one single charge or several partial charges (e.g. two half charges). The following is excluded from liability: •... -
Seite 127: Disposal
Disposal Disposal This symbol on your pedelec indicates that according to the WEEE Directive (2012/19/EU), Battery Directive (2006/66/EC) and national laws implementing these directives, the product must not be disposed of with household waste. Please take the pedelec to a local collection point at the end of its service life. Please collect packaging materials separately by type and dispose of them in ac- cordance with local regulations. You can return the batteries to an eBike dealer or send them to HNF Works GmbH for disposal in the supplied hazardous goods box: HNF Works GmbH → Battery recycling Sonnenallee 14-30 06766 Bitterfeld-Wolfen Germany... -
Seite 128: Ec Declaration Of Conformity
EC declaration of conformity HNF GmbH Bahnhofstraße 14 16359 Biesenthal We, HNF GmbH, declare that the machine HNF-NICOLAI XF3 Adventure a Pedelec/EPAC meets all relevant provisions of Machinery Directive 2006/42/EC. Furthermore, the machine complies with the following directives: Directive of Electromagnetic compatibility 2014/30/EC •... - Seite 129 Note...
- Seite 130 Note...
- Seite 131 Note...