Kapitel
Inhaltsverzeichnis

Verwandte Anleitungen für Blumfeldt Highgrow Advanced


Inhaltszusammenfassung für Blumfeldt Highgrow Advanced
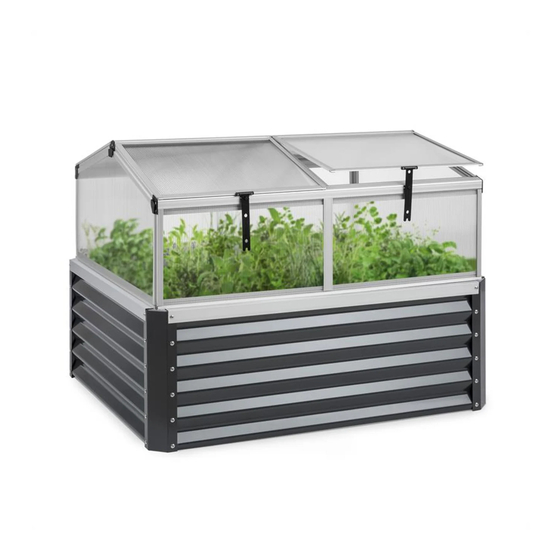
- Seite 1 Highgrow Advanced Hochbeet mit Gewächshausdach Raised Garden Bed with Green House Roof Potager surélevé avec couvercle de serre Jardinera elevada con techo de invernadero Fioriera rialzata con tett o per serra 10034687 10034688 10034689...
-
Seite 3: Hersteller
ARTIKEL Artikelnummer 10034687 10034688 10034689 Hersteller: Chal-Tec GmbH, Wallstraße 16, 10179 Berlin, Deutschland. SICHERHEITSHINWEISE • Einige Teile haben scharfe Metallkanten. Seien Sie beim Umgang mit den Metallkanten vorsichtig. Tragen Sie während des Zusammenbaus Arbeitshandschuhe, Schuhe und eine Schutzbrille. • Legen Sie alle Teile auf einen weichen Teppich oder eine Decke, um Kratzer und Beschädigungen zu vermeiden. -
Seite 4: Inhaltsverzeichnis
ZUSAMMENBAU PART NO QTY PART NO QTY PART NO QTY PART NO QTY TEIL TEIL TEIL TEIL L01A J 02 L01B J 03 L02A J 07 L02B J 08 L33A L03A J 09 L33B L04A W 02 L04B M4X8 L05A M4X12D M5X10 M 01... -
Seite 5: Part No Qty Teil Nr Anz L01A
PART NO QTY TEIL NR Fenstermontage Window Assembly M4X8 M4X12D J 09 J 08 4*Z01 2*Z02 J 09 J 08 J 09 J 08... - Seite 6 Befestigen Sie die Platten mit den Ecken (W04). Verwenden Sie die Schrauben S02 und M02. TEIL NR PART Fix the plates together with W04, using S02 & M02 as shown W 04 L33A L33B 800mm 1100mm M 6X10 Y11/Y12 Befestigen Sie die Teile L33 und L33B an W04. Verwenden Sie die Schrauben S02 und M02.
-
Seite 7: L02A
PART NO QTY TEIL NR L01A L02A L02B W 02 L02B L02A M5X10 M 01 L02B M4X12D L02A Schieben Sie 3 Schrauben (S01) in die Schiene von L02A. Befestigen Sie L02A an L33A. Verwenden Sie die Schrauben S01 und M01 in einem Abstand von jeweils 40 cm. -
Seite 8: L03A
PART NO QTY TEIL NR L03A L04A L04A L04A M4X12D M5X10 M 01 Schieben Sie 2 Schrauben (S01) in die Schiene von L04A. Slide 2*S01 into the channel of L04A 2*S01 L04A L04A L02A Befestigen Sie L04A an L02A. Fix L04A to L02A, Verwenden Sie eine Schraube S01 using one S01 &... - Seite 9 PART NO QTY NR ANZ TEIL L05A Setzen Sie die Teile Y2 in die Schiene Insert Y2 into the channel of L01A L01B von L01A ein. M4X12D Befestigen Sie das Teil L01A an L01A und L03A. Dazu verwenden Sie eine Schraube Z01. Befestigen Sie das Teil L05A an L01B mit einer Fix L01B to L01A &...
- Seite 10 TEIL NR Setzen Sie 2 Schrauben S01 in jeweils ein Teil L04B. PART NO QTY Slide 2*S01 into each L04B. L04B Befestigen Sie L04B an L03A und L05A mit Hilfe der Schrauben S01 und Fix L04B to L03A & L05A, using S01 & M01. M01.
- Seite 11 PART NO QTY TEIL J 02 J 03 TEIL J 07 M4X12D M4X8 J 02 J 02 J 07 L03A...
-
Seite 13: Safety Instructions
ITEM 10034687 10034688 10034689 Item number Producer: Chal-Tec GmbH, Wallstraße 16, 10179 Berlin, Deutschland. SAFETY INSTRUCTIONS • Some components have sharp metal edges. Please be careful when handling metal components. Please wear gloves, shoes and safety goggles during assembly. • Lay all of the components on a soft carpet or blanket to avoid any scratches or damages. - Seite 14 ASSEMBLY Parts PART NO QTY PART NO QTY PART NO QTY PART NO QTY L01A J 02 L01B J 03 L02A J 07 L02B J 08 L33A L03A J 09 L33B L04A W 02 L04B M4X8 L05A M4X12D M5X10 M 01 PART W 04 800mm...
-
Seite 15: L06
PART NO QTY Window Assembly M4X8 M4X12D J 09 J 08 4*Z01 2*Z02 J 09 J 08 J 09 J 08... - Seite 16 PART Fix the plates together with W04, using S02 & M02 as shown W 04 L33A L33B 800mm 1100mm M 6X10 Y11/Y12 Fix L33A & L33B to W04 using S02 & M02 L33A L33B L33A&L33B L33B L33A...
-
Seite 17: S01
PART NO QTY L01A L02A L02B W 02 L02B L02A M5X10 M 01 L02B M4X12D L02A Slide 3*S01 into the channel of each L02A, fix L02A to L33A using S01 & M01 at a distance about 40CM of each. Slide 2*S01 into the channel of each L02B, fix L02B to L33B using S01 &... - Seite 18 PART NO QTY L03A L04A L04A L04A M4X12D M5X10 M 01 Slide 2*S01 into the channel of L04A 2*S01 L04A L04A L02A Fix L04A to L02A, using one S01 & M01 L03A L03A Fix L03A to L04A, Fix L03A to L01A, using Z01 using another S01 &...
-
Seite 19: Z01
PART NO QTY L05A Insert Y2 into the channel of L01A L01B M4X12D Fix L01B to L01A & L03A, using screw Z01. Then, fix L05A to L01B using screw Z01. L05A L01B L01B L05A L03A L01B L01B... -
Seite 20: S01 M5X10
PART NO QTY Slide 2*S01 into each L04B. L04B Fix L04B to L03A & L05A, using S01 & M01. M5X10 L04B M 01 L04B L04B Slide the windows into the channel of L05A. w i ndow... -
Seite 21: Part No Qty
PART NO QTY J 02 J 03 J 07 M4X12D M4X8 J 02 J 02 J 07 L03A... -
Seite 23: Consignes De Sécurité
ARTICLE Numéro d'article 10034687 10034688 10034689 Fabricant : Chal-Tec GmbH, Wallstraße 16, 10179 Berlin, Allemagne. CONSIGNES DE SÉCURITÉ • Certaines pièces ont des bords métalliques tranchants. Soyez prudent lorsque vous manipulez les bords métalliques. Portez des gants, des chaussures et des lunettes de protection pendant le montage. -
Seite 24: 800Mm
ASSEMBLAGE PART NO QTY PART NO QTY PART NO QTY PART NO QTY NUM. QTÉ NUM. QTÉ NUM. QTÉ NUM. QTÉ L01A J 02 L01B J 03 L02A J 07 L02B J 08 L33A L03A J 09 L33B L04A W 02 L04B M4X8 L05A... - Seite 25 PART NO QTY NUM. QTÉ Installation des vitres Window Assembly M4X8 M4X12D J 09 J 08 4*Z01 2*Z02 J 09 J 08 J 09 J 08...
-
Seite 26: S02 M 6X10 M02 M6
Fixez les panneaux avec les coins (W04). Utilisez les vis S02 et M02. NUM. QTÉ PART Fix the plates together with W04, using S02 & M02 as shown W 04 L33A L33B 800mm 1100mm M 6X10 Y11/Y12 Fixez les pièces L33 et L33B à W04. Utilisez les vis S02 et M02. Fix L33A &... -
Seite 27: L01A
PART NO QTY NUM QTÉ L01A L02A L02B W 02 L02B L02A M5X10 M 01 L02B M4X12D L02A Insérez 3 vis (S01) dans le rail de L02A. Fixez L02A à L33A. Utilisez les vis S01 et M01 avec un espacement de 40 cm. Slide 3*S01 into the channel of each L02A, fix L02A to L33A Insérez 3 vis (S01) dans le rail des deux parties L02B. -
Seite 28: L03A
PART NO QTY NUM QTÉ L03A L04A L04A L04A M4X12D M5X10 M 01 Faites glisser 2 vis (S01) dans le rail de L04A. Slide 2*S01 into the channel of L04A 2*S01 L04A L04A L02A Fixez L04A à L02A. Utilisez une vis Fix L04A to L02A, S01 et M01. - Seite 29 PART NO QTY NUM QTÉ L05A Insérez les pièces Y2 dans le rail du Insert Y2 into the channel of L01A L01B L01A. M4X12D Fixez les pièces L01A à L01A et L03A. Utilisez pour cela une vis Z01. Fixez la pièce L05A à L01B avec une vis Z01. Fix L01B to L01A &...
-
Seite 30: L04B
PART NO QTY PCE NUM QTÉ Insérez 2 vis S01 dans chaque partie L04B. Slide 2*S01 into each L04B. L04B Fixez L04B sur L03A et L05A avec les vis S01 et M01. Fix L04B to L03A & L05A, using S01 & M01. M5X10 L04B M 01... -
Seite 31: Pce Part Num
PART NO QTY NUM. QTÉ J 02 J 03 NUM. QTÉ J 07 M4X12D M4X8 J 02 J 02 J 07 L03A... -
Seite 33: Instrucciones De Seguridad
ARTÍCULO Número artículo 10034687 10034688 10034689 Fabricante : Chal-Tec GmbH, Wallstraße 16, 10179 Berlín, Alemania. INSTRUCCIONES DE SEGURIDAD • Algunas piezas tienen cantos metálicos afilados. Tenga mucho cuidado al manipularlos. Póngase durante la manipulación y el montaje guantes de trabajo, botas de seguridad y gafas de protección. - Seite 34 MONTAJE PART NO QTY PART NO QTY PART NO QTY PART NO QTY PZA. NÚM. PZA. NÚM. CANT. PZA. NÚM. CANT. PZA. NÚM. CANT. CANT. L01A J 02 L01B J 03 L02A J 07 L02B J 08 L33A L03A J 09 L33B L04A W 02...
- Seite 35 PART NO QTY PZA. NÚM. CANT. Montaje de la ventana Window Assembly M4X8 M4X12D J 09 J 08 4*Z01 2*Z02 J 09 J 08 J 09 J 08...
- Seite 36 Fijar las placas con las esquinas (W04). Utilice los tornillos S02 y M02. PZA. NÚM. CANT. PART Fix the plates together with W04, using S02 & M02 as shown W 04 L33A L33B 800mm 1100mm M 6X10 Y11/Y12 Fijar las piezas L33 y L33B a W04 con los tornillos S02 y M02. Fix L33A &...
- Seite 37 PART NO QTY PZA. NÚM. CANT. L01A L02A L02B W 02 L02B L02A M5X10 M 01 L02B M4X12D L02A Introduzca 3 tornillos (S01) en la ranura L02A. Fíje la L02A a L33A utilizando las piezas S01 y M01 a una distancia de 40 cm. Slide 3*S01 into the channel of each L02A, fix L02A to L33A Introduzca 2 tornillos (S01) en la ranura de ambas piezas L02B.
- Seite 38 PART NO QTY PZA. NÚM. CANT. L03A L04A L04A L04A M4X12D M5X10 M 01 Deslice 2 tornillos (S01) en la ranura de L04A. Slide 2*S01 into the channel of L04A 2*S01 L04A L04A L02A Fije L04A en L02A. Utilice un tornillo Fix L04A to L02A, S01 y M01.
- Seite 39 PART NO QTY NÚM. CANT. PZA. L05A Coloque las piezas Y2 en las ranuras Insert Y2 into the channel of L01A L01B de L01A. M4X12D Fije las piezas L01A en L01A y L03A. Utilice en tornillo Z01. Fije la pieza L05A en L01B con un tornillo Z01. Fix L01B to L01A &...
- Seite 40 PART NO QTY PZA. NÚM. CANT. Coloque dos tornillos S01 en sendas piezas L04B. Slide 2*S01 into each L04B. L04B Fije la pieza L04B a L03A y L05A con los tornillos S01 y M01. Fix L04B to L03A & L05A, using S01 & M01. M5X10 L04B M 01...
- Seite 41 PART NO QTY NÚM. CANT. PZA. J 02 PZA. NÚM. CANT. J 03 J 07 M4X12D M4X8 J 02 J 02 J 07 L03A...
-
Seite 43: Avvertenze Di Sicurezza
ARTICOLO Numero articolo 10034687 10034688 10034689 Produttore: Chal-Tec GmbH, Wallstraße 16, 10179 Berlino, Germania. AVVERTENZE DI SICUREZZA • Alcuni pezzi hanno spigoli metallici appuntiti. Fare attenzione nel maneggiare questi spigoli. Indossare guanti da lavoro, scarpe e occhiali di protezione durante il montaggio. •... - Seite 44 MONTAGGIO PART NO QTY PART NO QTY PART NO QTY PART NO QTY NUM. NUM. NUM. QTÀ NUM. QTÀ QTÀ. QTÀ L01A J 02 L01B J 03 L02A J 07 L02B J 08 L33A L03A J 09 L33B L04A W 02 L04B M4X8 L05A...
-
Seite 45: Montare La Finestra
PART NO QTY PZA. NUM. QTÀ Montare la finestra Window Assembly M4X8 M4X12D J 09 J 08 4*Z01 2*Z02 J 09 J 08 J 09 J 08... -
Seite 46: M02
Montare i pannelli con gli angoli (W04). Utilizzare le viti S02 e M02. NUM. QTÀ. PART Fix the plates together with W04, using S02 & M02 as shown W 04 L33A L33B 800mm 1100mm M 6X10 Y11/Y12 Fissare i pezzi L33 e L33B su W04. Utilizzare le viti S02 e M02. Fix L33A &... -
Seite 47: Z01
PART NO QTY NUM. QTÀ. L01A L02A L02B W 02 L02B L02A M5X10 M 01 L02B M4X12D L02A Spingere le 3 viti (S01) nella guida L02A. Fissare L02A su L33A. Utilizzare le viti S01 e M01 a una distanza di 40 cm l’una dall’altra. Slide 3*S01 into the channel of each L02A, fix L02A to L33A Spingere le 2 viti S01 nella guida di entrambi i pezzi L02B. -
Seite 48: L01A
PART NO QTY NUM. QTÀ. L03A L04A L04A L04A M4X12D M5X10 M 01 Spingere le 2 viti (S01) nella guida L04A. Slide 2*S01 into the channel of L04A 2*S01 L04A L04A L02A Fissare L04A su L02A. Utilizzare una Fix L04A to L02A, vite S01 e M01. -
Seite 49: L03A
PART NO QTY NUM. QTÀ. L05A Inserire i pezzi Y2 nella guida L01A. Insert Y2 into the channel of L01A L01B M4X12D Fissare il pezzo L01B su L01A e L03A utilizzando una vite Z01. Fissare il pezzo L05 su L01B con una vite Z01. Fix L01B to L01A &... -
Seite 50: L04B
PART NO QTY NUM. QTÀ. Inserire le due viti S01 in ogni pezzo L04B. Slide 2*S01 into each L04B. L04B Fissare L04B su L03A e L05A con l’ausilio delle viti S01 e M01. Fix L04B to L03A & L05A, using S01 & M01. M5X10 L04B M 01... -
Seite 51: Z02
PART NO QTY NUM. QTÀ. J 02 NUM. QTÀ. J 03 J 07 M4X12D M4X8 J 02 J 02 J 07 L03A...