Inhaltsverzeichnis
Werbung
Verfügbare Sprachen
Verfügbare Sprachen
Quicklinks
• HOAZ7173IN
• HOAZ7173WI
USER INSTRUCTIONS
OVENS
NOTICE D'EMPLOI ET D'INSTALLATION
DES FOURS ENCASTRABLES
MANUALE D'ISTRUZIONI
FORNO
INSTRUCCIONES DE USO
HORNOS EMPOTRABLES
BEDIENUNGSANLEITUNG
BACKOFEN
KULLANIM KILAVUZU
FIRINLAR
POKYNY PRO UŽIVATELE
TROUBY
CANDY HOOVER GROUP S.R.L. • Via Comolli 16 • 20861 Brugherio (MB) - Italy
02
GB
16
FR
31
IT
45
ES
60
DE
74
TR
90
CZ
Werbung
Kapitel
Inhaltsverzeichnis

Verwandte Anleitungen für Hoover HOAZ7173IN


Inhaltszusammenfassung für Hoover HOAZ7173IN
- Seite 1 USER INSTRUCTIONS OVENS NOTICE D'EMPLOI ET D'INSTALLATION DES FOURS ENCASTRABLES MANUALE D’ISTRUZIONI FORNO INSTRUCCIONES DE USO HORNOS EMPOTRABLES BEDIENUNGSANLEITUNG BACKOFEN KULLANIM KILAVUZU FIRINLAR POKYNY PRO UŽIVATELE TROUBY CANDY HOOVER GROUP S.R.L. • Via Comolli 16 • 20861 Brugherio (MB) - Italy...
-
Seite 2: Safety Indications
Safety Indications • During cooking, moisture may condense inside the oven cavity or on the glass of the door. This is a normal condition. To reduce this effect, wait 10-15 minutes after turning on the power before putting food inside the oven. In any case, the condensation disappears when the oven reaches the cooking temperature. - Seite 3 •Do not use a steam cleaner for cleaning operations. • Connect a plug to the supply cable that is able to bear the voltage, current and load indicated on the tag and having the earth contact. The socket must be suitable for the load indicated on the tag and must be having the earth contact connected and in operation.
-
Seite 4: Inhaltsverzeichnis
Summary General Instructions 1.1 Safety indications 1.2 Electrical safety 1.3 Recommendations 1.4 Installation 1.5 Waste management 1.6 Conformity declaration 2.1 Overview Product Description 2.2 Accessories 2.3 First use Use of the Oven 3.1 Display description 3.2 Cooking modes Oven Cleaning and Maintenance 4.1 General notes on cleaning 4.2 Maintenance •... -
Seite 5: General Instructions
1. General Instructions We thank you for choosing one of our products. For the best results with your oven, you should read this manual carefully and retain it for future reference. Before installing the oven, take note of the serial number so that you can give it to customer service staff if any repairs are required. -
Seite 6: Recommendations
NOTE: As the oven could require maintenance work, it is advisable to keep another wall socket available so that the oven can be connected to this if it is removed from the space in which it is installed. The power cable must only be substituted by technical service staff or by technicians with equivalent qualifications. -
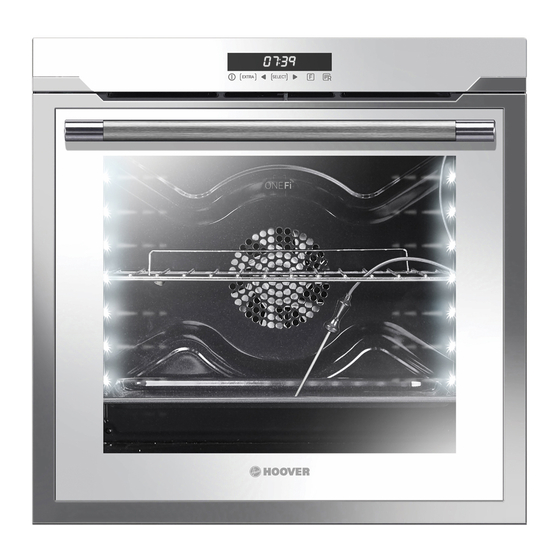
Seite 7: Product Description
2. Product Description 2.1 Overview 1. Control panel 2. Shelf positions (lateral wire grid if included) 3. Metal grill 4. Drip pan 5. Fan (behind the steel plate) 6. Meat probe 7. Oven door 2.2 Accessories (According to model) Led vision Metal grill Holds baking trays and plates. -
Seite 8: First Use
Meat-probe Lateral wire grids Measures the internal temperature of food during Lateral wire grid if included. cooking. Insert the meat-probe into the hole on the top of the cavity. – Prepare the food and properly insert the meat probe into the food. Do not preheat or start cooking before properly inserting the meat probe. - Seite 9 HOW TO FUNCTION HOW TO ACTIVATE WHAT IT DOES WHY IT IS NEEDED DEACTIVATE •To modify cooking before When a cooking programme When the cooking time has NB: can only be set with an the set time, press EXTRA t e r m i n a t e s , t h e o v e n f i n i s h e d , t h e o v e n active cooking programme.
- Seite 10 - The icon blinks 1 second on and 3 seconds off: the oven is in read only mode. HOOVER For detailed information on HOW TO CONNECT your OneFi appliance and HOW TO USE IT effectively, go to http://wizardservice.candy-hoover.com/ LANGUAGE SETTING The language can be set when...
- Seite 11 MEAT PROBE (depends on the oven model) If the meat probe is identified, the display shows "PROBE"; if the meat probe is inserted once a cooking programme is underway, the programme stops. When a cooking programme is selected, the display shows the default temperature but is never higher than 200°C: the selectable temperature is also limited to 200°C.
-
Seite 12: Cooking Modes
3.2 Cooking Modes Function T °C T °C Function (Depends on the oven model) Dial default range LAMP: Turns on the oven light. DEFROST: When the dial is set to this position. The fan circulates air at room temperature around the frozen food so that it defrosts in a few minutes 40 ÷... -
Seite 13: General Notes On Cleaning
4. Oven cleaning and maintenance 4.1 General notes on cleaning The lifecycle of the appliance can be extended through regular cleaning. Wait for the oven to cool before carrying out manual cleaning operations. Never use abrasive detergents, steel wool or sharp objects for cleaning, so as to not irreparably damage the enamelled parts. -
Seite 14: Removal And Cleaning Of The Glass
.REMOVAL AND CLEANING OF THE GLASS DOOR 1. Open the oven door. 2.3.4. Lock the hinges, remove the screws and remove the upper metal cover by pulling it upwards. 5.6. Remove the glass, carefully extracting it from the oven door (NB: in pyrolytic ovens, also remove the second and third glass (if present)). -
Seite 15: Faq
Troubleshooting 5.1 FAQ PROBLEM POSSIBLE CAUSE SOLUTION The oven does not heat up The clock is not set Set the clock The oven does not heat up The child lock is on Deactivate the child lock A cooking function and Ensure that the necessary The oven does not heat up temperature has not been set... -
Seite 16: Conseils De Securite
Conseils De Securite • Pendant la cuisson de l’humidité peut se créer dans la cavité ou sur la surface de la porte. Le cas décrit est normal. Si on veut reduire cet effet, il faut laisser réchauffer le four 10-15 minutes avant d’introduire les aliments. - Seite 17 Cette opération doit être exécutée par du personnel qualifié. En cas d’incompatibilité entre la prise d’alimentation et la fiche du câble de l’appareil, demander à un électricien professionnel de remplacer la prise d’alimentation par un dispositif compatible. La fiche du câble d’alimentation et la prise d’alimentation doivent être conformes aux normes en vigueur dans le pays d’installation.
- Seite 18 SOMMAIRE Instructions Générales 1.1 Indications de sécurité 1.2 Sécurité électrique 1.3 Recommandations 1.4 Installation 1.5 La gestion des déchets et la protection de l'environnement 1.6 Déclaration de conformité Description du produit 2.1 Vue d'ensemble 2.2 Accessoires 2.3 Première utilisation Utilisation du Four 3.1 Description de l'affichage 3.2 Mode de cuisson Nettoyage du four et...
-
Seite 19: Instructions Générales
1. Instructions générales Nous vous remercions d'avoir choisi un de nos produits. Pour obtenir les meilleurs résultats avec votre four, vous devez lire attentivement ce manuel et le conserver pour toute consultation ultérieure. Avant d'installer le four, notez le numéro de série, il vous sera demandé par le support technique si des réparations sont nécessaires. -
Seite 20: Recommandations
ATTENTION Faire vérifier la continuité de la terre de l’installation avant de procéder au raccordement. Le fabricant décline toute responsabilité en cas d'accidents ou d'autres problèmes qui pourraient survenir à l'usage d'un appareil non relié à la terre, ou relié à une terre dont la continuité serait défectueuse. REMARQUE: Le four peut nécessiter une opération de S.A.V. -
Seite 21: Déclaration De Conformité
ÉCONOMIE ET RESPECT DE L'ENVIRONNEMENT Lorsque cela est possible, éviter le préchauffage du four et éviter de le faire tourner à vide. N'ouvrez la porte du four que lorsque cela est nécessaire, car il y a des déperditions de chaleur à chaque fois qu'il est ouvert. - Seite 22 2.2. Accessories (Par modele) Grille métalique Léchefrite La grille métalique sert de support aux plats. Alimentaire recueille les gouttes pendant la cuisson sur le gril. Sonde à viande (selon Led vision modèle Ce système d'éclairage remplace les « ampoules » Mesure de la température interne de la traditionnelles.
-
Seite 23: Première Utilisation
2.3 Première Utilisation UN PREMIER NETTOYAGE doit être réalisé avant la première utilisation passer un chiffon doux et humide sur les surfaces extérieures de l'appareil. Nettoyer avec une éponge additionnée de produit lessiviel, les accessoires et l'intérieur du four. Rincer et sécher. Faire chauffer le four à vide une bonne heure à... - Seite 24 POURQUOI QUELS COMMENT LE FONCTION FONCTION PRINCIPALE COMMENT L'UTILISER BESOINS ? DESACTIVER N B : c e d i s p o s i t i f e s t Pour modifier le temps de Quand le programmme de Lors que le temps de cuisson fonctionnel une fois que le cuisson, appuyez deux fois cuisson prend fin, le four...
- Seite 25 -L'icône s'illumine pendant une seconde et s'éteint pendant 3 secondes : Le four est en mode lecture. HOOVER Pour obtenir des informations détaillées concernant le mode de fonctionnement de OneFi et pour savoir comment cette application s'utilise, il suffit d'aller sur le site http://wizardservice.candy-hoover.com/ FR 25...
- Seite 26 CHOIX DE LA LANGUE Une fois que le four Grill est éteint , il est possible de définir la langue de Cavité votre choix. Il faut appuyer de manière Pyro simultanée sur le bouton EXTRA, SELECT pendant 3 secondes. La langue actuelle s'affiche Tournebroche sur l'écran, et il est possible de la changer en Décongélation...
-
Seite 27: Mode De Cuisson
3.2 Mode de cuisson T °C T °C Bouton de Fonction (selon modèle) par défaut range sélection L'ampoule: Allumage de l’éclairage du four Décongélation: fonctionnement de la turbine de cuisson qui brasse l'air dans 40 ÷ 40 l'enceinte du four. Idéale pour réaliser une décongélation avant une cuisson. Chaleur brassée: fonction recommandée pour les volailles, les pâtisseries, les poissons, les légumes... -
Seite 28: Entretien
4. Nettoyage du four et maintenance 4.1 Remarques générales sur le nettoyage Le cycle de vie de l'appareil peut être étendu grâce à un nettoyage régulier. Attendez le refroidissement du four avant de procéder à des opérations de nettoyage manuel. Ne jamais utiliser de détergents abrasifs, de laine d'acier ou d'objets pointus pour le nettoyage, l'émail serait irrémédiablement abîmé. -
Seite 29: Retrait Et Nettoyage Des Vitres
RETRAIT ET NETTOYAGE DES VITRES 1. Ouvrez la porte du four. 2.3.4. Bloquer les charnières, enlever les vis et retirez le couvercle métallique supérieur en le tirant vers le haut. 5.6. Retirez le verre, l'extraire soigneusement de la porte du four (NB: dans les fours de pyrolyse, retirez également les deuxième et troisième verre (le cas échéant)). -
Seite 30: Dépannage 5.1 F.a.q
5. Dépannage 5.1 FAQ PROBLEMES CAUSE POSSIBLE SOLUTION Réglez l'horloge Le four ne chauffe pas L'horloge n'est pas réglée La sécurité enfant est Le four ne chauffe pas Désactivez la sécurité enfant activée Assurez-vous que les Les réglages nécessaires paramètres nécessaires Le four ne chauffe pas ne sont pas imposés sont corrects... -
Seite 31: Indicazioni Di Sicurezza
Indicazioni di Sicurezza • Durante la cottura l'umidità può condensarsi all'interno della cavità o sul vetro della porta. È normale. Per ridurre questo effetto, attendere 10-15 minuti dopo l'accensione prima di mettere il cibo all'interno del forno. In ogni caso, la condensa scompare quando il forno raggiunge la temperatura di cottura. - Seite 32 Funzionante. Il conduttore di terra è giallo-verde. Questa operazione deve essere eseguita solo da un tecnico adeguatamente addestrato. In caso di incompatibilità tra presa e spina dell'elettrodomestico, richiedere ad un tecnico specializzato di sostituire la presa con un'altra di tipo compatibile. La spina e la presa devono essere conformi alle normative attuali del paese di installazione.
- Seite 33 Sommario Avvertenze Generali 1.1 Suggerimenti sulla sicurezza 1.2 Sicurezza elettrica 1.3 Raccomandazioni 1.4 Installazione 1.5 Gestione dei rifiuti 1.6 Dichiarazione di conformità Descrizione del Prodotto 2.1 Panoramica 2.2 Accessori 2.3 Primo utilizzo Utilizzo del Forno 3.1 Descrizione del display 3.2 Modalità di cottura Pulizia e Manutenzione del Forno 4.1.Note generiche di pulizia 4.2 Manutenzione...
-
Seite 34: Avvertenze Generali
1. Avvertenze Generali Vi ringraziamo per aver scelto uno dei nostri prodotti. Per utilizzare il forno in modo ottimale è consigliabile leggere con attenzione questo manuale e conservarlo con cura per ogni ulteriore consultazione. Prima di installare il forno, prendere nota del numero di serie in modo da poterlo comunicare al personale del servizio di assistenza in caso di richiesta di intervento. -
Seite 35: Raccomandazioni
messa a terra con una continuità difettosa. NOTA: poiché il forno potrebbe richiedere interventi di assistenza, è consigliabile prevedere la disponibilità di un’ulteriore presa a muro a cui collegare il forno dopo che è stato rimosso dallo spazio in cui è stato installato. Il cavo di alimentazione deve essere sostituito solo dal personale dell’assistenza tecnica o da tecnici con qualifiche analoghe. -
Seite 36: Dichiarazione Di Conformità
1.6 Dichiarazione di conformità Tutti i componenti di questo elettrodomestico destinati a venire a contatto con gli alimenti sono conformi con le disposizioni della Direttiva CEE 89/109. Apponendo la marcatura su questo prodotto, dichiariamo, sotto la nostra responsabilità, di ottemperare a tutti i requisiti relativi alla tutela di sicurezza, salute e ambiente previsti dalla legislazione europea in essere per questo prodotto. -
Seite 37: Primo Utilizzo
Griglie a filo laterale Sonda Carne Misura la temperatura interna del cibo durante la Griglia laterale se inclusa. cottura. Inserire la sonda carne nell'apposito foro nella parte superiore della cavità. – Preparare il cibo e inserire correttamente la sonda carne nel cibo. Non preriscaldare o iniziare a cucinare prima di inserire correttamente la sonda carne. - Seite 38 FUNZIONE COME ATTIVARE COME DISATTIVARE COME FUNZIONA COSA SERVE Nota: l'impostazione è • Per modificare la cottura When a cooking programme Quando il tempo di cottura è possibile solo con un p r i m a d e l t e m p o t e r m i n a t e s , t h e o v e n terminato, il forno si spegne programma di cottura attivo.
- Seite 39 - L'icona lampeggia 3 secondi e 1 secondo si spegne: il forno sta tentando di connettersi al router Wi-Fi. - L'icona lampeggia 1 secondo e 3 secondi rimane spenta: il forno è in modalità di sola lettura. HOOVER : Per maggiori informazioni su COME CONNETTERE il tuo elettrodomestico OneFi e COME USARLO, vai sul sito http://wizardservice.candy-hoover.com/...
- Seite 40 SONDA CARNE (a seconda del modello) Se la sonda carne è identificata, il display mostra "SONDA". Se la sonda carne viene inserita mentre un programma di cottura è in corso, il programma si arresta. Quando viene selezionato un programma di cottura, il display visualizza la temperatura di default, ma non è...
-
Seite 41: Modalità Di Cottura
3.2 Modalità di cottura Manopola T° preim- Intervallo Funzione (a seconda del modello) commuta- postata di T° tore LAMPADA: Accende la luce interna. SCONGELAMENTO: Questa posizione permette di far circolare l’aria a 40 ÷ 40 temperatura ambiente intorno al cibo surgelato facendolo così scongelare in pochi minuti senza modificare od alterare il contenuto proteico. -
Seite 42: Pulizia E Manutenzione Del Forno
4. Pulizia e manutenzione del forno 4.1 Note generiche di pulizia La vita di servizio dell’apparecchio si allunga se questo viene pulito ad intervalli regolari. Attendere che il forno si raffreddi prima di effettuare le operazioni di pulizia manuali. Non utilizzare mai detergenti abrasivi, pagliette di ferro o oggetti appuntiti per lapulizia, per non danneggiare in modo irreparabile le parti smaltate.Utilizzare solo acqua, sapone o detergenti a base di candeggina (ammoniaca). -
Seite 43: Rimozione E Pulizia Della Porta In Vetro
RIMOZIONE E PULIZIA DELLA PORTA IN VETRO 1. Aprile la porta del forno. 2.3.4. Bloccare le cerniere, rimuovere le viti e rimuovere la copertura metallica superiore tirandola verso l’alto. 5.6. Rimuovere il vetro, estraendolo con molta cura, dalla controporta del forno (NB: nei forni pirolitici, rimuovere anche il secondo e terzo vetro (se presente)). -
Seite 44: Risoluzione Dei Problemi
5. Risoluzione dei Problemi 5.1 FAQ PROBLEMA POSSIBILE CAUSA SOLUZIONE Il forno non si scalda L’orologio non è impostato Impostare l’orologio Il forno non si scalda Il blocco bambini è attivo Disattivare il blocco bambini Le regolazioni necessarie Assicurarsi che le impostazioni Il forno non si scalda necessarie siano corrette non sono impostate... -
Seite 45: Indicaciones De Seguridad
Indicaciones de seguridad • Durante la cocción, podría condensarse humedad dentro de la cavidad del horno o en el cristal de la puerta. Esto es normal. Para reducir este efecto, espere de 10 a 15 minutos antes de introducir alimentos en el horno una vez que lo encienda. - Seite 46 De tierra es de color amarillo verdoso. Esta operación debe realizarla un profesional debidamente cualificado. Si la toma de corriente es incompatible con el enchufe del electrodoméstico, pida a un electricista profesional que sustituya la toma por otra adecuada. El enchufe y la toma deben cumplir las normas actuales del país donde se instala el electrodoméstico.
- Seite 47 Resumen Advertencias generales 1.1 Recomendaciones de seguridad 1.2 Seguridad eléctrica 1.3 Recomendaciones 1.4 Instalación 1.5 Gestión de residuos 1.6 Declaración de conformidad 2.1 Descripción general Descripción del producto 2.2 Accesorios 2.3 Primer uso 3.1 Descripción de la pantalla Utilización del horno 3.2 Modalidades de cocción Limpieza y mantenimiento 4.1 Notas genéricas de limpieza...
-
Seite 48: Advertencias Generales
1. Advertencias Generales Le agradecemos que haya elegido uno de nuestros productos. Para utilizar el horno de forma óptima es aconsejable leer con atención este manual y conservarlo para poder consultarlo en el futuro. Antes de instalar el horno, anote el número de serie para poder facilitárselo al personal del servicio de asistencia técnica en caso de solicitar su intervención. - Seite 49 NOTA: puesto que el horno podría requerir la intervención del servicio de asistencia, es aconsejable prever la disponibilidad de otro enchufe de pared al que conectar el horno después de extraerlo del espacio donde se ha instalado. El cable de alimentación debe sustituirse únicamente por personal de asistencia técnica o por técnicos con una cualificación análoga.
-
Seite 50: Descripción Del Producto
1.6 Consejos De Cumplimiento En este equipo, las piezas que se prevé que puedan estar en contacto con los alimentos, cumplen las regulaciones de la CEE indicadas en la directiva 89/109. Al mostrar el logo marcado en este producto, declaramos, bajo nuestra propia responsabilidad, el cumplimiento de todos los requisitos europeos en términos de seguridad, salud y medio ambiente, establecidos en la legislación de este producto. -
Seite 51: Primer Uso
Visi n Led ó Sonda para carnes Es un sistema de iluminacion que sustituye el Mide la temperatura interior de la comida tradicional sistema “de bombilla”. En la puerta del durante la cocción. Introduzca la sonda para horno se integran 14 luces LED (en versiones no carnes en el orificio superior de la cavidad. -
Seite 52: Uso Del Horno
3. Uso del horno 3.1 Descripción de la pantalla El horno se enciende y se apaga usando este botón. ENCENDIDO / APAGADO EXTRA Tiempo de Fin de la cocción Temporizador cocción Cuando el horno está apagado, en la pantalla aparece el reloj. Cuando el horno no está... - Seite 53 FUNCIóN CóMO SE ACTIVA CóMO SE DESACTIVA QUÉ HACE PARA QUÉ SIRVE TIEMPO Nota: sólo puede •Para mod f car la cocc ón Cuando f nal za el programa Cuando se cumple el t empo de conf gurar con un programa antes t empo de cocc ón, el horno se...
- Seite 54 Wi-Fi. - El icono parpadea 1 segundo encendido y 3 segundos apagado: el horno está en el modo de sólo lectura. HOOVER : Para una información detallada sobre CÓMO CONECTAR su aparato OneFi y CÓMO USARLO correctamente, visite la página http://wizardservice.candy-hoover.com/...
- Seite 55 SONDA PARA CARNES (depende del modelo de horno) Si la sonda para carnes es reconocida por el horno, la pantalla muestra la palabra "PROBE" (Sonda); si la sonda para carnes se introduce cuando hay un programa de cocción en ejecución, el programa se detiene. Cuando se selecciona un programa de cocción, la pantalla muestra la temperatura predeterminada, que nunca es superior a los 200°C: la temperatura que se puede seleccionar también se limita a 200°C.
- Seite 56 3.2 Modalidades de cocción Mando Rango T°C FUNCIÓN ( dependiendo del modelo selector de T°C establecida LAMPARA: Conecta la luz interior DESCONGELACIÓN: Funcionamiento de la turbina de cocción que hace 40 ÷ 40 circular el aire dentro del espacio del horno. Ideal para realizar una descongelación previa a una cocción.
-
Seite 57: Limpieza Y Mantenimiento Del Horno
4. Limpieza y mantenimiento del horno 4.1 Notas genéricas de limpieza La vida útil del aparato se prolonga si se limpia a intervalos regulares. Espere a que el horno se enfríe antes de llevar a cabo las operaciones de limpieza manuales. No utilice nunca detergentes abrasivos, estropajos metálicos ni objetos puntiagudos para la limpieza con el fin de no dañar de forma irreparable las piezas esmaltadas. - Seite 58 EXTRACCIÓN Y LIMPIEZA DE LA PUERTA DE VIDRIO 1. Abra la puerta del horno. 2.3.4. Bloquee las bisagras, desenrosque los tornillos y extraiga la cubierta metálica superior tirando hacia arriba. 5.6. Extraiga el vidrio con mucho cuidado de la contrapuerta del horno (N. B.: si se trata de un horno pirolítico, extraiga también el segundo y el tercer vidrio si los hubiera).
-
Seite 59: Solución De Problemas
5. Solución de problemas 5.1 Preguntas más frecuentes PROBLEMA CAUSA POSIBLE SOLUCIÓN El reloj no está en hora Configure el reloj El horno no se calienta El bloqueo infantil está Desactive el bloqueo infantil El horno no se calienta activado Asegúrese de que los ajustes Los ajustes necesarios no El horno no se calienta... -
Seite 60: S Cherhe Tsh Nwe Se
S cherhe tsh nwe se • Während des Garvorgangs kann Feuchtigkeit im Ofenraum oder auf dem Glas der Tür kondensieren. Dies ist ein normaler Zustand. Um diesen Effekt zu verringern, warten Sie 10-15 Minuten nach dem Einschalten des Geräts, bevor Sie die Speisen in den Ofen stellen. In jedem Fall verschwindet das Kondensat, wenn der Ofen die Gartemperatur erreicht hat. -
Seite 61: Typenschild Aufgeführte Last Ausgelegt Und Der Schutzkontakt
Typenschild aufgeführte Last ausgelegt und der Schutzkontakt angeschlossen und in Betrieb sein. Der Schutzleiter ist gelb-grün gefärbt. Dieser Vorgang darf nur von entsprechend qualifiziertem Fachpersonal durchgeführt werden. Im Falle einer Inkompatibilität zwischen Steckdose und Gerätestecker müssen Sie einen qualifizierten Elektriker bitten, die Steckdose durch eine geeigneten Typ zu ersetzen. - Seite 62 Zusammenfassung Allgemeine Anweisungen Sicherheitshinweise Elektrische Sicherheit Empfehlungen Installation Abfallentsorgung Konformitätserklärung Produktbeschreibung Übersicht Zubehör Inbetriebnahme Betrieb des Backofens Beschreibung der Anzeige Funktionen zum Garen Reinigung und Wartung des Allgemeine Reinigungshinweise Wartung Backofens • Entfernen und Reinigen der Führungsschienen • Entfernen und Reinigen der Glastür Fehlerbehebung Häufig gestellte Fragen DE 62...
-
Seite 63: Allgemeine Anweisungen
1. Allgemeine Anweisungen Vielen Dank, dass Sie sich für eins unserer Produkte entschieden haben. Damit Sie lange Freude mit Ihrem Backofen haben, sollten Sie diese Bedienungsanleitung sorgfältig durchlesen und zum Nachschlagen in der Zukunft aufbewahren. Notieren Sie sich vor dem Anschließen des Backofens die Seriennummer, sodass Sie diese im Reparaturfall an den Kundendienst weitergeben können. -
Seite 64: Empfehlungen
HINWEIS: Für eine eventuelle Wartung des Ofens ist die Zugänglichkeit einer zweiten Wandsteckdose von Vorteil, sodass er an diese angeschlossen werden kann, wenn er ausgebaut werden muss. Das Stromkabel darf nur von qualifizierten Kundendiensttechnikern oder Elektrikern ausgetauscht werden. 1.3 Empfehlungen Es empfiehlt sich, den Backofen nach jeder Verwendung grob zu reinigen. -
Seite 65: Produktbeschreibung
2. Produktbeschreibung 2.1 Übersicht 1. Bedienfeld 2. Führungsschienen (seitlicher Metallrost, falls enthalten) 3. Backrost 4. Fettpfanne/Backblech 5. Lüfter (hinter der Stahlabdeckung) 6. Kerntemperaturfühler 7. Backofentür 2.2 Zubehör Backrost Led vision Hält Auflauf- und Backformen. Das ist ein Beleuchtungssystem, dass die traditionelle Gluhbirne ersetzt. -
Seite 66: Kerntemperaturfühler
Kerntemperaturfühler Seitliche Draht Gitter M i s st d i e I n n e n t e m p e ra t u r wä h re n d d e s Seitliche Drahtnetz wenn inbegriffen. Garvorgangs. Den Kerntemperaturfühler in das Anschlussloch oben im Backofen stecken. - Seite 67 VERWENDUNGSZWECK FUNKTION VERWENDUNG DEAKTIVIEREN FUNKTIONSWEISE Hinweis: Kann Erreicht ein Garprogramm •Um die Garzeit vor dem Erreicht die Garzeit das Ende, zusammen einem das Ende, schaltet sich der wird der Backofen automatisch eingestellten Ende zu ändern, aktiven Garprogramm Backofen ausgeschaltet drücken Sie zweimal EXTRA eingestellt werden.
- Seite 68 - Symbol blinkt, eine Sekunde an, drei Sekunden aus: Der Backofen befindet sich im Lesemodus. HOOVER Detaillierte Informationen ZUM VERBINDEN Ihres Geräts von ONEFI und zu seiner effektiven NUTZUNG finden Sie unter. http://wizardservice.candy-hoover.com/ Grill SPRACHEINSTELLUNG Die Sprache kann eingestellt Ofen Innenraum werden, nachdem der Backofen ausgeschaltet wurde.
- Seite 69 KERNTEMPERATURFÜHLER (je nach Backofenmodell) Wurde die Kerntemperatur ermittelt, zeigt das Display „PROBE“. Wird der Kerntemperaturfühler eingeführt, während ein Garprogramm läuft, so wird das Programm angehalten. Wird ein Garprogramm ausgewählt, so zeigt das Display die Standardtemperatur an, die 200°C nie überschreitet. Die auswählbare Temperatur ist ebenfalls auf 200°C begrenzt.
-
Seite 70: Funktionen Zum Garen
3.2 Funktionen zum Garen T °C T °C Funktion Funktion (je nach Backofenmodell) standard Bereich LAMPE: Schaltet das Licht im Backofen an. AUFTAUEN: Wenn die Auswahl auf diese Funktion eingestellt wird. Der Ventilator 40 ÷ 40 wälzt die Luft bei Raumtemperatur um, sodass das Tiefkühlprodukt innerhalb weniger Minuten aufgetaut wird, ohne dass sein Eiweißgehalt sich ändert. -
Seite 71: Reinigung Und Wartung Des Backofens
4. Reinigung und Wartung des Backofens 4.1 Allgemeine Reinigungshinweise Die Lebensdauer des Geräts lässt sich durch eine regelmäßige Reinigung verlängern. Den Ofen vor der Reinigung abkühlen lassen. Keine Scheuermittel, Stahlwolle oder scharfkantige Gegenstände für die Reinigung verwenden, um die Emaillebeschichtung nicht zu beschädigen. Nur Wasser, Spülmittel oder Reinigungsmittel mit Bleiche (Ammoniak) verwenden. - Seite 72 ENTFERNEN UND REINIGEN DER GLASTÜR 1. Die Backofentür öffnen. 2.3.4. Scharniere sperren, Schrauben entfernen und die obere Metallkappe nach oben abziehen. 5.6. Die Glasscheibe vorsichtig aus der Ofentür ziehen (Hinweis: Bei Backöfen mit Pyrolyse- Reinigungsfunktion auch die zweite (falls vorhanden) und dritte Scheibe herausnehmen). 7.
- Seite 73 5. Fehlerbehebung 5.1 HÄUFIG GESTELLTE FRAGEN STÖRUNG MÖGLICHE URSACHE LÖSUNG Der Backofen wird nicht heiß. Die Uhr ist nicht eingestellt. Uhr einstellen. Die Kindersicherung ist Der Backofen wird nicht heiß. Kindersicherung deaktivieren. eingeschaltet. Garfunktion und Temperatur Prüfen, ob die nötigen Der Backofen wird nicht heiß.
-
Seite 74: Güvenlik Uyarıları
Güvenlik uyarıları • Pişirme sırasında nem, fırın içinde veya kapı camının içinde yoğunlaşabilir. Bu normal. Bu etkiyi azaltmak için, fırını 10-15 dakika çalıştırınız sonra yiyeceklerinizi fırının içine koyunuz. Fırın pişirme sıcaklığına ulaştığında yoğunlaşma ortadan kalkar. • Sebzeleri açık bir tepsi yerine kapaklı bir kapta pişiriniz. •... - Seite 75 değiştirmesini isteyin. Fiş ve priz kurulumun yapıldığı ülkede geçerli olan normlara uygun olmalıdır. Güç kaynağı bağlantısı, cihazla güç kaynağı arasına maksimum bağlı yükü kaldırabilecek ve geçerli mevzuata uygun olan omnipolar bir devre kesici yerleştirilerek de yapılabilir. Sarı-yeşil topraklama kablosu devre kesici tarafından kesintiye uğratılmamalıdır. Priz veya bağlantı için kullanılan omnipolar devre kesici, cihazın kurulumu yapıldığında kolayca erişilebilir durumda olmalıdır.
- Seite 76 Özet Genel Açıklamalar 1.1 Güvenlik ipuçları 1.2 Elektriksel güvenlik 1.3 Tavsiyeler 1.4 Kurulum 1.5 Atık yönetimi 1.6 Uygunluk beyanı Ürün Açıklaması 2.1 Genel bakış 2.2 Aksesuarlar 2.3 İlk kullanım Fırının Temizlenmesi ve Bakımı 3.1 Gösterge açıklamaları 3.2 Pişirme modları Fırının Temizlenmesi ve Bakımı 4.1 Temizleme hakkında genel notlar 4.2 Bakım •...
-
Seite 77: Genel Açıklamalar
1. Genel Açıklamalar Ürünlerimizden birini tercih ettiğiniz için teşekkür ederiz. Fırınınızdan en iyi sonuçları almak için bu kılavuzu dikkatle okuyun ve daha sonra başvurmak için saklayın. Fırının montajından önce, herhangi bir onarım gerekmesi halinde müşteri hizmetleri personeline vermek üzere seri numarasını... - Seite 78 çıkabilecek her türlü kaza veya zararda imalatçı herhangi bir sorumluluk kabul etmemektedir. NOT: fırında bazı bakım işlemleri yapılması gerektiğinden, montajın yapılmış olduğu alandan çıkarılması halinde fırının bağlanabileceği başka bir prizin yakınlarda bulunması tavsiye edilir. Elektrik kablosunun sadece teknik servis personeli ya da eşdeğer niteliklere sahip teknisyenler tarafından değiştirilmesi gereklidir.
-
Seite 79: Uygunluk Beyanı
Birçok ülkede, büyük WEEE'ler için şehir içinde toplama noktaları bulunmaktadır. Yeni bir cihaz satın aldığınızda, eski cihazın satın alınan cihazla aynı tipte olması ve aynı işlevlere sahip olması durumunda eski cihazı ücretsiz olarak bire bir kabul etmesi gereken satıcıya iade edebilirsiniz. ENERJİ... - Seite 80 Sıcaklık probu Led vision Klasik “elektrik ampulünün” yerine geçen bir Pişirme süresince yiyeceğin iç sıcaklığını ölçer. aydınlatma sistemidir. 14 adet LED (pirolitik Sıcaklık probunu pişirici haznenin üstünde olmayan modeller için) veya 10 adet Yüksek Güçlü bulunan deliğe geçirin. LED (pirolitik modeller için) lamba, kapıya –...
-
Seite 81: İlk Kullanım
2.3 İlk Kullanım İLK TEMİZLEME İlk kez kullanmadan önce fırını temizleyin. Dış yüzeyleri yumuşak bir ıslak bezle silin. Tüm aksesuarları yıkayın ve fırının içini sabunlu su ve sıvı bulaşık deterjanı karışımına batırılmış bir bezle silin. Boş fırını maksimum sıcaklık değerine ayarlayın ve yaklaşık 1 saat çalıştırın, bu şekilde fırının yeni olmasından kaynaklı... - Seite 82 NASIL DEVRE DIŞI İŞLEV NASIL KULLANILIR NE YAPAR NEDEN GEREKLİDİR BIRAKILIR Bir pişirme programının Pişirme süresi dolduğu zaman Not: sadece aktif bir pişirme • Ayarlanan süre dolmadan sonuna gelindiğinde fırın önce pişirme süresini fırın otomatik olarak kapanır ve programı ile ayarlanabilir. kapanır ve işlev yapan tek tuş...
- Seite 83 - Simge 3 saniye yanık ve 1 saniye sönük kalıyor: fırın Wi-Fi yönlendiricinize bağlanmaya çalışmaktadır. - Simge 1 saniye yanık ve 3 saniye sönük kalıyor: fırın sadece okuma modundadır. HOOVER OneFi cihazınıza NASIL BAĞLANILACAĞI ve etkin bir biçimde NASIL KULLANILACAĞI hakkında detaylı...
- Seite 84 SICAKLIK PROBU (fırın modeline bağlıdır) Eğer sıcaklık probu tanımlanmışsa göstergede "PROBE" gösterilir; eğer bir pişirme programı devam ederken sıcaklık probu takılırsa program durur. Bir pişirme programı seçildiğinde göstergede en fazla 200°C olmak üzere varsayılan sıcaklık değer gösterilir: seçilebilir sıcaklık değeri de 200°C ile sınırlandırılmıştır. "Select"...
- Seite 85 3.2 Pişirme Modları Fonksiyon Varsayılan Sıcaklık Fonksiyon (Fırın modeline bağlıdır) ikonu sıcaklık °C aralığı °C LAMBA: Fırın lambasını yakar. BUZ ÇÖZME: Düğme bu konuma alındığı zaman fan oda sıcaklığında havayı donmuş gıdanın etrafında dolaştırır, böylece gıdanın protein içeriği 40 ÷ 40 değişmeden birkaç...
- Seite 86 4. Fırının Temizlenmesi ve Bakımı 4.1 Temizleme hakkında genel notlar Düzenli temizlik ile cihazın kullanım ömrü uzatılabilir. Elle temizlik işlemlerini yapmadan önce fırının soğumasını bekleyin. Temizlik için asla aşındırıcı deterjanlar, çelik tel veya keskin nesneler kullanmayın, aksi takdirde emaye parçalarda onarılamaz hasarlar oluşabilir. Sadece su, sabun veya ağartıcı bazlı deterjanlar (amonyak) kullanın.
-
Seite 87: Sorun Giderme
CAMIN SÖKÜLMESİ VE TEMİZLENMESİ 1. Fırının kapağını açın. 2.3.4. Menteşeleri kilitleyin, vidaları çıkarın ve yukarı doğru çekerek üst metal kapağı çıkarın. 5.6. Camı dikkatli bir şekilde fırın kapağından çekerek çıkarın (Not: pirolitik fırınlarda ikinci ve üçüncü camı (eğer varsa) da çıkarın). 7. -
Seite 88: Tüketi̇ci̇ Hi̇zmetleri̇
Candy Hoover Euroasia tarafından sağlanan garanti şartları aşağıdaki koşullarda geçersiz olacaktır. • Ürüne, yetkili servis dışındaki kişiler tarafından müdahale edilmesi, elektrik-su kesintisi ve üründen kaynaklanmayan kaçaklar garanti kapsamı... -
Seite 89: Garanti̇ Belgesi̇
şahıslar tarafından bakımı, onarımı veya başka bir nedenle müdahale edilmemiş olması şartıyla bütün parçaları dahil olmak üzere tamamı malzeme, işçilik ve üretim hatalarına karşı ürünün teslim tarihinden itibaren 3 ( ÜÇ ) YIL SÜRE İLE CANDY HOOVER EUROASIA A.Ş. TARAFINDAN GARANTİ EDİLMİŞTİR. Malın bütün parçaları dahil olmak üzere tamamı garanti kapsamındadır. -
Seite 90: Bezpečnostní Pokyny
Bezpečnostní pokyny Bezpečnostní pokyny • Během vaření může ve vnitřním prostoru trouby nebo na skle dveří docházet ke kondenzaci vlhkosti. Jedná se o normální stav. Chcete-li tento efekt omezit, počkejte po zapnutí napájení 10-15 minut, než vložíte jídlo do trouby. Kondenzace v každém případě zmizí, jakmile trouba dosáhne teploty vaření. - Seite 91 kvalifikací. V případě neslučitelnosti mezi zásuvkou a zástrčkou spotřebičů požádejte kvalifikovaného elektrikáře, aby zásuvku nahradil jiný m vhodný m typem. Zástrčka i zásuvka musejí odpovídat platný m normám země instalace. Připojení k napájecímu zdroji lze provést také tak, že mezi spotřebičem a zdrojem energie, který zvládne maximální připojenou zátěž...
- Seite 92 Shrnutí Obecné pokyny 1.1 Bezpečnostní pokyny 1.2 Elektrická bezpečnost 1.3 Doporučení 1.4 Instalace 1.5 Odpadové hospodářství 1.6 Prohlášení o shodě Popis vý r obku 2.1 Přehled 2.2 Příslušenství 2.3 První použití Použití trouby 3.1 Popis displeje 3.2 Režimy vaření 4.1 Obecné poznámky k čištění Čištění...
-
Seite 93: Obecné Pokyny
1. Obecné pokyny Děkujeme Vám, že jste si zvolili jeden z našich vý r obků. Pro dosažení nejlepších výsledků s troubou byste si měli pečlivě přečíst tento návod a uschovat jej pro budoucí použití. Před instalací trouby si poznamenejte vý r obní číslo, abyste jej mohli poskytnout pracovníkům zákaznických služeb v případě... -
Seite 94: Instalace
POZNÁMKA: protože trouba může vyžadovat údržbu, je vhodné mít k dispozici další elektrickou zásuvku, ke které lze troubu připojit po vyjmutí z prostoru, ve kterém je nainstalována. Napájecí kabel smí být nahrazen pouze servisním technikem nebo technikem s rovnocennou kvalifikací. 1.3 Doporučení... -
Seite 95: Popis Výrobku
2. Popis vý robku 2.1 Přehled 1. Ovládací panel 2. Polohy polic (podélný dr átěný r ošt, je-li součástí dodávky) 3. Kovový r ošt 4. Odkapávací plech 5. Ventilátor (za ocelovou deskou) Sonda na maso 7. Dvířka trouby 2.2 Příslušenství Led vision Kovový... -
Seite 96: Použití Trouby
Boční drátěné mřížky Sonda na maso (závisí na modelu trouby) Boční drátěné mřížky Pokud zahrnuty. Měří vnitřní teplotu potravy během pečení. Zasuňte sondu pro maso do otvoru na vrcholu otvoru trouby. – Připravte si jídlo a správně vložte masovou sondu do jídla. - Seite 97 FUNKCE JAK POUŽÍVAT JAK DEAKTIVOVAT CO TO DĚLÁ PROČ JE TO POTŘEBA K d y ž p r o g r a m p e č e n í Po skončení doby pečení se Pozn.: může být nastavena •Chcete-li upravit pečení skončí, trouba se vypne a na p o u z e s a k t i v n í...
- Seite 98 - Ikona se začne na 1 sekundu rozsvěcet a na 3 sekundy zhasínat: trouba je v režimu pouze pro čtení. HOOVER Podrobné informace o POSTUPU PŘIPOJENÍ vašeho spotřebiče OneFi a JAK JEJ ÚČINNĚ POUŽÍVAT najdete na adrese http://wizardservice.candy-hoover.com/ NASTAVENÍ JAZYKA Jazyk můžete nastavit, když je Gril trouba vypnuta stisknutím tlačítek Extra a Select...
- Seite 99 SONDA DO MASA (závisí na modelu trouby) Pokud je identifikována sonda do masa, na displeji se zobrazí „PROBE“; pokud je sonda do masa vložena až v průběhu programu pečení, program se zastaví. Po navolení programu pečení se na displeji zobrazí výchozí teplota, ale nikdy ne vyšší než 200 °C: volitelná...
- Seite 100 3.2 Režimy vaření Volič T °C T °C Funkce (Závisí na modelu trouby) funkc výchozí ozmezí SVĚTLO: Zapne světlo v troubě. ROZMRAZOVÁNÍ: Je-li volič nastaven do této polohy. Ventilátor dmýchá 40 ÷ 40 vzduch o pokojové teplotě kolem zmrzlého pokrmu a tak jej za několik minut rozmrazí...
- Seite 101 4. Čištění a údržba trouby 4.1 Obecné poznámky k čištění Životnost spotřebiče můžete prodloužit prostřednictvím pravidelného čištění. Před prováděním ručního čištění počkejte, až trouba vychladne. Nikdy nepoužívejte při čištění brusné mycí prostředky, drátěnku nebo ostré předměty. Předejdete tak neopravitelnému poškození smaltovaných dílů. Používejte pouze mycí...
-
Seite 102: Řešení Potíží
DEMONTÁŽ A ČIŠTĚNÍ SKLENĚNÝCH DVÍŘEK 1. Otevřete dvířka trouby. 2.3.4. Zajistěte závěsy, vyšroubujte šrouby a demontujte horní kovový kryt vytažením směrem nahoru. 5.6. Vyjměte opatrně sklo ze dvířek trouby (Pozn: u pyrolytických trub vyjměte také druhé a třetí sklo (jsou-li osazena)). - Seite 103 INSTALLATION INSTALLATION INSTALLATION DU FOUR KURULUM INSTALLAZIONE INSTALACE INSTALACIÓN 560 mm Opening/ erture/ Apertura/ Öffnung/Açıklık/Otvor 460 mm x 15 mm 595 mm 580 mm 546 mm 595 mm 22 mm If the furniture is coverage with a bottom at the back part, provide an opening for the power supply cable.
- Seite 104 The manufacturer will not be responsible for any inaccuracy resulting from printing or transcript errors contained in this brochure. We reserve the right to carry out modifications to products as required, including the interests of consumption, without prejudice to the characteristics relating to safety or function.