Werbung
Verfügbare Sprachen
Verfügbare Sprachen
Quicklinks
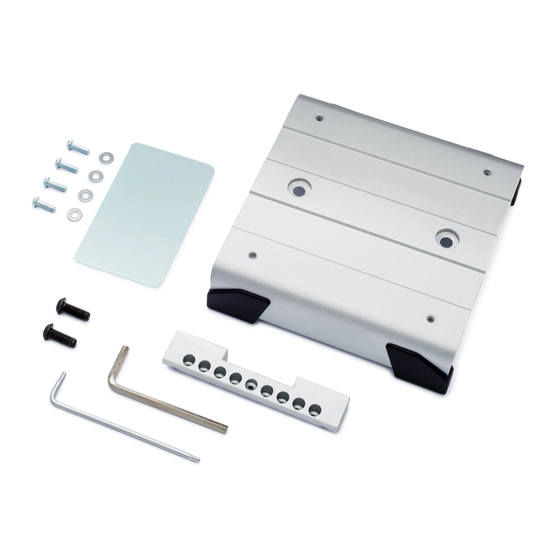
VESA Mounting Adapter for Apple™ iMacs and Displays
Mounting bracket
Mounting ange
Mounting screws
VESA screws
VESA washers
Edge Trim
Phillips head screwdriver
Plastic card (included)
T9 Torx wrench (included)
4mm Allen wrench (included)
A friend to help you hold the monitor (recommended)
Fits Apple™ Thunderbolt Displays, LED Cinema Display, 24-inch iMac (aluminum), and
Additional models may also be compatible. Check our online listings for the most recent compatibility updates.
© 2015 HumanCentric Ventures LLC
Model 101-1007
27-inch iMac (late 2009, mid 2010, early 2011).
Parts included
Tools needed for installation
Compatible with models
www.humancentric.com
English
1
1
2
4
4
4
1
Werbung

Verwandte Anleitungen für HumanCentric VESA 101-1007


Inhaltszusammenfassung für HumanCentric VESA 101-1007
- Seite 1 Fits Apple™ Thunderbolt Displays, LED Cinema Display, 24-inch iMac (aluminum), and 27-inch iMac (late 2009, mid 2010, early 2011). Additional models may also be compatible. Check our online listings for the most recent compatibility updates. © 2015 HumanCentric Ventures LLC www.humancentric.com...
- Seite 2 STEP 1 Expose Mounting Screws NOTE: This is the hardest part! Search YouTube for “remove iMac base” for some helpful videos. In order to access the screws that attach your display to the stand, you will need to use the included plastic card to release a latch inside the display.
- Seite 3 STEP 2 Remove base Place the monitor on a at surface (like the edge of a table) so the stand hangs over the edge. While holding the base with one hand, remove and keep the eight screws (you will use them in the next step).
- Seite 4 STEP 4 Install bracket Place the bracket over the ange so the holes in the ange align to the holes in the bracket. Use the two mounting screws to attach the bracket to the ange. NOTE: Tighten these screws until they are equally hand-tight on both sides.
- Seite 5 Passend für Apple™ Thunderbold Bildschirme, LED Cinema Bildschirm, 24 inch iMac (Aluminum) und 27 inch iMac (Ende 2009, Mitte 2010, Anfang 2011) Zusätzliche Modelle können ebenfalls kompatibel sein. Sehen Sie sich unsere Online-Au istung für die neuesten Kompatibilitätsupdates an. © 2015 HumanCentric Ventures LLC www.humancentric.com...
- Seite 6 SCHRITT 1 Legen Sie die Befestigungsschrauben frei HINWEIS: Das ist der schwierigste Teil! Suchen Sie auf YouTube nach hilfreichen Videos zum Thema „iMac Standfuß entfernen“. Um zu den Schrauben zu gelangen die den Bildschirm am Sockel festhalten, müssen Sie mit Hilfe der beigefügten Plastikkarte die Verriegelung im Inneren des Bildschirms freigeben.
-
Seite 7: Standfuß Entfernen
SCHRITT 2 Standfuß entfernen Legen Sie den Bildschirm auf eine ache Ober äche (zum Beispiel auf den Rand eines Tisches) sodass der Standfuß über den Rand steht. Halten Sie den Standfuß mit einer Hand und entfernen Sie die acht Schrauben (Sie brauchen diese im nächsten Schritt). - Seite 8 SCHRITT 4 Die Halterung anbringen Setzen Sie den Bügel über den Flansch, so dass die Löcher aufeinander ausgerichtet sind. Verwenden Sie die beiden Befestigungsschrauben um den Bügel auf dem Flansch zu befestigen. HINWEIS: Ziehen Sie diese Schrauben fest, bis sie gleichermaßen handfest auf beiden Seiten sind.
- Seite 9 S'adapte aux écrans Apple™ Thunderbolt Display et LED Cinema Display, aux iMac 24 pouces (aluminium) et iMac 27 pouces (fin 2009, mi-2010, début 2011) D'autres modèles peuvent aussi être compatibles. Véri ez sur nos listes en ligne les dernières mises à jour en termes de compatibilité. © 2015 HumanCentric Ventures LLC www.humancentric.com...
- Seite 10 ÉTAPE 1 Exposez les vis de xation NOTE : C'est la partie la plus dif cile ! Recherchez « retirer le pied de l'iMac » sur YouTube pour y trouver des vidéos utiles. A n d'accéder aux vis qui xent votre écran au pied, vous devrez utiliser la carte plastique fournie pour déverrouiller un...
- Seite 11 ÉTAPE 2 Retirez le pied Placez l'écran sur une surface plane (comme le bord d'une table) de telle sorte qu'il dépasse du bord. Tout en tenant le pied d'une main, retirez les huit vis et mettez-les de côté (vous les utiliserez à l'étape suivante).
- Seite 12 ÉTAPE 4 Installez le support Placez le support sur la bride de telle sorte que les trous de la bride soient alignés avec les trous du support. Utilisez les deux vis de xation pour xer le support à la bride. REMARQUE : serrez les vis jusqu'à...
- Seite 13 Compatibile con Apple™ Thunderbolt Display, LED Cinema Display, iMac 24" (alluminio) e iMac 27" (fine 2009, metà 2010, inizio 2011). Anche altri modelli potrebbero risultare compatibili. Consulta il nostro elenco su internet per gli ultimi aggiornamenti sulla compatibilità di nuovi modelli. © 2015 HumanCentric Ventures LLC www.humancentric.com...
- Seite 14 FASE 1 Scoprire le viti di montaggio NOTA: questa è la parte più dif cile! Cercando "staccare base iMac" su YouTube, è possibile vedere alcuni utili lmati. Per poter accedere alle viti che ssano il tuo display alla basetta, è necessario usare la tessera di plastica (fornita) per staccare il...
- Seite 15 FASE 2 Staccare la base Appoggiare il monitor su una super cie piana (per esempio sul bordo di un tavolo), in modo che la basetta sporga oltre il bordo. Tenendo ferma la basetta con una mano, togliere e mettere da parte le otto viti (che saranno usate nella fase successiva).
- Seite 16 FASE 4 Installare la staffa Posizionare la staffa sopra la angia, in modo che i fori della angia siano allineati con quelli della staffa. Usare le due viti di montaggio per ssare la staffa alla angia. NOTA: stringere manualmente queste viti allo stesso modo su entrambi i lati.
- Seite 17 Compatible con monitores Thunderbolt de Apple™, Monitores Led Cinema, iMac (Aluminio) 24 pulgadas, y iMac 27 pulgafas (finales 2009, mitad 2010, principios 2011) Otros modelos también pueden ser compatibles. Comprueba nuestras listas online para conocer las actualizaciones más recientes en cuanto a compatibilidad. © 2015 HumanCentric Ventures LLC www.humancentric.com...
- Seite 18 PASO 1 Exponer Tornillos de Montaje NOTA: ¡Esta es la parte más difícil! Busca en YouTube "quitar base de iMac" para ver algunos videos útiles. Con el n de acceder a los tornillos que jan tu pantalla al soporte, tendrás que usar la tarjeta de plástico incluida para liberar un pestillo de dentro de la pantalla.
- Seite 19 PASO 2 Retirar la base Coloca el monitor en una super cie plana (como el borde de una mesa) para que el pie se cierna sobre el borde. Mientras mantienes la base con una mano, extrae y mantén los ocho tornillos (que vas a utilizar en el el próximo paso).
- Seite 20 PASO 4 Instalar el soporte Coloca el soporte sobre la brida por lo que los agujeros en la brida se alinean a los agujeros en el soporte. Utiliza los dos tornillos de montaje para jar el soporte a la brida. NOTA: Aprieta los tornillos hasta que estén igualmente a mano apretada en ambos lados.