Inhaltsverzeichnis
Werbung
Verfügbare Sprachen
Verfügbare Sprachen
Werbung
Inhaltsverzeichnis
Fehlerbehebung

Verwandte Anleitungen für Disty distyNotruf NEO

Inhaltszusammenfassung für Disty distyNotruf NEO
- Seite 1 Deutsch English Bedienungsanleitung Operating instructions www.disty.de...
- Seite 2 Verpackungsinhalt | Package contents zweites Armband Bedienungsanleitung distyNotruf second wristband Operating instructions Netzteil/Ladekabel Halsband Gürtelclip (USB-Kabel) Neckband Belt clip Mains adapter/ charging lead (USB cable)
-
Seite 3: Inhaltsverzeichnis
Inhaltsverzeichnis Table of contents distyNotruf distyNotruf Inbetriebnahme Commissioning Aufl aden Charging Einbuchen und Subscribe and pre-programm Alarmnummern speichern the alarm numbers Funktionsweise Mode of operation Direktruf tätigen Make a direct call Meldekette/ Contact chain/ Alarmbestätigung alarm confi rmation Zurücknehmen eines Cancelling a direct call/ Direktrufs/Alarms an alarm... -
Seite 4: Distynotruf Neo
Herzlichen Glückwunsch! haben Sie ein DECT/GAP- distyNotruf NEO Telefonzusatzgerät erworben, das Sie ganz einfach per Knopfdruck bedienen ist die direkte Verbindung zu distyNotruf Ihren Vertrauenspersonen Sie legen fest, mit wem Sie im Notfall direkt sprechen möchten. Dazu können bis zu 5 Telefonnummern gespeichert werden. - Seite 5 als Telefon mit Freisprechfunktion distyNotruf können Sie auch als Telefon nutzen. distyNotruf Alle eingehenden Anrufe können Sie mit einem Knopfdruck annehmen. So sind Sie jederzeit erreichbar, von jedem Platz Ihres Zuhauses aus. Sogar im Garten oder Keller können Sie distyNotruf nutzen.* distyNotruf ist strahlwasser-...
-
Seite 6: Inbetriebnahme
Inbetriebnahme Die Inbetriebnahme besteht grundsätzlich aus drei Schritten: Aufl aden, Einbuchen an der Basisstation und Eingabe der Alarmnummer(n). Aufl aden Vor Inbetriebnahme muss distyNotruf vollständig aufgeladen werden (mindestens 4 Stunden). Zuerst das Ladekabel an den distyNotruf stecken und mit dem Netzteil verbinden und dieses dann in eine Steckdose stecken. -
Seite 7: Einbuchen Und Alarmnummern Speichern
über USB-Kabel mit dem PC verbinden. Mit der „Programmier App“ (für Windows 7/8/10), die Sie von www.disty.de bezogen haben, speichern Sie die Ruf- nummern in das Gerät und buchen den distyNotruf in Ihr DECT-Telefon ein. Das Ausbuchen bzw. Rücksetzen ein- zelner Parameter geschieht ebenfalls über die „Programmier... -
Seite 8: Funktionsweise
Funktionsweise Direktruf tätigen Drücken Sie die Alarmtaste. wählt nun die distyNotruf erste der hinterlegten Telefonnum mern. Die rote LED blinkt und zeigt, dass die Verbindung aufgebaut wird. Meldekette/Alarmbestätigung Die Annahme des Direktrufs muss von Diese Taste müssen die Empfänger Ihres Anrufs dem Empfänger bestätigt (quittiert) drücken, um den Direktruf an- werden, indem er nach Annahme... -
Seite 9: Zurücknehmen Eines Direktrufs/Alarms
Zurücknehmen eines Direktrufs/Alarms Sollten Sie versehentlich einen Alarm ausgelöst haben, drücken Sie einfach die Alarmtaste erneut. Anrufe annehmen Alle eingehenden Anrufe können Sie komfortabel über die Taste annehmen. Ein eingehender Anruf wird am durch die grün blinkende LED und durch distyNotruf Pieptöne signalisiert. -
Seite 10: Problembehebung
Problembehebung Wenn ich auf den Alarmknopf drücke, um einen Alarm auszulösen, passiert nichts. - Prüfen Sie, ob die LED Rot blinkt. Dann ist Ihr distyNotruf nicht mit der Basisstation verbunden. Beachten Sie, dass Sie sich innerhalb der Reichweite der Basisstation befinden müssen (max. Reichweite im Gebäude: etwa 50 m). - Seite 11 Modus Laden Leuchtdiode/Ton Leuchtdiode/Ton Mit dem Lade- Signalton, kabel verbinden rote LED leuchtet einmal Mit dem span- Rote LED blinkt im Sekunden- nungsversorgten takt während des Ladevor- Ladekabel ganges und erlischt, wenn verbunden das Laden abgeschlossen ist Modus Leuchtdiode/Ton Akkuladung Rote LED blinkt alle 30 Sek., niedrig Signalton...
-
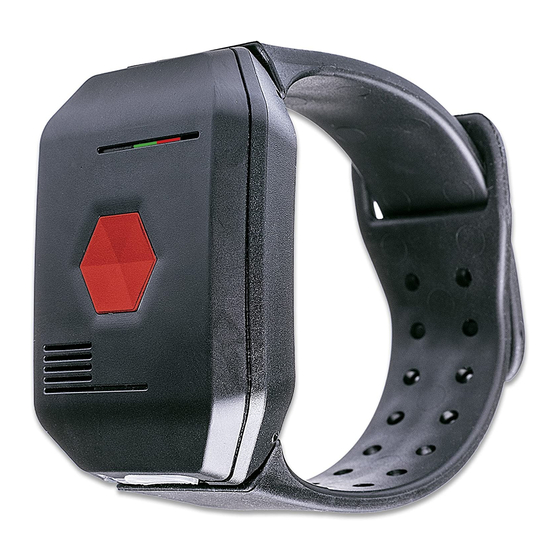
Seite 12: Tragevarianten
Tragevarianten distyNotruf kann auf drei unterschiedliche Arten am Körper getragen werden: Möglichkeit 1: Befestigung des distyNotruf am Handgelenk Das Armband ist bereits werksseitig vormontiert. Der distyNotruf so am Arm anzulegen, dass die Lade- buchse in Richtung Körper zeigt. Das kürzere Ende des Armbandes ist durch die Öffnung der anderen Armband- hälfte zu ziehen und entsprechend der Armdicke festzuziehen. -
Seite 13: Möglichkeit 2: Befestigung Mit Dem Gürtelclip
Möglichkeit 2: Befestigung mit dem Gürtelclip Armband demontieren (siehe Absatz linke Seite zu Möglichkeit 1) Federstifte aus dem Armband entfernen und ein Federstift auf der Seite der Ladebuchse einsetzen. Mittlere Lasche des Clips bis auf die Clipunterseite durchdrücken und unter den montierten Federstift schieben. -
Seite 14: Tipps & Tricks
Tipps & Tricks Gerät komplett ausschalten Wenn Sie das Gerät längere Zeit nicht benötigen (z. B. wäh- rend einer Abwesenheit im Urlaub), können Sie es komplett ausschalten. mit dem spannungsversorgten Ladekabel distyNotruf verbinden, als Bestätigung leuchtet die rote LED auf und ein akustisches Signal ertönt - nach spätestens 5 Sek. -
Seite 15: Einrichten Des Gerätes Ohne „Programmier App" (Pc)
Einrichten des Gerätes ohne „Programmier App“ (PC) Einbuchen Starten Sie an der Basisstation Ihres normalen DECT-Telefons den Einbuchvorgang zum Anmelden eines weiteren Mobil- teils (s. Bedienungsanleitung der Basisstation). distyNotruf mit dem Ladekabel verbinden und mit Spannung versorgen. Nun die Taste so lange drücken (10 Sek.), bis die grüne LED aufleuchtet. - Seite 16 Alle Alarmnummern speichern Zum Speichern der Alarmnummern per Telefon verfahren Sie bitte wie folgt (die Speicherung einer jeden Alarmnummer erfordert einen neuen Anruf): - Rufen Sie Ihren distyNotruf von einem ganz normalen Telefon oder einem Mobiltelefon/Handy an (kein Intern- gespräch von einem anderen Mobilteil an derselben Basis- station) - Nehmen Sie das Gespräch am distyNotruf...
-
Seite 17: Rücksetzen/Ausbuchen
Rücksetzen/Ausbuchen Die von Ihnen vorgenommenen Einstellungen können wieder auf den Auslieferungszustand rückgesetzt werden. Die pro- grammierten Notrufnummern bleiben dabei erhalten. Die Anmeldedaten der Basisstation werden gelöscht. Sie müssen das Gerät also vor einer weiteren Benutzung wieder an einer Basisstation anmelden. Führen Sie dazu bitte folgende Schritte aus (dazu muss distyNotruf eingebucht sein):... -
Seite 18: Technische Daten
Kunststoffgehäuse, 56 mm x 42 mm x 14 mm, Farbe: Anthrazit Schutzklasse: IP 65 Konformitätserklärung Wir, die disty communications GmbH, erklären, dass distyNotruf mit den grundlegenden Anforderungen und anderen relevanten Bestim- mungen der Richtlinie 2014/53/EU (Radio Equipment Directive; RED) über- einstimmt. -
Seite 19: Sicherheitshinweise
Alle Wartungs- und Reparaturarbeiten müssen durch gut ausgebildetes und qualifiziertes Personal durchgeführt werden. Weitere Informationen und Kontaktmöglichkeiten finden Sie unter: www.disty.de Servicetelefon: 04 31 · 3 64 58 22 Mo. – Fr. von 9.00 – 16.30 Uhr (außer an Feiertagen) Bedienungsanleitung... -
Seite 20: Distynotruf Neo
Congratulations! You are the owner of a DECT/ distyNotruf NEO GAP telephone accessory, which can be easily operated with the touch of a button is the direct connection to your distyNotruf trusted contacts You determine who you would like to speak to directly in the case of an emergency. - Seite 21 as a telephone with distyNotruf hands-free function distyNotruf can also be used as a telephone. All incoming calls can be accepted with a single touch of a button. You are now contactable from any place in your home. distyNotruf can even be used in the garden or the cellar.* distyNotruf is spray-proof and can even be...
-
Seite 22: Commissioning
Commissioning And three simple steps are all that are needed to confi gure and activate the device: charge, register with the base station, enter the alarm number(s). Charging Before putting into operation, distyNotruf must be fully charged (at least 4 hours). First, attach the charging lead to the distyNotruf and connect to the mains adapter... -
Seite 23: Subscribe And Pre-Programm The Alarm Numbers
PC using the USB cable. With the “Programmier App” (for Windows 7/8/10), which can be obtained from www.disty.de, you can pre-programm the telephone numbers on the device and register distyNotruf with your DECT phone. The “Programmier App” is also used to deregister the device or reset individual parameters. -
Seite 24: Mode Of Operation
Mode of operation Make a direct call Press the alarm button. is now calling the distyNotruf first of the pre-programmed telephone numbers. The red LED flashes and shows that the connection is being established. Contact chain/alarm confirmation The acceptance of the direct call This key must be pressed must be confirmed by the receiver by the receiver of your call in... -
Seite 25: Cancelling A Direct Call/An Alarm
Cancelling a direct call/an alarm If you accidentally trigger an alarm, simply press the alarm button again. Accepting calls All incoming calls can be conveniently accepted via the button. The distyNotruf signals an incoming call with a green fl ashing LED and beeps. Range warning If you move to the limits of the distyNotruf... -
Seite 26: Troubleshooting
Troubleshooting When I press the alarm button to trigger an alarm call, nothing happens. - Check whether the LED is flashing red. Your distyNotruf is not connected to the base station. Be aware that you must be within the range of the base station/max. - Seite 27 Charging mode LED/tone Connect to the Signal tone, charging lead red LED lights up once Connected to the The red LED fl ashes during charging lead the charging process and disappears when the charg- ing process is complete (fl ashing rhythm once a second) Mode LED/tone...
-
Seite 28: Wearing Options
Wearing options distyNotruf can be worn on the body in three different ways: Option 1: Attachment the distyNotruf to the wrist The wrist strap is pre-assembled in the factory. The distyNotruf should be attached to the wrist so that the charging socket faces the body. The shorter end of the strap should be pulled through the opening of the other half of the strap and tightened... - Seite 29 Option 2: Attachment using the belt clip Remove the wrist strap (see paragraph in Option 1) Remove the spring bolts from the wrist strap and insert a spring bolt on the side of the charging socket. Press through the centre lug of the clip until it reaches the underside of the clip and slide under the mounted spring bolt.
-
Seite 30: Tips & Tricks
Tips & tricks Switch device off If you do not need the device for a longer period of time (e. g. when away on holiday), you can switch it off completely. - connect the distyNotruf with the voltage-supplied charging lead, the red LED will then shine and an acoustic signal will ring out to confirm it is connected - after 5 seconds at the latest, press and hold the alarm button - now remove the voltage-supplied charging lead and let go off... -
Seite 31: Configuring The Device Without The "Programmier App" (Pc)
Configuring the device without the “Programmier App” (PC) Subscription Start the process on the base station of your normal DECT telephone for registering a further mobile handset (see the operating instructions of your base station). Connect the charging lead to the distyNotruf and then plug the cable into a power supply. - Seite 32 Programm all alarm numbers To programm the alarm numbers by telephone, proceed as follows (a new call is needed to save each individual alarm number): - Call your distyNotruf from a normal telephone or a mobile phone (not an internal call from another mobile handset to the same base station) - Accept the call with your distyNotruf...
-
Seite 33: Reset/Unsubscribe
Reset/Unsubscribe The settings configured by you can be reset to the original factory settings. The emergency numbers that have been programmed are not removed, however. The registration details of the base station are deleted. This means you will have to reregister the device with a base station before you can use it again. -
Seite 34: Technical Data
2014/53/EU guidelines (Radio Equipment Directive; RED). The conformity is confirmed by the CE symbol. The full declaration of conformity can be viewed on our website: www.disty.de Professional users will find additional information in the service section of our website www.disty.de. Operating instructions... -
Seite 35: Safety Information
Safety information Please observe the following safety information and check the packaging contents before first use. distyNotruf NEO is intended to be used for communication as part of a DECT installation. 2. Please keep the operating instructions for future reference. -
Seite 36: Für Ihre Persönliche Übersicht For Your Personal Overview
Für Ihre persönliche Übersicht For your personal overview Gespeicherte Personen/Saved persons: disty communications GmbH Holzkoppelweg 14 · D-24118 Kiel phone +49 (0)4 31 · 3 64 58 01 Servicehotline: +49 (0) 4 31 · 3 64 58 22 www.disty.de Technische Änderungen vorbehalten...