Inhaltsverzeichnis
Werbung
Verfügbare Sprachen
Verfügbare Sprachen
Quicklinks
NEDERLANDS
Hartelijk gefeliciteerd met de aanschaf van uw
In de bijgaande Snelstart handleiding wordt stap voor stap uitgelegd hoe u de Conceptronic
CIDE23U installeert.
Ingeval van problemen adviseren wij u onze support-site te bezoeken (ga naar:
www.conceptronic.net en klik op 'Support'). Hier vindt u een database met veelgestelde
vragen waar u hoogstwaarschijnlijk de oplossing voor uw probleem kunt vinden.
Heeft u andere vragen over uw product die u niet op de website kunt vinden, neem dan
contact met ons op via e-mail: support@conceptronic.net
Voor meer informatie over Conceptronic producten kunt u terecht op de Conceptronic
website: www.conceptronic.net.
Bij software/drivers installatie: Het is mogelijk dat onderstaande installatie iets afwijkt van
de installatie op uw computer. Dit is afhankelijk van de Windows versie die u gebruikt.
1. Introductie
De USB 2.0 naar IDE adapter maakt van elke 2.5"/ 3.5" harde schijf of CD/DVD drive een
handige externe drive. Sluit gewoon het IDE apparaat aan de adapter en plug deze in een
beschikbare USB poort van uw computer. Nu kunt u back-up bestanden van uw computer op
uw harde schijf zetten en vice versa. De USB naar IDE adapter is compatible met alle
IDE/ATAPI apparaten zoals ZIP drives, CD ROM, CD/RW, DVD/RW spelers en IDE hard drives.
2. Pakket Inhoud
De volgende onderdelen dienen aanwezig te zijn in de verpakking:
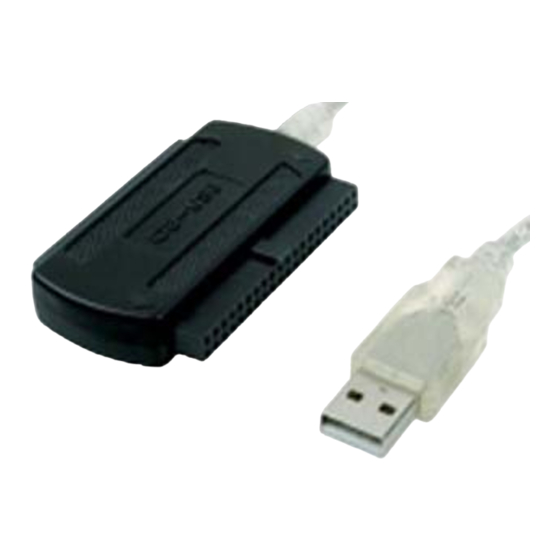
1x CIDE23U IDE Naar USB Adapterkabel
1x CIDE23U Spanningsadapter
1x Spanningskabel
1x Product CD-ROM
Conceptronic CIDE23U
Snelstart handleiding
Conceptronic IDE naar USB Adapter.
1x Snelstart Handleiding
1x Garantiekaart
1
Werbung
Inhaltsverzeichnis

Verwandte Anleitungen für Conceptronic CIDE23U


Inhaltszusammenfassung für Conceptronic CIDE23U
- Seite 1 Hartelijk gefeliciteerd met de aanschaf van uw Conceptronic IDE naar USB Adapter. In de bijgaande Snelstart handleiding wordt stap voor stap uitgelegd hoe u de Conceptronic CIDE23U installeert. Ingeval van problemen adviseren wij u onze support-site te bezoeken (ga naar: www.conceptronic.net en klik op ‘Support’).
- Seite 2 3.1 Een 2,5” Harde Schijf aansluiten op de CIDE23U Plaats de kleine IDE connector (1) van de CIDE23U op de IDE aansluiting van de harde schijf, zoals getoond in onderstaande afbeelding. Bij gebruik van een 2,5” Harde Schijf is geen spanningsadapter benodigd.
- Seite 3 NEDERLANDS 3.3 Een 5,25” CD/DVD Speler aansluiten op de CIDE23U Plaats de grote IDE connector (2) van de CIDE23U op de IDE aansluiting van CD/DVD Speler, zoals getoond in onderstaande afbeelding. Sluit tevens de spanningsadapter (3) aan op de CD/DVD Speler.
- Seite 4 Swissknife, welke u kunt vinden op de CD-ROM die meegeleverd is met de CIDE23U. Deze gratis applicatie is een Windows programma welke gebruikt kan worden om partities aan te maken en te formatteren op uw harde schijf.
- Seite 5 NEDERLANDS U kunt diverse instellingen maken voor het formatteren. Bij “Bestandssysteem” kunt u kiezen tussen NTFS of FAT32. Daarnaast kunt u een volumenaam toewijzen aan de schijf en kiezen voor snel formatteren. Klik op “Volgende” om door te gaan. Notitie: Bij schijven groter dan 32GB kunt u met Windows Schijfbeheer alleen NTFS als bestandssysteem kiezen! U krijgt een samenvatting van de gemaakte opdrachten.
- Seite 6 NEDERLANDS Het volgende scherm zal getoond worden: Selecteer de optie “Partition and Quick Format” en kies voor de schijf verbonden met “USB”.
- Seite 7 NEDERLANDS Wijzig Partition Type in “Primary”, het File System in “FAT 32” of “NTFS” (afhankelijk van uw keuze) en het Volume Label in een naam van uw keuze. Notitie: Het advies is om te kiezen voor het NTFS bestandssysteem (geschikt voor XP/W2K) als u bestanden groter dan 4GB wilt opslaan.
-
Seite 8: Package Contents
When you have other questions about your product and you cannot find it at our website, then contact us by e-mail: support@conceptronic.net For more information about Conceptronic products, please visit the Conceptronic Web Site: www.conceptronic.net The Software installation as described below, may be slightly different from the installation on your computer. - Seite 9 3.2 Connect a 3,5” Hard disk to the CIDE23U Connect the big IDE connector (2) of the CIDE23U to the IDE connector of the hard disk, as shown on the picture below. Also connect the power supply (3) to the hard...
- Seite 10 3.3 Connect a 5,25” CD/DVD drive to the CIDE23U Connect the big IDE connector (2) of the CIDE23U to the IDE connector of your CD/DVD drive, as shown on the picture below. Also connect the power supply (3) to the CD/DVD drive.
- Seite 11 CIDE23U will not show a replaceable hard disk with partitions in your operating system. To create and/or format the partition on the CIDE23U, you can use the default Windows format utility, or the program Swissknife, which you can find on the CD- ROM enclosed with the CIDE23U.
- Seite 12 ENGLISH You can make different settings to format the hard disk. At “File System”, you can choose between NTFS or FAT32. You can also assign a volume name for the partition and choose for “Quick Format”. Click “Next” to continue. Note: Partitions bigger than 32GB can only be formatted with the NTFS file system when using Windows Disk Management!
- Seite 13 ENGLISH Select the option “Partition and Quick Format” and select the hard disk connected to “USB”.
- Seite 14 ENGLISH Set the Partition Type to “Primary”, the File System to “FAT 32” or “NTFS” (depending on your preferred file system) and the Volume Label to a preferred Volume Name. Note: We advise you to use the NTFS file system (suitable for XP/W2K) when you use big files >4GB.
-
Seite 15: Contenido Del Paquete
Conceptronic CIDE23U. Si encuentra problemas, le aconsejamos que se dirija a nuestra página web www.conceptronic.net y haga clic en «Support». Aquí encontrará la base de datos de las preguntas más frecuentes o FAQ. Si tiene otras preguntas sobre su producto y no las encuentra en nuestro sitio web, póngase en contacto con nuestro servicio técnico por correo electrónico:... - Seite 16 3.1 Conecte un disco duro de 2,5” al CIDE23U Conecte el conector IDE pequeño (1) del CIDE23U al conector IDE del disco duro, tal y como muestra la imagen inferior. Si utiliza un disco duro de 2,5”, no necesitará un cable de alimentación aparte.
- Seite 17 ESPAÑOL 3.3 Conecte una unidad de CD/DVD de 5,25” al CIDE23U Conecte el conector IDE grande (2) del CIDE23U al conector IDE de la unidad de CD/DVD, tal y como muestra la imagen inferior. Conecte también el cable de alimentación (3) a la unidad de CD/DVD.
- Seite 18 Es posible que el disco duro que esté usando no esté todavía particionado/formateado. En este caso, el CIDE23U no mostrará un disco duro extraíble con particiones en su sistema operativo. Para crear y/o formatear la partición en el CIDE23U, puede usar la utilidad predeterminada de formato de Windows o el programa Swissknife, que encontrará...
- Seite 19 ESPAÑOL Puede aplicar diferentes ajustes para formatear el disco duro. En “Sistema de archivos” puede elegir entre NTFS o FAT32. También puede asignar un nombre de volumen a la partición y seleccionar “Formato rápido”. Haga clic en “Siguiente” para continuar. Nota: Las particiones superiores a 32 GB sólo se podrán formatear con el sistema de archivo NTFS cuando se utiliza el Gestor de Disco de Windows...
- Seite 20 ESPAÑOL 5.2 Utilizando Swissknife para formatear La aplicación Swissknife debe instalarse con el archivo “swissknife.exe”, que se encuentra en la carpeta “\Swissknife\” en el CD-ROM. Consulte http://www.compuapps.com/download/Swissknife/swissknife.htm para actualizaciones de la herramienta Swissknife. Instale la aplicación SwissKnife Ejecute el programa SwissKnife y seleccione “continue” (continuar) en la pantalla de información.
- Seite 21 ESPAÑOL Configure Partition Type (Tipo de partición) como “Primary” (Primaria), File System (Sistema de archivos) como “FAT 32” o “NTFS” (dependiendo de su sistema de archivos preferido) y Volume Label (Etiqueta del volumen) con el nombre de volumen que prefiera. Nota: Recomendamos que use el sistema de archivos NTFS (apropiado para XP/W2K) cuando use archivos grandes >4GB.
- Seite 22 Erklärungen für die Installation ihres Conceptronic CIDE23U. Sollten irgendwelche Probleme auftreten, empfehlen wir ihnen, auf unsere Support-Seite im Internet zu gehen (www.conceptronic.net) und auf 'Support’ zu klicken. Dort werden sie die "Frequently Asked Questions" Datenbank finden. Falls sie andere Fragen zu ihrem Produkt haben und sie diese nicht auf unserer Website finden können, kontaktieren sie uns bitte per E-Mail: support@conceptronic.net...
- Seite 23 DEUTSCH 3. Anschluss des CIDE23U an Ihr Gerät Hinweis: Der CIDE23U ist mit 2 verschiedenen Anschlüssen ausgestattet. Es kann jedoch jeweils nur ein Anschluss verwendet werden! 3.1 Anschluss einer 2,5“-Festplatte am CIDE23U Schließen Sie den kleinen IDE-Anschluss (1) des CIDE23U an den IDE-Anschluss der Festplatte an (siehe Abbildung unten).
- Seite 24 DEUTSCH 3.3 Anschluss eines 5,25”-CD-/DVD-Laufwerks am CIDE23U Schließen Sie den großen IDE-Anschluss (2) des CIDE23U an den IDE-Anschluss des CD- /DVD-Laufwerks an (siehe Abbildung unten). Schließen Sie außerdem das Netzteil (3) an das CD-/DVD-Laufwerk an. Hinweis: Sie müssen die Festplatte oder das CD-/DVD-Laufwerk, das Sie angeschlossen haben, auf ‚Master’...
-
Seite 25: Eine Partition Auf Der Festplatte Erstellen Und Formatieren
5. Eine Partition auf der Festplatte erstellen und formatieren Möglicherweise ist die Festplatte, die Sie verwenden, noch nicht partitioniert/formatiert. In diesem Fall zeigt die CIDE23U keinen Wechseldatenträger mit Partitionen in Ihrem Betriebssystem an. Sie können das Standard-Formatierungs-Hilfsprogramm von Windows oder das Programm Swissknife, das sich auf der mitgelieferten CD-ROM befindet, für das Erstellen und/oder Formatieren der Partition auf der CIDE23U verwenden. - Seite 26 DEUTSCH Ordnen Sie der neuen Partition einen Laufwerkbuchstaben zu. Standardmäßig wird der erste freie Laufwerkbuchstaben zugeordnet. Klicken Sie auf „Weiter". Sie können verschiedene Einstellungen für die Formatierung der Festplatte vornehmen. Unter „Dateisystem“ können Sie zwischen NTFS und FAT32 wählen. Sie können der Partition auch einen Volume-Namen zuweisen und die Durchführung einer „Schnellformatierung”...
-
Seite 27: Formatieren Mithilfe Von Swissknife
DEUTSCH 5.2 Formatieren mithilfe von Swissknife Die Swissknife Anwendung muss mit der Datei „swissknife.exe” installiert werden, die sich im Ordner „\Swissknife\” des CD-ROM. befindet. Updates für das Programm Swissknife finden Sie auf http://www.compuapps.com/download/Swissknife/swissknife.htm. Installieren Sie die Anwendung SwissKnife. Starten Sie das Programm SwissKnife und klicken Sie in der Informationsanzeige auf Continue [Weiter]. - Seite 28 DEUTSCH Stellen Sie den Partition Type auf „Primary”, das File System auf „FAT 32” oder „NTFS” (je nach bevorzugtem Dateisystem) und den Volume Label auf einen bevorzugten Volumenamen. Hinweis: Wir empfehlen Ihnen, das NTFS-Dateisystem (geeignet für XP/W2000) zu verwenden, wenn Sie mit großen Dateien >4GB arbeiten. Die Dateigröße für FAT32 ist auf 4GB beschränkt.
-
Seite 29: Guide De Démarrage Rapide
CIDE23U de Conceptronic. En cas de problèmes, nous vous recommandons de vous adresser à notre service technique (allez à www.conceptronic.net et cliquez sur « support »).Vous trouverez dans cette section la Base de Données des Foires Aux Questions. Si vous avez d’autres questions concernant votre produit et que vous ne trouvez pas la solution sur notre site web, contactez-nous par e-mail : support@conceptronic.net... - Seite 30 à la fois ! 3.1 Branchez le disque dur 2,5" sur le CIDE23U Branchez le petit connecteur IDE (1) du CIDE23U sur le connecteur IDE du disque dur comme indiqué dans l’image ci-après. Lorsque vous utilisez un Disque Dur de 2,5"...
- Seite 31 FRANÇAIS 3.3 Branchez le lecteur CD/DVD 5,25" sur le CIDE23U Branchez le grand connecteur IDE (2) du CIDE23U sur le connecteur IDE du lecteur CD/DVD comme indiqué dans l’image ci-après. Branchez aussi l’alimentation électrique (3) sur le lecteur CD/DVD. Remarque: Vous devez régler le disque dur connecté...
- Seite 32 Il est possible que le disque dur que vous utilisez ne soit pas encore partitionné ou formaté. Dans ce cas le CIDE23U n'affichera pas de disque dur de remplacement avec des partitions dans votre système d'exploitation. Pour créer et/ou formater la partition sur le CIDE23U, vous pouvez utiliser l'outil de formatage de Windows par défaut, ou le programme...
- Seite 33 FRANÇAIS Vous pouvez faire différents réglages pour formater le disque dur. Dans « Système de Fichier », vous pouvez choisir entre NTFS ou FAT 32. Vous pouvez aussi attribuer un nom de volume à la partition et choisir « Formatage Rapide ». Cliquez sur «...
- Seite 34 FRANÇAIS L'écran suivant s'affiche. Sélectionnez l'option "Partition et Formatage Rapide" et sélectionnez le disque dur connecté à "USB".
- Seite 35 FRANÇAIS Configurez Type de Partition (Partition Type) comme "Primaire", le Système de Fichier (File System) comme"FAT 32" ou "NTFS" (selon votre système de fichier préféré) et le Label de Volume (Volume Label) avec le Nom de Volume que vous souhaitez. Remarque: Nous vous conseillons d’utiliser le système de fichiers NTFS (qui convient pour XP/W2K) lorsque vous utilisez de gros fichiers, supérieurs à...
-
Seite 36: Contenuto Della Confezione
Conceptronic CIDE23U Guida d’installazione rapida Vi ringraziamo per l’acquisto dell’Adattatore IDE to USB Conceptronic La guida per l’installazione dell’hardware acclusa spiegherà passo a passo la CIDE23U Conceptronic. Se dovessero esserci dei problemi, vi consigliamo di visitare il nostro sito di supporto (andate su www.conceptronic.net e cliccate ‘support’), dove potrete trovare il Database... - Seite 37 ITALIANO 3. Collegare il CIDE23U al dispositivo Avviso: Il CIDE23U è provvisto di due connettori diversi. Ê possibile usarne solo uno per volta! 3.1 Collegare un disco rigido da 2,5” al CIDE23U Collegare il miniconnettore IDE (1) del CIDE23U al connettore IDE del disco rigido, come da immagine qui in basso.
- Seite 38 ITALIANO 3.3 Collegare un’unita CD/DVD 5,25” al CIDE23U Collegare il grande connettore IDE (2) del CIDE23U al connettore IDE dell’unità CD/DVD, come da immagine qui in basso. Collegare anche l’alimentatore di corrente (3) all’unità CD/DVD. Avviso: È necessario impostare il disco rigido o l’unità CD/DVD su “Master” o “Single”, a seconda del tipo di dispositivo in uso.
- Seite 39 CIDE23U non mostrerà un disco rigido sostituibile con partizioni nel sistema operativo in uso. Per creare e/o per far formato alla partizione nel CIDE23U si può utilizzare l’utility di default di Windows per realizzare formattazioni, o il programma Swissknife, che si trova nel CD-ROM in dotazione con il CIDE23U.
- Seite 40 ITALIANO Assegnare una lettera dell’unità alla nuova partizione. Per default viene assegnata la prima lettera dell’unità disponibile. Fare clic su “Avanti”. è possibile realizzare diverse configurazioni per dare formato al disco rigido. In “File System” (Sistema file) si può scegliere fra NTFS o FAT32. È anche possibile assegnare un nome di volume alla partizione e selezionare “Quick Format”...
- Seite 41 ITALIANO 5.2 Con il programma “Swissknife” per dare formato L’applicazione Swissknife deve essere installata mediante il file “swissknife.exe” contenuto nella cartella “\Swissknife\” del CD-ROM. Seelzionare: http://www.compuapps.com/download/Swissknife/swissknife.htm per ottenere aggiornamenti sul software Swissknife. Installare l’applicazione SwissKnife. Aprire il programma SwissKnife e selezionare “continua” nella videata informativa. Apparirà...
- Seite 42 ITALIANO Impostare il Partition Type (Tipo di Partizione) su “Primary” (Primario), il File System su “FAT 32” o “NTFS” (a seconda del sistema di file preferito) e la Volume Label (Etichetta di volume) sul Nome di Volume preferito. Avviso: Si consiglia di utilizzare il sistema di file NTFS (adatto a XP/W2K) quando vengono usati file di grandi dimensioni (con più...
-
Seite 43: Conteúdo Da Embalagem
Se tiver outras questões relativas ao nosso produto e não as conseguir encontrar no nosso webiste, pode-nos contactar através do e-mail: support@conceptronic.net Para mais informações sobre produtos de Conceptronic, por favor visite o Web Site da Conceptronic: www.conceptronic.net A instalação do Software conforme se encontra descrita abaixo pode ser ligeiramente diferente da instalação do seu computador. - Seite 44 3.1 Ligar um disco rígido de 2,5” ao CIDE23U Ligue o conector IDE pequeno (1) do CIDE23U ao conector IDE do disco rígido, tal como se mostra na figura seguinte. Quando usar um disco rígido de 2,5” não é necessária nenhuma fonte de alimentação separada.
- Seite 45 PORTUGUÊS 3.3 Ligar uma unidade de CD/DVD de 5,25” ao CIDE23U Ligue o conector IDE grande (2) do CIDE23U ao conector IDE da sua unidade de CD/DVD, tal como se mostra na figura seguinte. Ligue também a fonte de alimentação (3) à...
- Seite 46 Neste caso, o CIDE23U não vai mostrar um disco rígido substituível com partições no seu sistema operativo. Para criar e/ou formatar a partição no seu CIDE23U, pode usar a função de formatação predefinida do Windows, ou o programa Swissknife, que pode encontrar no CD-ROM incluído com o CIDE23U.
- Seite 47 PORTUGUÊS Atribua uma letra de unidade à nova partição. Por defeito, é atribuída a primeira letra de unidade disponível. Faça clique em “Next” (Seguinte). Pode fazer diferentes configurações para formatar o disco rígido. Em “File System” (Sistema de Ficheiros), pode escolher entre NTFS ou FAT32. Também pode atribuir um nome de volume para a partição e seleccionar “Quick Format”...
- Seite 48 PORTUGUÊS Aparece o ecrã seguinte: Seleccione a opção “Partition and Quick Format” (Partição e Formatação Rápida) e seleccione o disco rígido ligado a “USB”.
- Seite 49 PORTUGUÊS Defina o Partition Type (Tipo de partição) como “Primary” (Primária), o File System (Sistema de ficheiros) como “FAT 32” ou “NTFS” (dependendo do seu sistema de ficheiros preferido) e a Volume Label (Etiqueta de volume) com um Nome de Volume à sua escolha. Atenção: Aconselhamos a utilização do sistema de ficheiros NTFS (adequado para XP/W2K) quando usar ficheiros grandes >4GB.
-
Seite 50: A Csomag Tartalma
MAGYAR Conceptronic CIDE23U Gyors installációs kalauz Gratulálunk, hogy a Conceptronic IDE to USB adaptert választotta A mellékelt Hardver Installációs Kalauz részletes magyarázatot nyújt a Conceptronic CIDE23U installálásához. Probléma esetén javasoljuk, hogy vegye igénybe a Support-site-en nyújtott segítséget (menjen a www.conceptronic.net-re és kattintson a ‘Support’-ra. Itt megtalálja a Gyakran Ismételt Kérdések adatbázist. - Seite 51 MAGYAR 3. Csatlakoztassa a CIDE23U-t saját eszközéhez Megjegyzés: A CIDE23U két különböző csatlakozóval van ellátva. Egyszerre csak az egyiket használja! 3.1 Csatlakoztasson 2,5”-os merevlemezt a CIDE23U-hoz Csatlakoztassa a CIDE23U (1) kisméretű IDE-csatlakozóját a merevlemez IDE- csatlakozójához az alábbi képen látható módon. 2,5”-os merevlemez alkalmazásakor nincs szükség külön tápegységre.
- Seite 52 Amikor 3,5”-os vagy 5,25”-os eszközt használ, a hálózati kábelt a tápegységhez, valamint fali csatlakozóhoz kell csatlakoztatnia. A tápegységen lévő LED majd kigyullad. A Windows 2000, XP és Vista az eszközt (CIDE23U) automatikusan felismeri. A CIDE23U működtetéséhez semmilyen meghajtót nem kell installálni.
- Seite 53 5. Partíció előállítása és formázása merevlemezen Előfordulhat, hogy az Ön által használt merevlemez még nincs formázva illetve azon partíció létrehozva. Ez esetben a CIDE23U az operációs rendszerben nem mutat helyettesíthető merevlemezt. A partíciónak a CIDE23U-n való létrehozásához és/vagy formázásához, használhatja a Windows formátum segédprogramot, vagy a Swissknife programot, amelyet megtalál a CIDE23U-hoz mellékelt CD-ROM-on.
- Seite 54 MAGYAR A merevlemez formázása érdekében különböző beállításokra kerülhet sor. A „File System”-nél választhatunk az NTFS vagy a FAT32 közül. Kötetnevet is hozzárendelhetünk a partícióhoz, sőt választhatjuk a „Quick Format-ot. Ha folytatni kívánjuk, kattintsunk a „Next”-re. Megjegyzés: 32GB-nél nagyobb partíciók az NTFS fájlrendszerrel csak Windows-lemezkezelés alkalmazásával formázhatók! Ezután a kijelölt parancsok összegzése jelenik meg.
- Seite 55 MAGYAR Válassza ki a “Partíció és Gyors Formázás” opciót, és válassza ki az “USB”-hez csatlakoztatott merevlemezt!
- Seite 56 MAGYAR A Partíció típusnál válassza az “Elsődleges”-t, a Fájlrendszernél válassza a “FAT 32”-t vagy az “NTFS”-et (attól függően, hogy melyik fájlrendszert kedveli), a Kötetcímkénél pedig a kívánt kötetnevet. Megjegyzés: Ha 4GB-nál nagyobb fájlokat használ, javasoljuk, hogy használja a NTFS fájlrendszert (XP/W2K-hoz való) . A FAT32 esetében a maximális fájlméret 4GB-ra van korlátozva.
- Seite 57 Declaration of CE Conformity The manufacturer Conceptronic Address Databankweg 7 3821 AL Amersfoort, the Netherlands hereby declares that the product Type IDE to USB Adapter Product CIDE23U complies with following directives: 89/336/EEC EMC directive: Electromagnetic Compatibility 73/23/EEC Low Voltage Directive:...