Inhaltsverzeichnis
Werbung
Verfügbare Sprachen
Verfügbare Sprachen
Werbung
Inhaltsverzeichnis
Fehlerbehebung

Verwandte Anleitungen für Pulsar APEX LD38


Inhaltszusammenfassung für Pulsar APEX LD38
- Seite 1 A P E X THERMAL S I G H T S...
- Seite 2 Attention! Export of models 76415/76425/76475 with a refresh rate of 50Hz may have export limitations depending on the laws in your region. Attention! L'exportation des modèles 76415/76425/76475 avec une fréquence de renouvellement d'images de 50 Hz peut avoir des restrictions à l'exportation, selon la législation de votre région.
-
Seite 3: Specifications
PACKAGE CONTENTS SPECIFICATIONS SKU# 76411 76415 76421 76425 76471 76475 џ Thermal imaging sight APEX Carrying case Model: APEX LD38 XD38 LD50 XD50 LD75 XD75 џ Wireless remote control џ Microbolometer Mount (with screws and hex-nut key)*** џ Uncooled Uncooled Uncooled Type Dual cable: video and external power supply... -
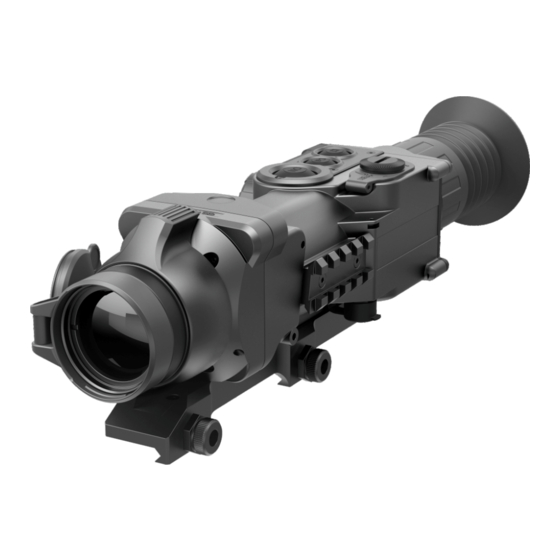
Seite 4: Components And Controls
Video output enabling recording џ Defective pixel repair option џ Extra Weaver rail for accessories џ Wireless remote control џ Wide range of display brightness and contrast adjustment with memorization џ of user settings Display off function – protects against decamouflage and quick power on for џ... -
Seite 5: Guidelines For Operation
Switch off the scope after use. Controller: џ Attempts to disassemble or repair the scope will void the warranty! Rotation (by default) – display brightness adjustment џ Clean the scope's optical surfaces only if necessary, and use caution. First, Short press – switching between brightness and contrast adjustment modes, џ... -
Seite 6: External Power Supply
Manual (silent) calibration mode џ The lens cap (8) should be closed. EXTERNAL POWER SUPPLY џ Power on the sight with the “ON” (1) button, hold down the controller (9) for two seconds to enter the menu. The sight can be powered with an external DC power supply (2.1mm pin) џ... -
Seite 7: Status Bar
џ Hold down the “MODE” (3) button to activate colour inversion mode the auxiliary cross within the limiting frame until the cross matches the point (functions “White hot” and “Black hot”). When function “White hot” is used, of impact. warm objects are represented in shades of bright colour; “Black hot” renders Note. - Seite 8 џ Confirm your choice by a short press of the controller. Menu М1 includes: џ Selection of operation mode џ List and full description of the reticles can be found at www.pulsar-nv.com џ Selection of calibration mode (Support => Download section).
-
Seite 9: Video Output
Defective pixel repair Display contrast level – 12; џ When operating the thermal imager, there is a possibility of defective (dead) Digital zoom – x1; pixels (bright or dark dots with constant brightness) appearing on the detector Image inversion – off; which are visible on the image. -
Seite 10: Troubleshooting
PROBLEM POSSIBLE CAUSE CORRECTIVE ACTION TECHNICAL INSPECTION The sight will not turn on. Batteries have been incorrectly Reinstall the batteries observing installed. polarity. It is recommended that you inspect the sight before every use. Make sure to Oxidized contact points in the Clean the battery compartment, battery compartment due to “leaky”... -
Seite 11: Contenu De L'emballage
CONTENU DE L'EMBALLAGE DONNÉES TECHNIQUES SKU# 76411 76415 76421 76425 76471 76475 џ Viseur thermique APEX Modèle: APEX LD38 XD38 LD50 XD50 LD75 XD75 џ Housse Microbolomètre џ Télécommande Type non refroidi non refroidi non refroidi џ Montage (avec les vis et clé écrou-hexagonal)*** La résolution, pixel 384x288 384x288... - Seite 12 Fonctions auxiliaires џ Fonction de débranchement de la sortie video pour abaisser la consommation énergétique џ Alimentation externe џ Haute résistance aux chocs џ Degrès de protection IPX7 (entièrement étanche à l’eau) џ Sortie vidéo – possibilité d'écriture vidéo sur d'autres dispositifs џ...
-
Seite 13: Installation Des Piles
џ Avant utilisation, vérifiez que vous avez installé et fixé le montage selon les Les modes supplémentaires bouton "MODE": instructions de la section "Installation du montage". Pression rapide – activation du zoom digital ou fonction “PiP” (si PiP est џ Conservez le viseur avec le couvercle de protection à lumière mis sur allumé). - Seite 14 Attention: ne pas utiliser des piles rechargeables, car pendant leur réglage du viseur de l'arme est impératif. utilisation la charge de la batterie pouvait être affiché incorrectement et Mise en service et étalonnage une déconnexion accidentelle pendant le fonctionnement est aussi џ...
- Seite 15 џ Dans le moment d'étalonnage automatique l'image s'immobilisera pour 1-2 џ Tout en maintenant le réticule au point de visée, par rotation de la secondes et vous étendrez le son du rideau intérieur. commande faîtes glisser la croix auxiliaire par rapport au réticule jusqu’à ce џ...
- Seite 16 џ Validez le choix par un appui instantané sur le bouton de commande. џ Fonction PiP Pour la liste et la description détaillée de réticules consultez le site www.pulsar-nv.com Répertoire du menu М2 Remarque: Le bon fonctionnement de réticules APEX est pris en charge (menu supplémentaire):...
- Seite 17 џ Moyennant la rotation de la commande choisissez le niveau de brillance des sur le senseur est possible, c'est-à-dire des points vifs ou sombres avec la icônes du menu de 1 à 10. brillance constante sont visibles sur l'image. Les viseurs thermiques Apex џ...
-
Seite 18: Entretien Technique
Choix du réticule à partir de la mémoire de l’appareil – 1 (pour tous les message “Complete”. En cas d'affichage du message Error (Erreur), types d'armes); recommancez la procédure. џ Le panneau est activée et prêt à fonctionner. “Changement de couleur du réticule” – couleur noire; џ... -
Seite 19: Recherche Des Defauts
PROBLÈME CAUSE PROBABLE SOLUTION La réticule s'écarte au moment du Absence de rigidité de montage du Vérifier la rigidité du motage du STOCKAGE tir. viseur sur le fusil, la fixation n'est viseur. Assurez-vous que vous pas bloquée par le dispositif de utilisez un tel type de cartouches Conservez toujours l'appareil dans son étui, dans un endroit sec et bien aéré. - Seite 20 LIEFERUMFANG TECHNISCHE DATEN SKU# 76411 76415 76421 76425 76471 76475 џ Zielfernrohr Modell: APEX LD38 XD38 LD50 XD50 LD75 XD75 џ Aufbewahrungstasche Microbolometer џ Fernbedienungspult ungekühlter ungekühlter ungekühlter џ Schiene (mit Schrauben und Sechskantschlüssel)*** џ Doppelkabel: Video und Stromversorgung 384x288 384x288 384x288 Auflösung, Pixel...
-
Seite 21: Bestandteile Und Steuerorgane
Zusatzfunktionen џ Funktion der Videoausgangsabschaltung für Energiesparen џ Externe Speisung џ Hohe Stoßfestigkeit џ Schutzklasse IPX7 (völlig wasserdicht) џ Videoausgang für Videoaufnahme џ Löschen der schadhaften Pixel џ Zusätzliche Weaver-Schiene für Zubehör џ Drahtlose Fernbedienung џ Umfangreiche Helligkeits- und Kontrasteinstellung mit Speicherung der Benutzereinstellungen џ... -
Seite 22: Besonderheiten Des Betriebs
Taste der Kalibrierung (“Cal”): Kurzes Drücken – Kalibrieren des Gerätes BESONDERHEITEN DES BETRIEBS (funktioniert in jedem Kalibrierungsmodus). Das Zielfernrohr Apex ist für eine dauerhafte Anwendung bestimmt. Um die Einschaltknopf für zusätzliche Modi (“MODE”): volle Leistungsfähigkeit des Gerätes zu gewährleisten, soll man sich an Kurzes Drücken –... -
Seite 23: Externe Stromspeisung
Setzen Sie den Deckel des Batteriefachs zurück ein, drücken Sie den an das Gewinde der Schrauben an und schrauben Sie sie fest. Lassen Sie џ Deckel bis er einrastet - der Deckel schließt. Vergewissern Sie sich, dass der die Gewindefixierungsflüssigkeit trocknen. џ... -
Seite 24: Einschiessen Des Zielfernrohrs Auf Die Waffe
Blende geschlossen. In diesem Betriebsmodus ist manuelle Kalibrierung 100 m. џ Stellen Sie das Zielfernrohr laut Anleitungen in Abschnitt 9 "Betrieb" ein. mittels Cal (2) Taste möglich. џ Das Gerät ist einzuschalten, der Objektivschutzdeckel (8) ist aufzumachen. џ Stellen Sie das Gewehr in die Zielscheibemitte entsprechend џ... -
Seite 25: Betrieb Und Menüinhalt
џ Symbole im Menü wechseln, drücken Sie kurz den Encoder. Langes Halten den Encoder џ Farbwechsel des Absehens gedrückt bestätigt die Speicherung der Korrekturen und ermöglicht den џ Betrieb PiP Ausgang aus diesem Menüpunkt. џ Falls die Koordinaten erfolgreich gespeichert wurden, erscheint an der Koordinatenstelle die Mitteilung „Ok”. - Seite 26 Die Liste und ausführliche Beschreibung der Absehen finden Sie auf der Löschen der schadhaften Pixel Webseite www.pulsar-nv.com. Während des Betriebs können auf dem Sensor des Wärmebildgerätes Achtung! Korrekte Arbeit der Absehen APEX wird bei der Basisvergrößerung jedes schadhafte Pixel (das Bild störende, stabil leuchtende helle oder dunkle Modells (1,5x;...
-
Seite 27: Anschlussstelle Video Out
Folgende Einstellungen werden zum Anfangszustand gebracht: (Piktogramm џ Drücken Sie den Encoder, es erscheint die Mitteilung “Wait” (warten) und Betriebsmodus – “Felsen”; Kalibrierungsmodus – automatisch; der Countdown fängt an, so soll im Laufe von dieser Zeit eine von den Tasten Gewehrauswahl - 1;... -
Seite 28: Fehlerbeseitigung
PROBLEM MÖGLICHE URSACHE BESEITIGUNG Sie früher Ihr Gewehr und Visier LAGERUNG eingeschossen haben, verwenden. Wenn Sie das Zielfernrohr im Lagern Sie das Zielfernrohr nur in der Aufbewahrungstasche, unbedingt in Sommer eingeschossen haben, einem gut gelüfteten Raum. Bei der langfristigen Lagerung nehmen Sie die und es im Winter (oder im Gegenteil) verwenden, dann ist Speiseelemente heraus. -
Seite 29: Contenido Del Embalaje
CONTENIDO DEL EMBALAJE CARACTERÍSTICAS TÉCNICAS SKU# 76411 76415 76421 76425 76471 76475 џ Visor térmico Modelo: APEX LD38 XD38 LD50 XD50 LD75 XD75 џ Funda Microbolómetro џ Mando control remoto Tipo no refrigerado no refrigerado no refrigerado џ Montaje (con tornillos y llave hexagonal)*** Resolución, pixel 384x288 384x288... - Seite 30 Funciónes adicionales: џ Régimen de ahorro de energía џ Alimentación externa џ Alta resistencia al impacto џ Grado de protección IPX7 (totalmente hermético ante el agua) џ Salida de video – posibilidad de grabación de video џ La función de eliminación de píxeles defectuosos џ...
-
Seite 31: Instalación De Baterías
џ ¡Apague el instrumento después de su uso! Botón “MODE” (activación de regimenes adicionales): џ ¡Se prohibe reparar o desarmar el visor cuando está en periodo de La presión breve – activación de zoom digital o régimen “PiP” (“imagen en garantía! imagen”) (si régimen “PiP”... -
Seite 32: Alimentación Externa
Conexión y calibración џ Pulse brevemente el botón “ON” (1) para encender el visor. En caso de ALIMENTACIÓN EXTERNA que las baterías estén descargadas, el pictograma empieza a parpadear. џ Lleve a cabo la calibración de la imagen. La calibración permite equilibrar El visor puede funcionar con una fuente externa de alimentación (clavija 2,1mm) o de la red eléctrica de automóvil. - Seite 33 џ Ajuste la nitidez de los pictogramas por medio de la rotación del anillo de determina la banda de ajustes – 200 clics por la horizontal (+100/-100) y 200 ajuste dióptrico del ocular (5). por la vertical (+100/-100). џ Para ajustar la luminosidad de la pantalla, gire el regulador (9). El grado џ...
- Seite 34 La lista y descripción completa de las retículas se puede encontrar en la џ Selección de las armas (1; 2; 3) página web www.pulsar-nv.com Nota. La operación corecta de las retículas de APEX está soportada para el џ Selección de la retícula de memoria del aumento de base para cada modelo (1,5x ;...
- Seite 35 џ A la derecha del pictograma aparecen las opciones "Sí" y "No". Reglaje de tiro con la función “Freeze” џ Gire el regulador para elegir “Yes” y pulse el regulador. Ver la sección 10 “REGLAJE DE TIRO” del manual de instrucciones. џ...
-
Seite 36: Mantenimiento Técnico
CONTROL REMOTO INALÁMBRICO MANTENIMIENTO TÉCNICO El control remoto inalámbrico doble las funciónes de conexión del visor, El mantenimiento técnico se lleva a cabo no menos de dos veces al año y calibración de la imagen y de las funciones “Zoom digital” y “PiP”. consiste en la realización de los puntos expuestos a continuación: En el control remoto hay tres botónes: џ... - Seite 37 FALLA POSIBLE CAUSA REPARACIÓN FALLA POSIBLE CAUSA REPARACIÓN Uso del visor en condiciones de Compruebe el enfoque del visor El visor no se enciende. Las baterías están colocadas Coloque las baterías en día a distancias lejanas de en condiciones nocturnas. incorrectamente.
-
Seite 38: Contenuto Della Confezione
CONTENUTO DELLA CONFEZIONE SPECIFICHE TECNICHE SKU# 76411 76415 76421 76425 76471 76475 џ Cannocchiale Modèle: APEX LD38 XD38 LD50 XD50 LD75 XD75 џ Custodia Microbolometro џ Comando remoto Tipo non refroidi non refroidi non refroidi џ Attacco (con viti e chiave esagonale)*** Risoluzione, pixel 384x288 384x288... - Seite 39 Extra: џ Uscita video disattivabile per ottimizzare il consumo energetico џ Alimentazione esterna џ Alta resistenza agli urti џ Impermeabilita' IPX7 (completamente resistente all’acqua ) џ Uscita video – la possibilità di registrazione video su dispositivo esterno џ Opzione di riparazione del pixel џ...
-
Seite 40: Inserimento Delle Batterie
Funzioni extra pulsante “MODE”: Pressione breve – attivazione dello zoom digitale o la funzione “PiP” La garanzia si perde se lo strumento viene riparato oppure smontato. (“immagine nell'immagine”)(se PiP e' accesa) џ La pulizia di parti ottiche esterne si fa con cautela e nel caso di necessità Pressione lunga –... -
Seite 41: Alimentazione Esterna
џ Fare la calibratura dell'immagine. La calibratura permette di equalizzare il fondo termico ed eliminare i difetti dell'immagine. ALIMENTAZIONE ESTERNA џ Tre possibilita' di calibratura: manuale (M), semiautomatica (H) e automatica (A). L'apparecchio può essere alimentato con una sorgente elettrica esterna DC (spina 2,1 mm), con voltaggio stabilizzato tra 8V e 15V (massimo consumo Calibratura manuale (silenzioso) 3W) o 12V da autoveicolo. - Seite 42 џ Per regolare la luminosità del display, girare il controller (9). Il livello rosso (vedi la figura) che determina la gamma di verifiche – 200 click su adeguato della luminosità (da 0 a 20) verrà indicato vicino all'indicatore orizzontale (+100/-100) e 200 click su verticale (+100/-100). џ...
-
Seite 43: Barra Di Stato
(menu) џ La lista e la descrizione completa dei reticoli possono essere trovate sul Cambio del colore del reticolo џ sito www.pulsar-nv.com Funzione PiP џ N.B.: per operare correttamentei reticoli APEX sono supportati da'ingrandimento di base per ogni modello (1.5x, 2x, 3x), e dalla modalita' Funzioni del menu М2... -
Seite 44: Uscita Video
џ Ruotare il controller per selezionare "Sì" e premerlo. MENU M2: џ Se si sceglie di non tornare ai pixel di default, selezionare "No" e premere Taratura del cannocchiale con colpo singolo Vedi parte 10 “TARATURA DELL’ARMA” delle istruzioni. il controller. џ... -
Seite 45: Manutenzione
TELECOMANDO MANUTENZIONE Il quadro del telecomando duplica le funzioni dell'inserimento dello strumento, La manutenzione ordinaria si esercita al minimo due volte all'anno e si calibratura e zoom digitale/PiP. procede come segue: Ci sono tre pulsanti sul quadro: џ Pulire superifici esterne di metallo e di plastica, rimuovere la polvere, lo џ... - Seite 46 DIFETTO (GUASTO) CAUSA POSSIBILE RIPARAZIONE DIFETTO (GUASTO) CAUSA POSSIBILE RIPARAZIONE L'unità non funziona se alimentata Assicurarsi che l'alimentatore Ricaricare la batteria (se indicato). L'apparecchio non si accende. Le batterie sono installate nel Mettere le batterie secondo la da una fonte esterna. fornisca energia.
-
Seite 47: Технические Характеристики
КОМПЛЕКТ ПОСТАВКИ ТЕХНИЧЕСКИЕ ХАРАКТЕРИСТИКИ SKU# 76411 76415 76421 76425 76471 76475 џ Прицел APEX Модель: APEX LD38 XD38 LD50 XD50 LD75 XD75 Чехол џ Микроболометр Беспроводной ПДУ џ Тип Неохлаждаемый Неохлаждаемый Неохлаждаемый Кронштейн (с винтами и шестигранным ключом)*** џ Разрешение, пикселей 384x288 384x288 384x288... -
Seite 48: Органы Управления
Дополнительные функции: џ Режим энергосбережения Возможность работы от внешнего питания џ Высокая ударная стойкость џ Степень защиты IPX7 (полная защита от проникновения воды) џ џ Видеовыход – возможность видеозаписи на сторонние устройства Функция удаления дефектных пикселей џ Дополнительная планка Weaver для установки аксессуаров џ... -
Seite 49: Установка Батарей
Кнопка калибровки прибора (“Cal”): Короткое нажатие – калибровка прибора (работает в любом режиме ОСОБЕННОСТИ ЭКСПЛУАТАЦИИ калибровки). Прицел предназначен для длительного использования. Для обеспечения работоспособности необходимо придерживаться Кнопка включения дополнительных режимов (“MODE”): следующих рекомендаций: Короткое нажатие – активация цифрового зума либо режима “PiP” џ... - Seite 50 Убедитесь, что крышка закрылась с двух сторон. выполнить рекомендации раздела "Пристрелка прицела к оружию". Примечание. При смене положения кронштейна, возможно, Уровень заряда отображается в строке статуса ( потребуется незначительная пристрелка. При полном разряде батарей в строке статуса мигает пиктограмма Включение и калибровка Внимание: не...
- Seite 51 Фокусировка и настройка изображения џ Для смены направления движения метки с горизонтального на џ Откройте крышку (8) объектива. вертикальное коротко нажмите на кнопку энкодера. При этом возле џ Настройте резкое изображение пиктограмм в строке статуса пиктограммы появятся вертикальные линии вращением кольца диоптрийной подстройки окуляра (5). Внимание! Опорный...
- Seite 52 џ Подтвердите выбор коротким нажатием кнопки энкодера. џ Выбор метки из памяти прибора Список и полное описание меток можно найти на сайте џ Регулировка яркости графики меню www.pulsar-nv.com џ Изменение цвета метки Примечание. Корректная работа прицельных меток APEX џ Режим PiP поддерживается...
- Seite 53 Режим PiP креста с горизонтального на вертикальное. џ После совмещения центра креста с дефектным пикселем коротко Режим PiP (“картинка в картинке”) позволяет увеличить центральную область перекрестия в два раза, что повышает удобство прицеливания нажмите кнопку без уменьшения поля зрения. џ MODE (3) для удаления дефектного пикселя. џ...
-
Seite 54: Технический Осмотр
ВИДЕОВЫХОД ТЕХНИЧЕСКИЙ ОСМОТР Прицел оснащен видеовыходом для подключения внешних При техническом осмотре, рекомендуемом перед каждым выездом на видеозаписывающих устройств и вывода изображения на монитор. охоту, проверьте: џ Подключите штекер (13) кабеля к разъему (10) прицела (см. схему), џ Внешний вид прицела (трещины, глубокие вмятины и следы коррозии совместив... - Seite 55 НЕИСПРАВНОСТЬ ВОЗМОЖНАЯ ПРИЧИНА ИСПРАВЛЕНИЕ НЕИСПРАВНОСТЬ ВОЗМОЖНАЯ ПРИЧИНА ИСПРАВЛЕНИЕ холодную погоду Вы можете Прицел не включается. Батареи установлены Установите батареи в использовать специальные неправильно. соответствии с маркировкой. антизапотевающие покрытия (например, как для Окислены контакты в Очистите контейнер батарей, корригирующих очков). контейнере батарей - "потекли" зачистите...