Renson Endura Twist Bedienungsanleitung
Vorschau ausblenden
Andere Handbücher für Endura Twist:
- Bedienungsanleitung (132 Seiten) ,
- Montageanleitung (92 Seiten)

Verwandte Anleitungen für Renson Endura Twist


Inhaltszusammenfassung für Renson Endura Twist
- Seite 1 Endura Twist ® Tastenbedienung Button Control Bedienungsanleitung User manual Software version 1.0.0...
-
Seite 2: Inhaltsverzeichnis
Inhaltsverzeichnis 1 • Professionelles Produkt 2 • Bestandteile 3 • Verpackung und Umweltschutz 4 • Sicherheitsvorschriften 5 • Montage und Anschluss 6 • Erste Schritte mit der Tastenbedienung 6.1 • Verbinden der Tastenbedienung mit dem Endura Twist ® 6.2 • Einstellungen 6.3 •... -
Seite 3: Professionelles Produkt
1 • Professionelles Produkt Die Tastenbedienung ermöglicht dem Benutzer die Wahl aus verschiedenen Lüftungsmodi und Lüftungsstufen: Sie können zwischen Ruhemodus und manuellem Modus (jeweils Stufe 1–4), natürlichem Modus und geschlossenem Modus wählen. 2 • Bestandteile Im Karton finden Sie die Tastenbedienung und ein Netzteil. Ein Etikett mit der Garantienummer Ihres Geräts finden Sie hinten in der Bedienungsanleitung. -
Seite 4: Verpackung Und Umweltschutz
Entsorgen Sie das Gerät darum auf keinen Fall zusammen mit dem normalen Abfall. Entsorgen Sie es auf umweltfreundliche Art und Weise. 4 • Sicherheitsvorschriften Das Gerät in dieser Verpackung entspricht den geltenden CE-Sicherheitsvorschriften. RENSON Ventilation nv ® IZ 2 Vijverdam Maalbeekstraat 10... - Seite 5 • Berücksichtigen Sie bei der Installation der Tastenbedienung immer nachstehende Sicherheitsvorschriften. Die Nichteinhaltung dieser Sicherheitsvorschriften, Warnungen, Hinweise und Anweisungen kann zu Schäden am Gerät oder zu Personenschäden führen. Hierfür übernimmt RENSON NV keine Haftung. ® ∙ Vergewissern Sie sich, dass die Stromversorgung 3 V hat (Knopfzelle, CR2430).
-
Seite 6: Montage Und Anschluss
Schäden, die durch falsche Bedienung oder nicht bestimmungsgemäßen Gebrauch verursacht werden. Stellen Sie die Tastenbedienung in einer störungsfreien Umgebung auf, sodass das Funksignal korrekt gesendet bzw. empfangen werden kann. Die Tastenbedienung kann nur in Kombination mit einer RENSON Endura ® ®... -
Seite 7: Stromversorgung
Stromversorgung Die Tastenbedienung wird mit einer Knopfzelle (3 V – CR2430) mit Strom versorgt. - Seite 8 Montage 12,7 Die Tastenbedienung kann wegen ihrer flachen Gehäuserückseite überall montiert werden. 58,4 Die Bedienung kann auch auf einer Unterputzdose montiert werden (festschrauben). 44,5 12,7 69,2 Sorgen Sie dafür, dass die Unterputzdose zwei Schraublöcher zum Festschrauben der Tastenbedienung hat. Beispiele für Unterputzdosen: Schraublöcher...
- Seite 9 Beispiel für Einzelmontage (einfaches Einbaugehäuse): Zuletzt klicken Sie die Abdeckkappe um die Tastenbedienung. Informieren Sie sich im Fachhandel über die betreffende Abdeckkappe (Marken, die ein passendes Format anbieten, sind z. B. Niko, BTicino Light). Bringen Sie die Drahtantenne wie in der Abbildung an.
-
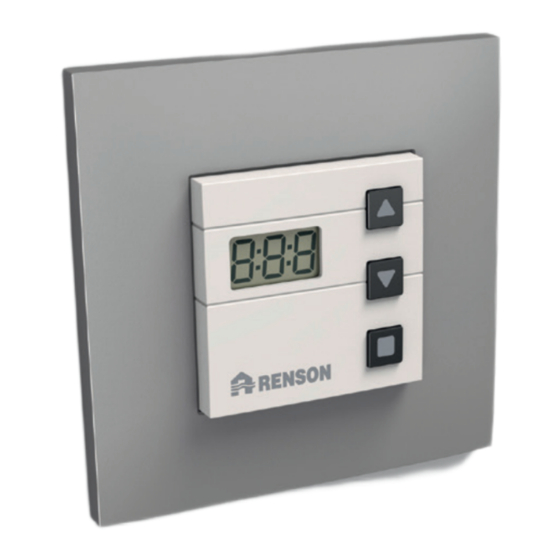
Seite 10: Erste Schritte Mit Der Tastenbedienung
6 • Erste Schritte mit der Tastenbedienung Display Taste 1 Taste 2 Taste 3 Bevor die Tastenbedienung das Endura Twist steuern kann, muss sie zuerst verbunden ® werden. -
Seite 11: Verbinden Der Tastenbedienung Mit Dem Endura
6.1 • Verbinden der Tastenbedienung mit dem Endura Twist ® Solange das Endura Twist nicht mit der Tastenbedienung verbunden ist, zeigt sie „noU“ (no ® Unit) an. Drücken Sie auf die LED, die sich am nächsten zur Antenne am Steuerkasten des Endura Twist befindet, um das Signal zu öffnen. -
Seite 12: Einstellungen
Hinweis: - Auch nach einem Stromausfall des Endura Twist oder nach dem Wechsel der Batterie ® der Tastenbedienung bleiben beide Geräte miteinander verbunden. - Sobald der Endura Twist angeschlossen ist, hören Sie vorübergehend ein tickendes ® Geräusch. Dies bedeutet, dass der Endura Twist kalibriert. -
Seite 13: Luftleistung In Abhängigkeit Mit Dem Lärmpegel 2X1 Modul
Auf Grund der folgenden Tabellen kann die Luftleistung und den Einfluss auf die Rausch Produktion bestimmt werden: • Endura Twist 2x1 ® Luftleistung in Abhängigkeit mit dem Lärmpegel 2x1 Modul Luftleistung m³/h Luftleistung ohne Filter Lärm ohne Filter Luftleistung mit G3 Filter Lärm mit G3 Filter Luftleistung mit F7 Filter Lärm mit F7 Filter... -
Seite 14: Luftleistung In Abhängigkeit Mit Dem Lärmpegel 2X2 Modul
• Endura Twist 2x2 ® Luftleistung in Abhängigkeit mit dem Lärmpegel 2x2 Modul Luftleistung m³/h Luftleistung ohne Filter Lärm ohne Filter Luftleistung mit G3 Filter Lärm mit G3 Filter Luftleistung mit F7 Filter Lärm mit F7 Filter... -
Seite 15: Luftleistung In Abhängigkeit Mit Dem Lärmpegel 2X3 Modul
• Endura Twist 2x3 ® Luftleistung in Abhängigkeit mit dem Lärmpegel 2x3 Modul Luftleistung m³/h Luftleistung ohne Filter Lärm ohne Filter Luftleistung mit G3 Filter Lärm mit G3 Filter Luftleistung mit F7 Filter Lärm mit F7 Filter... -
Seite 16: Luftleistung In Abhängigkeit Mit Dem Lärmpegel 2X4 Modul
• Endura Twist 2x4 ® Luftleistung in Abhängigkeit mit dem Lärmpegel 2x4 Modul 55 60 65 70 75 80 85 90 95 100 105 110 115 Luftleistung m³/h Luftleistung ohne Filter Lärm ohne Filter Luftleistung mit G3 Filter Lärm mit G3 Filter Luftleistung mit F7 Filter Lärm mit F7 Filter... -
Seite 17: Luftleistung In Abhängigkeit Mit Dem Lärmpegel 2X5 Modul
• Endura Twist 2x5 ® Luftleistung in Abhängigkeit mit dem Lärmpegel 2x5 Modul 0 5 10 55 60 65 70 75 80 85 90 95 100 105 110 115 120 125 130 135 140 145 Luftleistung m³/h Luftleistung ohne Filter Lärm ohne Filter Luftleistung mit G3 Filter Lärm mit G3 Filter... -
Seite 18: Luftleistung In Abhängigkeit Mit Dem Lärmpegel 2X6 Modul
• Endura Twist 2x6 ® Luftleistung in Abhängigkeit mit dem Lärmpegel 2x6 Modul 90 100 110 120 130 140 150 160 170 Luftleistung m³/h Luftleistung ohne Filter Lärm ohne Filter Luftleistung mit G3 Filter Lärm mit G3 Filter Luftleistung mit F7 Filter Lärm mit F7 Filter... -
Seite 19: Verwendung Der Tastenbedienung
6.3 • Verwendung der Tastenbedienung Mit der Tastenbedienung kann das Endura Twist gemäß zwei Lüftungsmodi gesteuert ® werden: manueller Modus und Ruhemodus. • Manueller Modus: Im manuellen Modus lüftet das Endura Twist gemäß der gewählten ® Lüftungsstufe (L1–L4). Es wird permanent gemäß der gewählten Stufe gelüftet. •... - Seite 20 • Geschlossener Modus Das Endura Twist kann auch vollständig geschlossen werden (geschlossener Modus). In ® diesem Modus wird die Einheit vollständig geschlossen, sodass kein Luftaustausch mehr zwischen drinnen und draußen stattfinden kann. Dieser Modus kann automatisch (infolge niedriger Außentemperaturen oder zu starken Windes) oder manuell aktiviert werden. Die Einheit befindet sich im Stand-by, solange der geschlossene Modus aktiv ist.
- Seite 21 • Natürlicher Modus Im natürlichen Lüftungsmodus werden die Ventilatoren des Endura Twist angehalten. Es wird ® noch gelüftet, aber dies findet auf natürliche Weise statt. Die Richtung des Luftstroms hängt also vom Druckunterschied zwischen drinnen und draußen ab. Im natürlichen Lüftungsmodus findet keine Wärmerückgewinnung oder Wärmeaustausch statt.
-
Seite 22: Fehlermeldungen
6.4 • Fehlermeldungen Wenn eine kritische Fehlermeldung auftritt, wird sie auf dem Display angezeigt. Drücken Sie 5 Sek. lang auf , um die Fehlermeldung zu löschen. Das Endura Twist wird ■ ® neu starten. Drücken Sie lange auf alle Tasten ( ), um das vollständige Fehlermenü... - Seite 23 Fehler Beschreibung Die Temperatursensoren reagieren nicht mehr ordnungs- ConnBoard gemäß. Das Gerät funktioniert weiterhin, allerdings ohne die Warnung Temp Temperatur zu berücksichtigen. Nehmen Sie Kontakt mit Ihrem Installateur auf, um die Temperatursensoren auszutauschen. Einer der Ventilatoren ist kaputt, die anderen arbeiten MainBoard Warnung weiterhin.
-
Seite 24: Filterwarnung
6.5 • Filterwarnung Wenn die Filter ausgetauscht werden müssen, erscheint der Code „FıL” auf dem Display. Drücken Sie 5 Sek. lang auf , um die Filtermeldung zu löschen. ■ Das Zurücksetzen der Filterzeit findet am Gerät selbst beim Austausch der Filter statt. Drücken Sie hierfür kurz auf die zweite Drucktaste (am weitesten von der Antenne entfernt) am Endura Twist, bis das ®... -
Seite 25: Gebäudemanagementsystem
Wie wird das Zeitintervall der Filterwarnung eingestellt? Halten Sie 5 Sekunden lang gedrückt. Auf dem Display ▼ ■ blinkt „FıL”. Verwenden Sie , um das Zeitintervall zu ändern (von 90 bis ▲ ▼ 360 Tagen + OFF (Standardeinstellung ist OFF)). Zur Bestätigung auf drücken. -
Seite 26: Reinigung Und Wartung
Geben Sie dabei die Garantienummer auf dem Etikett hinten in der Bedienungsanleitung an. Lassen Sie defekte Teile ausschließlich durch RENSON -Ersatzteile ersetzen. Nur dann sind ® Sie sicher, dass diese den Sicherheitsanforderungen von RENSON entsprechen. Durch ® unsachgemäß ausgeführte Reparaturen können für den Benutzer unvorhergesehene Risiken entstehen. -
Seite 27: Garantie Und Bedingungen
9 • Garantie und Bedingungen Die Garantielaufzeit beträgt zwei Jahre. Installation und Wartung haben gemäß der mitgelieferten Bedienungsanleitung für das Gerät und ordnungsgemäß zu erfolgen. Für ausführliche Garantie, überprüfen sie bitte unsere website: www.renson.eu... - Seite 28 Table of contents 1 • Professional product 2 • Components 3 • Packaging and environment 4 • Safety prescriptions 5 • Assembly and connection 6 • How to work with the button control 6.1 • How to link the button control with the Endura Twist ®...
-
Seite 29: Professional Product
1 • Professional product The button control enables the user to choose between the different ventilation-modes and ventilation levels: you can choose between a silent mode and a manual mode (each with level 1-4), a natural mode and a closed one. 2 •... -
Seite 30: Packaging And Environment
Don’t throw the disused device in your regular garbage bin. Choose to get rid of it in an environmental-friendly way. 4 • Safety prescriptions The device in this box meets the prescribed CE-safety prescriptions. RENSON Ventilation nv ® IZ 2 Vijverdam... - Seite 31 • Take the following safety regulations always into account when installing a button control. Failure to follow these regulations can cause damage to the device or can result in a personal injury, for which RENSON NV can’t be held liable. ®...
-
Seite 32: Assembly And Connection
® Control. Put the button control in an interference-free setting, in order to have a clear transmission and receiving of the RF-signal. This button control can only be used in combination with a RENSON ® Endura Twist ventilation unit. ®... - Seite 33 Battery The button control should be charged with a 3V button-cell battery (CR2430).
- Seite 34 Assembly 12,7 Due to its flat backside, the button control can be mounted everywhere. 58,4 The control can also be screwed on a mounting box. 44,5 12,7 69,2 Make sure the mounting box has 2 screw holes, in order to screw the button control. Some examples of boxes: Screw holes...
- Seite 35 An example of a simple assembly: In the end you should click the covering plate around the button control. Please make inquiries with your local distributor on the corresponding covering plate (following brands offer a compatible covering plate: e.g. Niko, BTicino Light). Place the antenna according to the figure.
-
Seite 36: How To Work With The Button Control
6 • How to work with the button control Display Button 1 Button 2 Button 3 The button control should first be linked to the Endura Twist or it won’t be able to control it. ®... -
Seite 37: How To Link The Button Control With The Endura
6.1 • How to link the button control with the Endura Twist ® The button control will be showing ‘noU’ (no unit) as long as it hasn’t been linked to the Endura Twist. ® Push on the LED closest to the antenna on your Endura Twist device ®... -
Seite 38: Settings
Remark: - The unit and the button control stay linked even after a power failure or after changing the battery of the button control. - The Endura Twist will temporarily make a ticking noise as soon as it’s started up. This ®... - Seite 39 The airflow capacity and noise production can be derived from the following graphics: • Endura Twist 2x1 ® Airflow and noise production 2x1 module Airflow m³/h Airflow without filter Noise production without filter Airflow with G3 filter Noise production with G3 filter Airflow with F7 filter Noise production with F7 filter...
- Seite 40 • Endura Twist 2x2 ® Airflow and noise production 2x2 module Airflow m³/h Airflow without filter Noise production without filter Airflow with G3 filter Noise production with G3 filter Airflow with F7 filter Noise production with F7 filter...
- Seite 41 • Endura Twist 2x3 ® Airflow and noise production 2x3 module Airflow m³/h Airflow without filter Noise production without filter Airflow with G3 filter Noise production with G3 filter Airflow with F7 filter Noise production with F7 filter...
- Seite 42 • Endura Twist 2x4 ® Airflow and noise production 2x4 module 55 60 65 70 75 80 85 90 95 100 105 110 115 Airflow m³/h Airflow without filter Noise production without filter Airflow with G3 filter Noise production with G3 filter Airflow with F7 filter Noise production with F7 filter...
- Seite 43 • Endura Twist 2x5 ® Airflow and noise production 2x5 module 0 5 10 55 60 65 70 75 80 85 90 95 100 105 110 115 120 125 130 135 140 145 Airflow m³/h Airflow without filter Noise production without filter Airflow with G3 filter Noise production with G3 filter Airflow with F7 filter...
- Seite 44 • Endura Twist 2x6 ® Airflow and noise production 2x6 module 90 100 110 120 130 140 150 160 170 Airflow m³/h Airflow without filter Noise production without filter Airflow with G3 filter Noise production with G3 filter Airflow with F7 filter Noise production with F7 filter...
-
Seite 45: How To Use The Button Control
6.3 • How to use the button control The button control makes it possible to operate the Endura Twist in 2 ventilation modes: ® a manual mode and a silent mode. • Manual mode: the Endura Twist will ventilate according to the chosen level (L1-L4). The ®... - Seite 46 • Closed mode The Endura Twist can also be completely closed (closed mode). The unit will be completely ® closed in this mode, as such there won’t be any air exchange between outside and inside. This mode can be activated automatically (due to extremely cold outside temperatures or due to severe winds) or it can be activated manually.
- Seite 47 • Natural mode The fans of the Endura Twist will stand still during the natural mode. There’s still ventilation ® but in a natural way. This implies that the direction of the air current depends on the difference in pressure between inside and outside. There won’t be any warmth exchange in the natural ventilation mode.
-
Seite 48: Errors
6.4 • Errors Whenever a critical error occurs, it will be shown on the display. Push 5 seconds on to erase the error. The Endura Twist will reboot. ■ ® Push on all the buttons ( ) for a long time to open the entire error list. ■... -
Seite 49: Type Description
Error Type Description The temperature sensors aren’t working as they should. ConnBoard Your unit still operates but won’t take the temperature Warning Temp into account. Please contact your installer to change the temperature sensors. MainBoard 1 of the fans is broken, the others are still operational. Warning Please contact your installer to replace the fan. -
Seite 50: Filterwarning
6.5 • Filterwarning Whenever the filters need to be replaced, ‘FıL’ will appear on the display. Press on for 5 seconds to clear the filterwarning. ■ Resetting filter time should be done on the Endura Twist while ® replacing the filters. To do so, briefly press on the second button (furthest from the antenna) until the light goes off. -
Seite 51: Building Management System
How to set the time period of the filterwarning? Keep pressed in for 5 seconds. ‘FıL’ flashes on the display. ▼ ■ to change the time interval (from 90 to 360 days + ▲ ▼ OFF (default on OFF)). Press to confirm. -
Seite 52: Cleaning And Maintenance
Never clean the Button Control with detergent or substances containing solvents. They could damage it. 8 • Repairs In case of malfunction please contact your RENSON installer. ® Please always mention the warranty number that can be found on the sticker at the back of this manual. -
Seite 53: Warranty
9 • Warranty The warranty period is 2 years. The installation and maintenance needs to be performed as described in the manual and according to good practice. For detailed warranty conditions, please consult our website: www.renson.eu... - Seite 54 Die Anleitung für das Endura Twist System kann über ® www.renson.eu heruntergeladen werden. You can download the Endura Twist manual ® via www.renson.eu.
- Seite 55 ® behandelten Produkten vorzunehmen. Die meist aktuelle Version dieser Broschüre kann aufgeladen werden von www.renson.eu RENSON reserves the right to make technical changes to the products shown. ® The most recent versions of our brochures can be downloaded from www.renson.eu...
- Seite 56 V E N T IL ATI O N S UN P ROT E CT I O N NV RENSON Ventilation SA • IZ 2 Vijverdam • Maalbeekstraat 10 • B-8790 Waregem ® Belgium • Tel: +32 (0)56 62 71 11 • info@renson.be • www.renson.eu...