Inhaltsverzeichnis
Werbung
Verfügbare Sprachen
Verfügbare Sprachen
Quicklinks
Werbung
Inhaltsverzeichnis

Verwandte Anleitungen für XciteRC H501S


Inhaltszusammenfassung für XciteRC H501S
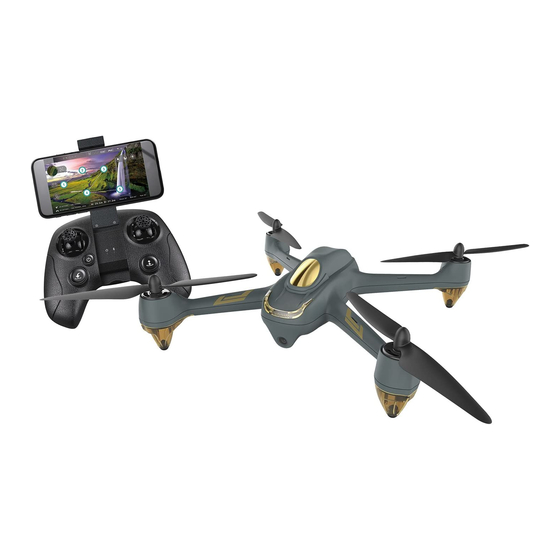
- Seite 1 Bedienungsanleitung Manual www.XciteRC.com Mode d‘emploi X4 FPV Brushless Quadrocopter - RTF-Drohne mit HD-Kamera, GPS, Follow-Me, Akku, Ladegerät und Fernsteuerung mit integriertem Farb- monitor #15030000, 15030050 Hubsan X4 FPV Brushless (H501S)
-
Seite 2: Inhaltsverzeichnis
Ausstattung vorbehalten. Aus Angaben und Abbildungen dieser Bedienungsanleitung können keine Ansprüche abgeleitet werden. KEINE HAFTUNG FÜR DRUCKFEHLER! ÄNDERUNGEN VORBEHALTEN! Die jeweils neueste Version dieser Anleitung finden Sie im Internet unter www.XciteRC.com © Copyright 2017 by XciteRC-Modellbau GmbH & Co. KG X4 FPV Brushless... -
Seite 3: Einführung
Einführung Vielen Dank für den Kauf des Hubsan X4 FPV Brushless von XciteRC. Die vorliegende Bedienungsanlei- tung enthält wichtige Hinweise für den Betrieb Ihres neuen Modells. Lesen Sie deshalb, bevor Sie das Modell in Betrieb nehmen, alle Anweisungen dieser Bedienungsanleitung vollständig durch, damit Sie Ihr Modell gefahrlos betreiben können. -
Seite 4: Erklärung Der Gefahrensymbole
Die folgenden Sicherheitshinweise müssen unbedingt beachtet werden. Für Sach-, Personen- oder Folge- schäden, die durch unsachgemäße Handhabung oder Nichtbeachtung der Sicherheitshinweise entstehen, übernimmt die XciteRC Modellbau GmbH & Co. KG keine Haftung. In diesen Fällen erlischt die Gewährleis- tung. Bewegen Sie Ihr Modell immer mit größter Vorsicht und Verantwortung, ansonsten kann es zu Schäden an fremden Eigentum oder gar Personenschäden kommen. -
Seite 5: Sicherheitshinweise Zum Umgang Mit Batterien Bzw. Akkus
Sicherheitshinweise • Bewegen Sie Ihr Modell niemals mit schwachen Senderbatterien, da dies die Reichweite drastisch redu- ziert. • Wird der Antriebsakku leerer, wird zuerst das Modell langsamer, bis es nicht mehr richtig auf Steuerbe- fehle reagiert. Stellen Sie den Betrieb spätestens dann ein und wechseln den Fahrakku oder laden ihn wieder auf. -
Seite 6: Flugakku Aufladen
Lithium-Akku längere Zeit gelagert, kann er beschädigt werden. Die Firma XciteRC Modellbau GmbH & Co. KG kann den korrekten Umgang mit den von Ihnen verwendeten Akkus bzw. Batterien nicht überwachen, daher wird die Gewährleistung bei falscher Ladung oder Entladung ausgeschlossen. -
Seite 7: Senderbatterien Einlegen
Akku laden · Senderbatterien · Motoren entsichern Die Propeller und die Motoren des X4 sind mit den Buchstaben A und B markiert. Montieren Sie die Propeller A an den Moteren A und Propeller B an den Motoren B. Blockieren Sie dazu den Motor mit dem beiliegenden U-Schlüssel und ziehen die Rotoren gut fest. -
Seite 8: Senderbeschreibung
Senderbeschreibung Senderbeschreibung Aufnahmedauer Technische Daten Sender: Aufnahme- SD-Karte Senderspannung Frequenz: 2.4 GHz Status Akkukapazität Ausgangsleistung: 3.2 mW 00:23:59 Spannung Geschwindigkeit 7.3V 0.3m/s Neigungswinkel Höhe 1.5m Pitch-Winkel Entfernung Flugrichtung H 247 Anzahl der Satelliten Trimmposition GPS X4 Längen- und GPS 6 N22.7914931 E:114.0479740 GPS Fernsteuerung... -
Seite 9: Steuerfunktionen
Steuerfunktionen Steuerfunktionen (Mode 2) Sender (FPV-Version) Bemerkungen steigen Der Gashebel steuert das Steigen oder Sinken des X4. Gashebel nach oben bewegen - das Modell steigt. Gashebel nach unten bewegen - das Modell sinkt. Verbleibt der Gashebel in der Mittelposition, schwebt der X4 und hält die aktuelle Höhe automatisch. -
Seite 10: Fotos / Videos Aufnehmen
Steuerhebel nach links bewegen - das Modell fliegt nach links. Fotos/Videos aufnehmen · GPS Home-Point nach links nach rechts Verbleibt der Steuerhebel in der Mittelposition, rollen rollen verbleibt der X4 in der aktuellen Position. Je weiter der Hebel bewegt wird, desto schneller fliegt der X4. -
Seite 11: Coming-Home Funktion
Coming-Home · Headless-Mode · Follow-Me Schalter in die obere Position aktiviert die GPS-Positionsbestimmung, in der unteren Position ist nur Altitude- Hold aktiv, die Position wird nicht gehalten. 1. Der Startpunkt (= Home-Point) ist automatisch die Stelle, bei der die Motoren nach dem Einschalten zum ersten Mal entriegelt werden (beide Steuerhebel in die untere innere Position) - Voraussetzung ist, dass mindestens sechs Satelliten gefunden wurden. -
Seite 12: Failsafe-Mode
Failsafe · LED-Statusanzeige · Steuerfunktionen umkehren · Sensitivity WARNUNG: die Follow-Me Funktion kann nur dann korrekt ausgeführt werden, wenn vom X4 und Sender durchgängig min. sechs Satelliten empfangen wuerden (siehe Senderdisplay) - Crashgefahr! Die Follow-Me Funktion wird sofort beendet, sobald ein Schalter oder Steuerhebel (Ausnahme Gas) des Senders bewegt wird! Failsafe-Mode Der Failsafe-Mode wird automatisch aktiviert, sobald der X4 die Verbindung zum Sender verliert. -
Seite 13: Manueller Modus
Manueller Modus · Binden · Kompass-Kalibrierung 0:08:49 0:08:49 MAIN MENU SET SENSITIVE Set Reverse Exit Set Sensitivity Expert mode 5.8G Frequency Elevator : Set Manual Aileron : Fly When no GPS Rudder : Show Version Exit BEACHTE: der X4 kann nicht entsichert werden, wenn der Sensitivity-Wert unter 60 programmiert wurde. -
Seite 14: Sender-Kalibrierung Bzw. Mode-Umschaltung
Senderkalibrierung BEACHTE: die Kompass-Kalibrierung darf nicht in Bereichen mit starken elektromagnetischen Feldern oder anderen Sendern wie WiFi-Routern, Mobiltelefonen oder Funksendern bzw. -schlüsseln durchgeführt werden. Zur Kalibrierung gehen Sie wie folgt vor: Gashebel in die unterste GPS-Schalter schnell auf und ab bewegen, bis im Senderdisplay Position bringen “Calib compass 1”... -
Seite 15: 5.8 Ghz Videofrequenz Einstellen
5.8 GHz Frequenz · Exploded View 5.8 GHz Videofrequenz einstellen Der Videosender sucht sich beim Einschalten automatisch die beste Frequenz, um einen störungsfreien FPV- Genuss zu ermöglichen. Sind mehrere Modelle gleichzeitig im Einsatz oder die Videoübertragung ist nicht stabil, kann die Frequenz im Bereich 5730 - 5845 Mhz auch manuell verändert werden. Gehen Sie dazu wie folgt vor: Gashebel in die unterste Position bringen und gleichzeitig den Steuerknüppel drücken, um in das Sender- Hauptmenü... -
Seite 16: Reparaturen, Ersatzteile
XciteRC Modellbau GmbH & Co. KG - Service, Autenbachstrasse 12, D-73035 Göppingen, Tel. +49 7161 40 799 50 Email: service@xciterc.de Ersatzteile für den XciteRC X4 FPV Brushless können Sie entweder im Fachhandel oder online unter http:// www.XciteRC.com beziehen. X4 FPV Brushless... -
Seite 17: Hinweise Zum Umweltschutz
Lagerung oder Entsorgung die Umwelt oder Ihre Gesundheit schädigen können. Batterien enthalten aber auch wichtige Rohstoffe wie z.B. Eisen, Zink, Mangan oder Nickel und werden wieder verwertet. Sie können die Batterien nach Gebrauch entweder ausreichend frankiert an uns zurücksenden: XciteRC Modellbau GmbH & Co.KG Autenbachstr. 12 D-73035 Göppingen oder in unmittelbarer Nähe (z.B. -
Seite 18: Konformitätserklärung
Declaration of Conformity Product: HUBSAN FPV X4 BRUSHLESS Model Number: H501S Manufacture's Name: SHENZHEN HUBSAN TECHNOLOGY COMPANY LIMITED Manufacture's Address: 13th Floor, Bldg 1C, Shenzhen Software Industry Base, Xuefu Road, Nanshan District, Shenzhen, China 518054 We, SHENZHEN HUBSAN TECHNOLOGY COMPANY LIMITED, declare under our sole responsibility that the above... - Seite 19 X4 FPV Brushless...
- Seite 20 XciteRC Modellbau GmbH & Co. KG Autenbachstraße 12 D-73035 Göppingen Phone: +49 7161 40 799 0 Fax: +49 7161 40 799 99 E-Mail: info@xciterc.de Web: www.XciteRC.com...
- Seite 21 READ THE INSTRUCTION MANUAL CAREFULLY PLEASE VISIT WWW.HUBSAN.COM TO UPGRADE THE HUBSAN X4 FPV BRUSHLESS ITEM NO: H501S FLY WHEN NO GPS SETUP, SEE CAUTION ON PAGE 02 ARM/DISARM MOTORS, SEE PAGE 06 RTH FUNCTION, SEE PAGE 09-10 FOLLOW ME FUNCTION, SEE PAGE 10-11...
-
Seite 22: Important Safety Notes
Hubsan FPV X4 Brushless 2015.01 V1.0 Please read the instruction manual carefully! IMPORTANT SAFETY NOTES OPERATION: Be extremely careful and responsible when using the drone. Small electronic components can be damaged by crashing or by dropping the X4 into water. To avoid further damages, please replace broken parts immediately. -
Seite 23: Items Included In The Box
INTRODUCTION Thank you for buying the HUBSAN products. It is designed as an easy-to-use, multi-functional RC model, capable of hovering, fast forward and acrobatic flight maneuvers. Please read the manual carefully and follow all the instructions. Be sure to keep the manual for future reference. Quadcopter Weight: 435g(including battery) FPV: First Person View Function enables you to experience every live moment of the flight from the drones's point of view. - Seite 24 2. QUAD COPTER MOTOR LED INDICATOR Indicator Status: 1. Power on: 4 white LED indicators blink simultaneously every 1.5 seconds. 2. Compass Calibration: 1). Horizontal calibration: 4 red LED indicators blink circularly. 2). Vertical calibration: 4 green LED indicators blink circularly. 3.
- Seite 25 4. QUAD COPTER UPGRADE USB port Upgrade firmwares via the USB port inside battery compartment. 5. PROPELLER Attach the propellers to the corresponding motors that are marked A and B,tighten the propellers and keep the motors deadlocked with the U wrench. ●...
- Seite 26 6. START TO FLY 6.1 FLIGHT ENVIRONMENT (1) The flying area should be open and without tall buildings or other obstacles; the steel structure within buildings interferes with the compass and the GPS signal. (2) DO NOT fly in bad weather such as strong wind, heavy snow, rain or fog. (3) Keep away from barriers, people, power cables, trees, and other obstructions.
- Seite 27 6.4 BASIC FLIGHT The operation mode for the transmitter including Mode 1 or Mode 2. The manual will use Mode 2 as an example to illustrate the transmitter’s operation. Transmitter (Model 2) Remarks The throttle stick controls the ascent and descent .
- Seite 28 The GPS Switch controls the position-hold function. In position 1 (up), the GPS function works. position 1 (upward) position 2 (downward) In position 2 (down), the GPS function is inactive. The RTH Switch controls the automatic return GPS Switch RTH Switch home function.
-
Seite 29: Advanced Performance Setup
7. ADVANCED PERFORMANCE SETUP 7.1 GPS POSITIONING/ HOME POINT SETTING 1.) GPS Positioning works ONLY when the GPS signal has no less than 6 satellites. 00:23:59 7.3V 0.3m/s 1.5m H 247 00:23:59 7.3V 7.3V 00:00:00 S: 0.1m/s H: 0.0m H 247 D: 0.0m GPS 6 N22.7914931... -
Seite 30: Headless Mode
EXIT RTH MODE Pull down the RTH Switch, the X4 will exit the RTH Mode. 7.3 HEADLESS MODE Headless mode means the X4 will default any directions MODE 2 MODE 1 (corresponding to the directions of transmitter sticks) as the up ahead when the mode is activated. - Seite 31 Press the Elevator stick for 0.5 second to switch on/ off follow me mode. Press the stick to enter into the follow me Mode, indicated by two "beep" sounds, the “ Follow On” displays on the LCD and the drone will turn and face the transmitter. Press the stick again to exit follow me Mode, indicated by one "beep"...
- Seite 32 8. TRANSMITTER Recording time Transmitter’s Record/Camera SD Card battery capacity status Quad copter’s battery capacity 00:23:59 Voltage Speed 0.3m/s 7.3V Tilt Angle Height 1.5m Pitch Angle Distance Nose Orientation H 247 GPS Signal Trimming Quad copter’s GPS Latitude&Longitude GPS 6 N22.7914931 E:114.0479740 Transmitter’s GPS...
-
Seite 33: Input Key Function
8.1 INPUT KEY FUNCTION Mode/ Control Function Push the stick forward or backward and the quadcopter will MODE 1 ascend or decend; Push the stick left or right and the quadcopter Throttle/Aileron Stick will fly left or right. Push the stick forward or backward and the quadcopter will fly MODE 1 forward or backward;Push the stick left or right and the quadcopter Elevator/Rudder Stick... -
Seite 34: Reversing Channel Setup
8.2 INSTALL THE TX BATTERY PUSH PUSH Install 4 x AA batteries Close the cover Remove the cover according to the correct polarities ● Do not mix old and new batteries ● Do not mix different types of batteries ● Do not charge non-rechargeable battery. 8.3 REVERSING CHANNEL SETUP If you would like to reverse any of the stick functions due to personal preference then follow the instructions below. - Seite 35 0:08:49 0:08:49 MAIN MENU SET SENSITIVE Set Reverse Exit Set Sensitivity Expert mode 5.8G Frequency Elevator : Set Manual Aileron : Fly When no GPS Rudder : Show Version Exit Sensitivity default setting is in Expert Mode. The quadcopter can’t be disarmed when sensitivity value less than “60”. 8.5 MANUAL MODE SETUP If you would like to make acrobatic flights, such as throwing, please switch off the GPS function and follow the instruction below to enter into the Manual mode...
-
Seite 36: Compass Calibration
9. COMPASS CALIBRATION Compass calibration is required before the first time flight, otherwise the system may not work properly. The compass is very sensitive to electromagnetic interference which can cause abnormal compass data and lead to poor flight performance or even flight failure. Regular calibration enables the compass is in optimum performance. -
Seite 37: Transmitter Calibration
10. TRANSMITTER CALIBRATION Mode 2: Push both sticks to the upper left corner and power on the transmitter simultaneously, the LCD will display “Calibrate Stick Mode 2”, rotate both sticks in circles for three times, release both sticks, then press any trim for 1.5 seconds until one “beep” heard which indicates a successful calibration. -
Seite 38: Exploded View
EXPLODED VIEW 2015 Hubsan 哈博森科技 版权所有... - Seite 39 NO. PART NAME NO. PART NAME Lower Body Shell Battery Cover Main Control Board Canopy Power Board Eye Lampshade 5.8 GHz Transmission PCBA Motor A Lampshade Compass PCBA Motor B Lampshade GPS Module Lens Holder USB PCBA Propeller A Camera Module Propeller B Rubber Feet Motor A...
- Seite 40 H501S SPARE PART CHART H109-04 H501S-01 H501S-02 H501S-02B H501S-02 H501S-03 Rubber Feet Body Shell Body Shell Battery Battery Canopy Set- White Set- Black Cover- Black Cover- White H501S-04 H501S-05 H501S-06 H501S-05B H501S-06B H501S-07 Screw Set Propeller Propeller Propeller Propeller Brushless...
-
Seite 41: Fcc Information
FCC INFORMATION This equipment has been tested and found to comply with the limits for a Class B digital device, pursuant to Part 15 of the FCC Rules. These limits are designed to provide reasonable protection against harmful interference in a residential installation. This equipment generates, uses, and can radiate radio frequency energy and, if not installed and used in accordance with the instructions, may cause harmful interference to radio communications. - Seite 42 © 2015 Hubsan 哈博森科技 版权所有...
- Seite 43 User manual is subject to change without prior notice due to unforseen product upgrades. Download the latest user manual from WWW.HUBSAN.COM VERSION 1.3 EN...