Werbung
Verfügbare Sprachen
Verfügbare Sprachen
Quicklinks
Werbung

Verwandte Anleitungen für Locinox MAMMOTH-180


Inhaltszusammenfassung für Locinox MAMMOTH-180
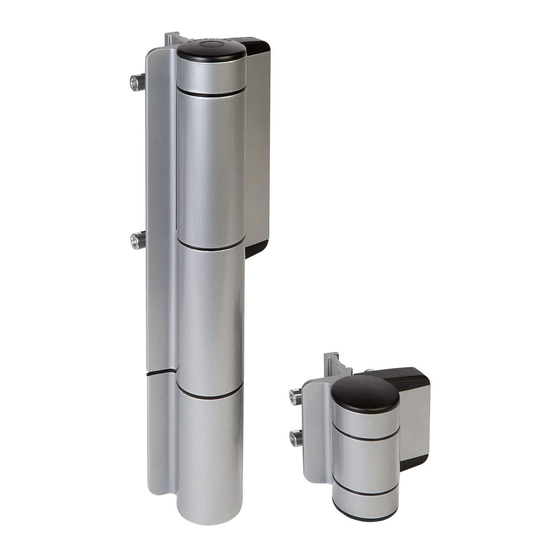
- Seite 1 MAMMOTH-180 USER GUIDE ENGLISH NEDERLANDS FRANçAIS DEUTSCH...
- Seite 2 If you require any additional information or assistance during the installation, please contact your dealer, who will be able to provide the latest information. Alternatively, you can visit the Locinox website for more technical information or e-mail us on sales@locinox.com...
- Seite 3 3. Spécifications 4. Dimensions 5. Choisir le sens d’ouverture de votre porte 6. Préparation des profils 7. Préparation du Mammoth-180 et du Dino 8. Montage de la charnière Ferme-porte 9. Finition Mammoth-180 et Dino 10. Speed and final snap adjustment 11.
- Seite 4 MAMMOTH-180 Manual - English 1. Introduction Thank you for choosing a Locinox gatecloser! Please read the following instructions carefully before mounting the Mammoth-180 & Dino to your swing gate. Enclosed you will find all relevant user information concerning the Mammoth.
- Seite 5 5. Choose the turning-direction of your gate Before preparing your profiles, decide if you have a left- or right hand door. The fixing of Mammoth 180° and Dino is different for each situation! Left hand gate Right hand gate MAMMOTH-180...
- Seite 6 6. Profile preparation There are four templates included, two for the Mammoth-180 and two for the Dino. Using blocks to hold the gate in place, set the gate into its installed position. Align both sets of templates with the alignment marks...
- Seite 7 T E M P - 0 0 0 0 2 3 20 mm 20 mm 20 mm 25/3 2” 25/32” 25/32” Fig. 6A.3 Fig. 6B.3 7. Mammoth and Dino preparation Remove the covercap and slide out the Quick-Fix cover. Fig. 7A Fig. 7B MAMMOTH-180...
- Seite 8 8. Mounting the gatecloser Place the Mammoth-180 on the gate or post and tighten the Quick-Fix bolts. Always start by mounting the left side hardware (L-wing side). Repeat this process for the Dino. Left hand gate Right hand gate Fig. 8A.1 Fig.
- Seite 9 9. Finishing Mammoth and Dino Silde the Quick-Fix cover back in place and replace the covercap. Open the gate and lock the Quick-Fix cover with the included setscrews. MAMMOTH-180...
- Seite 10 10. Speed and final snap adjustment Final snap and speed can be adjusted by means of the included 3 mm Allen key. Final snap Speed 11. Force adjustment Out of the box, the Mammoth 180° is set to its maximum closing-force: 15 Nm. We advise not to adjust the closing-force unless you have a specific applica- tion that requires a lower opening force.
- Seite 11 MAMMOTH-180...
- Seite 12 MAMMOTH-180 Handleiding - Nederlands 1. Inleiding Bedankt voor het kiezen voor een Locinox poortsluiter! Gelieve voor installatie van de Mammoth-180 en Dino, aandachtig de instructies te lezen. 2. Inhoud Gelieve te controleren of de verpakking volgende onderdelen bevat: MAMMOTH 180...
- Seite 13 Ø 15 (8x) Ø 15 (8x) 5. Keuze van draairichting van de poort Bepaal vooraleer u uw profielen voorbereid of u een links- of rechtsdraaiende poort heeft. De montage van de Mammoth-180 en de Dino zijn verschillend voor elke situatie! Linksdraaiende poort...
- Seite 14 6. Voorbereiding van de profielen 4 boortemplates zijn inbegrepen, 2 voor de Mammoth-180 en 2 voor de Dino. Positioneer de poort met behulp van blokken in de gewenste positie. Lijn beide sets boortemplates uit met behulp van de uitlijn markeringen...
- Seite 15 T E M P - 0 0 0 0 2 3 20 mm 20 mm 20 mm 25/3 2” 25/32” 25/32” Fig. 6A.3 Fig. 6B.3 7. Voorbereiding van Mammoth en Dino Verwijder het afdekkapje en schuif de Quick-Fix cover uit. Fig. 7A Fig. 7B MAMMOTH-180...
- Seite 16 8. Montage van de poortsluiter Positioneer de Mammoth-180 op de poort en paal en span de Quick-Fix vijzen aan. Begin steeds met montage van de linkerzijde (L-vleugel) van de Mammoth en de Dino. Herhaal het proces voor de Dino. Linksdraaiende poort Rechtsdraaiende poort Fig.
- Seite 17 9. Einde installatie Mammoth-180 en Dino Monteer de Quick-Fix cover opnieuw en plaats de afdekkap terug. Open de poort en fixeer de afdekkap met de bijgeleverde stelvijzen. MAMMOTH-180...
- Seite 18 11. Instellen van de sluitkracht Standaard is de Mammoth-180 ingesteld met de maximum sluitkracht van 1,5 kg of 15 Nm. We raden aan van de sluitkracht niet bij te regelen indien u geen specifieke situatie heeft waarbij een lagere openingskracht gewenst is. Begin met het verwijderen van de cover. Steek de inbussleutel in en duw krachtig naar beneden om de veer los te maken.
- Seite 19 MAMMOTH-180...
- Seite 20 MAMMOTH-180 Manuel - Français 1. Introduction Merci d’avoir choisi un ferme-porte de la gamme Locinox! S’il vous plaît veuillez lire attentivement les instructions suivantes avant d’installer le Mammoth-180 & Dino sur votre portail pivotant. Dans ce manuel vous trouverez toutes les informations nécessaires concernant la bonne utilisation du Mammoth.
- Seite 21 Ø 15 (8x) 5. Choisir le sens d’ouverture de votre porte Avant de préparer vos profils il faut définir le sens d’ouverture de votre porte. La fixation du Mammoth-180 et du Dino est différente en fonction de l’ouverture gauche ou droite.
- Seite 22 6. Préparation des profils Il y a quatre types de gabarit de perçage inclus, deux pour le Mammoth-180 et deux pour le Dino. Utilisation de cales pour mettre la porte en place, réglez la porte dans sa position finale. Alignez les deux gabarits avec les repères d’alignement...
- Seite 23 T E M P - 0 0 0 0 2 3 20 mm 20 mm 20 mm 25/3 2” 25/32” 25/32” Fig. 6A.3 Fig. 6B.3 7. Préparation du MAMMOTH et du DINO Retirer le couvercle et faites glisser le profil Fig. 7A Fig. 7B MAMMOTH-180...
- Seite 24 8. Montage de la charnière Ferme-porte Placez le Mammoth-180 sur la porte ou sur le pilier et serrer les fixations Quick-Fix. Toujours commencer par le montage du matériel sur le côté gauche du Mammoth. Répétez ce processus pour le Dino.
- Seite 25 9. Finition MAMMOTH-180 et DINO Faites glisser le carter de protection et replacer le couvercle. Ouvrez la porte et fixez le carter avec les vis fournies. MAMMOTH-180...
- Seite 26 12. Finalisation de l’installation Après l’installation du Mammoth-180, vous pouvez procéder à l’installation de votre serrure Locinox et de la gâche. Après la vitesse, la force de fermeture et l’a-coup final ont été testées à votre satisfaction, remettre le capuchon sur la vis de réglage de la force.
- Seite 27 MAMMOTH-180...
- Seite 28 MAMMOTH-180 Betriebsanleitung - Deutsch 1. Einleitung Danke, dass Sie sich für einen Locinox Türschliesser entschieden haben ! Lesen Sie sorgfältig die Instruktionen, bevor Sie den Mammoth 180 ° und das Dino an Ihrem Drehtor montieren. Darin finden Sie alle relevante Gebrauchsinformation bezüglich des Mammoth Türschliessers.
- Seite 29 5. Bestimmen Sie die Drehrichtung Ihres Tores Bevor Sie Ihre Profile vorbereiten, bestimmen Sie, ob Sie ein links- oder rechtsdrehendes Tor haben. Die Befestigung vom Mammoth 180 ° und Dino ist unterschiedlich abhängig der Situation. Linksdrehendes Tor Rechtsdrehendes Tor MAMMOTH-180...
- Seite 30 6. Vorbereitung der Profile Vier Schablonen sind einbegriffen, zwei für den Mammoth 180 ° und zwei für das Dino. Bringen Sie das Tor mit Blöcken auf der gewünschten Höhe und setzen Sie das Tor so fest. Richten Sie beide Schablonensets anhand der Markierungen aus.
- Seite 31 0 0 2 3 20 mm 20 mm 20 mm 25/3 2” 25/32” 25/32” Fig. 6A.3 Fig. 6B.3 7. Vorbereitung von Mammoth und Dino Entfernen Sie die Polyamid Abdeckkappe und schieben Sie das Aluminium Quick-Fix Schild raus. Fig. 7A Fig. 7B MAMMOTH-180...
- Seite 32 8. Montage des Türschliessers Montieren Sie den Mammoth 180 ° auf dem Tor oder dem Pfosten und spannen Sie die Quick-Fix Schrauben an. Fangen Sie immer mit der Montage der linken Seite (L-Flügel Seite) vom Mammoth und Dino an. Wiederholen Sie das ganze Verfahren für das Dino Torband. Linksdrehendes Tor Rechtsdrehendes Tor Fig.
- Seite 33 9. Ende Installation Mammoth-180 und Dino Schieben Sie das Aluminium Quick-Fix Schild zurück und schliessen Sie wieder mit der Polyamid Abdeckkappe. Öffnen Sie das Tor und schliessen Sie das Aluminium Quick-Fix Schild mit den mitgelieferten Stellschrauben. MAMMOTH-180...
- Seite 34 12. Installation beenden Nachdem Sie den Mammoth 180 ° installiert haben, können Sie mit der Installation Ihres Locinox Schlosses und Anschlages weitermachen. Testen Sie ob Geschwindigkeit, Schliesskraft und Endschlag nach Wunsch sind, und bedecken Sie dann die Stellschraube für die Schliesskraft...
- Seite 35 MAMMOTH-180...