Werbung
Quicklinks
USB 3.0 & eSATA Docking &
Clone Station for 4 SATA
User Manual
Benutzerhandbuch
Manuel Utilisateur
Manuale d'uso
LINDY No. 43114
www.lindy.com
Tested to Comply with FCC Standards
For Home and Office Use!
© LINDY ELECTRONICS LIMITED & LINDY-ELEKTRONIK GMBH - First Edition (January 2013)
Overview
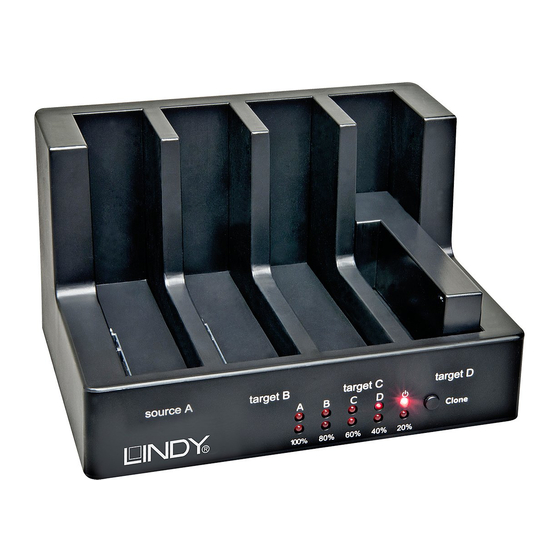
The LINDY USB 3.0 HDD Docking & Clone Station can be used as both
a HDD SATA docking station and a HDD cloning station.
The HDD Cloning function should be used standalone and creates a bit
by bit clone of the source HDD onto the target HDDs.
Features
• Connects 4 SATA HDD/SSDs to a computer using a single connector
• Accepts 1.8/2.5/3.5" HDD/SSDs with 22 pin SATA combo interface.
For Micro SATA, adapters are available from LINDY separately
(No.33502).
• Computer connection via USB 3.0 or eSATA
• SATA 3.0Gbps standard
• USB 3.0 SuperSpeed Interface up to 5Gbps, eSATA (3Gbps)
interface, Plug and Play
• Compatible with Windows XP/Vista/7/8, Mac OS 10.8 and above,
Linux 2.6.31 or above (drivers included, native support)
Package Contents
1x
SATA Docking & Cloning Station
1x
Power Supply 100-240VAC / 12V DC 6A
1x
Power Cord
1x
USB 3.0 cable
1x
eSATA cable
1x
This Manual
HDDs
English
Deutsch
Français
Italiano
English
English
English
Installation and Use
• Connect the power supply
• If you want to clone HDDs, do not connect the Docking Station to
your computer
• For normal docking station operation connect the Docking Station to
your computer by USB 3.0 cable or eSATA cable
• Insert the HDDs to the docking station, change the function switch on
the back of the Clone Station to "PM" (Port Multiplier) and press the
power switch on
• Wait until the drivers are loaded by the operating system – you
should then see the drives in the file manager program
• HDDs may need to be partitioned / formatted using your operating
system disk management utility before you can access them.
• Before unplugging HDDs make sure data transfer processes are
completed and that the activity light is not lit.
Using the CLONE function
• Install the source and maximum 3 target HDDs into the appropriately
labelled bays A (Source) and B/C/D (Target)
• The target HDDs must be of equal or larger capacity than the source
HDD
• Make sure target HDDs are empty and not partitioned
• Change the function switch on the back of the Clone Station to
"Clone". Press the power switch ON.
• Press the CLONE button three times consecutively until 20% LED
starts to flash and 3 beeping sounds will be heard. Percent status
changes as clone progresses. All 5 LEDs will ight up and a beeping
sound will be heard once the clone process has ended. Do not
switch off or unplug the HDDs during the cloning process!
English
English
Werbung

Inhaltszusammenfassung für Lindy 43114
- Seite 1 English • Connect the power supply The LINDY USB 3.0 HDD Docking & Clone Station can be used as both a HDD SATA docking station and a HDD cloning station. • If you want to clone HDDs, do not connect the Docking Station to...
- Seite 2 Introduction Français • Branchez l’alimentation La Docking & Clone Station USB 3.0 LINDY peut être utilisée aussi bien • Ne pas connecter la Docking Station à votre ordinateur si vous en station d’accueil pour disques durs qu’en station de clonage.
- Seite 3 Installazione ed uso Italiano • Collegate l’alimentazione La Docking & Clone Station USB 3.0 LINDY può essere utilizzata sia • Se volete utilizzare la funzione di duplicazione (clone) non connettete come lettore esterno per dischi SATA sia come Clone Station...


