
Inhaltszusammenfassung für Dtronic Q-5
- Seite 1 Teil 3: Funktionsbeschreibung E l e c t r o n i c D r u m k i t Q - 5 Bedienungsanleitung / Manual...
-
Seite 2: Wichtige Sicherheitshinweise
BEWAhrEn SiE DiE FOLgEnDEn SichErhEitSAnWEiSUngEn BittE SOrgFÄLtig AUF! WichtigE SichErhEitShinWEiSE: ACHTUNG – Bei Benutzung elektrischer Geräte sollten einige grundlegende Sicherheitsvorkehrungen getroffen werden. Dazu gehören insbeson- dere folgende: 1. Lesen Sie das gesamte Handbuch, bevor Sie das Gerät in Betrieb nehmen. 2. - Seite 3 Herzlichen Dank, dass Sie sich für ein elektronisches Schlagzeug von D-trOnic entschieden haben. Wir wünschen Ihnen viel Spaß und Freude mit Ihrem neuen Instrument. Bitte lesen Sie diese Bedienungs- anleitung sorgfältig durch, damit Sie alle Funktionen, die Ihnen Ihr elektronisches Schlagzeug bietet, in vollem Umfang nutzen können.
-
Seite 4: D-Tronic Q-5 Electronic Drumkit Im Überblick
D-trOnic Q-5 Electronic Drumkit im Überblick Crash Becken Ride Becken HiHat Becken Drum-Modul Tom1 Tom2 Tom3 Snare Drum Kick Drum Drumrack HiHat Controller... -
Seite 5: Inhaltsverzeichnis
teil 1: Aufbau des Schlagzeuges teil 2: Kurzanleitung teil 3: Funktionsbeschreibung 1. Ein-/Ausschalten des Schlagzeuges 2. Einstellen der Lautstärke 2.1 Kopfhöreranschluss 2.2 Aux In-Eingang 2.3 Master Out – Ausgang 3. Grundfunktionen des Soundmoduls 4. Auswahl verschiedener Drumkits 5. Einstellung der Pads 5.1 Instrument 5.2 Level 5.3 Sensitivität... -
Seite 6: Teil 1: Aufbau Des Schlagzeuges
Teil 1: Aufbau des Schlagzeuges teil 1: Aufbau des Schlagzeuges Montieren des Drumracks 1. Stecken Sie das linke Bein des Ständers in die am Fuß mon- Montieren Sie die drei verbliebenen Rohre wie abgebildet in tierte Klammer und ziehen Sie die Schraube mit dem Stimm- die drei dafür vorgesehenen Klammern am Drumrack und zie- schlüssel fest. -
Seite 7: Montieren Des Drum-Moduls
Teil 1: Aufbau des Schlagzeuges hihat crash + ride Becken Becken 1. Schrauben Sie die obere Flügelschraube vom jeweiligen Schrauben Sie das Metallteil 2 an der Rückseite an das Beckenhalter ab und nehmen Sie den Beckenfilz vom Becken- Bassdrum-Pad an. halter. -
Seite 8: Montieren Des Bassdrum-Pedals
Teil 1: Aufbau des Schlagzeuges Montieren des Bassdrum-Pedals Montieren Sie das Bassdrum-Pedal mittig am Ständer des Montieren Sie den Filzschlägel am Bassdrum-Pedal und Bassdrum-Pads. schrauben Sie ihn mit dem Stimmschlüssel fest. Anschließen der Pads an das Drum-Modul AchtUng! Um einen elektrischen Schlag und Schäden am Gerät zu vermeiden, achten Sie darauf, dass das D-TRONIC-Set und mit CRASH mit RIDE... -
Seite 9: Bevor Sie Beginnen
Teil 1: Aufbau des Schlagzeuges Bevor Sie beginnen Aufstellung Das Gerät darf nicht in staubigen, feuchten, sehr kalten oder sehr warmen Räumen benutzt oder abgestellt werden und weder direkter Sonneneinstrahlung noch Vibrationen ausgesetzt sein. interferenzen Bringen Sie das Instrument nicht in die Nähe von Leuchtstofflampen oder anderen Funkstörquellen. Benutzen Sie das Instrument nicht in der Nähe von Radioapparaten, Fernsehgeräten o. -
Seite 10: Teil 2: Kurzanleitung
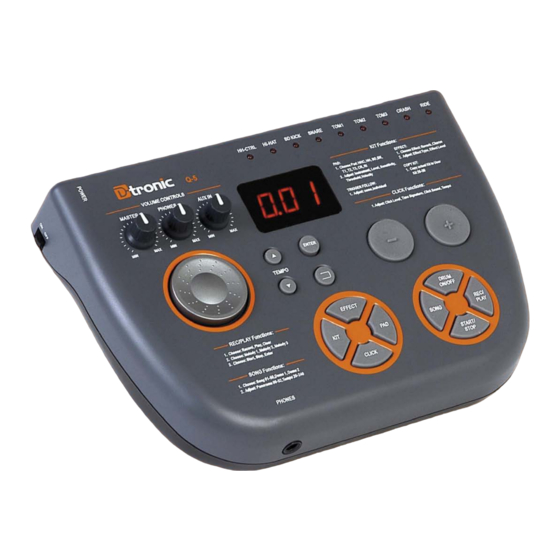
Teil 2: Kurzanleitung teil 2: Kurzanleitung Aufsicht TOM1 TOM3 RIDE HH-CTRL HI-HAT BD-KICK SNARE TOM2 CRASH VOLUME CONTROLS MASTER PHONES AUX IN ENTER TEMPO DRUM EFFECT ON/OFF REC/ SONG PLAY START/ CLICK STOP rückansicht M I D I I N M I D I O U T M A S T E R R I D E... -
Seite 11: Teil 3: Funktionsbeschreibung
Teil 3: Funktionsbeschreibung teil 3: Funktionsbeschreibung 1. Ein-/Ausschalten des Schlagzeuges 2.1 Kopfhöreranschluss Ihr Schlagzeug bietet Ihnen die Möglichkeit, einen Kopfhörer Zum Ein- und Ausschalten des elektronischen Schlagzeugs betätigen Sie den POWER-Schalter auf der linken Seite des an das Gerät anzuschließen. Der Kopfhöreranschluss befindet Soundmoduls. -
Seite 12: Grundfunktionen Des Soundmoduls
Teil 3: Funktionsbeschreibung 3. grundfunktionen des Soundmoduls 5. Einstellung der Pads Das Gerät bietet Ihnen die Möglichkeit einer einfachen und Das Schlagzeug bietet Ihnen die Möglichkeit, die einzelnen komfortablen Bedienung. Pads nach Ihren Wünschen anzupassen. Wählen Sie die Funk- tion Pad und bestätigen Sie diese mit der ENTER-Taste. Mithilfe der ENTER- und BACK-Tasten können Sie sich zwi- schen den einzelnen Ebenen des Menüs bewegen. -
Seite 13: Level
Teil 3: Funktionsbeschreibung Es stehen Ihnen 6 Instrumentengruppen zur Verfügung, die 5.5 Velocity Kurve über die erste Ziffer im LED-Display angezeigt werden. Die nächsten beiden Ziffern geben das jeweilige Instrument an. Unter Velocity Curve können Sie den Dynamikbereich des Pads In jeder Gruppe stehen Ihnen unterschiedlich viele Klänge zur einstellen: Auswahl (Eine Übersicht finden Sie auf Seite 18). -
Seite 14: Einstellung Der Soundeffekte
Teil 3: Funktionsbeschreibung 6. Einstellung der Soundeffekte Reverb Level: Sie können die Intensität des Reverb-Effektes Mit dieser Funktion können Sie verschiedene digitale Hallef- von 000 – 127 variieren. fekte auswählen, um eine realistische akustische Atmosphäre zu erzeugen. Wenn Sie die EFFECT-Taste drücken, gelangen Sie in das Menü... -
Seite 15: Kopieren Von Drumkits
Teil 3: Funktionsbeschreibung 7. Kopieren von Drumkits 8.1 Level Das Schlagzeug bietet Ihnen die Möglichkeit, sich Drumkits Unter Level können Sie die Lautstärke des Click-Sounds von nach Ihren Vorstellungen zusammenzustellen. Um dies zu 000 – 032 variieren. vereinfachen, können Sie ein Kit auf die so genannten User Kits (026 –... -
Seite 16: Song-Funktion
Teil 3: Funktionsbeschreibung 9. Song-Funktion 9.3 Drum on/off Das Schlagzeug hat 50 interne Songs und 2 Demosongs, die Sie haben die Möglichkeit, die interne Schlagzeugspur des je- Sie abspielen können und zu denen Sie gleichzeitig Schlag- weiligen Songs an- und auszuschalten. Wenn Sie die DRUM zeug spielen können. -
Seite 17: Aufnehmen
Teil 3: Funktionsbeschreibung 10.1 Aufnehmen Wenn Sie ein Stück aufnehmen möchten, bestätigen Sie die Nun können Sie zwischen Spur 001, Spur 002 oder Spur 003 REC-Funktion mit der ENTER-Taste. Nun können Sie zwischen wählen. Über die START/STOP-Taste können Sie das Stück Spur 001, Spur 002 oder Spur 003 wählen. -
Seite 18: Werkseinstellungen Wiederherstellen
Teil 3: Funktionsbeschreibung 11. Werkseinstellungen wiederherstellen Schalten Sie das Soundmodul aus. 11.3 Wiederherstellen der KIT-Einstellungen Halten Sie die Tasten [+] und [-] gleichzeitig gedrückt, wäh- rend Sie das Modul wieder einschalten. Alle Werkseinstel- Halten Sie die zwei Tasten [+] und [-] gleichzeitig bei ein- lungen sind nun wieder hergestellt. -
Seite 19: Midi-Funktionen
Teil 3: Funktionsbeschreibung 12. MiDi-Funktionen MIDI (Musical Instrument Digital Interface) ist ein weltwei- ter Standard für die Verbindung und die Datenübertragung zwischen elektronischen Musikinstrumenten, Computern und anderen Geräten. Dank MIDI können Sie Ihr Instrument zur Steuerung anderer Instrumente und diese wiederum zur Steu- erung Ihres Instrumentes einsetzen. -
Seite 20: Teil 4: Anhang
Teil 4: Anhang teil 4: Anhang 1. Liste der Drumkits Kit no. Kitname Kit no . Kitname Kit1 Standard -1 Kit14 Analog-1 Kit2 Standard -2 Kit15 Analog-2 Kit3 Dance-1 Kit16 Heavy Rock-1 Dance-2 Kit17 Heavy Rock-2 Kit5 Dance-3 Kit18 Rockbank Kit6 Jazz-1 Kit19... - Seite 21 Teil 4: Anhang Var 4 21-51 38 Snare Gate H 40 Mid Tom H Var 5 21-53 39 Snare Analog M 41 High Tom 2 21 Acoustic Cymbal 40 TR808 Snare Drum 42 Room Tom var 1 21 Acoustic HH Close 22 Acoustic Ride 41 Snare Drum 1 43 Room Tom var 2...
-
Seite 22: Liste Der Songs
Teil 4: Anhang 3. Liste der Songs Songname Songname 8BEAT MODERN DANCE 8BEAT MERSEy BEAT CHILL OUT SURF POP 70‘S DISCO 8BEAT LATIN DISCO 60‘S ROCK DISCO HEAVy ROCK DISCO PARTy ROCK SHUFFLE DISCO FEVER 80‘S ROCK Newyork DISCO 16 BEAT1 BIG BAND FAST POP SHUFFLE BIG BAND MID... -
Seite 23: Midi Implementation Chart
Teil 4: Anhang 4. MiDi implementation chart Function transmitted recognized remarks Basic Default 1-16CH 1-16CH Channel Changed 1-16CH 1-16CH Mode Default Mode 3 Mode 3 Messages Altered ********** Note 0 ~127 0 ~127 Number: True voice ********** 0 ~127 Velocity Note ON 0 9nH,v=1~127 0 9nH,v=1~127 Note OFF... -
Seite 24: Liste Der Led-Abkürzungen
Teil 4: Anhang 5. Liste der LED-Abkürzungen Display interpret Display interpret Delay Pan Delay Effect Copy Chorus 1 Trigger Chorus 2 Open Hi-Hat Chorus 3 Close Hi-Hat Chorus 4 Feedback Instrument Flanger Level Sensitivity Short Delay Threshold FB Delay Velocity Curve Bass Drum Reverb Snare... -
Seite 25: Teil 5: Technische Daten
Teil 5: Technische Daten teil 5: technische Daten Drum Pad: 4 Drum pads, 3 Cymbal pads, 1 Hi-Hat Control pedal, 1 BD Pad Voices: 235 Voices Drum kits: 25 Preset kits, 5 User kits Song: 50 Preset songs, and 2 Demos Effect: Reverb, Chorus controls:... - Seite 26 w w w . d - t r o n i c . i n f o b2bMusic.biz GmbH . Postfach 20 10 . 35008 Marburg . Germany . www.b2bMusic.biz...
- Seite 27 Teil 3: Funktionsbeschreibung E l e c t r o n i c D r u m k i t Q - 5 User‘s Manual...
- Seite 28 PLEASE KEEP thiS SAFEty ADVicE SAFE! Precautions: WARNING! When using electric products, basic precautions should always be followed, including the following: 1. Read this manual completely before using the product. 2. Do not use this product near water - for example, near a bathtub, washbowl, kitchen sink, in a wet basement, or near a swimming pool, or the like 3.
- Seite 29 Thank you for purchasing the D-trOnic electronic drumkit Q-5. We hope you‘ll enjoy playing your new instrument. For perfect operation and security, please read the manual carefully and keep it for future references. 29 29 Sicherheitshinweis...
- Seite 30 D-trOnic Q-5 Electronic Drumkit Survey Crash Cymbal Ride Cymbal HiHat Cymbal Drum-Module Tom1 Tom2 Tom3 Snare Drum Kick Drum HiHat Controller 30 30...
- Seite 31 Part 1: Assembly instruction Part 2: Overview Part 3: Functions 1. Setting up the drumkit 2. Adjusting the volume 2.1 Connecting headphones 2.2 Aux In-Input 2.3 Master Out Output 3. Main functions of the drum module 4. Choosing drumkits 5. Adjusting pads 5.1 Instrument 5.2 Level 5.3 Sensitivity...
-
Seite 32: Part 1: Assembly Instruction
Part 1: Assembly instruction Part 1: Assembly instruction Assembling the rack Insert the left and right support arm into the rack clamp as 1. Insert the left support into the base rack clamp, tighten the shown above. Tighten the set-screw. set-screw. - Seite 33 Part 1: Assembly instruction hihat crash + ride cymbals cymbals Set up plate 2 on the backside of the pad and tighten the 1. Take out the wing nut and felt washer. screw. 2. Place the cymbal over the tilter peg. Put the felt washer and wing nut onto the cymbal.
- Seite 34 Part 1: Assembly instruction Assembling the bassdrum pedal Attach drum pedal to the batter side hoop with hoop holder Insert the beater shaft into the beater link and tighten the clamp and tighten the T-screw. key bolt. connecting the pads to the drum-module cAUtiOn! To prevent electric shock and damage to the devices, make with CRASH...
- Seite 35 Part 1: Assembly instruction Before you start playing Placement The instrument should not be used or placed in dusty, damp, very cold or very warm environments and it should not be exposed to direct sunlight or vibrations. interference The instrument should not be used nearby of fluorescent lamps or other sources of electrical interference. To avoid interference to the microprocessors inside the instrument, do not use the instrument close to radios, TV‘s etc.
-
Seite 36: Part 2: Overview
Part 2: Overview Part 2: Overview top panel TOM1 TOM3 RIDE HH-CTRL HI-HAT BD-KICK SNARE TOM2 CRASH VOLUME CONTROLS MASTER PHONES AUX IN ENTER TEMPO DRUM EFFECT ON/OFF REC/ SONG PLAY START/ CLICK STOP rear panel M I D I I N M I D I O U T M A S T E R R I D E... -
Seite 37: Part 3: Functions
Part 3: Functions Part 3: Functions 1. Setting up the drum kit 2.1 Connecting headphones A pair of headphones can be connected to the drum modu- To turn the drumkit on and off, use the POWER switch located on the left side of the drum module. When the drum kit is le. -
Seite 38: Main Functions Of The Drum Module
Part 3: Functions 3. Main functions of the drum module 5. Adjusting pads The console is easy to use and very comfortable in handling. Every pad of the drumkit can be adjusted individualy. Just choose the Pad-mode and confirm it with the ENTER-button. By using the ENTER and BACK buttons you can switch bet- ween the layers of the menu. -
Seite 39: Level
Part 3: Functions There are 6 categories of instruments, which turn up as the 5.5 Velocity first number of the LED-display. The next two numbers show the certain instruments. you can choose between several The Velocity Curve (CUr) adjusts the dynamic range of the sounds in each category (refer to the list on page 46). -
Seite 40: Adjusting Soundeffects
Part 3: Functions 6. Adjusting soundeffects Reverb Level: you can adjust the intensity of the Reverb effect This function gives you the possibility to choose various digi- between a range from 000 – 127. tal reverb effects to generate a realistic acoustic atmosphere. Press the EFFECT-button to get into the Effect-menu. -
Seite 41: Copy Drumkits
Part 3: Functions 7. copy drumkits 8.1 Level The D-TRONIC Q-5 makes ist easy to combine your favourite Level adjusts the volume level of the Click sound in a range drumkits. Copying a kit to an individual User Kit (026 – 030) from 000 –... -
Seite 42: Song Function
Part 3: Functions 9. Song functions 9.3 Drum on/off The drumkit is equipped with 50 song presets and 2 demo- With this function the main drum track of a song can be swit- songs, that can be played back while you play the drums si- ched off, so you can play along with the song just hearing multaneously. -
Seite 43: Record
Part 3: Functions 10.1 Record When you are in the REC mode you can activate the recording Now you can choose between track 001, track 002 or track by pressing the ENTER button. Now you can choose between 003. Pressing the START/STOP button starts and stops the track 001, track 002 or track 003. -
Seite 44: Factory Reset
Part 3: Functions 11. Factory reset 11.3 Restoring the KIT settings Turn off the power of the soundmodule. Hold down buttons Turn on the sound module. Hold down the buttons [+] and [+] and [-] simultaneously while switching on the module [-] simultaneously. -
Seite 45: Midi
Part 3: Functions 12. MiDi MIDI (Musical Instrument Digital Interface) is a world-stan- dard communication interface that allows MIDI compatible musical instruments and equipment to share musical infor- mation and control one another. This makes it possible to create “systems“ of MIDI instruments and equipment that offer far greater versatility and control than is available with isolated instruments. -
Seite 46: Part 4: List Of Functions
Part 4: List of functions Part 4: List of functions 1. List of drumkits Kit no. Kitname Kit no . Kitname Kit1 Standard -1 Kit14 Analog-1 Kit2 Standard -2 Kit15 Analog-2 Kit3 Dance-1 Kit16 Heavy Rock-1 Dance-2 Kit17 Heavy Rock-2 Kit5 Dance-3 Kit18... - Seite 47 Part 4: List of functions Var 4 21-51 38 Snare Gate H 40 Mid Tom H Var 5 21-53 39 Snare Analog M 41 High Tom 2 21 Acoustic Cymbal 40 TR808 Snare Drum 42 Room Tom var 1 21 Acoustic HH Close 22 Acoustic Ride 41 Snare Drum 1 43 Room Tom var 2...
-
Seite 48: List Of Songs
Part 4: List of functions 3. List of songs Songname Songname 8BEAT MODERN DANCE 8BEAT MERSEy BEAT CHILL OUT SURF POP 70‘S DISCO 8BEAT LATIN DISCO 60‘S ROCK DISCO HEAVy ROCK DISCO PARTy ROCK SHUFFLE DISCO FEVER 80‘S ROCK Newyork DISCO 16 BEAT1 BIG BAND FAST POP SHUFFLE... -
Seite 49: Midi Implementation Chart
Part 4: List of functions 4. MiDi implementation chart Function transmitted recognized remarks Basic Default 1-16CH 1-16CH Channel Changed 1-16CH 1-16CH Mode Default Mode 3 Mode 3 Messages Altered ********** Note 0 ~127 0 ~127 Number: True voice ********** 0 ~127 Velocity Note ON 0 9nH,v=1~127 0 9nH,v=1~127... -
Seite 50: List Of Led Shortcuts
Part 4: List of functions 5. List of LED shortcuts Display interpret Display interpret Delay Pan Delay Effect Copy Chorus 1 Trigger Chorus 2 Open Hi-Hat Chorus 3 Close Hi-Hat Chorus 4 Feedback Instrument Flanger Level Sensitivity Short Delay Threshold FB Delay Velocity Curve Bass Drum... -
Seite 51: Part 5: Technical Specifications
Part 5: Technical specifucations Part 5: Technical specifications Drum Pad: 4 Drum pads, 3 Cymbal pads, 1 Hi-Hat Control pedal, 1 BD Pad Voices: 235 Voices Drum kits: 25 Preset kits, 5 User kits Song: 50 Preset songs, and 2 Demos Effect: Reverb, Chorus controls:... - Seite 52 w w w . d - t r o n i c . i n f o b2bMusic.biz GmbH . Postfach 20 10 . 35008 Marburg . Germany . www.b2bMusic.biz Modelländerungen ohne Vorankündigung vorbehalten. Keine Haftung für Irrtümer oder Druckfehler.