Inhaltsverzeichnis
Werbung
Verfügbare Sprachen
Verfügbare Sprachen
Werbung
Inhaltsverzeichnis
Fehlerbehebung

Inhaltszusammenfassung für auna Gaga 10022778
- Seite 1 Radio Gaga 10022778 10022781...
-
Seite 2: Kleine Objekte/Verpackungsteile
Warnung Zur Reduzierung der Gefahr von Brand, elektrischem Schlag und Beschädigung: • Setzen Sie dieses Gerät nicht dem Regen aus. • Stellen Sie keine mit Flüssigkeiten gefüllten Gefäße, wie Vasen, auf dieses Gerät. • Ausschließlich das empfohlene Zubehör verwenden. • Reparieren Sie dieses Gerät nicht selbst. Wenden Sie sich zur Wartung an qualifiziertes Kundendienstpersonal. -
Seite 3: Netzwerk-Voraussetzungen
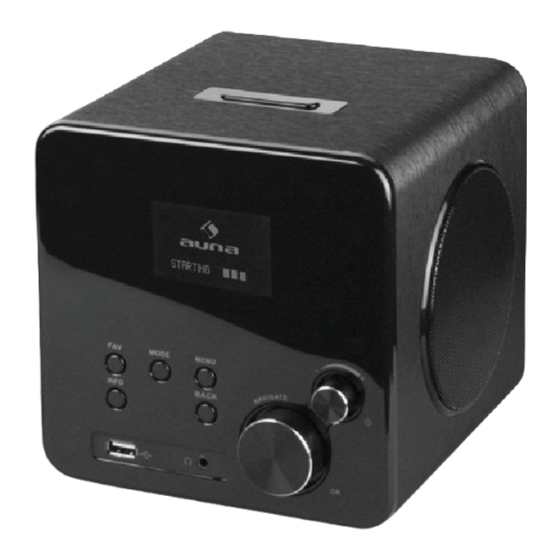
• Stellen Sie das Gerät nicht auf Verstärker oder andere Geräte, die heiß werden können. Diese Hitze könnte das Gerät beschädigen. • Setzen Sie dieses Gerät keinem direkten Sonnenlicht, hohen Temperaturen, starker Feuchtigkeit und übermäßigen Erschütterungen aus. Bestimmungsgemäßer Gebrauch Dieses Gerät dient zum •... - Seite 4 Bedienelemente Bezeichnung Funktion LCD-Bildschirm Anzeige Steuerungstasten und –räder Grundlegende Steuerungen USB-Port USB-Speicher zur Wiedegabe anschließen Kopfhörer-Ausgang Für 3.5mm-Klinke-Stecker Schlummer-Taste Aktiviert die Schlummer-Funktion Antenne Für besseren UKW-/DAB-Empfang LAN-Anschluss Zum Anschließen ans Netzwerk AN/AUS-Schalter Schaltet das Gerät ein bzw. aus Netzanschluss Für die Stromversorgung Audio-Eingang AUX-Eingang Audio-Ausgang...
-
Seite 5: Einrichtungsassistent
Fernbedienung Drücken Sie mit ihrem Daumen die Lasche am Batteriefach he- runter und ziehen Sie dieses heraus. Setzen Sie eine Batterie des Typs CR2025 (3V) ein und achten Sie darauf, dass Sie die Batterie mit der Plus-Seite nach oben einlegen. Achtung: Falsche Batterie-Typen könnten bei Verwendung u.u. - Seite 6 Drehen Sie am Lautstärke-Rad oder drücken Sie auf der Fernbedienung, um die Lautstärke anzu- passen. Mit der Taste schalten Sie den Sound stumm. Musik vom PC abspielen Um Musik von Ihrem PC aus abzuspielen, müssen Sie folgende Schritte vollziehen. • Verbinden Sie den PC mit dem Netzwerk.
- Seite 7 Manuelle Einstellung: Wenn Sie sich gegen das automatische Einstellen entscheiden, können Sie hier Zeit und Datum manuell eingeben. Angezeigt wir dies in folgendem Format: tt-mm-jjjj und hh:mm. Der angewählte Wert wird blinkend angezeigt. Passen Sie jeden Wert mit dem Navigations-Rad oder den Tasten </>...
- Seite 8 Einstellung abschließen Das Gerät versucht sich mit dem Netzwerk zu verbinden. Falls der Verbindungsaufbau scheitert, kehren Sie zum vor- herigen Bild zurück. Versuchen Sie es dann erneut. Drücken Sie Select, um den Assistenten zu verlassen. 2. Equalizer Verschiedene Equalizer-Modi sind verfügbar: Normal, Flat, Jazz, Rock, Movie, Classic, Pop und News.
-
Seite 9: Internet-Radio
Net-Remote PIN Einstellung: Stellen Sie den PIN ein, mit dem Remote-Apps auf das Gerät zugreifen können. Werkseinstellung ist 1234. Details zur Remote-App finden Sie weiter unten. Netzwerk-Profil: Das Gerät merkt sich die letzten 4 kabellosen Netzwerke mit denen es verbunden war und versucht automatisch sich mit einem davon zu verbinden, sofern eines davon gefunden wurde. Hier können Sie die Liste der gespeicherten Netzwerke einsehen. - Seite 10 Wenn Sie bereits einem Sender zuhören, können Sie Return oder < auf der Fernbedienung drücken, um zum vorherigen Abschnitt des Menü-Baums zu kommen. Drücken Sie Menü, um zum obersten Menü des Internet-Radios zu wechseln. Zuletzt gehört Wenn der Internet-Radio Modus gestartet wird, ist der letzte Sender ausgewählt. Um eine andere letz- tens gehörte Station auszuwählen, gehen Sie in diesen Menü-Punkt und wählen Sie den Sender aus.
- Seite 11 Senderspeicher (Presets) Diese Senderspeicher sind im Radio abgelegt und sind auf anderen Radios nicht verfügbar. Drücken und halten Sie Preset, um einen Sender zu dem Speicher hinzuzufügen. Das Display zeigt Ihnen nach kurzer Zeit den Speicherbildschirm an. Wählen Sie einen der 10 verfügbaren Speicherplätze. Drücken Sie Preset, um auf die gespeicherten Sender zuzugreifen.
- Seite 12 Abspielen von USB Von diesem Punkt an, werden die Menüs von den Ordnern auf dem USB-Speicher erstellt. Durchsuchen Sie die Ordner mit dem Navigations-Rad und der Return-Taste, oder den Richtungstasten auf der Fernbe- dienung. Das Display zeigt die Order- und Datei-Namen, aber nicht notwendigerweise die Titel-Namen. Drücken Sie Select sobald Sie einen Track gefunden haben, um diesen Abzuspielen.
- Seite 13 Systemsteureung > Netzwerk und Internet > Netzwerk und Freigabecenter > Medienstreamingoptionen Öffnen Sie den Windows Media Player und aktivieren Sie „Remotesteuerung des Players zulassen.“ Rechts-klicken Sie auf einen beliebigen Titel in der Musik Bibliothek, wählen Sie „Wiedergeben auf“ und klicken Sie auf das Wireless LAN Internet Radio...
- Seite 14 Ein zusätzliches Fenster der Musik-Wiedergabe erscheint. Bedienung von Smartphone oder Tablet. Suchen Sie in Google Play oder im Apple App Store nach einer kostenlosen DLNA-App. Wir empfehlen Ihnen die App iMediaShare, wenn Sie ein Android- oder iOS-Gerät verwenden. Die Musik wird wie folgt gestreamt: •...
- Seite 15 Hinweis: Einige Apps unterstützen u.U. kein Streamen von iPhone/iPod, allerdings können diese Geräte dann immer noch zu Steuern der Musik verwendet werden, die von anderen Servern gestreamt wird. Manche Apps unterstützen die gleichzeitige Wiedergabe auf mehreren Geräten. Manche Apps sind in der Lage Wiedergabelisten zu erstellen. Lesen Sie sich falls notwendig die Bedienungsanleitungen der jeweiligen Apps durch.
- Seite 16 Sobald die Suche abgeschlossen ist, wird eine Liste der verfügbaren Sender angezeigt. Drehen Sie das Navigations-Rad und drücken Sie es, um einen Sender auszuwählen. Sobald der Sender ausgewählt ist zeigt das Display Informationen über Sender, Titel oder Sendung. Senderspeicher (Presets) Drücken und halten Sie Preset, um einen Sender zu dem Speicher hinzuzufügen.
-
Seite 17: Aux-Eingang
Wiedergabe-Informationen Während ein Sender wiedergegeben wird, zeigt das Display dessen Frequenz und – sofern verfügbar - RDS-Informationen, wie z.B. den Namen der Sendung oder den Namen des Titels. Falls keine RDS- Informationen verfügbar sind zeigt das Display nur die Frequenz an. Stereo-Übertragungen werden oben auf dem Bildschirm gekennzeichnet. - Seite 18 Wecker Es gibt 2 vielseitige Weckrufe mit Schlummer-Funktion. Jeder Wecker kann auf verschiedene Art einge- stellt werden. Wählen Sie im Haupt-Menü Wecker (Alarm) um einen Wecker einzustellen. Wählen Sie Wecker 1 oder 2 und konfigurieren Sie Ihn nach folgenden Eigenschaften: • Aktiv: Ein/Aus • Haufigkeit: täglich, einmalig, an Wochentagen, an Wochenenden • Zeit • Modus: Buzzer, Internet-Radio, DAB, UKW •...
- Seite 19 NetRemote Dieses Gerät kann von Android- und iOS-Geräten ferngesteuert werden. Mit Hilfe einer App können Sie alle Modi von Internet-Radio, Musik-Player, DAB, UKW, und AUX einsehen. • Suchen Sie im Google Play oder dem App Store nach DOK und installieren Sie es. •...
- Seite 20 UKW: Suchen Sie manuell nach Sendern oder lassen Sie von der App aus nach Sendern suchen. Media-Player: Durchsuchen Sie die Musik-Dateien, die von anderen Geräten freigegeben sind oder sich auf einem verbundenen USB-Speicher befinden und spielen Sie sie ab. Hinweis: Wenn zwei Android/iOS-Geräte mit dem Internet-Radio gekoppelt sind, wird die Verbindung auf einem Gerät getrennt, sobald auf dem anderen die App gestartet wird.
-
Seite 21: Problembehebung
Problembehebung Problem Lösung Das Gerät schaltet sich nicht ein. Überprüfen Sie ob der Netzstecker richtig verbunden ist. Kein Sound. - Evl. ist das Gerät stumm geschaltet. - Drehen Sie die Lautstärke auf. - Entfernen Sie sämtlichen eingesteckten Audio-Kabel. Es kann keine Netzwerk- - Überprüfen Sie das LAN-Kabel oder die W-LAN-Funktion. - Seite 22 Reparaturen • Reparaturen am Gerät sollten nur von einer autorisierten Fachwerkstatt durchgeführt werden. • Ein Umbauen oder Verändern des Produktes beeinträchtigt die Produktsicherheit. Achtung Verletzungsgefahr! • Öffnen Sie das Produkt niemals eigenmächtig und führen Sie Reparaturen nie selber aus! • Falscher Zusammenbau führt möglicherweise zu Fehlfunktionen oder dem Totalausfall. • Öffnen Sie in keinem Fall das Gerät. Achtung: Es wird keine Haftung für Folgeschäden übernommen.
-
Seite 23: Network Requirement
IMPORTANT SAFETY INSTRUCTIONS 1. Read all instructions before using. 2. Before connecting the device to the power supply, check that the voltage indicated on the appliance (underside the device) corresponds with the voltage in your home. If this is not the case, contact your dealer and do not use the device. - Seite 24 Appearance and Key Descriptions Description Function LCD Screen Display Buttons and Reels Basic control of operation USB port Plug the USB driveor MP3 player for music playback Earphone jack 3.5mm jack for headphone or earphone SNOOZE button Snooze Antenna Strengthen theDAB/FM receiver LAN port Ethernet connection Power switch...
- Seite 25 Remote Controller Use your thumb to press the lid of the battery compartment and pull it out. Install a CR2025 type 3V battery into the battery compartment, taking care to insert it with the positive (+) side up. Caution: Risk of explosion of battery is replaced by an incorrect type. Dispose of used bat Getting Started The items enclosed in the packaging box are as follows:...
- Seite 26 • Open the UPnP platform Windows Media Player (11or later). Alternatively, other platforms or server such as Windows Media Connection may be used. Allow to share your media to Wireless LAN Internet Radio, whichis the device name for music • streaming.
- Seite 27 Manual update If you set No update, the wizard prompts you to set the time and date manually.The date and time are displayed as dd-mm-yyyy and hh:mm. The active value appears as flashing. Adjust each value with the navigatereel or /on the remote control. Oncethevalue is set,press to continue setting with next value. • Network Wlan region Select the Wlan region to obtain the optimal Wlan connectivity: Canada, Spain, France, Japan, Singapo- re, Australia, and Republic of Korea.
- Seite 28 • Skip WPS Enter key as for a standard encrypted network. For more information on setting up a WPS encrypted network, see your WPS router’s instructions. • Completion Unit attempts to connect to the selected network. It will show connected if the setup is successful It will show connected if the setup is successful.
- Seite 29 Several preset EQ modes are available: Normal, Flat, Jazz, Rock, Movie, Classic, Pop and News. Also a user-defined setting is available; create your own EQ with custom bass, treble and loudness set- tings. Press on the remote control to quick enter equalizermenu. 5.2.3 Network • Network wizard Enter to search AP SSID, then input the WEP / WPA key or choose Push Button/Pin/Skip WPS to connect to the wireless network.
- Seite 30 5.2.6 Factory reset A factory reset resets all user settings to default values, so that time and date, network configuration and presets are lost. However, the unit’s current software version is maintained, as is registration with the Internet radio portal. Internet radio favourites therefore remain unless you re-register your unit with another account on the portal website. 5.2.7 Software update From time to time, software upgrades may be created with bug fixes and/or additional features. You can either check manually or set the unit to check periodically automatically (this is the default).
- Seite 31 5.3.2 Station list Browse Internet broadcasts that organized into different categories, Location, Genre, Popular and New. You can also find the station with Search by keyword. 5.3.3 Favourites Favourites are stored with the Internet radio portal, and are available through all Internet radios registe- red on the same account. Before favourites can be used, the radio has to be registered with the Internet radio portal.
- Seite 32 5.3.6 Now playing information While the stream is playing, the screen shows its name and description. To view further information, press . Each time you press , another set of information is displayed, cycle through name/description, genre/ location, reliability, codec/sampling rate, playback buffer and today’s date. 5.4 Media Player Music player mode plays audio files in MP3, WMA, WAV, AAC or FLACformat from a computer on the local network, or frm a USB sick .
- Seite 33 Once you have found a track you want to play, press SELECT. A short press plays the track immediately. 5.4.3 Repeat/shuffle You can set to repeat tracks or play them in random order. Press on the remote control for shortcut. 5.4.4 Now playing information While a track is playing, the screen shows its track and artist (UPnP) or file name (USB). There is also a progress bar with figures for elapsed and total track time. At the bottom of the screen, an icon indicates...
- Seite 34 Open Windows Media Player to enable Allow remote control of my Player. Right click any music in the library and choose Play to Wireless LAN Internet Radio.
- Seite 35 A box of music playback pops up for the streaming. 5.5.2 Control onSmartphone / Tablet You may search (with keyword: DLNA) and install any free or commercialDLNA Apps from Google Play or Apple Store if you are using Android mobile, tablet or iPhone / iPad. It is suggested to use iMediaShare on Android mobile, tablet or iPhone/iPad.
- Seite 36 NOTE: Some Apps may not support streaming music from iPhone/iPod but iPhone/iPod could still be used to control streaming music from other servers. Some Apps may allow to play the music to multi players at the same time. Some Appscan create a playlist if you choose severalmusic. Study the own instruction of the software or Apps you use to enjoy DLNAstreaming if necessary.
- Seite 37 Once the scan is complete, the radio shows a list of available stations. To remove stations that are listed but not unavailable, choose Prune invalid. Turn the navigatereel to view a list of stations and press to select. Once selected, the station plays and the screen shows information about station, track or show as broadcast.
- Seite 38 To select a preset, press PRESET briefly, then select one of the listed preset stations. When a preset station is playing, it shows Pn (P1, P2 etc) at the bottom right of the screen. P1 to P10 on the remote control are for the use ofpreset station1-10. 5.7.2 Now playing information While the stream is playing, the screen shows its frequency, or if RDS information is available, station name and any further RDS information such as programme name, track title and contact details.
- Seite 39 5.9 Sleep To set the sleep timer, select Sleep under Main menu or press SLEEP on the remote control. Choose from Sleep OFF, 15 MINS, 30 MINS, 45 MINS or 60 MINS. Once you select a sleep period, the system returns to the main menu. Press MENU to return to the Now playing screen.
- Seite 40 5.11.3 NetRemote The unit gives a feature of remote control by smartphone or tablet in iOS or Android system. By downloa- ding the assigned App, you can view all the modes of Internet Radio, Music Player, DAB, FM and AUX IN. Search DOK from Google Playor Apple Store, and install it to your smartphone or tablet.
- Seite 41 • Internet Radio Browse the station list, choose station and view the station rolling text from the App. • Media Player Browse the music files from shared media or plugged USB driver, choose music from the App. • DAB Browse the scanned DAB stations, choose the station and read rolling text of station from the App.
- Seite 42 • FM Manual searchor scan the stations from the App. From the App, you can also control standby on/off of the unit, DAB scanning and other options under setting. There is an option of RadioVIS. It is a channel for broadcasters to deliver Slideshows over the Internet. RadioVIS Slideshows appear like the DAB slideshows, they are closely associated with the broadcasted audio service.
-
Seite 43: Troubleshooting
Troubleshooting Error Remedy The device does not switch on. Check it the power adaptor is connected properly No sound - Turn on the sound as it may be muted - Increase the volume - Pull any connected headphone or speaker from the connector jack. No network connection - Check the LAN cable or the WLAN function can be established. -
Seite 44: Technical Specifications
All other undetermined - NAP8101FD may process large amount of data after a period of operation, cases. no matter in which mode, it will cause the system freeze or malfunction. Reboot NAP8101FD if necessary. - The normal function of the product may be disturbed by strong Electro- Magnetic Interference.