Inhaltsverzeichnis
Werbung
Verfügbare Sprachen
Verfügbare Sprachen
Quicklinks
Werbung
Kapitel
Inhaltsverzeichnis

Verwandte Anleitungen für inqua 504G0007


Inhaltszusammenfassung für inqua 504G0007
- Seite 1 ® INQUA Nasendusche 504G0007 ©2013, INQUA GmbH, 177D2010-D-CA1000-B-03/13...
- Seite 2 Gebrauchsanweisung _____________3 Instructions for use ______________19 Notice d'utilisation ______________35 Istruzioni per l'uso_______________51 Gebruiksaanwijzing______________67...
-
Seite 3: Inhaltsverzeichnis
Informationen zur Gebrauchsanweisung Gestaltung von Sicherheitshinweisen Gegenanzeigen und Nebenwirkungen Anwendungshinweise Hygiene PRODUKTBESCHREIBUNG ___________________________________ 7 Lieferumfang Materialinformation Zweckbestimmung Lebensdauer ANWENDUNG ______________________________________________ 9 ® INQUA Nasendusche vorbereiten ® INQUA Nasendusche befüllen Nasenspülung durchführen Tipps REINIGUNG UND DESINFEKTION _____________________________ 14 Vorbereitung Reinigung Desinfektion Visuelle Kontrolle... -
Seite 4: Wichtige Hinweise
Sie umgehend Ihren Arzt. Informationen zur Gebrauchsanweisung Alle Gebrauchsanweisungen sind im Internet unter www.inqua.de abrufbar und auf Anfrage bei der INQUA GmbH in gedruckter Form erhältlich. Prüfen Sie regelmäßig, ob eine neuere Version der Gebrauchsanweisung erhältlich ist. Gestaltung von Sicherheitshinweisen... -
Seite 5: Gegenanzeigen Und Nebenwirkungen
Schließung des Gaumensegels nicht möglich ist, z.B. auf Grund einer Lähmung. Anwendungshinweise ® Verwenden Sie ausschließlich die INQUA Nasenspülung. ® Lesen Sie vor Anwendung der INQUA Nasendusche die ® Gebrauchsinformation der INQUA Nasenspülung. WARNUNG: Erstickungsgefahr durch Kleinteile Babys, Kindern und hilfebedürftige Personen erkennen nicht die Gefahren, die von Kleinteilen der ®... -
Seite 6: Hygiene
Hygiene Beachten Sie folgende Hygienehinweise: Verwenden Sie zur Nasenspülung nur eine gereinigte, desin- fizierte und getrocknete Nasendusche. Verunreinigungen und Restfeuchte führen zu Keimwachstum, wodurch eine erhöhte Infektionsgefahr besteht. Jede Nasendusche darf aus hygienischen Gründen nur von einem einzigen Patienten verwendet werden. ... -
Seite 7: Produktbeschreibung
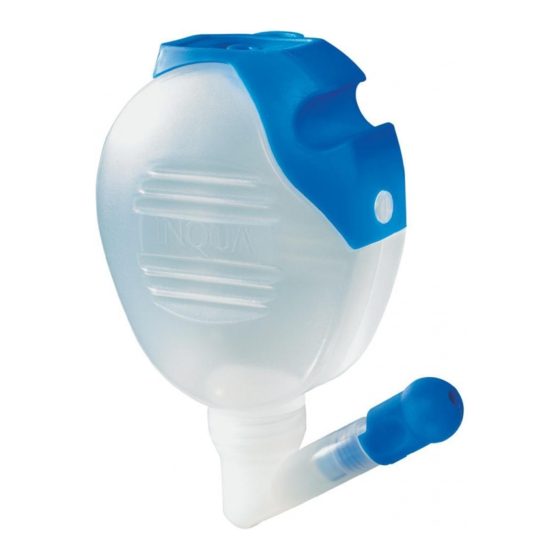
Nasendusche besteht aus vier Teilen und wird vor- montiert ausgeliefert. Prüfen Sie, ob alle Teile im Lieferumfang enthalten sind. Sollte etwas fehlen, verständigen Sie umgehend den Händler, von ® dem Sie die INQUA Nasendusche erhalten haben. Nasenolive Tank (Füllvolumen: 250 ml) Winkelstück... -
Seite 8: Zweckbestimmung
nach operativen Eingriffen im Bereich der Nase und Nasen- nebenhöhlen (nur nach Rücksprache mit dem Arzt) Lebensdauer ® Tauschen Sie die INQUA Nasendusche nach spätestens 1,5 Jahren aus, da sich das Material des Produkts mit der Zeit verändern kann. -
Seite 9: Anwendung
ANWENDUNG ® Vergewissern Sie sich, dass die INQUA Nasendusche vor Anwendung gemäß Kapitel „Reinigung und Desinfektion“ gerei- nigt und desinfiziert wurde. ® INQUA Nasendusche vorbereiten ® Ist die INQUA Nasendusche in ihre Einzelteile zerlegt, bauen Sie sie vor der Inhalation wie folgt zusammen: ... -
Seite 10: Inqua ® Nasendusche Befüllen
® INQUA Nasendusche befüllen Stellen Sie die Nasendusche auf das Ventil. ® Füllen Sie die INQUA Nasenspülung in die Nasendusche. Entnehmen Sie die Dosierung der Gebrauchsinformation zur ® INQUA Nasenspülung. Füllen Sie die Nasendusche bis zum unteren Rand des Schraubgewindes mit körperwarmem Trinkwasser. - Seite 11 Schrauben Sie das Winkelstück fest auf den Tank. Drehen Sie die Nasenolive in die STOP-Position, damit noch keine Flüs- sigkeit auslaufen kann (der Strich am Winkelstück zeigt auf „STOP“). Schwenken Sie die Nasendusche leicht hin und her, damit sich die Nasenspülung mit dem Trinkwasser vermischt.
-
Seite 12: Nasenspülung Durchführen
Nasenspülung durchführen Nehmen Sie zur Spülung des linken Nasenlochs die Nasendusche in die linke, zur Spülung des rechten in die rechte Hand. Legen Sie dabei den Zeigefinger auf das Ventil. Drehen Sie mit der freien Hand die Nasenolive in die Spül-Position (der Strich am Winkelstück zeigt auf das Dreieck). -
Seite 13: Tipps
Drücken Sie mit dem Zeigefinger leicht auf das Ventil der Nasendusche. Die Nasenspülung beginnt. Die Spüllösung fließt zum einen Nasenloch hinein, durch die Nasenhöhle hindurch und zum anderen Nasenloch wieder hinaus. Unterbrechen Sie ggf. den Spülvorgang, indem Sie den Zei- gefinger vom Ventil nehmen. -
Seite 14: Reinigung Und Desinfektion
Die INQUA Nasendusche muss nach jeder Anwendung gerei- nigt und mindestens einmal täglich desinfiziert werden. Vorbereitung ® Zerlegen Sie die INQUA Nasendusche in ihre Einzelteile: Schrauben Sie das Winkelstück vom Tank. Ziehen Sie die Nasenolive vom Winkelstück ab. -
Seite 15: Desinfektion
Desinfektion Desinfizieren Sie alle Einzelteile im Anschluss an die Reinigung (nur gereinigte Teile können wirksam desinfiziert werden). VORSICHT: Infektionsgefahr durch unzureichende Trocknung Eine feuchte Umgebung begünstigt Keimwachstum. Ent- nehmen Sie daher alle Teile unmittelbar nach Beendi- gung der Desinfektion aus dem Kochtopf bzw. aus dem Desinfektionsgerät. -
Seite 16: Visuelle Kontrolle
Thermische Desinfektion mit einem thermischen Desinfek- tionsgerät für Babyflaschen (keine Mikrowelle) ® Sie können die INQUA Nasendusche mit einem Dampfdesin- fektionsgerät (Vaporisator) desinfizieren. Die Einwirkzeit muss mindestens 15 Minuten betragen. Beachten Sie unbedingt die Gebrauchsanweisung des jeweiligen Vaporisators. VORSICHT: Infektionsgefahr durch unzureichende Desinfektion Die Desinfektion ist erst wirksam durchgeführt, wenn sich... -
Seite 17: Trocknung Und Aufbewahrung
Trocknung und Aufbewahrung Beschleunigen Sie das Abtropfen des Wassers durch Aus- schütteln aller Teile. Befestigen Sie das Ventil am Tank. Stecken Sie das Winkelstück in die Aussparung am Ventil. Legen Sie die Nasenolive in die Öff- nung des Winkelstücks. -
Seite 18: Sonstiges
SONSTIGES Entsorgung ® Die INQUA Nasendusche wird nach dem Auskochen mit dem Restmüll entsorgt. Herstellerangaben Siehe Rückseite der Gebrauchsanweisung. Zeichenerklärung Symbol für Hersteller Symbol für Gebrauchsanweisung beachten ® Die INQUA Nasendusche erfüllt die grundlegenden Anforderungen nach Anhang I der Richtlinie 93/42/EWG über Medizinprodukte. - Seite 19 Instructions for application Hygiene PRODUCT DESCRIPTION ____________________________________ 23 Components Material information Intended use Operating life APPLICATION _____________________________________________ 25 ® Prepare the INQUA nasal douche ® Fill the INQUA nasal douche Perform the nasal rinse Tips CLEANING AND DISINFECTION ______________________________ 30 Preparation...
-
Seite 20: Important Information
Information about the instructions for use All instructions for use can be retrieved on the internet at www.inqua.de, or they are available in hardcopy form on request from INQUA GmbH. Check for updated versions of all instructions for use at regular intervals. -
Seite 21: Contraindications And Side Effects
Read the instructions for use of ® ® the INQUA nasal rinse before using the INQUA nasal douche. WARNING: Small parts are a choking hazard Babies, children and anyone who requires assistance do not appreciate the hazards that may be associated with ®... -
Seite 22: Hygiene
Hygiene Observe the following hygiene instructions: Always use a clean, disinfected and dried nasal douche for nasal rinses. Contamination and residual moisture encourage the growth of bacteria, so increasing the risk of infection Each nasal douche must only be used by a single patient for hygiene reasons. -
Seite 23: Product Description
Check that all components are contained in your package. If anything is missing, please notify the dealer from whom you pur- ® chased the INQUA nasal douche immediately. Nasal insert Reservoir (250 ml fill volume) Knee... -
Seite 24: Intended Use
Intended use ® The INQUA nasal douche is a medical aid designed for flushing ® the nasal sinuses. Using the INQUA nasal douche moistens the mucous membranes of the nose and cleans the nasal sinuses. ® The INQUA nasal douche is suitable for use by children aged 3 and older as well as by adults. -
Seite 25: Application
APPLICATION ® Before each application, make sure that the INQUA nasal douche has been cleaned and disinfected as described in Chapter "Cleaning and disinfection". ® Prepare the INQUA nasal douche ® If the INQUA nasal douche has been dismantled, follow the instructions below to assemble it for use: ... -
Seite 26: Fill The Inqua ® Nasal Douche
® Fill the INQUA nasal douche Place the nasal douche on the valve. Fill the nasal douche with ® INQUA nasal rinse. Instructions regarding proper dosage are included in the instructions for use ® of the INQUA nasal rinse. - Seite 27 Screw the knee onto the reservoir tightly. Twist the nasal insert to the STOP position, to ensure that no liquid can escape yet (the line on the knee points to "STOP"). Shake the nasal douche back and forth so that the nasal rinse is mixed with the drinking water.
-
Seite 28: Perform The Nasal Rinse
Perform the nasal rinse To rinse the left nostril, hold the nasal douche in your left hand, hold it in your right hand for the right nostril. Rest your index finger on the valve. With your free hand, twist the nasal insert to the Rinse position (the line on the knee will point to the triangle). -
Seite 29: Tips
Press your index finger gently against the nasal douche valve. The nasal rinse will begin. The rinse solution flows in one nos- tril, through the nasal sinuses and back out of the other nostril. If necessary, you can interrupt the treatment simply by taking your index finger off of the valve. -
Seite 30: Cleaning And Disinfection
The INQUA nasal douche must be cleaned after each use and disinfected at least once a day. Preparation ® Dismantle the INQUA nasal douche into its individual parts: Unscrew the knee from the reservoir. Pull the nasal insert off from the knee. -
Seite 31: Disinfection
Disinfection Disinfect the components immediately after cleaning (only parts that have been cleaned can be disinfected effectively). CAUTION: Risk of infection due to insufficient drying A damp environment may encourage the growth of bac- teria. Therefore, remove all parts from the pot or disinfec- tor as soon as disinfection has finished. -
Seite 32: Visual Inspection
Thermal disinfection with a thermal disinfector for baby bottles (not a microwave oven) ® You can disinfect the INQUA nasal douche in a steam disinfec- tor (vaporisator). Treatment time must last at least 15 minutes. Be sure to follow the instructions for use of the steam disinfector you are using. -
Seite 33: Drying And Storage
Drying and storage You can remove excess water more quickly by shaking all parts. Attach the valve to the reservoir. Insert the knee in the hole in the valve. Insert the nasal insert in the aperture in the knee. -
Seite 34: Miscellaneous
MISCELLANEOUS Disposal ® The INQUA nasal douche is disposed of with non-recyclable waste after boiling. Manufacturer's data See back of instructions for use. Legend Symbol for manufacturer Symbol for Follow instructions for use ® The INQUA nasal douche satisfies the basic require- ments as set forth in Appendix I of Directive 93/42/EEC concerning medical devices. - Seite 35 DESCRIPTION DU PRODUIT _________________________________ 39 Étendue de livraison Informations matériaux Affectation Durée de vie UTILISATION ______________________________________________ 41 ® Préparation de la douche nasale INQUA ® Remplissage de la douche nasale INQUA Réalisation du rinçage nasal Astuces NETTOYAGE ET DÉSINFECTION _____________________________ 46 Préparation Nettoyage Désinfection...
-
Seite 36: Remarques Importantes
Informations à propos de la notice d'utilisation Toutes les notices d'utilisation peuvent être téléchargées sur Internet sous www.inqua.de ou être obtenues en version papier sur simple demande auprès de INQUA GmbH. Vérifiez réguliè- rement si une version plus récente de la notice d'utilisation est disponible. -
Seite 37: Contre-Indications Et Effets Secondaires
Lorsque le voile du palais ne peut pas être fermé, par ex. en raison d'une paralysie. Consignes d'utilisation ® Utilisez exclusivement le rinçage nasal INQUA . Avant d'utiliser ® la douche nasale INQUA , lisez la notice d'utilisation du rinçage ®... -
Seite 38: Hygiène
Hygiène Respectez les consignes d'hygiène suivantes : Utilisez exclusivement pour le rinçage nasal une douche nasale nettoyée, désinfectée et séchée. Les salissures et l'humidité résiduelle entraînent une croissance de germe, avec en conséquence une augmentation du risque d'infection. Chaque douche nasale ne peut être utilisée que par un seul patient pour des raisons d'hygiène. -
Seite 39: Description Du Produit
DESCRIPTION DU PRODUIT Étendue de livraison ® La douche nasale INQUA se compose de quatre éléments et est livrée prémontée. Contrôlez si tous les éléments sont bien compris dans l’étendue de la livraison. Si un élément manque, informez immédiatement le détaillant chez qui vous avez obtenu votre ®... -
Seite 40: Affectation
(uniquement après consultation du médecin) Durée de vie ® Remplacez la douche nasale INQUA au plus tard au bout d'un an et demi puisque le matériau du produit peut se modifier au fil du temps. -
Seite 41: Utilisation
UTILISATION ® Assurez-vous que la douche nasale INQUA a été nettoyée et désinfectée avant l'utilisation selon le chapitre « Nettoyage et désinfection ». ® Préparation de la douche nasale INQUA ® Lorsque la douche nasale INQUA est démontée, assemblez-la avant l'inhalation de la manière suivante : ... -
Seite 42: Remplissage De La Douche Nasale Inqua
® Remplissage de la douche nasale INQUA Placez la douche nasale sur la valve. ® Versez le rinçage nasal INQUA dans la douche nasale. Relevez le dosage dans la notice d'uti- ® lisation du rinçage nasal INQUA ... - Seite 43 Vissez le coude sur le réservoir à fond. Tournez l'embout nasal sur la position d'arrêt pour empêcher la sortie de liquide (le trait sur le coude est en face du « STOP »). Agitez légèrement la douche nasale pour que le rinçage nasal se mélange à...
-
Seite 44: Réalisation Du Rinçage Nasal
Réalisation du rinçage nasal Pour rincer la narine gauche, prenez la douche nasale dans la main gauche, pour rincer la narine droite, dans la main droite. Placez l'index sur la valve. Tournez avec la main libre l'embout nasal sur la position de rinçage (le trait sur le coude est en face du triangle). -
Seite 45: Astuces
Appuyez avec l'index légèrement sur la valve de la douche nasale. Le rinçage nasal commence. La solution de rinçage entre par une narine, passe à travers les fosses nasales et ressort par l'autre narine. Interrompez éventuellement l'opération de rinçage en retirant l'index de la valve. -
Seite 46: Nettoyage Et Désinfection
La douche nasale INQUA doit être nettoyée après chaque uti- lisation et être désinfectée au minimum une fois par jour. Préparation ® Démontez toutes les pièces de la douche nasale INQUA Dévissez le coude du réservoir. Retirez l'embout nasal du coude. -
Seite 47: Désinfection
Désinfection Désinfectez toutes les pièces à l'issue du nettoyage (seules les pièces nettoyées peuvent être désinfectées efficacement). ATTENTION: risque d'infection à cause d'un séchage insuffisant Un environnement humide favorise la formation de germes. En conséquence, retirez les différentes pièces et les accessoires dès la fin de la désinfection de la cas- serole ou de l'appareil de désinfection. -
Seite 48: Contrôle Visuel
Désinfection thermique avec un appareil de désinfection thermique pour les biberons (pas de micro-ondes) ® Vous pouvez désinfecter la douche nasale INQUA avec un appareil de désinfection à la vapeur (vaporisateur). La durée d'action doit être au minimum de 15 minutes. Respectez impé- rativement la notice d’utilisation du vaporisateur correspondant. -
Seite 49: Séchage Et Conservation
Séchage et conservation Vous pouvez accélérer le séchage en secouant toutes les pièces pour faire partir l'eau rapidement. Fixez la valve sur le réservoir. Montez le coude dans la partie creuse sur la valve. Placez l'embout nasal dans l'ouverture du coude. -
Seite 50: Divers
DIVERS Élimination ® La douche nasale INQUA est éliminée avec les déchets non recyclables après avoir été bouillie. Indications du fabricant Voir le recto de la notice d'utilisation. Signification des symboles Symbole du fabricant Respecter le symbole de la notice d'utilisation ®... - Seite 51 Igiene DESCRIZIONE DEL PRODOTTO ______________________________ 55 Confezione Informazioni sui materiali Finalità del prodotto Durata UTILIZZO _________________________________________________ 57 ® Preparazione della doccia nasale INQUA ® Riempimento della doccia nasale INQUA Esecuzione del risciacquo nasale Suggerimenti PULIZIA E DISINFEZIONE____________________________________ 62 Preparazione Pulizia...
-
Seite 52: Indicazioni Importanti
Tutte le istruzioni per l'uso sono disponibili per il download in Internet all'indirizzo www.inqua.de ed è possibile richiedere la versione in formato cartaceo a INQUA GmbH. Verificare rego- larmente se è disponibile una versione più recente delle istruzioni per l'uso. -
Seite 53: Controindicazioni Ed Effetti Collaterali
Quando non è possibile chiudere il palato molle come, ad esempio, a causa di una paralisi. Istruzioni per l'uso ® Utilizzare esclusivamente il prodotto per sciacqui nasali INQUA ® Prima di utilizzare la doccia nasale INQUA leggere le istruzioni ®... -
Seite 54: Igiene
Igiene Osservare le seguenti indicazioni igieniche: per il risciacquo nasale utilizzare solo una doccia nasale pulita, disinfettata e asciutta. Le impurità e l'umidità residua favoriscono lo sviluppo di germi, aumentando così il rischio di infezione; per motivi igienici ogni doccia nasale deve essere utilizzata da un unico paziente;... -
Seite 55: Descrizione Del Prodotto
Si prega di accertarsi che tutti i componenti del prodotto siano inclusi nella confezione. Qualora mancassero dei componenti, si prega di informare immediatamente il rivenditore presso il quale ® è stata acquistata la doccia nasale INQUA Oliva nasale Serbatoio (volume di riempi- mento: 250 ml) -
Seite 56: Finalità Del Prodotto
dopo interventi chirurgici nell'area del naso e dei seni nasali (solo dietro consiglio del proprio medico) Durata ® Sostituire la doccia nasale INQUA al massimo dopo 18 mesi, poiché con il tempo il materiale del prodotto può alterarsi. -
Seite 57: Utilizzo
UTILIZZO ® Assicurarsi che la doccia nasale INQUA sia stata pulita e disin- fettata prima dell'utilizzo in base alle istruzioni del capitolo "Pulizia e disinfezione". ® Preparazione della doccia nasale INQUA ® Se la doccia nasale INQUA viene smontata nei suoi compo- nenti, prima dell'inalazione ricomporla come descritto di seguito: ... -
Seite 58: Riempimento Della Doccia Nasale Inqua
® Riempimento della doccia nasale INQUA Posizionare la doccia nasale sulla valvola. Versare il prodotto per risciacquo ® nasale INQUA nella doccia nasale. Per il dosaggio corretto, consultare le istruzioni per l'uso del prodotto per ® risciacquo nasale INQUA ... - Seite 59 Avvitare saldamente l'elemento ango- lare al serbatoio. Ruotare l'oliva nasale nella posizione STOP per impedire la fuoriuscita di liquidi (la lineetta sull'elemento ango- lare indica "STOP"). Agitare leggermente la doccia nasale per miscelare il pro- dotto per risciacquo nasale con l'acqua potabile.
-
Seite 60: Esecuzione Del Risciacquo Nasale
Esecuzione del risciacquo nasale Per risciacquare la narice sinistra, tenere la doccia nasale nella mano sinistra; per risciacquare la narice destra, tenerla nella mano desta. Appoggiare l'indice sulla valvola. Con la mano libera ruotare l'oliva nasale in posizione di pulizia (la line- etta sull'elemento angolare indica il triangolo). -
Seite 61: Suggerimenti
Con il dito indice premere leggermente la valvola sulla doccia nasale. Ha inizio il risciacquo nasale. La soluzione di lavaggio entra in una narice, passa attraverso la cavità nasale e fuoriesce dall'altra narice. Per interrompere eventualmente la procedura di pulizia, rimuovere l'indice della valvola. -
Seite 62: Pulizia E Disinfezione
PULIZIA E DISINFEZIONE ® Pulire la doccia nasale INQUA dopo ogni utilizzo e disinfettarla almeno una volta al giorno. Preparazione ® Smontare la doccia nasale INQUA nei suoi componenti: Svitare l'elemento angolare dal serbatoio. Estrarre l'oliva nasale dall'elemento angolare. -
Seite 63: Disinfezione
Disinfezione Dopo la pulizia, disinfettare tutti i componenti (è possibile disin- fettare efficacemente solo dei componenti puliti). ATTENZIONE: Pericolo di infezione causato da un'asciugatura insufficiente Un ambiente umido favorisce la proliferazione di germi e batteri. Pertanto, al termine della procedura di disinfe- zione rimuovere tutti i componenti dalla pentola o dall'apparecchio per la disinfezione. -
Seite 64: Controllo Visivo
Disinfezione termica con un apparecchio per la disinfezione termica di biberon (senza microonde) ® È possibile disinfettare la doccia nasale INQUA con un vapo- rizzatore. Il periodo di induzione deve durare almeno 15 minuti. Osservare rigorosamente le istruzioni per l'uso del vaporizzatore utilizzato. -
Seite 65: Asciugatura E Conservazione
Asciugatura e conservazione Per accelerare il processo di sgocciolamento, scuotere tutti i componenti. Applicare la valvola al serbatoio. Inserire l'elemento angolare nell'allog- giamento sulla valvola. Appoggiare l'oliva nasale nell'apertura dell'elemento angolare. Appendere la doccia nasale per il cap- pio della valvola per asciugarla. -
Seite 66: Altro
ALTRO Smaltimento ® Dopo la sterilizzazione la doccia nasale INQUA può essere smaltita con i rifiuti domestici. Indicazioni del produttore Vedere il lato posteriore delle istruzioni per l'uso. Spiegazione dei simboli Simbolo del produttore Simbolo delle istruzioni per l'uso da seguire ®... - Seite 67 Vorm van de veiligheidsinstructies Contra-indicaties en bijwerkingen Aanwijzingen voor gebruik Hygiëne PRODUCTBESCHRIJVING ___________________________________ 71 Levering Materiaalinformatie Gebruiksdoel Levensduur GEBRUIK _________________________________________________ 73 ® INQUA neusdouche voorbereiden ® INQUA neusdouche vullen Neusspoeling uitvoeren Tips REINIGING EN DESINFECTIE_________________________________ 78 Voorbereiding Reiniging Desinfectie Visuele controle...
-
Seite 68: Belangrijke Aanwijzingen
Informatie over de gebruiksaanwijzing Alle gebruiksaanwijzingen kunnen op internet onder www.inqua.de worden opgehaald en zijn in gedrukte vorm op aanvraag verkrijgbaar bij INQUA GmbH. Controleer regelma- tig of een nieuwere versie van de gebruiksaanwijzing beschikbaar is. -
Seite 69: Contra-Indicaties En Bijwerkingen
wanneer het niet mogelijk is het zacht verhemelte te sluiten, bijv. als gevolg van een verlamming. Aanwijzingen voor gebruik ® Gebruik uitsluitend de INQUA neusspoeling. Lees vóór gebruik ® van de INQUA neusdouche de gebruiksaanwijzing van de ®... -
Seite 70: Hygiëne
Hygiëne Neem de volgende aanwijzingen aangaande de hygiëne in acht: Gebruik voor de neusspoeling alleen een gereinigde, gedes- infecteerde en gedroogde neusdouche. Verontreinigingen en restvocht leiden tot de groei van kiemen, waardoor er een verhoogd infectiegevaar bestaat. Elke neusdouche mag om hygiënische redenen maar door één patiënt worden gebruikt. -
Seite 71: Productbeschrijving
Controleer of alle componenten bij de levering aanwezig zijn. Indien er iets ontbreekt, neem dan onmiddellijk contact op met ® de distributeur van wie u de INQUA neusdouche hebt gekocht. Neusinsteekstuk Tank (vulvolume: 250 ml) Hoekstuk... -
Seite 72: Gebruiksdoel
na operatieve ingrepen bij neus en neusbijholten (alleen na overleg met de arts) Levensduur ® Vervang de INQUA neusdouche uiterlijk na 1,5 jaar, omdat het materiaal van het product na verloop van tijd kan veranderen. -
Seite 73: Gebruik
GEBRUIK ® Vergewis u ervan dat de INQUA neusdouche vóór gebruik con- form hoofdstuk "Reiniging en desinfectie" is gereinigd en gedes- infecteerd. ® INQUA neusdouche voorbereiden ® Als de INQUA neusdouche in zijn onderdelen is gedemon- teerd, zet hem dan vóór de inhalatie als volgt in elkaar: ... -
Seite 74: Inqua ® Neusdouche Vullen
Doe de INQUA neusspoeling in de neusdouche. Volg voor de dosering de gebruiksaan- ® wijzing van de INQUA neusspoeling. Vul de neusdouche tot de onderrand van het schroefdraad met drinkwater dat op lichaamstemperatuur is. VOORZICHTIG: infectiegevaar door met kiemen... - Seite 75 Schroef het hoekstuk vast op de tank. Draai het neusinsteekstuk in de STOP- positie, zodat er geen vloeistof meer kan uit lopen (de streep op het hoek- stuk wijst naar "STOP"). Draai de neusdouche licht heen en weer om de neusspoeling met het drinkwater te vermengen.
-
Seite 76: Neusspoeling Uitvoeren
Neusspoeling uitvoeren Houd voor de spoeling van het linker neusgat de neusdouche in de linker- hand en houd voor de spoeling van het rechter neusgat de neusdouche in de rechterhand. Leg de wijsvinger daarbij op het ventiel. Draai met de vrije hand het neusin- steekstuk in de spoelpositie (de streep op het hoekstuk wijst naar de drie- hoek). -
Seite 77: Tips
Druk met uw wijsvinger licht op het ventiel van de neusdou- che. De neusspoeling begint. De spoeloplossing stroomt via het ene neusgat naar binnen, stroomt door de neusholte en komt bij het andere neusgat weer naar buiten. Onderbreek het spoelen zo nodig door de wijsvinger van het ventiel te halen. -
Seite 78: Reiniging En Desinfectie
® De INQUA neusdouche moet na elk gebruik worden gereinigd en minstens eenmaal per dag worden gedesinfecteerd. Voorbereiding ® Demonteer de INQUA neusdouche: Schroef het hoekstuk van de tank af. Trek het neusinsteekstuk van het hoekstuk af. ... -
Seite 79: Desinfectie
Desinfectie Desinfecteer alle onderdelen direct na de reiniging (alleen gerei- nigde onderdelen kunnen effectief worden gedesinfecteerd). VOORZICHTIG: infectiegevaar door onvoldoende drogen Een vochtige omgeving bevordert de groei van kiemen. Haal alle onderdelen daarom onmiddellijk na afloop van de desinfectie uit de kookpan of uit het desinfectieappa- raat. -
Seite 80: Visuele Controle
Thermische desinfectie met een thermisch desinfectieappa- raat voor babyflessen (geen magnetron) ® U kunt de INQUA neusdouche desinfecteren met een stoom- sterilisator (vaporisator). De inwerktijd moet minstens 15 minuten bedragen. Neem beslist de gebruiksaanwijzing van de desbetreffende vaporisator in acht. -
Seite 81: Drogen En Opbergen
Drogen en opbergen Versnel het afdruipen van het water door met de onderdelen te schudden. Bevestig het ventiel aan de tank. Steek het hoekstuk in de uitsparing van het ventiel. Plaats het neusinsteekstuk in de ope- ning van het hoekstuk. -
Seite 82: Diversen
DIVERSEN Verwijderen ® De INQUA neusdouche wordt na het uitkoken samen met het restafval afgevoerd. Gegevens van de fabrikant Zie achterzijde van de gebruiksaanwijzing. Verklaring van symbolen Symbool voor fabrikant Symbool voor "Gebruiksaanwijzing in acht nemen" ® De INQUA neusdouche voldoet aan de essentiële eisen als bedoeld in Bijlage I van de Richtlijn 93/42/EEG betreffende medische producten. - Seite 84 INQUA GmbH Moosdorfstr.1 • 82229 Seefeld • Germany Tel.: +49 (0)8152-9934-0 Fax: +49 (0)8152-9934-20 E-Mail: info@inqua.de • www.inqua.de...