
Verwandte Anleitungen für Friedrich Hugo 3in1

Inhaltszusammenfassung für Friedrich Hugo 3in1
- Seite 1 BEDIENUNGSANLEITUNG OPERATING INSTRUCTIONS MODE D’EMPLOI INSTRUCCIONES ISTRUZIONI SPRACHEN / LANGUAGES Deutsch 2 English 30 Français 54 Español 95 Italiano 127...
-
Seite 2: Inhaltsverzeichnis
Allgemeines ..................................4 Herzlichen Glückwunsch zur Ihrem Kinderwagen ......................5 Was Sie beim Kauf beachten sollten..........................5 Sicherheitshinweise ................................5 Aufbauanleitung ................................7 Wagen aufstellen ................................7 Die Schwenkräder ................................. 7 Die Hinterradbremse ..............................8 Aufbau der Babywanne und Montage ......................... 8 Besonderheiten beim Bellami, Paris, London, myVario oder Florida Kinderwagen .......... - Seite 3 Darauf müssen Sie besonders achten!!! ........................25 Zu kurzer 3-Punkt-Fahrzeuggurt? ........................25 Verläuft der Fahrzeuggurt richtig? ........................25 Sitzt der Kindersitz bombenfest? ........................25 Falscher Gurt: Beckengurt? ..........................25 In welcher Richtung kann ich den Kindersitz anbringen? ................25 Sitz-Belegungs-Erkennung beim Auto ......................25 Abschalten des Beifahrer-Airbags ........................
-
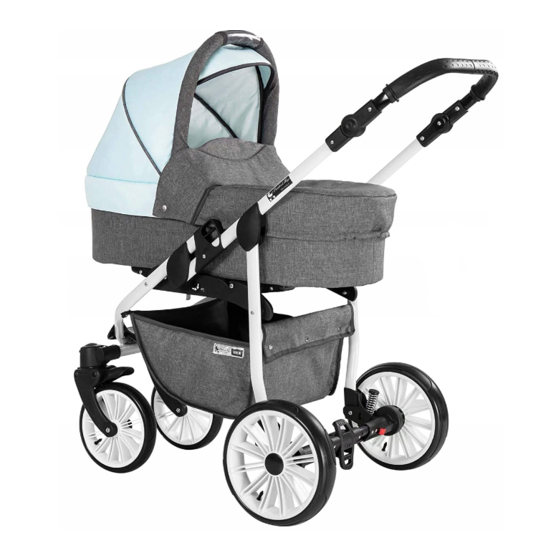
Seite 4: Allgemeines
ALLGEMEINES Dieser Wagen ist für Kinder im Alter von 0 – 3 Jahren und bis zu 15 kg bestimmt. Dieser Kinderwagen erfüllt die EU Sicherheitsnorm EN 1888: 2002 + A1: 2005 + A2:2005 + A3: 2005 Die Babyschale erfüllt die EU Sicherheitsnorm ECE R 44/04 Bitte lesen Sie alle Anleitungen vor Gebrauch Ihres Kinderwagens sorgfältig durch und beachten Sie besonders die Pflege- und Wartungshinweise genau. -
Seite 5: Herzlichen Glückwunsch Zur Ihrem Kinderwagen
HERZLICHEN GLÜCKWUNSCH ZUR IHREM KINDERWAGEN WAS SIE BEIM KAUF BEACHTEN SOLLTEN Prüfen Sie, dass der Wagen vollständig ausgeliefert worden ist und dass keine Teile fehlen. Prüfen Sie, dass alle Funktionen des Wagens vollständig funktionieren und melden Sie jegliche Fehlteile und Fehlfunktionen innerhalb Ihrer Widerrufsfrist an. - Seite 6 WARNUNG: Am Schieber befestigte Lasten beeinträchtigen die Standfestigkeit des Wagens, eine zu schwere Belastung kann ihren Wagen beschädigen und Ihr Kind gefährden. WARNUNG: Dieses Modell ist geeignet für 1 Kind. WARNUNG: Die Fußablage ist in waagerechter Position nur bis 5 kg belastbar und keinesfalls als Trittbrett zu benutzen.
-
Seite 7: Aufbauanleitung
WARNUNG: Lockere Bauteile und Schrauben führen bei weiterer Benutzung zu Folgeschäden und dadurch zur Aufhebung des Gewährleistungsanspruchs. WARNUNG: Diese Sitzeinheit ist für Kinder unter 6 Monaten nicht geeignet. WARNUNG: Beim Zusammenlegen und Aufstellen des Gestelles, beim Schwenken des Schiebers und beim Verstellen der Rückenlehne können Klemmstellen entstehen, die bei Unachtsamkeit zu Verletzungen führen können. -
Seite 8: Die Hinterradbremse
Empfehlungen: Die Räder und die Achse sollten sauber gehalten werden und mit Maschinenöl oder „WD 40“ hin und wieder gepflegt werden. DIE HINTERRADBREMSE Durch betätigen der Bremshebel wird die Bremse bei den Kinderwagen betätigt und ein Stift in das Bremsritzel am Rad eingeführt. - Seite 9 Beim Bellami Kinderwagen, dem myVARIO und dem Florida Kinderwagen ist die Befestigung zum Aufstellen der Babywanne eine andere. Diese sehen Sie auf der linken Seite. Sie müssen den Babywannenaufsteller bis zum Ende der Metallschienen schieben um die Babywanne aufzubauen. Beim Paris- und London Kinderwagen ist die Metallschiene eine Holzschiene die Quer liegt.
- Seite 10 Hinweis: Das Aufsetzen der Babywanne und das Abmontieren funktioniert genauso wie bei dem Sportsitz. Hinweis: Vor dem Gebrauch der Babywanne prüfen Sie, ob alle Verriegelungen auch wirklich sicher eingerastet sind.
-
Seite 11: Besonderheiten Beim Modell Retro
BESONDERHEITEN BEIM MODELL RETRO Das Gestell des Retro Kinderwagen hat einen speziellen Mechanismus der durch eine Drehbewegung am Verschlusselement geöffnet und geschlossen wird. Wie sie auf den Fotos sehen ist die Handhabung auch hier „kinderleicht“. 1. Den Hebel und den roten Knopf 2. -
Seite 12: Montage Des Sportsitzes
MONTAGE DES SPORTSIT ZES Setzen Sie den Sitz so auf, dass die beiden Stangen am Gestell parallel zueinander verlaufen. Legen Sie den Sitz auf den Boden und richten Sie die Fußstütze aus, sodass Sie flach auf dem Boden liegt, und sich eine Verlängerung der Sitzfläche bildet. -
Seite 13: Verstellen Der Rückenlehne
VERSTELLEN DER RÜCKE NLEHNE Ziehen Sie die Stange zum Entriegeln nach oben und stellen Sie den Sitz auf die gewünschte Position ein. Achten Sie darauf, dass Sie den richtigen Hebel zum Verstellen benutzen und nicht die Querverstrebungen der Rückenlehne WARNUNG! Wenn Sie die Rückenlehne verstellen, muss die Haltestange auf der rechten und linken Seite in den... -
Seite 14: Entriegeln Der Schwenkräder
Öffnen des Gurtes: Drücken Sie den Roten Punkt und beide Zungen öffnen sich und Sie können Ihr Kind rausnehmen. Der Gurt darf niemals als Tragegriff verwendet werden ENTRIEGELN DER SCHWENKRÄDER Zum Entriegeln drücken Sie bitte die kleinen Druckknöpfe auf den Rädern über den Fixierungen für die Schwenkräder ein und das Rad fällt aus der Führung. -
Seite 15: Entfernen Der Hinterräder
ENTFERNEN DER HINTERRÄDER Die Hinterräder können durch Druck auf den Knopf in der Mitte oder durch drücken des Hakens mittig am Hinterrad vom Gestell und der Achse gelöst werden. ZUSAMMENKLAPPEN DES WAGEN 1. Entfernen Sie den Aufsatz vom Gestell 2. Entfernen Sie die Schwenkräder 3. -
Seite 16: Besonderheiten Bei Modell Retro
BESONDERHEITEN BEI MODELL RETRO Der Retro Kinderwagen lässt sich „kinderleicht“ zusammenklappen. Sie müssen lediglich an zwei Hebeln ziehen und schon klappt das ganze Gestell nach vorne zusammen. -
Seite 17: Montage Und Bedienung Des Autositzes / Babyschale (Optional Erhältlich)
MONTAGE UND BEDIENUNG DES AUTOSITZES / BABYSCHALE (OPTIONAL ERHÄLTLICH) Lesen Sie diese Hinweise sorgfältig vor der Benutzung und bewahren Sie sie auf. Wenn Sie diese Hinweise nicht beachten, kann die Sicherheit Ihres Kindes beeinträchtigt werden. 1 DEN SICHERHEITSGURT LÖSEN. UM DEN AUTOSITZ ZU PLATZIEREN 2 DEN KINDERSITZ ENTG EGEN DER FAHRTRICHTU NG AUF DEN AUTOSITZ STELLEN. -
Seite 18: Den Sicherheitsgurt Durch Die Seitlichen Halterungen In Die Sicherheitsgurtaufnahme Stecken Und Prüfen Das Der Sicherheitsgurt Nicht Locker Ist
3 DEN SICHERHEITSGURT DURCH DIE SEITLICHE N HALTERUNGEN IN DIE SICHERHEITSGURTAUFNAHME STECKEN UND PRÜF EN DAS DER SICHERHEI TSGURT NICHT LOCKER IST 4 DEN SICHERHEITSGURT VON DER AUFNAHME HINTER DEM AUTOSITZ HE RZIEHEN UND DARAUF ACHTEN, DASS DER SIC HERHEITSGURT AUCH HINTEN AM AUTOSITZ DUR CH DIE HALTERUNG GEZOGEN WIRD... -
Seite 19: Achten Sie Darauf, Dass Der Sicherheitsgurt Sauber Durch Die Halterung Geführt Wird. Er Darf Nicht Verdreht Sein
5 ACHTEN SIE DARAUF, DASS DER SICHERHEITS GURT SAUBER DURCH DI E HALTERUNG GEFÜHRT WIRD. ER DARF NICHT VERDREHT SEIN! 6 ZUM SCHLUSS FÜHREN SIE DEN SICHERHEITSGURT WIEDER ZUR AUFROLLAUTOMATIK IHRES AUTOS. ACHTEN SIE AU CH HIER DARAUF, DASS DER GURT STRAFF FES TGEZOGEN IST... -
Seite 20: Das Sonnenverdeck
7 DAS SONNENVERDECK Das Verdeck wird erst an Position 1 befestigt und danach an dem Tragegriff (s. Pos. 2). 8 TRAGEGRIFFVERSTELLUNG Der Tragegriff hat 4 Verstell-Funktionen. 1. Autoposition 2. Trageposition 3. Schlafposition 4. Sitzposition. Kein Kippeln möglich... - Seite 21 Um den Tragegriff zu verschieben müssen Sie folgendes beachten. • Drücken Sie mit beiden Händen auf die zwei roten Knöpfe, damit die Arretierung gelöst wird • Bewegen Sie den Tragegriff in die gewünschte Position bis es einrastet.
-
Seite 22: Wie Verbinde Ich Den Autositz Mit Meinem Kinderwagen Gestell
WIE VERBINDE ICH DEN AUTOSITZ MI T MEINEM KINDERWAGEN GESTELL Es gibt zwei wichtige Punkte zu beachten. Punkt 1 ist, dass die Adapter nur auf eine Weise mit dem Gestell verbunden werden können. Dies sehen Sie auf den Fotos weiter unten. -
Seite 23: Besonderheiten Beim Bellami Kinderwagen
BESONDERHEITEN BEIM BELLAMI KINDERWAGEN Es gibt zwei wichtige Punkte zu beachten. Punkt 1 ist, dass die Adapter nur auf eine Weise mit dem Gestell verbunden werden können. Dies sehen Sie auf den Fotos weiter unten. Punkt 2 ist, dass Sie steht’s darauf achten, dass die Adapter richtig arretiert sind. Die Adapter werden wie auf den Bildern zu sehen auf das Gestell gesetzt. -
Seite 24: Lösen Der Adapter Von Der Babyschale
LÖSEN DER ADAPTER VO N DER BABYSCHALE: 1.) Babyschale von Gestell lösen 2.) Lösehaken am hinteren Teil der Babyschale greifen. 3.) Mit dem Finger in die Öse gehen und ziehen. 4.) Dadurch wurde der Adapter gelöst WARNUNG! Bei falscher Bedienung oder der falschen Montage der Aufsätze kann keine Gewährleistung übernommen werden. -
Seite 25: Darauf Müssen Sie Besonders Achten
DARAUF MÜSSEN SIE BESONDERS ACHTEN!!! ZU KURZER 3-PUNKT-FAHRZEUGGURT? Bei Babyschalen und Kindersitzen brauchen Sie einen langen Fahrzeuggurt. Denn meist werden hier Bauch- und Schultergurt um den Kindersitz geschlungen, damit dieser fest und sicher sitzt. VERLÄUFT DER FAHRZEUGGURT RICHTIG? Gehen Sie in unserer Filiale und lassen Sie sich den Kindersitz-Einbau von einer Fachkraft zeigen. -
Seite 26: Reinigung Und Handhabung
der Beifahrer-Airbag in der Werkstatt deaktiviert werden. Lesen Sie dies in der Bedienungsanleitung nach oder erkundigen Sie sich bei Ihrer Fachwerkstatt. Bei größeren Kindern, deren Sitze in Fahrtrichtung angebracht sind, brauchen Sie den Airbag nicht abzuschalten. Sie sollten den Sitz dann jedoch weit nach hinten schieben. Ob Ihr Kind nun in oder entgegen der Fahrtrichtung auf dem Rücksitz mitfährt, hier kann ein Seitenairbag einen großen Teil der Wucht bei einem Seitencrash auffangen. -
Seite 27: Montage & Bedienung Der Isofix Basis (Optional Erhältlich)
MONTAGE & BEDIENUNG DER ISOFIX BASIS (OPTIONAL ERHÄLTLICH) ISOFIX BASIS MIT GUR TSYSTEM BEFESTIGEN Stellen Sie die ISOFIX Basis auf den Autositz, mit dem Standbein Richtung Fußraum, und schnallen Sie den Gurt ganz normal an. Der Gurt ist jetzt über eine Vorrichtung geführt. Ziehen Sie diese nun nach Vorne Nun können Sie die Mechanik nach Oben drücken und so den Gurt mit der ISOFIX Basis befestigen Zum Schluss stellen Sie das Standbein auf die passende Höhe ein und achten auf den... -
Seite 28: Montageanleitung Babyschale
Jetzt schieben Sie die ISOFIX Basis nach vorne, damit Sie gut an die ISOFIX Haken kommen. Mit einem beherzten Ruck können Sie die Basisstation von der Karosserie des Autos trennen Jetzt ist Ihre ISOFIX Basis wieder locker. MONTAGEANLEITUNG BABYSCHALE Nehmen Sie die Babyschale am Tragegriff in die Hand und drücken Sie entgegen der Fahrtrichtung mit den zwei Metallstangen in die Vorrichtungen der ISOFIX Basis Auch hier signalisiert ein lautes CLICK Geräusch den korrekten Sitz. -
Seite 29: Isofix Basis In Der Übersicht
ISOFIX BASIS IN DER ÜBERSICHT 1. Teleskopfuß (vertikal verschiebbar) 2. Druckknopf für die Justierung des Teleskopfußes 3. Druckknopf zur Einstellung der Horizontalen Lage der Basisstation 4. Release Knopf zum Lösen der Babyschale / Autositzes 5. Signalisierung des korrekten Sitzes (Rot = FALSCH | Grün = RICHTIG) 6. -
Seite 30: Pflegehinweis
PFLEGEHINWEIS Alle von uns verwendeten Materialien lassen sich leicht pflegen. Der Kinderwagen ist ein Transportmittel für Ihr Kind und muss entsprechend der Bedienungsanleitung gepflegt und gewartet werden, damit seine Ursprungsqualität erhalten bleibt. Regelmäßige Reinigung des Kinderwagens und Ölen der beweglichen Teile gehören genau zu Ihren Aufgaben als Kunde, als auch die Sicherstellung der richtigen Handhabung Dritter. -
Seite 31: Pflege Der Räder
PFLEGE DER RÄD ER Achten Sie bei Luftbereifung auf einen ausreichenden Luftdruck, dieser sollte zwischen 0,5 und max. 0,8 bar liegen. Ein zu geringer Luftdruck führt zu übermäßigen Verschleiß des Mantels und des Schlauches. Zudem kann die Felge sich durch den Druck verformen WARNUNG! Der max. -
Seite 32: Bewegliche Teile Prüfen
BEWEGLICHE TEILE PRÜ FEN Ihr Kinderwagen ist ein wichtiger Bestandteil in Ihrem neu gewonnen Lebensabschnitt. Achten Sie daher besonders darauf, dass jegliche beweglichen Teile gereinigt und geölt werden. Nur so können Sie den Kinderwagen auch noch für weitere Kinder benutzen. Klappmechanismus Adapter am Gestell für die Aufsätze Schiebegriff Verstellung... -
Seite 33: Keine Gewährleistung Wird Übernommen Für
KEINE GEWÄHRLEISTUNG WIRD ÜBERNOMMEN FÜR... Es wird keine Gewähr übernommen für Mängel oder Schäden an den veräußerten Waren, die von uns nicht zu vertreten sind. Dies gilt insbesondere für • natürliche Abnutzungserscheinungen (Verschleiß) und Schäden durch übermäßige Beanspruchung • Folgefehler die dadurch entstanden sind, dass Schäden/Fehler nicht beachtet wurden und aufgrund dessen zu einer erschwerten Reparatur führen •... -
Seite 34: Vorgehensweise Bei Reklamationen
Noppenbildung der Stoffe: Gegen Noppenbildung wird keine Gewährleistung übernommen. Dieses fällt unter allgemeine Kleiderpflege und kann wie bei Wollpullovern einfach mit einer Kleiderbürste oder Noppenmaschine beseitigt werden. Einreißen der Nähte/Druckknöpfe/des Stoffes: Bitte prüfen Sie beim Kauf genau, dass alle Stoffteile, Nähte und Druckknöpfe ordnungsgemäß genäht und befestigt sind. Eventuelle Beanstandungen von Nähten / defekten Druckknöpfen müssen unverzüglich nach Feststellen des Fehlers bei Ihrem Fachhändler reklamiert werden. - Seite 35 General Congratulations For the safety of your Child Construction unpack the pram and build up the chassis The baby carriage SPECIAL FEATURES IN THE BELLAMI, PARIS, LONDON, MYVARIO OR FLORIDA KINDERWAGEN With the Bellami pram, the myVARIO and the Florida pram, the way to build the carrycot is different. You can see this on the left side.
- Seite 36 For the protection of your baby!!! Checklist to ensure that To protect your vehicle Cleaning Assembly and Handling of the ISOFIX Base (sold separately) ISOFIX Base with harness mounting ISOFIX BasE with ISOFIX Hook Unplug the ISOFIX Base Assembling the Car seat Unplug the car seat ISOFIX BasE Content Maintenance...
-
Seite 37: General
GENERAL The pram is intended for children from the age of 0-3 years and an approved weight to 15 The pram meets the EU safety standards EN 1888: 2002 + A1: 2005 + A2:2005 + A3: 2005 The Baby carrier (car seat) meets the safety standard ECE R 44/04 The product has been tested in a temperature range of -20°... -
Seite 38: Congratulations
CONGRATULATIONS High quality prams and ongoing quality controls give you the safeness that you have a stroller for a very long time. FOR THE SAFETY OF YOUR CHILD WARNING: Check before use that the stroller is not damaged. Also, be sure that all parts are not loose. - Seite 39 WARNING: On the footrest max. put a pressure of 5 kg in horizontal position on. Never use the footrest as ladder. In vertical position the footrest can be loaded with 15 kg of weight. WARNING: No part of the pram can be used in your car. Only the car seat is certified for using in the car.
- Seite 40 WARNING: Regular maintenance of the metal parts, especially after a stay by the sea is very important for the durability and functionality of the stroller WARNING: The maximum load of the shopping cart is 3 KG!
-
Seite 41: Construction
CONSTRUCTION UNPACK THE PRAM AND BUILD UP THE CHASSIS 1) Lift the handle until the frame opens and you here a locking noise. 2) In your package there are 2 axle parts to insert into the tires. If you do that you can easy build the rear axle. -
Seite 42: Special Features For Model Retro
SPECIAL FEATURES FOR MODEL RETRO The frame of the Retro stroller has a special mechanism that is opened and closed by a rotary movement on the closure element. As you can see in the photos, the handling here is "very easy". Find the lever and the red button Press the red button to release the safety mechanism... -
Seite 43: The Pushchair
To attach your body onto your chassis, position the body centrally over the chassis. Under the body there are locking points, lower the body so that these locate on the chassis mounting bars. Ensure that all locking points are unlocked at the moment of bringing the parts together Push the body downwards so that all locks ‘click’... -
Seite 44: Attach The Safety Bar
ATTACH THE SAFETY BA R The bumper bar on the body can be removed for easier access. Press the button on either side of the bumper bar and pull the bumper bar out from the body arms OPERATING THE FOOTRE ST To lower the footrest, reach underneath the footrest and locate the flattened strip. -
Seite 45: Adapter Of The Car Seat
ADAPTER OF THE CAR SEAT Mount the adapters to the infant carrier. You put the baby seat up and down like the carrycot and the sports seat. See installation and operation of the car seat / infant carrier (optional) SAFETY BELT Secure your child with the belt. -
Seite 46: Mount The Rear Tires
MOUNT THE REAR TIRES The rear wheels have a modern mounting rail. This is simply inserted into the wheel and then pushed into the receptacle on the frame. The lock confirms the correct hold of the axle, by a click noise. Check the correct position of the axle REMOVE THE REAR TIRE S The rear tires can be unmounted easily from... -
Seite 47: Pack The Chassis For Transporting
PACK THE CHASSIS FOR TRANSPORTING 1. Remove the attachment (car seat, carry cot or buggy) from the frame 2. Remove the swivel tires 3. Release the folding lock (button, lever or loop) 4. Pull the two latches simultaneously and the pushchair will collapse. Now push the safety catch to one side, so that the frame can fold. -
Seite 48: Special Features For Model Retro
SPECIAL FEATURES FOR MODEL RETRO The Retro stroller can be folded "very easy". All you have to do is pull on two levers and the whole frame folds forward. -
Seite 49: Assembly And Handling Of The Car Seat / Infant Carrier (Sold Separately)
ASSEMBLY AND HANDLING OF THE CAR SEAT / INFANT CARRIER (SOLD SEPARATELY) Read these advices carefully. You always need access to this manual. All our prams were produced by a separate company called Adbor. The car seat itself is called Capri and is certified by the European Class ECE R 44/04 1 OPEN THE SAFETY BELT, TO PLACE THE CAR S EAT 2 PUT THE CHILD SEAT ALONG THE DRIVING DIRECTION ON THE CAR SEAT . -
Seite 50: Remove The Safety Belt From Recording Behind The Car Seat And Make
4 REMOVE THE SAFETY BELT FROM RECORDING BEHIND THE CAR SEAT AND MAKE SURE THAT THE SAFETY BELT IS ALSO TOWED AT THE REAR LOCK ON T HE CAR SEAT 5 MAKE SURE THE SAFETY BELT IS CLEANED THROUGH THE BRACKET. HE MUST NOT BE TURNED! -
Seite 51: Finally, Run The Safety Belt Again To The Rolling Machine Of Your Car. Also, Here Make Sure The Belt Is Straffically Tightened
6 FINALLY, RUN THE SAF ETY BELT AGAIN TO TH E ROLLING MACHINE OF YOUR CAR. ALSO, HERE MAKE SURE THE BELT IS STR AFFICALLY TIGHTENED... -
Seite 52: The Suncover
7 THE SUNCOVER The hood is first attached to position 1 and then to the carrying handle (see item 2). -
Seite 53: Carry Handle Adjustment
8 CARRY HANDLE ADJUSTMENT The carrying handle has 4 adjustment functions. 1st car position 2nd carrying position 3rd sleeping position 4. seating position. No tilting possible To move the carrying handle you must note the following. • Press the two red buttons with both hands to release the catch •... -
Seite 54: How Do I Connect The Car Seat With My Stroller Chassis
HOW DO I CONNECT THE CAR SEAT WITH MY STROLLER CHASSIS? There are two important points to note. Point 1 is that the adapter can only be connected in a way to the frame. This you can see in the photos below. Point 2 is that you pay Wore out that the adapter is properly locked. -
Seite 55: Specials For The Bellami Pram
SPECIALS FOR THE BELLAMI PRAM There are two important points to keep in mind. Point 1 is that the adapters can only be connected to the frame in one way. You can see this in the photos below. Point 2 is that it's making sure that the adapters are locked correctly. The adapters are placed on the frame as shown in the pictures. -
Seite 56: The Steps To Release The Adapters
THE STEPS TO RELEASE THE ADAPTERS 1.) Look on the side of the car seat 2.) There is the release anker. 3.) Pull the trigger with your finger 4.) The adapters fall of the car seat WARNING! Wrong use of the car seat release will cause mail functions or defective parts. -
Seite 57: To Protect Your Vehicle
Please do not leave your child unattended in the child safety seat in the vehicle. For the protection of all vehicle occupants: Always check that... • the backrests of the vehicle seats are locked (i.e. that a foldable rear seat bench latch is engaged). -
Seite 58: Assembly And Handling Of The Isofix Base (Sold Separately)
ASSEMBLY AND HANDLING OF THE ISOFIX BASE (SOLD SEPARATELY) ISOFIX BASE WITH HARNESS MOUNTING Place the ISOFIX base on the car seat, with the leg in the direction of the footwell, and tighten the belt as normal. The belt is now passed over a device. Now drag them to the front Now you can push the mechanism up and attach the strap with the ISOFIX base Finally, adjust the leg to the appropriate height and ensure the correct fit of the straps and the base station. -
Seite 59: Assembling The Car Seat
ASSEMBLING THE CAR S EAT Grasp the carrycot by the carrying handle and press in the direction of travel with the two metal bars into the ISOFIX base devices Here, too, a loud CLICK sound signals the correct seat. In addition, a sign changes from red to green at the front of the ISOFIX base For additional safety, you can also make the seat belt around the baby seat. -
Seite 60: Isofix Base Content
ISOFIX BASE CONTENT Telescoping (vertical sliding) Push button for adjusting the telescopic foot Push button to adjust the horizontal position of the base station Release button to release the infant carrier / car seat Signaling the correct fit (red = FALSE | Green = TRUE) Push button for releasing and locking the belt holder belt holder Safety ISOFIX hooks for shells and car seats... -
Seite 61: Maintenance
MAINTENANCE CHECK THE SCREWS The screws of our strollers are fixed with an adhesive, but it may be, however, that the stroller is a bit loose. Therefore, prior to any use of the stroller please check the fittings. If a screw is loosed it must be fixed urgently again. -
Seite 62: Care Instructions
CARE INSTRUCTIONS All materials are easy to maintain MAINTAIN THE FABRIC PIECES To clean dirty fabrics, use only a clothes brush or clean water (dry with a hair dryer), avoid hard rubbing. Stubborn stains can be removed with a mild detergent. If you ever get in a heavy rain, dry your pram with stretched fabrics in a warm dry room, to avoid moisture in the inner fabric. -
Seite 63: No Warranty
NO WARRANTY Damage caused by improper use (see instructions) Damage caused by faulty installation or commissioning Damage caused by careless handling or improper maintenance of the purchased goods Damage due to improper modifications of the purchased item... - Seite 64 Généralités .......................................66 Félicitations pour l’achat de cette poussette ..........................67 Ce à quoi vous devez faire attention lors de l’achat ........................67 Consignes de sécurité ..................................67 Notice de montage ...................................70 Montage de la poussette ................................70 Les roues pivotantes ..................................70 Les freins arrière ..................................70 Montage de la nacelle .................................71 La nacelle ....................................71 SPecial features for Model Retro ............................72...
- Seite 65 Démontage de la base Isofix ...............................86 Votre base Isofix est alors libre. Indications pour le montage de la nacelle ................87 Indications pour le démontage de la nacelle ..........................87 Base Isofix – Vue d’ensemble ..............................88 Entretien ......................................89 Entretien des textiles ...................................89 Entretien du châssis ..................................89 Entretien des roues ..................................89 Entretien du dispositif de freinage –...
-
Seite 66: Généralités
GÉNÉRALITÉS Cette poussette est adaptée aux enfants entre 0 à 3 ans et jusqu’à 15Kg. Cette poussette respecte les normes européennes de sécurité suivantes EN 1888 : 2002 + A1 : 2005 + A2 :2005 + A3 : 2005 La nacelle respecte la norme de sécurité ECE R 44/04 Le produit a été... -
Seite 67: Félicitations Pour L'achat De Cette Poussette
FÉLICITATIONS POUR L’ACHAT DE CETTE POUSSETTE Afin que votre bébé se sente en sécurité, vous avez choisi judicieusement un produit de haute qualité et nous vous en remercions. La finition de haute qualité ainsi que des contrôles qualité sérieux et continus de votre poussette vous apporteront beaucoup de satisfaction. Les textiles ont été... - Seite 68 Attention : le hamac, le landau ou le sac à provision ne doivent pas être utilisés en voiture comme moyen de transport. Attention : utiliser une ceinture de sécurité dès que votre enfant est en mesure de s’assoir sans aide. Attention : assurez-vous que la poussette se tienne bien droite avant d’actionner les freins.
- Seite 69 Attention : la charge maximale du filet de course est de 3KG !
-
Seite 70: Notice De Montage
NOTICE DE MONTAGE MONTAGE DE LA POUSSETTE Dépl ier le châssis vers le haut en le tenant par le guidon, jusqu'à ce que les deux poignées de verrouillage s’enclenchent. uyer sur le bouton de la roue arrière et la faire glisser sur l’essieu jusqu’à ce que ça ne soit plus possible. -
Seite 71: Montage De La Nacelle
MONTAGE DE LA NACELL E LA NACELLE Image 1. Plier la nacelle (en tirant sur le tissu) et insérer la structure métallique dans le support prévu à cet effet. Mettez en place la nacelle et terminer l’opération en fermant le velcro. Appuyer simultanément sur les deux boutons de la capote et le mettre à... -
Seite 72: Special Features For Model Retro
SPECIAL FEATURES FOR MODEL RETRO The frame of the Retro stroller has a special mechanism that is opened and closed by a rotary movement on the closure element. As you can see in the photos, the handling here is "very easy". Find the lever and the red button Press the red button to release the safety mechanism... -
Seite 73: Montage Du Hamac
Indication : Le montage et démontage de la nacelle fonctionne de la même façon que pour le hamac. Conseil : Avant utilisation, vérifier si tous les verrouillages sont bien enclenchés. MONTAGE DU HAMAC Placer le siège de sorte que les deux barres du châssis soient bien parallèles l’une de l’autre. -
Seite 74: Réglage Du Dossier
RÉGLAGE DU DOSSIER Tirer la barre vers le haut pour déverrouiller et ajuster le siège à la position désirée. Assurez-vous que vous utilisez le bon levier de réglage et non les supports métalliques du dossier. Attention : Quand vous changez la position du dossier, la tige doit être enclenchée aussi bien du côté... -
Seite 75: Déblocage Des Roues Pivotantes
DÉBLOCAGE DES ROUES PIVOTANTES Pour déverrouiller les roues, appuyer sur les petits bouts en acier situés sur les fixations des roues pivotantes pour les roues pivotantes. La roue est alors mobile. Sur certains modèles, vous trouverez un bouton sur le dessus des roues pivotantes. - Seite 76 1. Retirier la nacelle du châssis. 2. Retirier les roues pivotantes. 3. Desserrer le verrou de sécurité avant de démonter (bouton, levier ou boucle). 4. Tirer en même temps sur les deux loquets de verrouillage (gauche et droite). Assurez-vous que d’éventuelles autres sécurités soient bien désenclenchées (soit appuyées ou poussées sur le côté).
-
Seite 77: Special Features For Model Retro
SPECIAL FEATURES FOR MODEL RETRO The Retro stroller can be folded "very easy". All you have to do is pull on two levers and the whole frame folds forward. -
Seite 78: Montage Et Utilisation Du Siège Auto / Nacelle Auto (Disponible En Option)
MONTAGE ET UTILISATION DU SIÈGE AUTO / NACELLE AUTO (DISPONIBLE EN OPTION) Lisez attentivement les consignes avant utilisation et gardez-les précieusement. Si vous ne suivez pas ces instructions, cela pourrait nuire à la sécurité de votre enfant. 1 Défaire la ceinture de sécurité afin de placer au centre le siège auto. 2 Placer le siège auto dans le sens inverse du sens de la marche et vérifier qu’il est bien stable. - Seite 79 3 Insérer la ceinture de sécurité à travers les supports latéraux dans sa prise et vérifier que la ceinture de sécurité ne soit pas lâche. 4 7Tirer la ceinture de sécurité de derrière le siège auto et assurez-vous qu’elle soit tirée jusqu’au derrière du siège auto...
- Seite 80 5Vérifier que la ceinture de sécurité soit bien mise en place dans chaque support. Il ne faut pas qu’elle soit tordue ! 6 A la fin, accompagner la ceinture jusque dans le système coulissant de la voiture, prévu à cet effet. Il faut faire attention que la ceinture de sécurité soit bien tirée.
-
Seite 81: La Protection Uv
LA PROTECTION UV 7 La protection UV sera d’abord fixée en position 1 et ensuite jusqu’à la poignée de transport. (Cf. position 2) -
Seite 82: Réglage De La Poignée De Portage
RÉGLAGE DE LA POIGNÉ E DE PORTAGE 8 La poignée de portage dispose de 4 réglages de position possible. 1. Position en votiere 2. Position de Portage 3. Position de Repros 4. Position assise. Pas de balancement possible Afin de changer la position de la poignée, voici quelques indications à suivre : Appuyer à... -
Seite 83: Comment Assembler Le Siège Auto Avec Le Châssis De La Poussette
COMMENT ASSEMBLER LE SIÈGE AUTO AVEC LE CHÂSSIS DE LA POUSSETTE Vous devez faire attention à deux points. Le premier : que les adaptateurs ne peuvent être reliés au châssis que d’une certaine façon. Vous verrez cela sur les photos ci-dessous. Le second point, assurez-vous que les adaptateurs soient correctement verrouillés. -
Seite 84: Ce À Quoi Vous Devez Particulièrement Faire Attention
CE À QUOI VOUS DEVEZ PARTICULIÈREMENT FAIRE ATTENTION!!! QUE FAIRE SI LA CEIN TURE 3 POINTS EST TR OP COURTE? Pour les nacelles auto et siège auto, vous aurez besoin d’une ceinture longue. Car la plupart du temps la ceinture ventrale et des épaules sera mise autour du siège auto afin qu’il soit plus stable. LA CEINTURE FONCTION NE-T-ELLE CORRECTEMENT? Rendez-vous dans une de nos filiales et montrer à... -
Seite 85: Nettoyage Et Utilisation
Que votre enfant voyage face ou dos à la route, un airbag latéral peut absorber une grande partie du choc en cas de crash latéral. Ici, cependant, vous devez respecter les instructions du manuel du fabricant ou vous adressez directement au fabricant lui-même. Avec des rehausseurs qui n’ont pas de maintien pour la tête comme les rabats pour dormir, vous devriez acheter un repose-tête. -
Seite 86: Montage Et Utilisation De La Base Isofix (Disponible En Option)
MONTAGE ET UTILISATION DE LA BASE ISOFIX (DISPONIBLE EN OPTION) STABILISER LA BASE ISOFIX AVEC LE SYSTÈM E DE CEINTURE Mettre la base Isofix sur un siège passager, le pied d’appui vers le bas, et attacher la ceinture normalement. La ceinture est à présent dans le dispositif. Tirez-la vers l’avant. A ce moment, vous pouvez relever le dispositif vers le haut et ainsi fixer la ceinture à... -
Seite 87: Votre Base Isofix Est Alors Libre. Indications Pour Le Montage De La Nacelle
VOTRE BASE ISOFIX EST ALORS LIBRE. INDIC ATIONS POUR LE MONTAGE DE LA NACELLE INDICATIONS POUR LE DÉMONTAGE DE LA NACELLE - Si la ceinture de sécurité est autour de la nacelle auto, retirez-la. - Fixer la poignée en position verticale –... -
Seite 88: Base Isofix - Vue D'ensemble
BASE ISOFIX – VUE D’ENSEMBLE Pied télescopique (coulissant verticalement) Bouton poussoir pour le réglage du pied télescopique Bouton-poussoir pour ajuster la position horizontale de la base Bouton pour détacher le siège auto de la base Indication de la position correcte (rouge = mauvaise position / vert = position correcte) Bouton pour verrouiller ou déverrouiller le blocage de la ceinture Système de blocage de la ceinture Crochets de sécurité... -
Seite 89: Entretien
ENTRETIEN Tous les matériaux que nous utilisons sont faciles à entretenir. La poussette est un moyen de transport pour votre enfant et doit être maintenue et entretenue conformément au mode d’emploi, de sorte que sa qualité d'origine soit maintenue. Un nettoyage régulier de la poussette et l’huilage de toutes les pièces mobiles sont de votre responsabilité. -
Seite 90: Entretien Du Dispositif De Freinage - Ajustement Du Frein
ENTRETIEN DU DISPOSITIF DE FREINAGE – AJUSTEMENT DU FREIN LUBRIFICATION POUR UNE UTILISATION PROLONGEE Pour les poussettes, il est très important de lubrifier les freins. Pour cela, il suffit de prendre un peu de lubrifiant et de remplir dans le mécanisme de frein (voir Fig.). Grâce à... -
Seite 91: Vérification Des Roues Arrière
Sorter les roues pivotantes de leur réceptacle et nettoyer les roues et le mandrin avec un chiffon ou du papier de cuisine. Nettoyer ensuite la structure de la roue. Après avoir nettoyé et retiré les cheveux et poussière, huiler la mécanique de la roue, les roulements à... -
Seite 92: Dépannage
DÉPANNAGE LES ROUES SE SONT DÉGONFLÉES Afin d’éviter de voiler les roues si vos pneus sont dégonflés, gonfler vos pneus à l’aide d’une pompe jusqu’à la moitié d’air, puis laissez tourner les roues et pomper le reste jusqu’à ce que ça soit bien entièrement gonflé. -
Seite 93: Cas De Garantie Ou Non
Des dommages causés par une mauvaise manipulation ou un mauvais entretien de l'article acheté Des dommages causés par des modifications inappropriées de l'article acheté Des dommages causés par une sollicitation excessive des matériaux (violence, forte pression) CAS DE GARANTIE OU N ON ? Rouille : le châssis et les roues Le cadre et les roues (en particulier pour les poussettes avec des roues à... -
Seite 94: Procédure À Suivre En Cas De Réclamations
Les roues : Les roues de la poussette ne sont pas équilibrées. Un léger déséquilibre est normal. L’usure des roues est une usure normale et lorsqu’elles sont plates, cela signifie que la chambre à air a été touchée. C’est sûrement une vis ou autre objet qui est à l’origine de cela. Aucune garantie ne s’applique. - Seite 95 General FELICITACIONES A SU CARRO BEBÉ LO QUE DEBE TENER EN CUENTA EN LA COMPRA SEGURIDAD INSTRUCCIONES DE MONTAJE INSTALAR WAGON LOS GIROS EL FRENO TRASERO CONSTRUCCIÓN DEL BABY PAN Y ASAMBLEA CARACTERÍSTICAS ESPECIALES EN BELLAMI, PARÍS, LONDRES, MYVARIO O FLORIDA KINDERWAGEN Con el cochecito Bellami, el myVARIO y el carrito de la Florida, el accesorio para ponerse el capazo es diferente.
- Seite 96 CARACTERÍSTICAS ESPECIALES EN EL BELLAMI COCHE INFANTIL SOLDADURA DE LOS ADAPTADORES DE LA BABY SHELL: 1. Retire el asiento para bebés del estante 2. Sujete el gancho de liberación en la parte posterior del portabebés. 3. Pon tu dedo en el ojete y tira. ¡POR LO TANTO, DEBERÁ...
-
Seite 97: General
GENERAL Este automóvil está destinado a niños de 0 a 3 años y hasta 15 kg. Este cochecito cumple con la norma de seguridad de la UE EN 1888: 2002 + A1: 2005 + A2: 2005 + A3: 2005 El portabebés cumple con la norma de seguridad de la UE ECE R 44/04 Lea atentamente todas las instrucciones antes de usar la carriola y preste especial atención a las instrucciones de cuidado y mantenimiento. - Seite 98 ADVERTENCIA: antes de su uso, verifique que el carro no esté dañado y que no haya partes rotas, sueltas o rotas, en cuyo caso no use el carrito. ADVERTENCIA: Nunca deje a su hijo desatendido. ADVERTENCIA: nunca use la carriola con fuerza (presión fuerte). Las cargas pesadas en las válvulas de compuerta oscilante u otras partes metálicas, así...
- Seite 99 accesorios sean resistentes antes de usar. La carriola solo es segura si todas las conexiones están bloqueadas correctamente. en Cochecitos con ruedas fijas, el freno debe ser fácil de operar. Un impacto demasiado firme en el mecanismo del freno puede dañar el piñón del freno o el pasador del freno, cancelando de este modo el reclamo de la garantía.
-
Seite 100: Instrucciones De Montaje
ADVERTENCIA: El cuidado regular de las partes metálicas, especialmente después de una estancia en el mar, es muy importante para la longevidad y la funcionalidad del cochecito. ADVERTENCIA: ¡la carga máxima de la cesta de la compra es de 3 KG! INSTRUCCIONES DE MONTAJE INSTALAR WAGON 1. -
Seite 101: Construcción Del Baby Pan Y Asamblea
CONSTRUCCIÓN DEL BABY PAN Y ASAMBLEA Pliegue la bañera del bebé (tirando de la tela hacia arriba) e inserte los soportes de metal en el soporte provisto. A continuación, doble el elevador de cabeza de nuevo a la posición inicial CARACTERÍSTICAS ESPECIALES EN BELLAMI, PARÍS, L ONDRES, MYVARIO O FLORIDA KINDERWAGEN Con el cochecito Bellami, el myVARIO y el carrito de la Florida, el accesorio para ponerse el capazo es diferente. - Seite 102 Ahora coloque la sartén con los ganchos guía en el lado primero que no se puede bloquear! A continuación, empuje la bandeja en el pestillo hasta que encaje en su lugar IMPORTANTE: El pestillo debe estar configurado para agarrar. El asiento correcto se señala con un clic. También verá...
-
Seite 103: Características Especiales Del Modelo Retro
CARACTERÍSTICAS ESPECIALES DEL MODEL O RETRO El marco de la carriola retro tiene un mecanismo especial que se abre y cierra mediante un movimiento giratorio en el elemento de cierre. Como puede ver en las fotos, el manejo aquí es "muy fácil". -
Seite 104: Montaje De Los Deportes
MONTAJE DE LOS DEPOR TES Levante el asiento para que los dos Varillas en el marco paralelas entre sí. Coloque el asiento en el piso y alinee el reposapiés para que quede plano sobre el piso, formando una extensión del asiento. Ahora conecte la capucha. -
Seite 105: Ajuste Del Respaldo
AJUSTE DEL RESPALDO Tire de la barra hacia arriba para desbloquear y ajuste el asiento a la posición deseada. Asegúrese de usar la palanca correcta para el ajuste, no las abrazaderas transversales del respaldo ¡ADVERTENCIA! Si ajusta el respaldo, la barra de soporte del lado derecho e izquierdo debe sujetar las rejillas designadas. -
Seite 106: Desbloqueo De Las Ruedas Giratorias
DESBLOQUEO DE LAS RU EDAS GIRATORIAS ZPara desbloquear, presione los pequeños botones en las ruedas sobre las fijaciones de la rueda giratoria y la rueda se saldrá de la guía. Para bloquear las ruedas giratorias, z. Por ejemplo, en terreno accidentado, simplemente presione el botón en la parte delantera de las ruedas giratorias. -
Seite 107: Eliminando Las Ruedas Traseras
ELIMINANDO LAS RUEDA S TRASERAS Las ruedas traseras se pueden soltar presionando el botón en el medio o presionando el gancho en el medio de la rueda trasera del marco y el eje. CÓMO PLEGAR EL COCHE 1. Retire el accesorio del estante 2. -
Seite 108: Características Especiales Para El Modelo Retro Retro
CARACTERÍSTICAS ESPECIALES PARA EL MODELO RETRO RETRO El cochecito retro se puede plegar "muy fácil". Todo lo que tienes que hacer es tirar de dos palancas y todo el marco se pliega hacia adelante. -
Seite 109: Montaje Y Funcionamiento Del Asiento De Seguridad / Baby Shell (Opcional Disponible)
MONTAJE Y FUNCIONAMIENTO DEL ASIENTO DE SEGURIDAD / BABY SHELL (OPCIONAL DISPONIBLE) Lea estas instrucciones cuidadosamente antes de usarlas y guárdelas. El incumplimiento de estas instrucciones puede afectar la seguridad de su hijo. 8 LIBERAR LA CORREA DE SEGURIDAD. PARA COL OCAR EL ASIENTO DE COCHE 9 COLOQUE EL ASIENTO INFANTIL A LO LARGO D E LA DIRECCIÓN AL ASIENTO DE SEGURIDAD. -
Seite 110: Enchufe La Correa De Seguridad En La Correa De Seguridad A Través De Los Soportes Laterales Yverifique Que La Correa De Seguridad No Es Suelta
10 ENCHUFE LA CORREA DE SEGURIDAD EN LA CORREA DE SEGURIDAD A TRAVÉS DE LOS SOPORTES LATERALES Y VERIFIQU E QUE LA CORREA DE S EGURIDAD NO ES SUELT A... 11 RETIRE LA BANDA DE S EGURIDAD DE LA GRABACIÓN DETRÁS DEL ASIE NTO DE SEGURIDAD Y ASEGÚRESE DE QUE LA CORREA DE SEGURIDAD TAMBIÉN SE RAYA EN EL BLOQUEO TRASERO DEL ASIENTO DE SEGURIDAD 12 ASEGÚRESE DE QUE LA CORREA DE SEGURIDAD ESTÉ... -
Seite 111: Finalmente, Ejecute La Correa De Seguridad De Nuevo Al Carrete Automático. También, Aquí Asegúrese De Que La Correa Esté Apretada De Forma Straáfica
13 FINALMENTE, EJECUTE LA CORREA DE SEGURIDAD DE NUEVO AL CARRE TE AUTOMÁTICO. TAMBIÉN, AQUÍ ASEGÚRESE DE QU E LA CORREA ESTÉ APR ETADA DE FORMA STRAÁFICA... -
Seite 112: La Puesta Del Sol
7 LA PUESTA DEL SOL La capucha se fija primero a la posición 1 y luego al asa de transporte (consulte el elemento 2). -
Seite 113: Ajuste Del Desgaste
8 AJUSTE DEL DESGASTE El asa de transporte tiene 4 funciones de ajuste. 1. posición del auto 2. posición de transporte 3. posición para dormir 4. posición de asiento. No es posible inclinar Para mover el asa de transporte debe tener en cuenta lo siguiente. •... -
Seite 114: ¿Cómo Conecto El Asi Ento De Seguridad Co N El Coche De Mi Hij O
¿CÓMO CONECTO EL ASI ENTO DE SEGURIDAD CO N EL COCHE DE MI HIJ O? Hay dos puntos importantes a tener en cuenta. El punto 1 es que los adaptadores solo se pueden conectar al cuadro de una manera. Puedes ver esto en las fotos a continuación. El punto 2 es que se está... -
Seite 115: Características Especiales En El Bellami Coche Infantil
CARACTERÍSTICAS ESPECIALES EN EL BELLAMI COCHE INFANTIL Hay dos puntos importantes a tener en cuenta. El punto 1 es que los adaptadores solo se pueden conectar al cuadro de una manera. Puedes ver esto en las fotos a continuación. El punto 2 es que se está... -
Seite 116: Soldadura De Los Adaptadores De La Baby Shell
SOLDADURA DE LOS ADA PTADORES DE LA BABY SHELL: 1. Retire el asiento para bebés del estante 2. Sujete el gancho de liberación en la parte posterior del portabebés. 3. Pon tu dedo en el ojete y tira. 4. Esto aflojó el adaptador ¡ADVERTENCIA! En el caso de un funcionamiento incorrecto o montaje incorrecto de los accesorios, no se puede... -
Seite 117: ¡Por Lo Tanto, Deber Á Cuidarse Particularmente
¡POR LO TANTO, DEBER Á CUIDARSE PARTICULARMENTE! ¿PARA CORREGIR LA CORREA DE VEHÍCULO DE 3 PUNTOS? Para portabebés y asientos para niños necesita un cinturón de vehículo largo. Debido a que, por lo general, la correa para el vientre y el hombro se envuelve alrededor del asiento para niños, de modo que quede firme y segura. -
Seite 118: Limpieza Y Manejo
Ya sea que su hijo viaje en la dirección de desplazamiento en el asiento trasero o en contra de la misma, una bolsa de aire lateral puede absorber una gran parte del impacto en caso de un choque lateral. Aquí, sin embargo, también debe tener en cuenta las instrucciones del fabricante en el manual o consultar directamente con el fabricante. -
Seite 119: Montaje Y Funcionamiento De La Base Isofix (Opcional Disponible)
MONTAJE Y FUNCIONAMIENTO DE LA BASE ISOFIX (OPCIONAL DISPONIBLE) FIJE LA BASE ISOFIX CON EL SISTEMA DE CO RREAS Coloque la base ISOFIX en el asiento del automóvil, con la pierna en la dirección del espacio para los pies, y apriete la correa con normalidad. El cinturón ahora se pasa sobre un dispositivo. -
Seite 120: Instrucciones De Montaje Baby Shell
INSTRUCCIONES DE MONTAJE BABY SHELL Sujete el capazo por el asa de transporte y presione en la dirección de desplazamiento con las dos barras metálicas en los dispositivos base ISOFIX. Aquí, también, un sonido CLICK fuerte indica el asiento correcto. Además, un signo cambia de rojo a verde en la parte delantera de la base ISOFIX. -
Seite 121: Isofix Basic En General
ISOFIX BASIC EN GENERAL 1. Manija telescópica (desplazable verticalmente) 2. Pulsador para el ajuste de la nariz del telescopio 3. Pulsador para ajustar la posición horizontal de la estación base 4. Suelte el botón para liberar el asiento del bebé / asiento del automóvil 5. -
Seite 122: Para Cuidados
PARA CUIDADOS Todos los materiales que utilizamos son fáciles de mantener. La silla de paseo es un medio de transporte para su hijo y debe mantenerse de acuerdo con las instrucciones y se mantiene a se preserva su calidad original. La limpieza regular de la silla de paseo y aceite a todas las piezas móviles son exactamente sus responsabilidades como cliente, así... -
Seite 123: Mantenimiento
tiempo si se usan. Evite el estacionamiento prolongado de llantas en pisos livianos de PVC o linóleo, ya que, como con todas las llantas de caucho, la goma podría mancharse de negro en este punto. Del mismo modo, pequeñas piedras deprimidas o similares pueden dañar el revestimiento del piso. -
Seite 124: Acuerdo Textura
Los frenos de su carrito son uno de los componentes más importantes de su automóvil nuevo. Estos deben ser revisados, limpiados y engrasados regularmente (al menos cada 4 semanas). Asegúrese de que las ruedas dentadas no estén dañadas y limpie bien la rueda. La mayoría de las sillas de paseo con accesorios sostienen la rueda en punto muerto usando un pasador de freno. -
Seite 125: Procedimiento Para Quejas
Blanqueamiento de telas: confirmamos que las telas cumplen con los estándares válidos. por La luz del sol, la influencia del sudor, los agentes de limpieza, la abrasión (especialmente en la zona de agarre) Manchas) o lavado demasiado frecuente, el blanqueamiento no puede descartarse y, por lo tanto, no hay motivo para una queja. - Seite 126 GENERALI ...................................... 128 CONGRATULAZIONI AL TUO carrozzina ............................129 CHE COSA DEVE NOTARE ALL'ACQUISTO............................. 129 SICUREZZA ....................................129 ISTRUZIONI PER IL MONTAGGIO ..............................131 INSTALLARE IL CARRELLO ................................ 131 IL girevole RUOTE ..................................131 IL FRENO POSTERIORE ................................131 COSTRUZIONE DEL BABY PAN E DELL'ASSEMBLEA ....................... 132 CARATTERISTICHE SPECIALI NELLE BELLAMI, PARIGI, LONDRA, MYVARIO O FLORIDA KINDERWAGEN ......
- Seite 127 2.) Afferrare il gancio di rilascio sulla parte posteriore del marsupio................147 3.) Metti le dita nell'occhiello e tira............................ 147 4.) Questo ha risolto l'adattatore ............................147 SOLVE BABY SHELL DALLA STRUTTURA ..........................147 PERTANTO DOVETE CURA PARTICOLARMENTE!!! ........................148 UNA CINGHIA DEL VEICOLO A 3 PUNTI BREVE? ........................
-
Seite 128: Generali
GENERALI Questa vettura è destinata ai bambini di età compresa tra 0 e 3 anni e fino a 15 kg. Questo passeggino soddisfa gli standard di sicurezza dell'UE EN 1888: 2002 + A1: 2005 + A2: 2005 + A3: 2005 Il marsupio è... -
Seite 129: Congratulazioni Al Tuo Carrozzina
CONGRATULAZIONI AL TUO CARROZZINA CHE COSA DEVE NOTARE ALL'ACQUISTO Controlla che l'auto sia stata consegnata completamente e che non manchi alcuna parte. Verificare che tutte le funzioni dell'automobile siano completamente funzionanti e segnalare eventuali disallineamenti e malfunzionamenti durante il periodo di cancellazione. - Seite 130 AVVERTENZA: l'unità sedile, la parte superiore del passeggino e la custodia per il trasporto non devono essere utilizzati per il trasporto in auto. AVVERTENZA: utilizzare una cintura di sicurezza non appena il bambino è in grado di sedersi in modo indipendente. AVVERTENZA: assicurarsi che la vettura sia realmente in piedi prima di applicare il freno.
-
Seite 131: Istruzioni Per Il Montaggio
AVVERTENZA: evitare l'esposizione alla luce solare diretta: molti tessuti possono essere molto sensibili a causa di radiazioni solari sempre più aggressive. AVVERTENZA: la regolare manutenzione delle parti metalliche, specialmente dopo un soggiorno in mare, è molto importante per la longevità e la funzionalità del passeggino ATTENZIONE: il carico massimo del carrello è... -
Seite 132: Costruzione Del Baby Pan E Dell'assemblea
COSTRUZIONE DEL BABY PAN E DELL'ASSEMBLE A Piegare la vaschetta per il bambino (sollevando il tessuto) e inserire le staffe di metallo nel supporto fornito. Quindi ripiegare il sollevatore di testa nella posizione iniziale CARATTERISTICHE SPECIALI NELLE BELLAMI, PARIGI, LONDRA, MYVA RIO O FLORIDA KINDER WAGEN Con il passeggino Bellami, il passeggino myVARIO e Florida, l'accessorio per indossare la navicella è... - Seite 133 Ora metti la padella con i ganci guida sul lato che prima non possono bloccare! Quindi spingere il vassoio nel fermo finché non scatta in posizione IMPORTANTE: il fermo deve essere regolato per afferrare. Il posto corretto è segnalato da un clic. Vedrai anche la giusta misura attraverso il rosso Chiusura a chiave che protegge gli attacchi dalla caduta.
-
Seite 134: Caratteristiche Speciali Del Modello Retro
CARATTERISTICHE SPECIALI DEL MODELLO RETRO Il telaio del passeggino Retro ha uno speciale meccanismo che viene aperto e chiuso da un movimento rotatorio sull'elemento di chiusura. Come puoi vedere nelle foto, la gestione qui è "molto facile“. 1. Trova la leva e il pulsante rosso 2. -
Seite 135: Montaggio Del Buggy
MONTAGGIO DEL BUGGY Posizionare il sedile in modo che le due barre sul telaio siano parallele l'una all'altra. Appoggiare il sedile sul pavimento e allineare il poggiapiedi in modo che poggi sul pavimento, formando un'estensione del sedile. Ora attacca il cappuccio. Questo è semplicemente cliccato su una staffa sul telaio del telaio, simile a uno zaino. -
Seite 136: Regolazione Dello Schienale
REGOLAZIONE DELLO SC HIENALE Tirare la barra verso l'alto per sbloccare e regolare il sedile nella posizione desiderata. Assicurarsi di utilizzare la leva corretta per la regolazione, non le parentesi graffe dello schienale ATTENZIONE! Se si regola lo schienale, la barra di supporto sul lato destro e sinistro deve afferrare le griglie designate. -
Seite 137: Sblocca Le Ruote Girevole
SBLOCCA LE RUOTE GIR EVOLE Per sbloccare, premere i piccoli pulsanti sulle ruote sopra i fissaggi delle ruote girevoli e la ruota cadrà fuori dalla guida. Per bloccare le ruote girevoli, z. Ad esempio, in terreni accidentati, basta premere il pulsante sulla parte anteriore delle ruote girevoli. -
Seite 138: Rimozione Delle Ruote Posteriori
RIMOZIONE DELLE RUOT E POSTERIORI Le ruote posteriori possono essere rilasciate premendo il pulsante al centro o premendo il gancio al centro della ruota posteriore del telaio e l'asse. COME PIEGARE L'AUTO 1. Rimuovere l'allegato dal rack 2. Rimuovere le ruote girevoli 3. -
Seite 139: Caratteristiche Speciali Per Il Modello Retro
CARATTERISTICHE SPECIALI PER IL MODELLO RETRO Il passeggino retrò può essere piegato "molto facile". Tutto ciò che devi fare è tirare due leve e l'intero telaio si piega in avanti. -
Seite 140: Montaggio E Funzionamento Del Seggiolino Auto / Baby Shell (Optional Disponibile)
MONTAGGIO E FUNZIONAMENTO DEL SEGGIOLINO AUTO / BABY SHELL (OPTIONAL DISPONIBILE) Leggere attentamente queste istruzioni prima dell'uso e conservarle. La mancata osservanza di queste istruzioni può influire sulla sicurezza del bambino. 14 RILASCIARE LA CINTURA DI SICUREZZA. PER INSERIRE IL SEGGIOLINO AUTO 15 METTI IL SEDILE PER BAMBINI LUNGO LA DIR EZIONE SULLA SEDILE. -
Seite 141: Rimuovere La Cintura Di Sicurezza Dalle Registrazioni Dietro Il Seggiolino Auto E Assicurarsi Che La Cintura Di Sicurezza Sia Anche Rimossa Al Blocco Posteriore Sulla Sede Dell'automobile
17 RIMUOVERE LA CINTURA DI SICUREZZA DALLE REGISTRAZIONI DIETRO IL SEGGIOLINO AUTO E ASSICURARSI CHE LA CINTURA DI SICUREZZA SIA ANCHE RIMOSSA AL BLOCCO POSTERIORE S ULLA SEDE DELL'AUTOMOBILE 18 ASSICURARSI CHE LA CINTURA DI SICUREZZA SIA PULITA ATTRAVERSO LA STAFFA. NON DEVE ESSERE GIRATO! -
Seite 142: Infine, La Cintura Di Sicurezza È Nuovamente Ripresa Ai Rulli Automatici. Inoltre Qui Assicurati Che La Cintura Sia Stata Straficamente Serrata
19 INFINE, LA CINTURA D I SICUREZZA È NUOVAM ENTE RIPRESA AI RULL I AUTOMATICI. INOLTRE QUI ASSICURATI CHE LA CINTURA SIA STATA STRA FICAMENTE SERRATA 7 IL TRAMONTO... -
Seite 143: 8 Manopola Di Regolazi One
La cappa viene prima fissata alla posizione 1 e quindi alla maniglia di trasporto (vedi punto 2). 8 MANOPOLA DI REGOLAZI ONE La maniglia di trasporto ha 4 funzioni di regolazione. 1. posizione della macchina 2. posizione di trasporto 3. posizione di riposo 4. - Seite 144 • Premere i due pulsanti rossi con entrambe le mani per rilasciare il fermo • Spostare la maniglia di trasporto nella posizione desiderata finché non si...
-
Seite 145: Come Faccio A Collegare Il Seggiolino Auto Con La Mia Auto Dei Bambini
COME FACCIO A COLLEG ARE IL SEGGIOLINO AU TO CON LA MIA AUTO D EI BAMBINI Ci sono due punti importanti da tenere a mente. Il punto 1 è che gli adattatori possono essere collegati al telaio solo in un modo. Puoi vedere questo nelle foto qui sotto. Il punto 2 è che si sta accertando che gli adattatori siano bloccati correttamente. -
Seite 146: Principali Caratteristiche Bellami Passeggino
PRINCIPALI CARATTERI STICHE BELLAMI PASSEGGINO Ci sono due punti importanti da tenere a mente. Il punto 1 è che gli adattatori possono essere collegati al telaio solo in un modo. Puoi vedere questo nelle foto qui sotto. Il punto 2 è che si sta accertando che gli adattatori siano bloccati correttamente. -
Seite 147: Saldare Gli Adattatori Del Baby Shell
SALDARE GLI ADATTATO RI DEL BABY SHELL: 1.) Rimuovere il seggiolino dal rack 2.) Afferrare il gancio di rilascio sulla parte posteriore del marsupio. 3.) Metti le dita nell'occhiello e tira. 4.) Questo ha risolto l'adattatore SOLVE BABY SHELL DALLA STRUTTURA ATTENZIONE! In caso di funzionamento errato o montaggio errato degli accessori, non si può... -
Seite 148: Pertanto Dovete Cura Particolarmente
PERTANTO DOVETE CURA PARTICOLARMENTE!!! UNA CINGHIA DEL VEIC OLO A 3 PUNTI BREVE? Per i marsupi e i seggiolini per bambini è necessaria una cintura lunga per il veicolo. Perché solitamente il ventre e la tracolla sono avvolti attorno al seggiolino, in modo che sia ben saldo e sicuro. LA CINGHIA DEL VEICOLO È... - Seite 149 La pulizia del seggiolino è molto semplice. Pulire la griglia con un po 'di acqua calda "saponata". Quando si sceglie il panno per la pulizia, assicurarsi che il panno non graffi il corpo. Il tessuto del seggiolino auto può essere lavato a mano a una temperatura inferiore ai 30 °...
-
Seite 150: Montaggio E Funzionamento Della Base Isofix (Optional Disponibile)
MONTAGGIO E FUNZIONAMENTO DELLA BASE ISOFIX (OPTIONAL DISPONIBILE) ATTACCARE BASE ISOFIX CON SISTEMA DI CIN GHIA Posizionare la base ISOFIX sul sedile dell'auto, con la gamba nella direzione del vano piedi e stringere la cinghia normalmente. La cintura è ora passata su un dispositivo. Ora trascinali in primo piano Ora è... -
Seite 151: Istruzioni Di Montaggio Copertura Del Bambino
ISTRUZIONI DI MONTAGGIO COPERTURA DEL BA MBINO Afferrare la navicella dalla maniglia di trasporto e premere nella direzione di marcia con le due barre di metallo nei dispositivi di base ISOFIX Anche qui, un forte suono CLIC segnala il sedile corretto, inoltre, un segno cambia da rosso a verde nella parte anteriore della base ISOFIX Per maggiore sicurezza, è... -
Seite 152: Isofix Basic In Panoramica
ISOFIX BASIC IN PANORAMICA 1. Maniglia telescopica (spostabile verticalmente) 2. Pulsante per la regolazione del naso del telescopio 3. Pulsante per regolare la posizione orizzontale della stazione base 4. Rilasciare il pulsante per rilasciare il seggiolino del bambino / il seggiolino 5. -
Seite 153: Per Cura
PER CURA Tutti i materiali che usiamo sono facili da mantenere. Il passeggino è un mezzo di trasporto per il bambino e deve essere curato e mantenuto in conformità con le istruzioni operative al fine di mantenere la sua qualità originale. La regolare pulizia del passeggino e l'oliatura delle parti mobili sono parte integrante del tuo lavoro di cliente, oltre a garantire la corretta gestione di terze parti. -
Seite 154: Manutenzione
danneggiare la pavimentazione. Quando si parcheggia l'auto sotto il sole cocente e quando si ripone sotto pressione nel bagagliaio a temperature superiori a 40 ° C, i pneumatici della camera d'aria possono deformarsi o deformarsi. MANUTENZIONE ISPEZIONARE LE VITI Le viti delle nostre carrozzine sono fissate con un adesivo, ma è comunque possibile che il passeggino sia un po 'allentato. -
Seite 155: Controllare I Meccanici Del Freno
Regolazione dei poggiapiedi Schwenkradfeststellung barra di sicurezza Maniglia per il trasporto del seggiolino auto CONTROLLARE I MECCAN ICI DEL FRENO I freni del passeggino sono uno dei componenti più importanti della tua nuova auto. Questi devono essere controllati, puliti e oliati regolarmente (almeno ogni 4 settimane). Assicurarsi che i pignoni non siano danneggiati e pulire accuratamente la ruota con cura. -
Seite 156: Caso Di Garanzia O Non
• Danni causati dall'uso eccessivo di materiali (violenza, forti pressioni) CASO DI GARANZIA O NON Ruggine: il telaio e le ruote (in particolare sul passeggino con ruote a raggi) sono trattati per proteggere la ruggine da un'adeguata protezione di base. In assenza di cura e asciugatura, tuttavia, potrebbe verificarsi la comparsa di macchie di ruggine. - Seite 157 prodotto. Qui ci riferiamo ai termini e condizioni generali. Nella maggior parte dei casi, possiamo aiutare con riparazioni rapide e pezzi di ricambio. Un passeggino a noleggio può essere reso possibile solo attraverso il rivenditore direttamente, ma non attraverso una spedizione.